Ecm
Components
COMPONENTS
ILLUSTRATION
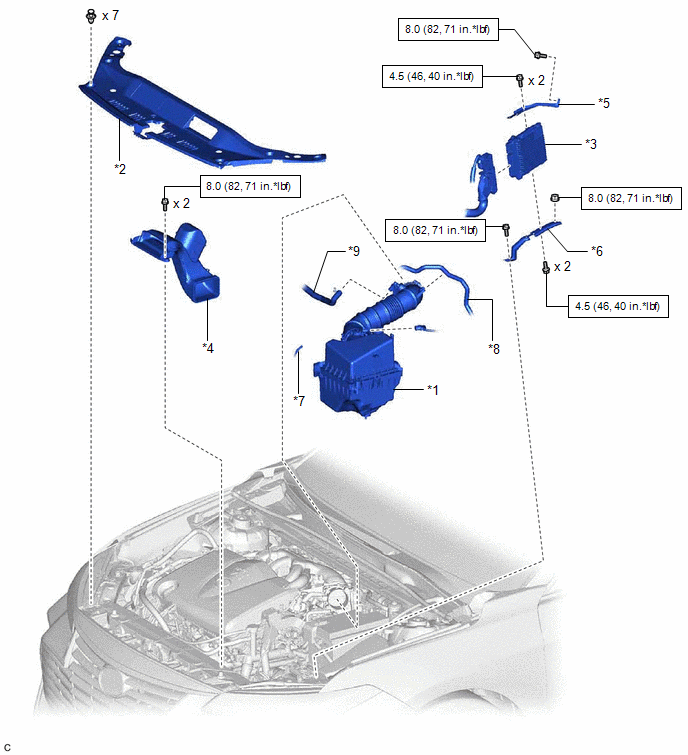
*1 |
AIR CLEANER ASSEMBLY WITH AIR CLEANER HOSE |
*2 |
COOL AIR INTAKE DUCT SEAL |
*3 |
ECM |
*4 |
INLET AIR CLEANER ASSEMBLY |
*5 |
NO. 1 ECM BRACKET |
*6 |
NO. 2 ECM BRACKET |
*7 |
VACUUM HOSE |
*8 |
NO. 1 FUEL VAPOR FEED HOSE |
*9 |
NO. 2 VENTILATION HOSE |
- |
- |
 |
N*m (kgf*cm, ft.*lbf): Specified torque |
- |
- |
Installation
INSTALLATION
PROCEDURE
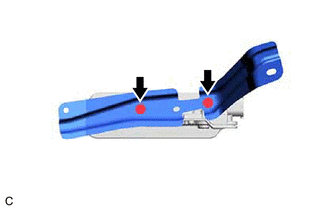
1. INSTALL NO. 2 ECM BRACKET
(a) Install the No. 2 ECM bracket to the ECM with the 2 screws.
Torque:
4,5 N·m {46 kgf·cm, 40 in·lbf}
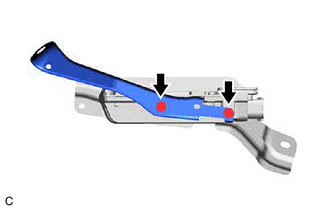
2. INSTALL NO. 1 ECM BRACKET
(a) Install the No. 1 ECM bracket to the ECM with the 2 screws.
Torque:
4,5 N·m {46 kgf·cm, 40 in·lbf}
3. INSTALL ECM
(a) Install the ECM with the 2 bolts and nut.
Torque:
8 N·m {82 kgf·cm, 71 in·lbf}
NOTICE:
If the ECM has been struck or dropped, replace it.
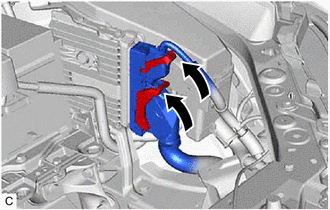
(b) Connect the 2 ECM connectors and rotate the 2 levers to lock them. NOTICE:
|
 |
4. INSTALL AIR CLEANER ASSEMBLY WITH AIR CLEANER HOSE
Click here 
5. INSTALL INLET AIR CLEANER ASSEMBLY
Click here
6. INSTALL COOL AIR INTAKE DUCT SEAL
Click here
7. CONNECT CABLE TO NEGATIVE BATTERY TERMINAL
Click here
8. PERFORM INITIALIZATION
Click here
Removal
REMOVAL
The necessary procedures (adjustment, calibration, initialization or registration) that must be performed after parts are removed and installed, or replaced during ECM removal/installation are shown below.
Necessary Procedures After Parts Removed/Installed/ReplacedReplaced Part or Performed Procedure | Necessary Procedure | Effect/Inoperative Function when Necessary Procedure not Performed | Link |
|---|---|---|---|
Battery terminal is disconnected/reconnected |
Perform steering sensor zero point calibration |
Lane Departure Alert System (w/ Steering Control) |
 |
Pre-collision System |
|||
Intelligent Clearance Sonar System*1 |
|||
Lighting System (for Gasoline Model with Cornering Light) |
|||
Memorize steering angle neutral point |
Parking Assist Monitor System |
|
|
Panoramic View Monitor System |
|
||
Replacement of ECM |
Vehicle Identification Number (VIN) registration |
MIL comes on |
|
ECU communication ID registration (Immobiliser system) |
Engine start function |
|
|
Replacement of ECM (If transaxle compensation code read from ECM) |
|
|
|
Replacement of ECM (If transaxle compensation code not read from ECM) |
|
||
Replacement of ECM |
Code registration (Smart Key System (for Start Function)) |
|
|
- *1: When performing learning using the Techstream.
Click here
- *2: Not necessary when ECM replaced with new one
NOTICE:
- After turning the engine switch off, waiting time may be required before disconnecting the cable from the negative (-) battery terminal. Therefore, make sure to read the disconnecting the cable from the negative (-) battery terminal notices before proceeding with work.
Click here
- If the ECM has been struck or dropped, replace it.
- Perform Vehicle Identification Number (VIN) registration when replacing the ECM.
Click here
PROCEDURE
1. DISCONNECT CABLE FROM NEGATIVE BATTERY TERMINAL
Click here
2. REMOVE COOL AIR INTAKE DUCT SEAL
Click here
3. REMOVE INLET AIR CLEANER ASSEMBLY
Click here
4. REMOVE AIR CLEANER ASSEMBLY WITH AIR CLEANER HOSE
Click here
5. REMOVE ECM
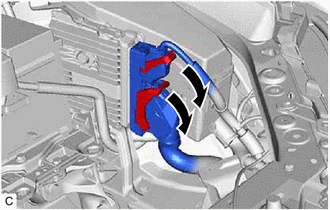
(a) Rotate the 2 levers while pushing the locks, and disconnect the 2 ECM connectors. NOTICE: After disconnecting the ECM connectors, make sure that dirt, water and other foreign matter does not contact the connecting parts of the ECM connectors. |
 |
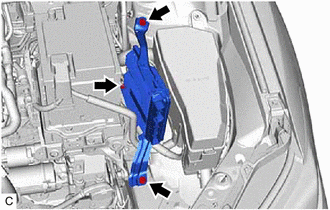
(b) Remove the 2 bolts, nut and ECM. NOTICE: If the ECM has been struck or dropped, replace it. |
 |
6. REMOVE NO. 1 ECM BRACKET
(a) Remove the 2 screws and No. 1 ECM bracket from the ECM. |
 |
7. REMOVE NO. 2 ECM BRACKET
(a) Remove the 2 screws and No. 2 ECM bracket from the ECM. |
 |