Front Crankshaft Oil Seal
Components
COMPONENTS
ILLUSTRATION
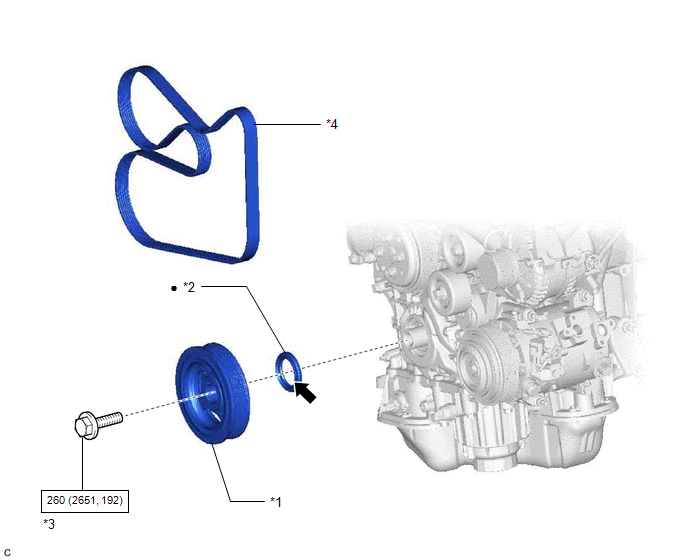
*1 |
CRANKSHAFT PULLEY |
*2 |
TIMING CHAIN CASE OIL SEAL |
*3 |
CRANKSHAFT PULLEY SET BOLT |
*4 |
V-RIBBED BELT |
 |
N*m (kgf*cm, ft.*lbf): Specified torque |
● |
Non-reusable part |
 |
MP grease |
- |
- |
Installation
INSTALLATION
PROCEDURE
1. INSTALL TIMING CHAIN CASE OIL SEAL
(a) Apply MP grease to the lip of a new timing chain case oil seal. |
|
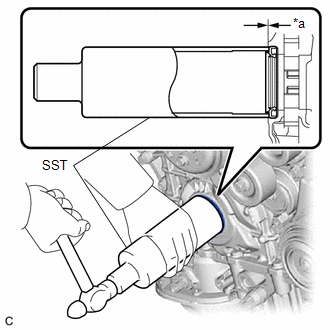
(b) Using SST and a hammer, tap in the timing chain case oil seal until its surface is flush with the timing chain cover assembly edge.
SST: 09316-60012
09316-00011
Oil Seal Protrusion Height:
0 to 1.0 mm (0 to 0.0394 in.)
NOTICE:
- Keep the lip free from foreign matter.
- Do not tap in the timing chain case oil seal at an angle.
2. INSTALL CRANKSHAFT PULLEY
(a) Align the pulley set key with the key groove of the crankshaft pulley.
(b) Using SST to hold the crankshaft pulley in place, tighten the crankshaft pulley set bolt.
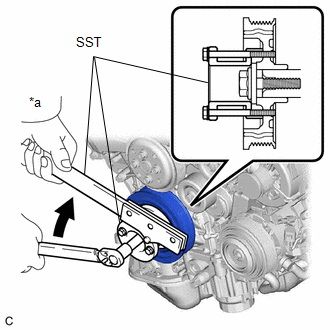
*a |
Hold |
 |
Turn |
SST: 09213-70011
09213-70020
SST: 09330-00021
Torque:
260 N·m {2651 kgf·cm, 192 ft·lbf}
3. INSTALL V-RIBBED BELT
Click here 
4. INSTALL ENGINE ASSEMBLY WITH TRANSAXLE
Click here
Removal
REMOVAL
The necessary procedures (adjustment, calibration, initialization or registration) that must be performed after parts are removed and installed, or replaced during front crankshaft oil seal removal/installation are shown below.
Necessary Procedure After Parts Removed/Installed/ReplacedReplaced Part or Performed Procedure | Necessary Procedure | Effect/Inoperative Function when Necessary Procedure not Performed | Link |
|---|---|---|---|
Battery terminal is disconnected/reconnected |
Perform steering sensor zero point calibration |
Lane departure alert system (w/ Steering Control) |
 |
Pre-collision system |
|||
Intelligent Clearance Sonar System*1 |
|||
Lighting System (for Gasoline Model with Cornering Light) |
|||
Memorize steering angle neutral point |
Parking Assist Monitor System |
|
|
Panoramic View Monitor System |
|
||
Replacement of ECM |
Vehicle Identification Number (VIN) registration |
MIL comes on |
|
ECU communication ID registration (Immobiliser system) |
Engine start function |
|
|
Gas leak from exhaust system is repaired |
Inspection after repair |
|
|
Replacement of automatic transaxle assembly |
|
|
|
Replacement of ECM (If transaxle compensation code read from ECM) |
|
||
Replacement of ECM (If transaxle compensation code not read from ECM) |
|
||
Replacement of automatic transaxle fluid |
ATF thermal degradation estimate reset |
The value of the Data List item "ATF Thermal Degradation Estimate" is not estimated correctly |
|
Replacement of ECM |
Code registration (Smart Key System (for Start Function)) |
|
|
Suspension, tires, etc. |
|
|
|
Rear television camera assembly optical axis adjustment (Back camera position setting) |
Parking Assist Monitor System |
|
|
|
Panoramic View Monitor System |
|
|
Perform headlight ECU sub-assembly LH initialization |
Lighting system (for Gasoline Model with Cornering Light) |
|
|
Front wheel alignment adjustment |
Perform system variant learning and acceleration sensor zero point calibration. |
|
|
- *1: When performing learning using the Techstream.
Click here
- *2: Not necessary when ECM replaced with new one.
PROCEDURE
1. REMOVE ENGINE ASSEMBLY WITH TRANSAXLE
Click here
2. REMOVE V-RIBBED BELT
Click here
3. REMOVE CRANKSHAFT PULLEY
(a) Using SST to hold the crankshaft pulley, loosen the crankshaft pulley set bolt. Further loosen the crankshaft pulley set bolt until 2 or 3 threads remain screwed into the crankshaft.
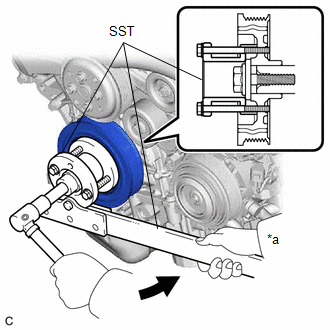
*a |
Hold |
 |
Turn |
SST: 09213-70011
09213-70020
SST: 09330-00021
(b) Using SST, remove the crankshaft pulley set bolt and crankshaft pulley.
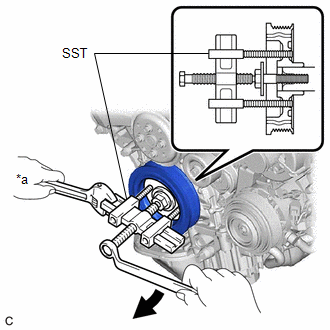
*a |
Hold |
|
Turn |
SST: 09950-50013
09951-05010
09952-05010
09953-05020
09954-05021
4. REMOVE TIMING CHAIN CASE OIL SEAL
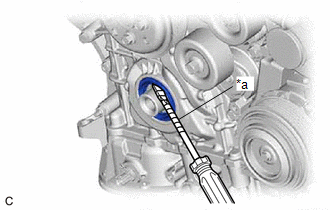
(a) Using a screwdriver with its tip wrapped with protective tape, pry out the timing chain case oil seal. NOTICE: After removal, check the crankshaft for damage. If it is damaged, smooth the surface with 400-grit sandpaper. |
|