Radiator Coolant Temperature Sensor Signal Compare Failure (P00B162). A/F (O2) Sensor Correlation Bank 1 Sensor 1/Bank 1 Sensor 2 Signal Compare Failure (P00D562). Active Grille Air Shutter "A" Actuat
Radiator Coolant Temperature Sensor Signal Compare Failure (P00B162)
DESCRIPTION
This engine uses a No. 2 engine coolant temperature sensor and an intake air temperature sensor to detect temperatures related to engine operation. A thermistor, whose resistance value varies according to the temperature, is built into each sensor. When the temperature becomes low, the resistance of the thermistor increases. When the temperature becomes high, the resistance decreases. These variations in resistance are transmitted to the ECM as voltage changes.
DTC No. | Detection Item | DTC Detection Condition | Trouble Area | MIL | Memory | Note |
|---|---|---|---|---|---|---|
P00B162 |
Radiator Coolant Temperature Sensor Signal Compare Failure |
All of the following conditions are met (2 trip detection logic):
|
|
Comes on |
DTC stored |
SAE Code: P00B2 |
MONITOR DESCRIPTION
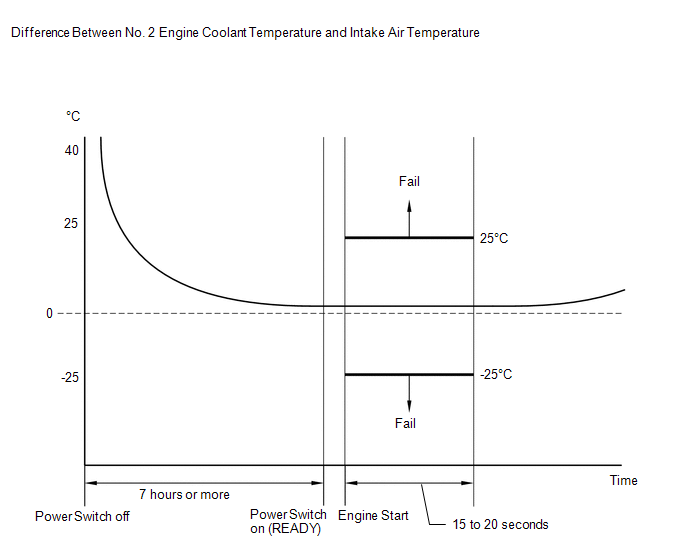
The ECM monitors the difference between the No. 2 engine coolant temperature and the intake air temperature when the engine is started cold to accurately detect the engine temperature conditions. The monitor runs when the engine is started after 7 hours or more have elapsed since the power switch was turned off in the previous trip. If the difference between the engine coolant temperature and the intake air temperature on a cold start exceeds 25 °C, the ECM interprets this as a malfunction in the No. 2 engine coolant temperature sensor circuit or intake air temperature sensor circuit, illuminates the MIL and stores this DTC.
MONITOR STRATEGY
Related DTCs |
P00B2: No. 2 engine coolant temperature sensor rationality |
Required Sensors/Components (Main) |
No. 2 engine coolant temperature sensor Intake air temperature sensor (mass air flow meter sub-assembly) |
Required Sensors/Components (Related) |
- |
Frequency of Operation |
Once per driving cycle |
Duration |
15 seconds |
MIL Operation |
2 driving cycles |
Sequence of Operation |
None |
TYPICAL ENABLING CONDITIONS
All of the following conditions are met |
- |
Soak time |
7 hours or more |
Auxiliary battery voltage |
10.5 V or higher |
Time after engine start |
Less than 20 seconds |
Intake air temperature at hybrid system ready-to-drive |
-10°C (14°F) or higher |
Intake air temperature sensor circuit fail (P0112, P0113) |
Not detected |
No. 2 engine coolant temperature sensor circuit fail (P00B3, P00B4) |
Not detected |
Soak timer fail (P2610) |
Not detected |
TYPICAL MALFUNCTION THRESHOLDS
Deviated No. 2 engine coolant temperature and intake air temperature |
Less than -25°C (-45°F), or higher than 25 °C |
CONFIRMATION DRIVING PATTERN
HINT:
- After repair has been completed, clear the DTC and then check that the vehicle has returned to normal by performing the following All Readiness check procedure.
Click here

- When clearing the permanent DTCs, refer to the "CLEAR PERMANENT DTC" procedure.
Click here
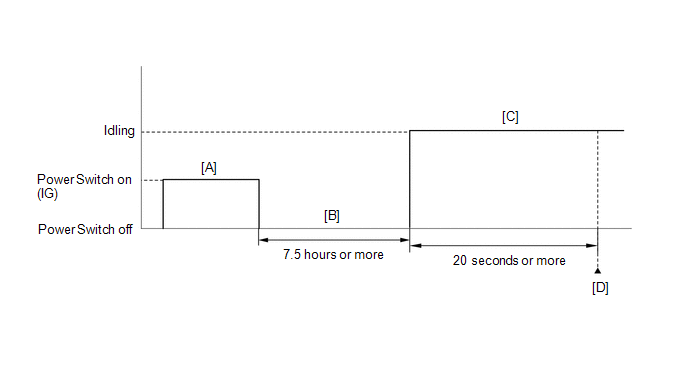
- Connect the Techstream to the DLC3.
- Turn the power switch on (IG) [A].
- Turn the Techstream on.
- Clear the DTCs (even if no DTCs are stored, perform the clear DTC procedure).
- Turn the power switch off.
- With the engine stopped, leave the vehicle as is for 7.5 hours or more [B].
- Turn the power switch on (IG).
- Turn the Techstream on.
- Put the engine in Inspection Mode (Maintenance Mode).
Click here
- Start the engine and wait 20 seconds or more [C].
- Enter the following menus: Powertrain / Engine / Trouble Codes [D].
- Read the pending DTCs.
HINT:
- If a pending DTC is output, the system is malfunctioning.
- If a pending DTC is not output, perform the following procedure.
- Enter the following menus: Powertrain / Engine / Utility / All Readiness.
- Input the DTC: P00B162.
- Check the DTC judgment result.
Techstream Display
Description
NORMAL
- DTC judgment completed
- System normal
ABNORMAL
- DTC judgment completed
- System abnormal
INCOMPLETE
- DTC judgment not completed
- Perform driving pattern after confirming DTC enabling conditions
HINT:
- If the judgment result is NORMAL, the system is normal.
- If the judgment result is ABNORMAL, the system is malfunctioning.
- If the judgment result is INCOMPLETE, perform steps [B] through [D] again.
- [B] to [D]: Normal judgment procedure.
The normal judgment procedure is used to complete DTC judgment and also used when clearing permanent DTCs.
- When clearing the permanent DTCs, do not disconnect the cable from the auxiliary battery terminal or attempt to clear the DTCs during this procedure, as doing so will clear the universal trip and normal judgment histories.
NOTICE:
- Vehicle Control History may be stored in the hybrid vehicle control ECU assembly if the engine is malfunctioning. Certain vehicle condition information is recorded when Vehicle Control History is stored. Reading the vehicle conditions recorded in both the Freeze Frame Data and Vehicle Control History can be useful for troubleshooting.
Click here
(Select Powertrain in Health Check and then check the time stamp data.)
Click here
- If any "Engine Malfunction" Vehicle Control History item has been stored in the hybrid vehicle control ECU assembly, make sure to clear it. However, as all Vehicle Control History items are cleared simultaneously, if any Vehicle Control History items other than "Engine Malfunction" are stored, make sure to perform any troubleshooting for them before clearing Vehicle Control History.
Click here
HINT:
Read Freeze Frame Data using the Techstream. The ECM records vehicle and driving condition information as Freeze Frame Data the moment a DTC is stored. When troubleshooting, Freeze Frame Data can help determine if the vehicle was moving or stationary, if the engine was warmed up or not, if the air fuel ratio was lean or rich, and other data from the time the malfunction occurred.
PROCEDURE
CHECK ANY OTHER DTCS OUTPUT (IN ADDITION TO DTC P00B162)
(a) Connect the Techstream to the DLC3.
(b) Turn the power switch on (IG).
(c) Turn the Techstream on.
(d) Enter the following menus: Powertrain / Engine / Trouble Codes.
(e) Read the DTCs and record the Freeze Frame Data.
Powertrain > Engine > Trouble CodesResult | Proceed to |
|---|---|
DTC P00B162 is output |
A |
DTC P00B162 and other DTCs are output |
B |
HINT:
If any DTCs other than P00B162 are output, troubleshoot those DTCs first.
| B |  |
GO TO DTC CHART |
|

CHECK FREEZE FRAME DATA (COOLANT TEMPERATURE AND RADIATOR COOLANT TEMPERATURE)
(a) Connect the Techstream to the DLC3.
(b) Turn the power switch on (IG).
(c) Turn the Techstream on.
(d) Using the Techstream, read the values displayed in the freeze frame data recorded in step 1.
Powertrain > Engine > DTC(P00B162) > Freeze Frame DataTester Display |
|---|
Coolant Temperature |
Radiator Coolant Temperature |
(e) Read the value displayed on the Techstream.
Standard:
Difference between the Coolant Temperature and the Radiator Coolant Temperature is within 15 °C.
HINT:
When the engine is cold, the value of the intake air temperature, ECM internal temperature and ambient temperature should be approximately the same.
| NG | |
REPLACE NO. 2 ENGINE COOLANT TEMPERATURE SENSOR |
|
CHECK FREEZE FRAME DATA (COOLANT TEMPERATURE AND INTAKE AIR TEMPERATURE)
(a) Connect the Techstream to the DLC3.
(b) Turn the power switch on (IG).
(c) Turn the Techstream on.
(d) Using the Techstream, read the values displayed in the Freeze Frame Data recorded in step 1.
Powertrain > Engine > DTC(P00B162) > Freeze Frame DataTester Display |
|---|
Coolant Temperature |
Intake Air Temperature |
(e) Read the value displayed on the Techstream.
Standard:
Difference between the Coolant Temperature and the Intake Air Temperature is within 15 °C.
HINT:
- When the engine is cold, the value of the intake air temperature, ECM internal temperature and ambient temperature should be approximately the same.
- Perform "Inspection After Repair" after replacing the engine coolant temperature sensor.
Click here
| OK | |
REPLACE ECM |
| NG | |
REPLACE ENGINE COOLANT TEMPERATURE SENSOR |
A/F (O2) Sensor Correlation Bank 1 Sensor 1/Bank 1 Sensor 2 Signal Compare Failure (P00D562)
DESCRIPTION
Refer to DTC P003012.
Click here 
Refer to DTC P003612.
Click here
HINT:
Although the DTC title say O2 sensor, this DTC relate to the air fuel ratio sensors (sensor 1 and sensor 2).
DTC No. | Detection Item | DTC Detection Condition | Trouble Area | MIL | Memory | Note |
|---|---|---|---|---|---|---|
P00D562 |
A/F (O2) Sensor Correlation Bank 1 Sensor 1/Bank 1 Sensor 2 Signal Compare Failure |
The difference between the averaged output values for air fuel ratio sensor (sensor 1) and air fuel ratio sensor (sensor 2) during fuel cut exceeds the threshold (2 trip detection logic). |
|
Comes on |
DTC stored |
SAE Code: P00D5 |
MONITOR DESCRIPTION
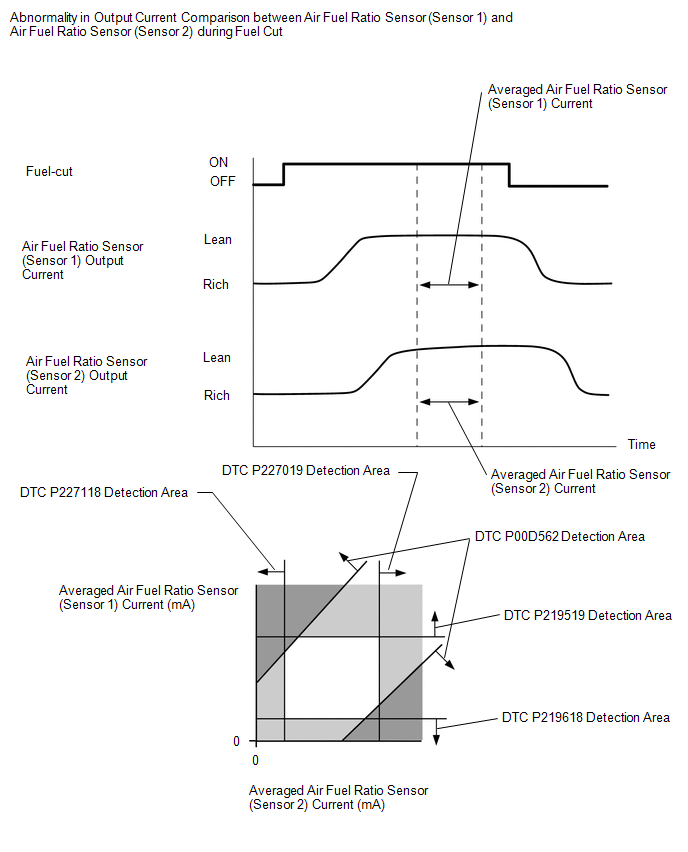
Abnormality in Output Current Comparison between Air Fuel Ratio Sensor (Sensor 1) and Air Fuel Ratio Sensor (Sensor 2) during Fuel Cut
Comparing the averaged output values during fuel cut for air fuel ratio sensor (sensor 1) and air fuel ratio sensor (sensor 2), if the difference between these two is outside the normal range, the ECM illuminates the MIL and stores a DTC.
MONITOR STRATEGY
Related DTCs |
P00D5: Air fuel ratio sensors comparison monitor during fuel cut |
Required Sensors/Components (Main) |
Air fuel ratio sensor (sensor 1) Air fuel ratio sensor (sensor 2) |
Required Sensors/Components (Related) |
Crankshaft position sensor Engine coolant temperature sensor Throttle position sensor |
Frequency of Operation |
Once per driving cycle |
Duration |
10 seconds |
MIL Operation |
2 driving cycles |
Sequence of Operation |
None |
TYPICAL ENABLING CONDITIONS
Monitor runs whenever the following DTCs are not stored |
None |
Auxiliary battery voltage |
11 V or higher |
Engine coolant temperature |
75 °C or higher |
Atmospheric pressure |
76 kPa(abs) [11.02 psi(abs)] or higher |
Air fuel ratio sensor (sensor 1) status |
Activated |
Fuel cut |
On |
Air fuel ratio sensor (sensor 1) malfunction (P2237, P2238, P2239, P2252, P2253) |
Not detected |
Air fuel ratio sensor (sensor 2) malfunction (P22AB, P22AC, P22AD, P22B3, P22B4) |
Not detected |
TYPICAL MALFUNCTION THRESHOLDS
(Averaged air fuel ratio sensor (sensor 1) current during fuel cut / air fuel ratio sensor (sensor 1) base) - (averaged air fuel ratio sensor (sensor 2) current during fuel cut / air fuel ratio sensor (sensor 2) base) |
Less than -1.18, or higher than 0.85 |
MONITOR RESULT
Refer to detailed information in Checking Monitor Status.
Click here
Monitor ID | Test ID | Scaling | Unit | Description |
|---|---|---|---|---|
$01 |
$97 |
Multiply by 0.001 |
No dimension |
Output rate bank 1 sensor 1/bank 1 sensor 2 |
CONFIRMATION DRIVING PATTERN
HINT:
- After repair has been completed, clear the DTC and then check that the vehicle has returned to normal by performing the following All Readiness check procedure.
Click here
- When clearing the permanent DTCs, refer to the "CLEAR PERMANENT DTC" procedure.
Click here
- Connect the Techstream to the DLC3.
- Turn the power switch on (IG).
- Turn the Techstream on.
- Clear the DTCs (even if no DTCs are stored, perform the clear DTC procedure).
- Turn the power switch off and wait for at least 30 seconds.
- Turn the power switch on (IG).
- Turn the Techstream on.
- Enter the following menus: Powertrain / Engine / Monitor / Current Monitor.
- Check that Catalyst Efficiency / Current is Incomplete.
- Put the engine in Inspection Mode (Maintenance Mode).
Click here
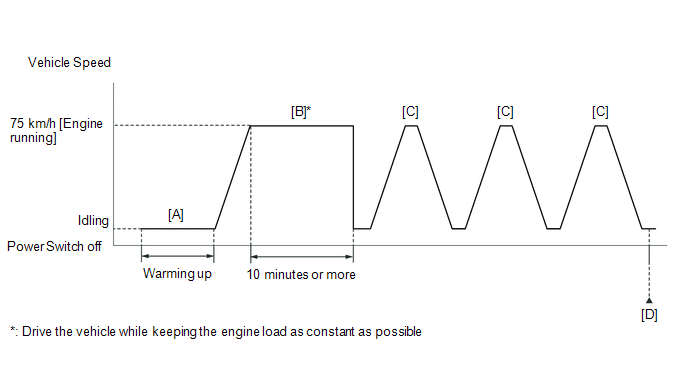
- Start the engine and warm it up until the engine coolant temperature is 75 °C or higher with the shift lever in P [A].
HINT:
In order to keep the idle stable, turn off the A/C and all other electric loads and do not perform any shift operations.
- Drive the vehicle at approximately 75 km/h for 10 minutes or more [B].
CAUTION:
When performing the confirmation driving pattern, obey all speed limits and traffic laws.
HINT:
- Drive the vehicle while keeping the engine load as constant as possible.
- If the engine stops, further depress the accelerator pedal to restart the engine.
- With the shift lever in S, drive the vehicle at 75 km/h, and then decelerate the vehicle by releasing the accelerator pedal for 10 seconds or more to perform the fuel-cut [C].
CAUTION:
When performing the confirmation driving pattern, obey all speed limits and traffic laws.
HINT:
If the engine stops, further depress the accelerator pedal to restart the engine.
- Repeat step [C] 2 times or more in one driving cycle.
- Enter the following menus: Powertrain / Engine / Trouble Codes / Pending [D].
- Read the pending DTCs.
HINT:
- If a pending DTC is output, the system is malfunctioning.
- If a pending DTC is not output, perform the following procedure.
- Enter the following menus: Powertrain / Engine / Utility / All Readiness.
- Input the DTC: P00D562.
- Check the DTC judgment result.
Techstream Display
Description
NORMAL
- DTC judgment completed
- System normal
ABNORMAL
- DTC judgment completed
- System abnormal
INCOMPLETE
- DTC judgment not completed
- Perform driving pattern after confirming DTC enabling conditions
HINT:
- If the judgment result is NORMAL, the system is normal.
- If the judgment result is ABNORMAL, the system is malfunctioning.
- If the judgment result is INCOMPLETE, drive the vehicle with the shift lever in S, and then perform step [C] again.
- [A] to [D]: Normal judgment procedure.
The normal judgment procedure is used to complete DTC judgment and also used when clearing permanent DTCs.
- When clearing the permanent DTCs, do not disconnect the cable from the auxiliary battery terminal or attempt to clear the DTCs during this procedure, as doing so will clear the universal trip and normal judgment histories.
NOTICE:
- Vehicle Control History may be stored in the hybrid vehicle control ECU assembly if the engine is malfunctioning. Certain vehicle condition information is recorded when Vehicle Control History is stored. Reading the vehicle conditions recorded in both the Freeze Frame Data and Vehicle Control History can be useful for troubleshooting.
Click here
(Select Powertrain in Health Check and then check the time stamp data.)
Click here
- If any "Engine Malfunction" Vehicle Control History item has been stored in the hybrid vehicle control ECU assembly, make sure to clear it. However, as all Vehicle Control History items are cleared simultaneously, if any Vehicle Control History items other than "Engine Malfunction" are stored, make sure to perform any troubleshooting for them before clearing Vehicle Control History.
Click here
HINT:
- Sensor 1 refers to the sensor closest to the engine assembly.
- Sensor 2 refers to the sensor farthest away from the engine assembly.
- Read Freeze Frame Data using the Techstream. The ECM records vehicle and driving condition information as Freeze Frame Data the moment a DTC is stored. When troubleshooting, Freeze Frame Data can help determine if the vehicle was moving or stationary, if the engine was warmed up or not, if the air fuel ratio was lean or rich, and other data from the time the malfunction occurred.
PROCEDURE
CHECK ANY OTHER DTCS OUTPUT (IN ADDITION TO DTC P00D562)
(a) Connect the Techstream to the DLC3.
(b) Turn the power switch on (IG).
(c) Turn the Techstream on.
(d) Enter the following menus: Powertrain / Engine / Trouble Codes.
(e) Read the DTCs.
Powertrain > Engine > Trouble CodesResult | Proceed to |
|---|---|
DTC P00D562 is output |
A |
DTC P00D562 and P219519 or P219618 are output |
B |
DTC P00D562 and P227019 or P227118 are output |
C |
DTC P00D562 and other DTCs are output |
D |
HINT:
- If any DTCs other than P00D562 are output, troubleshoot those DTCs first.
- Perform "Inspection After Repair" after replacing the air fuel ratio sensor (sensor 1) and air fuel ratio sensor (sensor 2).
Click here
| A |  |
REPLACE AIR FUEL RATIO SENSOR (SENSOR 1) AND AIR FUEL RATIO SENSOR (SENSOR 2) |
| B | |
GO TO DTC P219519, P219618 |
| C | |
GO TO DTC P227019, P227118 |
| D | |
GO TO DTC CHART |
Active Grille Air Shutter "A" Actuator Stuck On (P05A27E,P05A27F)
DESCRIPTION
Refer to DTC P059F73.
Click here 
DTC No. | Detection Item | DTC Detection Condition | Trouble Area | MIL | Memory | Note |
|---|---|---|---|---|---|---|
P05A27E |
Active Grille Air Shutter "A" Actuator Stuck On |
The following condition is met and the ECM receives a malfunction signal 17 times* (2 trip detection logic):
|
|
Comes on |
DTC stored |
SAE Code: P05A3 |
P05A27F |
Active Grille Air Shutter "A" Actuator Stuck Off |
The following condition is met and the ECM receives a malfunction signal 17 times* (2 trip detection logic):
|
|
Comes on |
DTC stored |
SAE Code: P05A3 |
HINT:
*: For every 65 ms that the ECM receives a grille shutter system malfunction signal from the grille shutter ECU (swing grille actuator assembly) the ECM determines it has received the signal 1 time. If the ECM determines the malfunction signal has been received 17 consecutive times (the signal is received for approximately 1 second continuously), it will store a DTC.
MONITOR DESCRIPTION
If the grille shutter ECU (swing grille actuator assembly) detects that the grille shutter motor (swing grille actuator assembly) is performing an open or close operation for longer than the threshold, it will output a malfunction signal to the ECM and the ECM will store a DTC.
Detection Condition | DTC No. |
|---|---|
Opening Operation |
P05A27E (Active Grille Air Shutter "A" Actuator Stuck On) |
Closing Operation |
P05A27F (Active Grille Air Shutter "A" Actuator Stuck Off) |
MONITOR STRATEGY
Related DTCs |
P05A3: Active grille air shutter performance |
Required Sensors/Components (Main) |
Swing grille actuator assembly Radiator shutter sub-assembly |
Required Sensors/Components (Related) |
- |
Frequency of Operation |
Continuous |
Duration |
17 times |
MIL Operation |
2 driving cycles |
Sequence of Operation |
None |
TYPICAL ENABLING CONDITIONS
Case 1Monitor runs whenever the following DTCs are not stored |
None |
Auxiliary battery voltage |
10.5 to 16 V |
Active grille air shutter close control |
Operating |
Monitor runs whenever the following DTCs are not stored |
None |
Auxiliary battery voltage |
10.5 to 16 V |
Active grille air shutter open control |
Operating |
TYPICAL MALFUNCTION THRESHOLDS
Case 1: Active grille air shutter motor stuck off malfunction is not detected in last power switch on (IG) cycleFollowing condition is met |
1 time or more |
Time after active grille air shutter close control is operated |
11 seconds or more |
Following condition is met |
1 time or more |
Time after active grille air shutter close control is operated |
11 seconds or more |
Following condition is met |
1 time or more |
Time after active grille air shutter open control is operated |
11 seconds or more |
Following condition is met |
1 time or more |
Time after active grille air shutter open control is operated |
11 seconds or more |
CONFIRMATION DRIVING PATTERN
- Connect the Techstream to the DLC3.
- Turn the power switch on (IG).
- Turn the Techstream on.
- Clear the DTCs (even if no DTCs are stored, perform the clear DTC procedure).
- Turn the power switch off and wait for at least 30 seconds.
- Turn the power switch on (IG).
- Turn the Techstream on.
- Enter the following menus: Body Electrical / Grill Shutter / Utility / Grill Shutter Control Mode Switching.
- According to the display on the Techstream, change the grille shutter control mode from normal mode to maintenance mode.
- Enter the following menus: Body Electrical / Grill Shutter / Active Test / Shutter Closing Operation Lock Detection / Data List / Shutter Operation Lock Detection Result for Active Test.
- According to the display on the Techstream, perform the Active Test and read the value of Data List item Shutter Operation Lock Detection Result for Active Test.
OK:
"Normal" is displayed.
- Enter the following menus: Body Electrical / Grill Shutter / Active Test / Shutter Opening Operation Lock Detection / Data List / Shutter Operation Lock Detection Result for Active Test.
- According to the display on the Techstream, perform the Active Test and read the value of Data List item Shutter Operation Lock Detection Result for Active Test.
OK:
"Normal" is displayed.
NOTICE:
- In order to ensure safety, before performing troubleshooting or removing the swing grille actuator assembly or radiator shutter sub-assembly, change the grille shutter control mode to maintenance mode.
- Vehicle Control History may be stored in the hybrid vehicle control ECU assembly if the engine is malfunctioning. Certain vehicle condition information is recorded when Vehicle Control History is stored. Reading the vehicle conditions recorded in both the Freeze Frame Data and Vehicle Control History can be useful for troubleshooting.
Click here
(Select Powertrain in Health Check and then check the time stamp data.)
Click here
- If any "Engine Malfunction" Vehicle Control History item has been stored in the hybrid vehicle control ECU assembly, make sure to clear it. However, as all Vehicle Control History items are cleared simultaneously, if any Vehicle Control History items other than "Engine Malfunction" are stored, make sure to perform any troubleshooting for them before clearing Vehicle Control History.
Click here
HINT:
Read Freeze Frame Data using the Techstream. The ECM records vehicle and driving condition information as Freeze Frame Data the moment a DTC is stored. When troubleshooting, Freeze Frame Data can help determine if the vehicle was moving or stationary, if the engine was warmed up or not, if the air fuel ratio was lean or rich, and other data from the time the malfunction occurred.
PROCEDURE
PERFORM UTILITY USING TECHSTREAM (GRILL SHUTTER CONTROL MODE SWITCHING)
(a) Connect the Techstream to the DLC3.
(b) Turn the power switch on (IG).
(c) Turn the Techstream on.
(d) Enter the following menus: Body Electrical / Grill Shutter / Utility / Grill Shutter Control Mode Switching.
Body Electrical > Grill Shutter > UtilityGrill Shutter Control Mode Switching
(e) According to the display on the Techstream, change the grille shutter control mode from normal mode to maintenance mode.
|

INSPECT GRILLE SHUTTER (FOREIGN MATTER AND ICE)
(a) Check the area around the shutters and the links of the grille shutter for foreign matter and ice.
OK:
No foreign matter or ice.
| NG |  |
GO TO STEP 8 |
|
PERFORM ACTIVE TEST USING TECHSTREAM (GRILLE SHUTTER OPERATION)
(a) Connect the Techstream to the DLC3.
(b) Turn the power switch on (IG).
(c) Turn the Techstream on.
(d) Enter the following menus: Body Electrical / Grill Shutter / Active Test / Shutter Closing Operation Lock Detection / Data List / Shutter Operation Lock Detection Result for Active Test.
Body Electrical > Grill Shutter > Active TestShutter Closing Operation Lock Detection
Shutter Operation Lock Detection Result for Active Test
(e) According to the display on the Techstream, perform the Active Test and read the value of Data List item Shutter Operation Lock Detection Result for Active Test.
OK:
"Normal" is displayed.
(f) Enter the following menus: Body Electrical / Grill Shutter / Active Test / Shutter Opening Operation Lock Detection / Data List / Shutter Operation Lock Detection Result for Active Test.
Body Electrical > Grill Shutter > Active TestShutter Opening Operation Lock Detection
Shutter Operation Lock Detection Result for Active Test
(g) According to the display on the Techstream, perform the Active Test and read the value of Data List item Shutter Operation Lock Detection Result for Active Test.
OK:
"Normal" is displayed.
HINT:
When the value of Data List item Shutter Operation Lock Detection Result for Active Test is "Normal", it can be determined that the grille shutter system has returned to normal.
| NG | |
GO TO STEP 6 |
|
CLEAR DTC
(a) Connect the Techstream to the DLC3.
(b) Turn the power switch on (IG).
(c) Turn the Techstream on.
(d) Enter the following menus: Powertrain / Engine / Trouble Codes.
(e) Clear the DTCs.
Powertrain > Engine > Clear DTCs(f) Turn the power switch off and wait for at least 30 seconds.
|
PERFORM UTILITY USING TECHSTREAM (GRILL SHUTTER CONTROL MODE SWITCHING)
(a) Turn the power switch on (IG).
(b) Turn the Techstream on.
(c) Enter the following menus: Body Electrical / Grill Shutter / Utility / Grill Shutter Control Mode Switching.
Body Electrical > Grill Shutter > UtilityGrill Shutter Control Mode Switching
(d) According to the display on the Techstream, change the grille shutter control mode from maintenance mode to normal mode.
(e) Check for DTCs and make sure that DTC B1333 is not output.
Body Electrical > Grill Shutter > Trouble Codes| NEXT | |
END |
PERFORM ACTIVE TEST USING TECHSTREAM (SWING GRILLE ACTUATOR ASSEMBLY OPERATION)
(a) Remove the radiator shutter sub-assembly.
Click here
(b) Remove the swing grille actuator assembly.
Click here
(c) Reconnect the swing grille actuator assembly connector.
(d) Connect the Techstream to the DLC3.
(e) Turn the power switch on (IG).
(f) Turn the Techstream on.
(g) Enter the following menus: Body Electrical / Grill Shutter / Active Test / Shutter Closing Operation Lock Detection.
Body Electrical > Grill Shutter > Active TestShutter Closing Operation Lock Detection
(h) According to the display on the Techstream, perform the Active Test and check the operation of the swing grille actuator assembly.
OK:
Operation is normal.
(i) Enter the following menus: Body Electrical / Grill Shutter / Active Test / Shutter Opening Operation Lock Detection.
Body Electrical > Grill Shutter > Active TestShutter Opening Operation Lock Detection
(j) According to the display on the Techstream, perform the Active Test and check the operation of the swing grille actuator assembly.
OK:
Operation is normal.
HINT:
Perform "Grill Shutter Control Mode Switching and Grill Shutter Initialization" after replacing the swing grille actuator assembly.
Click here
| NG | |
REPLACE SWING GRILLE ACTUATOR ASSEMBLY |
|
INSPECT RADIATOR SHUTTER SUB-ASSEMBLY (GRILLE SHUTTER OPERATION)
(a) Remove the radiator shutter sub-assembly.
Click here
(b) Remove the swing grille actuator assembly.
Click here
(c) Manually open and close the radiator shutter sub-assembly and check that it moves smoothly.
OK:
Radiator shutter sub-assembly moves smoothly.
HINT:
Perform "Grill Shutter Control Mode Switching and Grill Shutter Initialization" after replacing the swing grille actuator assembly or radiator shutter sub-assembly.
Click here
| OK | |
REPLACE SWING GRILLE ACTUATOR ASSEMBLY |
| NG | |
REPLACE RADIATOR SHUTTER SUB-ASSEMBLY |
REMOVE FOREIGN MATTER OR ICE (CLEAN GRILLE SHUTTER)
(a) Remove any foreign matter and/or ice from the area around the shutters and the links of the grille shutter.
|
PERFORM ACTIVE TEST USING TECHSTREAM (GRILLE SHUTTER OPERATION)
(a) Connect the Techstream to the DLC3.
(b) Turn the power switch on (IG).
(c) Turn the Techstream on.
(d) Enter the following menus: Body Electrical / Grill Shutter / Active Test / Shutter Closing Operation Lock Detection / Data List / Shutter Operation Lock Detection Result for Active Test.
Body Electrical > Grill Shutter > Active TestShutter Closing Operation Lock Detection
Shutter Operation Lock Detection Result for Active Test
(e) According to the display on the Techstream, perform the Active Test and read the value of Data List item Shutter Operation Lock Detection Result for Active Test.
OK:
"Normal" is displayed.
(f) Enter the following menus: Body Electrical / Grill Shutter / Active Test / Shutter Opening Operation Lock Detection / Data List / Shutter Operation Lock Detection Result for Active Test.
Body Electrical > Grill Shutter > Active TestShutter Opening Operation Lock Detection
Shutter Operation Lock Detection Result for Active Test
(g) According to the display on the Techstream, perform the Active Test and read the value of Data List item Shutter Operation Lock Detection Result for Active Test.
OK:
"Normal" is displayed.
HINT:
When the value of Data List item Shutter Operation Lock Detection Result for Active Test is "Normal", it can be determined that the grille shutter system has returned to normal.
| NG | |
GO TO STEP 6 |
|
CLEAR DTC
(a) Connect the Techstream to the DLC3.
(b) Turn the power switch on (IG).
(c) Turn the Techstream on.
(d) Enter the following menus: Powertrain / Engine / Trouble Codes.
(e) Clear the DTCs.
Powertrain > Engine > Clear DTCs(f) Turn the power switch off and wait for at least 30 seconds.
|
PERFORM UTILITY USING TECHSTREAM (GRILL SHUTTER CONTROL MODE SWITCHING)
(a) Turn the power switch on (IG).
(b) Turn the Techstream on.
(c) Enter the following menus: Body Electrical / Grill Shutter / Utility / Grill Shutter Control Mode Switching.
Body Electrical > Grill Shutter > UtilityGrill Shutter Control Mode Switching
(d) According to the display on the Techstream, change the grille shutter control mode from maintenance mode to normal mode.
(e) Check for DTCs and make sure that DTC B1333 is not output.
Body Electrical > Grill Shutter > Trouble Codes| NEXT | |
END |