Pattern Select Switch EV Mode Circuit. Pattern Select Switch Sport Mode Circuit. Precaution
Pattern Select Switch EV Mode Circuit
DESCRIPTION
The EV drive mode signal will be sent to the hybrid vehicle control ECU when the EV drive mode switch (electric parking brake switch assembly) is operated. If the specified conditions are met, the system enters EV drive mode and the vehicle will be driven using EV drive mode. This signal is then transmitted from the hybrid vehicle control ECU via CAN to the combination meter assembly to illuminate the EV drive mode indicator.
WIRING DIAGRAM
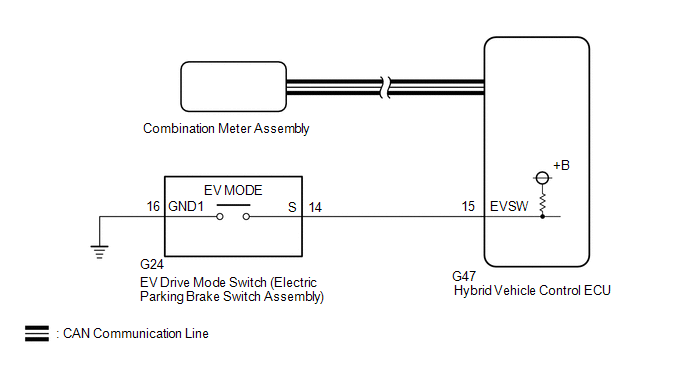
Depending on the condition of the hybrid control system and the driving conditions, the drive mode may not be able to be changed to EV drive mode and a warning message will be displayed on the multi-information display.
HINT:
Under the following conditions, the drive mode will not be able to be changed to EV drive mode:
- The hybrid control system is extremely hot.
- The hybrid control system is extremely cold.
- The engine is warming up.
- The SOC (State of Charge) of the HV battery is low.
- The vehicle is being driven at a speed higher than the specified value.
- The accelerator pedal is being fully depressed or the vehicle is climbing a slope.
- The defroster is on.
- DTCs are stored.
PROCEDURE
ASK ABOUT VEHICLE CONDITION
(a) Check if a buzzer sounded and a message was displayed on the multi-information display when attempting to enter EV drive mode.
Result | Proceed to |
|---|---|
No buzzer sounded and no message was displayed on multi-information display |
A |
A buzzer sounded and a message was displayed on multi-information display |
B |
HINT:
If a buzzer sounds and a message is displayed on the multi-information display, one or more of the EV drive mode entry conditions have not been met.
| B |  |
END |
|

READ VALUE USING TECHSTREAM (CAN BUS CHECK)
(a) Connect the Techstream to the DLC3.
(b) Turn the power switch on (IG).
(c) Turn the Techstream on.
(d) Enter the following menus: System Select / CAN Bus Check.
CAN Bus CheckResult | Proceed to |
|---|---|
All of the ECUs and sensors that are currently connected to the CAN communication system are displayed |
A |
None of the ECUs and sensors that are currently connected to the CAN communication system are displayed, or some of them are not displayed |
B |
(e) Turn the power switch off.
| B | |
GO TO CAN COMMUNICATION SYSTEM |
|
CHECK DTC OUTPUT (HEALTH CHECK)
(a) Connect the Techstream to the DLC3.
(b) Turn the power switch on (IG).
(c) Turn the Techstream on.
(d) Enter the following menus: System Select / Health Check.
(e) Check for DTCs.
Result | Proceed to |
|---|---|
No DTCs are output |
A |
DTCs are output |
B |
(f) Turn the power switch off.
| B | |
GO TO DTC CHART |
|
READ VALUE USING TECHSTREAM (EV MODE, EV MODE SWITCH)
(a) Connect the Techstream to the DLC3.
(b) Turn the power switch on (IG).
(c) Turn the Techstream on.
(d) Enter the following menus: Powertrain / Hybrid Control / Data List / EV Mode, EV Mode Switch.
Powertrain > Hybrid Control > Data ListTester Display |
|---|
EV Mode |
EV Mode Switch |
(e) Read the values displayed on the Techstream.
Powertrain > Hybrid Control > Data ListTester Display | Measurement Item | Range | Normal Condition |
|---|---|---|---|
EV Mode |
EV drive mode transition availability |
ON or OFF |
In EV drive mode: ON |
EV Mode Switch |
EV drive mode switch condition |
ON or OFF |
EV drive mode switch being pushed and held: ON EV drive mode switch not operated: OFF |
Result | Proceed to |
|---|---|
The display changes according to the EV drive mode switch operation |
A |
The display does not change according to the EV drive mode switch operation |
B |
(f) Turn the power switch off.
| A | |
GO TO PROBLEM SYMPTOMS TABLES |
|
INSPECT EV DRIVE MODE SWITCH (ELECTRIC PARKING BRAKE SWITCH ASSEMBLY)
Click here 
| NG | |
REPLACE ELECTRIC PARKING BRAKE SWITCH ASSEMBLY |
|
CHECK HARNESS AND CONNECTOR (EV DRIVE MODE SWITCH (ELECTRIC PARKING BRAKE SWITCH ASSEMBLY) - BODY GROUND)
(a) Disconnect the G24 EV drive mode switch (electric parking brake switch assembly) connector.
(b) Measure the resistance according to the value(s) in the table below. Standard Resistance:
|
|
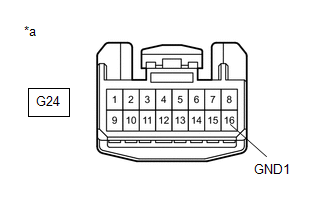
(c) Reconnect the G24 EV drive mode switch (electric parking brake switch assembly) connector.
| NG | |
REPAIR OR REPLACE HARNESS OR CONNECTOR |
|
CHECK HARNESS AND CONNECTOR (HYBRID VEHICLE CONTROL ECU - EV DRIVE MODE SWITCH (ELECTRIC PARKING BRAKE SWITCH ASSEMBLY))
(a) Disconnect the G47 hybrid vehicle control ECU connector.
(b) Disconnect the G24 EV drive mode switch (electric parking brake switch assembly) connector.
(c) Measure the resistance according to the value(s) in the table below. Standard Resistance:
|
|
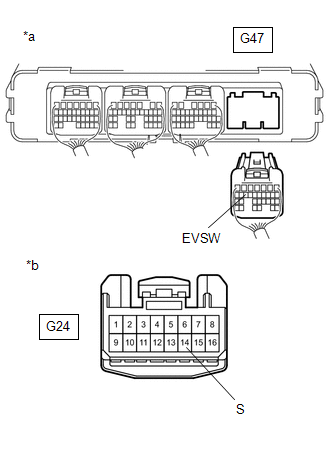
(d) Reconnect the G24 EV drive mode switch (electric parking brake switch assembly) connector.
(e) Reconnect the G47 hybrid vehicle control ECU connector.
| OK | |
REPLACE HYBRID VEHICLE CONTROL ECU |
| NG | |
REPAIR OR REPLACE HARNESS OR CONNECTOR |
Pattern Select Switch Sport Mode Circuit
DESCRIPTION
When selecting sport mode, the switch operation signal is sent to the hybrid vehicle control ECU. Following this, the system enters sport mode and the vehicle will be driven using sport mode. This signal is then transmitted from the hybrid vehicle control ECU via CAN to the combination meter assembly to illuminate the "SPORT" indicator.
HINT:
If the power switch is turned off while in sport mode, the drive mode will automatically be changed to normal mode when the power switch is turned on (IG).
WIRING DIAGRAM
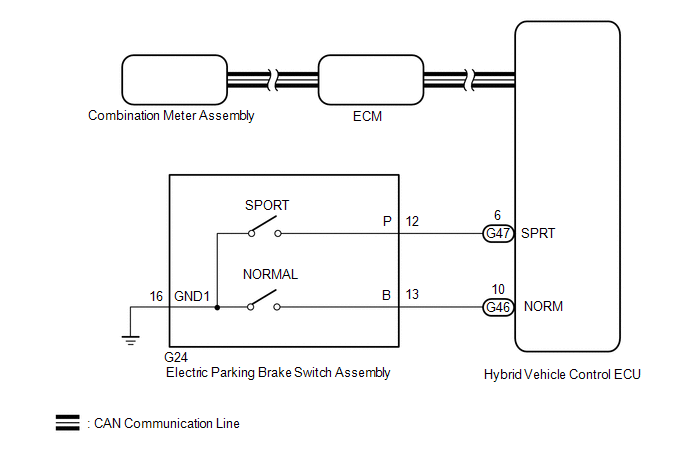
PROCEDURE
READ VALUE USING TECHSTREAM (CAN BUS CHECK)
Click here 
Result | Proceed to |
|---|---|
All of the ECUs and sensors that are currently connected to the CAN communication system are displayed |
A |
None of the ECUs and sensors that are currently connected to the CAN communication system are displayed, or some of them are not displayed |
B |
| B |  |
GO TO CAN COMMUNICATION SYSTEM |
|

CHECK DTC OUTPUT (HEALTH CHECK)
Click here
Result | Proceed to |
|---|---|
No DTCs are output |
A |
DTCs are output |
B |
| B | |
GO TO DTC CHART |
|
READ VALUE USING TECHSTREAM (SPORT MODE SWITCH, NORMAL MODE SWITCH)
(a) Connect the Techstream to the DLC3.
(b) Turn the power switch on (IG).
(c) Enter the following menus: Powertrain / Hybrid Control / Data List / Sport Mode Switch, Normal Mode Switch.
Powertrain > Hybrid Control > Data ListTester Display |
|---|
Sport Mode Switch |
Normal Mode Switch |
(d) Read the value displayed on the Techstream.
Powertrain > Hybrid Control > Data ListTester Display | Measurement Item | Range | Normal Condition |
|---|---|---|---|
Sport Mode Switch |
Sport mode switch condition |
ON or OFF |
Sport mode switch being pushed and held: ON Sport mode switch not operated: OFF |
Normal Mode Switch |
Normal mode switch condition |
ON or OFF |
Normal mode switch being pushed and held: ON Normal mode switch not operated: OFF |
Result | Proceed to |
|---|---|
The Techstream display changes according to the switch (Sport mode, Normal mode) operation |
A |
The Techstream display does not change according to the switch (Sport mode, Normal mode) operation |
B |
(e) Turn the power switch off.
| A | |
REPLACE HYBRID VEHICLE CONTROL ECU |
|
INSPECT ELECTRIC PARKING BRAKE SWITCH ASSEMBLY (SPORT MODE, NORMAL MODE)
Click here
| NG | |
REPLACE ELECTRIC PARKING BRAKE SWITCH ASSEMBLY |
|
CHECK HARNESS AND CONNECTOR (ELECTRIC PARKING BRAKE SWITCH ASSEMBLY - BODY GROUND)
(a) Disconnect the G24 electric parking brake switch assembly connector.
(b) Measure the resistance according to the value(s) in the table below. Standard Resistance:
|
|
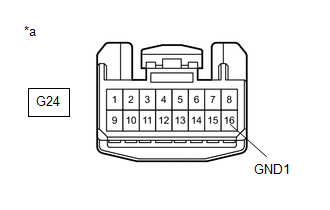
(c) Reconnect the G24 electric parking brake switch assembly connector.
| NG | |
REPAIR OR REPLACE HARNESS OR CONNECTOR |
|
CHECK HARNESS AND CONNECTOR (HYBRID VEHICLE CONTROL ECU - ELECTRIC PARKING BRAKE SWITCH ASSEMBLY)
(a) Disconnect the G46 and G47 hybrid vehicle control ECU connectors.
(b) Disconnect the G24 electric parking brake switch assembly connector.
(c) Measure the resistance according to the value(s) in the table below.
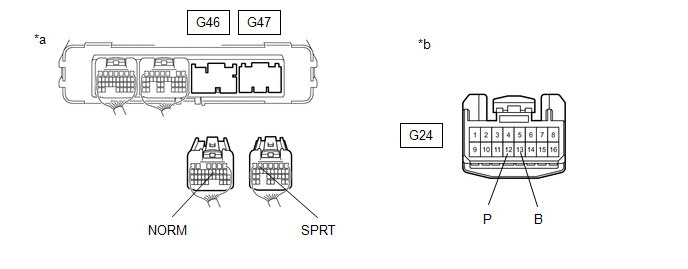
*a |
Rear view of wire harness connector (to Hybrid Vehicle Control ECU) |
*b |
Front view of wire harness connector (to Electric Parking Brake Switch Assembly) |
Standard Resistance:
Tester Connection | Condition | Specified Condition |
|---|---|---|
G47-6 (SPRT) - G24-12 (P) |
Always |
Below 1 Ω |
G47-6 (SPRT) or G24-12 (P) - Body ground |
Always |
10 kΩ or higher |
G46-10 (NORM) - G24-13 (B) |
Always |
Below 1 Ω |
G46-10 (NORM) or G24-13 (B) - Body ground |
Always |
10 kΩ or higher |
(d) Reconnect the G24 electric parking brake switch assembly.
(e) Reconnect the G46 and G47 hybrid vehicle control ECU connectors.
| OK | |
REPLACE HYBRID VEHICLE CONTROL ECU |
| NG | |
REPAIR OR REPLACE HARNESS OR CONNECTOR |
Precaution
PRECAUTION
PRECAUTIONS FOR INSPECTING HYBRID CONTROL SYSTEM
(a) Before the following operations are conducted, take precautions to prevent electric shock by turning the power switch off, wearing insulated gloves, and removing the service plug grip from HV battery.
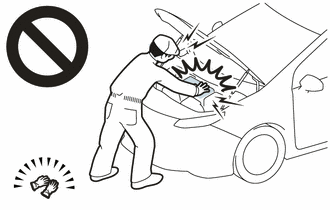
- Inspecting the high-voltage system
- Disconnecting the low voltage connector of the inverter with converter assembly
- Disconnecting the low voltage connector of the HV battery
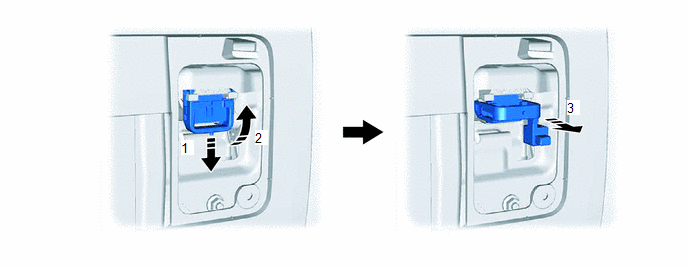
NOTICE:
- After turning the power switch off, waiting time may be required before disconnecting the cable from the negative (-) auxiliary battery terminal. Therefore, make sure to read the disconnecting the cable from the negative (-) auxiliary battery terminal notices before proceeding with work.
Click here

- After removing the service plug grip, turning the power switch on (READY) may cause a malfunction. Do not turn the power switch on (READY) unless instructed by the repair manual.
(b) To prevent electric shock, make sure to remove the service plug grip to cut off the high voltage circuit before servicing the vehicle.
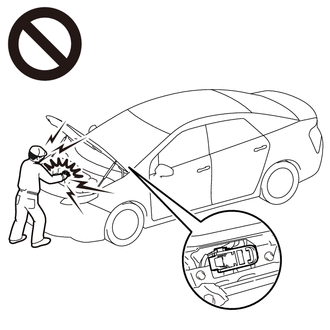
(c) After removing the service plug grip, put it in your pocket to prevent other technicians from accidentally reconnecting it while you are working on the high-voltage system.
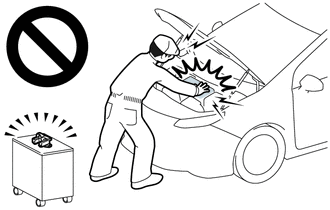
(d) After removing the service plug grip, wait for at least 10 minutes before touching any of the high-voltage connectors or terminals.
HINT:
Waiting for at least 10 minutes is required to discharge the high-voltage capacitor inside the inverter with converter assembly.
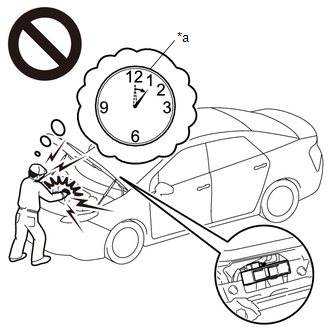
*a |
Without waiting for 10 minutes |
(e) Check the voltage at the terminals in the inspection point in the inverter with converter assembly.
CAUTION:
Be sure to wear insulated gloves.
(1) Remove the connector cover assembly from the inverter with converter assembly.
Click here
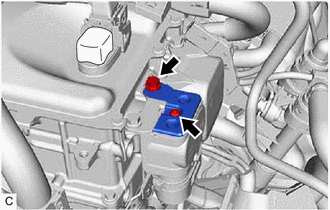
NOTICE:
- Do not touch the connector cover assembly waterproof seal.
- Do not allow any foreign matter or water to enter the inverter with converter assembly.
(2) Measure the voltage according to the value(s) in the table below.
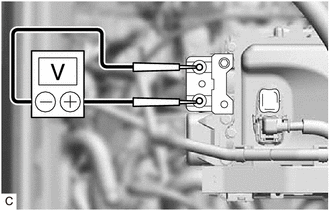
Standard Voltage:
Tester Connection | Condition | Specified Condition |
|---|---|---|
Inspection point |
At least 10 minutes after removing the service plug grip |
0 V |
HINT:
Set the tester to DC750 V or more to measure the voltage.
(3) Reinstall the connector cover assembly.
(f) When turning the power switch on (IG) during an inspection, do not press the power switch with the brake pedal depressed.
CAUTION:
Pressing the power switch with the brake pedal depressed causes the system to enter the READY-on state. This is very dangerous because high voltage may be applied to the inspection area.
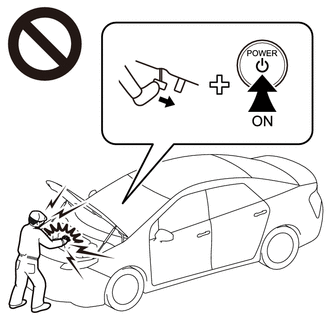
(g) Turn the power switch off, wear insulated gloves, and disconnect the cable from the negative (-) terminal of the auxiliary battery before touching any of the orange-colored wires of the high-voltage system.
NOTICE:
After turning the power switch off, waiting time may be required before disconnecting the cable from the negative (-) auxiliary battery terminal. Therefore, make sure to read the disconnecting the cable from the negative (-) auxiliary battery terminal notices before proceeding with work.
Click here
(h) Turn the power switch off before performing any resistance checks.
(i) Turn the power switch off before disconnecting or reconnecting any connectors.
(j) When performing work involving high-voltage wires, use either a tool wrapped with vinyl insulation tape or an insulated tool.
(k) When high-voltage connectors are removed, wrap the connectors with insulation tape to prevent them from contacting foreign matter.
NOTICE FOR HYBRID CONTROL SYSTEM ACTIVATION
(a) When the warning light is illuminated, or the auxiliary battery has been disconnected and reconnected, attempting to turn the power switch on (READY) may not start the system (the system may not enter the READY-on state) on the first attempt. If so, turn the power switch off and reattempt to start the hybrid system.
NOTICE:
After turning the power switch off, waiting time may be required before disconnecting the cable from the negative (-) auxiliary battery terminal. Therefore, make sure to read the disconnecting the cable from the negative (-) auxiliary battery terminal notices before proceeding with work.
Click here
PRECAUTIONS FOR DISCONNECTING AMD TERMINAL
HINT:
The AMD terminal is connected to the positive terminal of the auxiliary battery. To prevent damage when the AMD terminal is being disconnected, use the following procedure.
(a) Be sure to disconnect the cable from the negative (-) auxiliary battery terminal before disconnecting the AMD terminal from the No. 1 engine room relay block and No. 1 junction block assembly.
NOTICE:
After turning the power switch off, waiting time may be required before disconnecting the cable from the negative (-) auxiliary battery terminal. Therefore, make sure to read the disconnecting the cable from the negative (-) auxiliary battery terminal notices before proceeding with work.
Click here
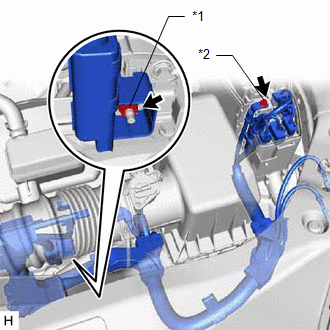
*1 |
AMD Terminal (Inverter with Converter Assembly Side) |
*2 |
AMD Terminal (No. 1 Engine Room Relay Block and No. 1 Junction Block Assembly Side) |
(b) After disconnecting the AMD terminal, wrap the terminal with insulation tape.
(c) Be sure to reconnect the AMD terminal to the No. 1 engine room relay block and No. 1 junction block assembly before reconnecting the cable to the negative (-) terminal of the auxiliary battery.
NOTICE:
A short circuit to ground may occur if the AMD terminal is disconnected before the cable is disconnected from the negative (-) auxiliary battery terminal. If a short circuit to ground occurs, a fusible link or fuse may break.
DISPOSING OF A HV BATTERY
(a) When disposing of an HV battery, make sure to return it through an authorized collection agent who is capable of handling it safely. If the HV battery is returned via the manufacturer specified route, it will be returned properly and in a safe manner by an authorized collection agent.
CAUTION:
- After removing the HV battery, keep it away from water. Exposure to water may cause the HV battery to produce heat, resulting in a fire.
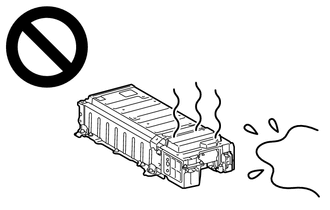
- Accidents such as electric shock may result if the HV battery is disposed of improperly or abandoned.
Therefore, make sure to return HV battery through an authorized collection agent.
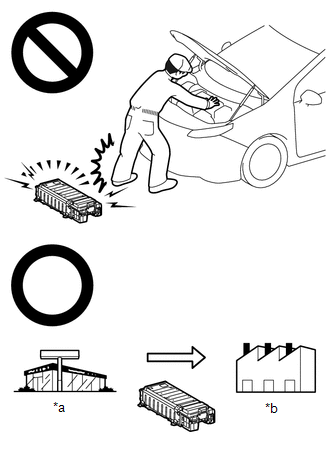
*a
Dealer
*b
Battery Collection Agent
- To reduce the risk of fire, HV battery must not be stored in an area where they will be exposed to fire or high temperatures.
- If the temperature of the HV battery is high, leave the vehicle until the temperature drops.
- Make sure to insulate the high-voltage connectors and terminals of the HV battery with insulating tape after removing it.
If the HV battery stored without insulating the connectors and terminals, electric shock or fire may result.
PRECAUTIONS WHEN REPLACING HYBRID VEHICLE CONTROL ECU
NOTICE:
Before replacing the hybrid vehicle control ECU, refer to Registration.
Click here
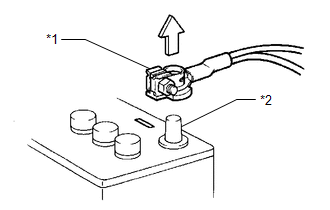
*1 |
Cable |
*2 |
Negative (-) Auxiliary Battery Terminal |
DISCONNECTING AND RECONNECTING NEGATIVE AUXILIARY BATTERY CABLE
(a) Before performing work on electronic components, disconnect the cable from the negative (-) auxiliary battery terminal to prevent damage to the electrical system or electrical components.
(b) Before disconnecting and reconnecting the auxiliary battery cable, turn the power switch off and the headlight switch off. Then loosen the terminal nut completely. Do not damage the cable or terminal.
(c) When the auxiliary battery cable is disconnected, the clock and radio settings and stored DTCs are cleared. Therefore, before disconnecting the auxiliary battery cable, make a note of them.
NOTICE:
- After turning the power switch off, waiting time may be required before disconnecting the cable from the negative (-) auxiliary battery terminal. Therefore, make sure to read the disconnecting the cable from the negative (-) auxiliary battery terminal notices before proceeding with work.
Click here
- When the cable is disconnected from the negative (-) auxiliary battery terminal, initialize the following systems after the cable is reconnected.
System Name | See Procedure |
|---|---|
Lane Departure Alert System (w/ Steering Control) |
|
Pre-collision System |
|
Intelligent Clearance Sonar System |
|
Parking Assist Monitor System |
|
Panoramic View Monitor System |
|
Lighting System (for HV Model with Cornering Light) |