Flow Shutting Valve
Components
COMPONENTS
ILLUSTRATION
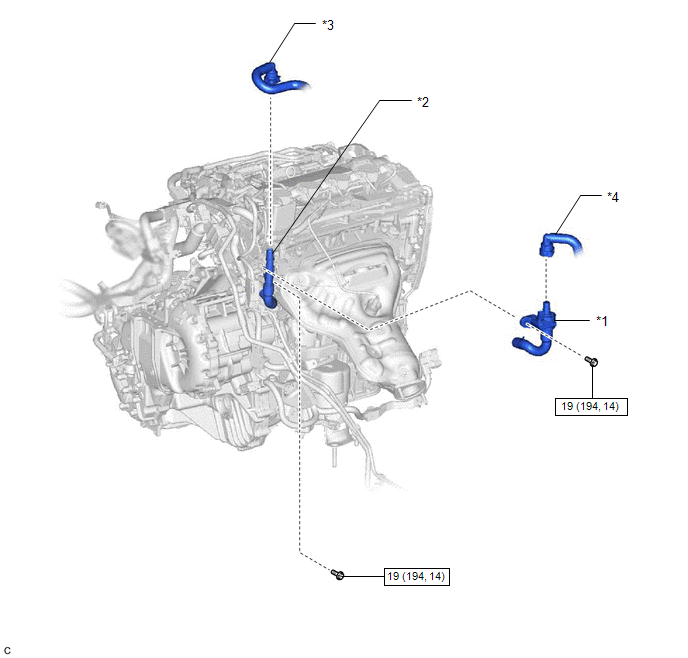
*1 |
FLOW SHUTTING VALVE (WATER BY-PASS HOSE ASSEMBLY) |
*2 |
NO. 2 WATER BY-PASS PIPE SUB-ASSEMBLY |
*3 |
OUTLET HEATER HOSE |
*4 |
INLET HEATER HOSE |
 |
N*m (kgf*cm, ft.*lbf): Specified torque |
- |
- |
Inspection
INSPECTION
PROCEDURE
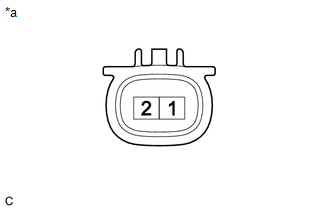
1. INSPECT FLOW SHUTTING VALVE (WATER BY-PASS HOSE ASSEMBLY)
(a) Measure the resistance according to the value(s) in the table below. Standard Resistance:
If the result is not as specified, replace the flow shutting valve (water by-pass hose assembly). |
|
Installation
INSTALLATION
PROCEDURE
1. INSTALL FLOW SHUTTING VALVE (WATER BY-PASS HOSE ASSEMBLY)
(a) Connect the flow shutting valve (water by-pass hose assembly) to the water by-pass outlet sub-assembly and slide the clip to secure it. NOTICE:
|
|
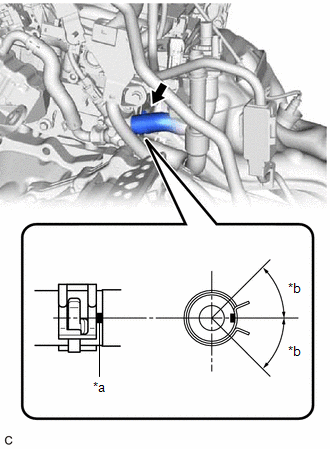
(b) Connect the flow shutting valve (water by-pass hose assembly) with the bolt.
Torque:
19 N·m {194 kgf·cm, 14 ft·lbf}
(c) Connect the No. 2 water by-pass pipe sub-assembly with the bolt.
Torque:
19 N·m {194 kgf·cm, 14 ft·lbf}
(d) Connect the inlet heater hose connector to the flow shutting valve (water by-pass hose assembly).
NOTICE:
Check that there is no damage or foreign matter on the connecting parts of the water lines.
(1) Align the protrusions of the inlet heater hose connector with the cutouts in the flow shutting valve (water by-pass hose assembly) and push them together until the inlet heater hose connector makes a "click" sound. |
|
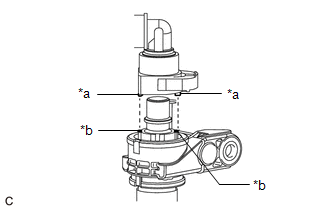
(2) Push in the retainer.
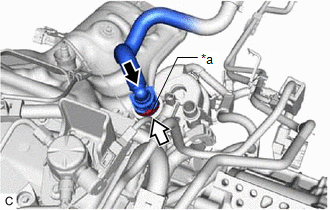
*a |
Retainer |
 |
Push |
 |
Push in |
(3) Check that the flow shutting valve (water by-pass hose assembly) and inlet heater hose connector are securely connected by pulling on them.
(e) Connect the outlet heater hose connector to the No. 2 water by-pass pipe sub-assembly.
NOTICE:
Check that there is no damage or foreign matter on the connecting parts of the water lines.
(1) Align the protrusion of the No. 2 water by-pass pipe sub-assembly with the cutout in the outlet heater hose connector and push them together until the outlet heater hose connector makes a "click" sound. |
|
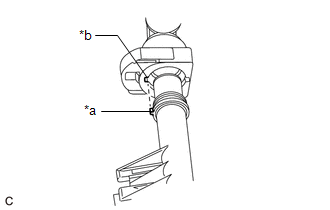
(2) Push in the retainer.
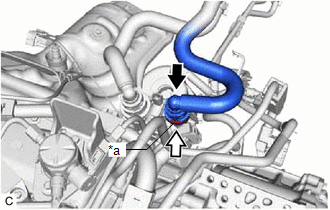
*a |
Retainer |
|
Push |
|
Push in |
(3) Check that the No. 2 water by-pass pipe sub-assembly and outlet heater hose connector are securely connected by pulling on them.
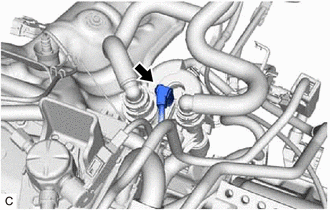
(f) Connect the flow shutting valve (water by-pass hose assembly) connector.
2. INSTALL INVERTER WITH CONVERTER ASSEMBLY
Click here 
3. ADD ENGINE COOLANT (for Engine)
Click here
4. INSPECT FOR COOLANT LEAK (for Engine)
Click here
Removal
REMOVAL
The necessary procedures (adjustment, calibration, initialization, or registration) that must be performed after parts are removed and installed, or replaced during flow shutting valve (water by-pass hose assembly) removal/installation are shown below.
Necessary Procedures After Parts Removed/Installed/ReplacedReplaced Part or Performed Procedure | Necessary Procedure | Effect/Inoperative Function when Necessary Procedure not Performed | Link |
|---|---|---|---|
| *: When performing learning using the Techstream. | |||
Auxiliary battery terminal is disconnected/reconnected |
Perform steering sensor zero point calibration |
Lane departure alert system (w/ Steering Control) |
 |
Pre-collision system |
|||
Intelligent clearance sonar system* |
|||
Lighting System (for HV Model with Cornering Light) |
|||
Memorize steering angle neutral point |
Parking assist monitor system |
|
|
Panoramic view monitor system |
|
||
Replacement of inverter with converter assembly |
Resolver learning |
|
|
Replacement of ECM |
Perform Vehicle Identification Number (VIN) registration |
MIL illuminates |
|
NOTICE:
After turning the power switch off, waiting time may be required before disconnecting the cable from the negative (-) auxiliary battery terminal. Therefore, make sure to read the disconnecting the cable from the negative (-) auxiliary battery terminal notices before proceeding with work.
Click here
PROCEDURE
1. REMOVE INVERTER WITH CONVERTER ASSEMBLY
Click here
2. DRAIN ENGINE COOLANT (for Engine)
Click here
3. REMOVE FLOW SHUTTING VALVE (WATER BY-PASS HOSE ASSEMBLY)
(a) Disconnect the flow shutting valve (water by-pass hose assembly) connector. |
 |
(b) Disconnect the outlet heater hose connector from the No. 2 water by-pass pipe sub-assembly.
NOTICE:
Remove any foreign matter on the No. 2 water by-pass pipe sub-assembly and outlet heater hose connector before performing this work.
(1) Pull out the retainer to disengage the lock claws and pull off the outlet heater hose connector.
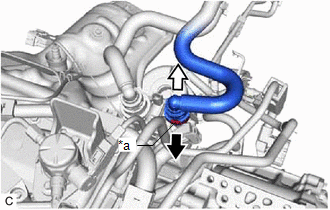
*a |
Retainer |
 |
Pull out |
 |
Pull off |
(2) Check that there is no foreign matter on the sealing surfaces of the disconnected water lines. Clean them if necessary.
(3) Cover the disconnected No. 2 water by-pass pipe sub-assembly and outlet heater hose connector with plastic bags to prevent damage and contamination.
(c) Disconnect the inlet heater hose connector from the flow shutting valve (water by-pass hose assembly).
NOTICE:
Remove any foreign matter on the flow shutting valve (water by-pass hose assembly) and inlet heater hose connector before performing this work.
(1) Pull out the retainer to disengage the lock claws and pull off the inlet heater hose connector.
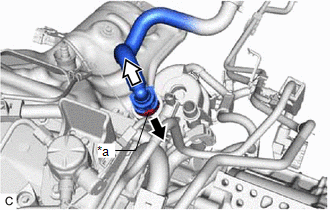
*a |
Retainer |
|
Pull out |
|
Pull off |
(2) Check that there is no foreign matter on the sealing surfaces of the disconnected water lines. Clean them if necessary.
(3) Cover the disconnected inlet heater hose connector with plastic bag to prevent damage and contamination.
(d) Remove the bolt to disconnect the No. 2 water by-pass pipe sub-assembly. |
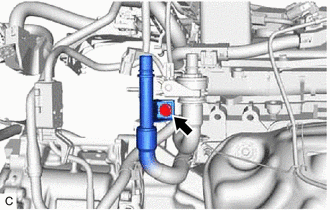 |
(e) Remove the bolt to disconnect the flow shutting valve (water by-pass hose assembly). |
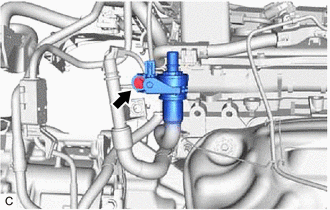 |
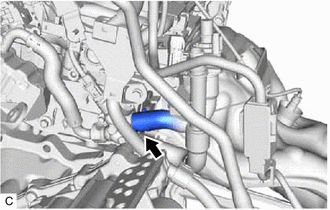
(f) Slide the clip and disconnect the flow shutting valve (water by-pass hose assembly) from the water by-pass outlet sub-assembly. HINT: Use a container to catch any engine coolant which flows out of the flow shutting valve (water by-pass hose assembly) and water by-pass outlet sub-assembly. |
 |