Water Pump
Components
COMPONENTS
ILLUSTRATION
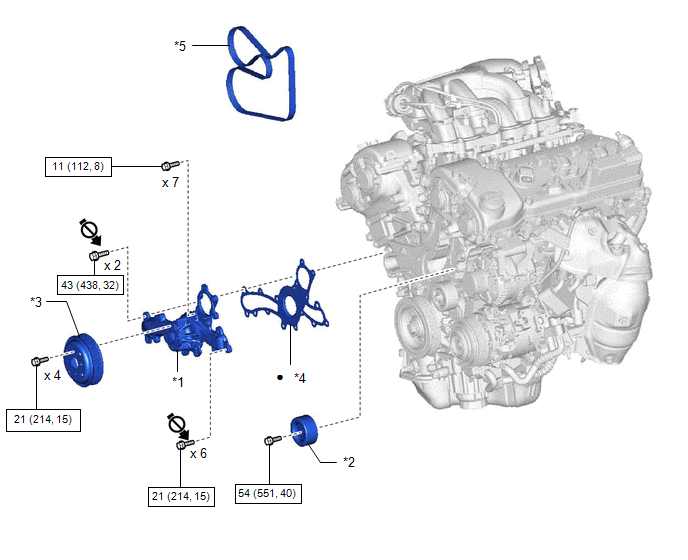
*1 |
ENGINE WATER PUMP ASSEMBLY |
*2 |
NO. 2 IDLER PULLEY SUB-ASSEMBLY |
*3 |
WATER PUMP PULLEY |
*4 |
WATER PUMP GASKET |
*5 |
V-RIBBED BELT |
- |
- |
 |
N*m (kgf*cm, ft.*lbf): Specified torque |
● |
Non-reusable part |
 |
Do not apply lubricants to the threaded parts |
- |
- |
Installation
INSTALLATION
PROCEDURE
1. INSTALL ENGINE WATER PUMP ASSEMBLY
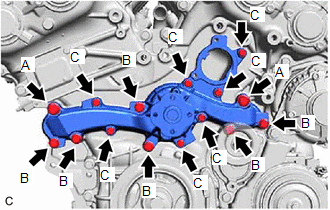
(a) Install a new water pump gasket and the engine water pump assembly with the 15 bolts. Torque: Bolt (A) : 43 N·m {438 kgf·cm, 32 ft·lbf} Bolt (B) : 21 N·m {214 kgf·cm, 15 ft·lbf} Bolt (C) : 11 N·m {112 kgf·cm, 8 ft·lbf} Standard Length:
NOTICE:
|
 |
2. INSTALL WATER PUMP PULLEY
(a) Temporarily install the water pump pulley with the 4 bolts.
(b) Using SST, hold the water pump pulley. SST: 09960-10010 09962-01000 09963-00700 |
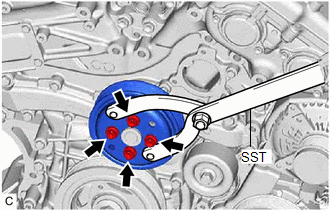 |
(c) Fully tighten the 4 bolts.
Torque:
21 N·m {214 kgf·cm, 15 ft·lbf}
3. INSTALL NO. 2 IDLER PULLEY SUB-ASSEMBLY
(a) Install the No. 2 idler pulley sub-assembly with the bolt.
Torque:
54 N·m {551 kgf·cm, 40 ft·lbf}
4. INSTALL V-RIBBED BELT
Click here 
5. INSTALL WATER INLET WITH THERMOSTAT SUB-ASSEMBLY
Click here
On-vehicle Inspection
ON-VEHICLE INSPECTION
PROCEDURE
1. INSPECT FOR COOLANT LEAK
HINT:
- The sliding surface inside the engine water pump assembly is lubricated by engine coolant. As some engine coolant is discharged during normal operation, engine coolant residue (solids) may be found on the drain plug or the bottom of the engine water pump assembly. Also, engine coolant may leak if foreign matter enters the engine water pump assembly, however the sealing performance will recover when the foreign matter is pushed out or breaks into fine pieces. In this case, check the area around the engine water pump assembly.
- Before performing this inspection, check that there are no engine coolant leaks from any parts other than the engine water pump assembly. If there are leaks, inspect those areas first.
- Perform this inspection when the engine is cold.
(a) Visually check the engine water pump assembly.
(1) Check that engine coolant is not dripping from the engine water pump assembly.
HINT:
- If engine coolant is dripping, replace the engine water pump assembly.
- If engine coolant is not dripping, perform the following check.
(b) Remove the V-ribbed belt.
Click here 
(c) Remove the water pump pulley.
Click here
HINT:
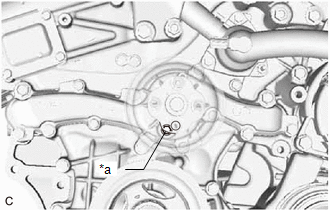
Move the water pump pulley so that the drain plug can be reached.
(d) Inspect the area around the engine water pump assembly.
HINT:
Check for deposits around the drain plug of the engine water pump assembly.
(1) Press a piece of paper towel against the drain plug and check that the paper towel is not wet and that there are no deposits on the lip of the drain plug. If the paper towel is wet, replace the engine water pump assembly. If the paper towel is not wet, thoroughly clean the area around the engine water pump assembly. |
|
(e) Install the water pump pulley.
Click here
2. INSPECT ENGINE WATER PUMP ASSEMBLY
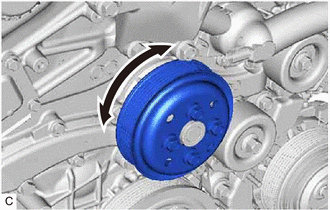
(a) Turn the water pump pulley and check that the bearing of the engine water pump assembly moves smoothly and quietly. If necessary, replace the engine water pump assembly. |
 |
(b) Install the V-ribbed belt.
Click here
Removal
REMOVAL
The necessary procedures (adjustment, calibration, initialization or registration) that must be performed after parts are removed and installed, or replaced during engine water pump assembly removal/installation are shown below.
Necessary Procedure After Parts Removed/Installed/ReplacedReplaced Part or Performed Procedure | Necessary Procedure | Effect/Inoperative Function when Necessary Procedure not Performed | Link |
|---|---|---|---|
Battery terminal is disconnected/reconnected |
Perform steering sensor zero point calibration |
Lane departure alert system (w/ Steering Control) |
 |
Pre-collision system |
|||
Intelligent Clearance Sonar System*1 |
|||
Lighting System (for Gasoline Model with Cornering Light) |
|||
Memorize steering angle neutral point |
Parking Assist Monitor System |
|
|
Panoramic View Monitor System |
|
||
Replacement of ECM |
Vehicle Identification Number (VIN) registration |
MIL comes on |
|
ECU communication ID registration (Immobiliser system) |
Engine start function |
|
|
|
Inspection after repair |
|
|
Replacement of automatic transaxle assembly |
|
|
|
Replacement of ECM (If transaxle compensation code read from ECM) |
|
||
Replacement of ECM (If transaxle compensation code not read from ECM) |
|
||
Replacement of automatic transaxle fluid |
ATF thermal degradation estimate reset |
The value of the Data List item "ATF Thermal Degradation Estimate" is not estimated correctly |
|
Replacement of ECM |
Code registration (Smart Key System (for Start Function)) |
|
|
Suspension, tires, etc. |
|
|
|
Rear television camera assembly optical axis adjustment (Back camera position setting) |
Parking Assist Monitor System |
|
|
|
Panoramic View Monitor System |
|
|
Perform headlight ECU sub-assembly LH initialization |
Lighting system (for Gasoline Model with Cornering Light) |
|
|
Front wheel alignment adjustment |
Perform system variant learning and acceleration sensor zero point calibration. |
|
|
- *1: When performing learning using the Techstream.
Click here
- *2: Not necessary when ECM replaced with new one.
PROCEDURE
1. REMOVE WATER INLET WITH THERMOSTAT SUB-ASSEMBLY
Click here
2. REMOVE V-RIBBED BELT
Click here
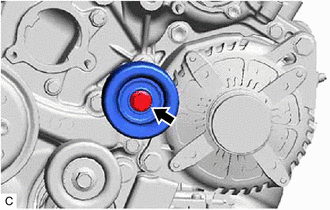
3. REMOVE NO. 2 IDLER PULLEY SUB-ASSEMBLY
(a) Remove the bolt and No. 2 idler pulley sub-assembly. |
 |
4. REMOVE WATER PUMP PULLEY
(a) Using SST, hold the water pump pulley. SST: 09960-10010 09962-01000 09963-00700 |
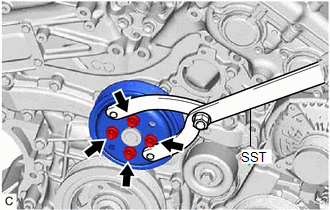 |
(b) Remove the 4 bolts and water pump pulley.
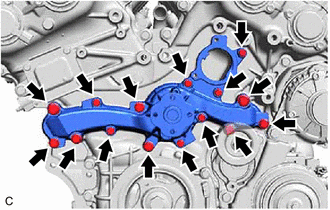
5. REMOVE ENGINE WATER PUMP ASSEMBLY
(a) Remove the 15 bolts, engine water pump assembly and water pump gasket. |
 |