Lost Communication with TCM Missing Message (U010187). Lost Communication with Instrument Panel Cluster (IPC) Control Module Missing Message (U015587). VC Output Circuit
Lost Communication with TCM Missing Message (U010187)
MONITOR DESCRIPTION
The engine control unit and the transmission control unit are located inside the ECM. The engine control unit intercommunicates with the transmission control via CAN communication.
If there is a problem in this communication, the ECM store this DTC.
DTC No. | Detection Item | DTC Detection Condition | Trouble Area | MIL | Memory | Note |
|---|---|---|---|---|---|---|
U010187 |
Lost Communication with TCM Missing Message |
All of the following conditions are met for 1.25 seconds (1 trip detection logic):
|
ECM |
Comes on |
DTC stored |
SAE Code: U0101 |
MONITOR STRATEGY
Related DTCs |
U0101: Lost communication with TCM (verify communication) |
Required Sensors/Components (Main) |
ECM |
Required Sensors/Components (Related) |
- |
Frequency of Operation |
Continuous |
Duration |
1.25 seconds |
MIL Operation |
Immediate |
Sequence of Operation |
None |
TYPICAL ENABLING CONDITIONS
Monitor runs whenever the following DTCs are not stored |
None |
All of the following conditions are met |
- |
Battery voltage |
10 V or higher |
Engine switch |
On (IG) |
Starter |
Off |
TYPICAL MALFUNCTION THRESHOLDS
Communication signal |
Lost communication with transmission control unit |
CONFIRMATION DRIVING PATTERN
HINT:
- After repair has been completed, clear the DTC and then check that the vehicle has returned to normal by performing the following All Readiness check procedure.
Click here

- When clearing the permanent DTCs, refer to the "CLEAR PERMANENT DTC" procedure.
Click here
- Connect the Techstream to the DLC3.
- Turn the engine switch on (IG).
- Turn the Techstream on.
- Clear the DTCs (even if no DTCs are stored, perform the clear DTC procedure).
- Turn the engine switch off and wait for at least 30 seconds.
- Turn the engine switch on (IG).
- Turn the Techstream on.
- Wait 5 seconds or more [A].
- Enter the following menus: Powertrain / Engine / Trouble Codes [B].
- Read the DTCs.
HINT:
- If a pending DTC is output, the system is malfunctioning.
- If a pending DTC is not output, perform the following procedure.
- Enter the following menus: Powertrain / Engine / Utility / All Readiness.
- Input the DTC: U010187.
- Check the DTC judgment result.
Techstream Display
Description
NORMAL
- DTC judgment completed
- System normal
ABNORMAL
- DTC judgment completed
- System abnormal
INCOMPLETE
- DTC judgment not completed
- Perform driving pattern after confirming DTC enabling conditions
HINT:
- If the judgment result is NORMAL, the system is normal.
- If the judgment result is ABNORMAL, the system has a malfunction.
- If the judgment result is INCOMPLETE, perform steps [A] through [B] again.
- [A] to [B]: Normal judgment procedure.
The normal judgment procedure is used to complete DTC judgment and also used when clearing permanent DTCs.
- When clearing the permanent DTCs, do not disconnect the cable from the battery terminal or attempt to clear the DTCs during this procedure, as doing so will clear the universal trip and normal judgment histories.
HINT:
Read freeze frame data using the Techstream. The ECM records vehicle and driving condition information as freeze frame data the moment a DTC is stored. When troubleshooting, freeze frame data can help determine if the vehicle was moving or stationary, if the engine was warmed up or not, if the air fuel ratio was lean or rich, and other data from the time the malfunction occurred.
PROCEDURE
CHECK ANY OTHER DTCS OUTPUT (IN ADDITION TO DTC U010187)
(a) Connect the Techstream to the DLC3.
(b) Turn the engine switch on (IG).
(c) Turn the Techstream on.
(d) Enter the following menus: System Select / Health Check.
(e) Read the DTCs.
Result | Proceed to |
|---|---|
DTC U010187 is output |
A |
DTC U010187 and other DTCs are output |
B |
HINT:
If any DTCs other than U010187 are output, troubleshoot those DTCs first.
| A |  |
REPLACE ECM |
| B | |
GO TO DTC CHART |
Lost Communication with Instrument Panel Cluster (IPC) Control Module Missing Message (U015587)
DESCRIPTION
The ECM and combination meter assembly send and receive signals via CAN communication.
If a communication error occurs between the ECM and combination meter assembly, the ECM illuminates the MIL and stores this DTC.
DTC No. | Detection Item | DTC Detection Condition | Trouble Area | MIL | Memory | Note |
|---|---|---|---|---|---|---|
U015587 |
Lost Communication with Instrument Panel Cluster (IPC) Control Module Missing Message |
All of the following conditions are met for 2.6 seconds or more (1 trip detection logic).
|
|
Comes on |
DTC stored |
SAE Code: U0155 |
MONITOR STRATEGY
Related DTCs |
U0155: Lost communication with instrument panel cluster control module (verify communication) |
Required Sensors/Components (Main) |
ECM |
Required Sensors/Components (Related) |
- |
Frequency of Operation |
Continuous |
Duration |
2.6 seconds |
MIL Operation |
Immediate |
Sequence of Operation |
None |
TYPICAL ENABLING CONDITIONS
Monitor runs whenever the following DTCs are not stored |
None |
Battery voltage |
10 V or higher |
Engine switch |
On (IG) |
TYPICAL MALFUNCTION THRESHOLDS
Communication signal |
Lost communication with instrument panel cluster control module |
CONFIRMATION DRIVING PATTERN
HINT:
- After repair has been completed, clear the DTC and then check that the vehicle has returned to normal by performing the following All Readiness check procedure.
Click here

- When clearing the permanent DTCs, refer to the "CLEAR PERMANENT DTC" procedure.
Click here
- Connect the Techstream to the DLC3.
- Turn the engine switch on (IG).
- Turn the Techstream on.
- Clear the DTCs (even if no DTCs are stored, perform the clear DTC procedure).
- Turn the engine switch off and wait for at least 30 seconds.
- Turn the engine switch on (IG).
- Turn the Techstream on.
- Wait 5 seconds or more [A].
- Enter the following menus: Powertrain / Engine / Trouble Codes [B].
- Read the DTCs.
HINT:
- If a pending DTC is output, the system is malfunctioning.
- If a pending DTC is not output, perform the following procedure.
- Enter the following menus: Powertrain / Engine / Utility / All Readiness.
- Input the DTC: U015587.
- Check the DTC judgment result.
Techstream Display
Description
NORMAL
- DTC judgment completed
- System normal
ABNORMAL
- DTC judgment completed
- System abnormal
INCOMPLETE
- DTC judgment not completed
- Perform driving pattern after confirming DTC enabling conditions
HINT:
- If the judgment result is NORMAL, the system is normal.
- If the judgment result is ABNORMAL, the system has a malfunction.
- If the judgment result is INCOMPLETE, perform steps [A] through [B] again.
- [A] to [B]: Normal judgment procedure.
The normal judgment procedure is used to complete DTC judgment and also used when clearing permanent DTCs.
- When clearing the permanent DTCs, do not disconnect the cable from the battery terminal or attempt to clear the DTCs during this procedure, as doing so will clear the universal trip and normal judgment histories.
HINT:
Read freeze frame data using the Techstream. The ECM records vehicle and driving condition information as freeze frame data the moment a DTC is stored. When troubleshooting, freeze frame data can help determine if the vehicle was moving or stationary, if the engine was warmed up or not, if the air fuel ratio was lean or rich, and other data from the time the malfunction occurred.
PROCEDURE
GO TO CAN COMMUNICATION SYSTEM
(a) Refer to the CAN Communication System.
Click here
| NEXT |  |
END |
VC Output Circuit
DESCRIPTION
The ECM constantly generates a 5 V power source voltage from the battery voltage supplied to the +B, +B2 (BATT) terminals to operate the microprocessor. The ECM also provides this power to the sensors through the VC output circuit.
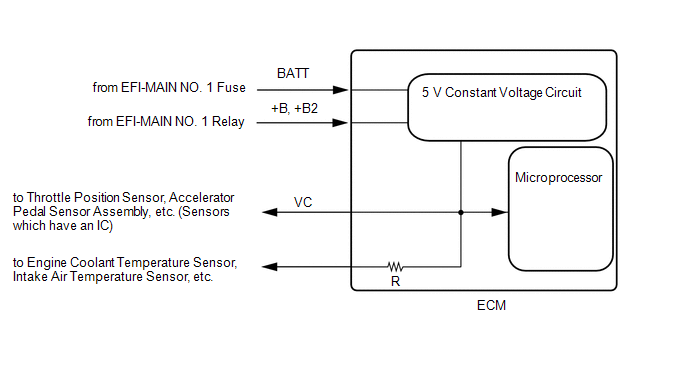
When the VC circuit has a short circuit, the microprocessor in the ECM and sensors that are supplied power through the VC circuit are deactivated because power is not supplied from the VC circuit. When the system is in this condition, it will not start.
WIRING DIAGRAM
- For the circuit diagram of the ECM power source refer to the ECM power source circuit.
Click here

- VC Output Circuit
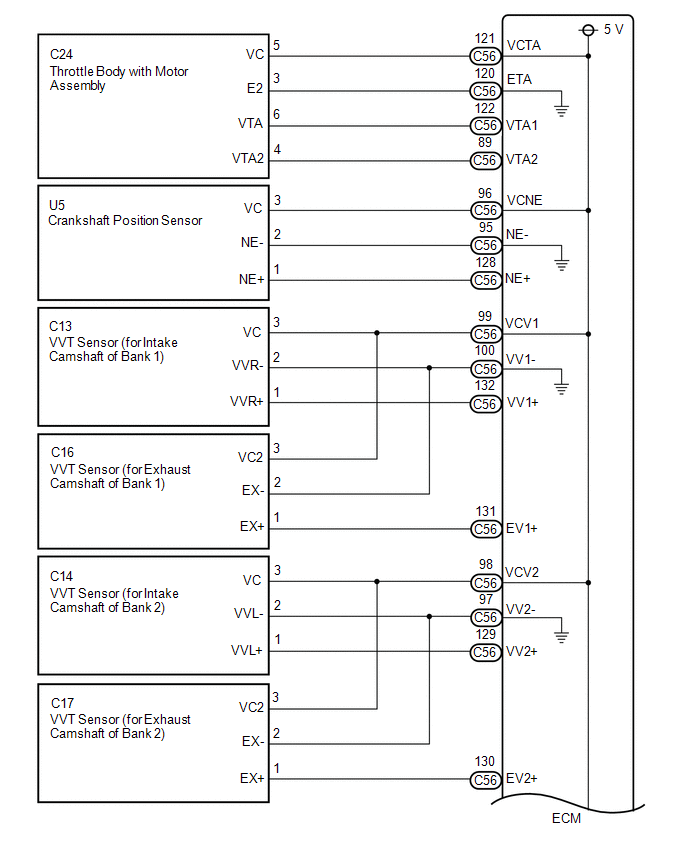
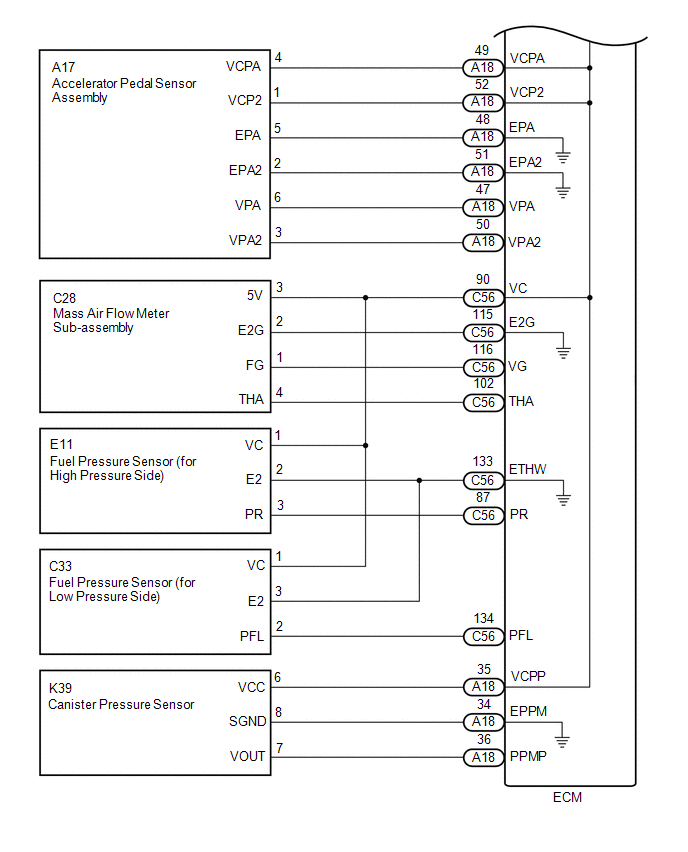
NOTICE:
Check the fuses for circuits related to this system before performing the following inspection procedure.
PROCEDURE
CHECK CONNECTION BETWEEN TECHSTREAM AND ECM
(a) Connect the Techstream to the DLC3.
(b) Turn the engine switch on (IG).
(c) Turn the Techstream on.
(d) Check the communication between the Techstream and ECM.
HINT:
It can be checked using the "Engine" item of the Data List.
Result | Proceed to |
|---|---|
Communication is not possible |
A |
Communication is possible |
B |
| B |  |
PROCEED TO NEXT SUSPECTED AREA SHOWN IN PROBLEM SYMPTOMS TABLE |
|

CHECK EFI NO. 1 FUSE VOLTAGE
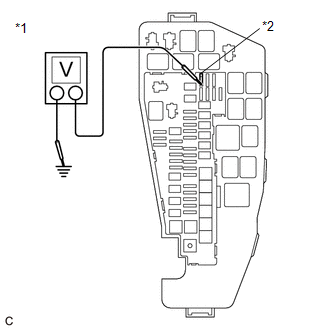
*1 |
No. 1 Engine Room Relay Block and No. 1 Junction Block Assembly |
*2 |
EFI NO. 1 Fuse |
(a) Turn the engine switch on (IG).
(b) Measure the voltage according to the value(s) in the table below.
Standard Voltage:
Tester Connection | Condition | Specified Condition |
|---|---|---|
1 (EFI NO. 1 fuse) - Body ground |
Engine switch on (IG) |
11 to 14 V |
HINT:
- Check the fuse with it installed to the No. 1 engine room relay block and No. 1 junction block assembly.
- If the result is not as specified, since current is not flowing to the +B and +B2 terminals of the ECM, the system may not be started.
| NG | |
GO TO ECM POWER SOURCE CIRCUIT |
|
CHECK CONNECTION BETWEEN TECHSTREAM AND ECM (THROTTLE POSITION SENSOR)
(a) Disconnect the throttle body with motor assembly connector.
(b) Turn the engine switch on (IG).
(c) Turn the Techstream on.
(d) Check the communication between the Techstream and ECM.
HINT:
It can be checked using the "Engine" item of the Data List.
Result | Proceed to |
|---|---|
Communication is not possible |
A |
Communication is possible |
B |
HINT:
Perform "Inspection After Repair" after replacing the throttle body with motor assembly.
Click here
| B | |
REPLACE THROTTLE BODY WITH MOTOR ASSEMBLY |
|
CHECK CONNECTION BETWEEN TECHSTREAM AND ECM (ACCELERATOR PEDAL POSITION SENSOR)
(a) Disconnect the accelerator pedal sensor assembly connector.
(b) Turn the engine switch on (IG).
(c) Turn the Techstream on.
(d) Check the communication between the Techstream and ECM.
HINT:
It can be checked using the "Engine" item of the Data List.
Result | Proceed to |
|---|---|
Communication is not possible |
A |
Communication is possible |
B |
| B | |
REPLACE ACCELERATOR PEDAL SENSOR ASSEMBLY |
|
CHECK CONNECTION BETWEEN TECHSTREAM AND ECM (CRANKSHAFT POSITION SENSOR)
(a) Disconnect the crankshaft position sensor connector.
(b) Turn the engine switch on (IG).
(c) Turn the Techstream on.
(d) Check the communication between the Techstream and ECM.
HINT:
It can be checked using the "Engine" item of the Data List.
Result | Proceed to |
|---|---|
Communication is not possible |
A |
Communication is possible |
B |
| B | |
REPLACE CRANKSHAFT POSITION SENSOR |
|
CHECK CONNECTION BETWEEN TECHSTREAM AND ECM (VVT SENSOR (FOR INTAKE CAMSHAFT OF BANK 1))
(a) Disconnect the VVT sensor (for intake camshaft of bank 1) connector.
(b) Turn the engine switch on (IG).
(c) Turn the Techstream on.
(d) Check the communication between the Techstream and ECM.
HINT:
It can be checked using the "Engine" item of the Data List.
Result | Proceed to |
|---|---|
Communication is not possible |
A |
Communication is possible |
B |
| B | |
REPLACE VVT SENSOR (FOR INTAKE CAMSHAFT OF BANK 1) |
|
CHECK CONNECTION BETWEEN TECHSTREAM AND ECM (VVT SENSOR (FOR INTAKE CAMSHAFT OF BANK 2))
(a) Disconnect the VVT sensor (for intake camshaft of bank 2) connector.
(b) Turn the engine switch on (IG).
(c) Turn the Techstream on.
(d) Check the communication between the Techstream and ECM.
HINT:
It can be checked using the "Engine" item of the Data List.
Result | Proceed to |
|---|---|
Communication is not possible |
A |
Communication is possible |
B |
| B | |
REPLACE VVT SENSOR (FOR INTAKE CAMSHAFT OF BANK 2) |
|
CHECK CONNECTION BETWEEN TECHSTREAM AND ECM (VVT SENSOR (FOR EXHAUST CAMSHAFT OF BANK 1))
(a) Disconnect the VVT sensor (for exhaust camshaft of bank 1) connector.
(b) Turn the engine switch on (IG).
(c) Turn the Techstream on.
(d) Check the communication between the Techstream and ECM.
HINT:
It can be checked using the "Engine" item of the Data List.
Result | Proceed to |
|---|---|
Communication is not possible |
A |
Communication is possible |
B |
| B | |
REPLACE VVT SENSOR (FOR EXHAUST CAMSHAFT OF BANK 1) |
|
CHECK CONNECTION BETWEEN TECHSTREAM AND ECM (VVT SENSOR (FOR EXHAUST CAMSHAFT OF BANK 2))
(a) Disconnect the VVT sensor (for exhaust camshaft of bank 2) connector.
(b) Turn the engine switch on (IG).
(c) Turn the Techstream on.
(d) Check the communication between the Techstream and ECM.
HINT:
It can be checked using the "Engine" item of the Data List.
Result | Proceed to |
|---|---|
Communication is not possible |
A |
Communication is possible |
B |
| B | |
REPLACE VVT SENSOR (FOR EXHAUST CAMSHAFT OF BANK 2) |
|
CHECK CONNECTION BETWEEN TECHSTREAM AND ECM (FUEL PRESSURE SENSOR (FOR HIGH PRESSURE SIDE))
(a) Disconnect the fuel pressure sensor (for high pressure side) connector.
(b) Turn the engine switch on (IG).
(c) Turn the Techstream on.
(d) Check the communication between the Techstream and ECM.
HINT:
It can be checked using the "Engine" item of the Data List.
Result | Proceed to |
|---|---|
Communication is not possible |
A |
Communication is possible |
B |
HINT:
Perform "Inspection After Repair" after replacing the fuel pressure sensor (for high pressure side).
Click here
| B | |
REPLACE FUEL DELIVERY PIPE WITH SENSOR ASSEMBLY LH (FUEL PRESSURE SENSOR (FOR HIGH PRESSURE SIDE)) |
|
CHECK CONNECTION BETWEEN TECHSTREAM AND ECM (FUEL PRESSURE SENSOR (FOR LOW PRESSURE SIDE))
(a) Disconnect the fuel pressure sensor (for low pressure side) connector.
(b) Turn the engine switch on (IG).
(c) Turn the Techstream on.
(d) Check the communication between the Techstream and ECM.
HINT:
It can be checked using the "Engine" item of the Data List.
Result | Proceed to |
|---|---|
Communication is not possible |
A |
Communication is possible |
B |
HINT:
Perform "Inspection After Repair" after replacing the fuel pressure sensor (for low pressure side).
Click here
| B | |
REPLACE FUEL DELIVERY PIPE RH (FUEL PRESSURE SENSOR (FOR LOW PRESSURE SIDE)) |
|
CHECK CONNECTION BETWEEN TECHSTREAM AND ECM (MASS AIR FLOW METER SUB-ASSEMBLY)
(a) Disconnect the mass air flow meter sub-assembly connector.
(b) Turn the engine switch on (IG).
(c) Turn the Techstream on.
(d) Check the communication between the Techstream and ECM.
HINT:
It can be checked using the "Engine" item of the Data List.
Result | Proceed to |
|---|---|
Communication is not possible |
A |
Communication is possible |
B |
| B | |
REPLACE MASS AIR FLOW METER SUB-ASSEMBLY |
|
CHECK CONNECTION BETWEEN TECHSTREAM AND ECM (CANISTER PUMP MODULE)
(a) Disconnect the canister pump module connector.
(b) Turn the engine switch on (IG).
(c) Turn the Techstream on.
(d) Check the communication between the Techstream and ECM.
HINT:
It can be checked using the "Engine" item of the Data List.
Result | Proceed to |
|---|---|
Communication is not possible |
A |
Communication is possible |
B |
| B | |
REPLACE CANISTER PUMP MODULE |
|
CHECK HARNESS AND CONNECTOR
(a) Disconnect the throttle body with motor assembly connector.
(b) Disconnect the accelerator pedal sensor assembly connector.
(c) Disconnect the crankshaft position sensor connector.
(d) Disconnect the VVT sensor (for intake camshaft of bank 1) connector.
(e) Disconnect the VVT sensor (for intake camshaft of bank 2) connector.
(f) Disconnect the VVT sensor (for exhaust camshaft of bank 1) connector.
(g) Disconnect the VVT sensor (for exhaust camshaft of bank 2) connector.
(h) Disconnect the fuel pressure sensor (for high pressure side) connector.
(i) Disconnect the fuel pressure sensor (for low pressure side) connector.
(j) Disconnect the mass air flow meter sub-assembly connector.
(k) Disconnect the ECM connectors.
(l) Disconnect the canister pump module connector.
(m) Measure the resistance according to the value(s) in the table below.
Standard Resistance:
Tester Connection | Condition | Specified Condition |
|---|---|---|
C56-121 (VCTA) - Body ground |
Always |
10 kΩ or higher |
A18-49 (VCPA) - Body ground |
Always |
10 kΩ or higher |
A18-52 (VCP2) - Body ground |
Always |
10 kΩ or higher |
C56-96 (VCNE) - Body ground |
Always |
10 kΩ or higher |
C56-99 (VCV1) - Body ground |
Always |
10 kΩ or higher |
C56-98 (VCV2) - Body ground |
Always |
10 kΩ or higher |
C56-90 (VC) - Body ground |
Always |
10 kΩ or higher |
A18-35 (VCPP) - Body ground |
Always |
10 kΩ or higher |
(n) Measure the resistance according to the value(s) in the table below.
HINT:
Remove the EFI-MAIN NO. 2 and EFI-MAIN NO. 3 relays connected between the checked terminals as the coil inside the relay influences the measurement value.
Standard Resistance:
Tester Connection | Condition | Specified Condition |
|---|---|---|
A18-2 (+B) - 1 (EFI NO. 1 fuse) |
Always |
Below 1 Ω |
A18-3 (+B2) - 1 (EFI NO. 1 fuse) |
Always |
Below 1 Ω |
A18-2 (+B) - Body ground |
Always |
10 kΩ or higher |
A18-3 (+B2) - Body ground |
Always |
10 kΩ or higher |
| OK | |
REPLACE ECM |
| NG | |
REPAIR OR REPLACE HARNESS OR CONNECTOR |