ECM Power Source Circuit. EVAP System. Fail-safe Chart
ECM Power Source Circuit
DESCRIPTION
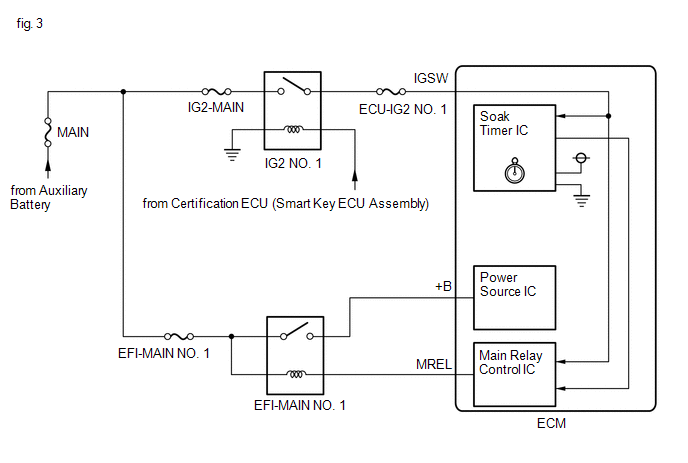
When the power switch is turned to on (IG), the auxiliary battery voltage is applied to IGSW of the ECM. When the transistor in the MREL circuit operates, current flows from the auxiliary battery to ground through the drive circuit of the EFI-MAIN NO. 1 relay, thus operating the relay which supplies power to the +B and +B2 terminals of the ECM.
WIRING DIAGRAM
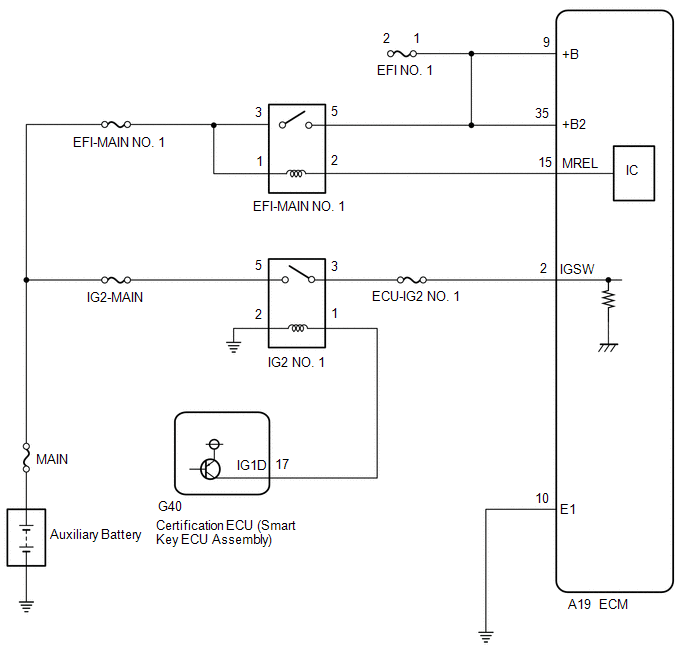
NOTICE:
Inspect the fuses for circuits related to this system before performing the following procedure.
PROCEDURE
CHECK HARNESS AND CONNECTOR (ECM - BODY GROUND)
(a) Disconnect the ECM connector.
(b) Measure the resistance according to the value(s) in the table below.
Standard Resistance:
Tester Connection | Condition | Specified Condition |
|---|---|---|
A19-10 (E1) - Body ground |
Always |
Below 1 Ω |
| NG |  |
REPAIR OR REPLACE HARNESS OR CONNECTOR |
|

CHECK TERMINAL VOLTAGE (IGSW TERMINAL VOLTAGE)
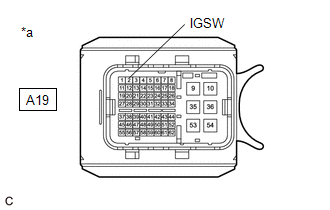
*a |
Front view of wire harness connector (to ECM) |
(a) Disconnect the ECM connector.
(b) Turn the power switch on (IG).
(c) Measure the voltage according to the value(s) in the table below.
Standard Voltage:
Tester Connection | Condition | Specified Condition |
|---|---|---|
A19-2 (IGSW) - Body ground |
Power switch on (IG) |
11 to 14 V |
| NG | |
GO TO STEP 6 |
|
INSPECT EFI-MAIN NO. 1 RELAY
(a) Inspect the EFI-MAIN NO. 1 relay.
Click here 
| NG | |
REPLACE EFI-MAIN NO. 1 RELAY |
|
CHECK HARNESS AND CONNECTOR (EFI-MAIN NO. 1 RELAY - ECM)
(a) Remove the EFI-MAIN NO. 1 relay from the No. 1 engine room relay block and No. 1 junction block assembly.
(b) Remove the VVT, EFI-MAIN NO. 2 and EFI-MAIN NO. 3 relays from the No. 1 engine room relay block and No. 1 junction block assembly.
HINT:
Remove the VVT, EFI-MAIN NO. 2 and EFI-MAIN NO. 3 relays connected between the checked terminals as the coil inside the relay influences the measurement value.
(c) Disconnect the ECM connector.
(d) Measure the resistance according to the value(s) in the table below.
Standard Resistance:
Tester Connection | Condition | Specified Condition |
|---|---|---|
2 (EFI-MAIN NO. 1 relay) - A19-15 (MREL) |
Always |
Below 1 Ω |
5 (EFI-MAIN NO. 1 relay) - A19-9 (+B) |
Always |
Below 1 Ω |
5 (EFI-MAIN NO. 1 relay) - A19-35 (+B2) |
Always |
Below 1 Ω |
2 (EFI-MAIN NO. 1 relay) or A19-15 (MREL) - Body ground and other terminals |
Always |
10 kΩ or higher |
5 (EFI-MAIN NO. 1 relay), A19-9 (+B) or A19-35 (+B2) - Body ground and other terminals |
Always |
10 kΩ or higher |
| NG | |
REPAIR OR REPLACE HARNESS OR CONNECTOR |
|
CHECK TERMINAL VOLTAGE (POWER SOURCE OF EFI-MAIN NO. 1 RELAY)
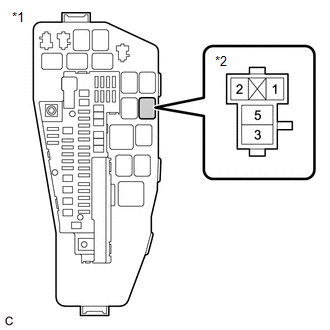
*1 |
No. 1 Engine Room Relay Block and No. 1 Junction Block Assembly |
*2 |
EFI-MAIN NO. 1 Relay |
(a) Remove the EFI-MAIN NO. 1 relay from the No. 1 engine room relay block and No. 1 junction block assembly.
(b) Measure the voltage according to the value(s) in the table below.
Standard Voltage:
Tester Connection | Condition | Specified Condition |
|---|---|---|
3 (EFI-MAIN NO. 1 relay) - Body ground |
Always |
11 to 14 V |
1 (EFI-MAIN NO. 1 relay) - Body ground |
Always |
11 to 14 V |
| OK | |
PROCEED TO NEXT SUSPECTED AREA SHOWN IN PROBLEM SYMPTOMS TABLE |
| NG | |
REPAIR OR REPLACE HARNESS OR CONNECTOR (AUXILIARY BATTERY - EFI-MAIN NO. 1 RELAY) |
INSPECT IG2 NO. 1 RELAY
(a) Inspect the IG2 NO. 1 relay.
Click here
| NG | |
REPLACE IG2 NO. 1 RELAY |
|
CHECK HARNESS AND CONNECTOR (IG2 NO. 1 RELAY - ECM)
(a) Remove the IG2 NO. 1 relay from the No. 1 engine room relay block and No. 1 junction block assembly.
(b) Disconnect the ECM connector.
(c) Measure the resistance according to the value(s) in the table below.
Standard Resistance:
Tester Connection | Condition | Specified Condition |
|---|---|---|
3 (IG2 NO. 1 relay) - A19-2 (IGSW) |
Always |
Below 1 Ω |
3 (IG2 NO. 1 relay) or A19-2 (IGSW) - Body ground and other terminals |
Always |
10 kΩ or higher |
| NG | |
REPAIR OR REPLACE HARNESS OR CONNECTOR |
|
CHECK TERMINAL VOLTAGE (POWER SOURCE OF IG2 NO. 1 RELAY)
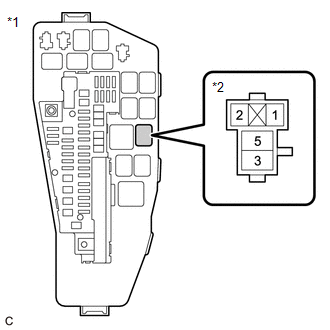
*1 |
No. 1 Engine Room Relay Block and No. 1 Junction Block Assembly |
*2 |
IG2 NO. 1 Relay |
(a) Remove the IG2 NO. 1 relay from the No. 1 engine room relay block and No. 1 junction block assembly.
(b) Measure the voltage according to the value(s) in the table below.
Standard Voltage:
Tester Connection | Condition | Specified Condition |
|---|---|---|
5 (IG2 NO. 1 relay) - Body ground |
Always |
11 to 14 V |
| NG | |
REPAIR OR REPLACE HARNESS OR CONNECTOR (AUXILIARY BATTERY - IG2 NO. 1 RELAY) |
|
CHECK HARNESS AND CONNECTOR (IG2 NO. 1 RELAY - BODY GROUND)
(a) Remove the IG2 NO. 1 relay from the No. 1 engine room relay block and No. 1 junction block assembly.
(b) Measure the resistance according to the value(s) in the table below.
Standard Resistance:
Tester Connection | Condition | Specified Condition |
|---|---|---|
2 (IG2 NO. 1 relay) - Body ground |
Always |
Below 1 Ω |
| NG | |
REPAIR OR REPLACE HARNESS OR CONNECTOR |
|
CHECK HARNESS AND CONNECTOR (CERTIFICATION ECU (SMART KEY ECU ASSEMBLY) - IG2 NO. 1 RELAY)
(a) Disconnect the certification ECU (smart key ECU assembly) connector.
(b) Remove the IG2 NO. 1 relay from the No. 1 engine room relay block and No. 1 junction block assembly.
(c) Measure the resistance according to the value(s) in the table below.
Standard Resistance:
Tester Connection | Condition | Specified Condition |
|---|---|---|
G40-17 (IG1D) - 1 (IG2 NO. 1 relay) |
Always |
Below 1 Ω |
G40-17 (IG1D) or 1 (IG2 NO. 1 relay) - Body ground and other terminals |
Always |
10 kΩ or higher |
| OK | |
GO TO SMART KEY SYSTEM |
| NG | |
REPAIR OR REPLACE HARNESS OR CONNECTOR |
EVAP System
RELATED DTCS
DTC No. | Monitoring Item | Link |
|---|---|---|
P043E00 |
Reference orifice low flow |
 |
P043F00 |
Reference orifice high flow |
|
P04417E |
Purge VSV stuck open |
|
P04417F |
Purge VSV stuck closed |
|
P04419C |
Insufficient purge flow |
|
P045011 |
Canister pressure sensor (built into canister pump module) voltage low |
|
P045015 |
Canister pressure sensor (built into canister pump module) voltage high |
|
P04502F |
Canister pressure sensor (built into canister pump module) signal noise |
|
P142000 |
Small or 0.02 inch leak from canister |
|
P142100 |
Gross leak from canister |
|
P142200 |
Small or 0.02 inch leak from fuel tank |
|
P142300 |
Gross leak from fuel tank |
|
P145011 |
Fuel tank pressure sensor voltage low |
|
P145015 |
Fuel tank pressure sensor voltage high |
|
P14502A |
Fuel tank pressure sensor signal noise |
|
P14502F |
Fuel tank pressure sensor signal fixed/flat |
|
P24007E |
Leak detection pump (built into canister pump module) stuck on |
|
P24007F |
Leak detection pump (built into canister pump module) stuck off |
|
P24187E |
Vent valve (built into canister pump module) stuck closed |
|
P24187F |
Vent valve (built into canister pump module) stuck open (vent) |
|
P24507E |
Fuel vapor-containment valve stuck open |
|
P24517F |
Fuel vapor-containment valve stuck closed |
|
P261029 |
Soak timer (built into ECM) |
|
P261093 |
DESCRIPTION
While the engine is running, if predetermined conditions (closed loop, etc.) are met, the purge VSV is opened by the ECM and stored fuel vapors in the canister are purged to the intake manifold. The ECM will change the duty cycle ratio of the purge VSV to control purge flow volume.
Purge flow volume is also determined by the intake manifold pressure. Atmospheric pressure is allowed to enter the canister through the vent valve to ensure that purge flow is maintained when negative pressure (vacuum) is applied to the canister.
The ECM monitors the condition of both the key-off monitor and purge flow monitor to ensure proper operation of the EVAP system.
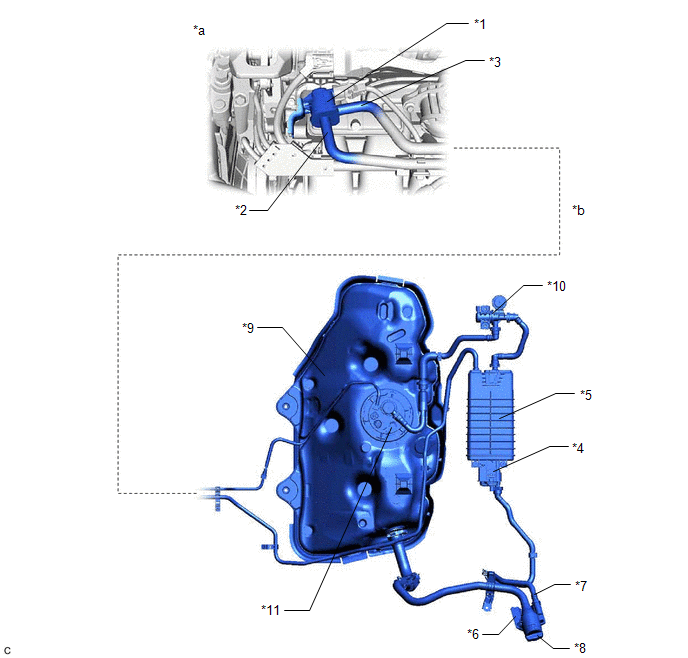
*1 |
Purge VSV |
*2 |
Fuel Vapor Feed Hose Assembly (EVAP Hose) (to Intake Manifold) |
*3 |
Fuel Vapor Feed Hose Assembly (EVAP Hose) (from Canister) |
*4 |
Canister Pump Module - Canister Pressure Sensor - Leak Detection Pump - Vent Valve |
*5 |
Canister |
*6 |
Canister Filter |
*7 |
Air Inlet Port |
*8 |
Fuel Tank Cap Assembly |
*9 |
Fuel Tank Assembly |
*10 |
Fuel Vapor-containment Valve |
*11 |
Fuel Tank Pressure Sensor |
- |
- |
*a |
Location of EVAP (Evaporative Emission) System |
*b |
Purge Line |
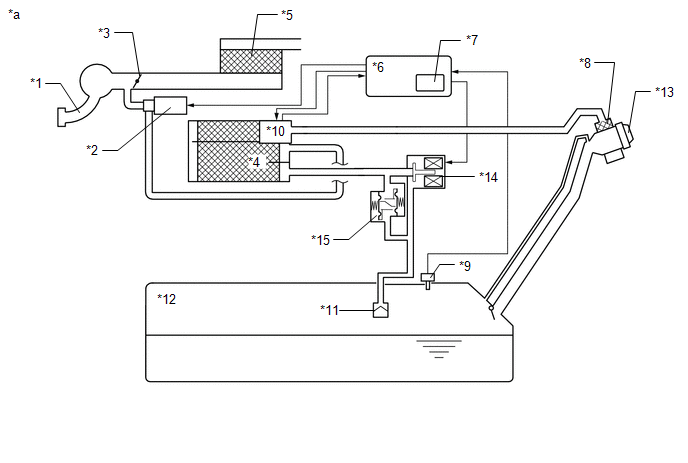
*1 |
Intake Manifold |
*2 |
Purge VSV |
*3 |
Throttle Valve |
*4 |
Canister |
*5 |
Air Cleaner |
*6 |
ECM |
*7 |
Soak Timer |
*8 |
Canister Filter |
*9 |
Fuel Tank Pressure Sensor |
*10 |
Canister Pump Module - Canister Pressure Sensor - Leak Detection Pump - Vent Valve |
*11 |
Cut-off Valve |
*12 |
Fuel Tank Assembly |
*13 |
Fuel Tank Cap Assembly |
*14 |
Fuel Vapor-containment Valve |
*15 |
Fuel Outlet Valve (Relief Valve) |
- |
- |
*a |
EVAP System Circuit |
- |
- |
Component | Operation |
|---|---|
Canister |
Contains activated charcoal to absorb EVAP (Evaporative Emissions) generated in fuel tank. |
Cut-off valve |
Located in the fuel tank. Valve closes by its own weight when vehicle is overturned to prevent fuel from spilling out. |
Purge VSV (Vacuum Switching Valve) |
Opens or closes line between canister and intake manifold. ECM uses purge VSV to control EVAP purge flow. In order to discharge EVAP absorbed by canister to intake manifold, ECM opens purge VSV. EVAP discharge volume to intake manifold controlled by purge VSV duty cycle (current-carrying time). (Open: on, Close: off) |
Soak timer |
Built into ECM. To ensure accurate EVAP monitor, measures 5 hours (+/-15 min) after power switch is turned off. This allows fuel to cool down, stabilizing EVAP pressure. When approximately 5 hours elapsed, ECM activates (refer to fig. 3). |
Fuel vapor-containment valve |
Opens and closes line between fuel tank and canister. When vehicle is stopped, this valve stays closed to keep fuel vapors in the tank and prevent them from being absorbed by canister. During refueling, valve opens to allow fuel vapors from tank to be absorbed by canister. When the vehicle is being driven, the valve maintains a slight positive pressure in the fuel tank. |
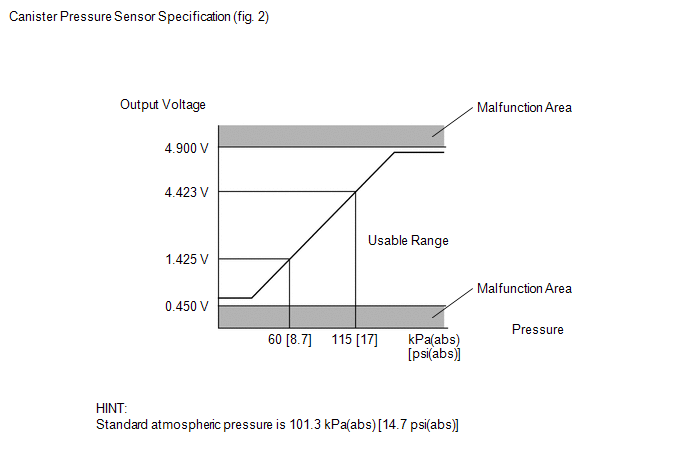
Fuel tank pressure sensor |
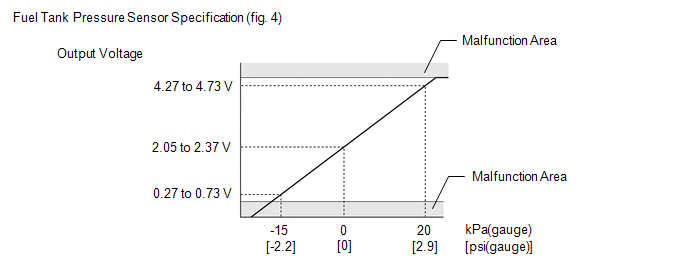
Converts pressure in fuel tank into voltage reading for use by ECM. ECM supplies 5 V to sensor, and uses voltage reading that is output as feedback to allow monitoring of fuel tank pressure (refer to fig. 4). |
Canister pump module |
Consists of (a) to (d) below. Canister pump module cannot be disassembled. |
(a) Vent valve |
Vents and closes EVAP system. When ECM turns valve on, EVAP system is closed. When ECM turns valve off, EVAP system is vented. Negative pressure (vacuum) is created in EVAP system to check for EVAP leaks by closing purge VSV, turning on vent valve (closing it) and operating leak detection pump (refer to fig. 1). |
(b) Canister pressure sensor |
Indicates pressure as voltages. ECM supplies regulated 5 V to pressure sensor, and uses feedback from sensor to monitor EVAP system pressure (refer to fig. 2). |
(c) Leak detection pump |
Creates negative pressure (vacuum) in EVAP system for leak check. |
(d) Reference orifice |
Has opening with 0.02 inch diameter. Vacuum is produced through orifice by closing purge VSV, turning off vent valve and operating leak detection pump, to monitor reference pressure. Reference pressure is used when checking for small EVAP leaks. |
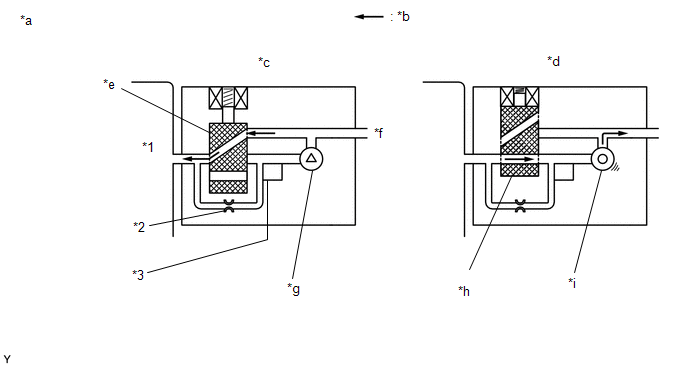
*1 |
Canister |
*2 |
Reference Orifice (0.02 Inch) |
*3 |
Canister Pressure Sensor |
- |
- |
*a |
Canister Pump Module (fig. 1) |
*b |
Airflow |
*c |
Condition: Purge Flow |
*d |
Condition: Leak Check |
*e |
Vent Valve: off (vent) |
*f |
to Canister Filter (Atmosphere) |
*g |
Leak Detection Pump: off |
*h |
Vent Valve: on (closed) |
*i |
Leak Detection Pump: on |
- |
- |
Key-off monitor
This monitor checks for EVAP (evaporative emission) system leaks and canister pump module malfunctions. The monitor starts 5 hours* after the power switch is turned off. At least 5 hours are required for the fuel to cool down to stabilize the EVAP pressure, thus making the EVAP system monitor more accurate.
The leak detection pump creates negative pressure (vacuum) in the EVAP system and the pressure is measured. Finally, the ECM monitors for leaks from the EVAP system, and malfunctions in both the canister pump module and purge VSV based on the EVAP pressure.
HINT:
*: If the engine coolant temperature is not less than 35 °C 5 hours after the power switch is turned off, the monitor check starts 2 hours later. If it is still not less than 35 °C 7 hours after the power switch is turned off, the monitor check starts 2.5 hours later.
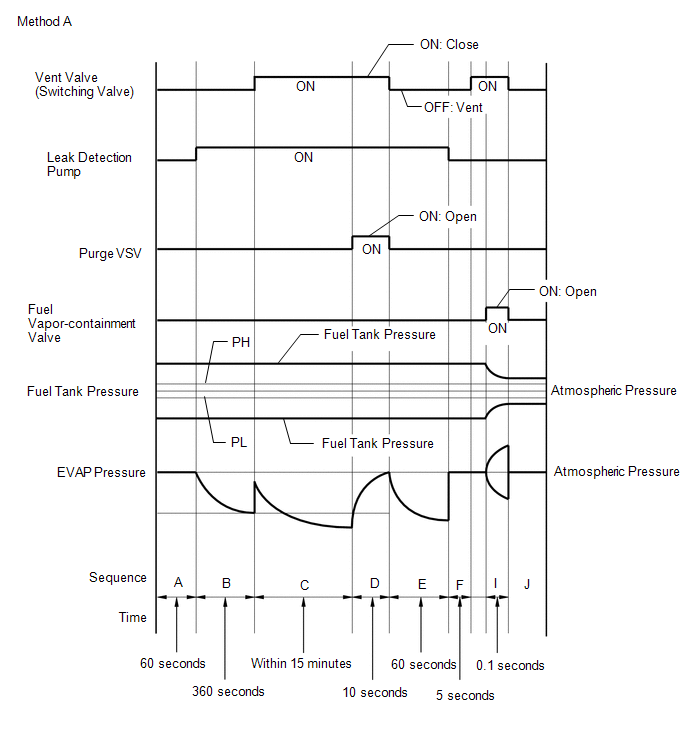
(a) If the fuel tank pressure is higher or lower than the atmospheric pressure, the system determines that there are no leaks in the closed tank system and the system will check for leaks from the piping and canister between the purge VSV and canister pump module. (Method A)
(b) If the fuel tank pressure is almost the same as the atmospheric pressure, vacuum will be allowed to enter the fuel tank and the system will check for leaks from the fuel tank after checking for leaks from the canister. (Method B)
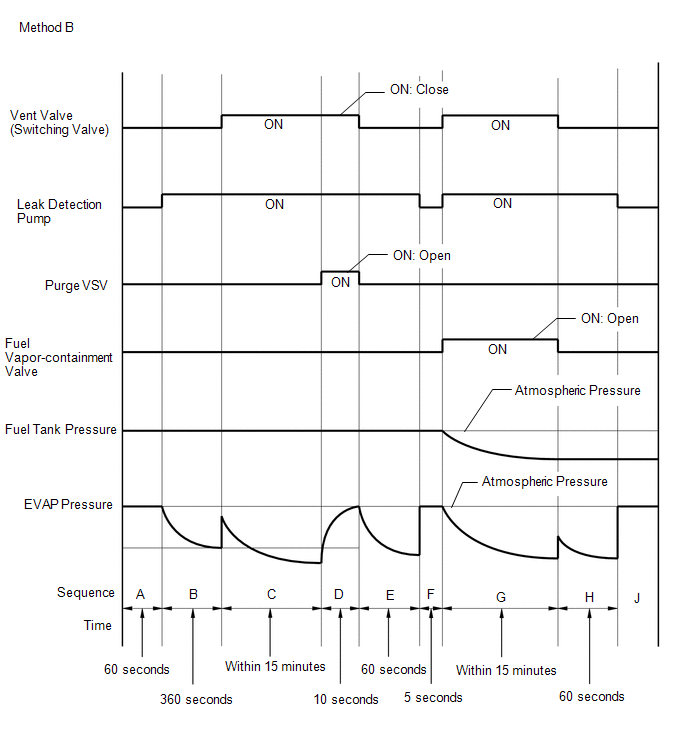
Sequence | Operation | Description | Duration |
|---|---|---|---|
- |
ECM activation |
Activated by soak timer, 5 hours (7 or 9.5 hours) after power switch turned off. |
- |
A |
Atmospheric pressure measurement |
Vent valve turned off (vent) and EVAP system pressure is measured by ECM in order to register atmospheric pressure. If pressure in EVAP system is not between 70 and 110 kPa(abs) [10.2 and 16 psi(abs)], ECM cancels EVAP system monitor. |
60 seconds |
B |
First reference pressure measurement |
In order to determine reference pressure, leak detection pump creates negative pressure (vacuum) through reference orifice and then ECM checks if leak detection pump and vent valve operate normally. |
360 seconds |
C |
EVAP system pressure measurement |
Vent valve is turned on (closed) to shut EVAP system. Negative pressure (vacuum) is created in EVAP system, and EVAP system pressure is then measured. Write down measured values as they will be used in leak check. If EVAP pressure does not stabilize within 15 minutes, ECM cancels EVAP system monitor. |
15 minutes |
D |
Purge VSV monitor |
Purge VSV opens and then EVAP system pressure is measured by ECM. Large increase indicates normal. |
10 seconds |
E |
Second reference pressure measurement |
After second reference pressure measurement, leak check is performed by comparing first and second reference pressure. If stabilized system pressure is higher than second reference pressure, ECM determines that EVAP system has a leak. |
60 seconds |
F |
Resetting |
Fuel tank pressure is compared with atmospheric pressure. If tank pressure is higher than PH or lower than PL, ECM determines that EVAP system is normal and runs sequence I in method A. If tank pressure is around atmospheric pressure, ECM performs sequence G in method B. |
5 seconds |
G |
Fuel tank pressure measurement |
Vent valve is turned on (closed). Fuel vapor-containment valve opens to allow negative pressure to enter the fuel tank and fuel tank pressure is measured. Write down measured values because they will be used in leak check. If fuel tank pressure does not stabilize within 15 minutes, ECM stops monitoring. |
15 minutes* |
H |
Third reference pressure measurement |
After third reference pressure measurement, leak check of fuel tank is performed. If recorded fuel tank pressure is higher than third reference pressure, ECM determines that EVAP system has a leak. |
60 seconds |
I |
Fuel vapor-containment valve stuck closed check |
Fuel vapor-containment valve is opened for a certain amount of time to check whether the valve is stuck closed. |
0.1 seconds |
J |
Final check |
Atmospheric pressure is measured and then monitoring result is recorded by ECM. |
- |
HINT:
*: If there is only a small amount of fuel in the fuel tank assembly, stabilizing the EVAP pressure takes longer than usual.
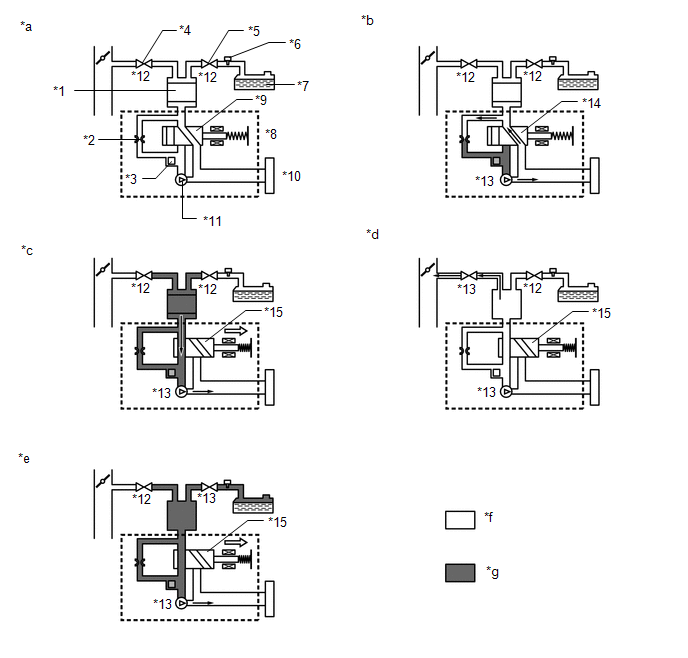
*1 |
Canister |
*2 |
Reference Orifice (0.02 inch) |
*3 |
Canister Pressure Sensor |
*4 |
Purge VSV |
*5 |
Fuel Vapor-containment Valve |
*6 |
Fuel Tank Pressure Sensor |
*7 |
Fuel Tank Assembly |
*8 |
Canister Pump Module |
*9 |
Vent Valve: OFF (Vent) |
*10 |
Canister Filter |
*11 |
Leak Detection Pump: OFF |
*12 |
OFF |
*13 |
ON |
*14 |
OFF (Vent) |
*15 |
ON (Closed) |
- |
- |
*a |
Operation A, F |
*b |
Operation B, E, H |
*c |
Operation C |
*d |
Operation D |
*e |
Operation G |
*f |
Atmospheric Pressure |
*g |
Negative Pressure |
- |
- |
Purge flow monitor
The purge flow monitor consists of the 2 monitors. The 1st monitor is conducted every time and the 2nd monitor is activated if necessary.
- The 1st monitor
While the engine is running and the purge VSV (Vacuum Switching Valve) is on (open), the ECM monitors the purge flow by measuring the EVAP pressure change. If negative pressure is not created, the ECM begins the 2nd monitor.
- The 2nd monitor
The vent valve is turned on (closed) and the EVAP pressure is then measured. If the variation in the pressure is less than 0.396 kPa [0.0574 psi], the ECM interprets this as the purge VSV being stuck closed, illuminates the MIL and stores DTC P04419C (2 trip detection logic).
- Atmospheric pressure check:
- In order to ensure reliable malfunction detection, the variation in atmospheric pressure, before and after of the purge flow monitor, is measured by the ECM.
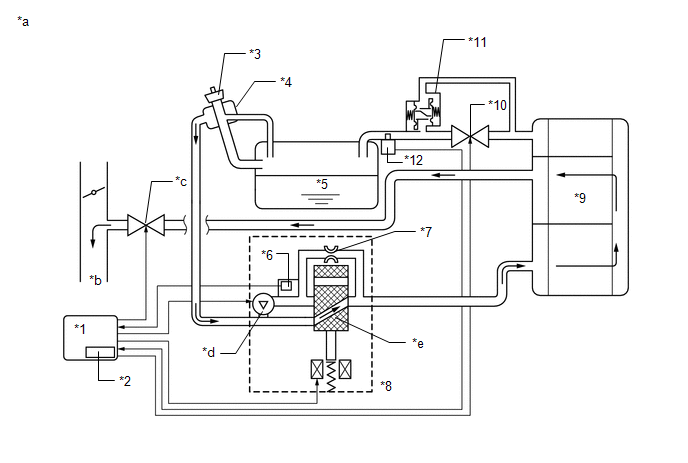
*1 |
ECM |
*2 |
Soak Timer |
*3 |
Fuel Cap |
*4 |
Canister Filter |
*5 |
Fuel Tank Assembly |
*6 |
Canister Pressure Sensor |
*7 |
Reference Orifice (0.02 inch) |
*8 |
Canister Pump Module |
*9 |
Canister |
*10 |
Fuel Vapor-containment Valve |
*11 |
Fuel Outlet Valve (Relief Valve) |
*12 |
Fuel Tank Pressure Sensor |
*a |
EVAP Purge Flow |
*b |
to Intake Manifold |
*c |
Purge VSV (on) |
*d |
Leak Detection Pump (off) |
*e |
Vent Valve (off) |
- |
- |
WIRING DIAGRAM
Refer to DTC P045011.
Click here
NOTICE:
- Inspect the fuses for circuits related to this system before performing the following procedure.
- The Techstream is required to conduct the following diagnostic troubleshooting procedure.
HINT:
- Using the Techstream monitor results enables the EVAP (Evaporative Emission) system to be confirmed.
- Read freeze frame data using the Techstream. The ECM records vehicle and driving condition information as freeze frame data the moment a DTC is stored. When troubleshooting, freeze frame data can help determine if the vehicle was moving or stationary, if the engine was warmed up or not, if the air fuel ratio was lean or rich, and other data from the time the malfunction occurred.
CONFIRMATION DRIVING PATTERN
HINT:
After a repair, check Monitor Status by performing the Key-Off Monitor Confirmation and Purge Flow Monitor Confirmation described below.
KEY-OFF MONITOR CONFIRMATION
NOTICE:
- The Evaporative System Check (Automatic Mode) consists of 9 steps performed automatically by the GTS. It takes a maximum of approximately 40 minutes.
- Do not perform the Evaporative System Check when the fuel tank is more than 90% full because the cut-off valve may be closed, making the fuel tank leak check unavailable.
- Do not start the engine during this operation.
- When the temperature of the fuel is 35 °C or higher, a large amount of vapor forms and any check results become inaccurate. When performing the Evaporative System Check, keep the fuel temperature less than 35 °C.
- Connect the GTS to the DLC3.
- Turn the power switch on (IG).
- Turn the GTS on.
- Clear the DTCs (even if no DTCs are stored, perform the clear DTC procedure).
- Turn the power switch off and wait for at least 30 seconds.
- Turn the power switch on (IG).
- Turn the GTS on.
- Enter the following menus: Powertrain / Engine / Utility / Evaporative System Check / Automatic Mode.
- After the "Evaporative System Check" is completed, check for All Readiness by entering the following menus: Powertrain / Engine / Utility / All Readiness.
- Input the DTC: P043E00, P043F00, P04417E, P04417F, P045011, P045015, P04502F, P142000, P142100, P142200, P142300, P145011, P145015, P14502A, P14502F, P24007E, P24007F, P24187E, P24187F, P24507E or P24517F.
- Check the DTC judgment result.
GTS Display
Description
NORMAL
- DTC judgment completed
- System normal
ABNORMAL
- DTC judgment completed
- System abnormal
INCOMPLETE
- DTC judgment not completed
- Perform driving pattern after confirming DTC enabling conditions
HINT:
- If the judgment result is NORMAL, the system is normal.
- If the judgment result is ABNORMAL, the system is malfunctioning.
PURGE FLOW MONITOR CONFIRMATION (P04419C)
HINT:
Perform this monitor confirmation after the Key-Off Monitor Confirmation shows Complete.
- Connect the GTS to the DLC3.
- Turn the power switch on (IG).
- Turn the GTS on.
- Clear the DTCs (even if no DTCs are stored, perform the clear DTC procedure).
- Turn the power switch off and wait for at least 30 seconds.
- Turn the power switch on (IG).
- Turn the GTS on.
- Put the engine in Inspection Mode (Maintenance Mode).
Click here
- Start the engine and wait 15 minutes or more.
- Enter the following menus: Powertrain / Engine / Trouble Codes.
- Read the pending DTCs.
HINT:
- If a pending DTC is output, the system is malfunctioning.
- If a pending DTC is not output, perform the following procedure.
- Enter the following menus: Powertrain / Engine / Utility / All Readiness.
- Input the DTC: P04419C.
- Check the DTC judgment result.
GTS Display
Description
NORMAL
- DTC judgment completed
- System normal
ABNORMAL
- DTC judgment completed
- System abnormal
INCOMPLETE
- DTC judgment not completed
- Perform driving pattern after confirming DTC enabling conditions
HINT:
- If the judgment result is NORMAL, the system is normal.
- If the judgment result is ABNORMAL, the system is malfunctioning.
MONITOR RESULT
Refer to detailed information in Checking Monitor Status.
Click here
Monitor ID | Test ID | Scaling | Unit | Description |
|---|---|---|---|---|
$3D |
$CB |
Multiply by 0.001 |
kPa |
Test value for leak detection pump stuck OFF |
Monitor ID | Test ID | Scaling | Unit | Description |
|---|---|---|---|---|
$3D |
$CD |
Multiply by 0.001 |
kPa |
Test value for leak detection pump stuck ON |
Monitor ID | Test ID | Scaling | Unit | Description |
|---|---|---|---|---|
$3D |
$CE |
Multiply by 0.001 |
kPa |
Test value for vent valve stuck off |
Monitor ID | Test ID | Scaling | Unit | Description |
|---|---|---|---|---|
$3D |
$CF |
Multiply by 0.001 |
kPa |
Test value for vent valve stuck on |
Monitor ID | Test ID | Scaling | Unit | Description |
|---|---|---|---|---|
$3D |
$D0 |
Multiply by 0.001 |
kPa |
Test value for reference orifice low flow |
Monitor ID | Test ID | Scaling | Unit | Description |
|---|---|---|---|---|
$3D |
$D1 |
Multiply by 0.001 |
kPa |
Test value for reference orifice high flow |
Monitor ID | Test ID | Scaling | Unit | Description |
|---|---|---|---|---|
$3D |
$D4 |
Multiply by 0.001 |
kPa |
Test value for purge VSV stuck closed |
Monitor ID | Test ID | Scaling | Unit | Description |
|---|---|---|---|---|
$3D |
$D5 |
Multiply by 0.001 |
kPa |
Test value for purge VSV stuck open |
Monitor ID | Test ID | Scaling | Unit | Description |
|---|---|---|---|---|
$3D |
$D7 |
Multiply by 0.001 |
kPa |
Test value for purge flow insufficient |
Monitor ID | Test ID | Scaling | Unit | Description |
|---|---|---|---|---|
$3D |
$D8 |
Multiply by 0.001 |
kPa |
Test value for canister small leak |
Monitor ID | Test ID | Scaling | Unit | Description |
|---|---|---|---|---|
$3D |
$D9 |
Multiply by 0.001 |
kPa |
Test value for canister gross leak |
Monitor ID | Test ID | Scaling | Unit | Description |
|---|---|---|---|---|
$3D |
$DA |
Multiply by 0.001 |
kPa |
Test value for fuel tank small leak |
Monitor ID | Test ID | Scaling | Unit | Description |
|---|---|---|---|---|
$3D |
$DB |
Multiply by 0.001 |
kPa |
Test value for fuel tank gross leak |
Monitor ID | Test ID | Scaling | Unit | Description |
|---|---|---|---|---|
$3D |
$DC |
Multiply by 0.001 |
kPa |
Test value for tank closed valve close stuck |
Monitor ID | Test ID | Scaling | Unit | Description |
|---|---|---|---|---|
$3D |
$DD |
Multiply by 0.001 |
kPa |
Test value for tank closed valve open stuck |
PROCEDURE
CONFIRM DTC
(a) Turn the power switch off and wait 10 seconds.
(b) Turn the power switch on (IG).
(c) Turn the power switch off and wait 10 seconds.
(d) Connect the Techstream to the DLC3.
(e) Turn the power switch on (IG).
(f) Turn the Techstream on.
(g) Enter the following menus: Powertrain / Engine / Trouble Codes.
Powertrain > Engine > Trouble Codes(h) Confirm the DTCs and freeze frame data.
EVAP Related DTCsDTC No. | Monitoring Item |
|---|---|
P043E00 |
Reference orifice low flow |
P043F00 |
Reference orifice high flow |
P04417E |
Purge VSV stuck open |
P04417F |
Purge VSV stuck closed |
P04419C |
Insufficient purge flow |
P142000 |
Small leak from canister |
P142100 |
Gross leak from canister |
P142200 |
Small leak from fuel tank |
P142300 |
Gross leak from fuel tank |
P24007E |
Leak detection pump stuck on |
P24007F |
Leak detection pump stuck off |
P24187E |
Vent valve stuck on (closed) |
P24187F |
Vent valve stuck off (vent) |
P24507E |
Fuel vapor-containment valve stuck open |
P24517F |
Fuel vapor-containment valve stuck closed |
Malfunction | Output DTC |
|---|---|
Reference orifice low flow |
P043E00, P043F00, P24007E, P24007F, P24187E |
Reference orifice high flow |
P043E00, P043F00, P24007E, P24007F, P24187E |
Leak detection pump stuck off |
P043E00, P043F00, P24007E, P24007F, P24187E |
Leak detection pump stuck on |
P043E00, P043F00, P24007E, P24007F, P24187E |
Vent valve stuck on (closed) |
P043E00, P043F00, P24007E, P24007F, P24187E |
Vent valve stuck off (vent) |
P24187F |
Insufficient purge flow |
P04419C |
Purge VSV stuck open |
P04417E, P142100 |
Purge VSV stuck closed |
P04417F |
Small leak from canister |
P142000 |
Gross leak from canister |
P04417E, P142100 |
Small leak from fuel tank |
P142200 |
Gross leak from fuel tank |
P142300 |
Fuel vapor-containment valve stuck open |
P142300, P24507E |
Fuel vapor-containment valve stuck closed |
P24517F |
|

CLEAR DTC
(a) Connect the Techstream to the DLC3.
(b) Turn the power switch on (IG).
(c) Turn the Techstream on.
(d) Clear the DTCs.
Powertrain > Engine > Clear DTCs(e) Turn the power switch off and wait for at least 30 seconds.
|
PERFORM EVAPORATIVE SYSTEM CHECK (AUTOMATIC MODE)
NOTICE:
- The Evaporative System Check (Automatic Mode) consists of 9 steps performed automatically by the Techstream. It takes a maximum of approximately 40 minutes.
- Do not perform the Evaporative System Check when the fuel tank is more than 90% full because the cut-off valve may be closed, making the fuel tank leak check unavailable.
- Do not start the engine during this operation.
- When the temperature of the fuel is 35 °C or higher, a large amount of vapor will from and any check result will be inaccurate. When performing the Evaporative System Check, keep the fuel temperature less than 35 °C.
(a) Remove the fuel tank cap assembly and reinstall the fuel tank cap assembly.
(b) Connect the Techstream to the DLC3.
(c) Turn the power switch on (IG).
(d) Turn the Techstream on.
(e) Enter the following menus: Powertrain / Engine / Utility / Evaporative System Check / Automatic Mode.
Powertrain > Engine > UtilityEvaporative System Check
(f) After the Evaporative System Check is completed, check for pending DTCs.
Result | Conclusion | Proceed to |
|---|---|---|
A pending DTC is stored |
A malfunction occurs and troubleshooting can be performed |
A |
A pending DTC is not stored |
No malfunctions occur and it is difficult to perform troubleshooting |
B |
A pending DTC is not stored and any of the current DTCs (P142200, P142300, or P24507E) is stored |
DTCs are stored because the fuel tank cap assembly is not tightened firmly |
C |
| B |  |
GO TO STEP 6 |
| C | |
END |
|
IDENTIFY TROUBLE AREAS USING DTC
(a) Refer to the table below to determine the next procedure according to the output DTCs.
Malfunction | Output DTC | Proceed to |
|---|---|---|
Reference orifice low flow |
P043E00, P043F00, P24007E, P24007F, P24187E |
B |
Reference orifice high flow |
P043E00, P043F00, P24007E, P24007F, P24187E |
|
Leak detection pump stuck off |
P043E00, P043F00, P24007E, P24007F, P24187E |
|
Leak detection pump stuck on |
P043E00, P043F00, P24007E, P24007F, P24187E |
|
Vent valve stuck on (closed) |
P043E00, P043F00, P24007E, P24007F, P24187E |
|
Vent valve stuck off (vent) |
P24187F |
C |
Insufficient purge flow |
P04419C |
A |
Purge VSV stuck open |
P04417E, P142100 |
|
Purge VSV stuck closed |
P04417F |
|
Small leak from canister |
P142000 |
D |
Gross leak from canister |
P04417E, P142100 |
A |
Small leak from fuel tank |
P142200 |
|
Gross leak from fuel tank |
P142300 |
|
Fuel vapor-containment valve stuck open |
P142300, P24507E |
|
Fuel vapor-containment valve stuck closed |
P24517F |
| B | |
GO TO STEP 38 |
| C | |
GO TO STEP 40 |
| D | |
GO TO STEP 22 |
|
IDENTIFY TROUBLE AREAS USING DTC
(a) Refer to the table below to determine the next procedure according to the output DTCs.
Malfunction | Output DTC | Proceed to |
|---|---|---|
Insufficient purge flow |
P04419C |
A |
Purge VSV stuck open |
P04417E, P142100 |
|
Purge VSV stuck closed |
P04417F |
|
Gross leak from canister |
P04417E, P142100 |
|
Small leak from fuel tank |
P142200 |
B |
Gross leak from fuel tank |
P142300 |
|
Fuel vapor-containment valve stuck open |
P142300, P24507E |
C |
Fuel vapor-containment valve stuck closed |
P24517F |
| A | |
GO TO STEP 21 |
| B | |
GO TO STEP 17 |
| C | |
GO TO STEP 33 |
CLEAR DTC
(a) Connect the Techstream to the DLC3.
(b) Turn the power switch on (IG).
(c) Turn the Techstream on.
(d) Clear the DTCs.
Powertrain > Engine > Clear DTCs(e) Turn the power switch off and wait for at least 30 seconds.
|
PERFORM EVAPORATIVE SYSTEM CHECK (MANUAL MODE)
HINT:
In the manual operation check, the EVAP system can be checked in several steps. Valve operation and pressure in each step can also be checked.
(a) Remove the fuel tank cap assembly and reinstall the fuel tank cap assembly.
(b) Connect the Techstream to the DLC3.
(c) Turn the power switch on (IG).
(d) Turn the Techstream on.
(e) Enter the following menus: Powertrain / Engine / Utility / Evaporative System Check / Manual Mode.
Powertrain > Engine > UtilityEvaporative System Check
NOTICE:
- The Evaporative System Check (Automatic Mode) consists of 9 steps performed automatically by the Techstream. It takes a maximum of approximately 40 minutes.
- Do not perform the Evaporative System Check when the fuel tank is more than 90% full because the cut-off valve may be closed, making the fuel tank leak check unavailable.
- Do not start the engine during this operation.
- When the temperature of the fuel is 35 °C or higher, a large amount of vapor will from and any check result will be inaccurate. When performing the Evaporative System Check, keep the fuel temperature less than 35 °C.
Display | Detail |
|---|---|
Atmosphere Press Check |
The number of steps and step names are displayed |
Purge VSV |
Purge VSV condition is displayed: ON (Open)/OFF (Closed) |
Vent Valve |
Vent valve condition is displayed: ON (Closed)/OFF (Open) |
Vacuum Pump |
Leak detection pump condition is displayed: ON/OFF |
Fuel VCV |
Fuel vapor-containment valve condition is displayed: ON (Open)/OFF (Closed) |
Tank Pressure |
Fuel tank pressure (Absolute pressure) |
Vapor Pressure (Gauge) |
EVAP pressure (Gauge pressure measured at canister pump module) |
Vapor Pressure (Absolute) |
EVAP pressure (Absolute pressure measured at canister pump module) |
Time (Step) |
Elapsed time for each step |
Time (VENT) |
Accumulated vent valve open time |
Time (PUMP) |
Accumulated leak detection pump operating time |
Step | Operations |
|---|---|
1. Atmosphere Pressure Check |
Atmospheric pressure measurement |
2. Reference Pressure (0.02 inch) Check 1 |
First reference pressure measurement |
3. Canister Leak Check |
EVAP system pressure measurement |
4. Purge VSV Check |
Purge VSV monitor |
5. Reference Pressure (0.02 inch) Check 2 |
Second reference pressure measurement |
6. Resetting |
Resetting |
7. Tank Leak Check |
Fuel tank pressure measurement |
8. Reference Pressure (0.02 inch) Check 3 |
Third reference pressure measurement |
9. Atmosphere Pressure Check |
Atmospheric pressure measurement |
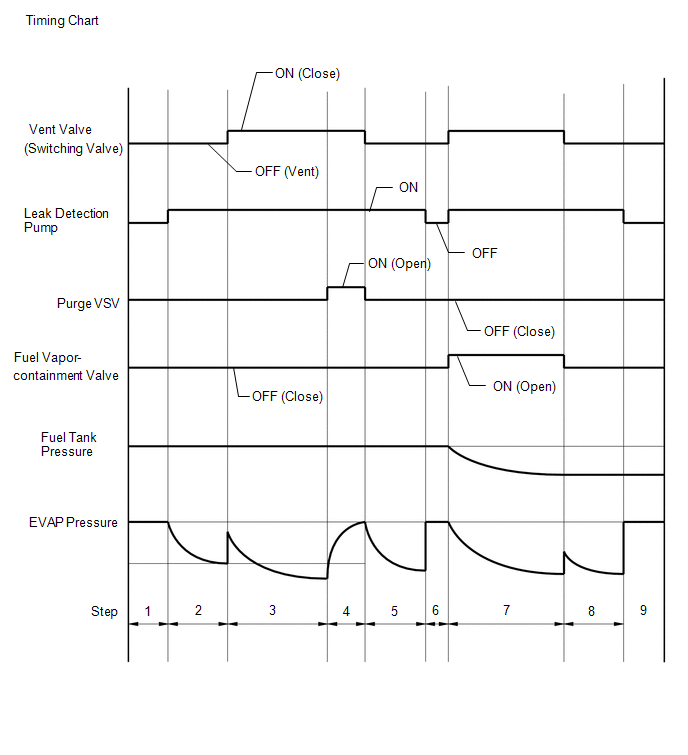
|
PERFORM EVAPORATIVE SYSTEM CHECK (MANUAL MODE STEP 1)
(a) Select step 1 and wait 10 seconds.
|
PERFORM EVAPORATIVE SYSTEM CHECK (MANUAL MODE STEP 2)
(a) Perform step 2.
(b) Check the evaporative pressure 2 seconds after the leak detection pump is activated* (A).
*: The leak detection pump begins to operate at the start of step 2.
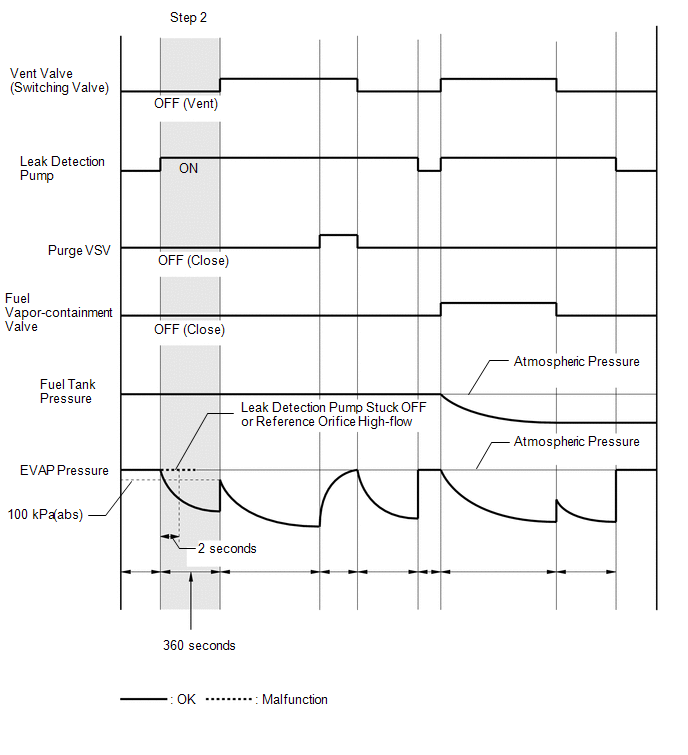
(c) Check the evaporative (EVAP) pressure again when it has stabilized (B). This pressure is the first reference pressure.
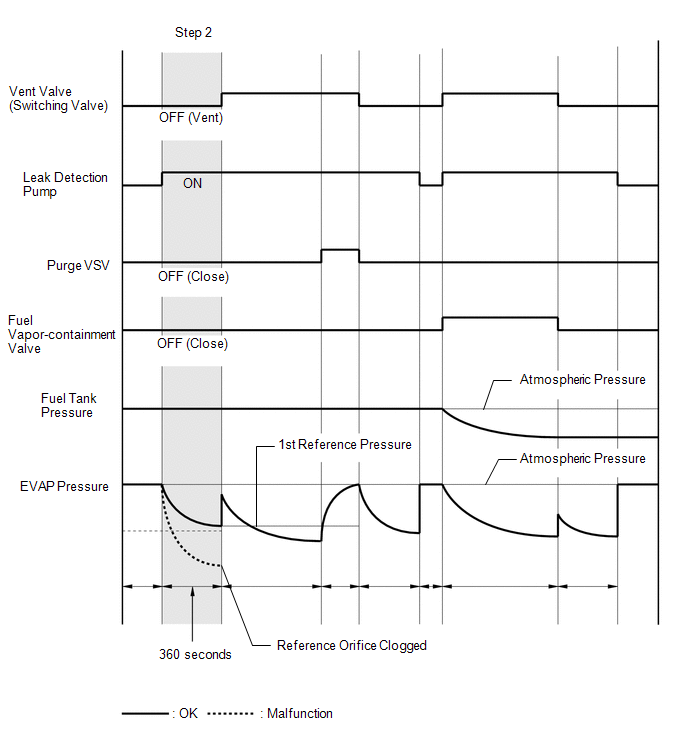
Result | Suspected Trouble Area | Proceed to |
|---|---|---|
EVAP pressure in inspection item (B) is between -4.85 and -1.068 kPa(gauge) [-0.7 and -0.155 psi(gauge)] |
Not yet determined |
A |
EVAP pressure in inspection item (B) is -1.068 kPa(gauge) [-0.155 psi(gauge)] or higher |
|
B |
EVAP pressure in inspection item (B) is less than -4.85 kPa(gauge) [-0.7 psi(gauge)] |
Reference orifice clogged |
C |
| B | |
GO TO STEP 38 |
| C | |
GO TO STEP 44 |
|
PERFORM EVAPORATIVE SYSTEM CHECK (MANUAL MODE STEP 3)
(a) Perform step 3.
(b) Check the evaporative (EVAP) pressure change in step 3 (A).
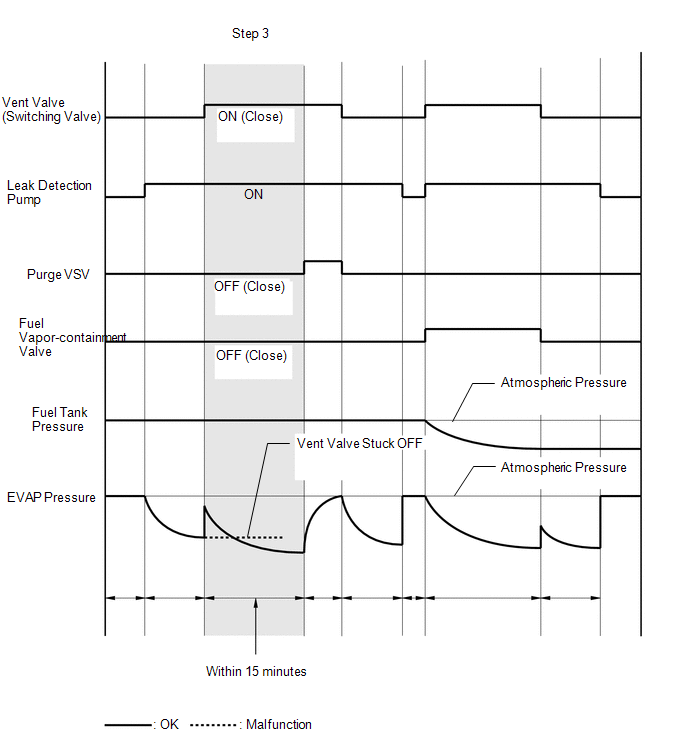
Result | Suspected Trouble Area | Proceed to |
|---|---|---|
EVAP pressure change in inspection item (A) is 0.3 kPa [0.04 psi] or higher |
Not yet determined |
A |
EVAP pressure change in inspection item (A) is less than 0.3 kPa [0.04 psi] |
Vent valve (switching valve) stuck off |
B |
(c) Check the fuel tank pressure change in step 3 (B).
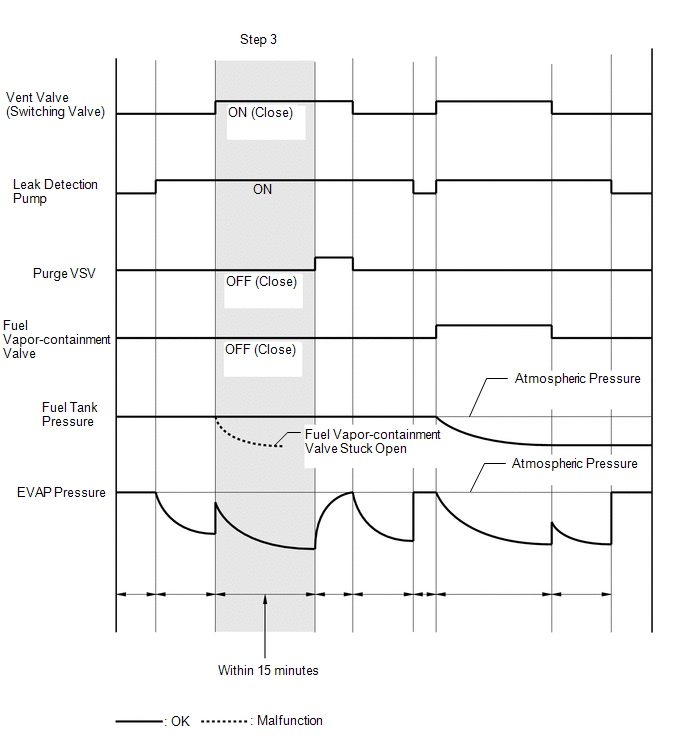
Result | Suspected Trouble Area | Proceed to |
|---|---|---|
Fuel tank pressure change in inspection item (B) is less than 0.5 kPa [0.07 psi] |
Not yet determined |
A |
Fuel tank pressure change in inspection item (B) is higher than 0.5 kPa [0.07 psi] |
Fuel vapor-containment valve stuck on (open) |
C |
(d) Check the EVAP pressure again when it has stabilized. This pressure is the canister leak pressure.
(e) Compare the first reference pressure with the canister leak pressure.
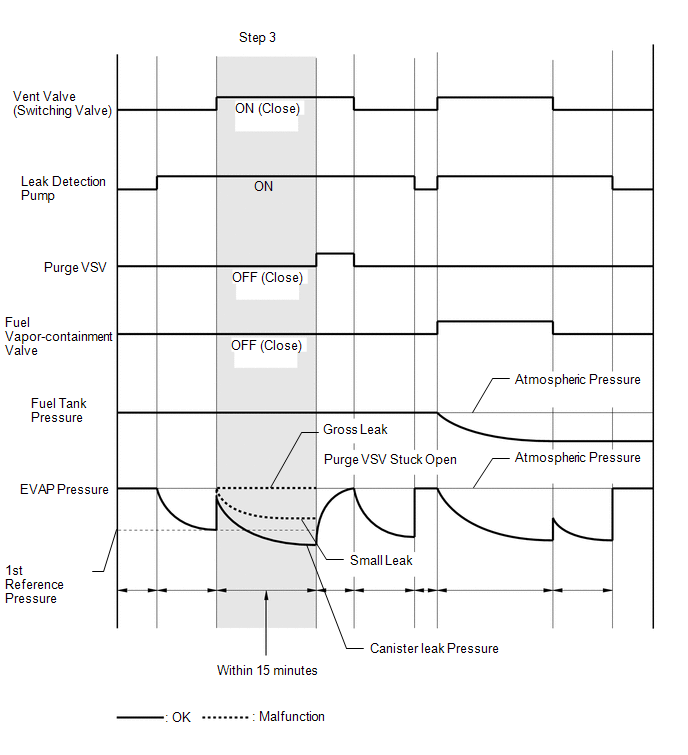
Result | Suspected Trouble Area | Proceed to |
|---|---|---|
Lower than first reference pressure |
Not yet determined |
A |
First reference pressure or higher |
|
D |
| B | |
GO TO STEP 40 |
| C | |
GO TO STEP 33 |
| D | |
GO TO STEP 28 |
|
PERFORM EVAPORATIVE SYSTEM CHECK (MANUAL MODE STEP 4)
(a) Perform step 4.
(b) Check the evaporative (EVAP) pressure change in step 4 (A).
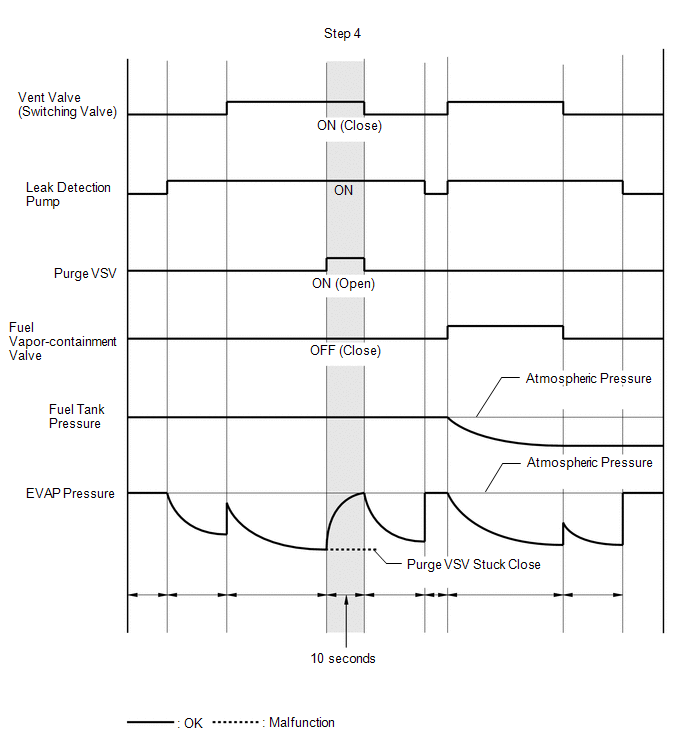
Result | Suspected Trouble Area | Proceed to |
|---|---|---|
EVAP pressure increases by 0.3 kPa [0.04 psi] or higher within 10 seconds of proceeding from step 3 to 4 |
Not yet determined |
A |
Variation in EVAP pressure is less than 0.3 kPa [0.04 psi] for 10 seconds, after proceeding from step 3 to 4 |
Purge VSV stuck closed |
B |
| B | |
GO TO STEP 21 |
|
PERFORM EVAPORATIVE SYSTEM CHECK (MANUAL MODE STEP 5)
(a) Perform step 5 and wait 60 seconds.
(b) Check the evaporative (EVAP) pressure. This pressure is the second reference pressure.
|
PERFORM EVAPORATIVE SYSTEM CHECK (MANUAL MODE STEP 6)
(a) Perform step 6 and wait 5 seconds.
|
PERFORM EVAPORATIVE SYSTEM CHECK (MANUAL MODE STEP 7)
(a) Perform step 7.
(b) Check that the tank pressure and EVAP pressure change.
(c) Check the tank pressure again when it has stabilized. This pressure is the fuel tank leak pressure.
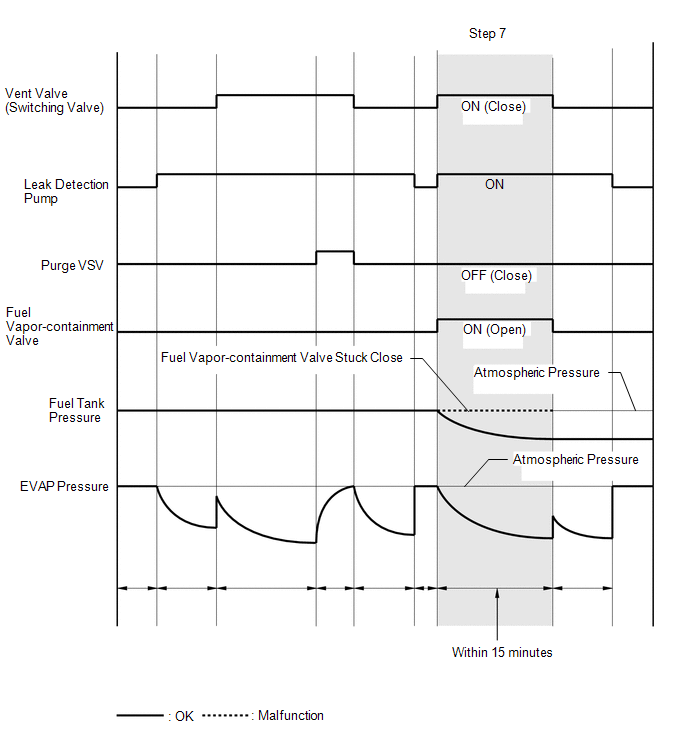
Result | Suspected Trouble Area | Proceed to |
|---|---|---|
Fuel tank pressure change is higher than 0.5 kPa [0.07 psi] and EVAP pressure is higher than 0.9 kPa(gauge) [0.1 psi(gauge)] |
Not yet determined |
A |
Fuel tank pressure change is less than 0.5 kPa [0.07 psi] and EVAP pressure is less than 0.9 kPa(gauge) [0.1 psi(gauge)] |
Fuel vapor-containment valve stuck OFF (closed) |
B |
| B | |
GO TO STEP 33 |
|
PERFORM EVAPORATIVE SYSTEM CHECK (MANUAL MODE STEP 8)
(a) Perform step 8 and wait 60 seconds.
(b) Check the evaporative (EVAP) pressure. This pressure is the third reference pressure.
(c) Compare the fuel tank pressure checked in step 7 with the third reference pressure.
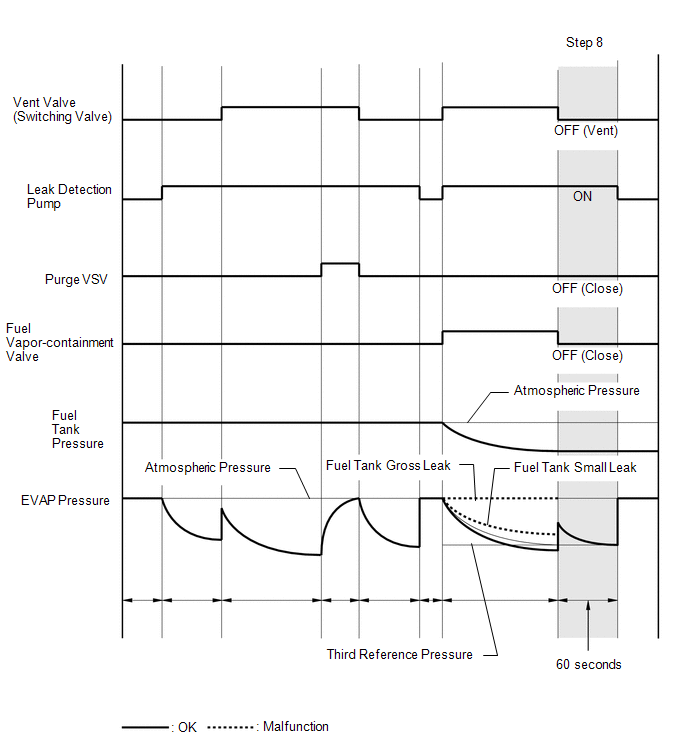
Result | Suspected Trouble Area | Proceed to |
|---|---|---|
Lower than third reference pressure |
Not yet determined |
A |
Third reference pressure or higher |
Leakage from line between fuel vapor-containment valve and fuel tank |
B |
| B | |
GO TO STEP 17 |
|
PERFORM CONFIRMATION DRIVING PATTERN
(a) Refer to Confirmation Driving Pattern.
| NEXT | |
PERFORM EVAPORATIVE SYSTEM CHECK AGAIN (AUTOMATIC MODE) |
CHECK FUEL TANK CAP ASSEMBLY
(a) Check that the fuel tank cap assembly is correctly installed and confirm that the fuel tank cap assembly meets OEM specifications.
(b) Tighten the fuel tank cap assembly firmly (only one click sound could be heard).
HINT:
If an EVAP tester is available, check the fuel tank cap assembly using the tester.
(1) Remove the fuel tank cap assembly and install it onto a fuel tank cap adapter.
(2) Connect an EVAP tester pump hose to the adapter, and pressurize the cap to 3.2 to 3.7 kPa(gauge) [0.46 to 0.54 psi(gauge)] using an EVAP tester pump.
(3) Seal the adapter and wait for 2 minutes.
(4) Check the pressure. If the pressure is 2 kPa(gauge) [0.3 psi(gauge)] or higher, the fuel tank cap assembly is normal.
Result | Suspected Trouble Area | Proceed to |
|---|---|---|
Fuel tank cap assembly correctly installed |
- |
A |
Fuel tank cap assembly loose |
|
B |
| B | |
GO TO STEP 20 |
|
CHECK HOSES (FUEL VAPOR-CONTAINMENT VALVE - FUEL TANK)
(a) Connect the EVAP pressure tester tool to the canister pump module with the adapter.
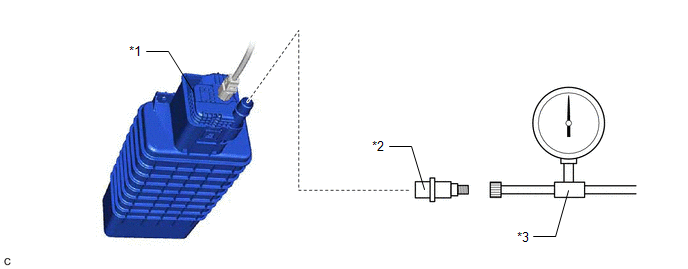
*1 |
Canister Pump Module |
*2 |
Adapter |
*3 |
EVAP Pressure Tester Tool |
- |
- |
(b) Connect the Techstream to the DLC3.
(c) Turn the power switch on (IG).
(d) Turn the Techstream on.
(e) Enter the following menus: Powertrain / Engine / Active Test / Activate the Fuel Vapor-Containment Valve.
Powertrain > Engine > Active TestActivate the Fuel Vapor-Containment Valve
(f) Turn the fuel vapor-containment valve open (on) using the Techstream.
(g) Confirm good connection at the canister pump module.
(h) Pressurize the EVAP system to between 3.2 and 3.7 kPa(gauge) [0.46 to 0.54 psi(gauge)].
NOTICE:
Higher than 4.7 kPa(gauge) [0.7 psi(gauge)] of pressure will damage the EVAP system. Pay attention to the pressure.
(i) Apply soapy water to the piping and connections of the EVAP system.
(j) Look for areas where bubbles appear.
HINT:
If the system has leaks, a whistling sound will be heard.
|
REPLACE MALFUNCTIONING PART
(a) Repair or replace the leak point.
| NEXT | |
PERFORM EVAPORATIVE SYSTEM CHECK AGAIN (AUTOMATIC MODE) |
REPLACE FUEL TANK CAP ASSEMBLY
(a) Replace the fuel tank cap assembly.
| NEXT | |
PERFORM EVAPORATIVE SYSTEM CHECK AGAIN (AUTOMATIC MODE) |
CHECK VACUUM HOSE (PURGE VSV - INTAKE MANIFOLD)
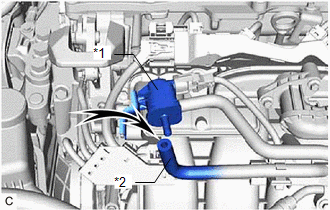
*1 |
Purge VSV |
*2 |
Fuel Vapor Feed Hose Assembly (to Intake Manifold) |
(a) Disconnect the fuel vapor feed hose assembly (connected to the intake manifold) from the purge VSV.
(b) Connect the Techstream to the DLC3.
(c) Turn the power switch on (IG).
(d) Turn the Techstream on.
(e) Put the engine in Inspection Mode (Maintenance Mode).
Powertrain > Hybrid Control > UtilityInspection Mode
(f) Start the engine.
(g) Use your finger to confirm that the hose has suction.
Test Result | Suspected Trouble Area | Proceed to |
|---|---|---|
Suction applied |
EVAP hose between purge VSV and intake manifold normal |
A |
No suction |
|
B |
| B | |
GO TO STEP 30 |
|
PERFORM ACTIVE TEST USING TECHSTREAM (ACTIVATE THE VSV FOR EVAP CONTROL)
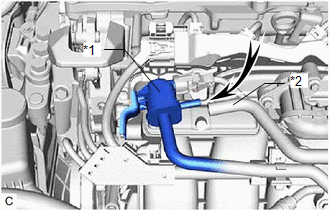
*1 |
Purge VSV |
*2 |
Fuel Vapor Feed Hose Assembly (to Canister) |
(a) Disconnect the fuel vapor feed hose assembly (connected to the canister) from the purge VSV.
(b) Connect the Techstream to the DLC3.
(c) Turn the power switch on (IG).
(d) Turn the Techstream on.
(e) Put the engine in Inspection Mode (Maintenance Mode).
Powertrain > Hybrid Control > UtilityInspection Mode
(f) Start the engine.
(g) Enter the following menus: Powertrain / Engine / Active Test / Activate the EVAP Purge VSV.
Powertrain > Engine > Active TestActivate the EVAP Purge VSV
(h) Using the Techstream, turn off the purge VSV (Activate the EVAP Purge VSV: OFF).
(i) Use your finger to confirm that the purge VSV has no suction.
(j) Using the Techstream, turn on the purge VSV (Activate the EVAP Purge VSV: ON).
(k) Use your finger to confirm that the purge VSV has suction.
Result | Suspected Trouble Area | Proceed to |
|---|---|---|
Suction applied when purge VSV turned off |
|
A |
No suction when purge VSV turned on |
Purge VSV stuck closed |
|
No suction when purge VSV turned off, and suction applied when turned on |
Purge VSV normal |
B |
| B | |
GO TO STEP 28 |
|
CHECK PURGE VSV
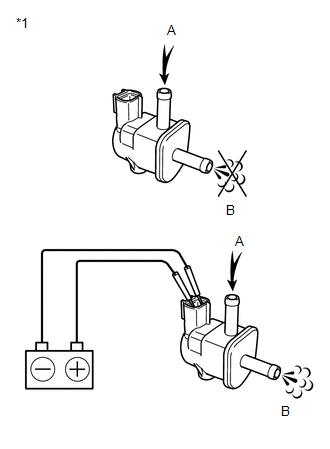
*1 |
Purge VSV |
(a) Remove the purge VSV.
(b) Apply compressed air to the purge VSV, and confirm that no air flows from A to B as shown in the illustration.
(c) Apply auxiliary battery voltage to the terminal of the purge VSV.
(d) While applying compressed air, confirm that air flows from A to B as shown in the illustration.
Result | Proceed to |
|---|---|
Air flows from A to B only when auxiliary battery voltage applied to purge VSV. Conclusion: purge VSV is normal |
A |
No air flows from A to B when auxiliary battery voltage is applied to purge VSV. Conclusion: purge VSV is malfunctioning. |
B |
Air flows from A to B when auxiliary battery voltage is not applied to purge VSV. Conclusion: purge VSV is malfunctioning |
| B | |
GO TO STEP 27 |
|
CHECK TERMINAL VOLTAGE (POWER SOURCE OF PURGE VSV)
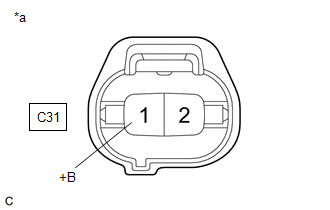
*a |
Purge VSV |
(a) Disconnect the purge VSV connector.
(b) Turn the power switch on (IG).
(c) Measure the voltage according to the value(s) in the table below.
Tester Connection | Condition | Specified Condition | Suspected Trouble Area | Proceed to |
|---|---|---|---|---|
C31-1 (+B) - Body ground |
Power switch on (IG) |
11 to 14 V |
Purge VSV power source normal
|
A |
Other than result above |
Wire harness or connectors between purge VSV and auxiliary battery |
B |
| B | |
GO TO STEP 48 |
|
CHECK HARNESS AND CONNECTOR (PURGE VSV - ECM)
(a) Disconnect the purge VSV connector.
(b) Disconnect the ECM connector.
(c) Measure the resistance according to the value(s) in the table below.
Standard Resistance:
Tester Connection | Condition | Specified Condition |
|---|---|---|
C31-2 (EVP1) - C55-66 (PRG) |
Always |
Below 1 Ω |
C31-2 (EVP1) or C55-66 (PRG) - Body ground and other terminals |
Always |
10 kΩ or higher |
| NG | |
GO TO STEP 48 |
|
REPLACE ECM
(a) Replace the ECM.
Click here
| NEXT | |
PERFORM EVAPORATIVE SYSTEM CHECK AGAIN (AUTOMATIC MODE) |
REPLACE PURGE VSV
(a) Replace the purge VSV.
Click here
| NEXT | |
PERFORM EVAPORATIVE SYSTEM CHECK AGAIN (AUTOMATIC MODE) |
CHECK HOSES (PURGE VSV - CANISTER)
(a) Connect the EVAP pressure tester tool to the canister pump module with the adapter.
*1 |
Canister Pump Module |
*2 |
Adapter |
*3 |
EVAP Pressure Tester Tool |
- |
- |
(b) Confirm good connection at the canister pump module.
(c) Pressurize the EVAP system to between 3.2 and 3.7 kPa(gauge) [0.46 and 0.54 psi(gauge)].
NOTICE:
Higher than 4.7 kPa(gauge) [0.7 psi(gauge)] of pressure will damage the EVAP system. Pay attention to the pressure.
(d) Apply soapy water to the piping and connections of the EVAP system.
(e) Look for areas where bubbles appear.
HINT:
If the system has leaks, a whistling sound will be heard.
|
REPLACE MALFUNCTIONING PART
(a) Repair or replace the leak point.
| NEXT | |
PERFORM EVAPORATIVE SYSTEM CHECK AGAIN (AUTOMATIC MODE) |
INSPECT INTAKE MANIFOLD (EVAP PURGE PORT)
(a) Disconnect the fuel vapor feed hose assembly from the intake manifold.
(b) Connect the Techstream to the DLC3.
(c) Turn the power switch on (IG).
(d) Turn the Techstream on.
(e) Put the engine in Inspection Mode (Maintenance Mode).
Powertrain > Hybrid Control > UtilityInspection Mode
(f) Start the engine.
(g) Use your finger to confirm that the port of the intake manifold has suction.
Result | Suspected Trouble Area | Proceed to |
|---|---|---|
Suction applied |
EVAP hose between intake manifold and purge VSV |
A |
No suction |
Intake manifold |
B |
| B | |
GO TO STEP 32 |
|
REPAIR OR REPLACE EVAP HOSE (INTAKE MANIFOLD - PURGE VSV)
(a) Repair or replace the fuel vapor feed hose assembly.
| NEXT | |
PERFORM EVAPORATIVE SYSTEM CHECK AGAIN (AUTOMATIC MODE) |
REPAIR OR REPLACE INTAKE MANIFOLD (EVAP PURGE PORT)
(a) Check that the EVAP purge port of the intake manifold is not clogged. If necessary, replace the intake manifold.
| NEXT | |
PERFORM EVAPORATIVE SYSTEM CHECK AGAIN (AUTOMATIC MODE) |
CHECK TERMINAL VOLTAGE (POWER SOURCE OF FUEL VAPOR-CONTAINMENT VALVE)
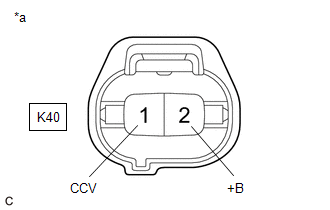
*a |
Front view of wire harness connector (to Fuel Vapor-containment Valve) |
(a) Disconnect the fuel vapor-containment valve connector.
(b) Turn the power switch on (IG).
(c) Measure the voltage according to the value(s) in the table below.
Standard Voltage:
Tester Connection | Condition | Specified Condition |
|---|---|---|
K40-2 (+B) - K40-1 (CCV) |
Power switch on (IG) |
10 to 14 V |
| NG | |
GO TO STEP 48 |
|
INSPECT FUEL VAPOR-CONTAINMENT VALVE
(a) Inspect the fuel vapor-containment valve.
Click here
| NG | |
GO TO STEP 37 |
|
CHECK HARNESS AND CONNECTOR (FUEL VAPOR-CONTAINMENT VALVE - ECM)
(a) Disconnect the fuel vapor-containment valve connector.
(b) Disconnect the ECM connector.
(c) Measure the resistance according to the value(s) in the table below.
Standard Resistance:
Tester Connection | Condition | Specified Condition |
|---|---|---|
K40-1 (CCV) - A19-12 (CCV2) |
Always |
Below 1 Ω |
K40-1 (CCV) or A19-12 (CCV2) - Body ground and other terminals |
Always |
10 kΩ or higher |
| NG | |
GO TO STEP 48 |
|
REPLACE ECM
(a) Replace the ECM.
Click here
| NEXT | |
PERFORM EVAPORATIVE SYSTEM CHECK AGAIN (AUTOMATIC MODE) |
REPLACE FUEL VAPOR-CONTAINMENT VALVE
(a) Replace the fuel vapor-containment valve.
Click here
| NEXT | |
PERFORM EVAPORATIVE SYSTEM CHECK AGAIN (AUTOMATIC MODE) |
PERFORM ACTIVE TEST USING TECHSTREAM (ACTIVATE THE VACUUM PUMP)
(a) Connect the Techstream to DLC3.
(b) Turn the power switch on (IG).
(c) Turn the Techstream on.
(d) Enter the following menus: Powertrain / Engine / Active Test / Activate the Vacuum Pump.
Powertrain > Engine > Active TestActivate the Vacuum Pump
(e) Turn the vacuum pump (leak detection pump) on with the Techstream.
(f) Touch the canister pump module and check if the leak detection pump is moving.
OK:
Leak detection pump operates.
| NG | |
GO TO STEP 43 |
|
PERFORM ACTIVE TEST USING TECHSTREAM (ACTIVATE THE VSV FOR VENT VALVE)
(a) Connect the Techstream to DLC3.
(b) Turn the power switch on (IG).
(c) Turn the Techstream on.
(d) Enter the following menus: Powertrain / Engine / Active Test / Activate the VSV for Vent Valve.
Powertrain > Engine > Active TestActivate the VSV for Vent Valve
(e) Touch the canister pump module, use the Techstream to turn the vent valve on and off, and check if the vent valve is moving.
OK:
Vent valve vibration can be felt.
| OK | |
GO TO STEP 44 |
|
CHECK CANISTER PUMP MODULE (VENT VALVE POWER SOURCE CIRCUIT)
(a) Disconnect the canister pump module connector.
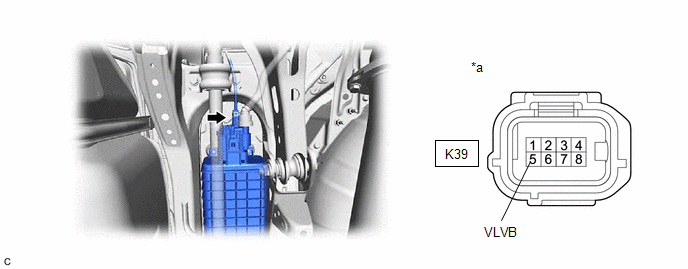
*a |
Front view of wire harness connector (to Canister Pump Module) |
- |
- |
(b) Turn the power switch on (IG).
(c) Measure the voltage according to the value(s) in the table below.
Standard Voltage:
Tester Connection | Condition | Specified Condition |
|---|---|---|
K39-5 (VLVB) - Body ground |
Power switch on (IG) |
10 to 14 V |
| NG | |
GO TO STEP 48 |
|
INSPECT CANISTER PUMP MODULE (VENT VALVE OPERATION)
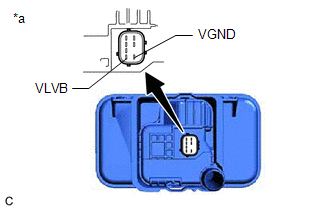
*a |
Component without harness connected (Canister Pump Module) |
(a) Disconnect the canister pump module connector.
(b) Apply auxiliary battery voltage to VLVB and VGND terminals of the canister pump module.
(c) Touch the canister pump module to confirm the vent valve operation.
Result | Suspected Trouble Area | Proceed to |
|---|---|---|
Operating |
ECM |
A |
Not operating |
Vent valve |
B |
| B | |
GO TO STEP 44 |
|
REPLACE ECM
(a) Replace the ECM.
Click here
| NEXT | |
PERFORM EVAPORATIVE SYSTEM CHECK AGAIN (AUTOMATIC MODE) |
CHECK TERMINAL VOLTAGE (CANISTER PUMP MODULE)
(a) Disconnect the canister pump module connector.
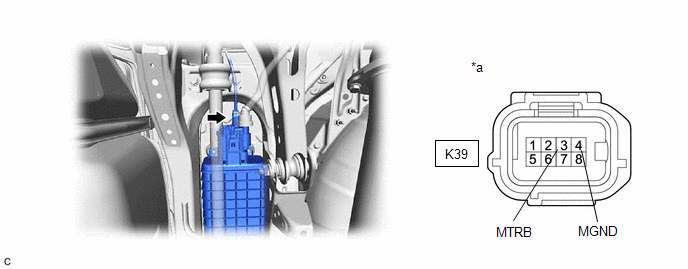
*a |
Front view of wire harness connector (to Canister Pump Module) |
- |
- |
(b) Turn the power switch on (IG).
(c) Measure the voltage according to the value(s) in the table below.
Standard Voltage:
Tester Connection | Condition | Specified Condition |
|---|---|---|
K39-3 (MTRB) - K39-4 (MGND) |
Power switch on (IG) |
10 to 14 V |
Power switch off |
Below 3 V |
| NG | |
GO TO STEP 45 |
|
REPLACE CANISTER PUMP MODULE
(a) Replace the canister pump module.
Click here
| NEXT | |
PERFORM EVAPORATIVE SYSTEM CHECK AGAIN (AUTOMATIC MODE) |
CHECK HARNESS AND CONNECTOR (CANISTER PUMP MODULE - BODY GROUND)
(a) Disconnect the canister pump module connector.
(b) Measure the resistance according to the value(s) in the table below.
Standard Resistance:
Tester Connection | Condition | Specified Condition |
|---|---|---|
K39-4 (MGND) - Body ground |
Always |
Below 1 Ω |
| NG | |
GO TO STEP 48 |
|
CHECK HARNESS AND CONNECTOR (CANISTER PUMP MODULE - ECM)
(a) Disconnect the canister pump module connector.
(b) Disconnect the ECM connector.
(c) Measure the resistance according to the value(s) in the table below.
Standard Resistance:
Tester Connection | Condition | Specified Condition |
|---|---|---|
K39-3 (MTRB) - A19-5 (MPMP) |
Always |
Below 1 Ω |
K39-3 (MTRB) or A19-5 (MPMP) - Body ground and other terminals |
Always |
10 kΩ or higher |
| NG | |
GO TO STEP 48 |
|
REPLACE ECM
(a) Replace the ECM.
Click here
| NEXT | |
PERFORM EVAPORATIVE SYSTEM CHECK AGAIN (AUTOMATIC MODE) |
REPAIR OR REPLACE HARNESS OR CONNECTOR
(a) Repair or replace harness or connector.
| NEXT | |
PERFORM EVAPORATIVE SYSTEM CHECK AGAIN (AUTOMATIC MODE) |
Fail-safe Chart
FAIL-SAFE CHART
If any of the following DTCs are stored, the ECM enters fail-safe mode to allow the vehicle to be driven temporarily or stops fuel injection.
DTC Code | Component | Fail-Safe Operation | Fail-Safe Deactivation Condition |
|---|---|---|---|
P001001 P001600 P136001 P136201 P261401 |
Cam timing control motor with EDU assembly |
The cam timing control motor with EDU assembly is operated to the most retarded position. |
Pass condition detected and then power switch turned off |
P001100 P001200 |
VVT system |
Idling up (misfire prevention), or the cam timing control motor with EDU assembly is operated to the most retarded position. |
Pass condition detected and then power switch turned off |
P001500 |
VVT system |
|
Pass condition detected |
P003012 P003013 P101A9E |
Air fuel ratio sensor (sensor 1) heater |
The ECM turns off the air fuel ratio sensor (sensor 1) heater. |
Power switch off |
P003612 P003613 P102A9E |
Air fuel ratio sensor (sensor 2) heater |
The ECM turns off the air fuel ratio sensor (sensor 2) heater. |
Power switch off |
P006900 P222611 P222615 |
|
The ECM maintains the last learned atmospheric pressure value. |
Pass condition detected |
P008700 P008800 P123513 |
Fuel pump assembly (for high pressure side) |
|
Power switch off |
P010012 P010014 |
Mass air flow meter sub-assembly |
The ECM calculates ignition timing according to the engine speed and throttle valve position. |
Pass condition detected and then power switch turned off |
P011011 P011015 |
Intake air temperature sensor (mass air flow meter sub-assembly) |
The ECM estimates the intake air temperature to be 20 °C. |
Pass condition detected and then power switch turned off |
P011511 P011515 |
Engine coolant temperature sensor |
The ECM estimates the engine coolant temperature to be 80 °C. |
Pass condition detected |
P012011 P012015 P01201C P022011 P022015 P060444 P060647 P060747 P060787 P060E49 P065714 P06579E P16B09F P210014 P210015 P211172 P211173 P211900 P211904 P211977 P21199B P21352B |
Electronic throttle control system |
The ECM cuts off throttle actuator current and the throttle valve is returned to a 7.5° throttle position by the return spring. The ECM controls the fuel injection duration and ignition timing in accordance with the engine torque requested by the hybrid vehicle control ECU assembly. Fuel-cut is performed intermittently.*1 |
Pass condition detected and then power switch turned off |
P019011 P019015 |
Fuel pressure sensor (for high pressure) |
|
Pass condition detected and then power switch turned off |
P020113 P020213 P020313 P020413 P062D13 |
ECM (injector driver) |
The ECM performs fuel-cut when the engine speed is 1000 rpm or more. |
Pass condition detected and then power switch turned off |
P030000 P030027 P030085 P030100 P030200 P030300 P030400 *2 |
|
When a catalyst-damaging misfire occurs (MIL blinking), the following fail-safe operation is performed for catalyst overheat malfunction prevention.
|
Pass condition detected and then power switch turned off |
P032511 P032515 |
Knock control sensor |
The ECM sets the ignition timing to maximum retard. |
Power switch off |
P04019C P040318 P040319 P140018 P140019 |
EGR valve assembly |
The ECM fully closes the EGR valve and stops EGR control. |
Pass condition detected |
P052012 P052014 P052024 P05202A |
Oil pressure sensor (oil pressure sender gauge assembly) |
Current to the oil pressure control valve assembly is cut in order to fully close the oil pressure control valve assembly so that the pump operates at maximum capacity. |
Pass condition detected and then power switch turned off |
P052477 P15F009 P15F077 |
Engine oil pressure control system |
|
Pass condition detected and then power switch turned off |
P059F73 P05A072 P05A074 P05A211 P05A212 P05A213 P05A27E P05A27F P05B131 |
Swing grille actuator assembly |
The grille shutter system control is suspended. |
Normal system condition detected, power switch turned off then on (IG) and normal grille shutter closing and opening operation performed |
P05B112 P05B114 |
Swing grille actuator assembly |
|
Normal system condition detected, power switch turned off then on (IG) and normal grille shutter closing and opening operation performed |
P06DA13 |
Oil pressure control valve assembly |
Current to the oil pressure control valve assembly is cut in order to fully close the oil pressure control valve assembly so that the pump operates at maximum capacity. |
Pass condition detected and then power switch turned off |
P107A11 P107A15 |
No. 2 fuel pressure sensor (for low pressure side) |
|
Pass condition detected and then power switch turned off |
P15F109 |
Engine oil pressure control system |
|
Pass condition detected and then power switch turned off |
P15F177 |
Engine oil pressure control system |
Current to the oil pressure control valve assembly is cut in order to fully close the oil pressure control valve assembly so that the pump operates at maximum capacity. |
Pass condition detected and then power switch turned off |
P21CF13 P21D013 P21D113 P21D213 |
Port fuel injector assembly |
The ECM performs fuel-cut when the engine speed is 1000 rpm or more. |
Pass condition detected and then power switch turned off |
P223711 P223712 P223713 P223716 P223717 P22371B P225111 P225112 |
Air fuel ratio sensor (sensor 1) |
Air fuel ratio sensor (sensor 1) air fuel ratio feedback control is stopped. |
Pass condition detected and then power switch turned off |
P22AB11 P22AB12 P22AB13 P22AB16 P22AB17 P22B211 P22B212 |
Air fuel ratio sensor (sensor 2) |
|
Pass condition detected and then power switch turned off |
P26CA12 P26CA31 P26CB71 |
Water inlet housing with water pump sub-assembly |
When the engine coolant temperature reaches 105 °C, the engine speed is limited to 2500 rpm or less. |
Pass condition detected and then power switch turned off |
P26CA14 |
Water inlet housing with water pump sub-assembly |
|
Pass condition detected and then power switch turned off |
P26CE37 |
Water inlet housing with water pump sub-assembly |
The water inlet housing with water pump sub-assembly is temporarily operated and stopped in a repeating cycle.
|
Pass condition detected and then power switch turned off |
HINT:
- *1: The vehicle can be driven slowly when the accelerator pedal is depressed firmly and slowly. If the accelerator pedal is depressed quickly, the vehicle may speed up and slow down erratically.
- *2: Misfire-related fail-safe operations occur when catalyst overheat malfunctions occur.