Engine Switch
Components
COMPONENTS
ILLUSTRATION
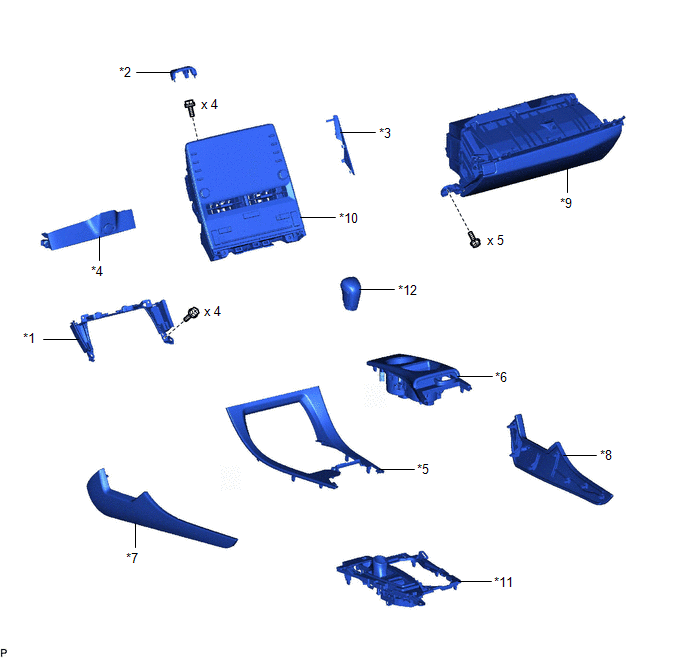
*1 |
CENTER INSTRUMENT CLUSTER FINISH PANEL SUB-ASSEMBLY |
*2 |
CENTER NO. 1 INSTRUMENT CLUSTER FINISH PANEL |
*3 |
CENTER NO. 2 INSTRUMENT CLUSTER FINISH PANEL |
*4 |
CONSOLE BOX BEZEL |
*5 |
CONSOLE BOX POCKET SUB-ASSEMBLY |
*6 |
FRONT CONSOLE UPPER PANEL GARNISH |
*7 |
LOWER INSTRUMENT PANEL FINISH PANEL RH |
*8 |
LOWER INSTRUMENT PANEL FINISH PANEL LH |
*9 |
LOWER INSTRUMENT PANEL SUB-ASSEMBLY |
*10 |
RADIO AND DISPLAY RECEIVER ASSEMBLY WITH BRACKET |
*11 |
REAR UPPER CONSOLE PANEL SUB-ASSEMBLY |
*12 |
SHIFT LEVER KNOB SUB-ASSEMBLY |
ILLUSTRATION
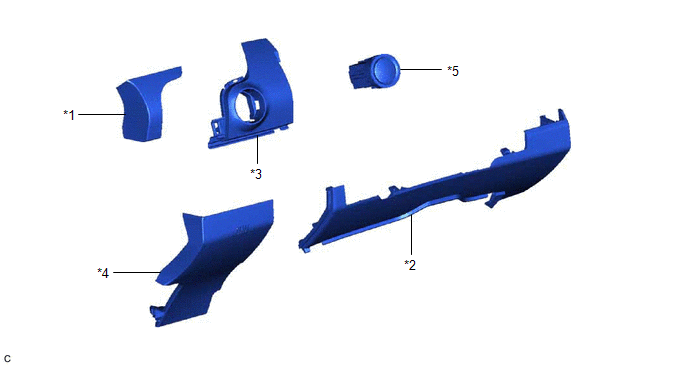
*1 |
INSTRUMENT CLUSTER FINISH PANEL GARNISH ASSEMBLY |
*2 |
LOWER CENTER INSTRUMENT PANEL FINISH PANEL |
*3 |
LOWER INSTRUMENT PANEL FINISH PANEL ASSEMBLY |
*4 |
LOWER NO. 2 INSTRUMENT PANEL FINISH PANEL |
*5 |
ENGINE SWITCH |
- |
- |
Inspection
INSPECTION
PROCEDURE
1. INSPECT ENGINE SWITCH
(a) Check the resistance.
(1) Measure the resistance according to the value(s) in the table below. Standard Resistance:
If the result is not as specified, replace the engine switch. |
|
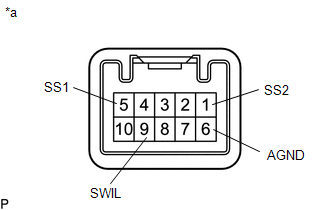
(b) Check the LED illumination.
(1) Apply battery voltage between the terminals of the engine switch and check the illumination condition of the engine switch indicator light.
OK:
Condition | Specified Condition |
|---|---|
Battery positive (+) → Terminal 9 (SWIL) Battery negative (-) → Terminal 6 (AGND) |
Illuminates |
HINT:
- If the positive (+) lead and the negative (-) lead are incorrectly connected, the engine switch indicator light will not illuminate.
- If the voltage is too low, the engine switch indicator light will not illuminate.
If the result is not as specified, replace the engine switch.
Installation
INSTALLATION
PROCEDURE
1. INSTALL ENGINE SWITCH
(a) Engage the 2 claws to install the engine switch to the lower instrument panel finish panel assembly.
2. INSTALL LOWER INSTRUMENT PANEL FINISH PANEL ASSEMBLY
Click here 
3. INSTALL INSTRUMENT CLUSTER FINISH PANEL GARNISH ASSEMBLY
Click here
4. INSTALL LOWER CENTER INSTRUMENT PANEL FINISH PANEL
Click here
5. INSTALL LOWER NO. 2 INSTRUMENT PANEL FINISH PANEL
Click here
6. INSTALL LOWER INSTRUMENT PANEL SUB-ASSEMBLY
Click here
7. INSTALL RADIO AND DISPLAY RECEIVER ASSEMBLY WITH BRACKET
Click here
8. INSTALL CENTER NO. 2 INSTRUMENT CLUSTER FINISH PANEL
Click here
9. INSTALL CENTER NO. 1 INSTRUMENT CLUSTER FINISH PANEL
Click here
10. INSTALL CONSOLE BOX BEZEL
Click here
11. INSTALL REAR UPPER CONSOLE PANEL SUB-ASSEMBLY
Click here
12. INSTALL SHIFT LEVER KNOB SUB-ASSEMBLY
Click here
13. INSTALL CENTER INSTRUMENT CLUSTER FINISH PANEL SUB-ASSEMBLY
Click here
14. INSTALL CONSOLE BOX POCKET SUB-ASSEMBLY
Click here
15. INSTALL FRONT CONSOLE UPPER PANEL GARNISH
Click here
16. INSTALL LOWER INSTRUMENT PANEL FINISH PANEL RH
Click here
17. INSTALL LOWER INSTRUMENT PANEL FINISH PANEL LH
Click here
18. INSTALL LOWER NO. 2 INSTRUMENT PANEL AIRBAG ASSEMBLY
Click here
19. CUSTOMIZE POWER TILT AND POWER TELESCOPIC STEERING COLUMN SYSTEM (for Power Tilt and Power Telescopic Steering Column)
Click here
Removal
REMOVAL
The necessary procedures (adjustment, calibration, initialization or registration) that must be performed after parts are removed and installed, or replaced engine switch removal/installation are shown below.
Necessary Procedures After Parts Removed/Installed/ReplacedReplaced Part or Performed Procedure | Necessary Procedure | Effect/Inoperative Function when Necessary Procedure not Performed | Link |
|---|---|---|---|
| *: When performing learning using the Techstream. Click here |
|||
Battery terminal is disconnected/reconnected |
Perform steering sensor zero point calibration |
Lane departure alert system (w/ Steering Control) |
 |
Pre-collision system |
|||
Intelligent clearance sonar system* |
|||
Lighting System (for Gasoline Model with Cornering Light) |
|||
Memorize steering angle neutral point |
Parking assist monitor system |
|
|
Panoramic view monitor system |
|
||
PROCEDURE
1. PRECAUTION
NOTICE:
After turning the engine switch off, waiting time may be required before disconnecting the cable from the negative (-) auxiliary battery terminal. Therefore, make sure to read the disconnecting the cable from the negative (-) auxiliary battery terminal notices before proceeding with work.
Click here
2. CHANGE POWER TILT AND POWER TELESCOPIC STEERING COLUMN SYSTEM SETTINGS (for Power Tilt and Power Telescopic Steering Column)
Click here
3. REMOVE LOWER NO. 2 INSTRUMENT PANEL AIRBAG ASSEMBLY
Click here
4. REMOVE LOWER INSTRUMENT PANEL FINISH PANEL LH
Click here
5. REMOVE LOWER INSTRUMENT PANEL FINISH PANEL RH
Click here
6. REMOVE FRONT CONSOLE UPPER PANEL GARNISH
Click here
7. REMOVE CONSOLE BOX POCKET SUB-ASSEMBLY
Click here
8. REMOVE CENTER INSTRUMENT CLUSTER FINISH PANEL SUB-ASSEMBLY
Click here
9. REMOVE SHIFT LEVER KNOB SUB-ASSEMBLY
Click here
10. REMOVE REAR UPPER CONSOLE PANEL SUB-ASSEMBLY
Click here
11. REMOVE CONSOLE BOX BEZEL
Click here
12. REMOVE CENTER NO. 1 INSTRUMENT CLUSTER FINISH PANEL
Click here
13. REMOVE CENTER NO. 2 INSTRUMENT CLUSTER FINISH PANEL
Click here
14. REMOVE RADIO AND DISPLAY RECEIVER ASSEMBLY WITH BRACKET
Click here
15. REMOVE LOWER INSTRUMENT PANEL SUB-ASSEMBLY
Click here
16. REMOVE LOWER NO. 2 INSTRUMENT PANEL FINISH PANEL
Click here
17. REMOVE LOWER CENTER INSTRUMENT PANEL FINISH PANEL
Click here
18. REMOVE INSTRUMENT CLUSTER FINISH PANEL GARNISH ASSEMBLY
Click here
19. REMOVE LOWER INSTRUMENT PANEL FINISH PANEL ASSEMBLY
Click here
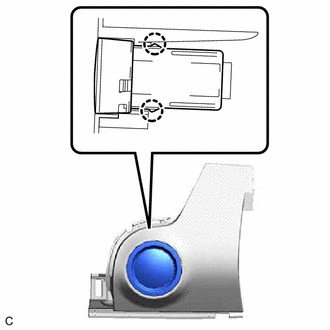
20. REMOVE ENGINE SWITCH
(a) Disengage the 2 claws and remove the engine switch from lower instrument panel finish panel assembly. |
 |