Oil Pump
Components
COMPONENTS
ILLUSTRATION
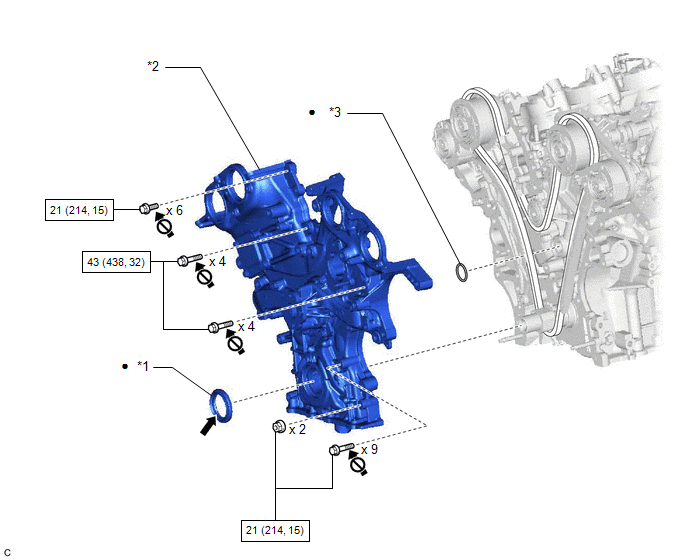
*1 |
TIMING CHAIN CASE OIL SEAL |
*2 |
TIMING CHAIN COVER ASSEMBLY |
*3 |
OIL PUMP GASKET |
- |
- |
 |
N*m (kgf*cm, ft.*lbf): Specified torque |
● |
Non-reusable part |
 |
MP Grease |
 |
Do not apply lubricants to the threaded parts |
ILLUSTRATION
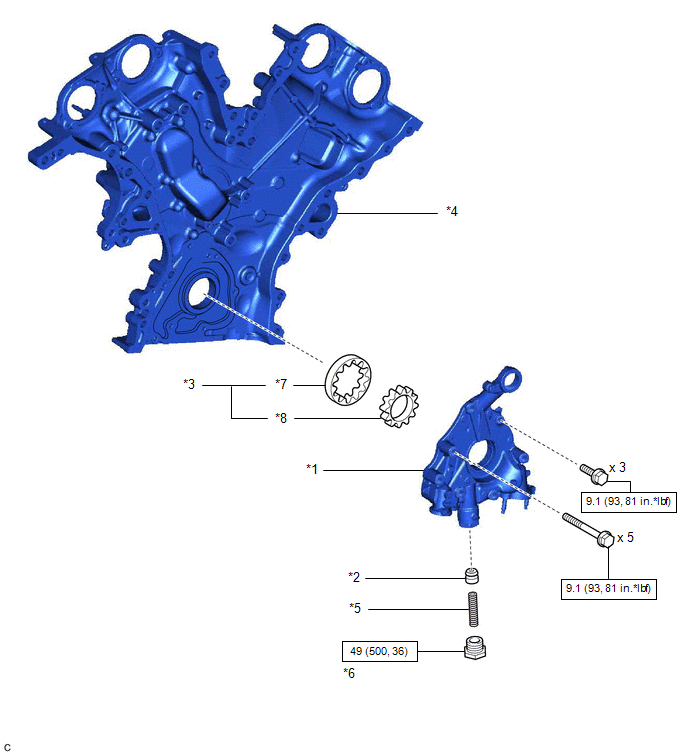
*1 |
OIL PUMP COVER |
*2 |
OIL PUMP RELIEF VALVE |
*3 |
OIL PUMP ROTOR SET |
*4 |
TIMING CHAIN COVER ASSEMBLY |
*5 |
OIL PUMP RELIEF VALVE SPRING |
*6 |
OIL PUMP RELIEF VALVE PLUG |
*7 |
DRIVEN ROTOR |
*8 |
DRIVE ROTOR |
|
N*m (kgf*cm, ft.*lbf): Specified torque |
- |
- |
Disassembly
DISASSEMBLY
PROCEDURE
1. REMOVE OIL PUMP RELIEF VALVE
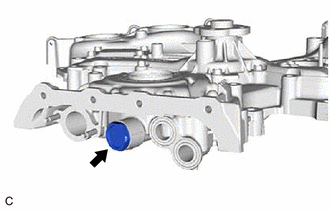
(a) Using a 27 mm socket wrench, remove the oil pump relief valve plug from the oil pump cover. |
 |
(b) Remove the oil pump relief valve spring and oil pump relief valve from the valve hole.
2. REMOVE OIL PUMP COVER
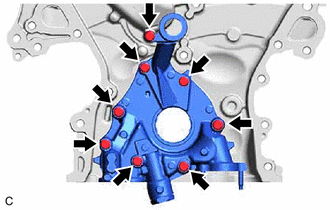
(a) Remove the 8 bolts and oil pump cover from the timing chain cover assembly. |
 |
3. REMOVE OIL PUMP ROTOR SET
(a) Remove the drive rotor and driven rotor from the timing chain cover assembly. |
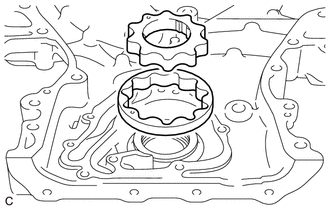 |
Inspection
INSPECTION
PROCEDURE
1. INSPECT OIL PUMP RELIEF VALVE
(a) Coat the oil pump relief valve with engine oil and check that it falls smoothly into the valve hole by its own weight. HINT: If the oil pump relief valve does not fall smoothly, replace the timing chain cover assembly. |
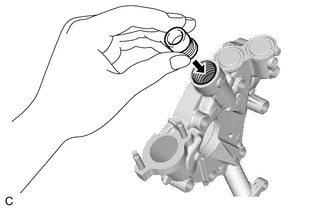 |
2. INSPECT OIL PUMP ROTOR SET
(a) Apply engine oil to the drive rotor and driven rotor.
(b) Install the drive rotor and driven rotor to the timing chain cover assembly with the rotor marks facing up. Check that the rotors rotate smoothly. HINT: If the rotors do not rotate smoothly, replace the timing chain cover assembly. |
|
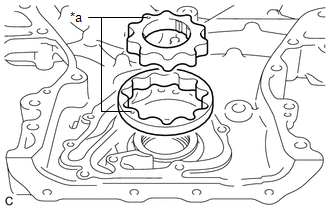
(c) Check the tip clearance. (1) Using a feeler gauge, measure the clearance between the drive rotor and driven rotor tips as shown in the illustration. Standard Tip Clearance: 0.040 to 0.150 mm (0.00157 to 0.00591 in.) Maximum Tip Clearance: 0.150 mm (0.00591 in.) HINT: If the tip clearance is more than the maximum, replace the timing chain cover assembly. |
|
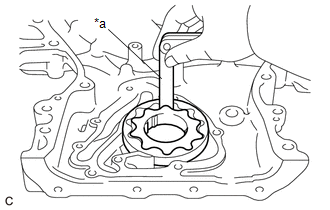
(d) Check the side clearance. (1) Using a feeler gauge and precision straightedge, measure the clearance between the drive rotor and driven rotor and precision straightedge as shown in the illustration. Standard Side Clearance: 0.030 to 0.070 mm (0.00118 to 0.00276 in.) Maximum Side Clearance: 0.070 mm (0.00276 in.) HINT: If the side clearance is more than the maximum, replace the timing chain cover assembly. |
|
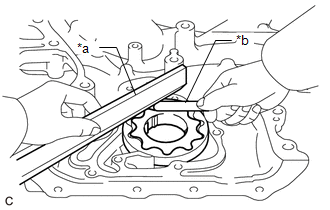
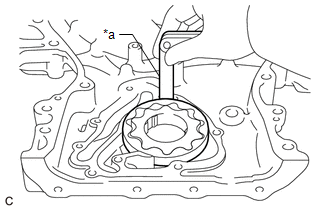
(e) Check the body clearance. (1) Using a feeler gauge, measure the clearance between the timing chain cover assembly and driven rotor as shown in the illustration. Standard Body Clearance: 0.250 to 0.325 mm (0.00984 to 0.0128 in.) Maximum Body Clearance: 0.325 mm (0.0128 in.) HINT: If the body clearance is more than the maximum, replace the timing chain cover assembly. |
|
Installation
INSTALLATION
PROCEDURE
1. INSTALL TIMING CHAIN COVER ASSEMBLY
(a) Clean the contact surfaces of the engine assembly, and confirm that no oil, moisture, or other foreign matter is on the surfaces.
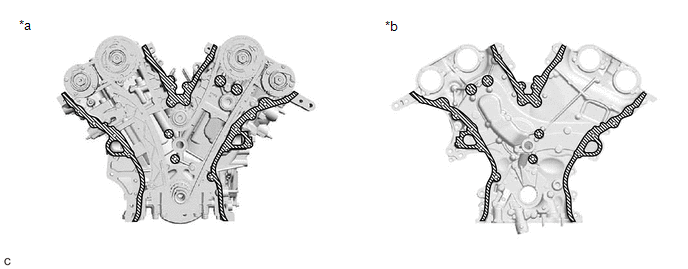
*a |
Engine Assembly Side |
*b |
Timing Chain Cover Assembly Side |
 |
Clean |
- |
- |
NOTICE:
Be sure to clean the contact surfaces, especially the surfaces shown in the illustration.
(b) Apply seal packing to the timing chain cover assembly as shown in the illustration.
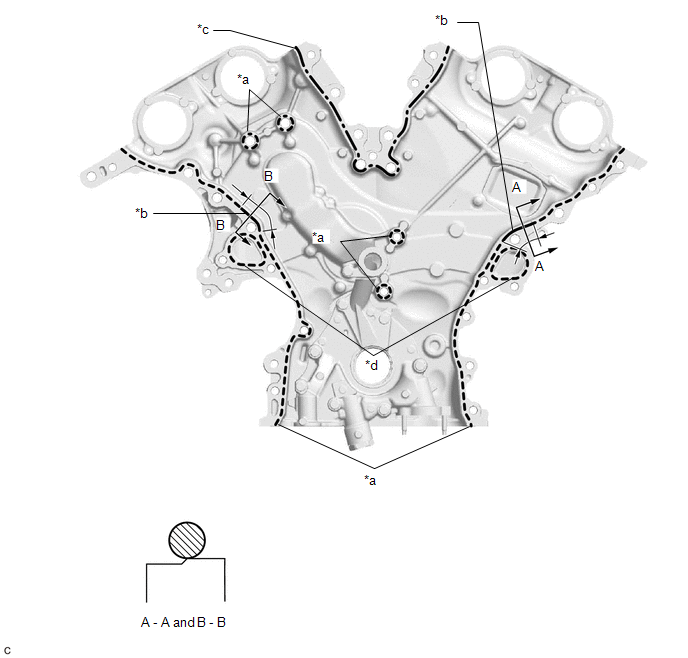
*a |
Dashed Line Area (Seal packing: Toyota Genuine Seal Packing Black, Three Bond 1207B or equivalent) |
*b |
Continuous Line Area (Seal packing: Toyota Genuine Seal Packing Black, Three Bond 1207B or equivalent) |
*c |
Alternate Long and Short Dashed Line Area (Seal packing: Toyota Genuine Seal Packing Black, Three Bond 1207B or equivalent) |
*d |
Dashed Line Area (Seal packing: Toyota Genuine Seal Packing 1282B, Three Bond 1282B or equivalent) |
|
6.0 mm (0.236 in.) or more |
- |
- |
Seal Packing:
Toyota Genuine Seal Packing Black, Three Bond 1207B or equivalent
Toyota Genuine Seal Packing 1282B, Three Bond 1282B or equivalent
NOTICE:
If there is oil on the contact surfaces, wipe them with an oil-free cloth before applying seal packing.
Seal Packing Application Chart:
Area | Seal Packing Diameter | Application Position from Inside Seal Line |
|---|---|---|
Dashed Line Area (Seal packing: Toyota Genuine Seal Packing Black, Three Bond 1207B or equivalent) |
3.5 mm (0.138 in.) or more |
3.0 to 4.0 mm (0.118 to 0.157 in.) |
Continuous Line Area (Seal packing: Toyota Genuine Seal Packing Black, Three Bond 1207B or equivalent) |
6.0 mm (0.236 in.) or more |
5.0 mm (0.197 in.) |
Alternate Long and Short Dashed Line Area (Seal packing: Toyota Genuine Seal Packing Black, Three Bond 1207B or equivalent) |
4.5 mm (0.177 in.) or more |
3.0 to 4.0 mm (0.118 to 0.157 in.) |
Dashed line area (Seal packing: Toyota Genuine Seal Packing 1282B, Three Bond 1282B or equivalent) |
3.5 mm (0.138 in.) or more |
2.0 to 3.0 mm (0.0787 to 0.118 in.) |
(c) Install a new oil pump gasket to the cylinder block sub-assembly.
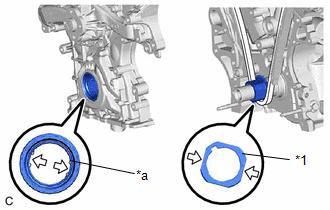
(d) Align the drive rotor spline and the crankshaft as shown in the illustration. Install the timing chain cover assembly. |
|
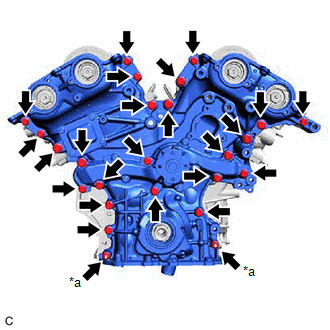
(e) Install the 23 bolts and 2 nuts in the order shown in the illustration.
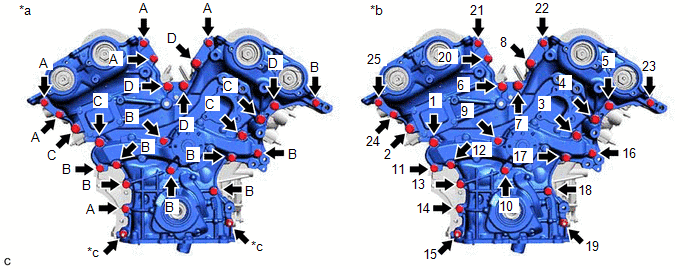
*a |
Torque |
*b |
Bolt and Nut Tightening Order |
*c |
Nut |
- |
- |
Bolt Length:
Item | Length |
|---|---|
(A) |
28 mm (1.10 in.) |
(B) |
55 mm (2.17 in.) |
(C) |
60 mm (2.36 in.) |
(D) |
40 mm (1.57 in.) |
NOTICE:
Make sure that there is no oil on the threads of the bolts.
Torque:
Bolt (A), (B)
21 N*m (214 kgf*cm, 15 ft.*lbf)
Bolt (C), (D)
43 N*m (438 kgf*cm, 32 ft.*lbf)
Nut
21 N*m (214 kgf*cm, 15 ft.*lbf)
NOTICE:
- Tighten the bolts within 10 minutes of applying seal packing.
- Do not add engine oil for at least 2 hours after installation.
- Do not start the engine for at least 2 hours after installation.
2. INSTALL TIMING CHAIN CASE OIL SEAL
Click here 
3. INSTALL OIL PAN SUB-ASSEMBLY
Click here
Reassembly
REASSEMBLY
PROCEDURE
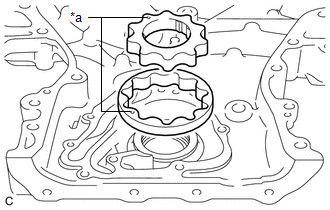
1. INSTALL OIL PUMP ROTOR SET
(a) Coat the drive rotor and driven rotor with engine oil and place them into the timing chain cover assembly with the rotor marks facing up. Check that the rotors rotate smoothly. |
|
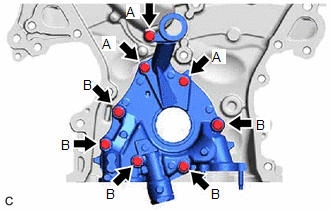
2. INSTALL OIL PUMP COVER
(a) Install the oil pump cover to the timing chain cover assembly with the 8 bolts. Torque: 9,1 N·m {93 kgf·cm, 81 in·lbf} Bolt Length:
|
 |
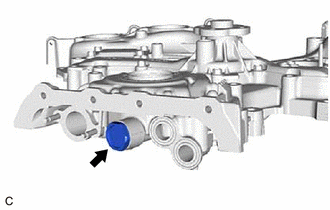
3. INSTALL OIL PUMP RELIEF VALVE
(a) Coat the oil pump relief valve with engine oil.
(b) Insert the oil pump relief valve and oil pump relief valve spring into the valve hole.
(c) Using a 27 mm socket wrench, install the oil pump relief valve plug to the oil pump cover. Torque: 49 N·m {500 kgf·cm, 36 ft·lbf} |
 |
Removal
REMOVAL
The necessary procedures (adjustment, calibration, initialization or registration) that must be performed after parts are removed and installed, or replaced during timing chain cover assembly removal/installation are shown below.
Necessary Procedure After Parts Removed/Installed/ReplacedReplaced Part or Performed Procedure | Necessary Procedure | Effect/Inoperative Function when Necessary Procedure not Performed | Link |
|---|---|---|---|
Battery terminal is disconnected/reconnected |
Perform steering sensor zero point calibration |
Lane departure alert system (w/ Steering Control) |
 |
Pre-collision system |
|||
Intelligent Clearance Sonar System*1 |
|||
Lighting System (for Gasoline Model with Cornering Light) |
|||
Memorize steering angle neutral point |
Parking Assist Monitor System |
|
|
Panoramic View Monitor System |
|
||
Replacement of ECM |
Vehicle Identification Number (VIN) registration |
MIL comes on |
|
ECU communication ID registration (Immobiliser system) |
Engine start function |
|
|
|
Inspection after repair |
|
|
Replacement of automatic transaxle assembly |
|
|
|
Replacement of ECM (If transaxle compensation code read from ECM) |
|
||
Replacement of ECM (If transaxle compensation code not read from ECM) |
|
||
Replacement of automatic transaxle fluid |
ATF thermal degradation estimate reset |
The value of the Data List item "ATF Thermal Degradation Estimate" is not estimated correctly |
|
Replacement of ECM |
Code registration (Smart Key System (for Start Function)) |
|
|
Suspension, tires, etc. |
|
|
|
Rear television camera assembly optical axis adjustment (Back camera position setting) |
Parking Assist Monitor System |
|
|
|
Panoramic View Monitor System |
|
|
Perform headlight ECU sub-assembly LH initialization |
Lighting system (for Gasoline Model with Cornering Light) |
|
|
Front wheel alignment adjustment |
Perform system variant learning and acceleration sensor zero point calibration. |
|
|
- *1: When performing learning using the Techstream.
Click here
- *2: Not necessary when ECM replaced with new one.
PROCEDURE
1. REMOVE OIL PAN SUB-ASSEMBLY
Click here
2. REMOVE TIMING CHAIN CASE OIL SEAL
Click here
3. REMOVE TIMING CHAIN COVER ASSEMBLY
(a) Remove the 23 bolts and 2 nuts shown in the illustration. |
|
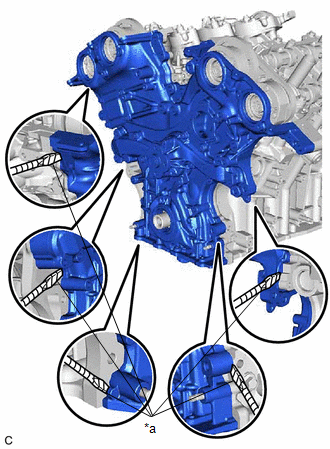
(b) Remove the timing chain cover assembly by prying between the timing chain cover assembly and cylinder head sub-assembly or cylinder block sub-assembly with a screwdriver with its tip wrapped with protective tape. NOTICE: Be careful not to damage the contact surfaces of the cylinder head sub-assembly, cylinder block sub-assembly and timing chain cover assembly. |
|
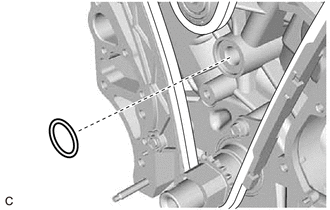
(c) Remove the oil pump gasket from the cylinder block sub-assembly. |
 |