Exhaust Manifold
Components
COMPONENTS
ILLUSTRATION
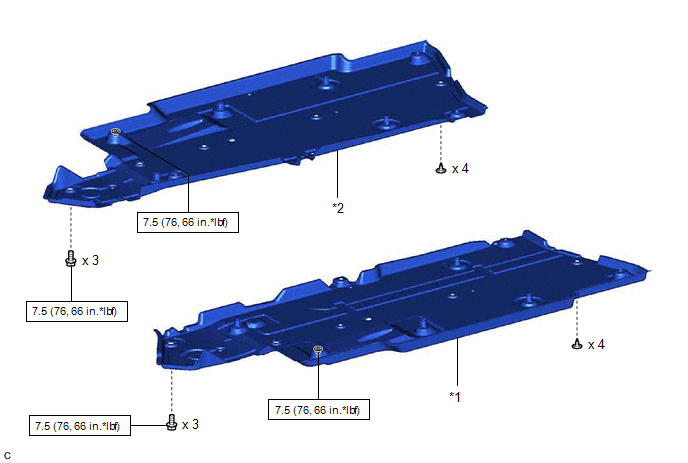
*1 |
FRONT FLOOR COVER LH |
*2 |
FRONT FLOOR COVER RH |
 |
N*m (kgf*cm, ft.*lbf): Specified torque |
- |
- |
ILLUSTRATION
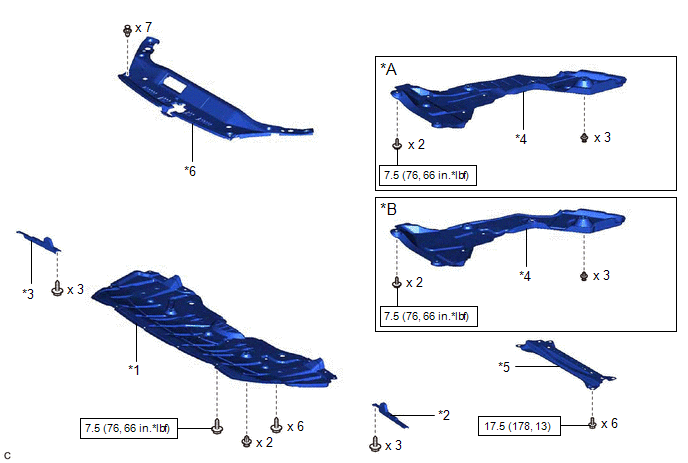
*A |
Type A |
*B |
Type B |
*1 |
NO. 1 ENGINE UNDER COVER |
*2 |
FRONT WHEEL OPENING EXTENSION PAD LH |
*3 |
FRONT WHEEL OPENING EXTENSION PAD RH |
*4 |
REAR ENGINE UNDER COVER RH |
*5 |
BODY MOUNTING PLATE |
*6 |
COOL AIR INTAKE DUCT SEAL |
|
N*m (kgf*cm, ft.*lbf): Specified torque |
- |
- |
ILLUSTRATION
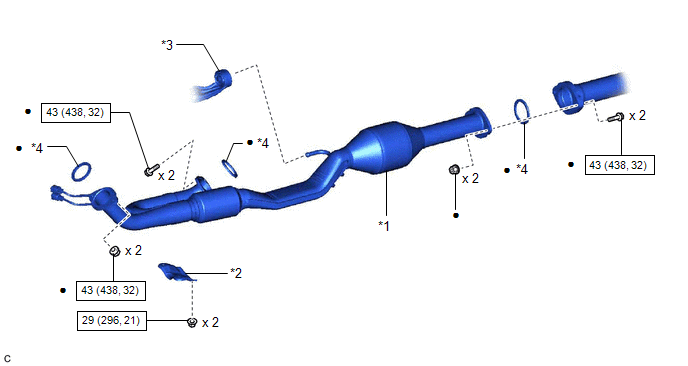
*1 |
FRONT EXHAUST PIPE ASSEMBLY (TWC: Rear Catalyst) |
*2 |
NO. 1 EXHAUST PIPE SUPPORT BRACKET (for Lower Side) |
*3 |
EXHAUST PIPE SUPPORT |
*4 |
GASKET |
|
N*m (kgf*cm, ft.*lbf): Specified torque |
● |
Non-reusable part |
ILLUSTRATION
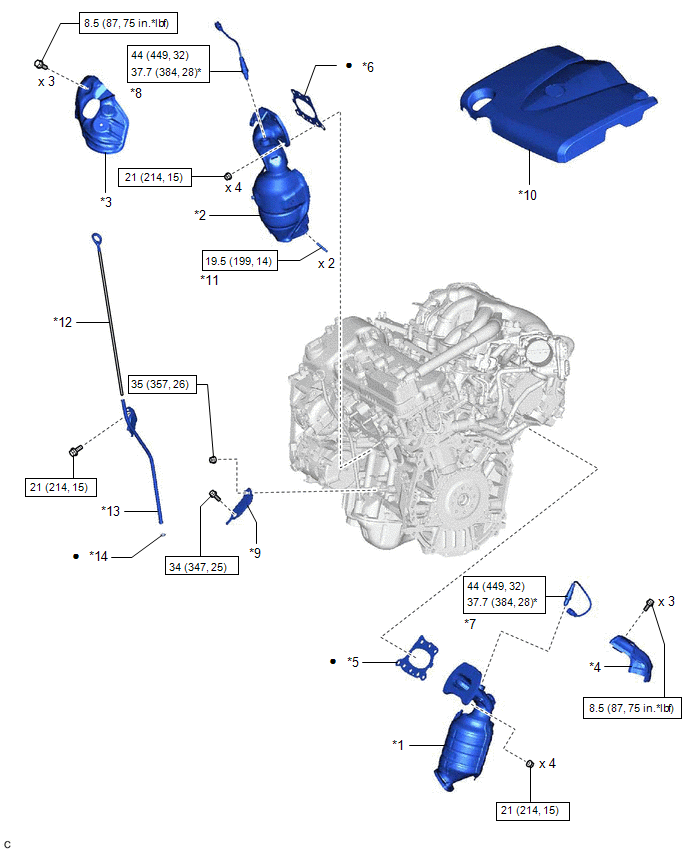
*1 |
EXHAUST MANIFOLD ASSEMBLY RH (TWC: Front Catalyst) |
*2 |
EXHAUST MANIFOLD ASSEMBLY LH (TWC: Front Catalyst) |
*3 |
NO. 2 EXHAUST MANIFOLD HEAT INSULATOR |
*4 |
NO. 1 EXHAUST MANIFOLD HEAT INSULATOR |
*5 |
EXHAUST MANIFOLD TO HEAD GASKET (for Bank 1) |
*6 |
EXHAUST MANIFOLD TO HEAD GASKET (for Bank 2) |
*7 |
AIR FUEL RATIO SENSOR (for Bank 1) |
*8 |
AIR FUEL RATIO SENSOR (for Bank 2) |
*9 |
NO. 2 MANIFOLD STAY |
*10 |
V-BANK COVER SUB-ASSEMBLY |
*11 |
STUD BOLT |
*12 |
ENGINE OIL LEVEL DIPSTICK |
*13 |
ENGINE OIL LEVEL DIPSTICK GUIDE |
*14 |
ENGINE OIL LEVEL DIPSTICK GUIDE O-RING |
|
N*m (kgf*cm, ft.*lbf): Specified torque |
* |
For use with SST |
● |
Non-reusable part |
- |
- |
Installation
INSTALLATION
PROCEDURE
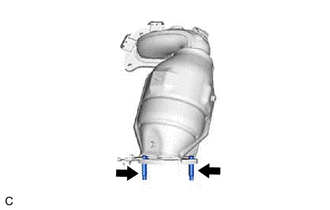
1. INSTALL STUD BOLT
HINT:
If a stud bolt is deformed or its threads are damaged, replace it.
(a) Using an E8 "TORX" socket wrench, install the 2 stud bolts to the exhaust manifold assembly LH (TWC: Front Catalyst). Torque: 19,5 N·m {199 kgf·cm, 14 ft·lbf} |
 |
2. INSTALL EXHAUST MANIFOLD TO HEAD GASKET (for Bank 2)
(a) Install a new exhaust manifold to head gasket (for Bank 2) to the cylinder head sub-assembly.
3. INSTALL EXHAUST MANIFOLD ASSEMBLY LH (TWC: Front Catalyst)
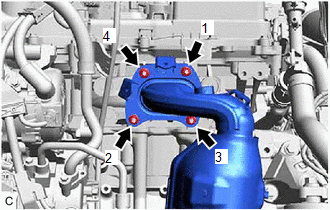
(a) Temporarily install the exhaust manifold assembly LH (TWC: Front Catalyst) with the 4 nuts.
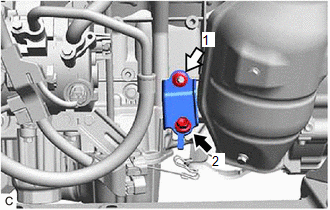
(b) Temporarily install the No. 2 manifold stay to the exhaust manifold assembly LH (TWC: Front Catalyst) and cylinder block sub-assembly with the bolt and nut.
(c) Using a 12 mm deep socket wrench, tighten the 4 nuts in the order shown in the illustration. Torque: 21 N·m {214 kgf·cm, 15 ft·lbf} |
 |
(d) Tighten the bolt and nut in the order shown in the illustration.
 |
Bolt |
 |
Nut |
Torque:
Nut :
35 N·m {357 kgf·cm, 26 ft·lbf}
Bolt :
34 N·m {347 kgf·cm, 25 ft·lbf}
4. CONNECT NO. 5 WATER BY-PASS HOSE
(a) Engage the 2 clamps to connect the No. 5 water by-pass hose and No. 6 water by-pass hose to the hose clamp.
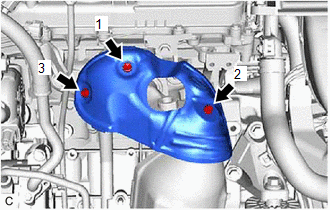
5. INSTALL NO. 2 EXHAUST MANIFOLD HEAT INSULATOR
(a) Install the No. 2 exhaust manifold heat insulator to the exhaust manifold assembly LH (TWC: Front Catalyst) with the 3 bolts in the order shown in the illustration. Torque: 8,5 N·m {87 kgf·cm, 75 in·lbf} |
 |
6. INSTALL ENGINE OIL LEVEL DIPSTICK GUIDE
Click here 
7. INSTALL AIR FUEL RATIO SENSOR (for Bank 2)
Click here
8. INSTALL COOL AIR INTAKE DUCT SEAL
Click here
9. INSTALL V-BANK COVER SUB-ASSEMBLY
Click here
10. INSTALL EXHAUST MANIFOLD TO HEAD GASKET (for Bank 1)
(a) Install a new exhaust manifold to head gasket (for Bank 1) to the cylinder head sub-assembly RH.
11. INSTALL EXHAUST MANIFOLD ASSEMBLY RH (TWC: Front Catalyst)
(a) Temporarily install the exhaust manifold assembly RH (TWC: Front Catalyst) with the 4 nuts.
(b) Using a 12 mm deep socket wrench, tighten the 4 nuts in the order shown in the illustration. Torque: 21 N·m {214 kgf·cm, 15 ft·lbf} |
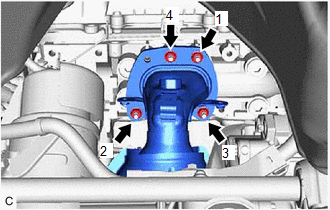 |
12. INSTALL NO. 1 EXHAUST MANIFOLD HEAT INSULATOR
(a) Install the No. 1 exhaust manifold heat insulator to the exhaust manifold assembly RH (TWC: Front Catalyst) with the 3 bolts in the order shown in the illustration. Torque: 8,5 N·m {87 kgf·cm, 75 in·lbf} |
|
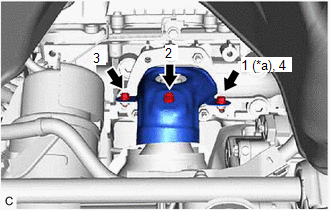
13. INSTALL AIR FUEL RATIO SENSOR (for Bank 1)
Click here
14. INSTALL FRONT EXHAUST PIPE ASSEMBLY (TWC: Rear Catalyst)
(a) Install 3 new gaskets to the front exhaust pipe assembly (TWC: Rear Catalyst).
(b) Connect the front exhaust pipe assembly (TWC: Rear Catalyst) to the exhaust pipe support.
(c) Install the front exhaust pipe assembly (TWC: Rear Catalyst) with 4 new bolts and 4 new nuts.
Torque:
43 N·m {438 kgf·cm, 32 ft·lbf}
(d) Engage the 2 wire harness clamps.
(e) Connect the 2 heated oxygen sensor connectors.
15. INSTALL NO. 1 EXHAUST PIPE SUPPORT BRACKET (for Lower Side)
Click here
16. INSTALL BODY MOUNTING PLATE
Click here
17. INSTALL FRONT FLOOR COVER LH
Click here
18. INSTALL FRONT FLOOR COVER RH
Click here
19. INSPECT FOR EXHAUST GAS LEAK
Click here
20. INSTALL REAR ENGINE UNDER COVER RH
Click here
21. INSTALL NO. 1 ENGINE UNDER COVER
Click here
22. INSTALL FRONT WHEEL OPENING EXTENSION PAD LH
Click here
23. INSTALL FRONT WHEEL OPENING EXTENSION PAD RH
Click here
Removal
REMOVAL
The necessary procedures (adjustment, calibration, initialization or registration) that must be performed after parts are removed and installed, or replaced during exhaust manifold assembly RH (TWC: Front Catalyst) and exhaust manifold assembly LH (TWC: Front Catalyst) removal/installation are shown below.
Necessary Procedures After Parts Removed/Installed/ReplacedReplaced Part or Performed Procedure | Necessary Procedure | Effect/Inoperative Function when Necessary Procedure not Performed | Link |
|---|---|---|---|
|
Inspection After Repair |
|
 |
CAUTION:
- To prevent burns, do not touch the engine, exhaust manifold or other high temperature components while the engine is hot.
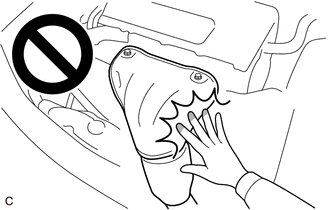
- To prevent burns, do not touch the engine, exhaust pipe or other high temperature components while the engine is hot.
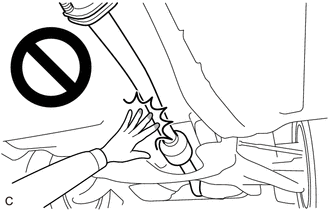
PROCEDURE
1. REMOVE FRONT FLOOR COVER LH
Click here
2. REMOVE FRONT FLOOR COVER RH
Click here
3. REMOVE BODY MOUNTING PLATE
Click here
4. REMOVE NO. 1 EXHAUST PIPE SUPPORT BRACKET (for Lower Side)
Click here
5. REMOVE FRONT EXHAUST PIPE ASSEMBLY (TWC: Rear Catalyst)
(a) Disconnect the 2 heated oxygen sensor connectors. |
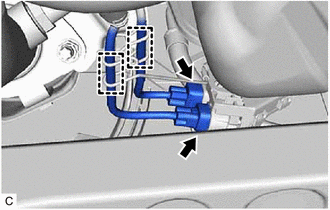 |
(b) Disengage the 2 wire harness clamps.
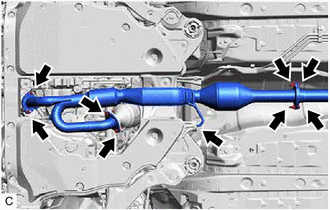
(c) Remove the 4 bolts, 4 nuts and disconnect the front exhaust pipe assembly (TWC: Rear Catalyst). |
 |
(d) Remove the front exhaust pipe assembly (TWC: Rear Catalyst) from the exhaust pipe support.
(e) Remove the 3 gaskets from the front exhaust pipe assembly (TWC: Rear Catalyst).
6. REMOVE AIR FUEL RATIO SENSOR (for Bank 1)
Click here
7. REMOVE NO. 1 EXHAUST MANIFOLD HEAT INSULATOR
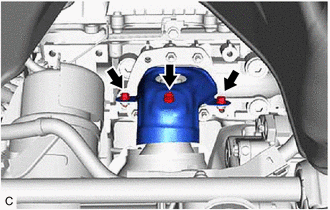
(a) Remove the 3 bolts and No. 1 exhaust manifold heat insulator from the exhaust manifold assembly RH (TWC: Front Catalyst). |
 |
8. REMOVE EXHAUST MANIFOLD ASSEMBLY RH (TWC: Front Catalyst)
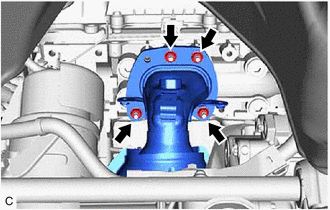
(a) Using a 12 mm deep socket wrench, remove the 4 nuts and exhaust manifold assembly RH (TWC: Front Catalyst) from the cylinder head sub-assembly RH. |
 |
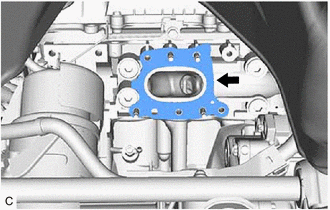
9. REMOVE EXHAUST MANIFOLD TO HEAD GASKET (for Bank 1)
(a) Remove the exhaust manifold to head gasket (for Bank 1) from the cylinder head sub-assembly RH. |
 |
10. REMOVE FRONT WHEEL OPENING EXTENSION PAD LH
Click here
11. REMOVE FRONT WHEEL OPENING EXTENSION PAD RH
Click here
12. REMOVE NO. 1 ENGINE UNDER COVER
Click here
13. REMOVE REAR ENGINE UNDER COVER RH
Click here
14. REMOVE V-BANK COVER SUB-ASSEMBLY
Click here
15. REMOVE COOL AIR INTAKE DUCT SEAL
Click here
16. REMOVE AIR FUEL RATIO SENSOR (for Bank 2)
Click here
17. REMOVE ENGINE OIL LEVEL DIPSTICK GUIDE
Click here
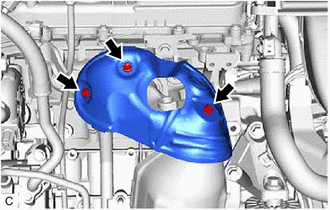
18. REMOVE NO. 2 EXHAUST MANIFOLD HEAT INSULATOR
(a) Remove the 3 bolts and No. 2 exhaust manifold heat insulator from the exhaust manifold assembly LH (TWC: Front Catalyst). |
 |
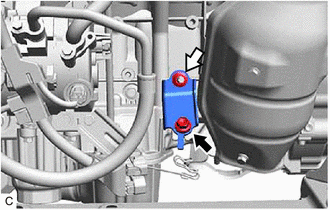
19. REMOVE NO. 2 MANIFOLD STAY
(a) Remove the bolt, nut and No. 2 manifold stay from the exhaust manifold assembly LH (TWC: Front Catalyst) and cylinder block sub-assembly.
 |
Bolt |
 |
Nut |
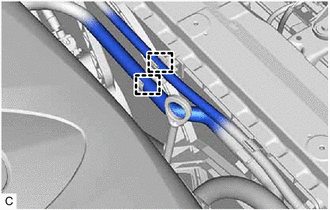
20. DISCONNECT NO. 5 WATER BY-PASS HOSE
(a) Disengage the 2 clamps to disconnect the No. 5 water by-pass hose and No. 6 water by-pass hose from the hose clamp. |
 |
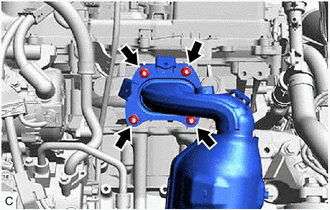
21. REMOVE EXHAUST MANIFOLD ASSEMBLY LH (TWC: Front Catalyst)
(a) Using a 12 mm deep socket wrench, remove the 4 nuts and exhaust manifold assembly LH (TWC: Front Catalyst). |
 |
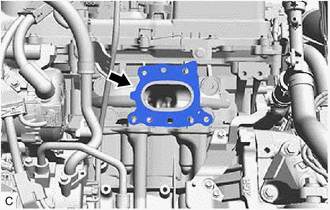
22. REMOVE EXHAUST MANIFOLD TO HEAD GASKET (for Bank 2)
(a) Remove the exhaust manifold to head gasket (for Bank 2) from the cylinder head sub-assembly. |
 |
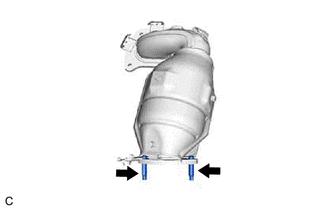
23. REMOVE STUD BOLT
HINT:
If a stud bolt is deformed or its threads are damaged, replace it.
(a) Using an E8 "TORX" socket wrench, remove the 2 stud bolts from the exhaust manifold assembly LH (TWC: Front Catalyst). |
 |