Camshaft Position Sensor "B" Bank 1 Signal Stuck in Range (P03652A,P036531). Exhaust Gas Recirculation "A" Low / Insufficient Flow (P04019C). Evaporative Emission System Incorrect Purge Flow Actuator
Camshaft Position Sensor "B" Bank 1 Signal Stuck in Range (P03652A,P036531)
DESCRIPTION
Refer to DTC P036511.
Click here 
DTC No. | Detection Item | DTC Detection Condition | Trouble Area | MIL | Memory | Note |
|---|---|---|---|---|---|---|
P03652A |
Camshaft Position Sensor "B" Bank 1 Signal Stuck in Range |
No camshaft position sensor (for exhaust camshaft) signal to ECM while engine cranking (1 trip detection logic). |
|
Comes on |
DTC stored |
SAE Code: P0365 |
P036531 |
Camshaft Position Sensor "B" Bank 1 No Signal |
No camshaft position sensor (for exhaust camshaft) signal for 5 seconds at an engine speed of 600 rpm or higher (1 trip detection logic). |
|
Comes on |
DTC stored |
SAE Code: P0365 |
Reference: Inspection using an oscilloscope.
Click here
MONITOR DESCRIPTION
If no pulse signal is transmitted by the camshaft position sensor (for exhaust camshaft) despite the camshaft rotating, or the rotation of the camshaft and the crankshaft is not synchronized, the ECM interprets this as a malfunction of the sensor.
MONITOR STRATEGY
Related DTCs |
P0365: Exhaust camshaft position sensor verify pulse input |
Required Sensors/Components (Main) |
Camshaft position sensor (for exhaust camshaft) |
Required Sensors/Components (Related) |
Crankshaft position sensor |
Frequency of Operation |
Continuous |
Duration |
2 times: Case 1 5 seconds: Case 2 |
MIL Operation |
Immediate |
Sequence of Operation |
None |
TYPICAL ENABLING CONDITIONS
Case 1Monitor runs whenever the following DTCs are not stored |
None |
Both of the following conditions are met |
- |
Starter |
After off to on timing |
Minimum auxiliary battery voltage while starter on |
Less than 11 V |
All of the following conditions are met |
- |
Engine speed |
600 rpm or higher |
Exhaust camshaft position sensor range check fail (P0367, P0368) |
Not detected |
Power switch |
On (IG) |
Auxiliary battery voltage |
8 V or higher |
Exhaust camshaft position sensor voltage |
0.3 to 4.7 V |
Hybrid control module judge |
Engine running |
Lost communication with hybrid vehicle control ECU assembly (U0293) |
Not detected |
TYPICAL MALFUNCTION THRESHOLDS
Exhaust camshaft position sensor signal |
No signal |
CONFIRMATION DRIVING PATTERN
HINT:
- After repair has been completed, clear the DTC and then check that the vehicle has returned to normal by performing the following All Readiness check procedure.
Click here
- When clearing the permanent DTCs, refer to the "CLEAR PERMANENT DTC" procedure.
Click here
- Connect the Techstream to the DLC3.
- Turn the power switch on (IG).
- Turn the Techstream on.
- Clear the DTCs (even if no DTCs are stored, perform the clear DTC procedure).
- Turn the power switch off and wait for at least 30 seconds.
- Turn the power switch on (IG).
- Turn the Techstream on.
- Put the engine in Inspection Mode (Maintenance Mode).
Click here
- Start the engine [A].
- Idle the engine for 10 seconds or more [B].
- Enter the following menus: Powertrain / Engine / Trouble Codes [C].
- Read the pending DTCs.
HINT:
- If a pending DTC is output, the system is malfunctioning.
- If a pending DTC is not output, perform the following procedure.
- Enter the following menus: Powertrain / Engine / Utility / All Readiness.
- Input the DTC: P03652A or P036531.
- Check the DTC judgment result.
Techstream Display
Description
NORMAL
- DTC judgment completed
- System normal
ABNORMAL
- DTC judgment completed
- System abnormal
INCOMPLETE
- DTC judgment not completed
- Perform driving pattern after confirming DTC enabling conditions
HINT:
- If the judgment result is NORMAL, the system is normal.
- If the judgment result is ABNORMAL, the system is malfunctioning.
- If the judgment result is INCOMPLETE, perform steps [B] through [C] again.
- [A] to [C]: Normal judgment procedure.
The normal judgment procedure is used to complete DTC judgment and also used when clearing permanent DTCs.
- When clearing the permanent DTCs, do not disconnect the cable from the auxiliary battery terminal or attempt to clear the DTCs during this procedure, as doing so will clear the universal trip and normal judgment histories.
WIRING DIAGRAM
Refer to DTC P036511.
Click here
NOTICE:
- Vehicle Control History may be stored in the hybrid vehicle control ECU assembly if the engine is malfunctioning. Certain vehicle condition information is recorded when Vehicle Control History is stored. Reading the vehicle conditions recorded in both the Freeze Frame Data and Vehicle Control History can be useful for troubleshooting.
Click here
(Select Powertrain in Health Check and then check the time stamp data.)
Click here
- If any "Engine Malfunction" Vehicle Control History item has been stored in the hybrid vehicle control ECU assembly, make sure to clear it. However, as all Vehicle Control History items are cleared simultaneously, if any Vehicle Control History items other than "Engine Malfunction" are stored, make sure to perform any troubleshooting for them before clearing Vehicle Control History.
Click here
HINT:
- If no problem is found through this diagnostic troubleshooting procedure, there may be a mechanical problem with the engine.
- Read Freeze Frame Data using the Techstream. The ECM records vehicle and driving condition information as Freeze Frame Data the moment a DTC is stored. When troubleshooting, Freeze Frame Data can help determine if the vehicle was moving or stationary, if the engine was warmed up or not, if the air fuel ratio was lean or rich, and other data from the time the malfunction occurred.
PROCEDURE
CHECK HARNESS AND CONNECTOR
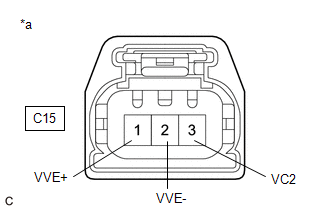
*a |
Front view of wire harness connector (to Camshaft Position Sensor (for Exhaust Camshaft)) |
HINT:
Make sure that the connector is properly connected. If it is not, securely connect it and check for DTCs again.
(a) Disconnect the camshaft position sensor (for exhaust camshaft) connector.
(b) Turn the power switch on (IG).
(c) Measure the voltage according to the value(s) in the table below.
Standard Voltage:
Tester Connection | Condition | Specified Condition |
|---|---|---|
C15-3 (VC2) - Body ground |
Power switch on (IG) |
4.5 to 5.5 V |
C15-1 (VVE+) - Body ground |
Power switch on (IG) |
3.0 to 5.0 V |
(d) Turn the power switch off and wait for at least 30 seconds.
(e) Measure the resistance according to the value(s) in the table below.
Standard Resistance:
Tester Connection | Condition | Specified Condition |
|---|---|---|
C15-3 (VC2) - C15-1 (VVE+) |
Power switch off |
1.425 to 1.575 kΩ |
C15-2 (VVE-) - Body ground |
Always |
Below 1 Ω |
| NG |  |
GO TO STEP 4 |
|

CHECK SENSOR INSTALLATION AND CONDUCT VISUAL INSPECTION (CAMSHAFT POSITION SENSOR (FOR EXHAUST CAMSHAFT))
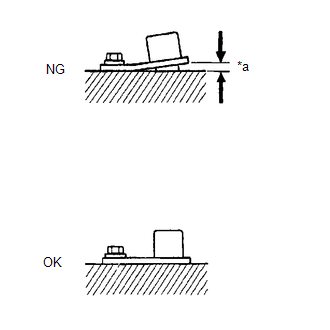
*a |
Clearance |
(a) Visually check the camshaft position sensor (for exhaust camshaft) for damage.
(b) Check the camshaft position sensor (for exhaust camshaft) installation condition.
OK:
The camshaft position sensor (for exhaust camshaft) does not have any damage and is installed properly.
| NG | |
SECURELY REINSTALL CAMSHAFT POSITION SENSOR (FOR EXHAUST CAMSHAFT) |
|
INSPECT EXHAUST CAMSHAFT (TIMING ROTOR)
(a) Check the timing rotor of the exhaust camshaft.
OK:
Camshaft timing rotor does not have any cracks or deformation.
HINT:
Perform "Inspection After Repair" after replacing the exhaust camshaft.
Click here
| OK | |
REPLACE CAMSHAFT POSITION SENSOR (FOR EXHAUST CAMSHAFT) |
| NG | |
REPLACE EXHAUST CAMSHAFT |
CHECK HARNESS AND CONNECTOR (CAMSHAFT POSITION SENSOR (FOR EXHAUST CAMSHAFT) - ECM)
(a) Disconnect the camshaft position sensor (for exhaust camshaft) connector.
(b) Disconnect the ECM connector.
(c) Measure the resistance according to the value(s) in the table below.
Standard Resistance:
Tester Connection | Condition | Specified Condition |
|---|---|---|
C15-1 (VVE+) - C55-91 (EV1+) |
Always |
Below 1 Ω |
C15-2 (VVE-) - C55-114 (EV1-) |
Always |
Below 1 Ω |
C15-3 (VC2) - C55-113 (VCE1) |
Always |
Below 1 Ω |
C15-1 (VVE+) or C55-91 (EV1+) - Body ground and other terminals |
Always |
10 kΩ or higher |
C15-2 (VVE-) or C55-114 (EV1-) - Body ground and other terminals |
Always |
10 kΩ or higher |
C15-3 (VC2) or C55-113 (VCE1) - Body ground and other terminals |
Always |
10 kΩ or higher |
| OK | |
REPLACE ECM |
| NG | |
REPAIR OR REPLACE HARNESS OR CONNECTOR |
Exhaust Gas Recirculation "A" Low / Insufficient Flow (P04019C)
DESCRIPTION
Based on the driving conditions, the ECM regulates the volume of exhaust gas that is recirculated to each engine cylinder in order to lower the combustion temperature and reduce NOx emissions. The ECM monitors signals such as engine speed, engine coolant temperature, electric load, and vehicle speed. When the EGR permission conditions are met, the ECM controls the opening of the EGR valve linearly through signals to the EGR step motor.
DTC No. | Detection Item | DTC Detection Condition | Trouble Area | MIL | Memory | Note |
|---|---|---|---|---|---|---|
P04019C |
Exhaust Gas Recirculation "A" Low / Insufficient Flow |
Change in intake manifold pressure is small when the EGR valve opened and closed during fuel cut operation (2 trip detection logic). |
|
Comes on |
DTC stored |
SAE Code: P0401 |
MONITOR DESCRIPTION
The ECM monitors the pressure inside the intake manifold while opening and closing the EGR valve during fuel cut operation. If there is no change in the manifold absolute pressure sensor value, the ECM interprets this as a malfunction of the EGR valve assembly, illuminates the MIL and stores this DTC.
MONITOR STRATEGY
Related DTC |
P0401: EGR valve high flow rate/low flow rate |
Required Sensors/Components (Main) |
EGR valve assembly Manifold absolute pressure sensor |
Required Sensors/Components (Related) |
Engine coolant temperature sensor |
Frequency of Operation |
Once per driving cycle |
Duration |
Within 5 seconds |
MIL operation |
2 driving cycles |
Sequence of operation |
None |
TYPICAL ENABLING CONDITIONS
Monitor runs whenever the following DTCs are not stored |
P0010, P1360, P1362, P1364, P1366, P2614 (Motor drive VVT system control module) P0011 (VVT system - advance) P0012 (VVT system - retard) P0013 (Exhaust VVT oil control solenoid) P0014 (Exhaust VVT system - advance) P0015 (Exhaust VVT system - retard) P0016 (VVT system - misalignment) P0017 (Exhaust VVT system - misalignment) P0031, P0032, P101D (Air fuel ratio sensor (sensor 1) heater) P0101, P0102, P0103 (Mass air flow meter) P0106, P0107, P0108 (Manifold absolute pressure) P0111, P0112, P0113 (Intake air temperature sensor) P0116, P0117, P0118 (Engine coolant temperature sensor) P0121, P0122, P0123, P0222, P0223, P2135 (Throttle position sensor) P0125 (Insufficient coolant temperature for closed loop fuel control) P014C, P014D, P015A, P015B, P2195, P2196, P2237, P2238, P2239, P2252, P2253 (Air fuel ratio sensor (sensor 1)) P0171, P0172 (Fuel system) P0327, P0328 (Knock control sensor) P0335, P0337, P0338 (Crankshaft position sensor) P0340, P0342, P0343 (Camshaft position sensor) P0365, P0367, P0368 (Exhaust camshaft position sensor) P0489, P0490 (EGR control circuit) P0657, P2102, P2103, P2111, P2112, P2119 (Throttle actuator) P106A (Evaporative emission control system pressure sensor - manifold pressure sensor correlation) P11EA, P11EC, P11ED, P11EE, P11EF, P219A, P219C, P219D, P219E, P219F (Air-fuel ratio imbalance) P2228, P2229 (Atmospheric pressure sensor) |
Time after engine started |
3 seconds or more |
Time after engine fuel cut |
2597 msec or more |
Engine speed |
950 to 1600 rpm |
Vehicle speed |
20 km/h or more |
Engine coolant temperature |
75 °C or higher |
Auxiliary battery voltage |
11 V or higher |
Intake air temperature |
-10°C (14°F) or higher |
Atmospheric pressure |
76 kPa(abs) [11 psi(abs)] or higher |
TYPICAL MALFUNCTION THRESHOLDS
Manifold pressure change |
Less than 1.72 kPa [0.25 psi] |
At engine speed |
2400 rpm |
MONITOR RESULT
Refer to detailed information in Checking Monitor Status.
Click here 
Monitor ID | Test ID | Scaling | Unit | Description |
|---|---|---|---|---|
$31 |
$BD |
Multiply by 0.01 |
kPa |
Delta manifold absolute pressure |
CONFIRMATION DRIVING PATTERN
HINT:
- After repair has been completed, clear the DTC and then check that the vehicle has returned to normal by performing the following All Readiness check procedure.
Click here
- When clearing the permanent DTCs, refer to the "CLEAR PERMANENT DTC" procedure.
Click here
- Connect the Techstream to the DLC3.
- Turn the power switch on (IG).
- Turn the Techstream on.
- Clear the DTCs (even if no DTCs are stored, perform the clear DTC procedure).
- Turn the power switch off and wait for at least 30 seconds.
- Turn the power switch on (IG).
- Turn the Techstream on.
- Put the engine in Inspection Mode (Maintenance Mode).
Click here
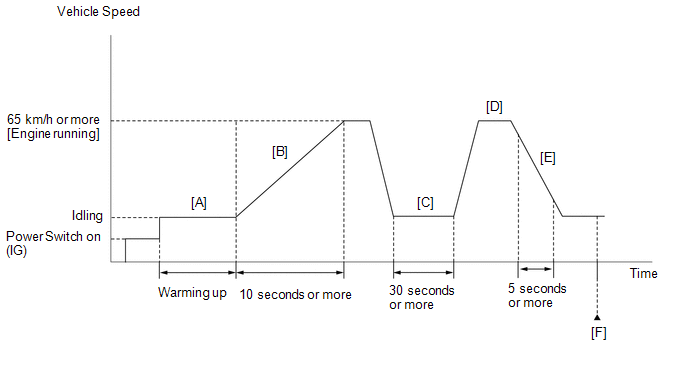
- Start the engine and warm it up until the engine coolant temperature reaches 75 °C or higher [A].
- With the engine running, accelerate the vehicle to 65 km/h or more by depressing the accelerator pedal for at least 10 seconds [B].
CAUTION:
When performing the confirmation driving pattern, obey all speed limits and traffic laws.
HINT:
When accelerating the vehicle, depress the accelerator pedal more than normal to start the engine.
- Idle the engine for 30 seconds or more [C].
- With the shift lever in S and the engine running, accelerate the vehicle to 65 km/h or more [D].
CAUTION:
When performing the confirmation driving pattern, obey all speed limits and traffic laws.
HINT:
If the engine stops, further depress the accelerator pedal to restart the engine.
- Perform the fuel cut operation for 5 seconds or more, with the accelerator pedal fully released [E].
- Enter the following menus: Powertrain / Engine / Monitor / Current Monitor [F].
- Check that Exhaust Gas Recirculation/VVT / Current is Complete.
HINT:
If the monitor item Exhaust Gas Recirculation/VVT / Current is Incomplete, perform the driving pattern again.
- Enter the following menus: Powertrain / Engine / Monitor / Current Monitor / Exhaust Gas Recirculation/VVT / Details.
- Check the Details (EGR FLOW INSUFFICIENCY).
HINT:
Make sure that the value is between MIN and MAX.
- If the monitor item Exhaust Gas Recirculation/VVT / Current is still Incomplete, perform the following procedure.
- Enter the following menus: Powertrain / Engine / Trouble Codes.
- Read the pending DTCs.
HINT:
- If a pending DTC is output, the system is malfunctioning.
- If a pending DTC is not output, perform the following procedure.
- Enter the following menus: Powertrain / Engine / Utility / All Readiness.
- Input the DTC P04019C.
- Check the DTC judgment result.
Techstream Display
Description
NORMAL
- DTC judgment completed
- System normal
ABNORMAL
- DTC judgment completed
- System abnormal
INCOMPLETE
- DTC judgment not completed
- Perform driving pattern after confirming DTC enabling conditions
HINT:
- If the judgment result is NORMAL, the system is normal.
- If the judgment result is ABNORMAL, the system has a malfunction.
- If the judgment result is INCOMPLETE, perform the steps [A] through [F] again.
- [A] to [F]: Normal judgment procedure.
The normal judgment procedure is used to complete DTC judgment and also used when clearing permanent DTCs.
- When clearing the permanent DTCs, do not disconnect the cable from the auxiliary battery terminal or attempt to clear the DTCs during this procedure, as doing so will clear the universal trip and normal judgment histories.
WIRING DIAGRAM
Refer to DTC P040318.
Click here
NOTICE:
- Vehicle Control History may be stored in the hybrid vehicle control ECU assembly if the engine is malfunctioning. Certain vehicle condition information is recorded when Vehicle Control History is stored. Reading the vehicle conditions recorded in both the Freeze Frame Data and Vehicle Control History can be useful for troubleshooting.
Click here
(Select Powertrain in Health Check and then check the time stamp data.)
Click here
- If any "Engine Malfunction" Vehicle Control History item has been stored in the hybrid vehicle control ECU assembly, make sure to clear it. However, as all Vehicle Control History items are cleared simultaneously, if any Vehicle Control History items other than "Engine Malfunction" are stored, make sure to perform any troubleshooting for them before clearing Vehicle Control History.
Click here
HINT:
- By using the Control the EGR Step Position Active Test, the operation of the EGR valve can be checked.
- If the EGR valve is normal and is opened using the Active Test, the Data List value changes as follows.
Data List Item
Change in Data List when Number of Steps is Increased Using Control the EGR Step Position Active Test
Intake Manifold Absolute Pressure
Pressure rises
- Read Freeze Frame Data using the Techstream. The ECM records vehicle and driving condition information as Freeze Frame Data the moment a DTC is stored. When troubleshooting, Freeze Frame Data can help determine if the vehicle was moving or stationary, if the engine was warmed up or not, if the air fuel ratio was lean or rich, and other data from the time the malfunction occurred.
PROCEDURE
CHECK ANY OTHER DTCS OUTPUT (IN ADDITION TO DTC P04019C)
(a) Connect the Techstream to the DLC3.
(b) Turn the power switch on (IG).
(c) Turn the Techstream on.
(d) Enter the following menus: Powertrain / Engine / Trouble Codes.
(e) Read the DTCs.
Powertrain > Engine > Trouble CodesResult | Proceed to |
|---|---|
DTC P04019C is output |
A |
DTC P04019C and other DTCs are output |
B |
HINT:
If any DTCs other than P04019C are output, troubleshoot those DTCs first.
| B |  |
GO TO DTC CHART |
|

READ VALUE USING TECHSTREAM (INTAKE MANIFOLD ABSOLUTE PRESSURE)
(a) Connect the Techstream to the DLC3.
(b) Turn the power switch on (IG).
(c) Turn the Techstream on.
(d) Enter the following menus: Powertrain / Engine / Data List / Intake Manifold Absolute Pressure.
Powertrain > Engine > Data ListIntake Manifold Absolute Pressure
(e) Read the value of Intake Manifold Absolute Pressure.
Standard:
Techstream Display | Specified Condition |
|---|---|
Intake Manifold Absolute Pressure |
80 to 110 kPa (11.6 to 15.95 psi) |
| NG | |
REPLACE MANIFOLD ABSOLUTE PRESSURE SENSOR |
|
PERFORM ACTIVE TEST USING TECHSTREAM (CONTROL THE EGR STEP POSITION)
(a) Connect the Techstream to the DLC3.
(b) Turn the power switch on (IG).
(c) Turn the Techstream on.
(d) Put the engine in Inspection Mode (Maintenance Mode).
Powertrain > Hybrid Control > UtilityInspection Mode
(e) Start the engine and warm it up until the engine coolant temperature is 75 °C or higher.
HINT:
The A/C switch and all accessories should be off.
(f) Enter the following menus: Powertrain / Engine / Active Test / Control the EGR Step Position / Data List / Intake Manifold Absolute Pressure, Coolant Temperature and Engine Independent.
Powertrain > Engine > Active TestControl the EGR Step Position
Data List Display |
|---|
Intake Manifold Absolute Pressure |
Coolant Temperature |
Engine Independent |
(g) According to the display on the Techstream, compare the values of Data List item Intake Manifold Absolute Pressure before and while performing the Active Test.
NOTICE:
- Make sure that the value of Data List item Engine Independent is "Operate" while performing the Active Test.
- Do not leave the EGR valve open for 10 seconds or more during the Active Test.
- Be sure to return the EGR valve to step 0 when the Active Test is completed.
- Do not open the EGR valve 30 steps or more during the Active Test.
Standard:
The value of Intake Manifold Absolute Pressure changes according to the EGR valve step set by the Active Test.
Data List | Control the EGR Step Position (Active Test) |
||
|---|---|---|---|
Before Active Test (Engine idling) | 0 Steps | 0 to 30 Steps (Engine idling) |
|
Intake Manifold Absolute Pressure |
20 to 40 kPa (2.9 to 5.8 psi) |
(EGR valve is fully closed) |
Intake Manifold Absolute Pressure value is at least +10 kPa (1.45 psi) higher than when EGR valve is fully closed |
HINT:
- If the value of Data List item Engine Independent is "Not Opr" when the engine is idling, charge control is being performed. Perform the Active Test after charge control is complete ("Operate" is displayed).
- While performing the Active Test, if the increase in the value of Intake Manifold Absolute Pressure is small, the EGR valve assembly may be malfunctioning.
- Even if the EGR valve assembly is malfunctioning, rough idling or an increase in the value of Intake Manifold Absolute Pressure may occur while performing the Active Test. However, the amount that the value of Intake Manifold Absolute Pressure increases will be smaller than normal.
Result | Proceed to |
|---|---|
Before performing the Active Test (while the engine is idling), the value of Intake Manifold Absolute Pressure is not between 20 to 40 kPa (2.9 to 5.8 psi). |
A |
When performing the Active Test to change the EGR valve step between 0 (EGR valve fully closed) and 30, the value of Intake Manifold Absolute Pressure changes less than 10 kPa (1.45 psi). |
B |
Other than above |
C |
| B | |
GO TO STEP 6 |
| C | |
GO TO STEP 12 |
|
CHECK INTAKE SYSTEM
(a) Check the intake system for vacuum leaks.
Click here
OK:
No leaks from intake system.
HINT:
Perform "Inspection After Repair" after repairing or replacing the intake system.
Click here
| NG | |
REPAIR OR REPLACE INTAKE SYSTEM |
|
INSPECT EGR VALVE ASSEMBLY
(a) Remove the EGR valve assembly.
Click here
(b) Check if the EGR valve is stuck open.
OK:
EGR valve is tightly closed.
HINT:
Perform "Inspection After Repair" after replacing the EGR valve assembly.
Click here
| OK | |
REPLACE MANIFOLD ABSOLUTE PRESSURE SENSOR |
| NG | |
REPLACE EGR VALVE ASSEMBLY |
REPLACE EGR VALVE ASSEMBLY
(a) Replace the EGR valve assembly.
Click here
HINT:
Perform "Inspection After Repair" after replacing the EGR valve assembly.
Click here
|
CLEAR DTC
(a) Connect the Techstream to the DLC3.
(b) Turn the power switch on (IG).
(c) Turn the Techstream on.
(d) Clear the DTCs.
Powertrain > Engine > Clear DTCs(e) Turn the power switch off and wait for at least 30 seconds.
|
CHECK WHETHER DTC OUTPUT RECURS (DTC P04019C)
(a) Drive the vehicle in accordance with the driving pattern described in Confirmation Driving Pattern.
(b) Enter the following menus: Powertrain / Engine / Trouble Codes.
(c) Read the DTCs.
Powertrain > Engine > Trouble CodesResult | Proceed to |
|---|---|
DTCs are not output |
A |
DTC P04019C is output |
B |
| A | |
END |
|
REPLACE EGR COOLER ASSEMBLY
(a) Replace the EGR cooler assembly.
Click here
HINT:
- If any of the EGR system related pipes (EGR pipe, exhaust manifold, etc.) are cracked, damaged or clogged, replace them as necessary.
- Perform "Inspection After Repair" after replacing the EGR system.
Click here
|
CLEAR DTC
(a) Connect the Techstream to the DLC3.
(b) Turn the power switch on (IG).
(c) Turn the Techstream on.
(d) Clear the DTCs.
Powertrain > Engine > Clear DTCs(e) Turn the power switch off and wait for at least 30 seconds.
|
CHECK WHETHER DTC OUTPUT RECURS (DTC P04019C)
(a) Drive the vehicle in accordance with the driving pattern described in Confirmation Driving Pattern.
(b) Enter the following menus: Powertrain / Engine / Trouble Codes.
(c) Read the DTCs.
Powertrain > Engine > Trouble CodesOK:
DTCs are not output.
| NEXT | |
END |
CLEAR DTC
(a) Connect the Techstream to the DLC3.
(b) Turn the power switch on (IG).
(c) Turn the Techstream on.
(d) Clear the DTCs.
Powertrain > Engine > Clear DTCs(e) Turn the power switch off and wait for at least 30 seconds.
|
CHECK WHETHER DTC OUTPUT RECURS (DTC P04019C)
(a) Drive the vehicle in accordance with the driving pattern described in Confirmation Driving Pattern.
(b) Enter the following menus: Powertrain / Engine / Trouble Codes.
(c) Read the DTCs.
Powertrain > Engine > Trouble CodesResult | Proceed to |
|---|---|
DTCs are not output |
A |
DTC P04019C is output |
B |
HINT:
Perform "Inspection After Repair" after replacing the EGR valve assembly.
Click here
| A | |
END |
| B | |
REPLACE EGR VALVE ASSEMBLY |
Evaporative Emission System Incorrect Purge Flow Actuator Stuck On (P04417E,P04417F,P04419C)
DTC SUMMARY
DTC No. | Detection Item | DTC Detection Condition | Trouble Area | MIL | Memory | Note |
|---|---|---|---|---|---|---|
P04417E |
Evaporative Emission System Incorrect Purge Flow Actuator Stuck On |
The stabilized EVAP system pressure is higher than [second reference pressure x 0.2] and the purge VSV is judged as stuck on. |
|
Comes on |
DTC stored |
SAE Code: P0441 |
P04417F |
Evaporative Emission System Incorrect Purge Flow Actuator Stuck Off |
When the purge VSV is opened, the EVAP system pressure does not return to near atmospheric pressure and the purge VSV is judged as stuck off. |
|
Comes on |
DTC stored |
SAE Code: P0441 |
P04419C |
Evaporative Emission System Incorrect Purge Flow Low/Insufficient Flow |
The following conditions are met successively while the engine is running:
|
|
Comes on |
DTC stored |
SAE Code: P0441 |
DTC No. | Monitoring Item | Detection Timing | Detection Logic | SAE Code |
|---|---|---|---|---|
P04417E |
Purge VSV (Vacuum Switching Valve) stuck on (open) |
While power switch off |
2 trip |
P0441 |
P04417F |
Purge VSV stuck off (closed) |
While power switch off |
||
P04419C |
Purge flow |
While engine running |
DESCRIPTION
Refer to EVAP (Evaporative Emission) System.
Click here 
MONITOR DESCRIPTION
The 2 monitors, Key-off and Purge Flow, are used to detect malfunctions relating to DTCs P04417E, P04417F and P04419C. The key-off monitor is initiated by the ECM internal timer, known as the soak timer, 5 hours* after the power switch is turned off. The purge flow monitor runs while the engine is running.
HINT:
*: If the engine coolant temperature is not less than 35 °C 5 hours after the power switch is turned off, the monitor check starts 2 hours later. If it is still not less than 35 °C 7 hours after the power switch is turned off, the monitor check starts 2.5 hours later.
- KEY-OFF MONITOR
- Purge VSV stuck open
In operation C, the leak detection pump creates negative pressure (vacuum) in the EVAP system. The EVAP system pressure is then measured by the ECM using the canister pressure sensor. If the stabilized system pressure is higher than [second reference pressure x 0.2], the ECM interprets this as the purge VSV (Vacuum Switching Valve) being stuck open. The ECM illuminates the MIL and stores the DTC (2 trip detection logic).
- Purge VSV stuck closed
During sequence D, the canister pressure sensor measures the EVAP system pressure. The pressure measurement for purge VSV monitor is begun when the purge VSV is turned on (open) after the EVAP leak check. When the measured pressure indicates an increase of 0.3 kPa [0.04 psi] or higher, the purge VSV is functioning normally. If the pressure does not increase, the ECM interprets this as the purge VSV being stuck closed. The ECM illuminates the MIL and stores the DTC (2 trip detection logic).
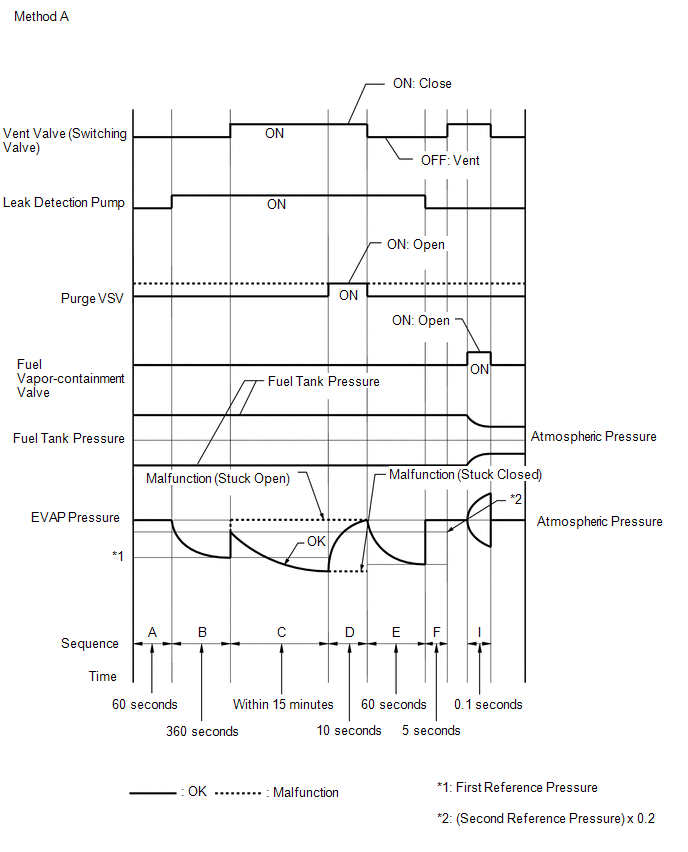
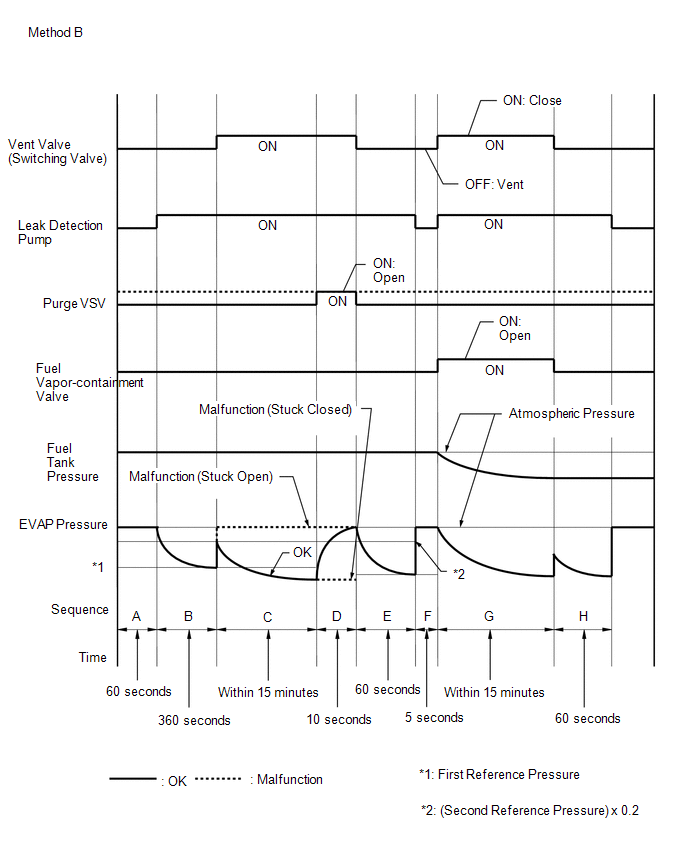
- Purge VSV stuck open
- PURGE FLOW MONITOR
The purge flow monitor consists of 2 monitors. The 1st monitor is conducted every time and the 2nd monitor is activated if necessary.
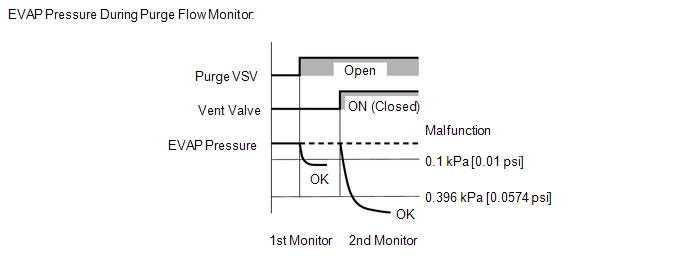
- The 1st monitor
While the engine is running and the purge VSV is on (open), the ECM monitors the purge flow by measuring the EVAP pressure change. If negative pressure is not created, the ECM begins the 2nd monitor.
- The 2nd monitor
The vent valve is turned on (closed) and the EVAP pressure is then measured. If the variation in the pressure is less than 0.396 kPa [0.0574 psi], the ECM interprets this as the Purge VSV being stuck closed. The ECM illuminates the MIL and stores DTC P04419C (2 trip detection logic).
Atmospheric pressure check:
In order to ensure reliable malfunction detection, the variation in atmospheric pressure, before and after performing the purge flow monitor, is measured by the ECM.
MONITOR STRATEGY
Required Sensors/Components (Main) |
Purge VSV Canister pump module |
Required Sensors/Components (Related) |
- |
Frequency of Operation |
Once per driving cycle |
Duration |
Within 30 seconds: Purge flow Within 20 minutes: Purge VSV stuck open/closed |
MIL Operation |
2 driving cycles |
Sequence of Operation |
None |
TYPICAL ENABLING CONDITIONS
Key-off Monitor (Purge VSV Stuck Open/Closed)Key-off monitor runs when all of the following conditions are met |
- |
Atmospheric pressure |
70 kPa(abs) [10.2 psi(abs)] or higher, and less than 110 kPa(abs) [16 psi(abs)] |
Auxiliary battery voltage |
10.5 V or higher |
Vehicle speed |
Less than 4 km/h |
Power switch |
Off |
Engine condition |
Not running |
Key-OFF duration |
5, 7 or 9.5 hours |
Pressure sensor of canister pump module malfunction (P0451, P0452, P0453) |
Not detected |
Fuel tank pressure sensor malfunction (P1451, P1452, P1453) |
Not detected |
Purge VSV |
Not operated by scan tool |
Vent valve |
Not operated by scan tool |
Fuel vapor-containment valve |
Not operated by scan tool |
Leak detection pump |
Not operated by scan tool |
Purge flow before key-OFF |
Performed |
Engine coolant temperature |
4,4 °C or higher, and less than 35 °C |
Intake air temperature |
4,4 °C or higher, and less than 35 °C |
Engine |
Running |
Engine coolant temperature |
4,4 °C or higher |
Intake air temperature |
4,4 °C or higher |
Pressure sensor of canister pump module malfunction (P0451, P0452, P0453) |
Not detected |
Purge VSV |
Not operated by scan tool |
EVAP system check |
Not operated by scan tool |
Auxiliary battery voltage |
10 V or higher (varies with intake air temperature) |
Purge duty-cycle |
8% or higher |
TYPICAL MALFUNCTION THRESHOLDS
Purge VSV Stuck OpenEVAP pressure when vacuum introduction for canister was complete |
Higher than [reference pressure x 0.2] |
EVAP pressure change for 10 seconds after purge VSV on (open) |
Less than 0.3 kPa [0.04 psi] |
Both of the following conditions are met |
- |
EVAP pressure change when purge flow is started |
Less than 0.1 kPa [0.01 psi] |
EVAP pressure change during purge flow when vent valve is on (closed) |
Less than 0.396 kPa [0.0574 psi] |
MONITOR RESULT
Refer to EVAP System.
Click here
CONFIRMATION DRIVING PATTERN
NOTICE:
- The Evaporative System Check (Automatic Mode) consists of 9 steps performed automatically by the Techstream. It takes a maximum of approximately 40 minutes.
- Do not perform the Evaporative System Check when the fuel tank is more than 90% full because the cut-off valve may be closed, making the fuel tank leak check unavailable.
- Do not start the engine during this operation.
- When the temperature of the fuel is 35 °C or higher, a large amount of vapor will from and any check result will be inaccurate. When performing the Evaporative System Check, keep the fuel temperature less than 35 °C.
HINT:
- After repair has been completed, clear the DTC and then check that the vehicle has returned to normal by performing the following All Readiness check procedure.
Click here
- When clearing the permanent DTCs, refer to the "CLEAR PERMANENT DTC" procedure.
Click here
- Connect the Techstream to the DLC3.
- Turn the power switch on (IG).
- Turn the Techstream on.
- Clear the DTCs (even if no DTCs are stored, perform the clear DTC procedure).
- Turn the power switch off and wait for at least 30 seconds.
- Turn the power switch on (IG) [A].
- Turn the Techstream on.
- Enter the following menus: Powertrain / Engine / Utility / Evaporative System Check / Automatic Mode [B].
- After the Evaporative System Check is completed, check for All Readiness by entering the following menus: Powertrain / Engine / Utility / All Readiness.
- Input the DTC: P04417E or P04417F.
- Check the DTC judgment result.
Techstream Display
Description
NORMAL
- DTC judgment completed
- System normal
ABNORMAL
- DTC judgment completed
- System abnormal
INCOMPLETE
- DTC judgment not completed
- Perform driving pattern after confirming DTC enabling conditions
HINT:
- If the judgment result is NORMAL, the system is normal.
- If the judgment result is ABNORMAL, the system is malfunctioning.
- [A] to [B]: Normal judgment procedure.
The normal judgment procedure is used to complete DTC judgment and also used when clearing permanent DTCs.
- When clearing the permanent DTCs, do not disconnect the cable from the auxiliary battery terminal or attempt to clear the DTCs during this procedure, as doing so will clear the universal trip and normal judgment histories.
- Connect the Techstream to the DLC3.
- Turn the power switch on (IG).
- Turn the Techstream on.
- Clear the DTCs (even if no DTCs are stored, perform the clear DTC procedure).
- Turn the power switch off and wait for at least 30 seconds.
- Turn the power switch on (IG).
- Turn the Techstream on.
- Put the engine in Inspection Mode (Maintenance Mode).
Click here
- Start the engine and wait 15 minutes or more [A].
- Enter the following menus: Powertrain / Engine / Trouble Codes [B].
- Read the pending DTCs.
HINT:
- If a pending DTC is output, the system is malfunctioning.
- If a pending DTC is not output, perform the following procedure.
- Enter the following menus: Powertrain / Engine / Utility / All Readiness.
- Input the DTC: P04419C.
- Check the DTC judgment result.
Techstream Display
Description
NORMAL
- DTC judgment completed
- System normal
ABNORMAL
- DTC judgment completed
- System abnormal
INCOMPLETE
- DTC judgment not completed
- Perform driving pattern after confirming DTC enabling conditions
HINT:
- If the judgment result is NORMAL, the system is normal.
- If the judgment result is ABNORMAL, the system is malfunctioning.
- [A] to [B]: Normal judgment procedure.
The normal judgment procedure is used to complete DTC judgment and also used when clearing permanent DTCs.
- When clearing the permanent DTCs, do not disconnect the cable from the auxiliary battery terminal or attempt to clear the DTCs during this procedure, as doing so will clear the universal trip and normal judgment histories.
NOTICE:
- Vehicle Control History may be stored in the hybrid vehicle control ECU assembly if the engine is malfunctioning. Certain vehicle condition information is recorded when Vehicle Control History is stored. Reading the vehicle conditions recorded in both the Freeze Frame Data and Vehicle Control History can be useful for troubleshooting.
Click here
(Select Powertrain in Health Check and then check the time stamp data.)
Click here
- If any "Engine Malfunction" Vehicle Control History item has been stored in the hybrid vehicle control ECU assembly, make sure to clear it. However, as all Vehicle Control History items are cleared simultaneously, if any Vehicle Control History items other than "Engine Malfunction" are stored, make sure to perform any troubleshooting for them before clearing Vehicle Control History.
Click here
PROCEDURE
CHECK ANY OTHER DTCS OUTPUT (IN ADDITION TO DTC P04417E, P04417F AND/OR P04419C)
(a) Connect the Techstream to the DLC3.
(b) Turn the power switch on (IG).
(c) Turn the Techstream on.
(d) Enter the following menus: Powertrain / Engine / Trouble Codes.
(e) Read the DTCs.
Powertrain > Engine > Trouble CodesResult | Proceed to |
|---|---|
DTC P04417E, P04417F or P04419C is output |
A |
DTC P04417E, P04417F or P04419C and other DTCs are output |
B |
HINT:
If any DTCs other than DTC P04417E, P04417F or P04419C are output, troubleshoot those DTCs first.
| A |  |
GO TO EVAP SYSTEM |
| B | |
GO TO DTC CHART |