Hybrid/EV Battery Discharge Control Malfunction (P300000). Hybrid/EV Battery Control System Circuit Voltage Below Threshold (P300016). High Voltage Power Resource Circuit Short during Pre-Charge (P300
Hybrid/EV Battery Discharge Control Malfunction (P300000)
DESCRIPTION
The hybrid vehicle control ECU alerts the driver and performs fail-safe control based on error signals received from the battery voltage sensor. This DTC is stored when the SOC (state of charge) of the HV battery has dropped excessively as a result of leaving shift lever in N, running out of fuel, or a malfunction in the hybrid system.
DTC No. | Detection Item | DTC Detection Condition | Trouble Area | MIL | Warning Indicate |
|---|---|---|---|---|---|
P300000 |
Hybrid/EV Battery Discharge Control Malfunction |
Discharging prohibited Discharging of the HV battery continues even after discharging is prohibited when the hybrid system is malfunctioning and "Hybrid Battery SOC" has reached the lower limit. (1 trip detection logic) |
|
Does not come on |
Master Warning Light: Does not come on |
DTC No. | Data List |
|---|---|
P300000 |
|
CONFIRMATION DRIVING PATTERN
HINT:
After repair has been completed, clear the DTC and then check that the vehicle has returned to normal by performing the following All Readiness check procedure.
Click here 
- Connect the Techstream to the DLC3.
- Turn the power switch on (IG) and turn the Techstream on.
- Clear the DTCs (even if no DTCs are stored, perform the clear DTC procedure).
- Turn the power switch off and wait for 2 minutes or more.
- Turn the power switch on (IG) and turn the Techstream on.
- Turn the power switch on (READY) with shift lever in P and cause the "Hybrid Battery SOC" to decrease. Check that the engine is started to charge the HV battery, and the value of Data List item "Hybrid Battery SOC" increases and then remains within an appropriate range.
- Enter the following menus: Powertrain / Hybrid Control / Utility / All Readiness.
- Check the DTC judgment result.
HINT:
- If the judgment result shows NORMAL, the system is normal.
- If the judgment result shows ABNORMAL, the system has a malfunction.
- If the judgment result shows INCOMPLETE or N/A, perform driving pattern again.
HINT:
- If the vehicle is left with shift lever in N (parked or stopped) for a long time, the battery cannot be charged. In this case, the SOC may drop below the lower limit and DTC P300000 may be stored. (This is not a system malfunction.)
- When the engine cannot be started, DTC P300000 may be stored because the HV battery cannot be charged.
- Repeated engine start checks may cause the SOC to drop, resulting in DTC P300000 being stored. In this case, charge the HV battery using the THS charger.
- Cranking the engine once causes the SOC to drop approximately 1%.
- Charging the HV battery once (10 minutes) using the THS charger restores the SOC approximately 2%.
- Charging the HV battery using the THS charger takes approximately 10 minutes when the battery temperature is 25 °C or approximately 30 minutes when the battery temperature is 0 °C.
- The THS charger is a supplemental charging device that enables the hybrid system to start (READY-on state).
- If the result of this inspection is to charge the HV battery, clear the DTCs and then charge the HV battery using the THS charger.
PROCEDURE
CHECK DTC OUTPUT (HYBRID CONTROL)
(a) Connect the Techstream to the DLC3.
(b) Turn the power switch on (IG).
(c) Enter the following menus: Powertrain / Hybrid Control / Trouble Codes.
(d) Check for DTCs.
Powertrain > Hybrid Control > Trouble CodesResult | Proceed to |
|---|---|
P300000 or P300016 only is output. |
A |
DTCs other than P300000 and P300016 are also output. |
B |
(e) Turn the power switch off.
| B |  |
GO TO DTC CHART (HYBRID CONTROL SYSTEM) |
|

CHECK DTC OUTPUT (ENGINE)
(a) Connect the Techstream to the DLC3.
(b) Turn the power switch on (IG).
(c) Enter the following menus: Powertrain / Engine / Trouble Codes.
(d) Check for DTCs.
Powertrain > Engine > Trouble CodesResult | Proceed to |
|---|---|
No DTCs are output. |
A |
DTCs are output. |
B |
(e) Turn the power switch off.
| B | |
GO TO DTC CHART (SFI SYSTEM) |
|
CHECK AMOUNT OF FUEL
(a) Turn the power switch on (IG).
(b) Check the amount of fuel by referring to the fuel gauge in the meter.
HINT:
Add fuel until the low fuel level warning light turns off.
Result | Proceed to |
|---|---|
Proper amount of fuel is in the tank. |
A |
There is no fuel in the tank. |
B |
(c) Turn the power switch off.
| B | |
REFUEL VEHICLE |
|
CHECK FREEZE FRAME DATA
(a) Connect the Techstream to the DLC3.
(b) Turn the power switch on (IG).
(c) Enter the following menus: Powertrain / Hybrid Control / Trouble Codes.
(d) Read the freeze frame data item "Shift Position" of DTC P300000.
Powertrain > Hybrid Control > Trouble Codes Powertrain > Hybrid ControlShift Position
NOTICE:
- When the freeze frame data "Shift Position" was N, DTC P300000 may be stored due to the vehicle was left with shift lever in N and the HV battery could not be charged.
- If DTC "P300000" only is output, charge the HV battery without replacing the HV battery if necessary.
(e) Turn the power switch off.
|
CHECK ENGINE START
(a) Turn the power switch on (READY).
(b) Check if the engine starts.
HINT:
- Depressing the accelerator pedal with shift lever in P will cause the engine to start.
- Turning the power switch on (READY) and off repeatedly while the SOC is low may cause the SOC to drop further, resulting in DTC P300016 being stored. Charge the HV battery using the THS charger as necessary.
- Cranking the engine once causes the SOC to drop approximately 1%.
- Charging the HV battery once (10 minutes) using the THS charger restores the SOC approximately 2%.
Result | Proceed to |
|---|---|
The engine starts. |
A |
The engine does not start. |
B |
(c) If the engine does not start, turn the power switch off.
| A | |
LEAVE VEHICLE WITH SHIFT LEVER IN P, AND CHARGE HV BATTERY BY IDLING UNTIL IDLING STOPS |
|
CLEAR DTC
Click here
| NEXT | |
CHARGE HV BATTERY (CHECK THAT ENGINE STARTS) |
Hybrid/EV Battery Control System Circuit Voltage Below Threshold (P300016)
DESCRIPTION
The hybrid vehicle control ECU alerts the driver and performs fail-safe control based on error signals received from the battery voltage sensor.
This DTC is stored if the HV battery is discharged excessively or the hybrid control system malfunctions.
HINT:
If the HV battery voltage has dropped due to a malfunction in other components such as the inverter with converter assembly or the hybrid vehicle transaxle assembly, recharging the HV battery will be able to restore the voltage. If the HV battery voltage has dropped excessively after the vehicle was left for a long time, the HV battery will need to be replaced.
DTC No. | Detection Item | DTC Detection Condition | Trouble Area | MIL | Warning Indicate |
|---|---|---|---|---|---|
P300016 |
Hybrid/EV Battery Control System Circuit Voltage Below Threshold |
Malfunction is received from the battery voltage sensor: Voltage of a battery block drops drastically. (1 trip detection logic) |
|
Does not come on |
Master Warning Light: Comes on |
DTC No. | Data List |
|---|---|
P300016 |
|
CONFIRMATION DRIVING PATTERN
HINT:
After repair has been completed, clear the DTC and then check that the vehicle has returned to normal by performing the following All Readiness check procedure.
Click here 
- Connect the Techstream to the DLC3.
- Turn the power switch on (IG) and turn the Techstream on.
- Clear the DTCs (even if no DTCs are stored, perform the clear DTC procedure).
- Turn the power switch off and wait for 2 minutes or more.
- Turn the power switch on (IG) and turn the Techstream on.
- Turn the power switch on (READY) with shift lever in P.
- Wait until the engine starts and then stops.
- Enter the following menus: Powertrain / Hybrid Control / Utility / All Readiness.
- Check the DTC judgment result.
HINT:
- If the judgment result shows NORMAL, the system is normal.
- If the judgment result shows ABNORMAL, the system has a malfunction.
- If the judgment result shows INCOMPLETE or N/A, perform driving pattern again.
CAUTION:
- Before the following operations are conducted, take precautions to prevent electric shock by turning the power switch off, wearing insulated gloves, and removing the service plug grip from HV battery.
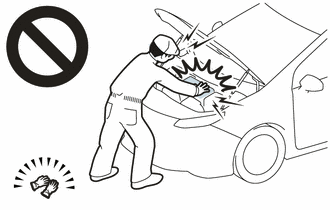
- Inspecting the high-voltage system
- Disconnecting the low voltage connector of the inverter with converter assembly
- Disconnecting the low voltage connector of the HV battery
- To prevent electric shock, make sure to remove the service plug grip to cut off the high voltage circuit before servicing the vehicle.
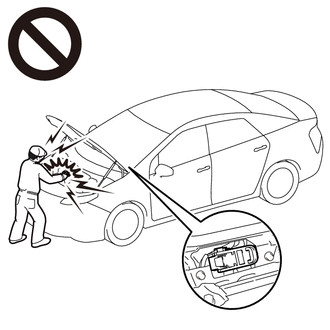
- After removing the service plug grip from the HV battery, put it in your pocket to prevent other technicians from accidentally reconnecting it while you are working on the high-voltage system.
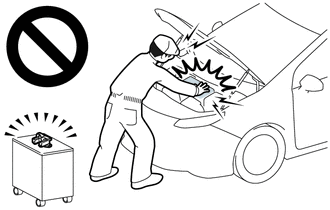
- After removing the service plug grip, wait for at least 10 minutes before touching any of the high-voltage connectors or terminals. After waiting for 10 minutes, check the voltage at the terminals in the inspection point in the inverter with converter assembly. The voltage should be 0 V before beginning work.
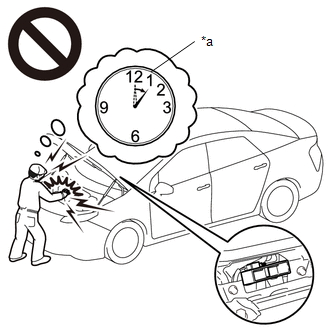
*a
Without waiting for 10 minutes
Click here
HINT:
Waiting for at least 10 minutes is required to discharge the high-voltage capacitor inside the inverter with converter assembly.
- Make sure to insulate the high-voltage connectors and terminals of the HV battery with insulating tape after removing it.
If the HV battery stored without insulating the connectors and terminals, electric shock or fire may result.
- When disposing of an HV battery, make sure to return it through an authorized collection agent who is capable of handling it safely. If the HV battery is returned via the manufacturer specified route, it will be returned properly and in a safe manner by an authorized collection agent.
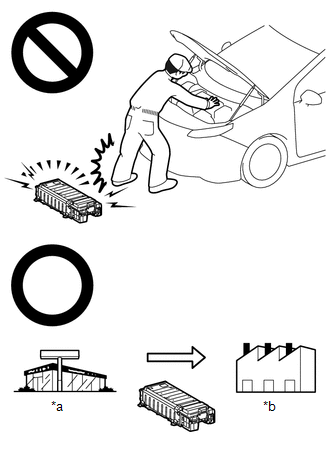
*a
Dealer
*b
Battery Collection Agent
- Before returning the HV battery, make sure to perform a recovery inspection.
- Make a note of the output DTCs as some of them may be necessary for recovery inspection of the HV battery.
NOTICE:
After turning the power switch off, waiting time may be required before disconnecting the cable from the negative (-) auxiliary battery terminal. Therefore, make sure to read the disconnecting the cable from the negative (-) auxiliary battery terminal notices before proceeding with work.
Click here
HINT:
- Thoroughly interview the customer as DTC P300016 may be stored if the SOC drops due to the vehicle being left with shift lever in N for a long time or running out of fuel.
- When the engine cannot be started, DTC P300016 may be stored because the HV battery cannot be charged.
PROCEDURE
CHECK DTC OUTPUT (HYBRID CONTROL)
(a) Connect the Techstream to the DLC3.
(b) Turn the power switch on (IG).
(c) Enter the following menus: Powertrain / Hybrid Control / Trouble Codes.
(d) Check for DTCs.
Powertrain > Hybrid Control > Trouble CodesResult | Proceed to |
|---|---|
P300016 or P300000 only is output. |
A |
DTCs other than P300016 or P300000 are also output. |
B |
HINT:
If the HV battery voltage has dropped due to a malfunction in other components such as the inverter with converter assembly or the hybrid vehicle transaxle assembly, recharge the HV battery and then repair the malfunctioning part.
(e) Turn the power switch off.
| B |  |
GO TO DTC CHART (HYBRID CONTROL SYSTEM) |
|

CHECK DTC OUTPUT (ENGINE)
(a) Connect the Techstream to the DLC3.
(b) Turn the power switch on (IG).
(c) Enter the following menus: Powertrain / Engine / Trouble Codes.
(d) Check for DTCs.
Powertrain > Engine > Trouble CodesResult | Proceed to |
|---|---|
No DTCs are output. |
A |
DTCs are output. |
B |
(e) Turn the power switch off.
| B | |
GO TO DTC CHART (SFI SYSTEM) |
|
CHECK ENGINE START
(a) Turn the power switch on (READY).
(b) Check if the engine starts.
NOTICE:
Do not turn the power switch on (READY) repeatedly after duplicating the problem symptom indicated by DTC P300016 and clearing the DTCs. This may cause another problem to occur.
HINT:
Depressing the accelerator pedal with shift lever in P will cause the engine to start.
Result | Proceed to |
|---|---|
The engine does not start. |
A |
The engine starts. |
B |
(c) Turn the power switch off.
| B | |
LEAVE VEHICLE WITH SHIFT LEVER IN P, AND CHARGE HV BATTERY BY IDLING UNTIL IDLING STOPS |
|
CHECK CRANKSHAFT PULLEY REVOLUTION (P POSITION)
(a) Make sure that the shift lever is in P position.
(b) Lift up the vehicle.
(c) Turn the crankshaft pulley using hand tools to check if the crankshaft can rotate smoothly.
CAUTION:
Do not turn the power switch on (READY) while performing this inspection. Be sure to turn the power switch off before performing this inspection, to prevent the engine from starting.
NOTICE:
Engine compression causes resistance when turning the crankshaft pulley. Check if the crankshaft rotates smoothly (or if it is locked) by manually applying sufficient torque to turn the crankshaft pulley. The torque required to turn the crankshaft pulley should be the same as for a known good vehicle of the same type.
Result | Proceed to |
|---|---|
The crankshaft rotates smoothly. |
A |
The crankshaft does not rotate smoothly. |
B |
(d) Lower the vehicle.
| B | |
GO TO STEP 6 |
|
CHECK HV BATTERY
(a) Turn the power switch off.
(b) Wait 10 minutes or more.
(c) Connect the Techstream to the DLC3.
(d) Turn the power switch on (IG).
(e) Enter the following menus: Powertrain / Hybrid Control / Data List / Hybrid Battery Block 1 to 11 Voltage.
Powertrain > Hybrid Control > Data ListTester Display |
|---|
Hybrid Battery Block 1 Voltage |
Hybrid Battery Block 2 Voltage |
Hybrid Battery Block 3 Voltage |
Hybrid Battery Block 4 Voltage |
Hybrid Battery Block 5 Voltage |
Hybrid Battery Block 6 Voltage |
Hybrid Battery Block 7 Voltage |
Hybrid Battery Block 8 Voltage |
Hybrid Battery Block 9 Voltage |
Hybrid Battery Block 10 Voltage |
Hybrid Battery Block 11 Voltage |
(f) Read the Data List.
Result | Proceed to |
|---|---|
Any of "Hybrid Battery Block 1, 2, 9, 10, 11 Voltage" is 12.0 V or less, or any of "Hybrid Battery Block 3, 4, 5, 6, 7, 8 Voltage" is 24.0 V or less |
A |
Other than above |
B |
(g) Turn the power switch off.
| A | |
REPLACE HV BATTERY |
| B | |
GO TO STEP 10 |
CHECK CRANKSHAFT PULLEY REVOLUTION (N POSITION)
(a) Lift up the vehicle.
(b) Turn the power switch on (IG).
(c) Depress the brake pedal and move the shift lever to N.
(d) Turn the crankshaft pulley using hand tools to check if the crankshaft can rotate smoothly.
CAUTION:
Do not turn the power switch on (READY) while performing this inspection. Be sure to turn the power switch on (IG) before performing this inspection, to prevent the engine from starting.
NOTICE:
Engine compression causes resistance when turning the crankshaft pulley. Check if the crankshaft rotates smoothly (or if it is locked) by manually applying sufficient torque to turn the crankshaft pulley. The torque required to turn the crankshaft pulley should be the same as for a known good vehicle of the same type.
Result | Proceed to |
|---|---|
The crankshaft does not rotate smoothly. |
A |
The crankshaft rotates smoothly. |
B |
(e) Lower the vehicle.
(f) Turn the power switch off.
| B | |
GO TO STEP 11 |
|
REPAIR OR REPLACE ENGINE
|
CHECK ENGINE START
(a) Turn the power switch on (READY).
(b) Check if the engine starts.
NOTICE:
Do not turn the power switch on (READY) repeatedly after duplicating the problem symptom indicated by DTC P300016 and clearing the DTCs. This may cause another problem to occur.
HINT:
Depressing the accelerator pedal with shift lever in P will cause the engine to start.
Result | Proceed to |
|---|---|
The engine does not start. |
A |
The engine starts. |
B |
(c) Turn the power switch off.
| B | |
LEAVE VEHICLE WITH SHIFT LEVER IN P, AND CHARGE HV BATTERY BY IDLING UNTIL IDLING STOPS |
|
CHECK HV BATTERY
(a) Turn the power switch off.
(b) Wait 10 minutes or more.
(c) Connect the Techstream to the DLC3.
(d) Turn the power switch on (IG).
(e) Enter the following menus: Powertrain / Hybrid Control / Data List / Hybrid Battery Block 1 to 11 Voltage.
Powertrain > Hybrid Control > Data ListTester Display |
|---|
Hybrid Battery Block 1 Voltage |
Hybrid Battery Block 2 Voltage |
Hybrid Battery Block 3 Voltage |
Hybrid Battery Block 4 Voltage |
Hybrid Battery Block 5 Voltage |
Hybrid Battery Block 6 Voltage |
Hybrid Battery Block 7 Voltage |
Hybrid Battery Block 8 Voltage |
Hybrid Battery Block 9 Voltage |
Hybrid Battery Block 10 Voltage |
Hybrid Battery Block 11 Voltage |
(f) Read the Data List.
Result | Proceed to |
|---|---|
Any of "Hybrid Battery Block 1, 2, 9, 10, 11 Voltage" is 12.0 V or less, or any of "Hybrid Battery Block 3, 4, 5, 6, 7, 8 Voltage" is 24.0 V or less |
A |
Other than above |
B |
(g) Turn the power switch off.
| A | |
REPLACE HV BATTERY |
| B | |
GO TO STEP 14 |
CLEAR DTC
Click here
| NEXT | |
CHARGE HV BATTERY (ABOUT 10 MINUTES) |
REPLACE HYBRID VEHICLE TRANSAXLE ASSEMBLY
Click here
|
CHECK ENGINE START
(a) Turn the power switch on (READY).
(b) Check if the engine starts.
NOTICE:
Do not turn the power switch on (READY) repeatedly after duplicating the problem symptom indicated by DTC P300016 and clearing the DTCs. This may cause another problem to occur.
HINT:
Depressing the accelerator pedal with shift lever in P will cause the engine to start.
Result | Proceed to |
|---|---|
The engine does not start. |
A |
The engine starts. |
B |
(c) Turn the power switch off.
| B | |
LEAVE VEHICLE WITH SHIFT LEVER IN P, AND CHARGE HV BATTERY BY IDLING UNTIL IDLING STOPS |
|
CHECK HV BATTERY
(a) Turn the power switch off.
(b) Wait 10 minutes or more.
(c) Connect the Techstream to the DLC3.
(d) Turn the power switch on (IG).
(e) Enter the following menus: Powertrain / Hybrid Control / Data List / Hybrid Battery Block 1 to 11 Voltage.
Powertrain > Hybrid Control > Data ListTester Display |
|---|
Hybrid Battery Block 1 Voltage |
Hybrid Battery Block 2 Voltage |
Hybrid Battery Block 3 Voltage |
Hybrid Battery Block 4 Voltage |
Hybrid Battery Block 5 Voltage |
Hybrid Battery Block 6 Voltage |
Hybrid Battery Block 7 Voltage |
Hybrid Battery Block 8 Voltage |
Hybrid Battery Block 9 Voltage |
Hybrid Battery Block 10 Voltage |
Hybrid Battery Block 11 Voltage |
(f) Read the Data List.
Result | Proceed to |
|---|---|
Any of "Hybrid Battery Block 1, 2, 9, 10, 11 Voltage" is 12.0 V or less, or any of "Hybrid Battery Block 3, 4, 5, 6, 7, 8 Voltage" is 24.0 V or less |
A |
Other than above |
B |
(g) Turn the power switch off.
| A | |
REPLACE HV BATTERY |
| B | |
GO TO STEP 15 |
CLEAR DTC
Click here
| NEXT | |
CHARGE HV BATTERY (ABOUT 10 MINUTES) |
CLEAR DTC
Click here
| NEXT | |
CHARGE HV BATTERY (ABOUT 10 MINUTES) |
High Voltage Power Resource Circuit Short during Pre-Charge (P300449)
DTC SUMMARY
MALFUNCTION DESCRIPTION
The hybrid vehicle control ECU monitors the high-voltage wiring between the HV battery and inverter with converter assembly and detects an open circuit malfunction.
The cause of this malfunction may be one of the following:
Inverter voltage sensor (VH) internal circuit malfunction- Voltage sensor (VH) malfunction
- Motor generator control ECU (MG ECU) malfunction
- Communication (wire harness) malfunction
- HV battery malfunction
- HV battery junction block assembly malfunction
- Inverter with converter assembly malfunction
- High-voltage wire harness malfunction
- High-voltage connector or connection malfunction
- Hybrid vehicle control ECU malfunction
- HV battery junction block assembly malfunction
- Low voltage wire harness malfunction
- Low voltage connector malfunction
INSPECTION DESCRIPTION
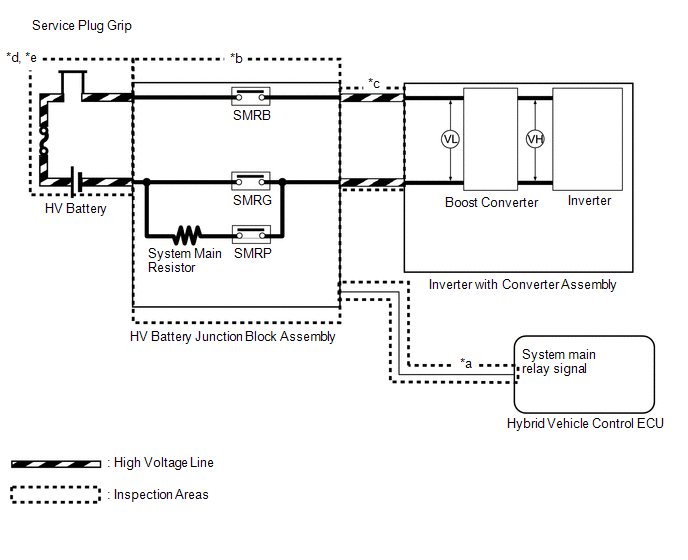
System Diagram Range | Inspection Content | Reason | Inspection Step |
|---|---|---|---|
*a |
Check connection condition and wire harness continuity between hybrid vehicle control ECU and HV battery junction block assembly |
In order to check whether connectors are connected properly and to check for an open circuit in the SMRP and SMRB primary lines |
3 to 7 |
*b |
Check system main relay |
Check whether SMRB and SMRP stuck OFF |
8, 9 |
*c |
Check connection condition and high-voltage cable continuity between HV battery junction block assembly and inverter with converter assembly |
Check for open circuit and defective connection (arc marks) due to looseness |
10 to 12 |
*d |
Check high-voltage cable and connection condition between HV battery and HV battery junction block assembly |
Check for open circuit and defective connection (arc marks) due to looseness |
13, 14, 15, 16, 21 |
*e |
Check HV battery |
Check whether HV battery voltage has drastically dropped below normal range |
17 |
DESCRIPTION
Refer to the description for DTC P0AE411.
Click here 
The hybrid vehicle control ECU monitors the high-voltage wiring between the HV battery and the inverter with converter assembly and detects the following malfunction.
DTC No. | Detection Item | DTC Detection Condition | Trouble Area | MIL | Warning Indicate |
|---|---|---|---|---|---|
P300449 |
High Voltage Power Resource Circuit Short during Pre-Charge |
Although a system main relay operation signal was sent when the power switch was operated, the system voltage is not sufficiently increased after boosting and the HV battery current does not flow. High-voltage circuit malfunctions between the HV battery and inverter with converter assembly. The EV electric battery fuse is blown, the service plug grip is removed, the system main resistor is blown, SMRP or SMRB remains open, or the high-voltage cable has an open circuit. (2 trip detection logic) |
|
Does not come on |
Master Warning Light: Comes on |
DTC No. | Data List |
|---|---|
P300449 |
|
The following items can be helpful when performing repairs:
Data List- Ready Signal
- Inter Lock Switch
- SMRP Status
- SMRB Status
- SMRG Status
CONFIRMATION DRIVING PATTERN
HINT:
After repair has been completed, clear the DTC and then check that the vehicle has returned to normal by performing the following All Readiness check procedure.
Click here
- Connect the Techstream to the DLC3.
- Turn the power switch on (IG) and turn the Techstream on.
- Clear the DTCs (even if no DTCs are stored, perform the clear DTC procedure).
- Turn the power switch off and wait for 2 minutes or more.
- Turn the power switch on (IG) and turn the Techstream on.
- Turn the power switch on (READY) and wait for 3 minutes or more.
HINT:
According to the display on the Techstream, read the Data List and monitor the values of "Hybrid Battery Voltage" and "VL-Voltage before Boosting" for 3 minutes. If the difference between "Hybrid Battery Voltage" and "VL-Voltage before Boosting" is always less than 50 V, the vehicle has returned to normal.
- Enter the following menus: Powertrain / Hybrid Control / Utility / All Readiness.
- Check the DTC judgment result.
HINT:
- If the judgment result shows NORMAL, the system is normal.
- If the judgment result shows ABNORMAL, the system has a malfunction.
- If the judgment result shows INCOMPLETE or N/A, perform driving pattern again.
WIRING DIAGRAM
Refer to the wiring diagram for DTC P0AA649.
Click here
Refer to the wiring diagram for the HV battery high-voltage line circuit.
Click here
CAUTION:
- Before the following operations are conducted, take precautions to prevent electric shock by turning the power switch off, wearing insulated gloves, and removing the service plug grip from HV battery.
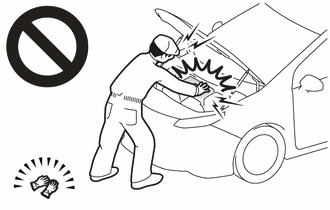
- Inspecting the high-voltage system
- Disconnecting the low voltage connector of the inverter with converter assembly
- Disconnecting the low voltage connector of the HV battery
- To prevent electric shock, make sure to remove the service plug grip to cut off the high voltage circuit before servicing the vehicle.
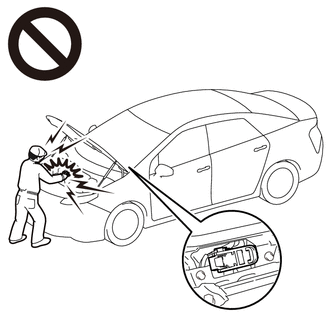
- After removing the service plug grip from the HV battery, put it in your pocket to prevent other technicians from accidentally reconnecting it while you are working on the high-voltage system.
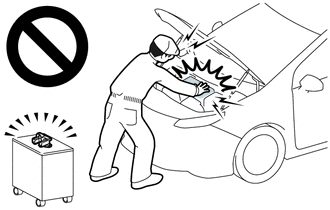
- After removing the service plug grip, wait for at least 10 minutes before touching any of the high-voltage connectors or terminals. After waiting for 10 minutes, check the voltage at the terminals in the inspection point in the inverter with converter assembly. The voltage should be 0 V before beginning work.
Click here
HINT:
Waiting for at least 10 minutes is required to discharge the high-voltage capacitor inside the inverter with converter assembly.
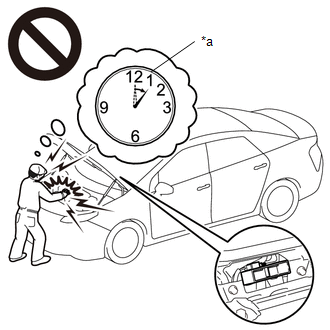
*a
Without waiting for 10 minutes
- Make sure to insulate the high-voltage connectors and terminals of the HV battery with insulating tape after removing it.
If the HV battery stored without insulating the connectors and terminals, electric shock or fire may result.
- When disposing of an HV battery, make sure to return it through an authorized collection agent who is capable of handling it safely. If the HV battery is returned via the manufacturer specified route, it will be returned properly and in a safe manner by an authorized collection agent.
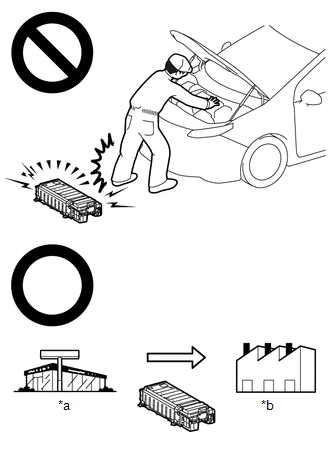
*a
Dealer
*b
Battery Collection Agent
- Before returning the HV battery, make sure to perform a recovery inspection.
- Make a note of the output DTCs as some of them may be necessary for recovery inspection of the HV battery.
NOTICE:
After turning the power switch off, waiting time may be required before disconnecting the cable from the negative (-) auxiliary battery terminal. Therefore, make sure to read the disconnecting the cable from the negative (-) auxiliary battery terminal notices before proceeding with work.
Click here
PROCEDURE
CHECK DTC OUTPUT (HYBRID CONTROL, MOTOR GENERATOR)
(a) Connect the Techstream to the DLC3.
(b) Turn the power switch on (IG).
(c) Enter the following menus: Powertrain / Hybrid Control and Motor Generator / Trouble Codes.
(d) Check for DTCs.
Powertrain > Hybrid Control > Trouble Codes Powertrain > Motor Generator > Trouble CodesResult | Proceed to |
|---|---|
P300449 only is output, or DTCs except the ones in the table below are also output. |
A |
DTCs of hybrid control system in the tables below are output. |
B |
DTCs of motor generator control system in the tables below are output. |
C |
Malfunction Content | System | Relevant DTC |
|
|---|---|---|---|
Microcomputer malfunction |
Hybrid control system |
P0A1B49 |
Drive Motor "A" Control Module Internal Electronic Failure |
P060647 |
Hybrid/EV Powertrain Control Module Processor Watchdog / Safety MCU Failure |
||
P060687 |
Hybrid/EV Powertrain Control Module Processor to Monitoring Processor Missing Message |
||
P060A47 |
Hybrid/EV Powertrain Control Module Monitoring Processor Watchdog / Safety MCU Failure |
||
P060A87 |
Hybrid/EV Powertrain Control Module Processor from Monitoring Processor Missing Message |
||
P1C9E9F |
Hybrid/EV System Reset Stuck Off |
||
P0AFC96 |
Hybrid/EV Battery Sensor Module Component Internal Failure |
||
P0AFC00 |
Hybrid/EV Battery Sensor Module |
||
Motor generator control system |
P0A1B1F |
Generator Control Module Circuit Intermittent |
|
P0A1A47 |
Generator Control Module Watchdog / Safety μC Failure |
||
P0A1A49 |
Generator Control Module Internal Electronic Failure |
||
P1C2A1C |
Generator A/D Converter Circuit Circuit Voltage Out of Range |
||
P1C2A49 |
Generator A/D Converter Circuit Internal Electronic Failure |
||
P313383 |
Communication Error from Generator to Drive Motor "A" Value of Signal Protection Calculation Incorrect |
||
P313386 |
Communication Error from Generator to Drive Motor "A" Signal Invalid |
||
P313387 |
Communication Error from Generator to Drive Motor "A" Missing Message |
||
Power source circuit malfunction |
Hybrid control system |
P0AFC16 |
Hybrid/EV Battery Sensor Module Circuit Voltage Below Threshold |
Motor generator control system |
P06D61C |
Generator Control Module Offset Power Circuit Voltage Out of Range |
|
Communication system malfunction |
Hybrid control system |
P312387 |
Lost Communication with Drive Motor Control Module "A" from Hybrid/EV Control Module Missing Message |
U029A87 |
Lost Communication with Hybrid/EV Battery Sensor Module Missing Message |
||
Sensor and actuator circuit malfunction |
Hybrid control system |
P0AD915 |
Hybrid/EV Battery Positive Contactor Circuit Short to Auxiliary Battery or Open |
P0AD911 |
Hybrid/EV Battery Positive Contactor Circuit Short to Ground |
||
P0AE415 |
Hybrid/EV Battery Precharge Contactor Circuit Short to Auxiliary Battery or Open |
||
P0AE411 |
Hybrid/EV Battery Precharge Contactor Circuit Short to Ground |
||
P0ADD15 |
Hybrid/EV Battery Negative Contactor Circuit Short to Auxiliary Battery or Open |
||
P0ADD11 |
Hybrid/EV Battery Negative Contactor Circuit Short to Ground |
||
P0ABF11 |
Hybrid/EV Battery Current Sensor "A" Circuit Short to Ground |
||
P0ABF15 |
Hybrid/EV Battery Current Sensor "A" Circuit Short to Auxiliary Battery or Open |
||
P0B3B14 |
Hybrid/EV Battery Voltage Sensor "A" Circuit Short to Ground or Open |
||
P0B4014 |
Hybrid/EV Battery Voltage Sensor "B" Circuit Short to Ground or Open |
||
P0B4514 |
Hybrid/EV Battery Voltage Sensor "C" Circuit Short to Ground or Open |
||
P0B4A14 |
Hybrid/EV Battery Voltage Sensor "D" Circuit Short to Ground or Open |
||
P0B4F14 |
Hybrid/EV Battery Voltage Sensor "E" Circuit Short to Ground or Open |
||
P0B5414 |
Hybrid/EV Battery Voltage Sensor "F" Circuit Short to Ground or Open |
||
P0B5914 |
Hybrid/EV Battery Voltage Sensor "G" Circuit Short to Ground or Open |
||
P0B5E14 |
Hybrid/EV Battery Voltage Sensor "H" Circuit Short to Ground or Open |
||
P0B6314 |
Hybrid/EV Battery Voltage Sensor "I" Circuit Short to Ground or Open |
||
P0B6814 |
Hybrid/EV Battery Voltage Sensor "J" Circuit Short to Ground or Open |
||
P0B6D14 |
Hybrid/EV Battery Voltage Sensor "K" Circuit Short to Ground or Open |
||
P0B7214 |
Hybrid/EV Battery Voltage Sensor "L" Circuit Short to Ground or Open |
||
P308A13 |
Hybrid/EV Battery Voltage Sensor All Circuit Open |
||
P0AFC62 |
Hybrid/EV Battery Sensor Module Signal Compare Failure |
||
P0B231C |
Hybrid/EV Battery "A" Voltage Sensor Voltage Out of Range |
||
P308A12 |
Hybrid/EV Battery Voltage Sensor All Circuit Short to Auxiliary Battery |
||
P0ABF00 |
Hybrid/EV Battery Current Sensor "A" Circuit Range/Performance |
||
P0ABF28 |
Hybrid/EV Battery Current Sensor "A" Signal Bias Level Out of Range / Zero Adjustment Failure |
||
P0ABF2A |
Hybrid/EV Battery Current Sensor "A" Signal Stuck In Range |
||
System malfunction |
Hybrid control system |
P0C7600 |
Hybrid/EV Battery System Discharge Time Too Long |
P0D2D1C |
Drive Motor "A" Inverter Voltage Sensor Voltage Out of Range |
||
P1C8149 |
High Voltage Power Resource Circuit Consumption Circuit Short |
||
P1C8249 |
High Voltage Power Resource Circuit Over Loading |
||
P1C8349 |
High Voltage Power Resource Circuit Voltage Sensor after Boosting Malfunction |
||
Motor generator control system |
P0D2D16 |
Drive Motor "A" Inverter Voltage Sensor(VH) Circuit Voltage Below Threshold |
|
P0D2D17 |
Drive Motor "A" Inverter Voltage Sensor(VH) Circuit Voltage Above Threshold |
||
P1CB69E |
Drive Motor "A" Inverter Voltage Sensor(VH) Stuck On |
||
P0CA300 |
DC/DC Converter Step Up Voltage Performance |
||
HINT:
- P300449 may be output as a result of the malfunction indicated by the DTCs above.
- The chart above is listed in inspection order of priority.
- Check DTCs that are output at the same time by following the listed order. (The main cause of the malfunction can be determined without performing unnecessary inspections.)
(e) Turn the power switch off.
| B |  |
GO TO DTC CHART (HYBRID CONTROL SYSTEM) |
| C | |
GO TO DTC CHART (MOTOR GENERATOR CONTROL SYSTEM) |
|

CHECK FREEZE FRAME DATA (HYBRID CONTROL)
(a) Connect the Techstream to the DLC3.
(b) Turn the power switch on (IG).
(c) Enter the following menus: Powertrain / Hybrid Control / Trouble Codes.
(d) Read the freeze frame data of DTC P300449.
Powertrain > Hybrid Control > Trouble CodesResult | Proceed to |
|---|---|
Both of the following conditions are met:
|
A |
Except above |
B |
(e) Turn the power switch off.
| A | |
REPLACE INVERTER WITH CONVERTER ASSEMBLY |
|
CHECK CONNECTOR CONNECTION CONDITION (HYBRID VEHICLE CONTROL ECU CONNECTOR)
Click here
| NG | |
CONNECT SECURELY |
|
CHECK CONNECTOR CONNECTION CONDITION (FLOOR WIRE CONNECTOR)
Click here
Result | Proceed to |
|---|---|
OK |
A |
NG (The connector is not connected securely.) |
B |
NG (The terminals are not making secure contact or are deformed, or water or foreign matter exists in the connector.) |
C |
| B | |
CONNECT SECURELY |
| C | |
REPAIR OR REPLACE HARNESS OR CONNECTOR |
|
CHECK CONNECTOR CONNECTION CONDITION (HV BATTERY JUNCTION BLOCK ASSEMBLY CONNECTOR)
Click here
| NG | |
CONNECT SECURELY |
|
CHECK HARNESS AND CONNECTOR (HYBRID VEHICLE CONTROL ECU - HV BATTERY JUNCTION BLOCK ASSEMBLY)
CAUTION:
Be sure to wear insulated gloves.
(a) Check that the service plug grip is not installed.
NOTICE:
After removing the service plug grip, do not turn the power switch on (READY), unless instructed by the repair manual because this may cause a malfunction.
(b) Remove the No. 1 HV battery cover panel RH.
Click here
(c) Disconnect the K18 HV battery junction block assembly connector.
(d) Disconnect the G46 hybrid vehicle control ECU connector.
(e) Measure the resistance according to the value(s) in the table below. Standard Resistance:
|
|
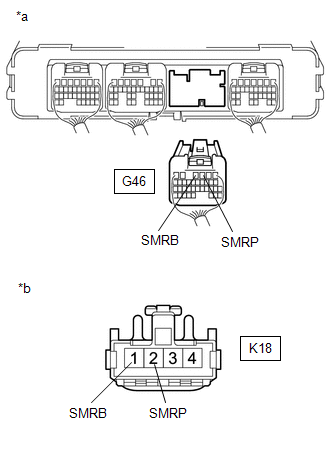
(f) Reconnect the G46 hybrid vehicle control ECU connector.
(g) Reconnect the K18 HV battery junction block assembly connector.
(h) Install the No. 1 HV battery cover panel RH.
| NG | |
REPAIR OR REPLACE HARNESS OR CONNECTOR |
|
CHECK HARNESS AND CONNECTOR (HV BATTERY JUNCTION BLOCK ASSEMBLY - BODY GROUND)
CAUTION:
Be sure to wear insulated gloves.
(a) Check that the service plug grip is not installed.
NOTICE:
After removing the service plug grip, do not turn the power switch on (READY), unless instructed by the repair manual because this may cause a malfunction.
(b) Remove the No. 1 HV battery cover panel RH.
Click here
(c) Disconnect the K18 HV battery junction block assembly connector.
(d) Measure the resistance according to the value(s) in the table below. Standard Resistance:
|
|
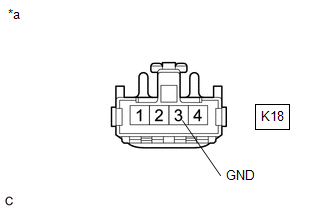
(e) Reconnect the K18 HV battery junction block assembly connector.
(f) Install the No. 1 HV battery cover panel RH.
| NG | |
REPAIR OR REPLACE HARNESS OR CONNECTOR |
|
INSPECT HV BATTERY JUNCTION BLOCK ASSEMBLY (SMRB)
CAUTION:
Be sure to wear insulated gloves.
(a) Check that the service plug grip is not installed.
NOTICE:
After removing the service plug grip, do not turn the power switch on (READY), unless instructed by the repair manual because this may cause a malfunction.
(b) Remove the HV battery junction block assembly.
Click here
(c) Measure the resistance according to the value(s) in the table below.
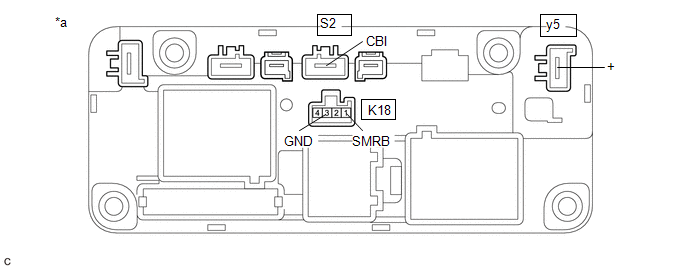
*a |
Component without harness connected (HV Battery Junction Block Assembly) |
- |
- |
Standard Resistance:
Tester Connection | Condition | Specified Condition |
|---|---|---|
y5-1 (+) - S2-1 (CBI) |
Auxiliary battery voltage applied between terminals K18-1 (SMRB) and K18-3 (GND) |
Below 1 Ω |
(d) Measure the resistance according to the value(s) in the table below.
Standard Resistance:
Tester Connection | Condition | Specified Condition |
|---|---|---|
K18-1 (SMRB) - K18-3 (GND) |
-40 to 80 °C |
25.0 to 59.0 Ω |
(e) Install the HV battery junction block assembly.
| NG | |
REPLACE HV BATTERY JUNCTION BLOCK ASSEMBLY |
|
INSPECT HV BATTERY JUNCTION BLOCK ASSEMBLY (SMRP)
CAUTION:
Be sure to wear insulated gloves.
(a) Check that the service plug grip is not installed.
NOTICE:
After removing the service plug grip, do not turn the power switch on (READY), unless instructed by the repair manual because this may cause a malfunction.
(b) Remove the HV battery junction block assembly.
Click here
(c) Measure the resistance according to the value(s) in the table below.
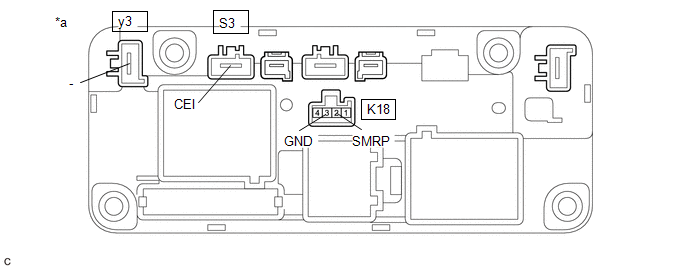
*a |
Component without harness connected (HV Battery Junction Block Assembly) |
- |
- |
Standard Resistance:
Tester Connection | Condition | Specified Condition |
|---|---|---|
y3-1 (-) - S3-1 (CEI) |
Auxiliary battery voltage applied between terminals k18-2 (SMRP) and k18-3 (GND) |
24.3 to 29.7 Ω |
(d) Measure the resistance according to the value(s) in the table below.
Standard Resistance:
Tester Connection | Condition | Specified Condition |
|---|---|---|
K18-2 (SMRP) - K18-3 (GND) |
-40 to 80 °C |
140 to 290 Ω |
(e) Install the HV battery junction block assembly.
| NG | |
REPLACE HV BATTERY JUNCTION BLOCK ASSEMBLY |
|
CHECK INVERTER WITH CONVERTER ASSEMBLY (HV FLOOR UNDER WIRE)
CAUTION:
Be sure to wear insulated gloves.
(a) Check that the service plug grip is not installed.
NOTICE:
After removing the service plug grip, do not turn the power switch on (READY), unless instructed by the repair manual because this may cause a malfunction.
(b) Check that the bolts for the HV floor under wire is tightened to the specified torque, the HV floor under wire is connected securely, and there are no contact problems. Specified Condition: T = 8.0 N*m (82 kgf*cm, 71 in.*lbf) |
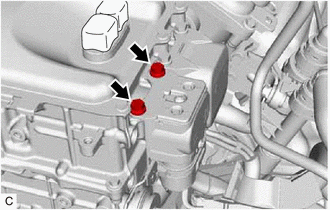 |
(c) Disconnect the HV floor under wire from the inverter with converter assembly.
(d) Check for arc marks on the terminals for the HV floor under wire and inverter with converter assembly.
Result | Proceed to |
|
|---|---|---|
The terminals are connected securely and there are no contact problems. |
There are no arc marks. |
A |
The terminals are not connected securely and there is a contact problem. |
There are arc marks. |
B |
The terminals are not connected securely and there is a contact problem. |
There are no arc marks. |
C |
The terminals are connected securely and there are no contact problems. |
There are arc marks. |
B |
(e) Reconnect the HV floor under wire.
| B | |
REPLACE MALFUNCTIONING PARTS |
| C | |
CONNECT SECURELY |
|
CHECK HV BATTERY JUNCTION BLOCK ASSEMBLY (HV FLOOR UNDER WIRE)
CAUTION:
Be sure to wear insulated gloves.
(a) Check that the service plug grip is not installed.
NOTICE:
After removing the service plug grip, do not turn the power switch on (READY), unless instructed by the repair manual because this may cause a malfunction.
(b) Remove the No. 1 HV battery cover panel RH.
Click here
(c) Check that the HV floor under wire is connected securely, and there are no contact problems. |
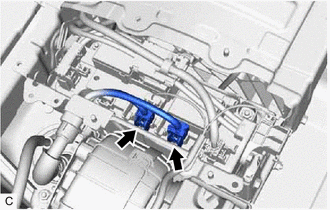 |
(d) Disconnect the HV floor under wire connectors from the HV battery junction block assembly.
(e) Check for arc marks on the terminals of the HV floor wire and the HV battery junction block assembly.
Result | Proceed to |
|
|---|---|---|
The terminals are connected securely and there are no contact problems. |
There are no arc marks. |
A |
The terminals are not connected securely and there is a contact problem. |
There are arc marks. |
B |
The terminals are not connected securely and there is a contact problem. |
There are no arc marks. |
C |
The terminals are connected securely and there are no contact problems. |
There are arc marks. |
B |
(f) Reconnect the HV floor under wire.
(g) Install the No. 1 HV battery cover panel RH.
| B | |
REPLACE MALFUNCTIONING PARTS |
| C | |
CONNECT SECURELY |
|
CHECK HV FLOOR UNDER WIRE
CAUTION:
Be sure to wear insulated gloves.
(a) Check that the service plug grip is not installed.
NOTICE:
After removing the service plug grip, do not turn the power switch on (READY), unless instructed by the repair manual because this may cause a malfunction.
(b) Remove the No. 1 HV battery cover panel RH.
Click here
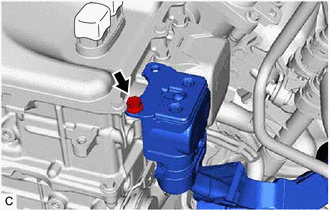
(c) Disconnect the HV floor under wire connectors from the HV battery junction block assembly. |
|
(d) Disconnect the HV floor under wire connector from the inverter with converter assembly. |
 |
(e) Measure the resistance according to the value(s) in the table below.
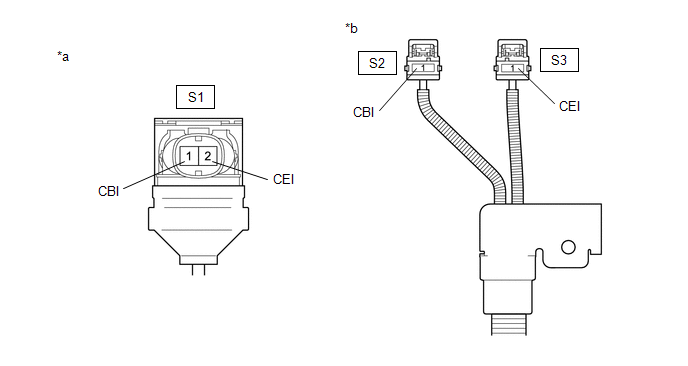
*a |
HV Floor Under Wire (Inverter with Converter Assembly Side) |
*b |
HV Floor Under Wire (HV Battery Junction Block Assembly Side) |
Standard Resistance:
Tester Connection | Condition | Specified Condition |
|---|---|---|
S1-1 (CBI) - S2-1 (CBI) |
Power switch off |
Below 1 Ω |
S1-2 (CEI) - S3-1 (CEI) |
Power switch off |
Below 1 Ω |
NOTICE:
Be sure not to damage or deform the terminal being inspected.
(f) Reconnect the HV floor under wire connector to the inverter with converter assembly.
(g) Reconnect the HV floor under wire connectors to the HV battery junction block assembly.
(h) Install the No. 1 HV battery cover panel RH.
| NG | |
REPLACE HV FLOOR UNDER WIRE |
|
CHECK HV BATTERY JUNCTION BLOCK ASSEMBLY (HV BATTERY HIGH VOLTAGE CONNECTOR CONNECTION CONDITION)
CAUTION:
Be sure to wear insulated gloves.
(a) Check that the service plug grip is not installed.
NOTICE:
After removing the service plug grip, do not turn the power switch on (READY), unless instructed by the repair manual because this may cause a malfunction.
(b) Remove the No. 1 HV battery cover panel RH.
Click here
(c) Check the 2 HV battery high voltage connectors are connected securely, and there are no contact problems. |
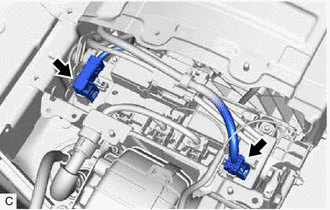 |
(d) Disconnect the 2 HV battery high voltage connectors from the HV battery junction block assembly.
NOTICE:
Insulate each disconnected high-voltage connector with insulating tape. Wrap the connector from the wire harness side to the end of the connector.
(e) Check for arc marks on the terminals of the HV battery high voltage connectors and HV battery junction block assembly.
Result | Proceed to |
|
|---|---|---|
The terminals are connected securely and there are no contact problems. |
There are no arc marks. |
A |
The terminals are not connected securely and there is a contact problem. |
There are arc marks. |
B |
The terminals are not connected securely and there is a contact problem. |
There are no arc marks. |
C |
The terminals are connected securely and there are no contact problems. |
There are arc marks. |
B |
(f) Reconnect the 2 HV battery high voltage connectors.
(g) Install the No. 1 HV battery cover panel RH.
| B | |
REPLACE MALFUNCTIONING PARTS |
| C | |
CONNECT SECURELY |
|
CHECK HV BATTERY HIGH VOLTAGE CABLE
CAUTION:
Be sure to wear insulated gloves.
(a) Check that the service plug grip is not installed.
NOTICE:
After removing the service plug grip, do not turn the power switch on (READY), unless instructed by the repair manual because this may cause a malfunction.
(b) Remove the No. 1 HV battery cover panel RH.
Click here
(c) Disconnect the y5 HV battery high voltage cable connector from the HV battery junction block assembly. NOTICE: Insulate each disconnected high-voltage connector with insulating tape. Wrap the connector from the wire harness side to the end of the connector. |
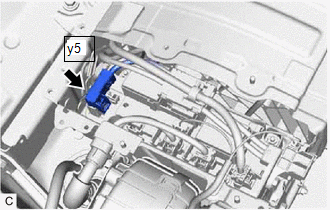 |
(d) Measure the resistance according to the value(s) in the table below. Standard Resistance:
|
|
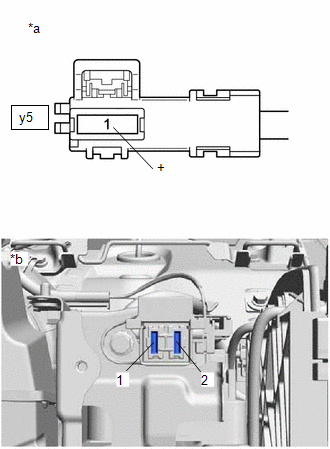
(e) Reconnect the y5 HV battery high voltage cable connector.
(f) Install the No. 1 HV battery cover panel RH.
| NG | |
REPLACE HV BATTERY |
|
CHECK HV BATTERY
CAUTION:
Be sure to wear insulated gloves.
(a) Check that the service plug grip is not installed.
NOTICE:
After removing the service plug grip, do not turn the power switch on (READY), unless instructed by the repair manual because this may cause a malfunction.
(b) Remove the No. 1 HV battery cover panel RH.
Click here
(c) Disconnect the y3 HV battery high voltage cable connector from the HV battery junction block assembly. NOTICE: Insulate each disconnected high-voltage connector with insulating tape. Wrap the connector from the wire harness side to the end of the connector. |
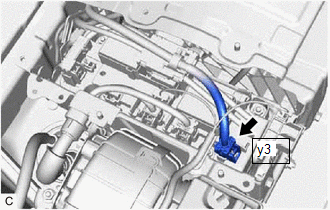 |
(d) Measure the voltage according to the value(s) in the table below. Standard Voltage:
CAUTION: Do not allow the probes of the electrical tester to contact each other during this inspection. |
|
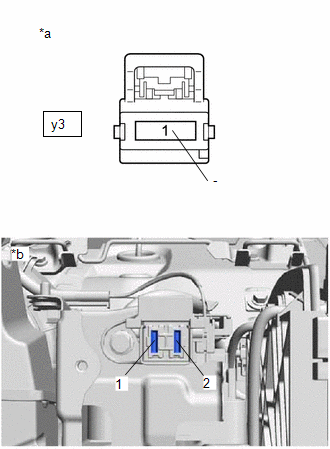
(e) Reconnect the y3 HV battery high voltage cable connector.
(f) Install the No. 1 HV battery cover panel RH.
| NG | |
GO TO STEP 19 |
|
CHECK FOR INTERMITTENT PROBLEMS
(a) Check for intermittent problems.
Click here
Result | Proceed to |
|---|---|
Problem symptom does not recur. |
A |
Problem symptom recurs. |
B |
HINT:
- Since 2 trip detection logic is used, the DTC detection condition must be met twice.
- If DTC P300449 is output again after performing the inspection, replace the inverter with converter assembly. If DTC P300449 is not output again, replace the HV battery junction block assembly.
| B | |
REPLACE INVERTER WITH CONVERTER ASSEMBLY |
|
REPLACE HV BATTERY JUNCTION BLOCK ASSEMBLY
Click here
|
CHECK HYBRID VEHICLE CONTROL ECU (CHECK FOR NORMAL OPERATION)
Click here
Result | Proceed to |
|---|---|
Difference between "Hybrid Battery Voltage" and "VL-Voltage before Boosting" is always less than 50 V. |
A |
Difference between "Hybrid Battery Voltage" and "VL-Voltage before Boosting" is 50 V or more. |
B |
| A | |
END |
| B | |
REPLACE HYBRID VEHICLE CONTROL ECU |
CHECK HYBRID BATTERY TERMINAL BLOCK (HV BATTERY HIGH VOLTAGE CONNECTOR CONNECTION CONDITION)
CAUTION:
Be sure to wear insulated gloves and protective goggles.
(a) Check that the service plug grip is not installed.
NOTICE:
After removing the service plug grip, do not turn the power switch on (READY), unless instructed by the repair manual because this may cause a malfunction.
(b) Remove the No. 1 HV battery shield panel.
Click here
(c) Check that the 2 HV battery high voltage connectors are connected securely, and there are no contact problems. |
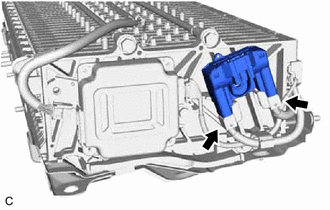 |
(d) Remove the hybrid battery terminal block.
Click here
NOTICE:
Insulate each disconnected high-voltage connector with insulating tape. Wrap the connector from the wire harness side to the end of the connector.
(e) Check for arc marks on the terminals of the HV battery high voltage connectors and hybrid battery terminal block.
Result | Proceed to |
|
|---|---|---|
The terminals are connected securely and there are no contact problems. |
There are no arc marks. |
A |
The terminals are not connected securely and there is a contact problem. |
There are arc marks. |
B |
The terminals are not connected securely and there is a contact problem. |
There are no arc marks. |
C |
The terminals are connected securely and there are no contact problems. |
There are arc marks. |
B |
(f) Install the hybrid battery terminal block.
(g) Install the No. 1 HV battery shield panel.
| B | |
REPLACE MALFUNCTIONING PARTS |
| C | |
CONNECT SECURELY |
|
CHECK HV BATTERY HIGH VOLTAGE CABLE
CAUTION:
Be sure to wear insulated gloves and protective goggles.
(a) Check that the service plug grip is not installed.
NOTICE:
After removing the service plug grip, do not turn the power switch on (READY), unless instructed by the repair manual because this may cause a malfunction.
(b) Remove the No. 1 HV battery shield panel.
Click here
(c) Remove the bolt from the hybrid battery terminal block. |
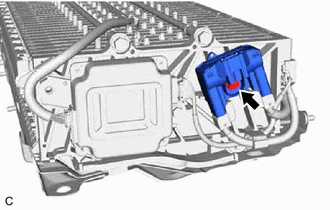 |
(d) Disconnect the y4 high voltage connector from the hybrid battery terminal block. NOTICE: Insulate each disconnected high-voltage connector with insulating tape. Wrap the connector from the wire harness side to the end of the connector. |
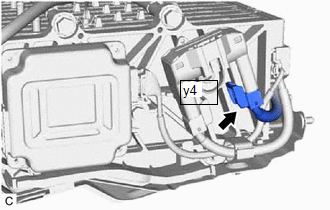 |
(e) Measure the resistance according to the value(s) in the table below. Standard Resistance:
|
|
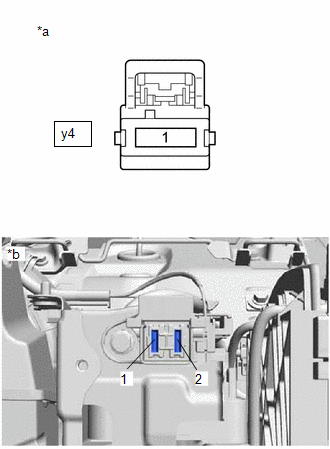
(f) Reconnect the y4 high voltage connector to the hybrid battery terminal block.
(g) Install the bolt to the hybrid battery terminal block.
Click here
(h) Install the No. 1 HV battery shield panel.
| NG | |
REPLACE HV BATTERY |
|
CHECK HYBRID BATTERY TERMINAL BLOCK
CAUTION:
Be sure to wear insulated gloves and protective goggles.
(a) Remove the Hybrid battery terminal block.
Click here
(b) Measure the resistance according to the value(s) in the table below. Standard Resistance:
|
|
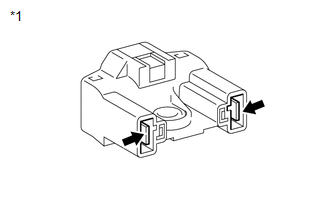
(c) Install the Hybrid battery terminal block.
| OK | |
REPLACE HV BATTERY |
| NG | |
REPLACE HYBRID BATTERY TERMINAL BLOCK |