Fuel Injection/Ignition System
GENERAL INFORMATION
A fault code is indicated by a series of long (0.6 second) and short (0.3 second) flashes of the malfunction indicator lamp on the instrument panel and the red LED on the right side of the ECU. The long flashes, which indicate the first digit of the fault code, are output first. Approximately 0.9 seconds later, the short flashes, which indicate the second digit, are output. There is a pause of approximately 2.1 seconds between fault codes. After all codes have been output, the ECU starts outputting the fault codes again from the beginning, with a 2.1 second pause. General DiagnosticsPROCEDURE
1. If a fault occurs in the fuel injection/ignition system, first check that all system connectors are securely connected and free of corrosion.
2. Next, check whether the fault is caused by poor engine maintenance. Check that the air cleaner element is not clogged, that the spark plugs are in good condition and have the correct gap, that the engine valve clearances are correctly adjusted, and that the cylinder compression pressure is within specification.
3. Also check that the ignition timing is set correctly and that the exhaust emission control systems are operating properly. Refer to Subsection 7.7.1 and Subsection 6.4 for more detailed information.
4. If these checks do not locate the source of the fault, a quick check of the fuel injection/ignition system circuits can be performed by setting the engine ECU to self-diagnosis mode "2".
5. In mode "2", the ECU displays the fault code stored in its memory by flashing the malfunction indicator lamp on the instrument panel or the red LED on the right side of the ECU.
6. Fault records detected by the ECU are stored in its memory until the starter has been engaged 50 times.
7. If the fault does not reoccur within this period, its record is erased from memory.
8. Fault records can be erased from the ECU memory by setting the ECU to self-diagnosis mode "2", then switching back to mode "1", or by disconnecting the battery for more than 24 hours.
Setting the Self-Diagnosis Modes
PROCEDURE
1. Remove the fuse block cover to access the diagnosis connector, which is mounted on the underside of the fuse block.
2. Turn the ignition key to the "ON" position, but do not start the engine. The engine ECU is now in self-diagnosis mode "1".
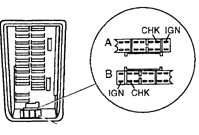
3. Using a short piece of wire, connect the "IGN" terminal and the "CHK" terminal of the diagnosis connector.
4. Keep the terminals connected for more than 2 seconds, then disconnect the wire. The engine ECU is now in self-diagnosis mode "2".
5. In mode "2", the engine ECU displays the fault code stored in its memory.
WARNING: If codes 11 and 21 are displayed at the same time, check the crankshaft position sensor circuit before checking the rest of the ignition system.
6. On models with a catalytic converter, if the ECU is set to mode "2", the ECU automatically switches to the exhaust gas sensor check mode when the engine is started. In this mode, the malfunction indicator lamp on the instrument panel and the red LED show the exhaust gas condition. When the lamp and LED are on, the CO content of the exhaust gas is low. When they are off, the exhaust gas is rich in CO.
7. To check the sensor, set the engine ECU to self-diagnosis mode "2", start the engine, and warm it up to normal operating temperature.
8. Once the engine has warmed up, increase engine speed to approximately 2000 rpm and hold it for approximately 2 minutes while monitoring the warning light on the instrument panel or the LED on the electronic control unit.
9. If the exhaust gas sensor is operating correctly, the warning light/LED should flash at least 5 times every 10 seconds.
10. After all checks are complete, exit self-diagnosis mode "2".
11. If the engine was not started, exit self-diagnosis mode "2" by reconnecting the "IGN" and "TEN" terminals of the diagnostic connector for more than 2 seconds.
12. If the engine is running, exit self-diagnosis mode "2" by turning the ignition key to the "OFF" position and disconnecting the negative battery cable.
13. If a more detailed check of the fuel injection/ignition system is required, consult a specialist. A repair shop must have an electronic diagnostic tool that connects to the diagnostic connector and allows a complete check of all system components.
Adjustment: On models without a catalytic converter, the engine idle speed and the fuel mixture composition (CO level in the exhaust gas) can be adjusted. On models with a catalytic converter, only the engine idle speed can be adjusted.
Fault Codes: Code / Faulty Circuit 11 Crankshaft position sensor circuit 12 Air flow sensor circuit 13 Engine coolant temperature sensor circuit 21 Ignition signal circuit 34 Knock sensor circuit 43 Throttle position sensor potentiometer circuit 55 All circuits operating normally
Test yourself
A quick Nissan Sunny quiz: every answer comes with an explanation and a link to the manual page.