Intake Manifold
GENERAL INFORMATION
Warning: On vehicles with a 2.0 liter engine, the model type ("Phase I" or "Phase II") can be identified by the shape of the intake manifold. On "Phase I" models, the throttle body is mounted on the base of the intake manifold, and the manifold rises up toward the cylinder head; the fuel injectors are located on top of the intake manifold and are easily accessible. On "Phase II" models, the throttle body is mounted on top of the intake manifold, and the manifold slopes down toward the cylinder head; the fuel injectors are less accessible.Removal
PROCEDURE
Models with 1.6 L engine1. Drain the coolant from the cooling system. Refer to the procedure in Subsection 2.4.
5.
2. Perform steps 1–6 in Subsection 6.3.2.10 and disconnect all components from the throttle body.
3. Note or mark the installation position of all vacuum hoses and coolant hoses on the intake manifold. Disconnect them from the intake manifold and, if necessary, from the corresponding vacuum valves. To avoid mixing up the hoses during installation, label each hose during removal.

4. Remove the union nut (indicated by the arrow) and disconnect the exhaust gas recirculation tube connecting the intake and exhaust manifolds from the valve on the left side of the intake manifold.
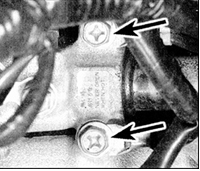
5. Disconnect the injector connectors and the coolant temperature sensor connector. Remove the wires from all retaining clips and move them away from the intake manifold. If necessary, remove the mounting bolts and disconnect the ground wires (indicated by the arrows) from the intake manifold.
6. Remove the mounting bolts and remove the mounting bracket from the underside of the intake manifold.
7. Relieve the fuel system pressure. Refer to the procedure in Subsection 6.3.2.6. Then release the retaining clamps and disconnect the fuel supply hose and the fuel return hose from the left side of the fuel rail. Plug the hose and fuel rail openings to prevent fuel leakage and contamination.
8. Make sure all vacuum/ventilation hoses are disconnected from the intake manifold. Then, in the reverse order of the tightening sequence shown in the illustration for the intake manifold nuts and bolts – 1.6 L engine models, loosen and remove the mounting nuts and bolts.
9. Remove the intake manifold from the cylinder head and take it out of the engine compartment. Remove the intake manifold gasket and discard it.
"Phase I" models with 2 L engine
10. To improve access, apply the parking brake, then raise the front of the vehicle and support it on stands. Access to the intake manifold and related components is possible from above and below the vehicle.
11. Release the retaining clamp and disconnect the air intake duct from the throttle body. Disconnect the accelerator cable from the throttle lever, then loosen the locknut and adjusting nut, and remove the cable sheath from the mounting bracket.
12. Relieve the fuel system pressure. Refer to the procedure in Subsection 6.3.2.6. Then release the retaining clamps and disconnect the fuel supply hose and the fuel return hose from the left side of the fuel rail. Plug the hose and fuel rail openings to prevent fuel leakage and contamination.
13. Release the retaining clamps and disconnect the coolant hoses from the throttle body and intake manifold. Immediately plug the hose openings to prevent coolant leakage.
14. Note or mark the installation position of all vacuum hoses and coolant hoses on the intake manifold. Disconnect them from the intake manifold and, if necessary, from the corresponding vacuum valves. To avoid mixing up the hoses during installation, label each hose during removal.
15. Disconnect the connectors from the throttle position sensor, the air control valve, the injectors, the coolant temperature sensor, and the idle air control unit. Remove the wires from the retaining clips.
16. Remove the mounting bolts and remove the mounting brackets from the left and right sides of the intake manifold.
17. Make sure all vacuum/ventilation hoses are disconnected from the intake manifold.
18. In the reverse order of the tightening sequence shown in the illustration for the intake manifold nuts and bolts – "Phase I" 2 L engine models, loosen and remove the intake manifold mounting nuts and bolts. Note that you may need to remove the oil filter and/or the oil filter cover from the rear of the cylinder block to access the lower intake manifold nuts and bolts.
19. Remove the intake manifold from the cylinder head and take it out of the engine compartment. Remove the intake manifold gasket and discard it.
"Phase II" models with 2 L engine
20. To improve access, apply the parking brake, then raise the front of the vehicle and support it on stands. Access to the intake manifold and related components is possible from above and below the vehicle.
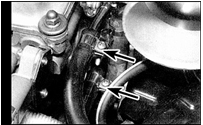
21. Relieve the fuel system pressure. Refer to the procedure in Subsection 6.3.2.6. Then release the retaining clamps and disconnect the fuel supply hose and the fuel return hose from the left side of the fuel rail. Plug the hose and fuel rail openings to prevent fuel leakage and contamination.
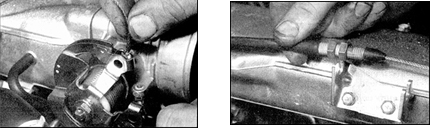
22. Release the retaining clamp and disconnect the air intake duct from the throttle body. Disconnect the accelerator cable from the throttle lever, then loosen the locknut and adjusting nut, and remove the cable sheath from the mounting bracket.
23. Note or mark the installation position of all vacuum hoses and cooling system hoses. Disconnect them from the upper section of the intake manifold and the throttle body. Immediately plug the cooling system hose openings to prevent coolant leakage. To avoid confusion during installation, label each hose when removing it.
24. Disconnect the electrical connectors from the throttle position sensor, the auxiliary air control valve, the fast idle solenoid valve and the engine coolant temperature sensor. Release the wiring harness from the retaining clips.
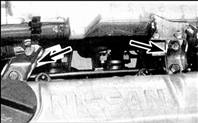
25. Loosen and remove the eight retaining bolts, Fig. Intake manifold nut and bolt tightening sequence - "Phase II" models with 2 L engine, and the upper bracket bolts (indicated by arrows). Then remove the upper section of the intake manifold together with the throttle body. Remove the gasket and discard it.
26. Disconnect the electrical connectors from the air control valve and the fuel injectors. Release the wiring harness from the retaining clips and move it aside, away from the intake manifold.
27. Release the retaining clamps and disconnect the cooling system hoses from the throttle body and intake manifold. Immediately plug the hose openings to prevent coolant leakage.
28. Remove the retaining bolts and remove the mounting brackets from the rear side of the intake manifold.
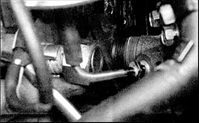
29. Loosen the union nut and disconnect the exhaust gas recirculation tube connecting the intake and exhaust manifolds from the valve on the left side of the intake manifold.
30. Note or mark the installation position of the hoses. Disconnect them from the lower section of the intake manifold. Immediately plug the cooling system hose openings to prevent coolant leakage. To avoid confusion during installation, label each hose when removing it. Make sure all vacuum/breather hoses are disconnected from the intake manifold.
31. Drain the engine oil and remove the oil filter, following the instructions in the relevant chapter. If the filter was damaged during removal, replace it.
32. In the reverse order of the sequence shown in Fig. Intake manifold nut and bolt tightening sequence - "Phase II" models with 2 L engine, loosen and remove the intake manifold retaining nuts and bolts. Note that it may be necessary to remove the oil filter cover from the rear of the cylinder block to gain access to the lower intake manifold nuts and bolts.
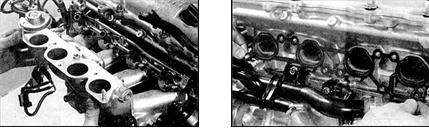
33. Remove the intake manifold from the cylinder head and lift it out of the engine compartment. Then remove the intake manifold gasket and discard it.
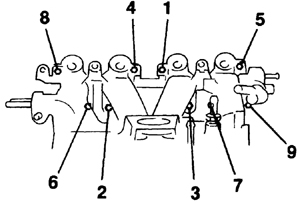
Intake manifold nut and bolt tightening sequence - models with 1.6 L engine

Intake manifold nut and bolt tightening sequence - "Phase I" models with 2 L engine

Lower intake manifold nut and bolt tightening sequence - "Phase II" models with 2 L engine

Upper intake manifold nut and bolt tightening sequence - "Phase II" models with 2 L engine 1–
5. Rear bolts A–B. Front bolts
Installation
PROCEDURE
Models with 1.6 L engine1. Installation is the reverse of the removal procedure. Pay attention to the following points during installation.
2. Make sure the mating surfaces of the intake manifold and cylinder head are clean and dry, and install a new gasket over the cylinder head bolts. Install the intake manifold and tighten the retaining nuts and bolts to the specified torque in the sequence shown in the figure (see Fig. Intake manifold nut and bolt tightening sequence - models with 1.6 L engine).
3. Make sure all relevant hoses are connected correctly and secured with hose clamps where necessary.
4. Adjust the accelerator cable, following the instructions in subsection 6.3.2.
3.
5. After installation, fill the cooling system with coolant, following the instructions in subsection 2.4.
5. "Phase I" models with 2 L engine
6. Installation is the reverse of the removal procedure. Pay attention to the following points during installation.
7. Make sure the mating surfaces of the intake manifold and cylinder head are clean and dry, and install a new gasket over the cylinder head bolts. Install the intake manifold and tighten the retaining nuts and bolts to the specified torque in the sequence shown in the figure (see Fig. Intake manifold nut and bolt tightening sequence - "Phase I" models with 2 L engine).
8. Make sure all relevant hoses are connected correctly and secured with hose clamps where necessary.
9. Make sure the fuel injection system wiring is routed correctly and secured with the appropriate retaining clips.
10. Adjust the accelerator cable, following the instructions in subsection 6.3.2.
3.
11. If necessary, install new O-rings into the grooves of the oil filter cover and install the cover on the cylinder block, tightening the retaining bolts securely.
12. Install the oil filter and fill the engine with engine oil, following the instructions in the relevant chapter.
"Phase II" models with 2 L engine
13. Installation is the reverse of the removal procedure. Pay attention to the following points during installation.
14. Check that the mating surfaces of the lower intake manifold section and the cylinder head are clean and dry, then install a new gasket over the cylinder head bolts. Install the lower intake manifold section and tighten the nuts and bolts to the specified torque in the sequence shown in the figure (see fig. Lower intake manifold nut and bolt tightening sequence – "Phase II" models with 2 L engine).
15. Install a new gasket on the lower intake manifold section, then install the upper intake manifold section and loosely tighten all mounting bolts. Securely tighten the rear mounting bolts in the sequence shown in the figure (see fig. Upper intake manifold nut and bolt tightening sequence – "Phase II" models with 2 L engine), then securely tighten the three front mounting bolts.
16. Check that all related hoses are connected correctly and secured with clamps where necessary.
17. Check that the fuel injection system wiring is routed correctly and secured with the appropriate retaining clips.
18. Adjust the throttle cable following the instructions in subsection 6.3.2.
3. If necessary, install new O-rings into the grooves of the oil filter housing and install the housing onto the cylinder block, tightening the mounting bolts securely.
19. Install the oil filter and fill the engine with engine oil (see subsection 2.2).
Test yourself
A quick Nissan Sunny quiz: every answer comes with an explanation and a link to the manual page.