Unità di azionamento portellone elettrico
- Rimozione
- Installazione
Rimozione
RIMOZIONE
Le procedure necessarie (regolazione, calibrazione, inizializzazione o registrazione) da eseguire dopo la rimozione e l'installazione o la sostituzione di parti durante la rimozione/installazione dell'unità di azionamento del portellone elettrico sono indicate di seguito.
Procedure necessarie dopo la rimozione/installazione/sostituzione dei componentiComponente sostituito o procedura eseguita | Procedure necessarie | Effetto/funzione non operativa se le procedure necessarie non vengono eseguite | Collegamento |
|---|---|---|---|
| *: Anche se il componente non viene sostituito, è necessario eseguire le procedure necessarie specificate dopo l'installazione. | |||
|
Azzerare la posizione di chiusura del portellone |
Sistema portellone elettrico |
 |
SUGGERIMENTO:
- Utilizzare la stessa procedura per il lato destro e il lato sinistro.
- La seguente procedura si riferisce al lato sinistro.
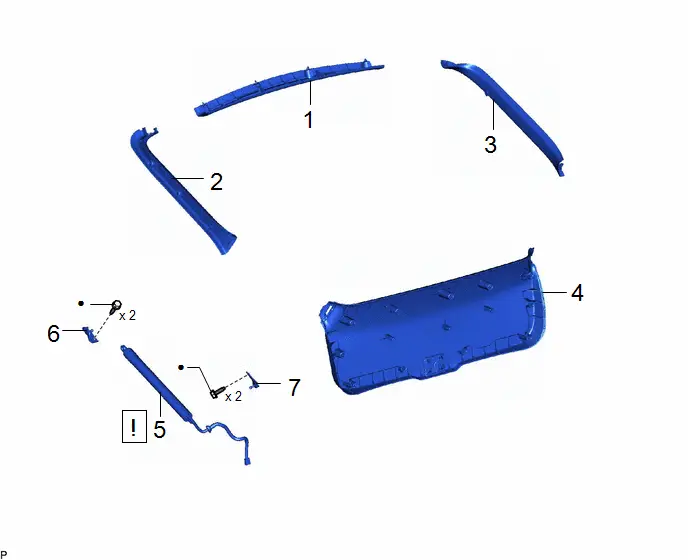
Procedura | Codice nome parte |  |  |  |
|
|---|---|---|---|---|---|
1 |
GRUPPO PANNELLO SUPERIORE RIVESTIMENTO PORTELLONE POSTERIORE |
64790B |
- |
- |
- |
2 |
RIVESTIMENTO LATERALE PORTELLONE POSTERIORE SINISTRO |
67938A |
- |
- |
- |
3 |
RIVESTIMENTO LATERALE PORTELLONE POSTERIORE DESTRO |
67937B |
- |
- |
- |
4 |
GRUPPO PANNELLO RIVESTIMENTO PORTELLONE POSTERIORE |
67750 |
- |
- |
- |
5 |
GRUPPO UNITÀ PORTELLONE ELETTRICO |
68920A |
 |
- |
- |
6 |
STAFFA SUPERIORE PUNTONE AMMORTIZZATORE PORTELLONE POSTERIORE |
68946 |
- |
- |
- |
7 |
STAFFA INFERIORE ASTA AMMORTIZZATORE PORTELLONE POSTERIORE |
68948 |
- |
- |
- |
● |
Parte non riutilizzabile |
- |
- |
PROCEDURA
1. RIMUOVERE IL GRUPPO PANNELLO SUPERIORE RIVESTIMENTO PORTELLONE POSTERIORE
Clicca qui
2. RIMUOVERE LA GUARNIZIONE LATERALE PORTELLONE POSTERIORE SINISTRA
Clicca qui
3. RIMUOVERE LA GUARNIZIONE LATERALE PORTELLONE POSTERIORE DESTRA
(a) Eseguire la stessa procedura per il lato sinistro.
4. RIMUOVERE IL GRUPPO PANNELLO RIVESTIMENTO PORTELLONE POSTERIORE
Clicca qui
5. RIMUOVERE GRUPPO UNITÀ PORTELLONE ELETTRICO
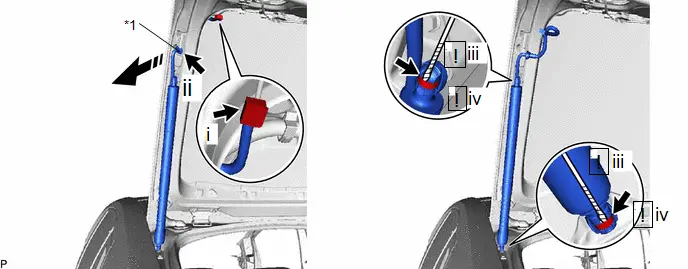
*1 |
Passacavo |
- |
- |
 |
Rimuovere in questa direzione |
- |
- |
(1) Scollegare il connettore.
(2) Sganciare il passacavo come mostrato nell'illustrazione.
(3) Usando un cacciavite con la punta avvolta con nastro protettivo, sollevare leggermente i 2 anelli di arresto come mostrato nell'illustrazione.
(4) Sganciare i 2 giunti sferici per rimuovere il gruppo unità portellone elettrico.
AVVISO:
- Rimuovere il gruppo unità portellone elettrico reggendo manualmente il portellone posteriore.
- Assicurarsi di sostituire il gruppo unità portellone elettrico con uno nuovo.
6. RIMUOVERE STAFFA SUPERIORE ASTA AMMORTIZZATORE PORTELLONE POSTERIORE

7. RIMUOVERE STAFFA INFERIORE ASTA AMMORTIZZATORE PORTELLONE POSTERIORE

Installazione
INSTALLAZIONE
SUGGERIMENTO:
- Utilizzare la stessa procedura per il lato destro e il lato sinistro.
- La seguente procedura si riferisce al lato sinistro.
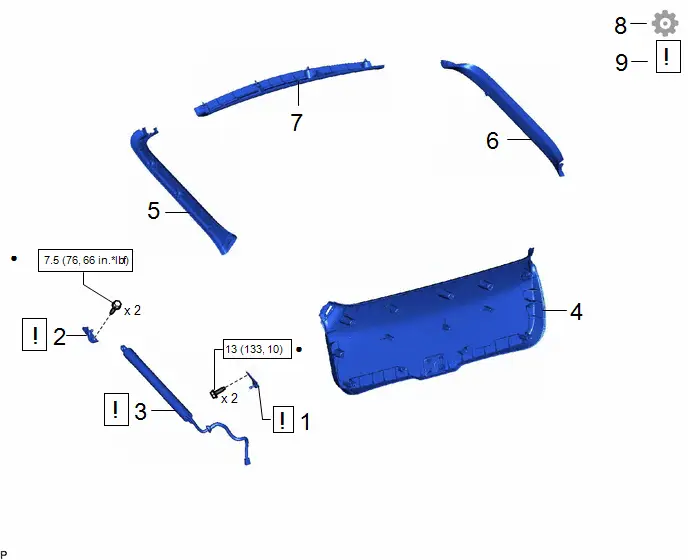
Procedura | Codice nome parte |  |  |  |
|
|---|---|---|---|---|---|
1 |
STAFFA INFERIORE ASTA AMMORTIZZATORE PORTELLONE POSTERIORE |
68948 |
 |
- |
- |
2 |
STAFFA SUPERIORE PUNTONE AMMORTIZZATORE PORTELLONE POSTERIORE |
68946 |
 |
- |
- |
3 |
GRUPPO UNITÀ PORTELLONE ELETTRICO |
68920A |
 |
- |
- |
4 |
GRUPPO PANNELLO RIVESTIMENTO PORTELLONE POSTERIORE |
67750 |
- |
- |
- |
5 |
RIVESTIMENTO LATERALE PORTELLONE POSTERIORE SINISTRO |
67938A |
- |
- |
- |
6 |
RIVESTIMENTO LATERALE PORTELLONE POSTERIORE DESTRO |
67937B |
- |
- |
- |
7 |
GRUPPO PANNELLO SUPERIORE RIVESTIMENTO PORTELLONE POSTERIORE |
64790B |
- |
- |
- |
8 |
INIZIALIZZARE IL SISTEMA PORTELLONE POSTERIORE ELETTRICO |
- |
- |
- |
 |
9 |
ISPEZIONARE IL SISTEMA PORTELLONE POSTERIORE ELETTRICO |
- |
 |
- |
- |
 |
N*m (kgf*cm, ft.*lbf): Coppia specificata |
● |
Parte non riutilizzabile |
★ |
Parte preverniciata |
- |
- |
PROCEDURA
1. INSTALLARE STAFFA INFERIORE ASTA AMMORTIZZATORE PORTELLONE POSTERIORE
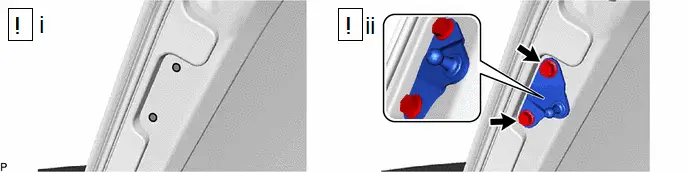
 |
Area di pulizia |
- |
- |
(1) Pulire i fori dei bulloni della carrozzeria della Toyota Prius.
(2) Installare la staffa inferiore dell'asta ammortizzatore portellone posteriore con 2 bulloni nuovi.
Coppia di serraggio:
13 N·m {133 kgf·cm, 10 ft·lbf}
2. INSTALLARE LA STAFFA SUPERIORE PUNTONE AMMORTIZZATORE PORTELLONE POSTERIORE
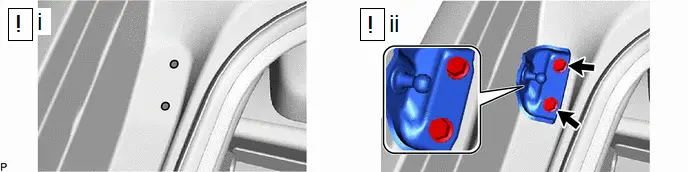
 |
Area di pulizia |
- |
- |
(1) Pulire i fori dei bulloni della carrozzeria della Toyota Prius.
(2) Installare la staffa superiore dell'asta ammortizzatore portellone posteriore con 2 bulloni nuovi.
Coppia di serraggio:
7.5 N·m {76 kgf·cm, 66 in·lbf}
3. INSTALLARE IL GRUPPO UNITÀ PORTELLONE POSTERIORE ELETTRICO
 |
AVVISO: Non applicare alcun carico orizzontale al gruppo unità portellone posteriore elettrico per evitare che si deformi. |
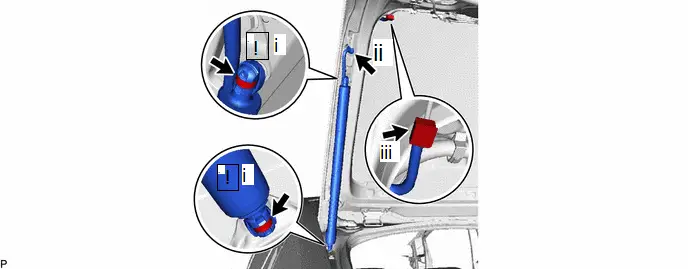
(1) Innestare i 2 giunti sferici per installare il gruppo unità portellone posteriore elettrico.
AVVISO:
- Installare il gruppo unità portellone posteriore elettrico sostenendo il portellone posteriore con la mano.
- Verificare che il gruppo unità portellone posteriore elettrico sia innestato ai giunti sferici e che non possa essere estratto.
(2) Innestare il passacavo come mostrato nell'illustrazione.
(3) Collegare il connettore.
4. INSTALLARE IL GRUPPO PANNELLO RIVESTIMENTO PORTELLONE POSTERIORE
5. INSTALLARE LA GUARNIZIONE LATERALE PORTELLONE POSTERIORE SX
6. INSTALLARE LA GUARNIZIONE LATERALE PORTELLONE POSTERIORE DX
7. INSTALLARE IL GRUPPO PANNELLO SUPERIORE RIVESTIMENTO PORTELLONE POSTERIORE
8. INIZIALIZZARE IL SISTEMA PORTELLONE POSTERIORE ELETTRICO
Clicca qui
9. ISPEZIONARE IL SISTEMA PORTELLONE POSTERIORE ELETTRICO
 |
Clicca qui |
