Interruptor principal del elevalunas eléctrico
Desmontaje
DESMONTAJE
COMPONENTES (DESMONTAJE)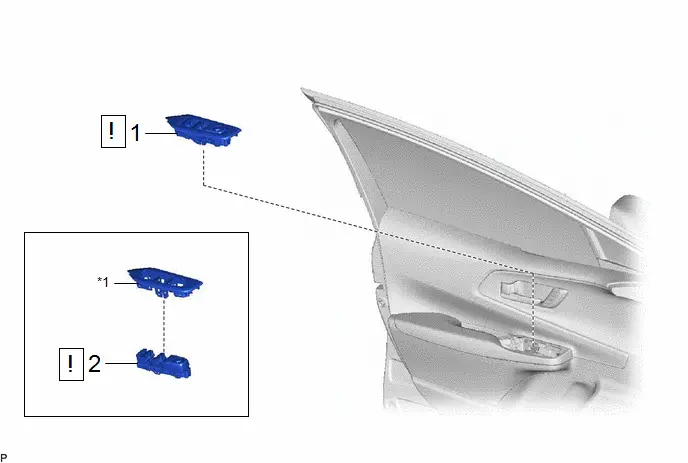
Procedimiento | Código del nombre de la pieza |  |  |  |
|
|---|---|---|---|---|---|
1 |
CONJUNTO DEL INTERRUPTOR MAESTRO DE LA RED MULTIPLEXADA CON PANEL BASE DEL APOYABRAZOS SUPERIOR DE LA PUERTA DELANTERA |
- |
 |
- |
- |
2 |
CONJUNTO DEL INTERRUPTOR MAESTRO DE RED MULTIPLEX |
84040 |
 |
- |
- |
*1 |
PANEL BASE DEL APOYABRAZOS SUPERIOR DE LA PUERTA DELANTERA |
- |
- |
PROCEDIMIENTO
1. RETIRE EL CONJUNTO DEL INTERRUPTOR MAESTRO DE LA RED MULTIPLEXADA JUNTO CON LA BASE SUPERIOR DEL APOYABRAZOS DE LA PUERTA DELANTERA
 |
Haga clic aquí |


2. DESMONTE EL CONJUNTO DEL INTERRUPTOR PRINCIPAL DE LA RED MULTIPLEXADA
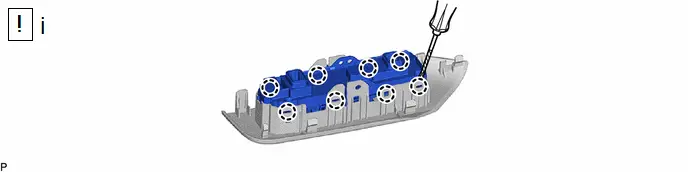
(1) Utilizando un destornillador con la punta envuelta en cinta protectora, libere las 8 lengüetas para desmontar el conjunto del interruptor principal de la red multiplexada.
Inspección
INSPECCIÓN
PROCEDIMIENTO
1. INSPECCIONE EL CONJUNTO DEL INTERRUPTOR PRINCIPAL DE LA RED MULTIPLEXADA
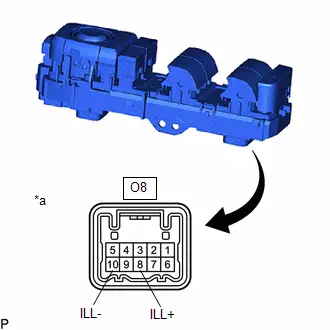
(a) Compruebe que los LED se iluminan.
(1) Aplique voltaje de la batería auxiliar al conjunto del interruptor principal de la red multiplexada y compruebe que el LED se ilumina. OK:  Haga clic en Ubicación y trayecto(O8) Haga clic en Conector(O8)
Si el resultado no es el especificado, sustituya el conjunto del interruptor principal de la red multiplexada. |
|
Instalación
INSTALACIÓN
COMPONENTES (MONTAJE)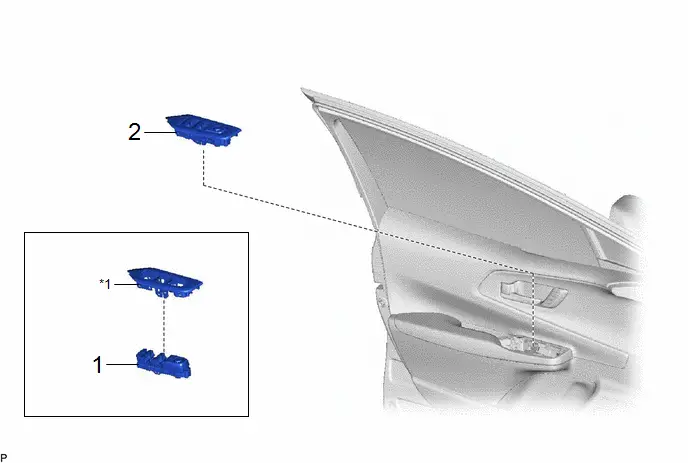
Procedimiento | Código del nombre de la pieza |  |  |  |
|
|---|---|---|---|---|---|
1 |
CONJUNTO DEL INTERRUPTOR MAESTRO DE RED MULTIPLEX |
84040 |
- |
- |
- |
2 |
CONJUNTO DEL INTERRUPTOR MAESTRO DE LA RED MULTIPLEXADA CON PANEL BASE DEL APOYABRAZOS SUPERIOR DE LA PUERTA DELANTERA |
- |
- |
- |
- |
*1 |
PANEL BASE DEL APOYABRAZOS SUPERIOR DE LA PUERTA DELANTERA |
- |
- |
PROCEDIMIENTO
1. INSTALE EL CONJUNTO DEL INTERRUPTOR PRINCIPAL DE LA RED MULTIPLEXADA
2. INSTALAR EL CONJUNTO DEL INTERRUPTOR MAESTRO DE LA RED MULTIPLEX CON EL PANEL BASE DEL APOYABRAZOS SUPERIOR DE LA PUERTA DELANTERA