Basic Inspection - Distance Sensor Alignment ++

In this manual: Basic Inspection - Distance Sensor Alignment ++
General Information — 8Engine :: Engine Mechanical — 19Engine Lubrication System - Precautions. Preparation — 1Engine Lubrication System - Lubrication System (System Description). Engine Oil Pressure (Basic Inspection). Service Data and Specifications (SDS) — 1Engine Cooling System - Precautions. Preparation. Service Data and Specifications (SDS) — 1Engine Cooling System - Engine Coolant — 1Engine Control System - System Description — 1System Description - Component Parts ++ — 1System Description - System ++ — 1Engine Control System - Ecu Diagnosis Information — 1Ecu Diagnosis Information - Ecm ++ — 1Engine Control System - Basic Inspection — 1Basic Inspection - Diagnosis and Repair Workflow ++ — 1Basic Inspection - Basic Inspection ++ — 1Basic Inspection - Additional Service When Replacing Ecm ++ — 1Basic Inspection - Fuel Pressure Check ++ — 1Basic Inspection - How to Set Srt Code ++ — 1Basic Inspection - How to Erase Permanent Dtc ++ — 1Engine Control System - Dtc/circuit Diagnosis — 1Engine Control System - Symptom Diagnosis — 1Engine Control System - Periodic Maintenance — 1Engine Control System - Removal and Installation — 1Fuel System - Precautions. Preparation. Service Data and Specifications (SDS) — 1Fuel System - Fuel System (Periodic Maintenance). Fuel Level Sensor Unit (Disassembly and Assembly) — 1Exhaust System - Precautions. Preparation — 1Exhaust System - Exhaust System (Periodic Maintenance). Exhaust System (Removal and Installation) — 1Starting System - Precautions. Preparation. Starter Motor (Service Data and Specifications (sds)) — 1Starting System - Diagnosis and Repair Work Flow — 1Starting System - Starting System (Symptom Diagnosis). Starter Motor (Removal and Installation) — 1Accelerator Control System - Precautions. Service Data and Specifications (SDS) — 1Accelerator Control System - Accelerator Pedal Assembly — 1Transmission & Driveline :: Transaxle & Transmission — 21Driveline - System Description — 1Transfer: Ty92b - Ecu Diagnosis Information. Awd Control Unit ++ — 1Driveline - Basic Inspection — 1Driveline - Dtc/circuit Diagnosis — 1Driveline - Symptom Diagnosis — 1Driveline - Removal and Installation — 1Transfer: Ty92b - Unit Removal and Installation. Transfer Assembly ++ — 1Driveline - Unit Disassembly and Assembly — 1Driveline - Basic Inspection — 1Driveline - Removal and Installation — 1Driveline - Unit Disassembly and Assembly — 1Front Axle - Precautions. Preparation — 1Front Axle - Noise, Vibration and Harshness (nvh) Troubleshooting (Symptom Diagnosis). Service Data and Specifications (SDS) — 1Front Axle - Front Drive Shaft Boot — 1Front Axle - Front Drive Shaft — 1Rear Axle - Precautions. Preparation. Service Data and Specifications (SDS) — 1Rear Axle - Noise, Vibration and Harshness (nvh) Troubleshooting — 1Rear Axle - Rear Drive Shaft — 1Suspension :: Front Suspension — 7Rear Suspension - Precautions. Preparation — 1Rear Suspension - Noise, Vibration and Harshness (nvh) Troubleshooting (Symptom Diagnosis). Service Data and Specifications (SDS) — 1Rear Suspension - Rear Suspension Assembly — 1Road Wheels & Tires - Precautions — 1Road Wheels & Tires - Preparation. Bcm (Ecu Diagnosis Information). Service Data and Specifications (SDS) — 1Road Wheels & Tires - System — 1Brakes :: Brake System — 9Parking Brake System - Precautions. Preparation — 1Parking Brake System - System — 1Vdc/tcs/abs - Precautions ++ — 1Brake Control System - System Description — 1System Description - Component Parts ++ — 1System Description - System ++ — 1Brake Control System - Basic Inspection — 1Brake Control System - Symptom Diagnosis — 1Brake Control System - Removal and Installation — 1Brake Control System - System Description — 1Brake Control System - Dtc/circuit Diagnosis — 1Brake Control System - Removal and Installation — 1Brake Control System - System Description — 1Brake Control System - Basic Inspection — 1Brake Control System - Symptom Diagnosis — 1Brake Control System - System Description — 1Brake Control System - Basic Inspection — 1Brake Control System - Symptom Diagnosis — 1Steering :: Steering System — 9Steering Control System - Precautions — 1Steering Control System - System — 1Steering Control System - Eps Control Unit (Ecu Diagnosis Information. Removal and Installation) — 1Restraints :: Seat Belt — 7Srs Air Bag - Precautions. Preparation — 1Srs Air Bag - Collision Diagnosis — 1Srs Air Bag - Occupant Classification System — 1Srs Air Bag Control System - Precautions — 1Srs Air Bag Control System - System — 1Srs Air Bag Control System - Diagnosis Sensor Unit — 1Srs Air Bag Control System - Inspection and Adjustment — 1Ventilation, Heater & Air Conditioner :: Ventilation System — 6Heater & Air Conditioning System - Precautions — 1Heater & Air Conditioning System - Preparation — 1Heater & Air Conditioning System - Component Parts — 1Heater & Air Conditioning System - Diagnosis and Repair Work Flow — 1Heater & Air Conditioning System - Compressor — 1Heater & Air Conditioning System - Cooler Pipe and Hose — 1Heater & Air Conditioning System - Condenser. Condenser — 1Heater & Air Conditioning System - Heating and Cooling Unit Assembly — 1Heater & Air Conditioning System - Service Data and Specifications (SDS) — 1Heater & Air Conditioning Control System - System Description — 1System Description - Component Parts ++ — 1System Description - System ++ — 1System Description - Operation ++ — 1Heater & Air Conditioning Control System - Ecu Diagnosis Information — 1Heater & Air Conditioning Control System - Basic Inspection — 1Heater & Air Conditioning Control System - Dtc/circuit Diagnosis — 1Heater & Air Conditioning Control System - Symptom Diagnosis — 1Heater & Air Conditioning Control System - Removal and Installation — 1Body Interior :: Interior — 8Instrument Panel - Precautions. Preparation. Clip List — 1Instrument Panel - Squeak and Rattle Trouble Diagnoses — 1Instrument Panel - Cluster Lid C — 1Seat - Precautions — 1Seat - Preparation. Clip List — 1Seat - Component Parts — 1Seat - System — 1Seat - Diagnosis and Repair Work Flow — 1Seat - Front Seat — 1Seat - Second Row Seats — 1Seat - Third Row Seats — 1Seat - Front Seat — 1Seat - Second Row Seat — 1Seat - Third Row Seat — 1Automatic Drive Positioner - Precautions. Preparation — 1Automatic Drive Positioner - System — 1Automatic Drive Positioner - Diagnosis and Repair Work Flow — 1Automatic Drive Positioner - Inspection and Adjustment — 1Body Exterior, Doors, Roof & Vehicle Security :: Door & Lock — 38Security Control System - Precautions — 1Security Control System - System — 1Security Control System - Ecm, Bcm, Intelligent Key Unit, Ipdm E/r — 1Security Control System - Vehicle Security System Cannot Be Set — 1Glass & Window System - Precautions. Preparation — 1Glass & Window System - Squeak and Rattle Trouble Diagnoses — 1Power Window Control System - Precautions. Preparation — 1Power Window Control System - Power Supply and Ground Circuit — 1Power Window Control System - Power Window Motor Circuit — 1Power Window Control System - Front Power Window Rh Alone Does Not Operate — 1Power Window Control System - Rear Lh Side Power Window Alone Does Not Operate — 1Power Window Control System - Rear Rh Side Power Window Alone Does Not Operate — 1Roof - Precautions. Preparation — 1Roof - Power Supply and Ground Circuit — 1Roof - Moonroof Switch Assembly — 1Roof - Lin Communication Circuit — 1Roof - Auto Operation Does Not Operate — 1Roof - Anti-Pinch Function Does Not Operate — 1Exterior - Precautions. Preparation. Clip List (Preparation) — 1Exterior - Squeak and Rattle Trouble Diagnoses — 1Exterior - Fender Protector — 1Exterior - Over Fender — 1Exterior - Under Cover — 1Exterior - Roof Side Rail — 1Body Repair - Service Information — 1Service Information - Sheet Metal Work ++ — 1Service Information - Body Welding and Precautions ++ — 1Service Information - Safety and Health ++ — 1Service Information - Repairing Procedures and Precautions ++ — 1Body Repair - Precaution — 1Body Repair - Preparation — 1Body Repair - Removal and Installation — 1Driver Controls :: Mirrors — 8Exterior Lighting System - System Description — 1System Description - Component Parts ++ — 1Exterior Lighting System - Basic Inspection — 1Exterior Lighting System - Dtc/circuit Diagnosis — 1Exterior Lighting System - Symptom Diagnosis — 1Exterior Lighting System - Periodic Maintenance — 1Exterior Lighting System - Removal and Installation — 1Interior Lighting System - Precautions. Preparation — 1Interior Lighting System - Component Parts. Interior Lighting System — 1Interior Lighting System - System — 1Interior Lighting System - Diagnosis and Repair Work Flow — 1Interior Lighting System - Interior Lighting System Symptoms (Symptom Diagnosis). Bcm (Ecu Diagnosis Information). Service Data and Specifications (SDS) — 1Interior Lighting System - Foot Lamp — 1Wiper & Washer - Precautions — 1Wiper & Washer - Preparation. Bcm, Ipdm E/r (Ecu Diagnosis Information). Service Data and Specifications (SDS) — 1Wiper & Washer - System — 1Wiper & Washer - Diagnosis and Repair Work Flow — 1Defogger - Precautions. Bcm, A/c Auto Amp. (Ecu Diagnosis Information) — 1Defogger - Diagnosis and Repair Work Flow — 1Horn - Precautions — 1Electrical & Power Control :: Power Outlet — 13Body Control System - Precautions. Preparation — 1Body Control System - Component Parts — 1Body Control System - System — 1Body Control System - Diagnosis System (bcm) — 1Body Control System - Bcm — 1Lan System - System Description — 1Lan System - System Description — 1Lan System - Dtc/circuit Diagnosis — 1Lan System - System Description — 1Lan System - Dtc/circuit Diagnosis — 1Power Control System - System Description — 1Power Control System - Basic Inspection — 1Power Control System - Dtc/circuit Diagnosis — 1Power Control System - System Description — 1Power Control System - Basic Inspection — 1Power Control System - Dtc/circuit Diagnosis — 1Power Control System - Removal and Installation — 1Charging System - Precautions. Preparation. Ecm, Ipdm E/r (Ecu Diagnosis Information) — 1Charging System - Diagnosis and Repair Work Flow — 1Charging System - Charging System (Symptom Diagnosis). Generator (Removal and Installation). Service Data and Specifications (SDS) — 1Power Supply, Ground & Circuit Elements - Precautions. Preparation. Service Data and Specifications (SDS) — 1Driver Information & Multimedia :: Meter, Warning Lamp & Indicator — 25Warning Chime System - Application Notice (How to Use This Manual). Precautions — 1Warning Chime System - System — 1Warning Chime System - Diagnosis System (combination Meter) — 1Warning Chime System - Bcm, Combination Meter (Ecu Diagnosis Information). Diagnosis and Repair Work Flow (Basic Inspection) — 1Sonar System - Precautions. Preparation — 1Sonar System - Sonar Control Unit — 1Dtc/circuit Diagnosis - B2720 Corner Sensor [rl] ++ — 1Audio, Visual & Navigation System - System Description — 1System Description - Component Parts ++ — 1System Description - System ++ — 1Audio, Visual & Navigation System - Ecu Diagnosis Information — 1Audio, Visual & Navigation System - Basic Inspection — 1Audio, Visual & Navigation System - Dtc/circuit Diagnosis — 1Dtc/circuit Diagnosis - Multi Av (av Control Unit) ++ — 1Audio, Visual & Navigation System - Symptom Diagnosis — 1Symptom Diagnosis - Multi Av System ++ — 1Audio, Visual & Navigation System - Removal and Installation — 1Audio, Visual & Navigation System - System Description — 1Audio, Visual & Navigation System - Ecu Diagnosis Information — 1Audio, Visual & Navigation System - Basic Inspection — 1Audio, Visual & Navigation System - Dtc/circuit Diagnosis — 1Audio, Visual & Navigation System - Symptom Diagnosis — 1Audio, Visual & Navigation System - Removal and Installation — 1Audio, Visual & Navigation System - System Description — 1Audio, Visual & Navigation System - Basic Inspection — 1Audio, Visual & Navigation System - Dtc/circuit Diagnosis — 1Audio, Visual & Navigation System - Symptom Diagnosis — 1Audio, Visual & Navigation System - Removal and Installation — 1Audio, Visual & Navigation System - System Description — 1Audio, Visual & Navigation System - Basic Inspection — 1Audio, Visual & Navigation System - Dtc/circuit Diagnosis — 1Audio, Visual & Navigation System - Symptom Diagnosis — 1Audio, Visual & Navigation System - Removal and Installation — 1Cruise Control & Driver Assistance :: Cruise Control System — 17Driver Assistance System - System Description — 1Driver Assistance System - Basic Inspection — 1Driver Assistance System - Dtc/circuit Diagnosis — 1Driver Assistance System - System Description — 1System Description - Component Parts ++ — 1System Description - System ++ — 1System Description - Operation ++ — 1System Description - Handling Precaution ++ — 1Driver Assistance System - Ecu Diagnosis Information — 1Driver Assistance System - Basic Inspection — 1Basic Inspection - Distance Sensor Alignment ++ — 1Basic Inspection - Camera Aiming Adjustment ++ — 1Basic Inspection - Action Test ++ — 1Driver Assistance System - Dtc/circuit Diagnosis — 1Dtc/circuit Diagnosis - Laser/radar (distance Sensor) ++ — 1Dtc/circuit Diagnosis - Lane Camera (front Camera Unit) ++ — 1Driver Assistance System - Symptom Diagnosis — 1Driver Assistance System - Removal and Installation — 1Driver Assistance System - System Description — 1System Description - System ++ — 1Driver Assistance System - Basic Inspection — 1Driver Assistance System - Dtc/circuit Diagnosis — 1Drive Mode System - Precautions — 1Drive Mode System - Component Parts. Drive Mode System — 1Drive Mode System - System — 1Drive Mode System - Diagnosis and Repair Work Flow — 1Drive Mode System - Drive Mode Select Switch Circuit — 1Maintenance - Precautions. Preparation — 1Maintenance - General Maintenance — 1Maintenance - Periodic Maintenance — 1Maintenance - Recommended Fluids and Lubricants — 1Maintenance - Engine Maintenance — 1Maintenance - Chassis and Body Maintenance — 1Engine Lubrication System - Periodic Maintenance — 1Engine Lubrication System - Removal and Installation — 1Engine Cooling System - System Description — 1Engine Cooling System - Removal and Installation — 1Engine Control System - Vq35dd — 1Fuel System - Removal and Installation — 1Starting System - System Description — 1Starting System - Dtc/circuit Diagnosis — 1Driveline - Transfer: Ty92b — 1Driveline - Rear Propeller Shaft: 3fcj-Cvj — 1Driveline - Rear Final Drive: R145 — 1Front Axle - Periodic Maintenance — 1Front Axle - Removal and Installation — 1Rear Axle - Periodic Maintenance — 1Rear Axle - Removal and Installation — 1Rear Suspension - Removal and Installation — 1Road Wheels & Tires - System Description — 1Road Wheels & Tires - Basic Inspection — 1Road Wheels & Tires - Dtc/circuit Diagnosis — 1Road Wheels & Tires - Symptom Diagnosis — 1Road Wheels & Tires - Periodic Maintenance — 1Road Wheels & Tires - Removal and Installation — 1Parking Brake System - System Description — 1Parking Brake System - Basic Inspection — 1Parking Brake System - Dtc/circuit Diagnosis — 1Parking Brake System - Symptom Diagnosis — 1Parking Brake System - Removal and Installation — 1Brake Control System - Vdc/tcs/abs — 1Brake Control System - Automatic Brake Hold — 1Brake Control System - Automatic Emergency Braking — 1Brake Control System - Rear Automatic Braking — 1Steering Control System - System Description — 1Steering Control System - Basic Inspection — 1Steering Control System - Dtc/circuit Diagnosis — 1Steering Control System - Symptom Diagnosis — 1Srs Air Bag - Removal and Installation — 1Srs Air Bag Control System - System Description — 1Srs Air Bag Control System - Basic Inspection — 1Srs Air Bag Control System - Symptom Diagnosis — 1Heater & Air Conditioning System - Symptom Diagnosis — 1Heater & Air Conditioning System - Periodic Maintenance — 1Heater & Air Conditioning Control System - Automatic Air Conditioning — 1Instrument Panel - Removal and Installation — 1Instrument Panel - Unit Disassembly and Assembly — 1Seat - Ecu Diagnosis Information — 1Seat - Dtc/circuit Diagnosis — 1Seat - Symptom Diagnosis — 1Automatic Drive Positioner - System Description — 1Automatic Drive Positioner - Ecu Diagnosis Information — 1Automatic Drive Positioner - Dtc/circuit Diagnosis — 1Automatic Drive Positioner - Symptom Diagnosis — 1Automatic Drive Positioner - Removal and Installation — 1Security Control System - System Description — 1Security Control System - Basic Inspection — 1Security Control System - Dtc/circuit Diagnosis — 1Security Control System - Symptom Diagnosis — 1Security Control System - Removal and Installation — 1Glass & Window System - Removal and Installation — 1Power Window Control System - System Description — 1Power Window Control System - Ecu Diagnosis Information — 1Power Window Control System - Basic Inspection — 1Power Window Control System - Dtc/circuit Diagnosis — 1Power Window Control System - Symptom Diagnosis — 1Power Window Control System - Removal and Installation — 1Roof - System Description — 1Roof - Ecu Diagnosis Information — 1Roof - Basic Inspection — 1Roof - Dtc/circuit Diagnosis — 1Roof - Symptom Diagnosis — 1Roof - Removal and Installation — 1Exterior - System Description — 1Exterior - Removal and Installation — 1Body Repair - Repair Information — 1Exterior Lighting System - Led Headlamp — 1Interior Lighting System - Dtc/circuit Diagnosis — 1Interior Lighting System - Removal and Installation — 1Wiper & Washer - System Description — 1Wiper & Washer - Dtc/circuit Diagnosis — 1Wiper & Washer - Symptom Diagnosis — 1Wiper & Washer - Removal and Installation — 1Defogger - System Description — 1Defogger - Dtc/circuit Diagnosis — 1Defogger - Symptom Diagnosis — 1Defogger - Removal and Installation — 1Horn - Removal and Installation — 1Body Control System - Basic Inspection — 1Body Control System - Dtc/circuit Diagnosis — 1Body Control System - Symptom Diagnosis — 1Body Control System - Removal and Installation — 1Lan System - Can Fundamental — 1Lan System - Can — 1Lan System - Can Gateway — 1Power Control System - Ipdm E/r — 1Power Control System - Power Distribution System — 1Charging System - System Description — 1Charging System - Dtc/circuit Diagnosis — 1Power Supply, Ground & Circuit Elements - System Description — 1Power Supply, Ground & Circuit Elements - Basic Inspection — 1Power Supply, Ground & Circuit Elements - Removal and Installation — 1Warning Chime System - System Description — 1Warning Chime System - Dtc/circuit Diagnosis — 1Warning Chime System - Symptom Diagnosis — 1Sonar System - System Description — 1Sonar System - Basic Inspection — 1Sonar System - Dtc/circuit Diagnosis — 1Sonar System - Symptom Diagnosis — 1Sonar System - Removal and Installation — 1Audio, Visual & Navigation System - Nissanconnect — 1Audio, Visual & Navigation System - Intelligent Around View Monitor System — 1Audio, Visual & Navigation System - Rear View Monitor System — 1Audio, Visual & Navigation System - Telematics System — 1Driver Assistance System - Adas Control Unit 2 — 1Driver Assistance System - Driver Assistance System — 1Driver Assistance System - Chassis Control — 1Drive Mode System - Removal and Installation — 1Dtc/circuit Diagnosis (C053c Wheel Speed Sensor ... U2141 Can Comm Circuit) — 1Dtc/circuit Diagnosis (P0011 Intake Valve Timing Control ... P0111 Iat Sensor) — 1Dtc/circuit Diagnosis (P0116 Engine Coolant Temperature Sensor ... P025b Fuel Pump Module a) — 1Dtc/circuit Diagnosis (P026b Injection Timing ... P0420 Three Way Catalyst Function) — 1Dtc/circuit Diagnosis (P0441 Evap Control System ... P0524 Engine Oil Pressure) — 1Dtc/circuit Diagnosis (P0532 A/c Refrigerant Pressure Sensor ... P064d Ecm) — 1Dtc/circuit Diagnosis (P06da Engine Oil Pressure Control Solenoid Valve ... P1217 Engine Over Temperature) — 1Dtc/circuit Diagnosis (P1220 Fuel Pump Control Module (fpcm) ... P1574 Ascd Vehicle Speed Sensor) — 1Dtc/circuit Diagnosis (P1575 Brake Switch ... P2101 Electric Throttle Control Function) — 1Dtc/circuit Diagnosis (P2118 Throttle Control Motor ... P34ac Electric Intake Valve Timing Control Actuator) — 1Dtc/circuit Diagnosis (Active Grille Shutter ... High Pressure Fuel Pump) — 1Dtc/circuit Diagnosis (Ignition Signal ... Variable Induction Air System) — 14012 C1040 Emergency Brake — 14013 C106a Wheel Sensor — 14014 C1078-55 Not Configuration — 14015 C10b4-98 Overheat — 14016 B1001 Lap Pre-Tensioner Lh — 14017 B0001 Driver Air Bag Module — 14018 B100e Knee Air Bag Module Rh — 14019 B142x Collision Detection — 1Dtc/circuit Diagnosis (B20c7-11 A/c Clutch ... B24a6-11 in-Vehicle Sensor) — 1Dtc/circuit Diagnosis (B24a6-15 in-Vehicle Sensor ... U2140-87 Can Comm Err (ecm)) — 1Dtc/circuit Diagnosis (C1f00-1c Control Unit ... C1f04-61 Brake Sw/stop Lamp Sw) — 1Dtc/circuit Diagnosis (C1f05-49 Front Camera Unit ... C1f70-87 Ethernet Circuit) — 1
57steps
~342min
5/5difficulty
Done 0 of 57

Work Procedure

Always perform the radar alignment after removing and installing or replacing the distance sensor.

Application Notice

Type Description
TYPE 1 When using KV99112700 for radar alignment. Refer to Description.
TYPE 2 When using 1-20-2851-1 for radar alignment. Refer to Description.

TYPE 1

Description

OUTLINE OF RADAR ALIGNMENT PROCEDURE

  • A 4-wheel vehicle alignment must be performed before proceeding with radar alignment procedure.

  • Always perform the radar alignment after removing and installing or replacing the distance sensor.

  1. Set the target board (SST: KV99112700) to the correct position in front of the vehicle.

  2. Set the radar alignment mode (“MILLIWAVE RADAR ADJUST” on “Work support”) with CONSULT, and then perform the adjustment according to the display. (Distance sensor automatically adjusts.)

Preparation

CHECK EXTRIOR

Check front bumper, front grille, and active grille shutter for damage.

Does damage exist?

YES>>

Repair or replace affected components. Refer to Removal and Installation (front bumper), Removal and Installation (front grille), or Removal and Installation (active grille shutter), and then GO TO 2.

NO>>

GO TO 2.

CHECK DISTANCE SENSOR

Check distance sensor and distance sensor sensor bracket for damage and installation condition (installation position, properly tightened).

Is the inspection result normal?

YES>>

Repair or replace the malfunctioning parts. Refer to Removal and Installation, and then GO TO 3.

NO>>

GO TO 3.

ADVANCE PREPARATION FOR RADAR ALIGNMENT

  1. Adjust all tire pressure to the specified value.

  2. Empty the Nissan Pathfinder vehicle. (Remove any luggage from the passenger compartment, trunk room, etc.)

  3. Shift the selector lever to “P” position, and release the parking brake.

  4. Fully fill the fuel tank, and then check that the coolant and oils are filled up to correct level.

  5. Clean the distance sensor area of the front bumper grille.
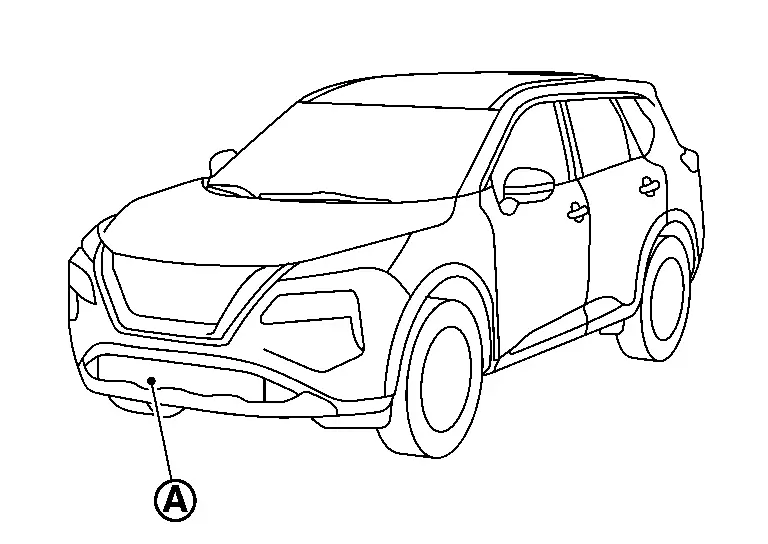
>>

GO TO 4.

RADAR ALIGNMENT OPERATION AREA

Position the Nissan Pathfinder vehicle in a place that is level and where area can be secured.
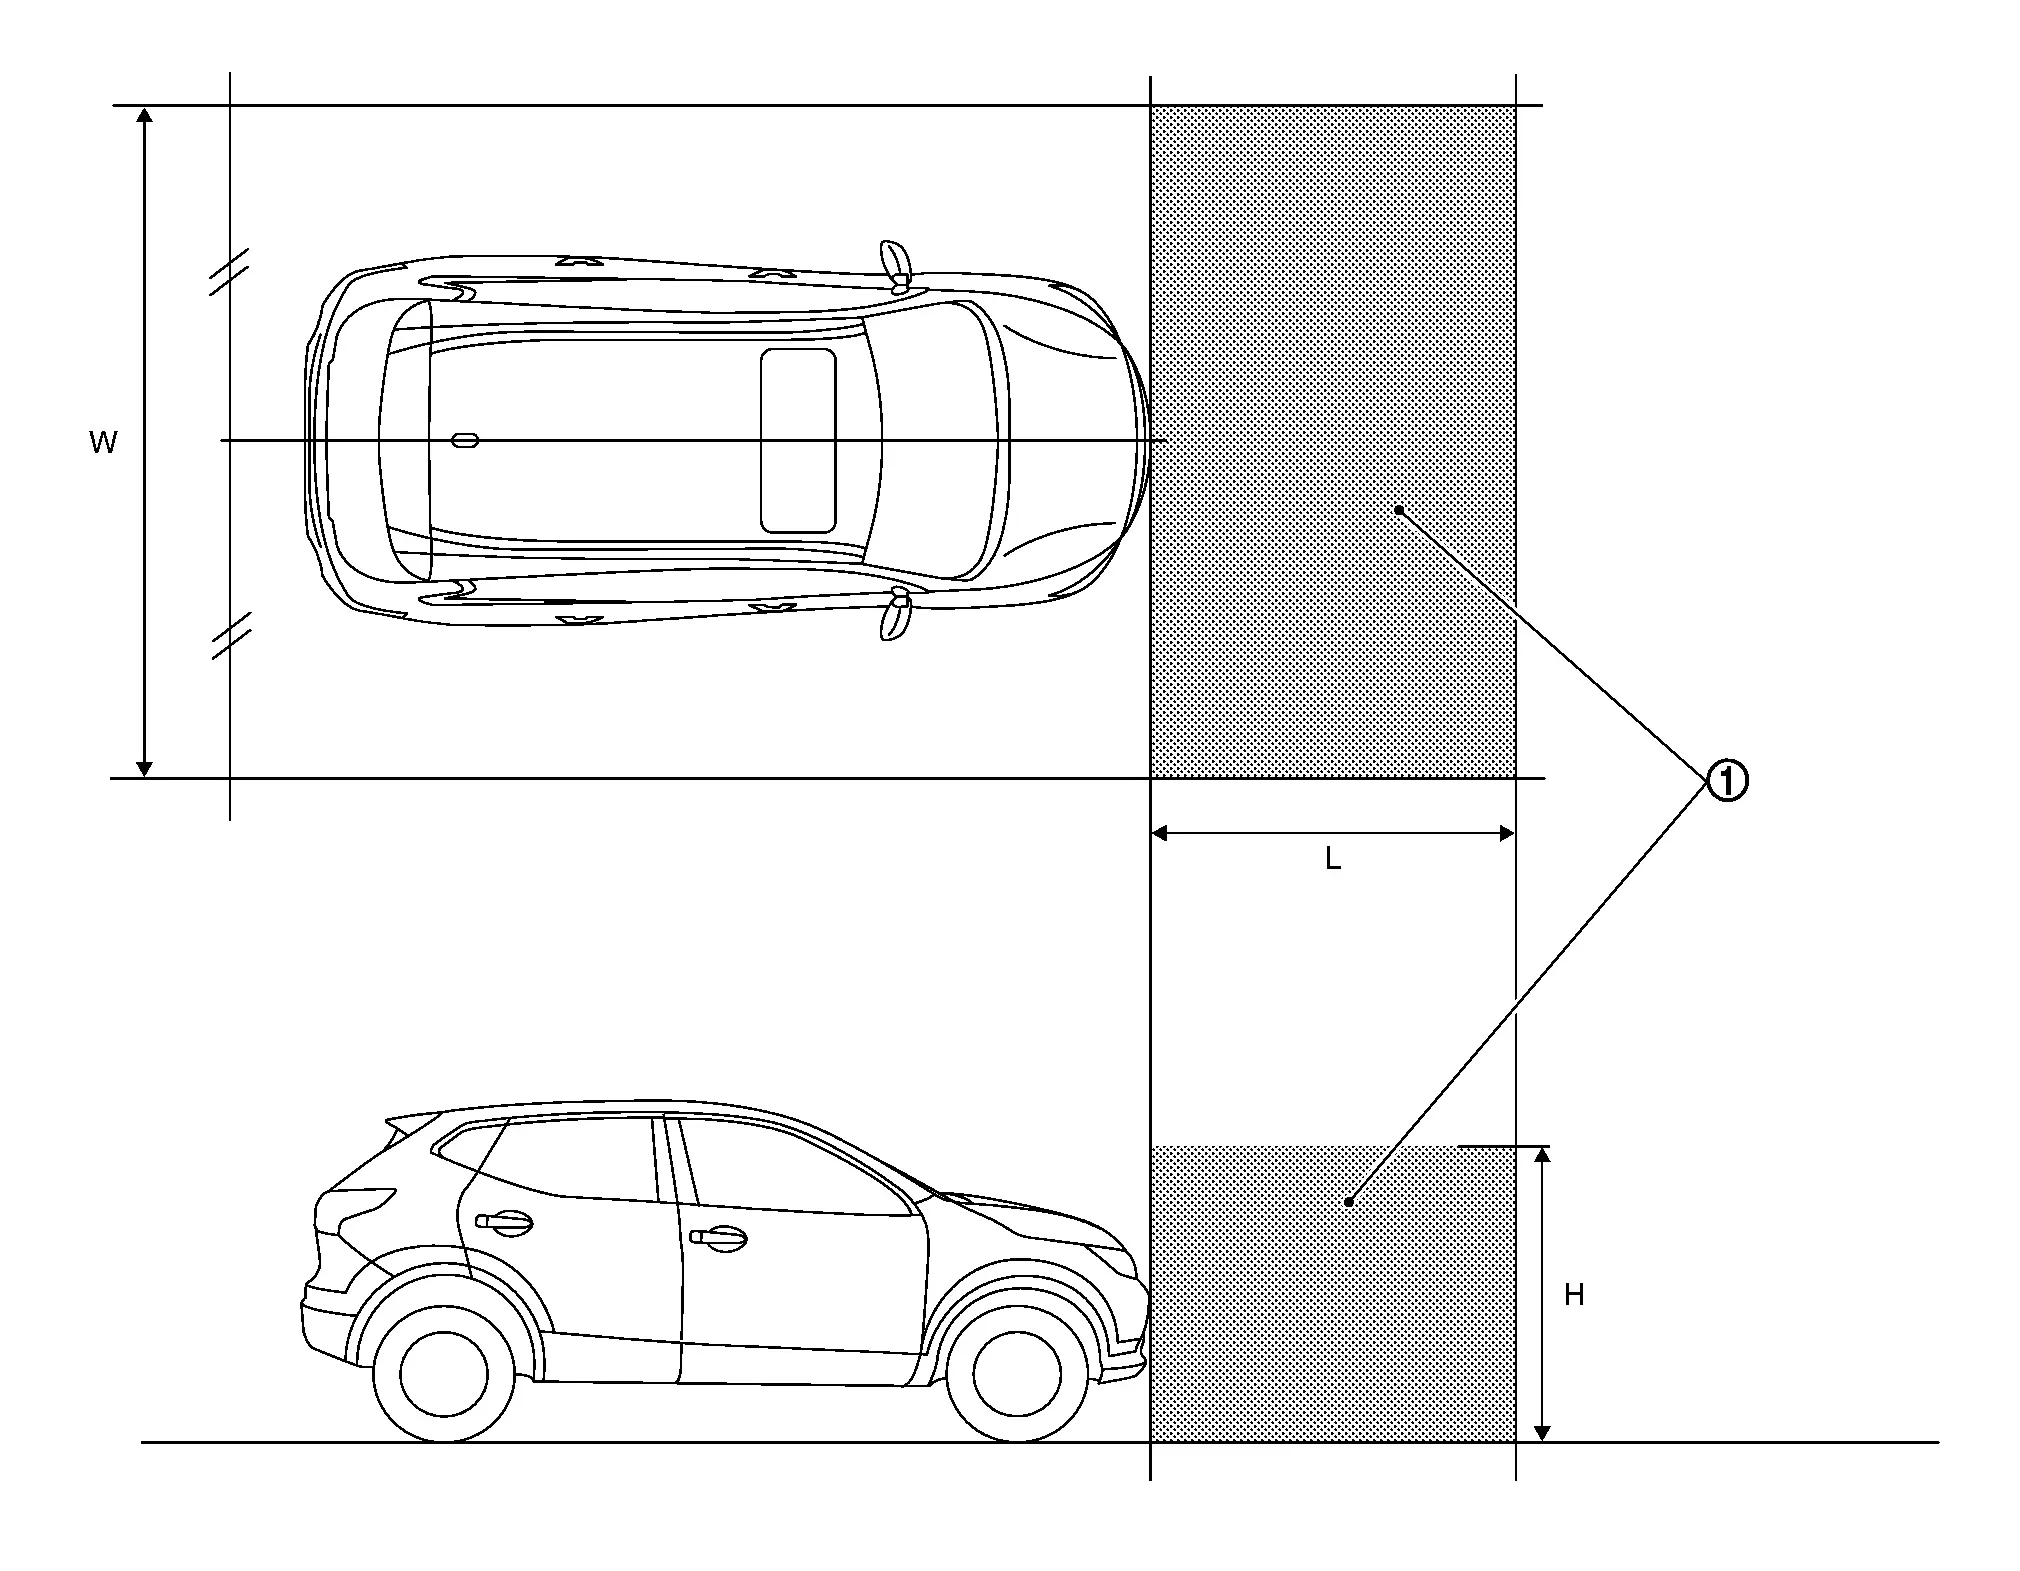
W : 3000 mm (118.11 in)
L : 2000 mm (78.74 in)
H : 2000 mm (78.74 in)

>>

Go to Setting The Target Board.

Setting The Target Board

Accurate adjustment of the radar alignment requires that the target board be accurately positioned.

TARGET BOARD HEIGHT ADJUSTMENT

Adjust the base of ICC target board to approximately 410 mm (16.17 in) from the ground.

>>

GO TO 2.

PREPARATION OF SETTING TARGET BOARD (1)
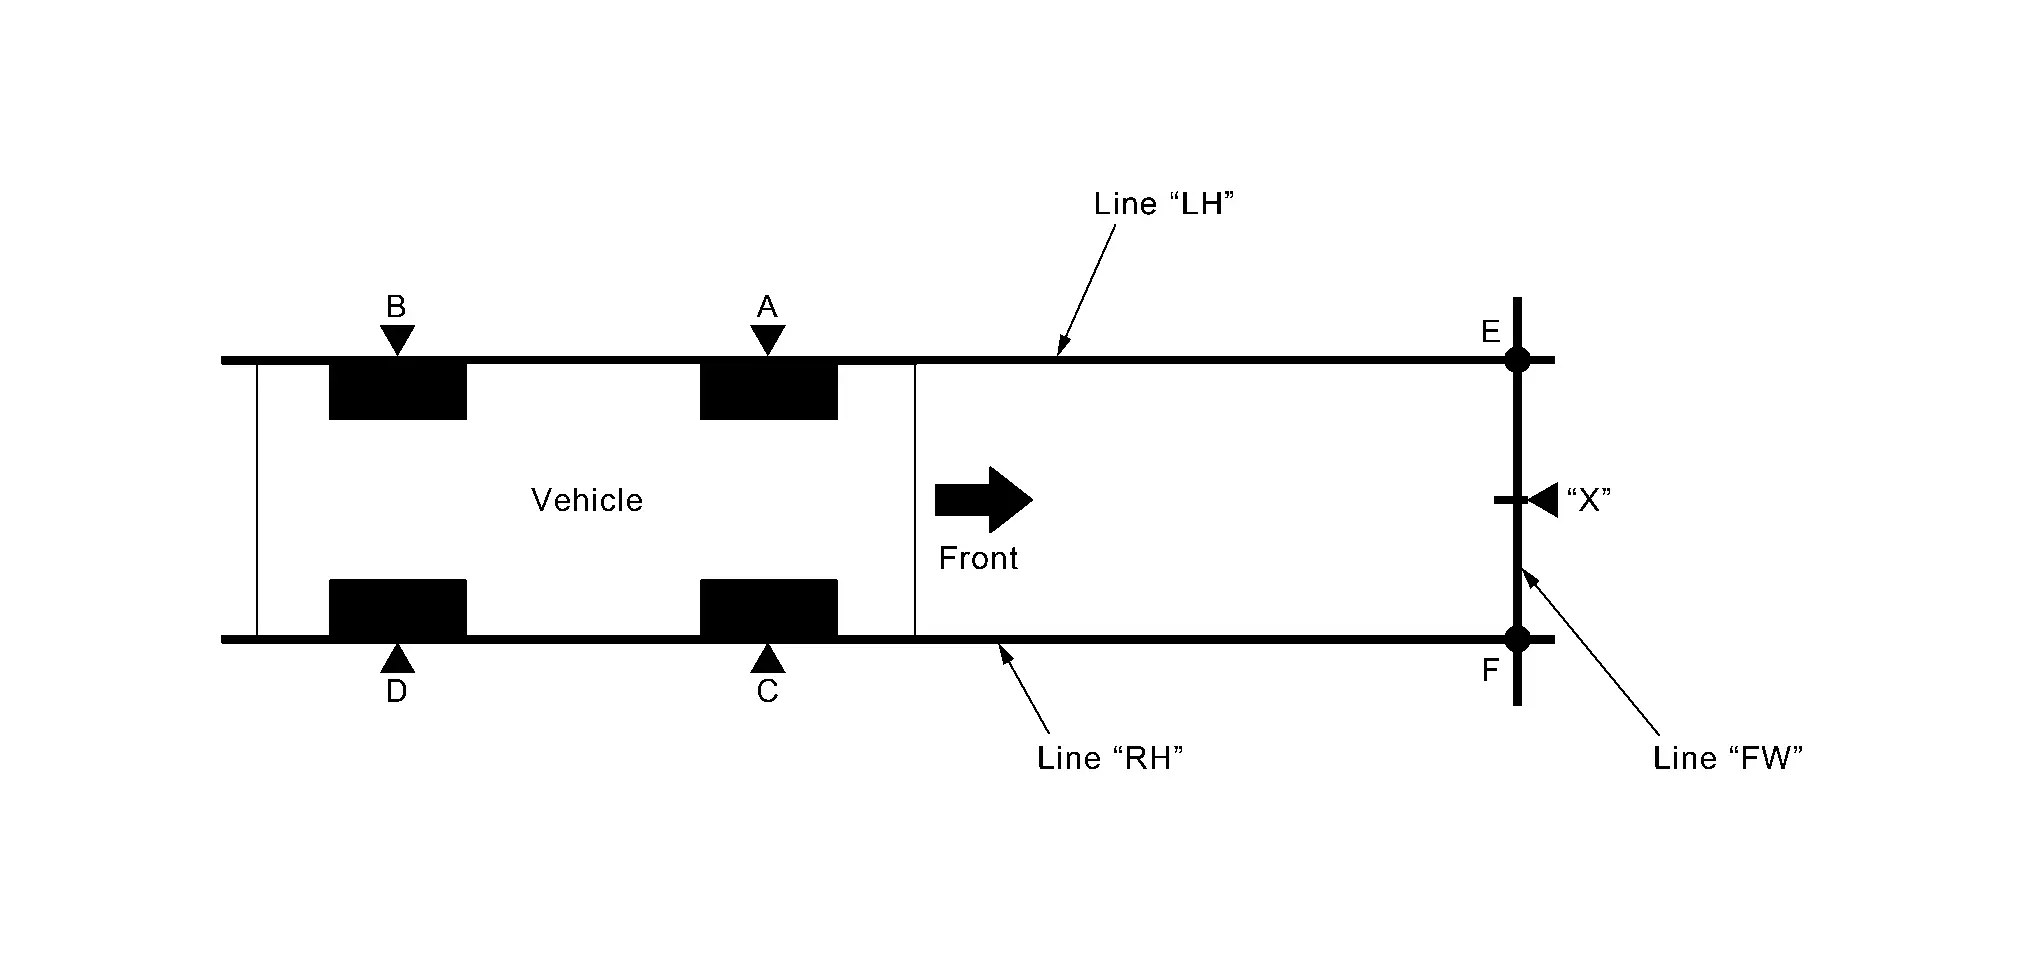
“A”–“E” (“C”–“F”) : 2000 mm (78.7 in)
  1. Mark points “A”, “B”, “C” and “D”at the center of the lateral surface of each wheels.
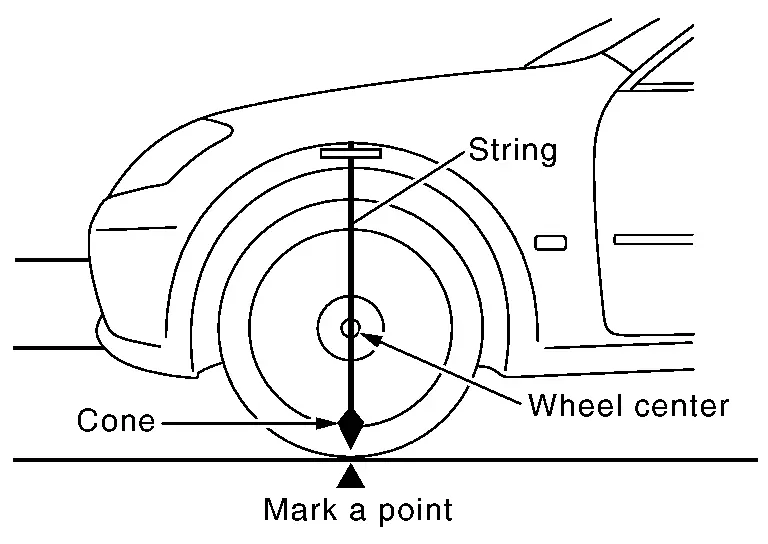
  2. Draw line “LH” passing through points “A” and “B” on the left side of Nissan Pathfinder vehicle.

  3. Mark point “E” on the line “LH” at the positions 2000 mm (78.7 in) from point “A”.

  4. Draw line “RH” passing through points “C” and “D” on the right side of Nissan Pathfinder vehicle in the same way as step 2.

  5. Mark point “F” on the line “RH” at the positions 2000 mm (78.7 in) from point “C”.

  6. Draw line “FW” passing through the points “E” and “F” on the front side of Nissan Pathfinder vehicle.

  7. Mark point “X” at the center of point “E” and “F” on the line “FW”.

>>

GO TO 3.

SETTING TARGET BOARD

Place the center of target board on point “G” at line “E-F” and install the target board.
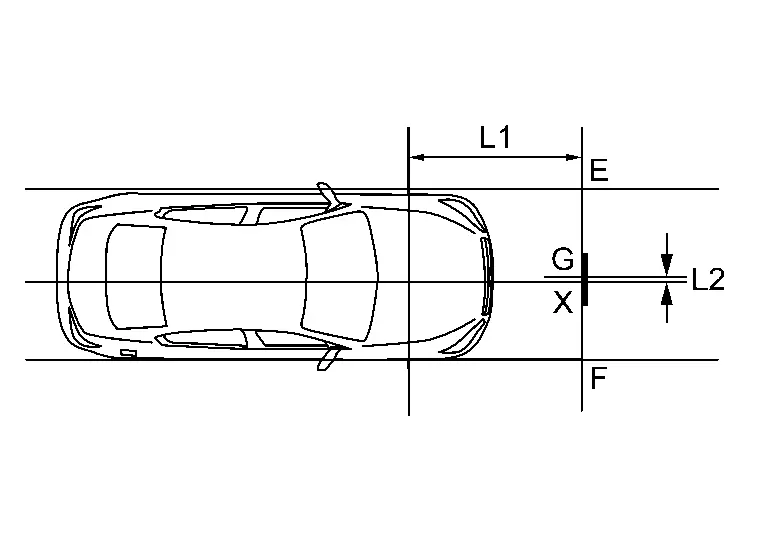
L1 : 2000 mm (78.7 in)
L2 : 0 mm (0 in)

>>

GO TO 4.

CHECK THE TARGET BOARD INSTALLATION AREA

Do not place anything other than target board in the space shown in the figure (view from top).
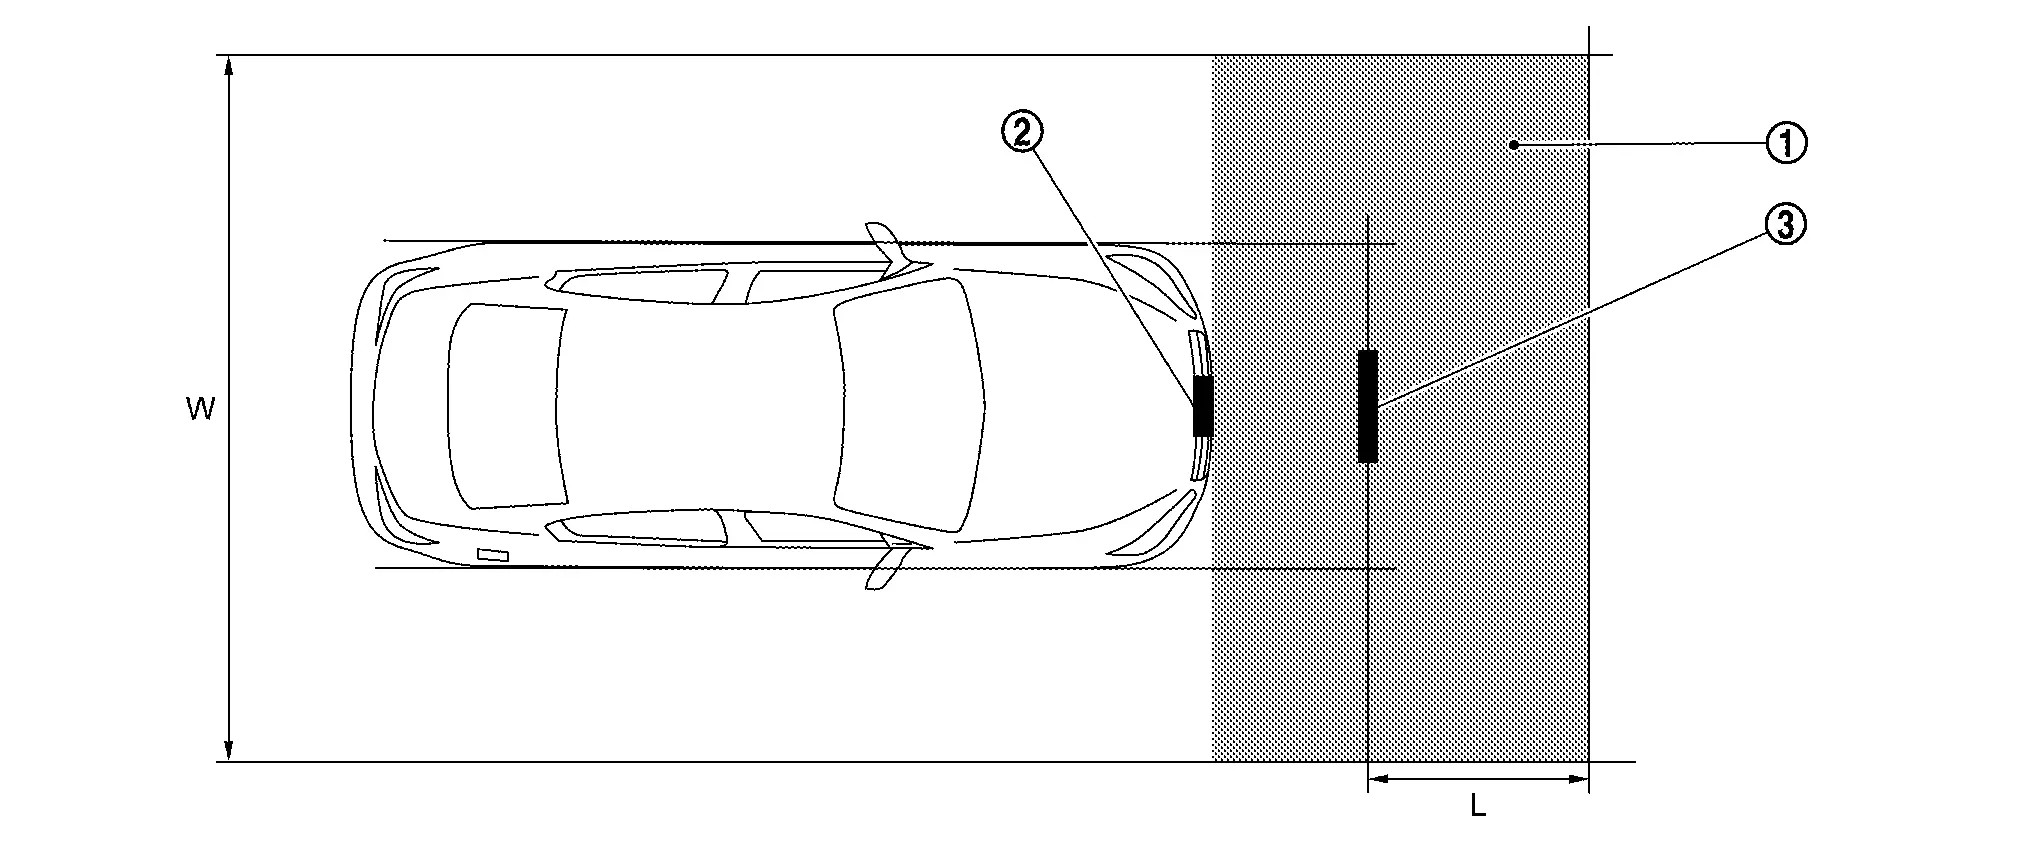
No object zone Distance sensor Target board
W. 3000 mm (118.11 in) L. 1500 mm (59.06 in)

>>

Go to Radar Alignment.

Radar Alignment

The radar alignment is performed automatically with CONSULT.

SELECT WORK SUPPORT ITEM

  1. Start the engine.

  2. Connect CONSULT and select “Work support” of “LASER/RADAR”.

  3. Select “MILLIWAVE RADAR ADJUST”.

  • The target should be accurately placed.

  • The Nissan Pathfinder vehicle should be stopped.

Is the radar alignment start screen displayed?

YES>>

GO TO 2.

NO–1 (When "Nissan Pathfinder Vehicle is moving" is displayed)>>

Stop the vehicle and touch "Retry" to perform radar alignment again.

NO–2 (When "System malfunction is detected" is displayed)>>

GO TO 4.

NO–3 (When error message other than the above is displayed)>>

GO TO 3.

START RADAR ALIGNMENT

Select “Start” after the conditions displayed on CONSULT are satisfied.

Is the result normal?

YES>>

RADAR ALIGNMENT END

NO–1 (When "Nissan Pathfinder Vehicle is moving" is displayed)>>

Stop the vehicle and touch "Retry" to perform radar alignment again.

NO–2 (When "System malfunction is detected" is displayed)>>

GO TO 4.

NO–3 (When error message other than the above is displayed)>>

GO TO 3.

CHECK EXECUTION CONDITION

Check if the following conditions are satisfied.

  • The target should be accurately placed.

  • The Nissan Pathfinder vehicle should be stopped.

Is the result normal?

YES>>

GO TO 4.

NO>>

Check the condition and perform the radar alignment again.

CHECK SELF-DIAGNOSIS RESULTS OF LASER/RADAR

  1. Perform "All DTC Reading".

  2. Check if the DTC is detected on the self-diagnosis results of LASER/RADAR. Refer toDTC Index.

  3. Perform trouble diagnosis for the detected DTC, and repair or replace the identified malfunctioning parts.

  4. Ignition switch OFF to ON, and perform the radar alignment again.

>>

WORK END.

TYPE 2

Description

OUTLINE OF RADAR ALIGNMENT PROCEDURE

  • A 4-wheel vehicle alignment must be performed before proceeding with radar alignment procedure.

  • Always perform the radar alignment after removing and installing or replacing the distance sensor.

  • Always perform the radar alignment if rear axle toe settings have been made.

  1. Required tools, refer to Required Tools.

  2. Preparation, refer to Preparation.

  3. Nissan Pathfinder Vehicle set up, refer to Vehicle Set Up.

  4. Setting the target board, refer to Setting The Target Board.

  5. Distance sensor adjustment, refer to Distance Sensor Adjustment.

Required Tools

The following tools are necessary to perform distance sensor alignment:

  • Radar Sensor Aiming Kit 1–20–2851–1 Kit includes the following:

a) Target Board (Fixture)

b) Laser assembly

c) Rear Stand

Use kit 1–20–2851–1 with a self-centering wheel adapter (e.g. 1–20–2722–1–IF, Hunter 20–3339–1 or equivalent).

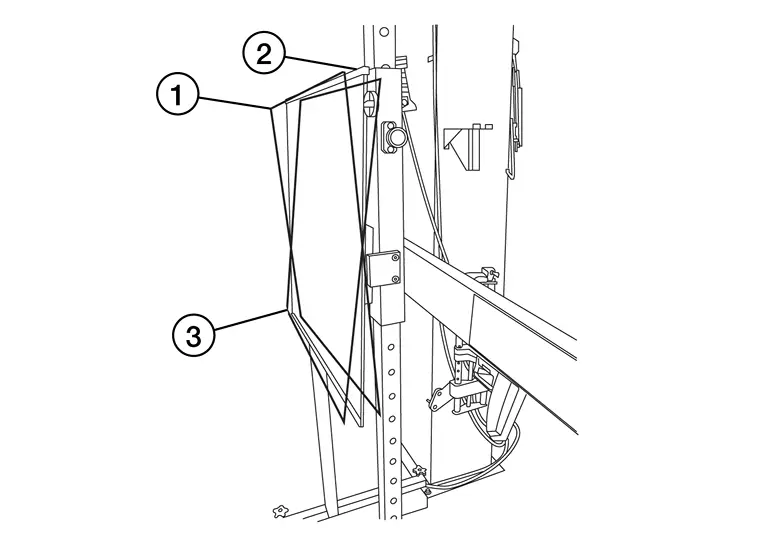
  • Target board.

    1. : Position 1, with top tilted 2° toward Nissan Pathfinder vehicle (Not used).

    2. : Position 2, vertical.

    3. : Position 3, with top tilted 2° away from Nissan Pathfinder vehicle (Not used).

  • Hunter self-centering wheel adapter [shown with laser assembly installed] (Hunter alignment rack head may be substituted).
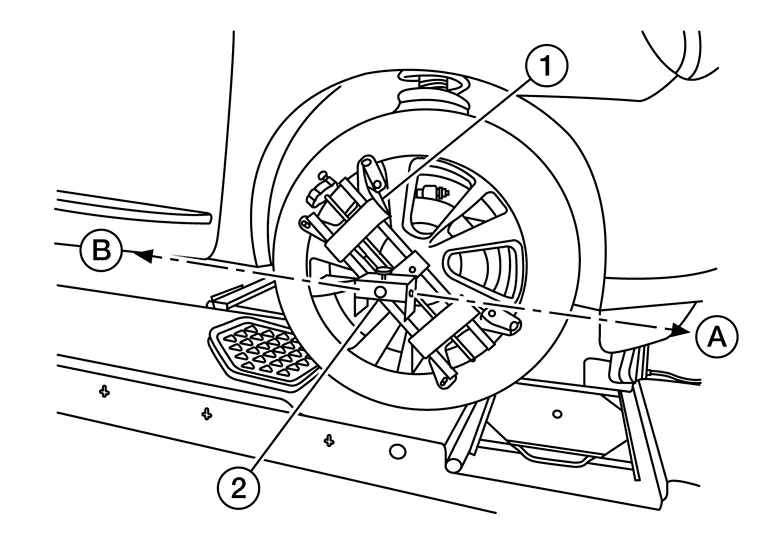
  • Laser assembly (with bi-directional laser beam) as shown in the illustration.
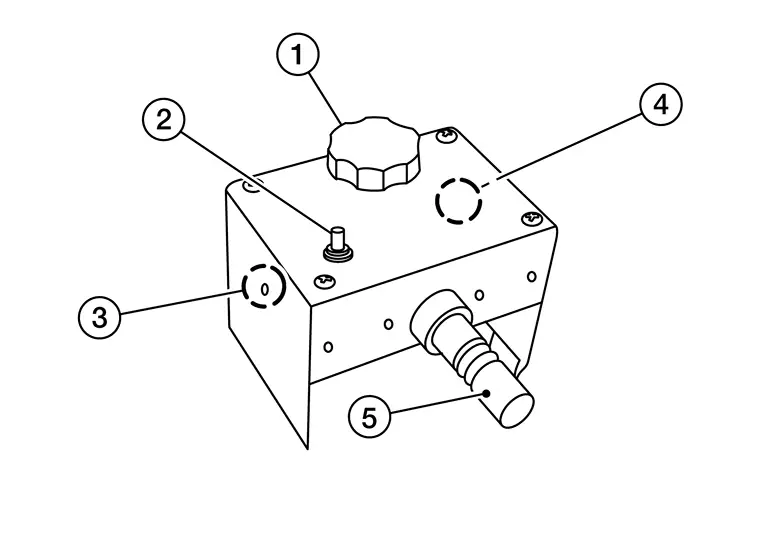
    1. Tightening knob

    2. Power ON/OFF button

    3. Front laser beam opening

    4. Rear laser beam opening

    5. Attaching shaft

  • Rear stand as shown in the illustration.
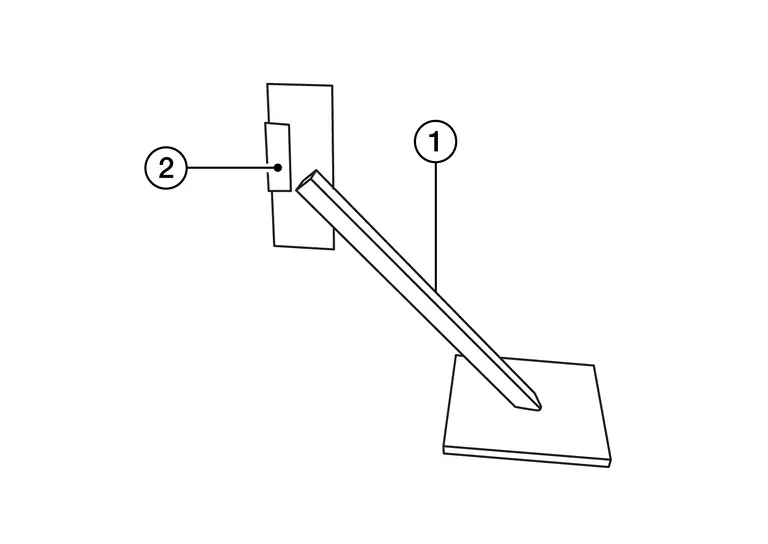
    1. Rear stand

    2. Laser signal reception plate

  • Distance chain (not shown)

Preparation

CHECK EXTRIOR

Check front bumper, front grille, and active grille shutter for damage.

Does damage exist?

YES>>

Repair or replace affected components. Refer to Removal and Installation (front bumper), Removal and Installation (front grille), or Removal and Installation (active grille shutter), and then GO TO 2.

NO>>

GO TO 2.

CHECK DISTANCE SENSOR

Check distance sensor and distance sensor sensor bracket for damage and installation condition (installation position, properly tightened).

Is the inspection result normal?

YES>>

Repair or replace the malfunctioning parts. Refer to Removal and Installation, and then GO TO 3.

NO>>

GO TO 3.

ADVANCE PREPARATION FOR RADAR ALIGNMENT PROCEDURE

  1. Adjust all tire pressure to the specified value.

  2. Empty the Nissan Pathfinder vehicle. (Remove any luggage from the passenger compartment, luggage room, etc.)

  3. Shift the selector lever to “P” position, and release the parking brake.

  4. Fully fill the fuel tank, and then check that the coolant and oils are filled up to correct level.

  5. Clean the distance sensor area of the front bumper grille.

>>

Refer to Nissan Pathfinder Vehicle Set Up.

Vehicle Set Up

Accurate adjustment of the radar alignment requires that the target board, wheel adapter, laser assembly, and rear stand be properly positioned.

PREPOSITION TARGET BOARD

  • To identify the sensor wave axis center, measure the point as shown in the illustration.
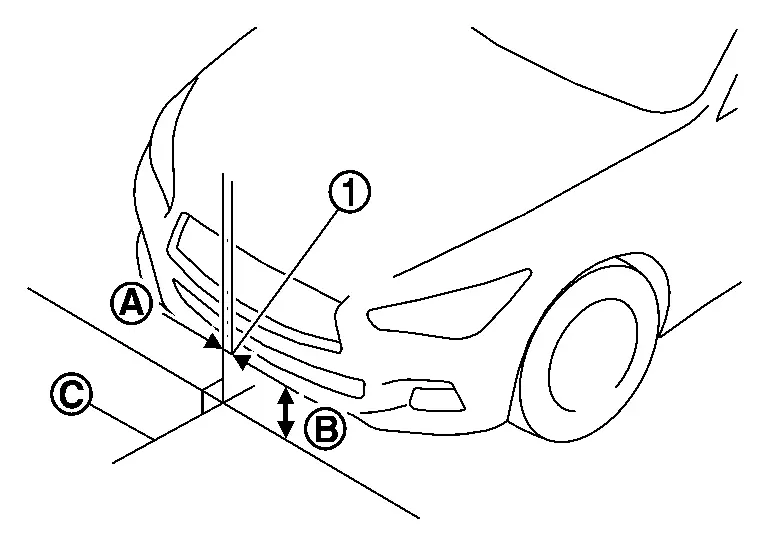
    A : 0 mm (0 in)
    B : 410 mm (16.17 in)
    C : Nissan Pathfinder Vehicle center
  • Target board setting must be in the center position. (Position 2)

  • Attaching the distance sensor alignment kit attachment board to the target board.

  1. Position the target board in front facing the right front side of the Nissan Pathfinder vehicle:
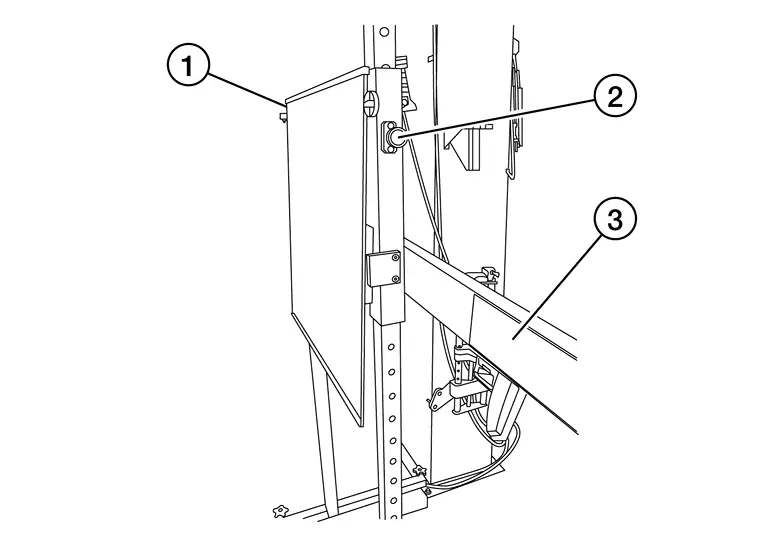
    1. Place the marked center of the target board 813.6 mm (32.03 in) ± 50 mm (1.97 in) facing the distance sensor.

    2. Adjust the height of the target board using the adjustable nut to achieve the proper height. The up/down tolerance is ± 30 mm (1.18 in).

    3. Adjust the target board lateral position aligning the marked center of the board horizontally with the center of the distance sensor. The right/left tolerance is ± 80 mm (3.15 in).

  2. Extend the machined arm of the target board exposing the reflective surface to the right front side of the Nissan Pathfinder vehicle.

  3. Place one side of the laser assembly flush against the center of the target board to assist in the positioning.
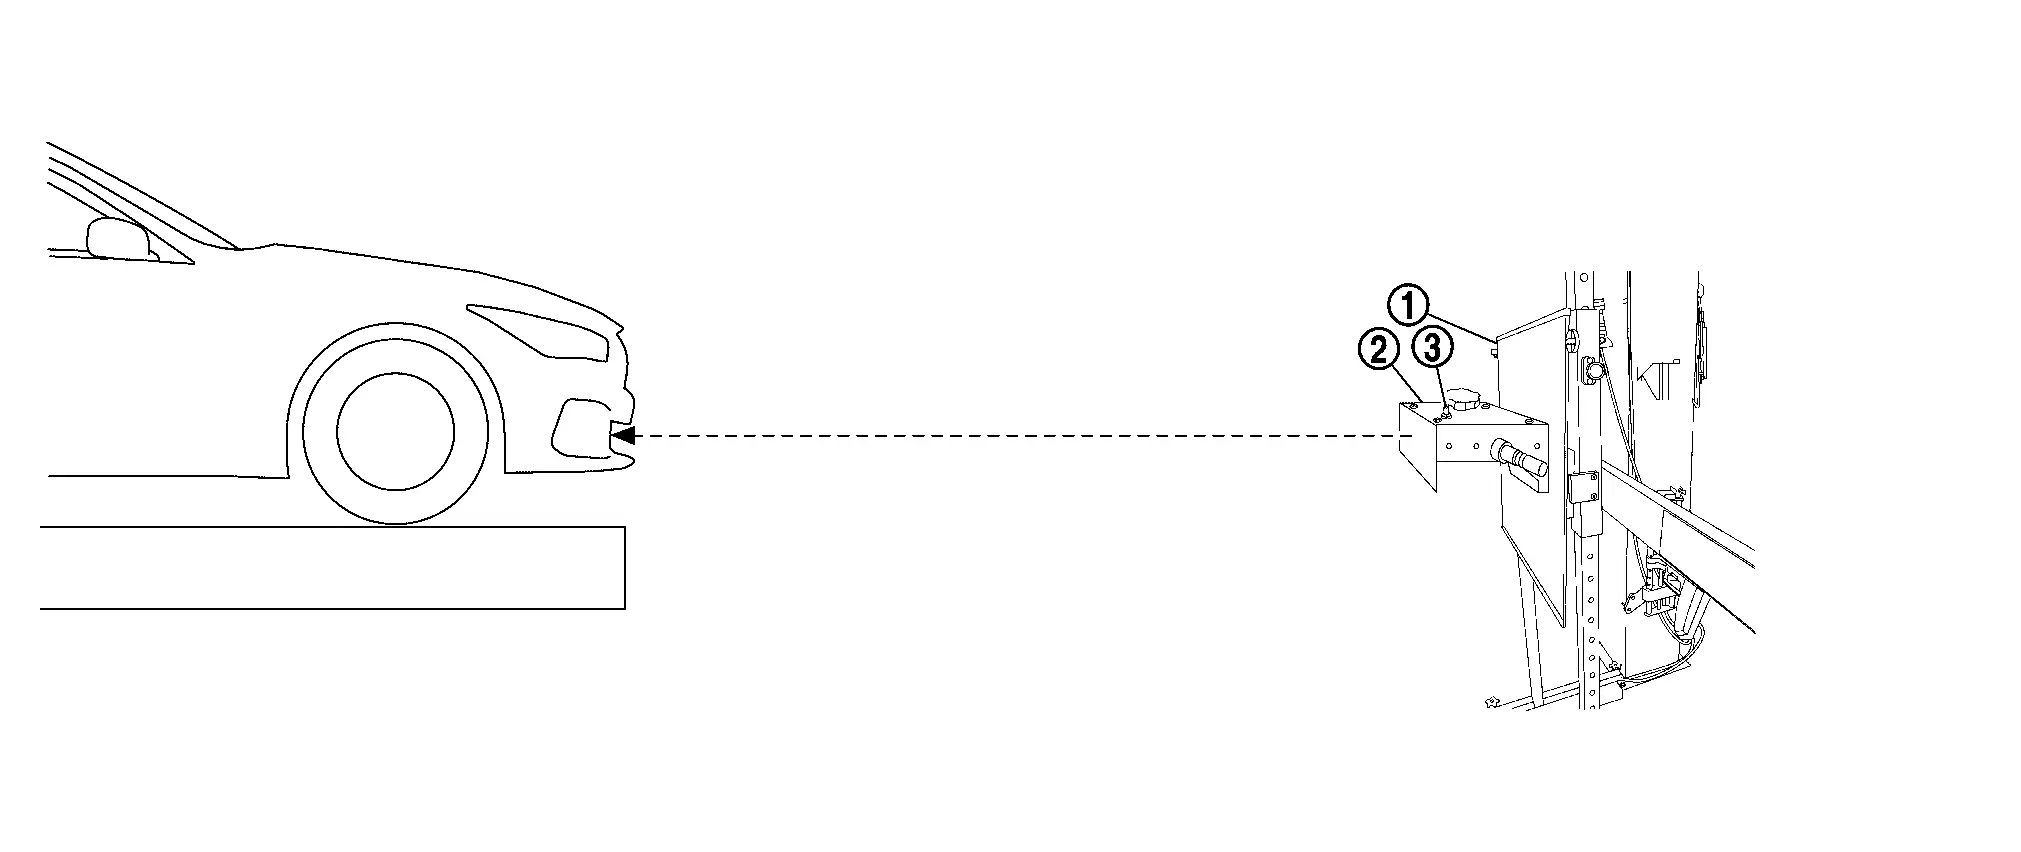
  4. Turn the laser assembly ON allowing the laser beam to emit through the opening of the laser assembly toward the center of the distance sensor.

  5. Move the target board as necessary so that center of target board aligns with center of distance sensor.

  6. Turn the laser assembly OFF when done.

Are using Hunter alignment equipment?

YES>>

Refer to Hunter’s equipment instructions for complete Nissan Pathfinder vehicle set up and target board setting. Then, refer to Distance Sensor Adjustment.

NO>>

GO TO 2.

INSTALLING LASER ASSEMBLY

  1. Install the wheel adapter on the right front wheel.

  2. Mount the laser assembly to the wheel adapter as shown in the figure.

>>

GO TO 3.

SETTING UP REAR STAND

  1. Place the rear stand next to the right rear tire as shown in the figure.
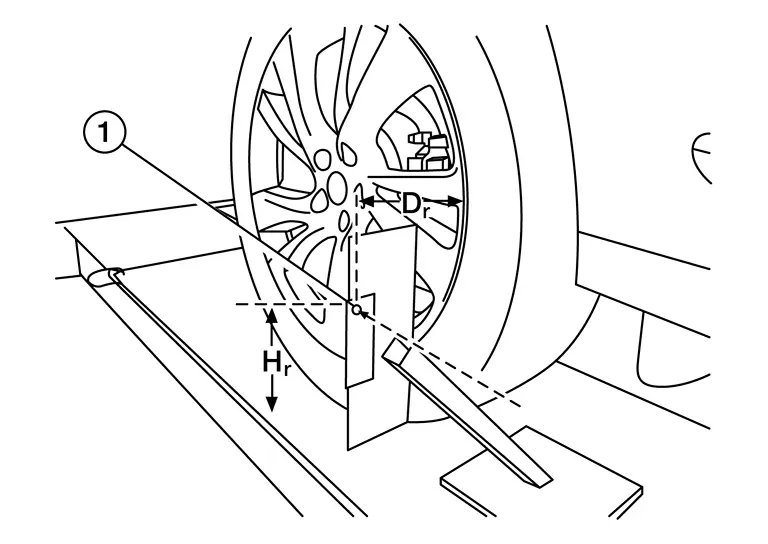
  2. Turn the laser assembly ON allowing the laser beam to be emitted through the front and rear laser assembly openings.

  3. Measure and record the distance (Dr) between the edge of the right rear wheel and the laser beam on the rear stand (horizontal line).

  4. Measure and record the height (Hr) between the laser beam on the rear stand and ground level (vertical line).

  5. Measure and record the distance (Df) between the edge of the right front wheel and the laser beam signal/opening on the laser assembly (horizontal line).
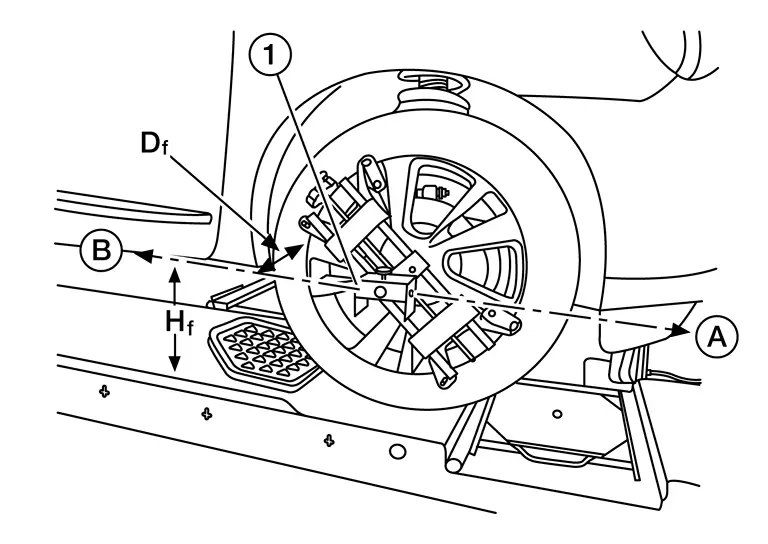
  6. Measure and record the height (Hf) between the laser beam signal/opening on the laser assembly and ground level (vertical line).

  7. Adjust laser beam as necessary until the two distances match and the two heights match.

>>

Refer to Setting The Target Board.

Setting The Target Board

Accurate adjustment of the radar alignment requires that the target board be accurately positioned.

TARGET BOARD FINAL SETTING

  1. With the target board arm extended, the laser beam emitted by the laser assembly will be reflected back toward the laser assembly.
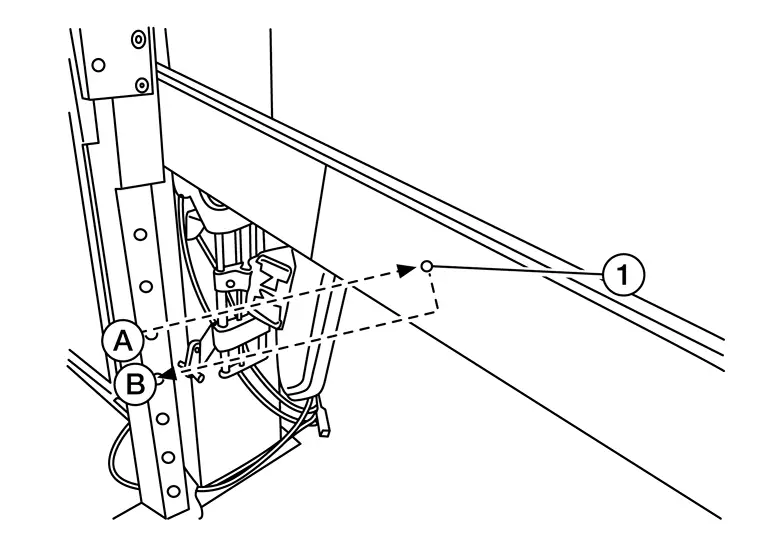
  2. Rotate the target board to achieve the necessary horizontal adjustment.

  3. Adjust the target board leveling screws to achieve the necessary vertical adjustment.

  4. The figure shown illustrates the laser beam emitted by the laser assembly and its reflection off of the target board arm.
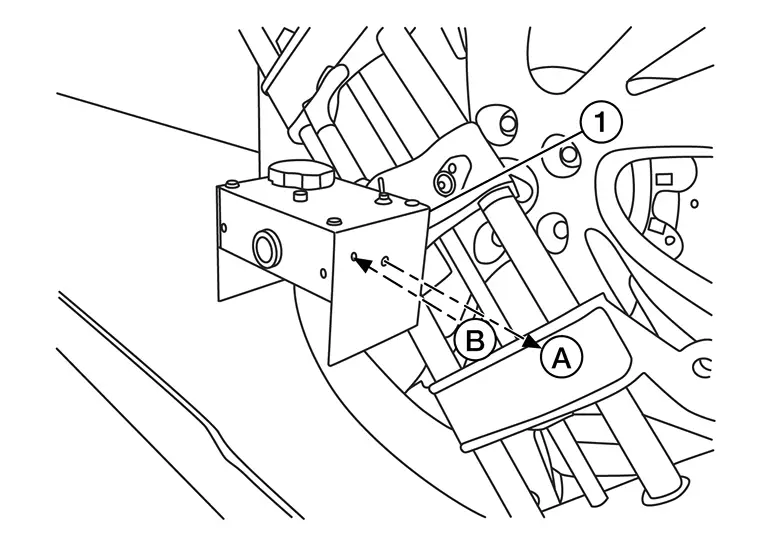
>>

GO TO 2.

CHECK THE POSITION OF THE TARGET BOARD

Do not place anything other than the target board in the space shown in front of the Nissan Pathfinder vehicle (view from top).
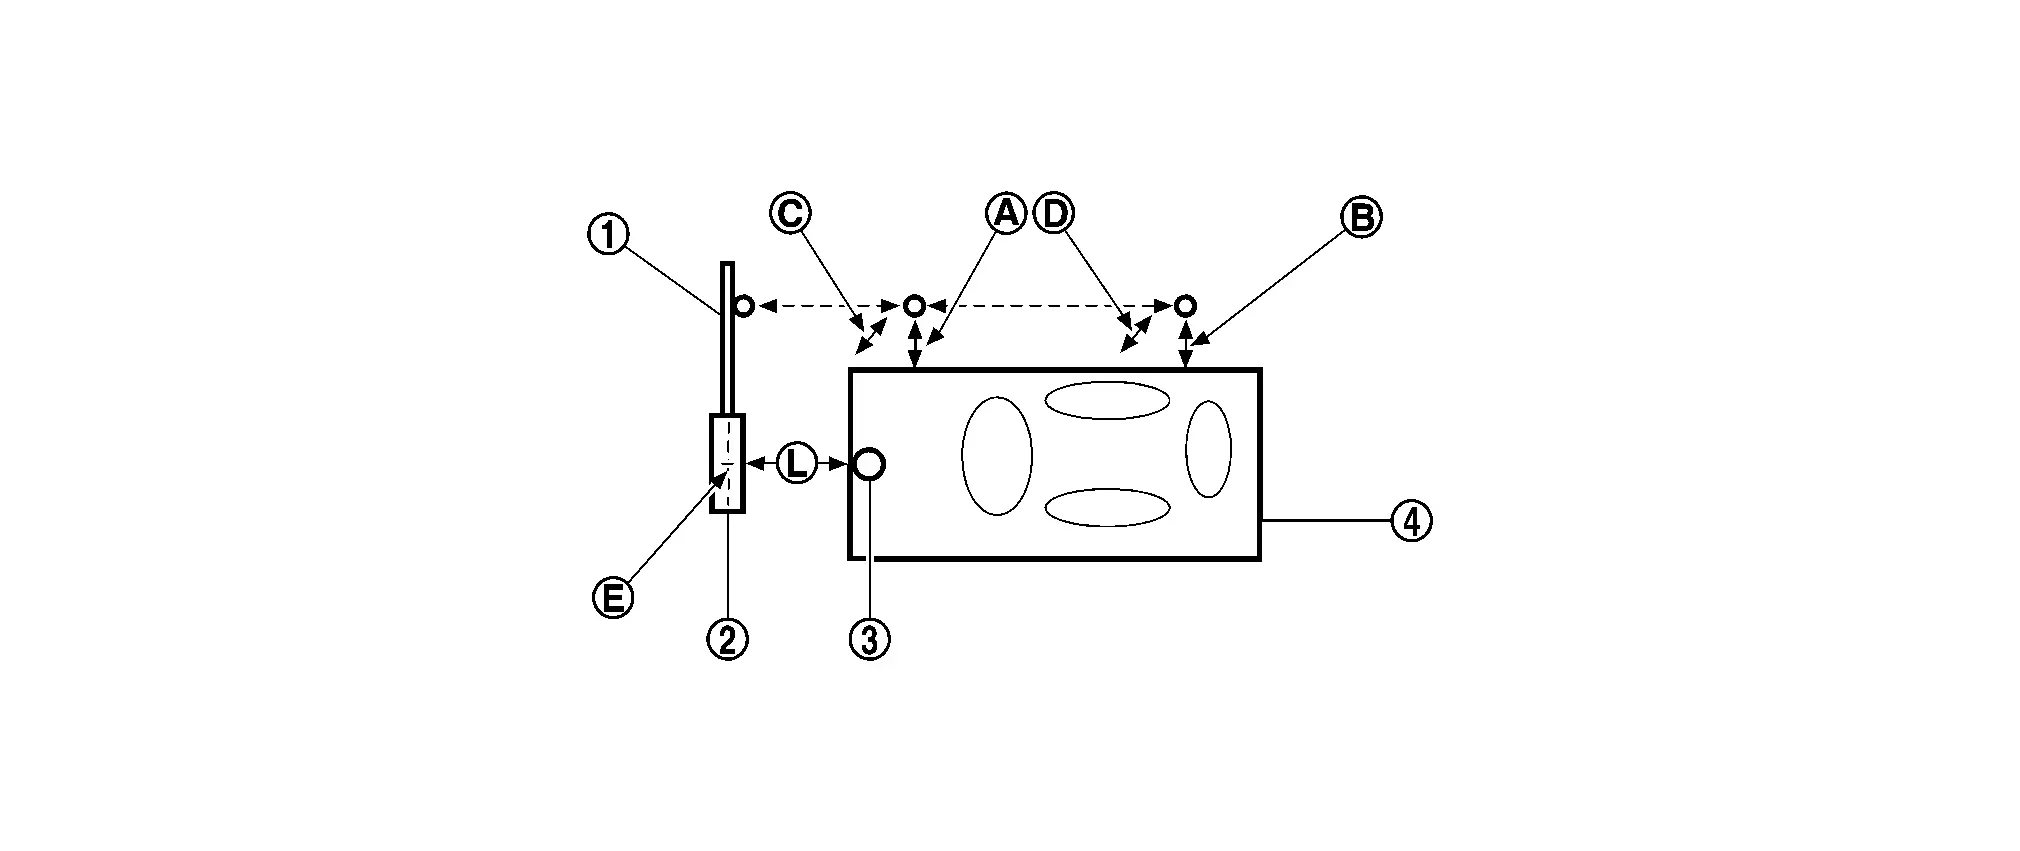
Target board arm Target board Distance sensor
Nissan Pathfinder Vehicle
Distance between front wheel and laser beam (Df) Distance between rear wheel and laser beam (Dr) Height between front laser beam and ground (Hf)
Height between rear laser beam and ground (Hr) Target board center position 1010 - 1110 mm (39.76 - 43.7 in)

>>

Refer to Distance Sensor Adjustment.

Distance Sensor Adjustment

The radar alignment is performed automatically with CONSULT.

SELECT WORK SUPPORT ITEM

  1. Start the engine.

  2. Connect CONSULT and select “Work support” of “LASER/RADAR”.

  3. Select “MILLIWAVE RADAR ADJUST”.

  • The target should be accurately placed.

  • The Nissan Pathfinder vehicle should be stopped.

Is the radar alignment start screen displayed?

YES>>

GO TO 2.

NO–1 (When "Nissan Pathfinder Vehicle is moving" is displayed)>>

Stop the vehicle and touch "Retry" to perform radar alignment again.

NO–2 (When "System malfunction is detected" is displayed)>>

GO TO 4.

NO–3 (When error message other than the above is displayed)>>

GO TO 3.

START RADAR ALIGNMENT

Select “Start” after the conditions displayed on CONSULT are satisfied.

Is the result normal?

YES>>

RADAR ALIGNMENT END

NO–1 (When "Nissan Pathfinder Vehicle is moving" is displayed)>>

Stop the vehicle and touch "Retry" to perform radar alignment again.

NO–2 (When "System malfunction is detected" is displayed)>>

GO TO 4.

NO–3 (When error message other than the above is displayed)>>

GO TO 3.

CHECK EXECUTION CONDITION

Check if the following conditions are satisfied.

  • The target should be accurately placed.

  • The Nissan Pathfinder vehicle should be stopped.

Is the result normal?

YES>>

GO TO 4.

NO>>

Check the condition and perform the radar alignment again.

CHECK SELF-DIAGNOSIS RESULTS OF LASER/RADAR

  1. Perform "All DTC Reading".

  2. Check if the DTC is detected on the self-diagnosis results of LASER/RADAR. Refer toDTC Index.

  3. Perform trouble diagnosis for the detected DTC, and repair or replace the identified malfunctioning parts.

  4. Ignition switch OFF to ON, and perform the radar alignment again.

>>

WORK END.