Body Repair - Removal and Installation

In this manual: Body Repair - Removal and Installation
General Information — 8Engine :: Engine Mechanical — 19Engine Lubrication System - Precautions. Preparation — 1Engine Lubrication System - Lubrication System (System Description). Engine Oil Pressure (Basic Inspection). Service Data and Specifications (SDS) — 1Engine Cooling System - Precautions. Preparation. Service Data and Specifications (SDS) — 1Engine Cooling System - Engine Coolant — 1Engine Control System - System Description — 1System Description - Component Parts ++ — 1System Description - System ++ — 1Engine Control System - Ecu Diagnosis Information — 1Ecu Diagnosis Information - Ecm ++ — 1Engine Control System - Basic Inspection — 1Basic Inspection - Diagnosis and Repair Workflow ++ — 1Basic Inspection - Basic Inspection ++ — 1Basic Inspection - Additional Service When Replacing Ecm ++ — 1Basic Inspection - Fuel Pressure Check ++ — 1Basic Inspection - How to Set Srt Code ++ — 1Basic Inspection - How to Erase Permanent Dtc ++ — 1Engine Control System - Dtc/circuit Diagnosis — 1Engine Control System - Symptom Diagnosis — 1Engine Control System - Periodic Maintenance — 1Engine Control System - Removal and Installation — 1Fuel System - Precautions. Preparation. Service Data and Specifications (SDS) — 1Fuel System - Fuel System (Periodic Maintenance). Fuel Level Sensor Unit (Disassembly and Assembly) — 1Exhaust System - Precautions. Preparation — 1Exhaust System - Exhaust System (Periodic Maintenance). Exhaust System (Removal and Installation) — 1Starting System - Precautions. Preparation. Starter Motor (Service Data and Specifications (sds)) — 1Starting System - Diagnosis and Repair Work Flow — 1Starting System - Starting System (Symptom Diagnosis). Starter Motor (Removal and Installation) — 1Accelerator Control System - Precautions. Service Data and Specifications (SDS) — 1Accelerator Control System - Accelerator Pedal Assembly — 1Transmission & Driveline :: Transaxle & Transmission — 21Driveline - System Description — 1Transfer: Ty92b - Ecu Diagnosis Information. Awd Control Unit ++ — 1Driveline - Basic Inspection — 1Driveline - Dtc/circuit Diagnosis — 1Driveline - Symptom Diagnosis — 1Driveline - Removal and Installation — 1Transfer: Ty92b - Unit Removal and Installation. Transfer Assembly ++ — 1Driveline - Unit Disassembly and Assembly — 1Driveline - Basic Inspection — 1Driveline - Removal and Installation — 1Driveline - Unit Disassembly and Assembly — 1Front Axle - Precautions. Preparation — 1Front Axle - Noise, Vibration and Harshness (nvh) Troubleshooting (Symptom Diagnosis). Service Data and Specifications (SDS) — 1Front Axle - Front Drive Shaft Boot — 1Front Axle - Front Drive Shaft — 1Rear Axle - Precautions. Preparation. Service Data and Specifications (SDS) — 1Rear Axle - Noise, Vibration and Harshness (nvh) Troubleshooting — 1Rear Axle - Rear Drive Shaft — 1Suspension :: Front Suspension — 7Rear Suspension - Precautions. Preparation — 1Rear Suspension - Noise, Vibration and Harshness (nvh) Troubleshooting (Symptom Diagnosis). Service Data and Specifications (SDS) — 1Rear Suspension - Rear Suspension Assembly — 1Road Wheels & Tires - Precautions — 1Road Wheels & Tires - Preparation. Bcm (Ecu Diagnosis Information). Service Data and Specifications (SDS) — 1Road Wheels & Tires - System — 1Brakes :: Brake System — 9Parking Brake System - Precautions. Preparation — 1Parking Brake System - System — 1Vdc/tcs/abs - Precautions ++ — 1Brake Control System - System Description — 1System Description - Component Parts ++ — 1System Description - System ++ — 1Brake Control System - Basic Inspection — 1Brake Control System - Symptom Diagnosis — 1Brake Control System - Removal and Installation — 1Brake Control System - System Description — 1Brake Control System - Dtc/circuit Diagnosis — 1Brake Control System - Removal and Installation — 1Brake Control System - System Description — 1Brake Control System - Basic Inspection — 1Brake Control System - Symptom Diagnosis — 1Brake Control System - System Description — 1Brake Control System - Basic Inspection — 1Brake Control System - Symptom Diagnosis — 1Steering :: Steering System — 9Steering Control System - Precautions — 1Steering Control System - System — 1Steering Control System - Eps Control Unit (Ecu Diagnosis Information. Removal and Installation) — 1Restraints :: Seat Belt — 7Srs Air Bag - Precautions. Preparation — 1Srs Air Bag - Collision Diagnosis — 1Srs Air Bag - Occupant Classification System — 1Srs Air Bag Control System - Precautions — 1Srs Air Bag Control System - System — 1Srs Air Bag Control System - Diagnosis Sensor Unit — 1Srs Air Bag Control System - Inspection and Adjustment — 1Ventilation, Heater & Air Conditioner :: Ventilation System — 6Heater & Air Conditioning System - Precautions — 1Heater & Air Conditioning System - Preparation — 1Heater & Air Conditioning System - Component Parts — 1Heater & Air Conditioning System - Diagnosis and Repair Work Flow — 1Heater & Air Conditioning System - Compressor — 1Heater & Air Conditioning System - Cooler Pipe and Hose — 1Heater & Air Conditioning System - Condenser. Condenser — 1Heater & Air Conditioning System - Heating and Cooling Unit Assembly — 1Heater & Air Conditioning System - Service Data and Specifications (SDS) — 1Heater & Air Conditioning Control System - System Description — 1System Description - Component Parts ++ — 1System Description - System ++ — 1System Description - Operation ++ — 1Heater & Air Conditioning Control System - Ecu Diagnosis Information — 1Heater & Air Conditioning Control System - Basic Inspection — 1Heater & Air Conditioning Control System - Dtc/circuit Diagnosis — 1Heater & Air Conditioning Control System - Symptom Diagnosis — 1Heater & Air Conditioning Control System - Removal and Installation — 1Body Interior :: Interior — 8Instrument Panel - Precautions. Preparation. Clip List — 1Instrument Panel - Squeak and Rattle Trouble Diagnoses — 1Instrument Panel - Cluster Lid C — 1Seat - Precautions — 1Seat - Preparation. Clip List — 1Seat - Component Parts — 1Seat - System — 1Seat - Diagnosis and Repair Work Flow — 1Seat - Front Seat — 1Seat - Second Row Seats — 1Seat - Third Row Seats — 1Seat - Front Seat — 1Seat - Second Row Seat — 1Seat - Third Row Seat — 1Automatic Drive Positioner - Precautions. Preparation — 1Automatic Drive Positioner - System — 1Automatic Drive Positioner - Diagnosis and Repair Work Flow — 1Automatic Drive Positioner - Inspection and Adjustment — 1Body Exterior, Doors, Roof & Vehicle Security :: Door & Lock — 38Security Control System - Precautions — 1Security Control System - System — 1Security Control System - Ecm, Bcm, Intelligent Key Unit, Ipdm E/r — 1Security Control System - Vehicle Security System Cannot Be Set — 1Glass & Window System - Precautions. Preparation — 1Glass & Window System - Squeak and Rattle Trouble Diagnoses — 1Power Window Control System - Precautions. Preparation — 1Power Window Control System - Power Supply and Ground Circuit — 1Power Window Control System - Power Window Motor Circuit — 1Power Window Control System - Front Power Window Rh Alone Does Not Operate — 1Power Window Control System - Rear Lh Side Power Window Alone Does Not Operate — 1Power Window Control System - Rear Rh Side Power Window Alone Does Not Operate — 1Roof - Precautions. Preparation — 1Roof - Power Supply and Ground Circuit — 1Roof - Moonroof Switch Assembly — 1Roof - Lin Communication Circuit — 1Roof - Auto Operation Does Not Operate — 1Roof - Anti-Pinch Function Does Not Operate — 1Exterior - Precautions. Preparation. Clip List (Preparation) — 1Exterior - Squeak and Rattle Trouble Diagnoses — 1Exterior - Fender Protector — 1Exterior - Over Fender — 1Exterior - Under Cover — 1Exterior - Roof Side Rail — 1Body Repair - Service Information — 1Service Information - Sheet Metal Work ++ — 1Service Information - Body Welding and Precautions ++ — 1Service Information - Safety and Health ++ — 1Service Information - Repairing Procedures and Precautions ++ — 1Body Repair - Precaution — 1Body Repair - Preparation — 1Body Repair - Removal and Installation — 1Driver Controls :: Mirrors — 8Exterior Lighting System - System Description — 1System Description - Component Parts ++ — 1Exterior Lighting System - Basic Inspection — 1Exterior Lighting System - Dtc/circuit Diagnosis — 1Exterior Lighting System - Symptom Diagnosis — 1Exterior Lighting System - Periodic Maintenance — 1Exterior Lighting System - Removal and Installation — 1Interior Lighting System - Precautions. Preparation — 1Interior Lighting System - Component Parts. Interior Lighting System — 1Interior Lighting System - System — 1Interior Lighting System - Diagnosis and Repair Work Flow — 1Interior Lighting System - Interior Lighting System Symptoms (Symptom Diagnosis). Bcm (Ecu Diagnosis Information). Service Data and Specifications (SDS) — 1Interior Lighting System - Foot Lamp — 1Wiper & Washer - Precautions — 1Wiper & Washer - Preparation. Bcm, Ipdm E/r (Ecu Diagnosis Information). Service Data and Specifications (SDS) — 1Wiper & Washer - System — 1Wiper & Washer - Diagnosis and Repair Work Flow — 1Defogger - Precautions. Bcm, A/c Auto Amp. (Ecu Diagnosis Information) — 1Defogger - Diagnosis and Repair Work Flow — 1Horn - Precautions — 1Electrical & Power Control :: Power Outlet — 13Body Control System - Precautions. Preparation — 1Body Control System - Component Parts — 1Body Control System - System — 1Body Control System - Diagnosis System (bcm) — 1Body Control System - Bcm — 1Lan System - System Description — 1Lan System - System Description — 1Lan System - Dtc/circuit Diagnosis — 1Lan System - System Description — 1Lan System - Dtc/circuit Diagnosis — 1Power Control System - System Description — 1Power Control System - Basic Inspection — 1Power Control System - Dtc/circuit Diagnosis — 1Power Control System - System Description — 1Power Control System - Basic Inspection — 1Power Control System - Dtc/circuit Diagnosis — 1Power Control System - Removal and Installation — 1Charging System - Precautions. Preparation. Ecm, Ipdm E/r (Ecu Diagnosis Information) — 1Charging System - Diagnosis and Repair Work Flow — 1Charging System - Charging System (Symptom Diagnosis). Generator (Removal and Installation). Service Data and Specifications (SDS) — 1Power Supply, Ground & Circuit Elements - Precautions. Preparation. Service Data and Specifications (SDS) — 1Driver Information & Multimedia :: Meter, Warning Lamp & Indicator — 25Warning Chime System - Application Notice (How to Use This Manual). Precautions — 1Warning Chime System - System — 1Warning Chime System - Diagnosis System (combination Meter) — 1Warning Chime System - Bcm, Combination Meter (Ecu Diagnosis Information). Diagnosis and Repair Work Flow (Basic Inspection) — 1Sonar System - Precautions. Preparation — 1Sonar System - Sonar Control Unit — 1Dtc/circuit Diagnosis - B2720 Corner Sensor [rl] ++ — 1Audio, Visual & Navigation System - System Description — 1System Description - Component Parts ++ — 1System Description - System ++ — 1Audio, Visual & Navigation System - Ecu Diagnosis Information — 1Audio, Visual & Navigation System - Basic Inspection — 1Audio, Visual & Navigation System - Dtc/circuit Diagnosis — 1Dtc/circuit Diagnosis - Multi Av (av Control Unit) ++ — 1Audio, Visual & Navigation System - Symptom Diagnosis — 1Symptom Diagnosis - Multi Av System ++ — 1Audio, Visual & Navigation System - Removal and Installation — 1Audio, Visual & Navigation System - System Description — 1Audio, Visual & Navigation System - Ecu Diagnosis Information — 1Audio, Visual & Navigation System - Basic Inspection — 1Audio, Visual & Navigation System - Dtc/circuit Diagnosis — 1Audio, Visual & Navigation System - Symptom Diagnosis — 1Audio, Visual & Navigation System - Removal and Installation — 1Audio, Visual & Navigation System - System Description — 1Audio, Visual & Navigation System - Basic Inspection — 1Audio, Visual & Navigation System - Dtc/circuit Diagnosis — 1Audio, Visual & Navigation System - Symptom Diagnosis — 1Audio, Visual & Navigation System - Removal and Installation — 1Audio, Visual & Navigation System - System Description — 1Audio, Visual & Navigation System - Basic Inspection — 1Audio, Visual & Navigation System - Dtc/circuit Diagnosis — 1Audio, Visual & Navigation System - Symptom Diagnosis — 1Audio, Visual & Navigation System - Removal and Installation — 1Cruise Control & Driver Assistance :: Cruise Control System — 17Driver Assistance System - System Description — 1Driver Assistance System - Basic Inspection — 1Driver Assistance System - Dtc/circuit Diagnosis — 1Driver Assistance System - System Description — 1System Description - Component Parts ++ — 1System Description - System ++ — 1System Description - Operation ++ — 1System Description - Handling Precaution ++ — 1Driver Assistance System - Ecu Diagnosis Information — 1Driver Assistance System - Basic Inspection — 1Basic Inspection - Distance Sensor Alignment ++ — 1Basic Inspection - Camera Aiming Adjustment ++ — 1Basic Inspection - Action Test ++ — 1Driver Assistance System - Dtc/circuit Diagnosis — 1Dtc/circuit Diagnosis - Laser/radar (distance Sensor) ++ — 1Dtc/circuit Diagnosis - Lane Camera (front Camera Unit) ++ — 1Driver Assistance System - Symptom Diagnosis — 1Driver Assistance System - Removal and Installation — 1Driver Assistance System - System Description — 1System Description - System ++ — 1Driver Assistance System - Basic Inspection — 1Driver Assistance System - Dtc/circuit Diagnosis — 1Drive Mode System - Precautions — 1Drive Mode System - Component Parts. Drive Mode System — 1Drive Mode System - System — 1Drive Mode System - Diagnosis and Repair Work Flow — 1Drive Mode System - Drive Mode Select Switch Circuit — 1Maintenance - Precautions. Preparation — 1Maintenance - General Maintenance — 1Maintenance - Periodic Maintenance — 1Maintenance - Recommended Fluids and Lubricants — 1Maintenance - Engine Maintenance — 1Maintenance - Chassis and Body Maintenance — 1Engine Lubrication System - Periodic Maintenance — 1Engine Lubrication System - Removal and Installation — 1Engine Cooling System - System Description — 1Engine Cooling System - Removal and Installation — 1Engine Control System - Vq35dd — 1Fuel System - Removal and Installation — 1Starting System - System Description — 1Starting System - Dtc/circuit Diagnosis — 1Driveline - Transfer: Ty92b — 1Driveline - Rear Propeller Shaft: 3fcj-Cvj — 1Driveline - Rear Final Drive: R145 — 1Front Axle - Periodic Maintenance — 1Front Axle - Removal and Installation — 1Rear Axle - Periodic Maintenance — 1Rear Axle - Removal and Installation — 1Rear Suspension - Removal and Installation — 1Road Wheels & Tires - System Description — 1Road Wheels & Tires - Basic Inspection — 1Road Wheels & Tires - Dtc/circuit Diagnosis — 1Road Wheels & Tires - Symptom Diagnosis — 1Road Wheels & Tires - Periodic Maintenance — 1Road Wheels & Tires - Removal and Installation — 1Parking Brake System - System Description — 1Parking Brake System - Basic Inspection — 1Parking Brake System - Dtc/circuit Diagnosis — 1Parking Brake System - Symptom Diagnosis — 1Parking Brake System - Removal and Installation — 1Brake Control System - Vdc/tcs/abs — 1Brake Control System - Automatic Brake Hold — 1Brake Control System - Automatic Emergency Braking — 1Brake Control System - Rear Automatic Braking — 1Steering Control System - System Description — 1Steering Control System - Basic Inspection — 1Steering Control System - Dtc/circuit Diagnosis — 1Steering Control System - Symptom Diagnosis — 1Srs Air Bag - Removal and Installation — 1Srs Air Bag Control System - System Description — 1Srs Air Bag Control System - Basic Inspection — 1Srs Air Bag Control System - Symptom Diagnosis — 1Heater & Air Conditioning System - Symptom Diagnosis — 1Heater & Air Conditioning System - Periodic Maintenance — 1Heater & Air Conditioning Control System - Automatic Air Conditioning — 1Instrument Panel - Removal and Installation — 1Instrument Panel - Unit Disassembly and Assembly — 1Seat - Ecu Diagnosis Information — 1Seat - Dtc/circuit Diagnosis — 1Seat - Symptom Diagnosis — 1Automatic Drive Positioner - System Description — 1Automatic Drive Positioner - Ecu Diagnosis Information — 1Automatic Drive Positioner - Dtc/circuit Diagnosis — 1Automatic Drive Positioner - Symptom Diagnosis — 1Automatic Drive Positioner - Removal and Installation — 1Security Control System - System Description — 1Security Control System - Basic Inspection — 1Security Control System - Dtc/circuit Diagnosis — 1Security Control System - Symptom Diagnosis — 1Security Control System - Removal and Installation — 1Glass & Window System - Removal and Installation — 1Power Window Control System - System Description — 1Power Window Control System - Ecu Diagnosis Information — 1Power Window Control System - Basic Inspection — 1Power Window Control System - Dtc/circuit Diagnosis — 1Power Window Control System - Symptom Diagnosis — 1Power Window Control System - Removal and Installation — 1Roof - System Description — 1Roof - Ecu Diagnosis Information — 1Roof - Basic Inspection — 1Roof - Dtc/circuit Diagnosis — 1Roof - Symptom Diagnosis — 1Roof - Removal and Installation — 1Exterior - System Description — 1Exterior - Removal and Installation — 1Body Repair - Repair Information — 1Exterior Lighting System - Led Headlamp — 1Interior Lighting System - Dtc/circuit Diagnosis — 1Interior Lighting System - Removal and Installation — 1Wiper & Washer - System Description — 1Wiper & Washer - Dtc/circuit Diagnosis — 1Wiper & Washer - Symptom Diagnosis — 1Wiper & Washer - Removal and Installation — 1Defogger - System Description — 1Defogger - Dtc/circuit Diagnosis — 1Defogger - Symptom Diagnosis — 1Defogger - Removal and Installation — 1Horn - Removal and Installation — 1Body Control System - Basic Inspection — 1Body Control System - Dtc/circuit Diagnosis — 1Body Control System - Symptom Diagnosis — 1Body Control System - Removal and Installation — 1Lan System - Can Fundamental — 1Lan System - Can — 1Lan System - Can Gateway — 1Power Control System - Ipdm E/r — 1Power Control System - Power Distribution System — 1Charging System - System Description — 1Charging System - Dtc/circuit Diagnosis — 1Power Supply, Ground & Circuit Elements - System Description — 1Power Supply, Ground & Circuit Elements - Basic Inspection — 1Power Supply, Ground & Circuit Elements - Removal and Installation — 1Warning Chime System - System Description — 1Warning Chime System - Dtc/circuit Diagnosis — 1Warning Chime System - Symptom Diagnosis — 1Sonar System - System Description — 1Sonar System - Basic Inspection — 1Sonar System - Dtc/circuit Diagnosis — 1Sonar System - Symptom Diagnosis — 1Sonar System - Removal and Installation — 1Audio, Visual & Navigation System - Nissanconnect — 1Audio, Visual & Navigation System - Intelligent Around View Monitor System — 1Audio, Visual & Navigation System - Rear View Monitor System — 1Audio, Visual & Navigation System - Telematics System — 1Driver Assistance System - Adas Control Unit 2 — 1Driver Assistance System - Driver Assistance System — 1Driver Assistance System - Chassis Control — 1Drive Mode System - Removal and Installation — 1Dtc/circuit Diagnosis (C053c Wheel Speed Sensor ... U2141 Can Comm Circuit) — 1Dtc/circuit Diagnosis (P0011 Intake Valve Timing Control ... P0111 Iat Sensor) — 1Dtc/circuit Diagnosis (P0116 Engine Coolant Temperature Sensor ... P025b Fuel Pump Module a) — 1Dtc/circuit Diagnosis (P026b Injection Timing ... P0420 Three Way Catalyst Function) — 1Dtc/circuit Diagnosis (P0441 Evap Control System ... P0524 Engine Oil Pressure) — 1Dtc/circuit Diagnosis (P0532 A/c Refrigerant Pressure Sensor ... P064d Ecm) — 1Dtc/circuit Diagnosis (P06da Engine Oil Pressure Control Solenoid Valve ... P1217 Engine Over Temperature) — 1Dtc/circuit Diagnosis (P1220 Fuel Pump Control Module (fpcm) ... P1574 Ascd Vehicle Speed Sensor) — 1Dtc/circuit Diagnosis (P1575 Brake Switch ... P2101 Electric Throttle Control Function) — 1Dtc/circuit Diagnosis (P2118 Throttle Control Motor ... P34ac Electric Intake Valve Timing Control Actuator) — 1Dtc/circuit Diagnosis (Active Grille Shutter ... High Pressure Fuel Pump) — 1Dtc/circuit Diagnosis (Ignition Signal ... Variable Induction Air System) — 14012 C1040 Emergency Brake — 14013 C106a Wheel Sensor — 14014 C1078-55 Not Configuration — 14015 C10b4-98 Overheat — 14016 B1001 Lap Pre-Tensioner Lh — 14017 B0001 Driver Air Bag Module — 14018 B100e Knee Air Bag Module Rh — 14019 B142x Collision Detection — 1Dtc/circuit Diagnosis (B20c7-11 A/c Clutch ... B24a6-11 in-Vehicle Sensor) — 1Dtc/circuit Diagnosis (B24a6-15 in-Vehicle Sensor ... U2140-87 Can Comm Err (ecm)) — 1Dtc/circuit Diagnosis (C1f00-1c Control Unit ... C1f04-61 Brake Sw/stop Lamp Sw) — 1Dtc/circuit Diagnosis (C1f05-49 Front Camera Unit ... C1f70-87 Ethernet Circuit) — 1
10steps
~60min
4/5difficulty
Done 0 of 10
  • Corrosion Protection
  • Body Sealing
  • Body Construction
  • Replacement Operations

Corrosion Protection Nissan Pathfinder

Description

To provide improved corrosion prevention, the following anti-corrosive measures have been implemented in NISSAN production plants. When repairing or replacing body panels, it is necessary to use the same anti-corrosive measures.

Anti-Corrosive Precoated Steel (Galvannealed Steel)

To improve repairability and corrosion resistance, a new type of anti-corrosive precoated steel sheet has been adopted, replacing conventional zinc-coated steel sheet.
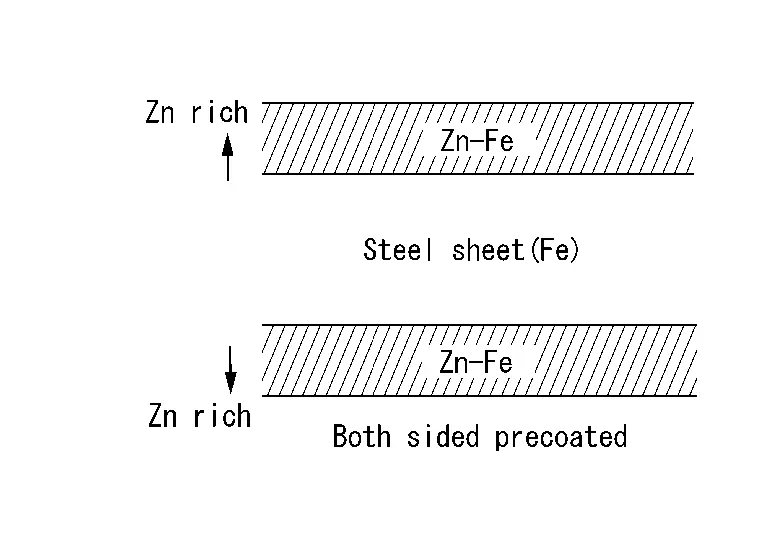
Galvannealed steel is electroplated and heated to form zinc-iron alloy, which provides excellent and long term corrosion resistance with cationic electrodeposition primer.

Nissan Genuine Service Parts are fabricated from galvannealed steel. Therefore, it is recommended that GENUINE NISSAN PARTS or equivalent be used for panel replacement to maintain the anti-corrosive performance built into the Nissan Pathfinder vehicle at the factory.

Phosphate Coating Treatment and Cationic Electrodeposition Primer

A phosphate coating treatment and a cationic electrodeposition primer, which provide excellent corrosion protection, are employed on all body components.
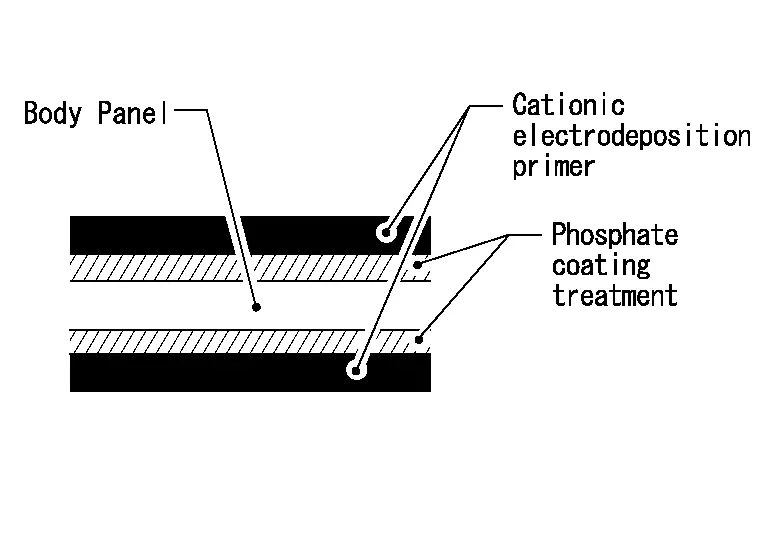
Nissan Genuine Service Parts are also treated in the same manner. Therefore, it is recommended that GENUINE NISSAN PARTS or equivalent be used for panel replacement to maintain anti-corrosive performance built into the Nissan Pathfinder vehicle at the factory.

Undercoating

The underside of the floor and wheelhouse are undercoated to prevent rust, vibration, noise and stone chipping. Therefore, when such a panel is replaced or repaired, apply undercoating to that part. Use an undercoating which is rust preventive, soundproof, vibration-proof, shock-resistant, adhesive, and durable.

PRECAUTIONS IN UNDERCOATING

  1. Do not apply undercoating unless specified. Avoid areas such as the areas above the muffler and three-way catalyst which are subjected to heat.

  2. Do not undercoat the exhaust pipe or other parts which become hot.

  3. Do not undercoat rotating parts.

  4. Apply cavity wax after applying undercoating.

  5. After putting seal on the Nissan Pathfinder vehicle, put undercoating on it.

UNDERCOATED AREAS

: Undercoated areas

: Sealed portions

Body Sealing Nissan Pathfinder 2022

Description

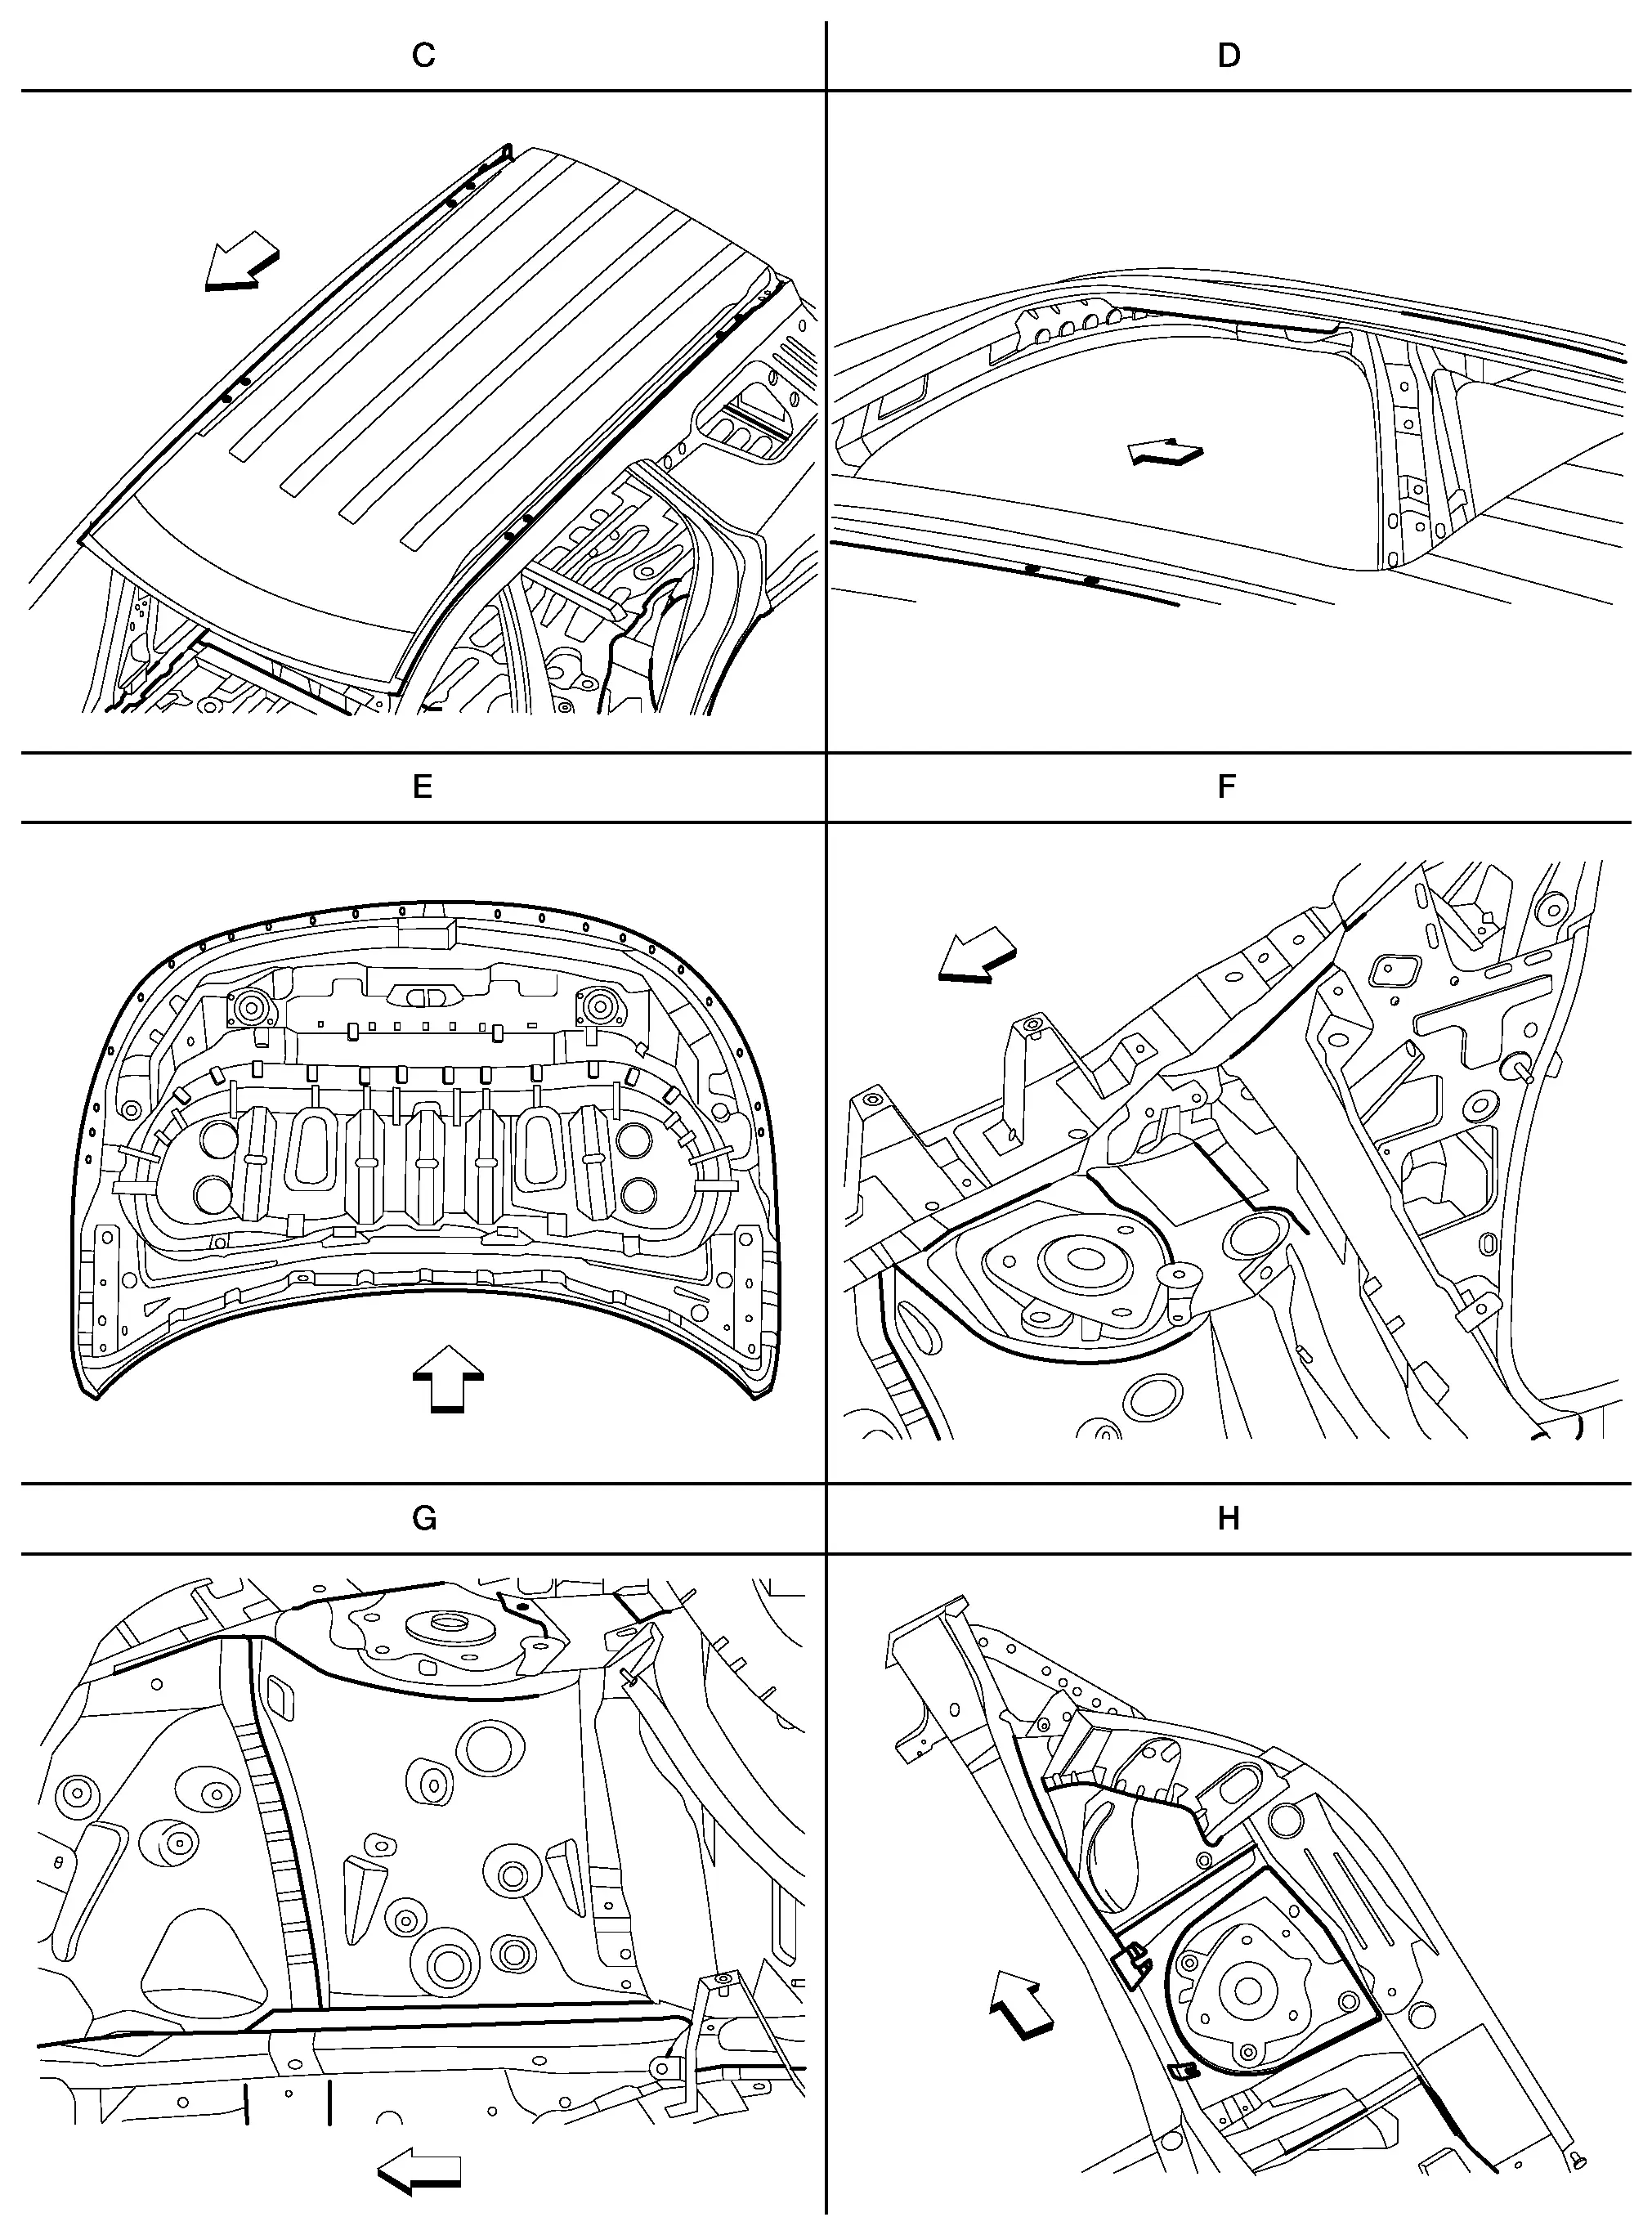
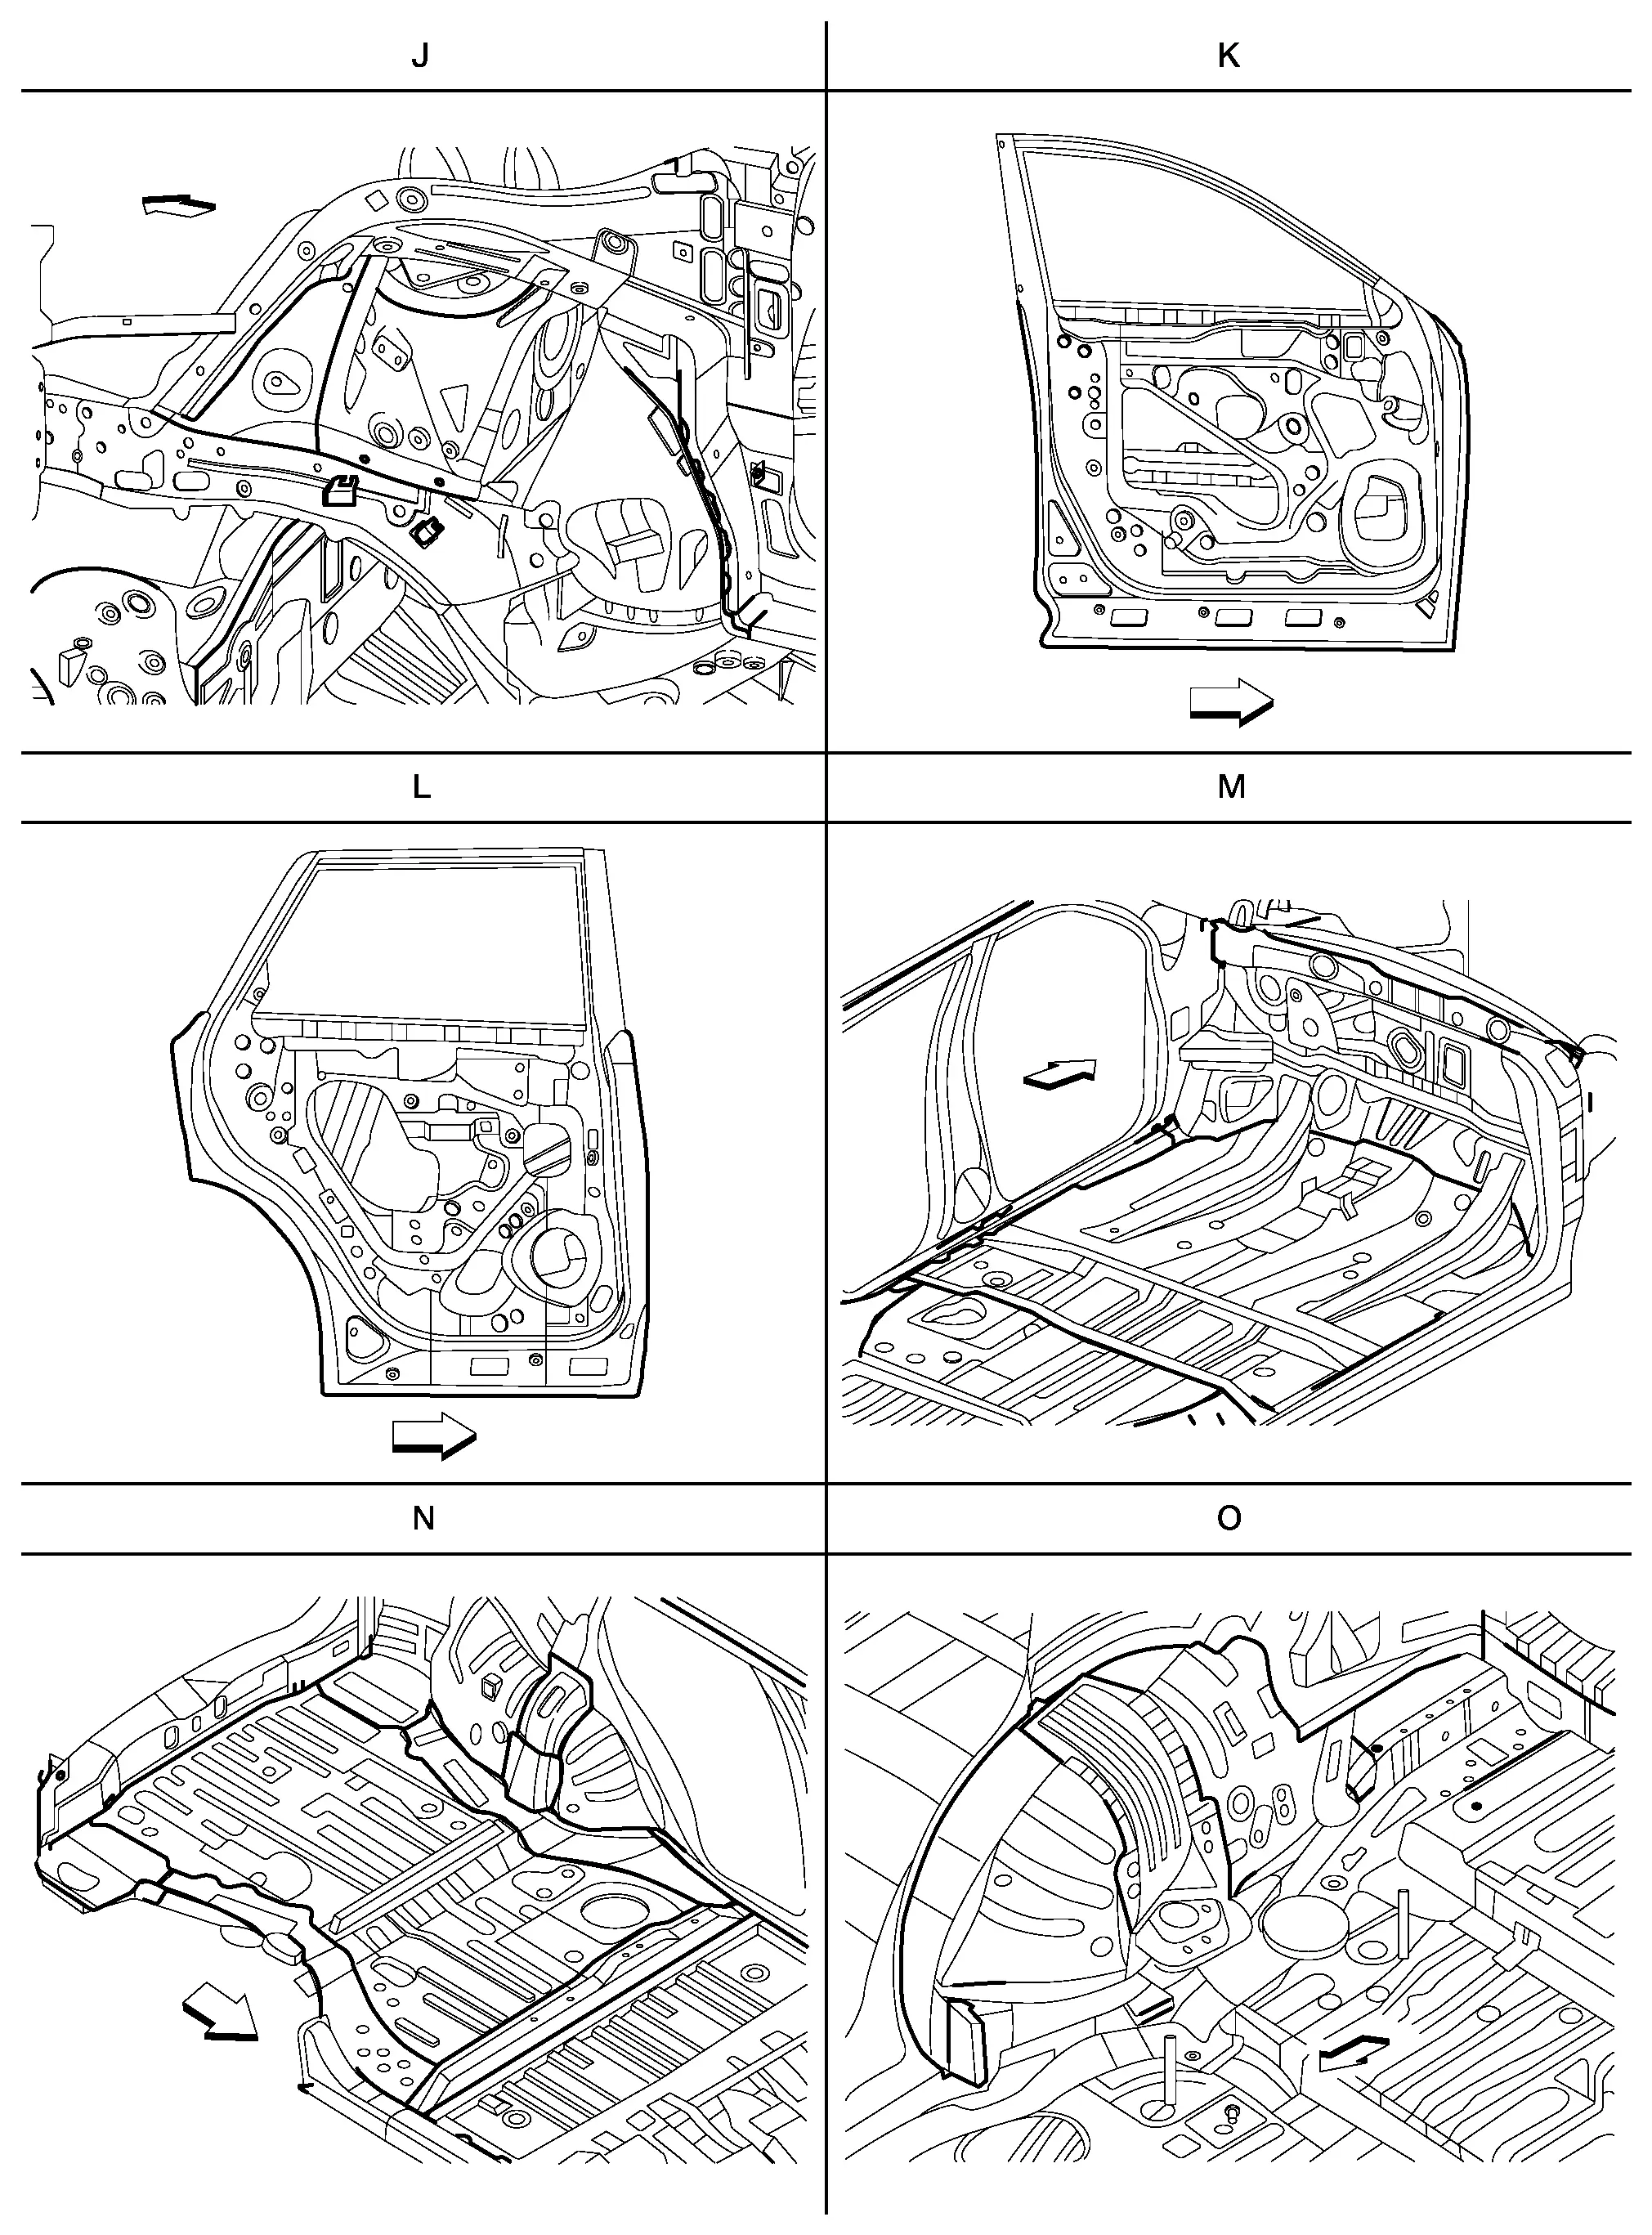
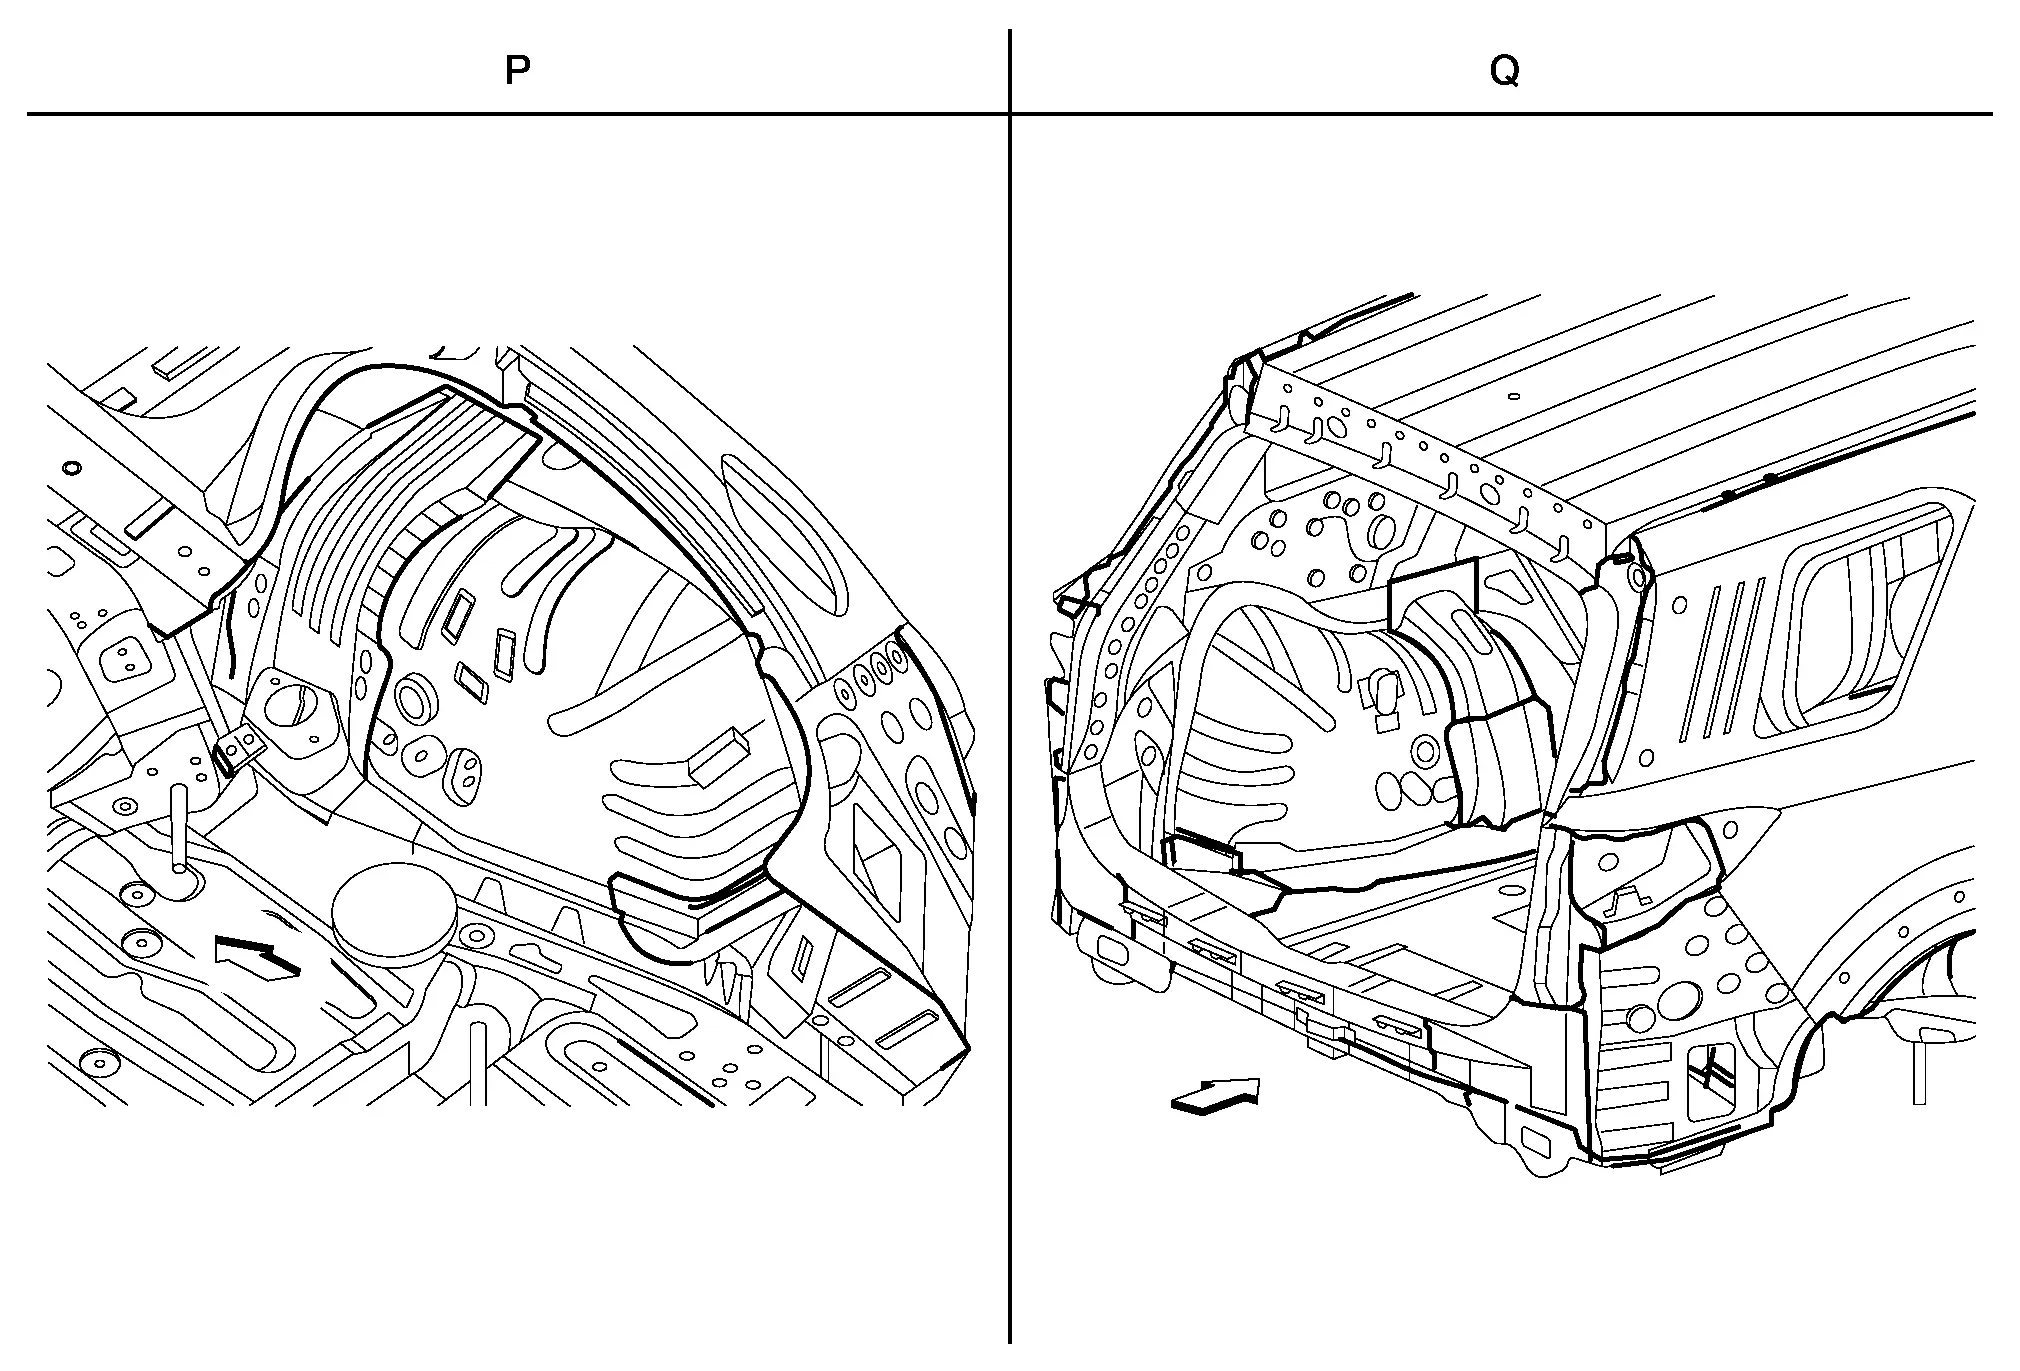
The following figure shows the areas which are sealed at the factory. Sealant which has been applied to these areas should be smooth and free from cuts or gaps. Care should be taken not to apply an excess amount of sealant and not to allow other unaffected parts to come into contact with the sealant.
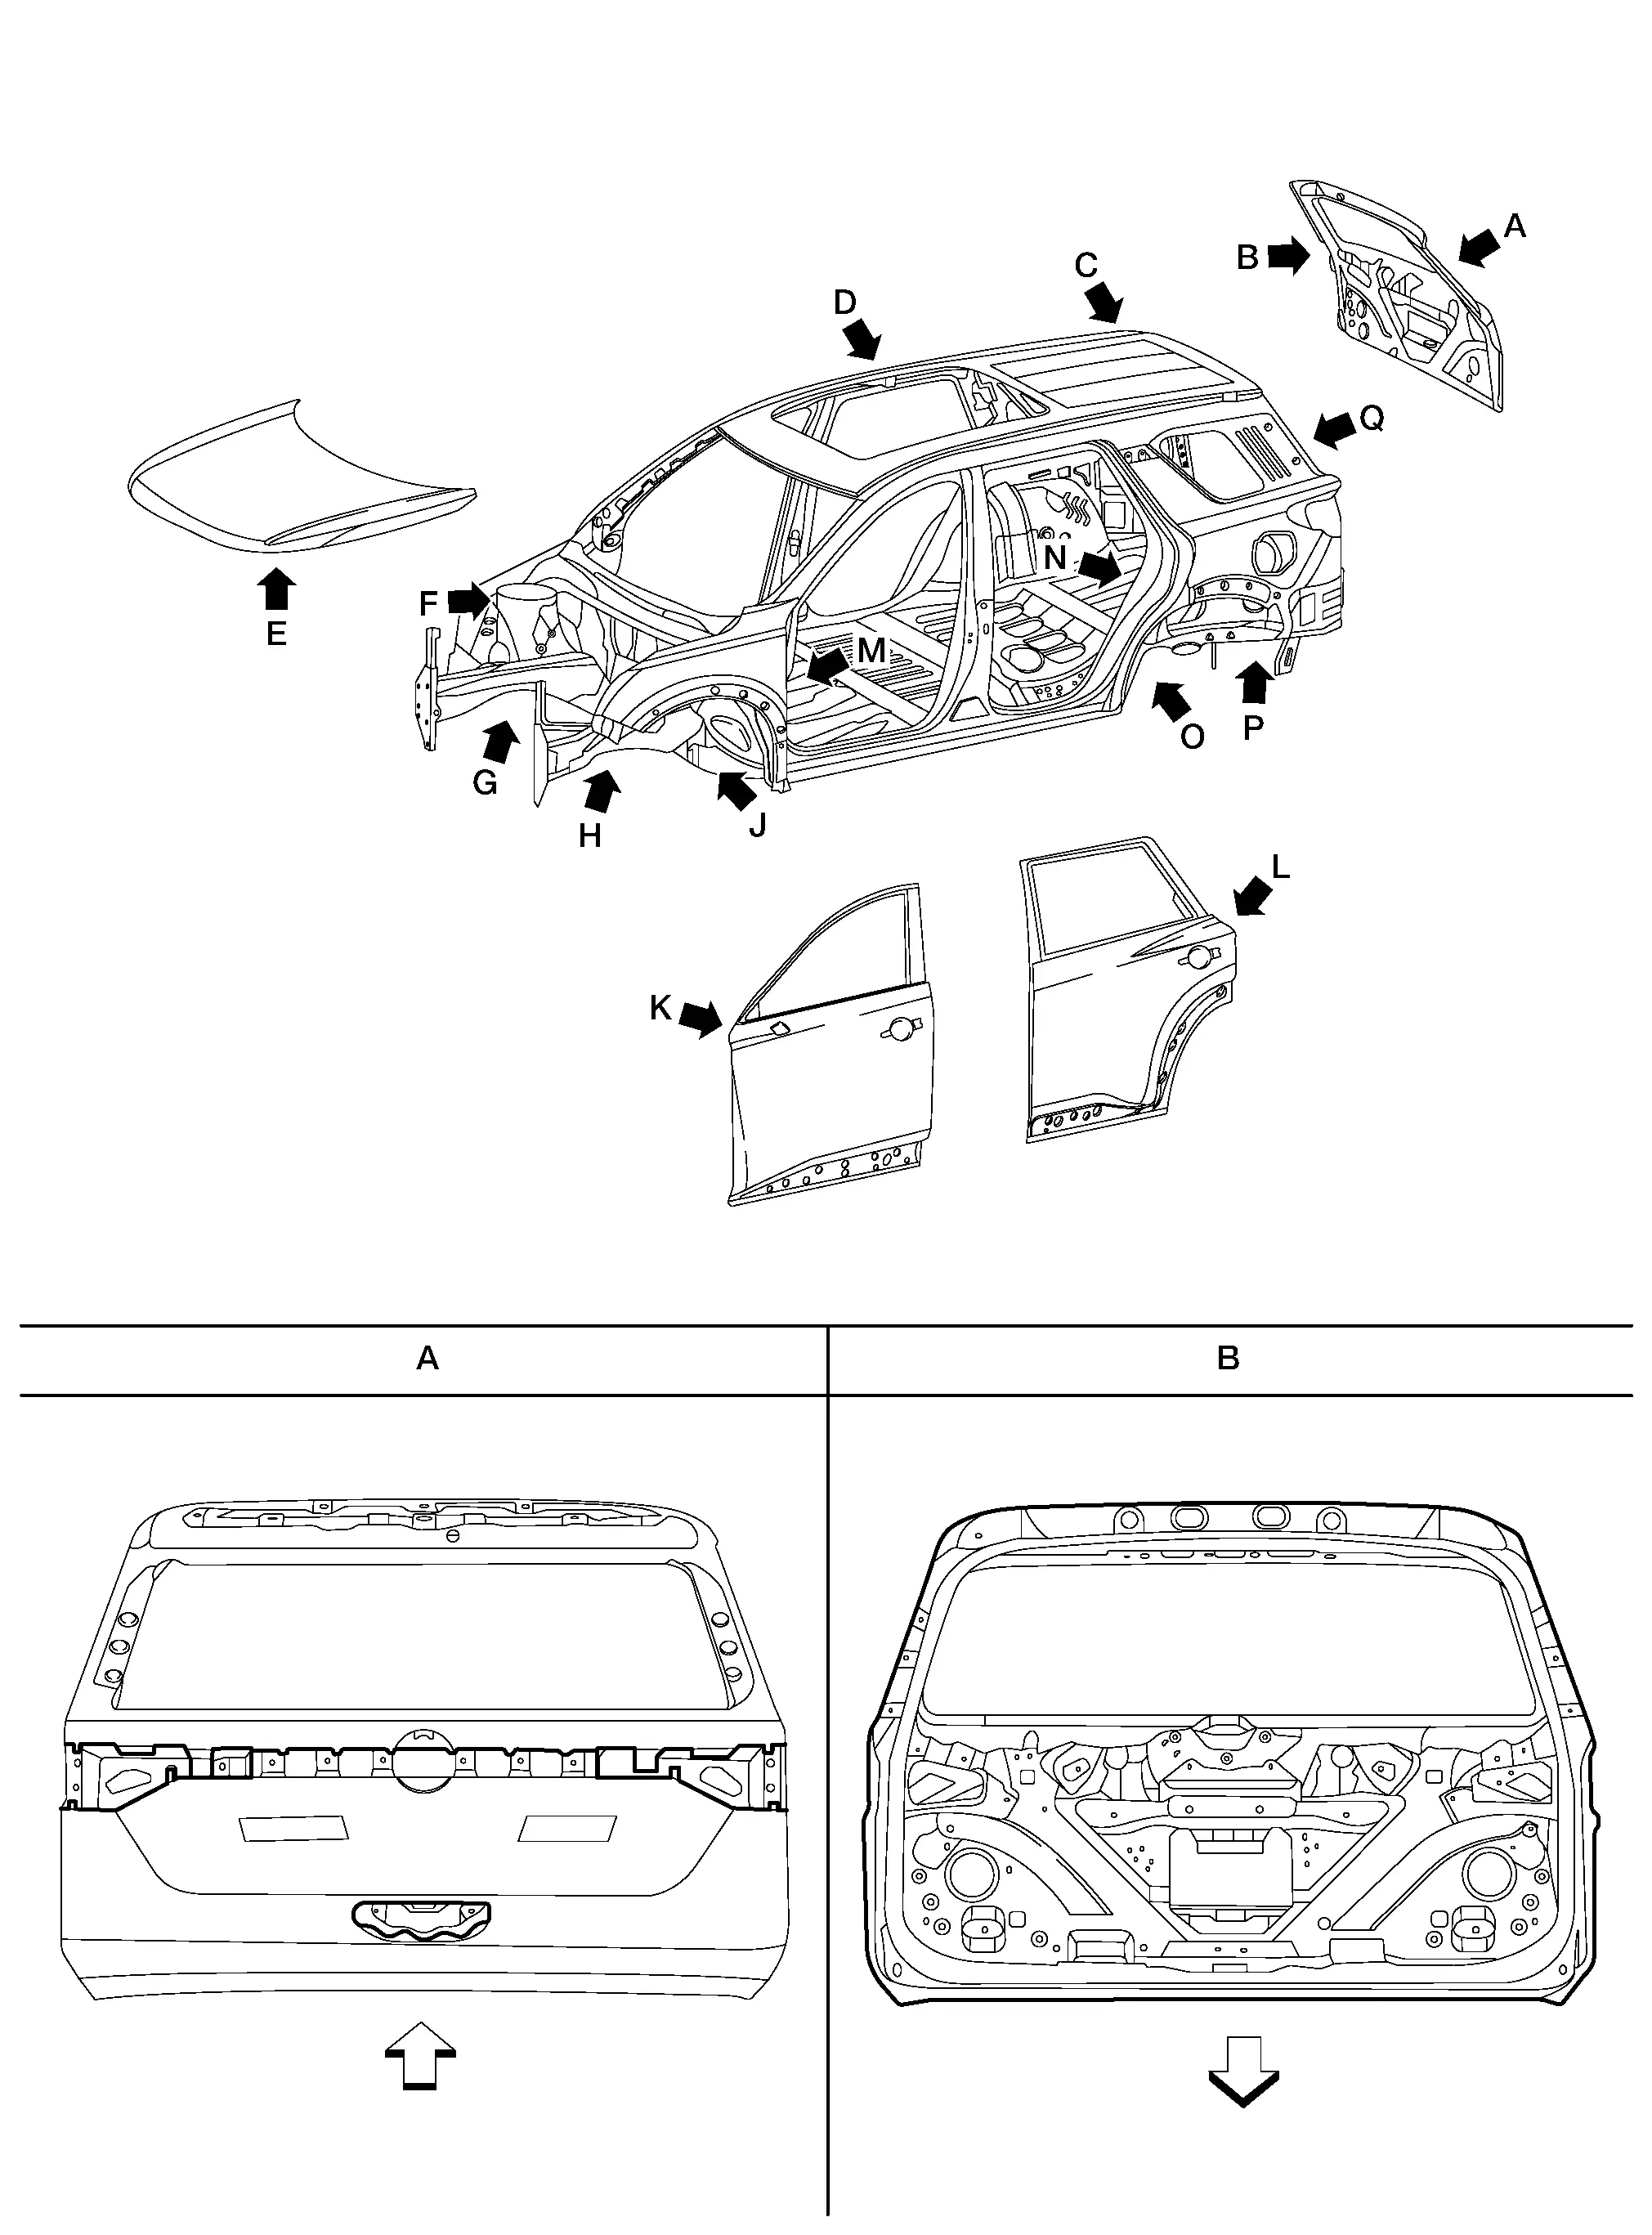
Front
C. Roof (without panoramic roof glass) shown; roof (with panoramic roof glass) similar
. Front
Front
Front

Body Construction Nissan Pathfinder 2026

Body Construction
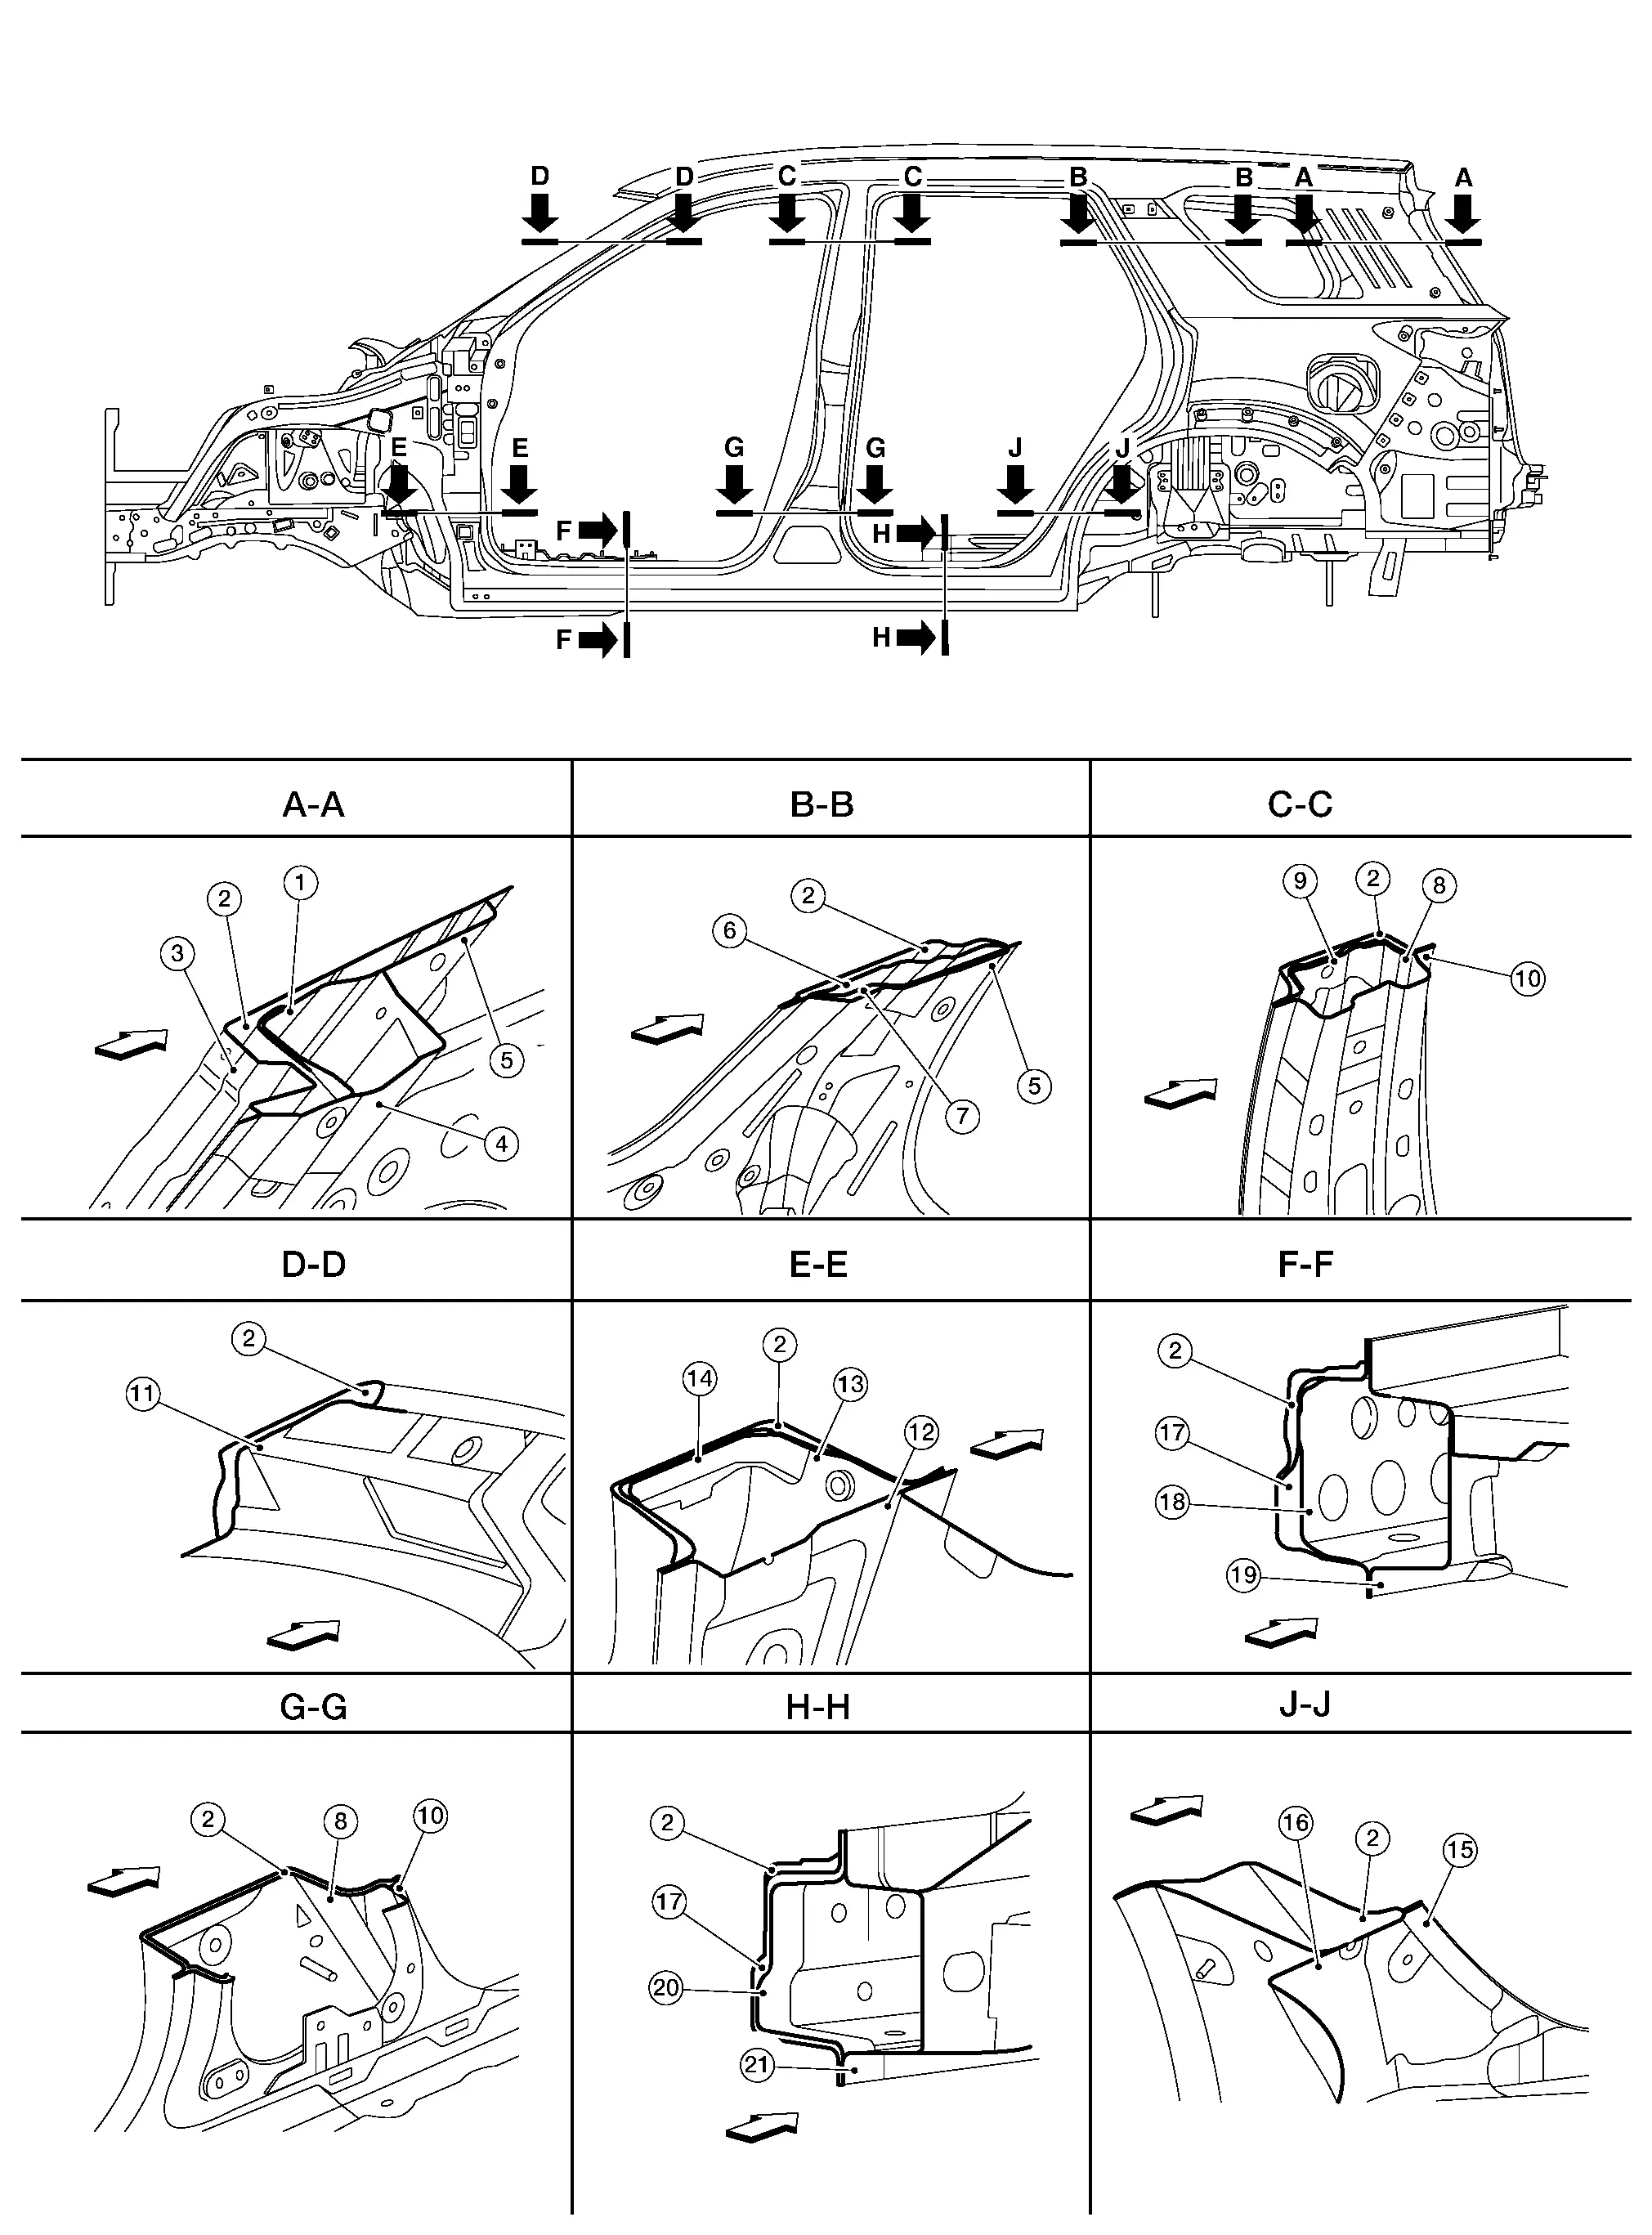
1. Back pillar upper reinforcement 2. Body side outer 3. Back pillar
4. Rear roof rail brace 5. Rear pillar inner 6. Rear pillar inner reinforcement
7. Rear pillar seatbelt anchor 8. Center pillar reinforcement 9. Center pillar outer reinforcement
10. Center pillar inner 11. Front pillar upper reinforcement 12. Dash side
13. Front pillar upper hinge brace 14. Lower hinge plate 15. Rear wheelhouse inner
16. Rear wheelhouse outer 17. Sill outer reinforcement 18. Sill outer reinforcement inner
19. Sill inner reinforcement 20. Sill outer reinforcement rear 21. Sill inner extension
Front

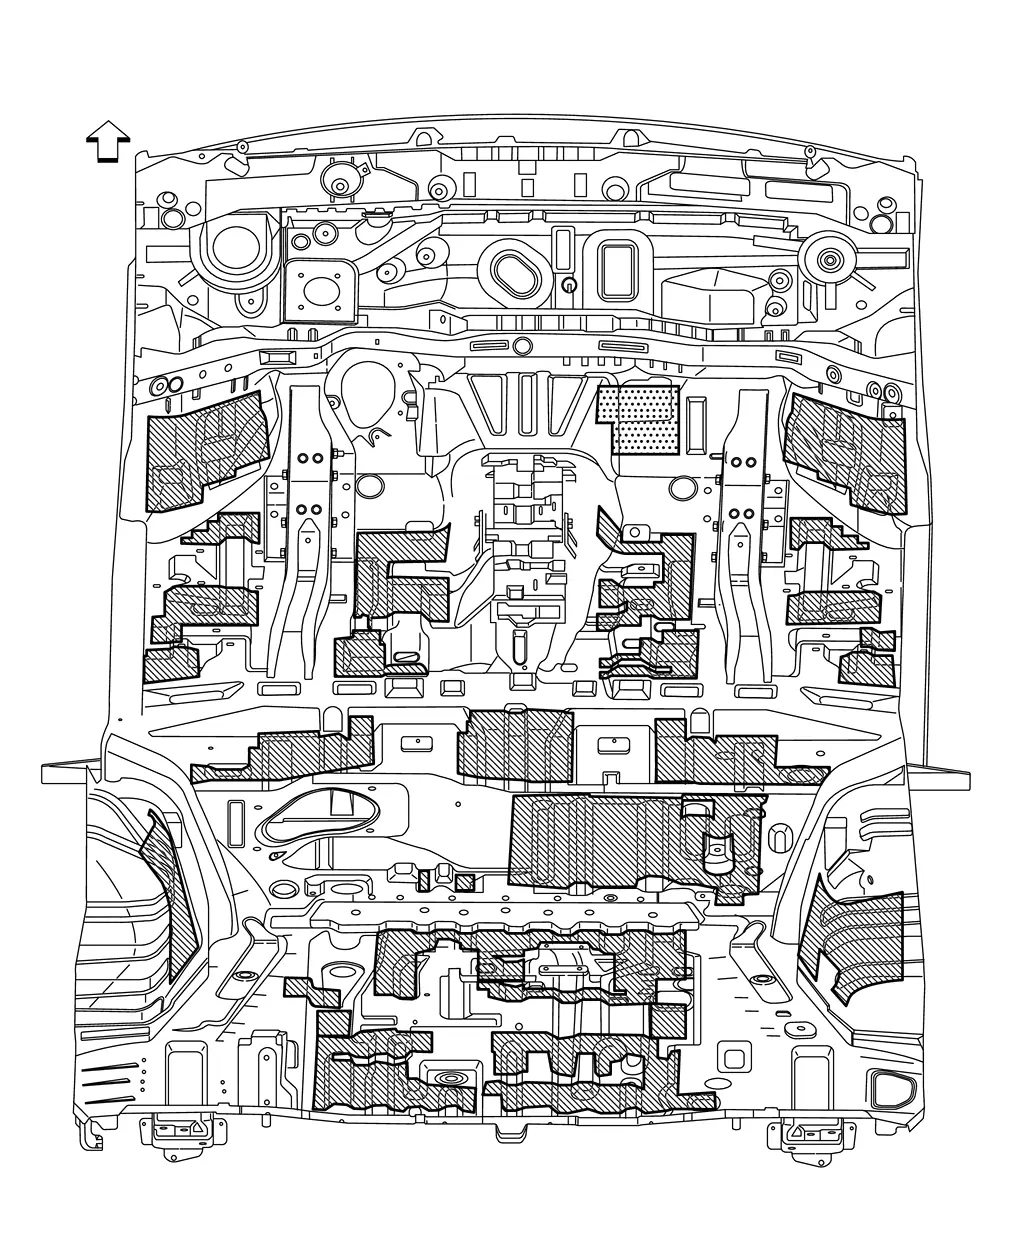
Fusible Insulator Applying Part

Apply the fusible insulator to prevent road noise, vibration and exhaust system heat inside the vehicle.

The service replacement material is cut-to-fit and not supplied in the same shape as original factory installed fusible insulator.

Place the fusible insulators in the positions shown in the figure and properly affix them to the vehicle surface.
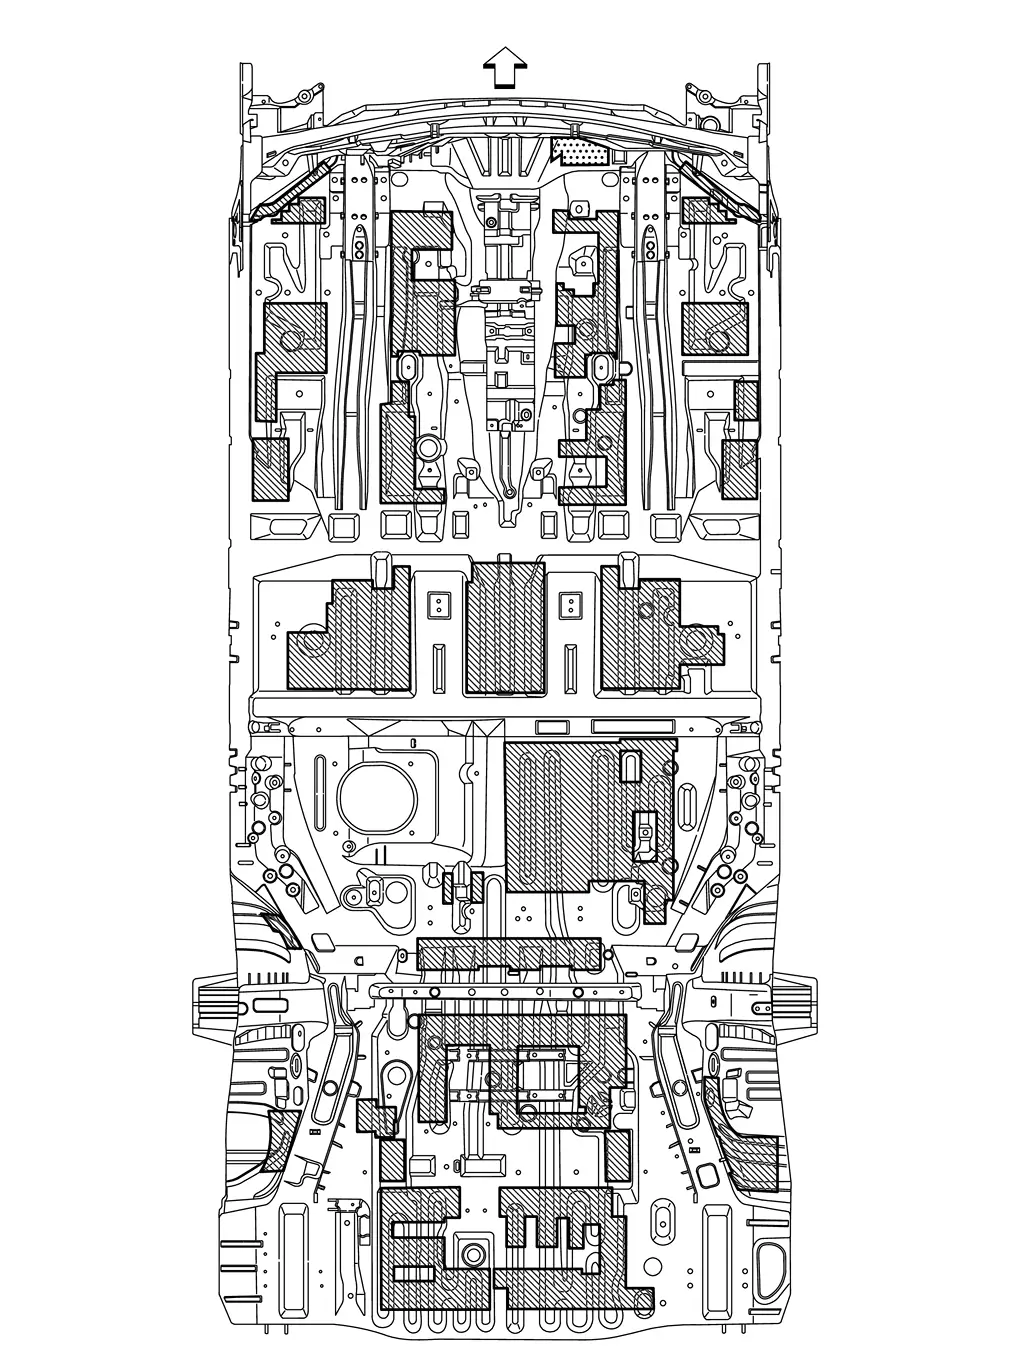
Unit: mm (in)

: Nissan Pathfinder Vehicle front
: Fusible insulator thickness 3.0 (0.12)
: Fusible insulator thickness 3.7 (0.15)

Unit: mm (in)

: Nissan Pathfinder Vehicle front
: Fusible insulator thickness 3.0 (0.12)
: Fusible insulator thickness 3.7 (0.15)

Replacement Operations Nissan Pathfinder Fifth generation

Precautions for Body Repair

Description

  • Technicians are encouraged to read the Body Repair Manual (Fundamentals) in order to ensure that the original functions and quality of the Nissan Pathfinder vehicle are maintained. The Body Repair Manual (Fundamentals) contains additional information, including cautions and warnings, that are not included in this manual. Technicians should refer to both manuals to ensure proper repair.

  • Please note that this information is prepared for worldwide usage, and as such, certain procedures might not apply in some regions or countries.

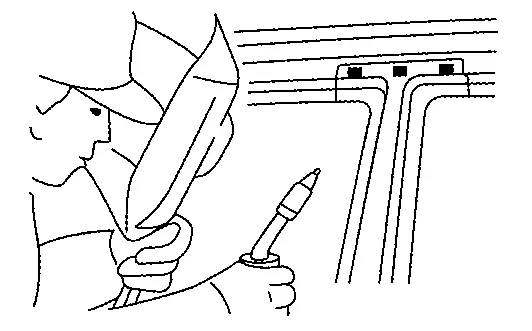
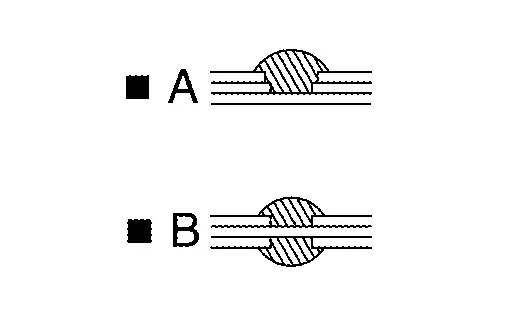
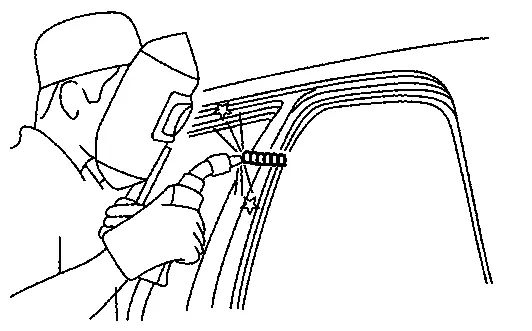
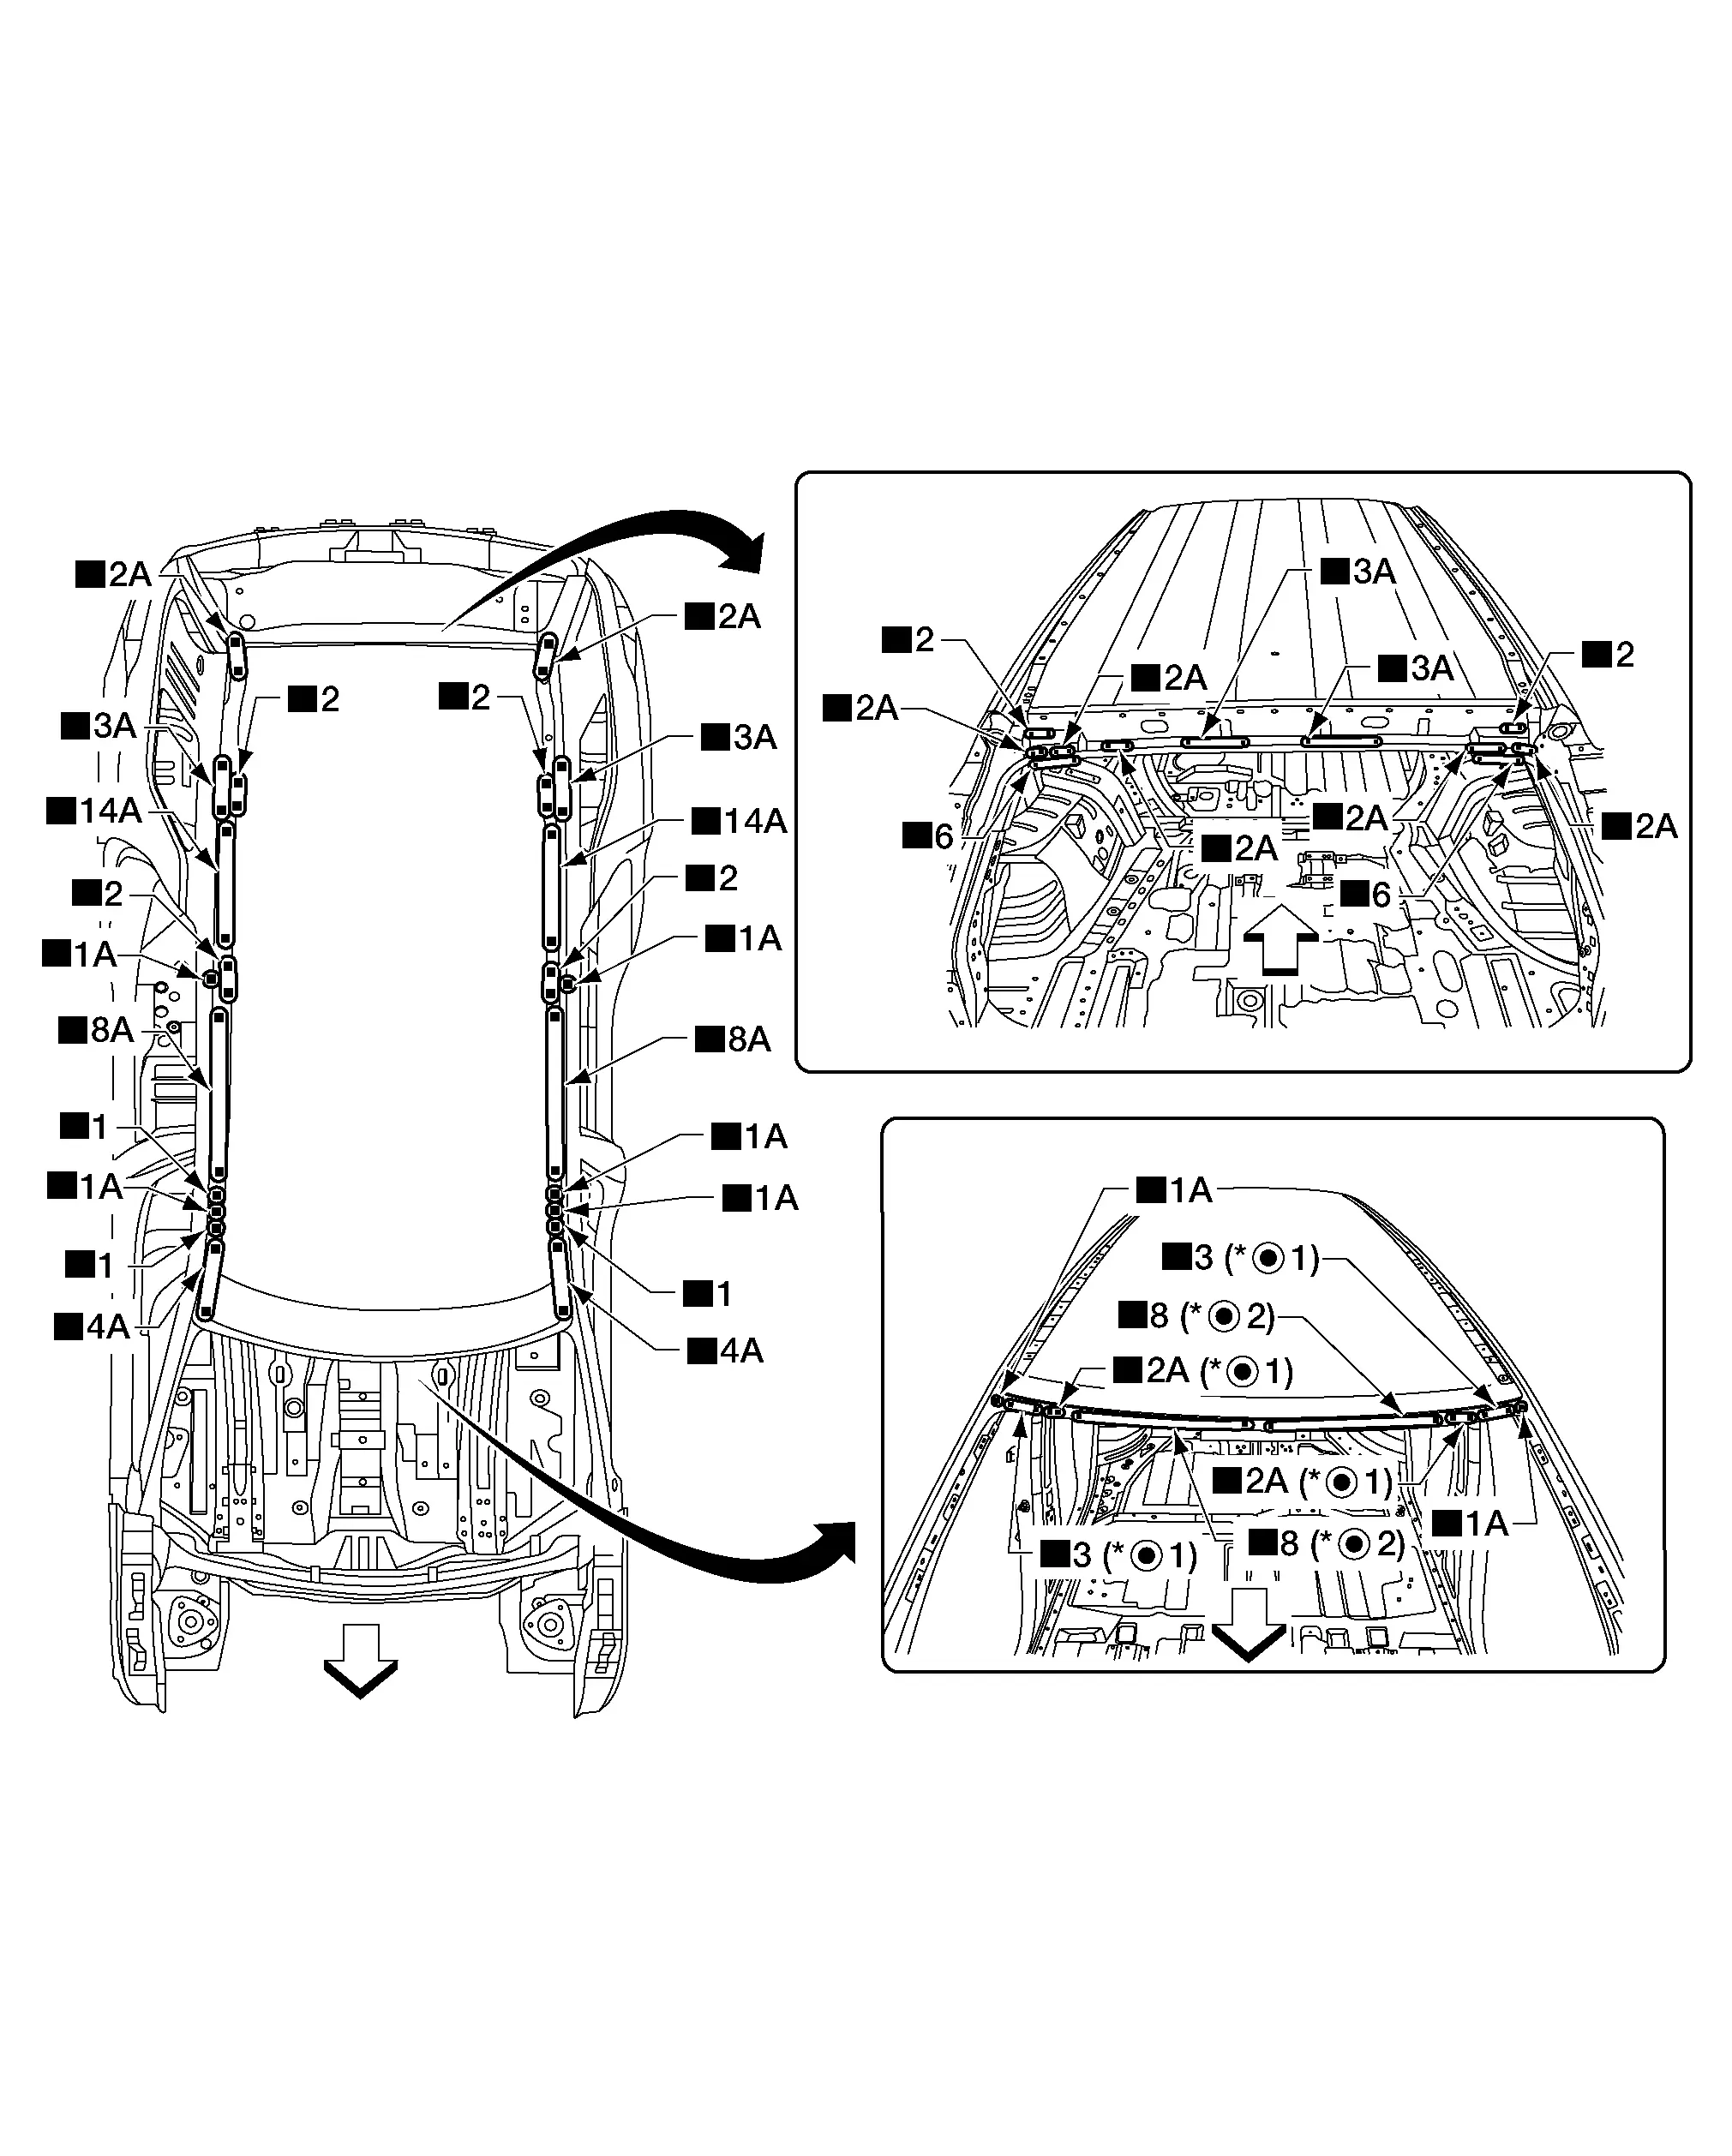
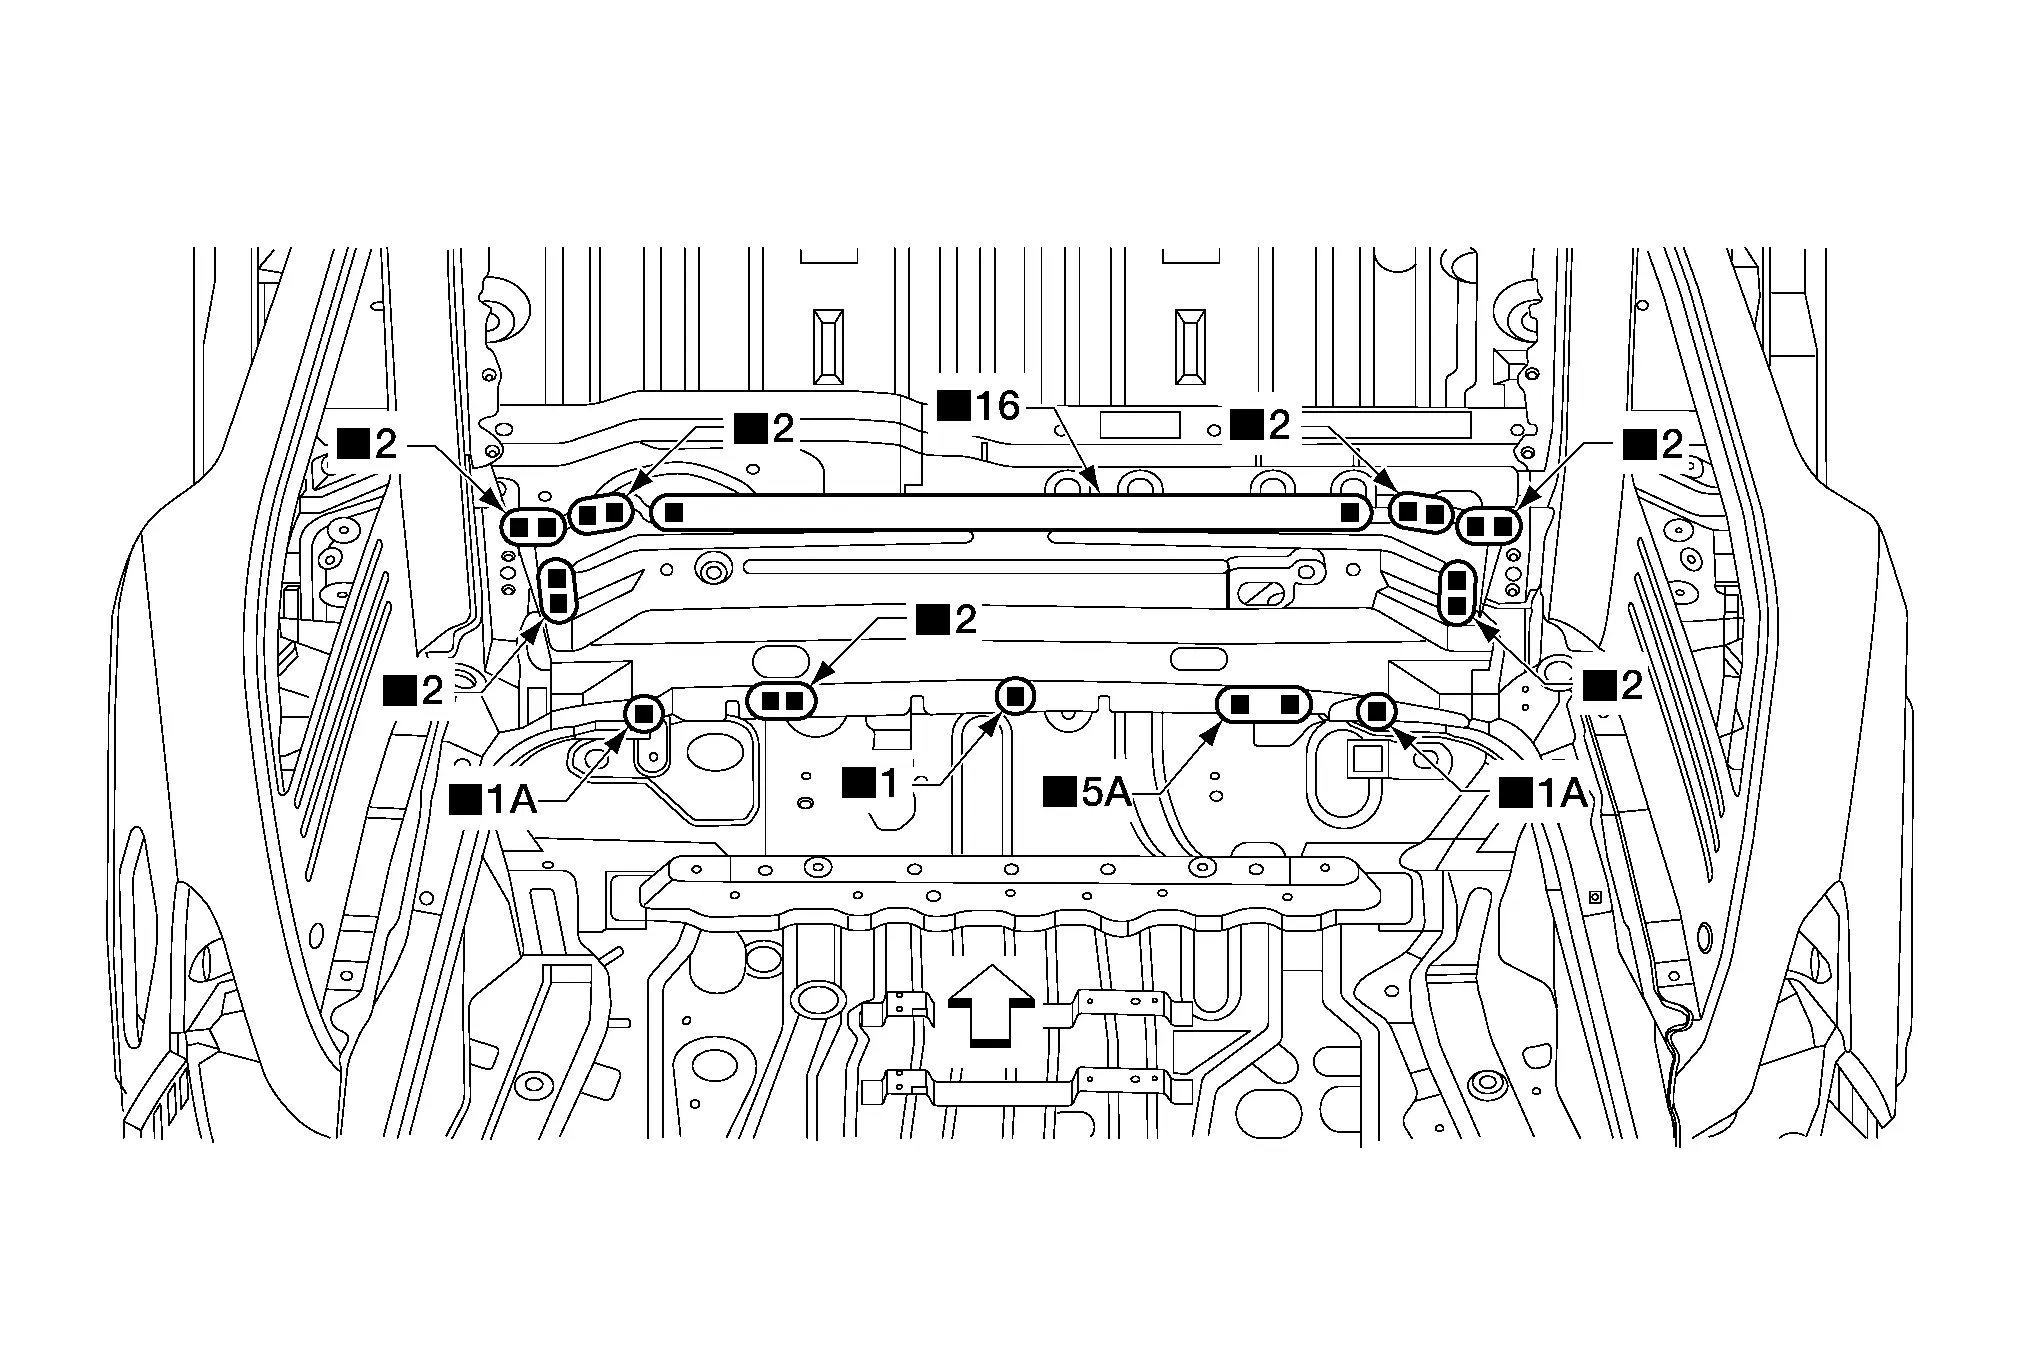
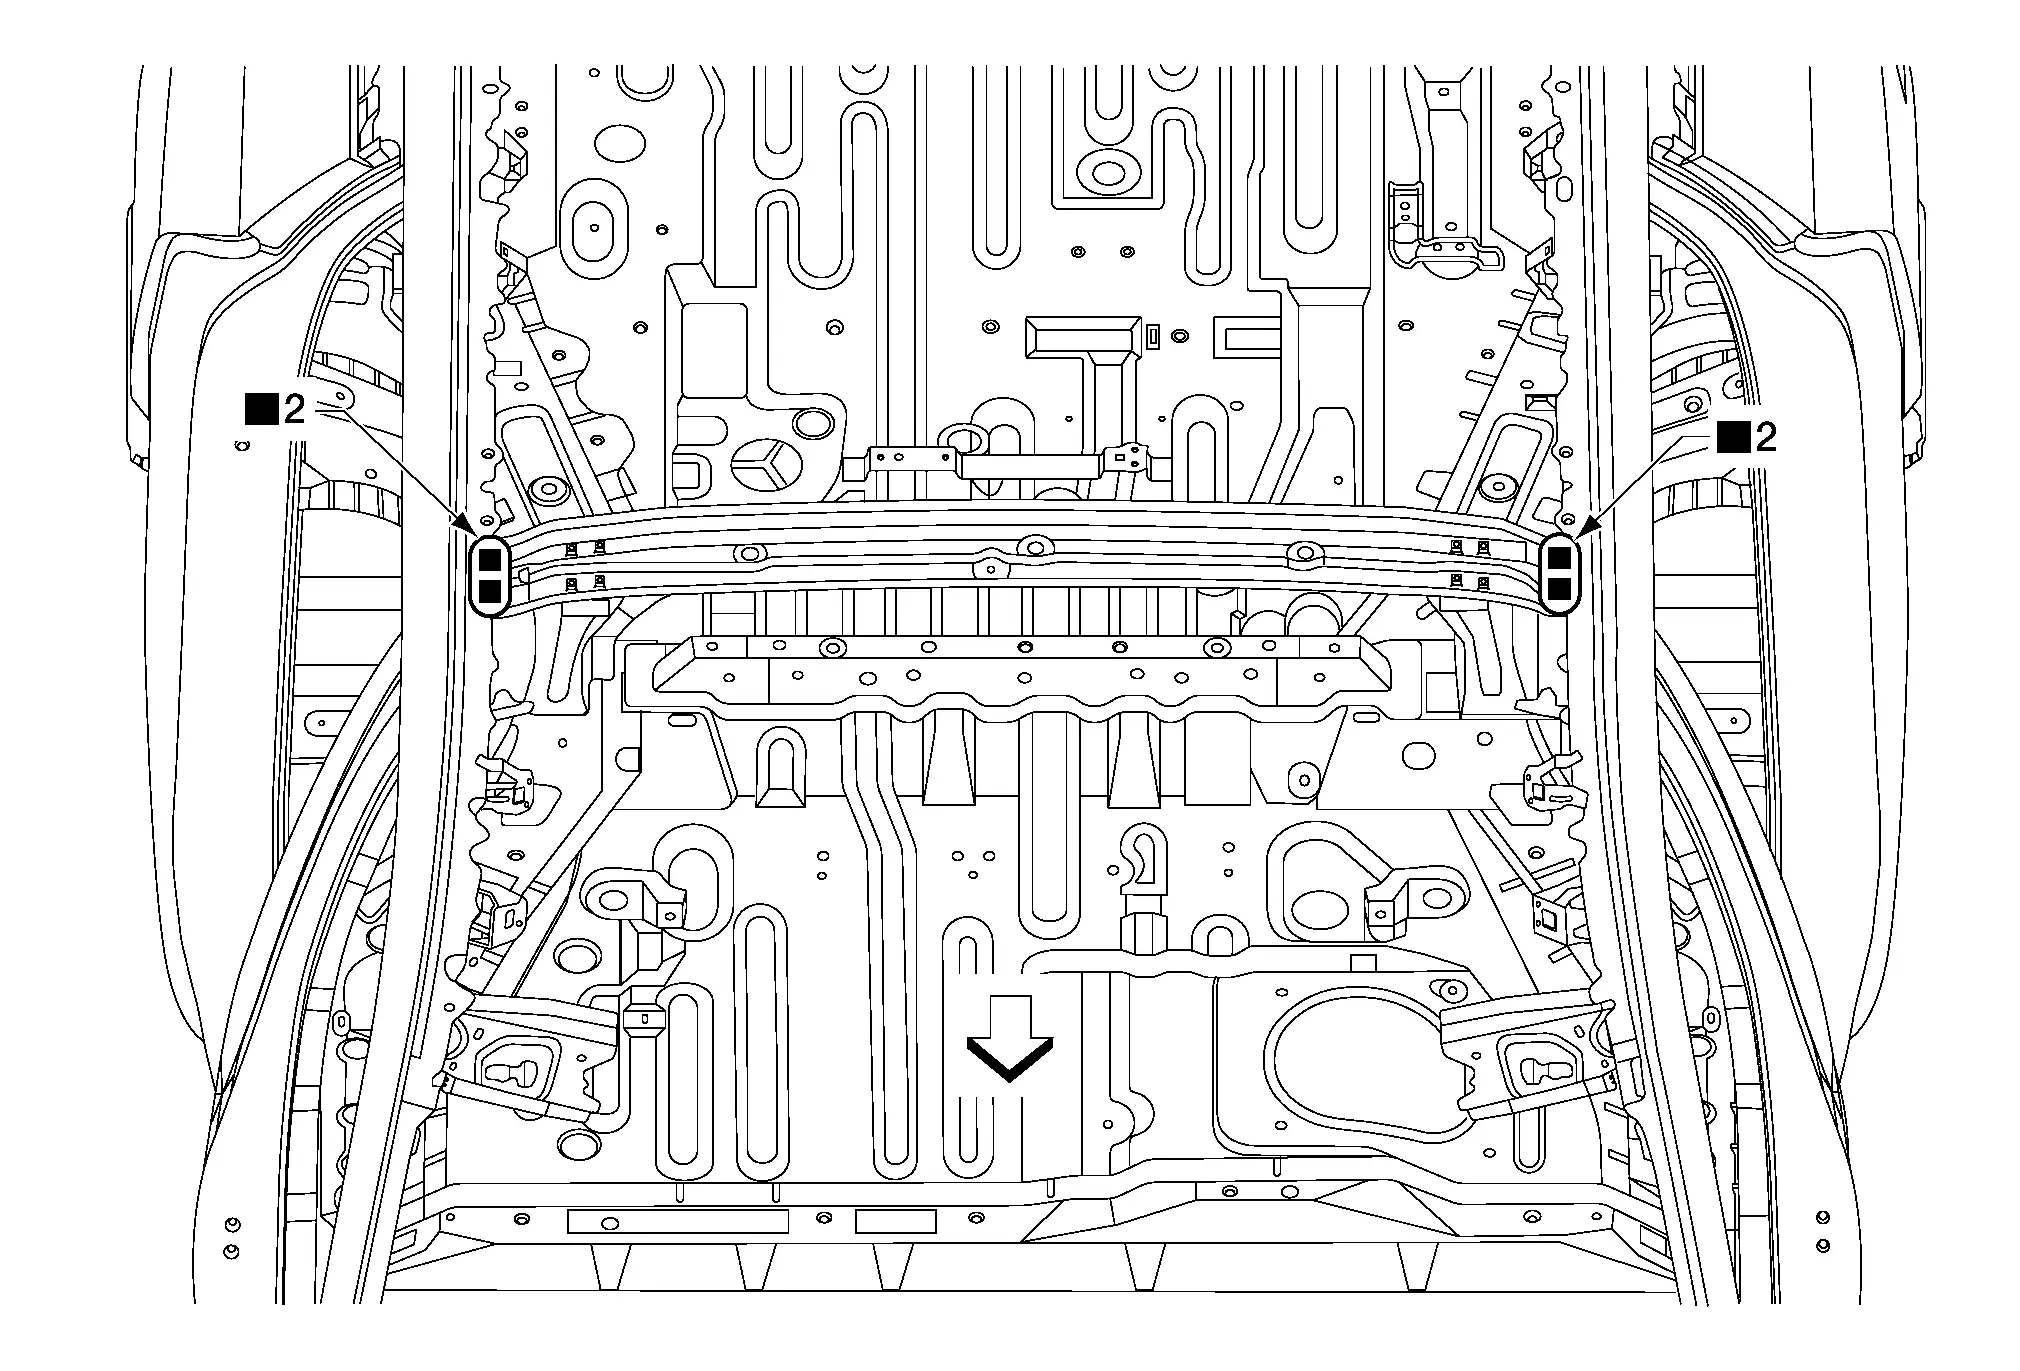
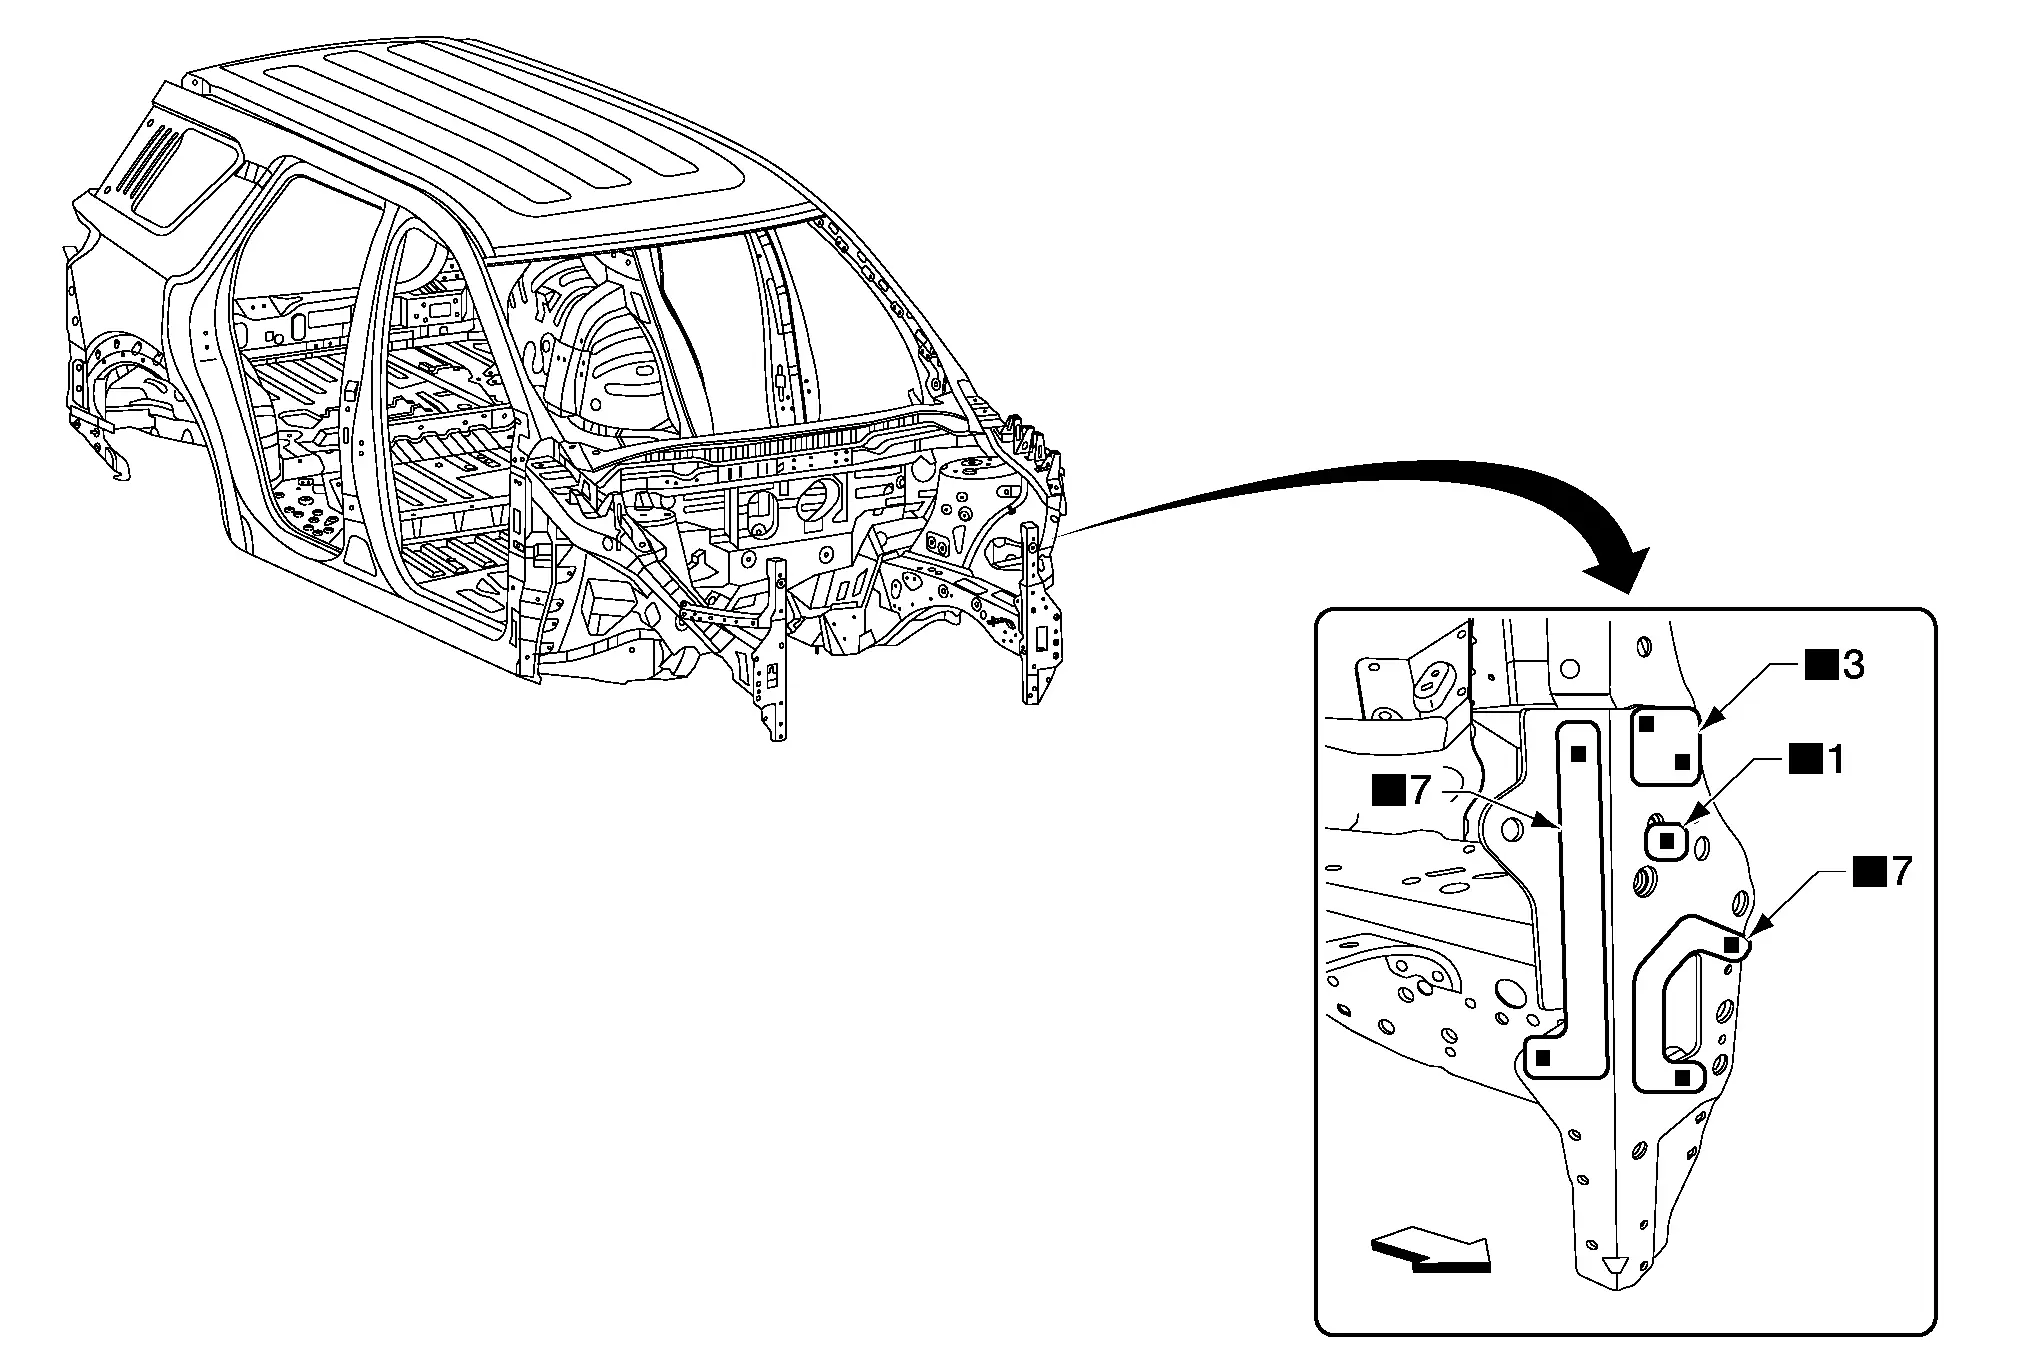
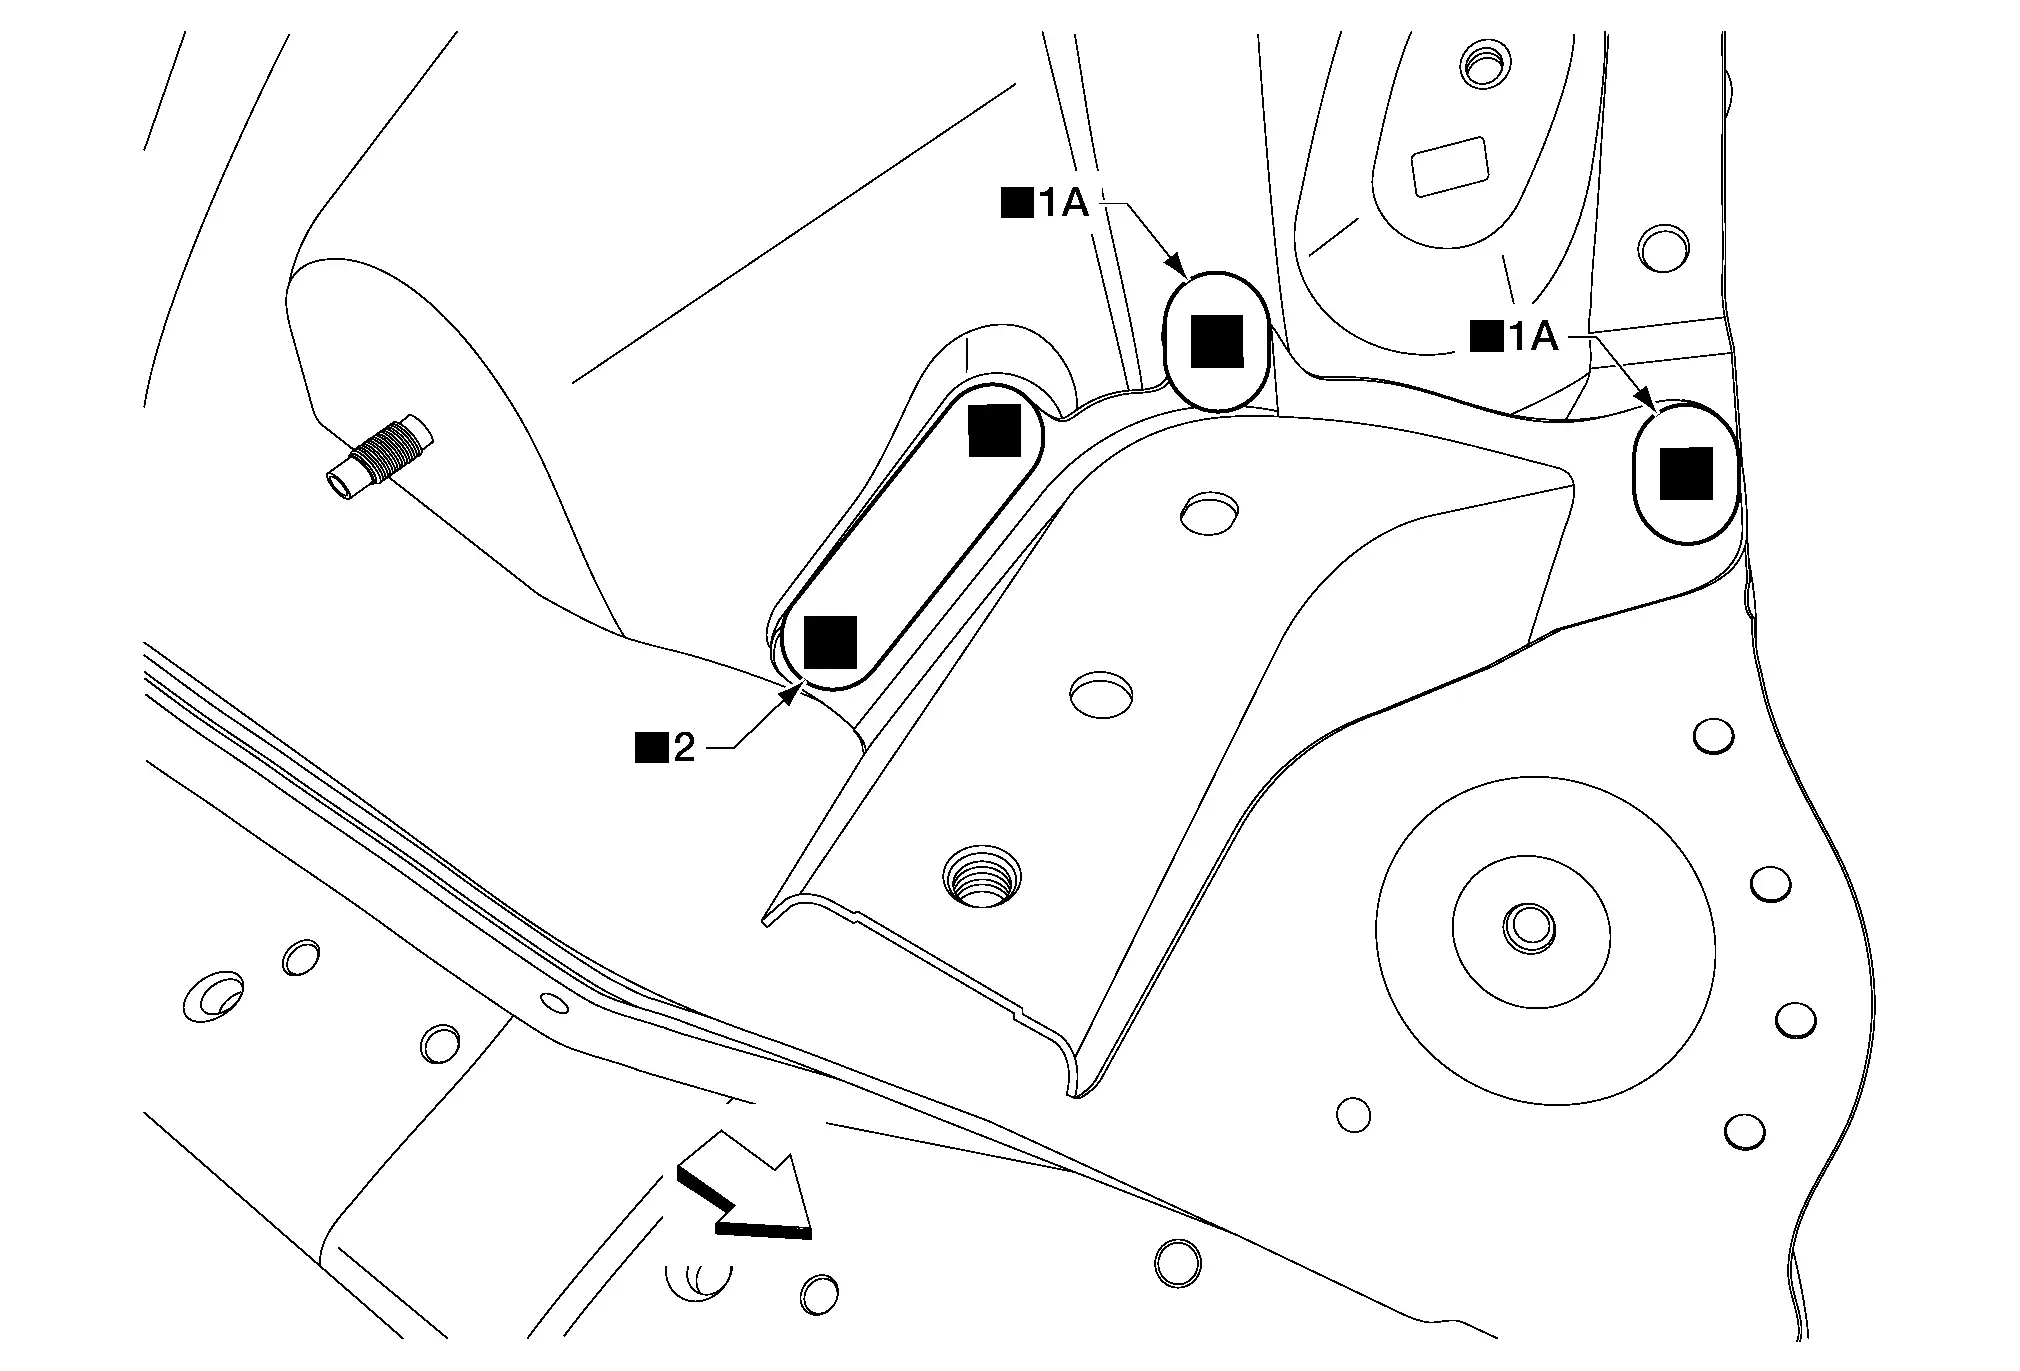
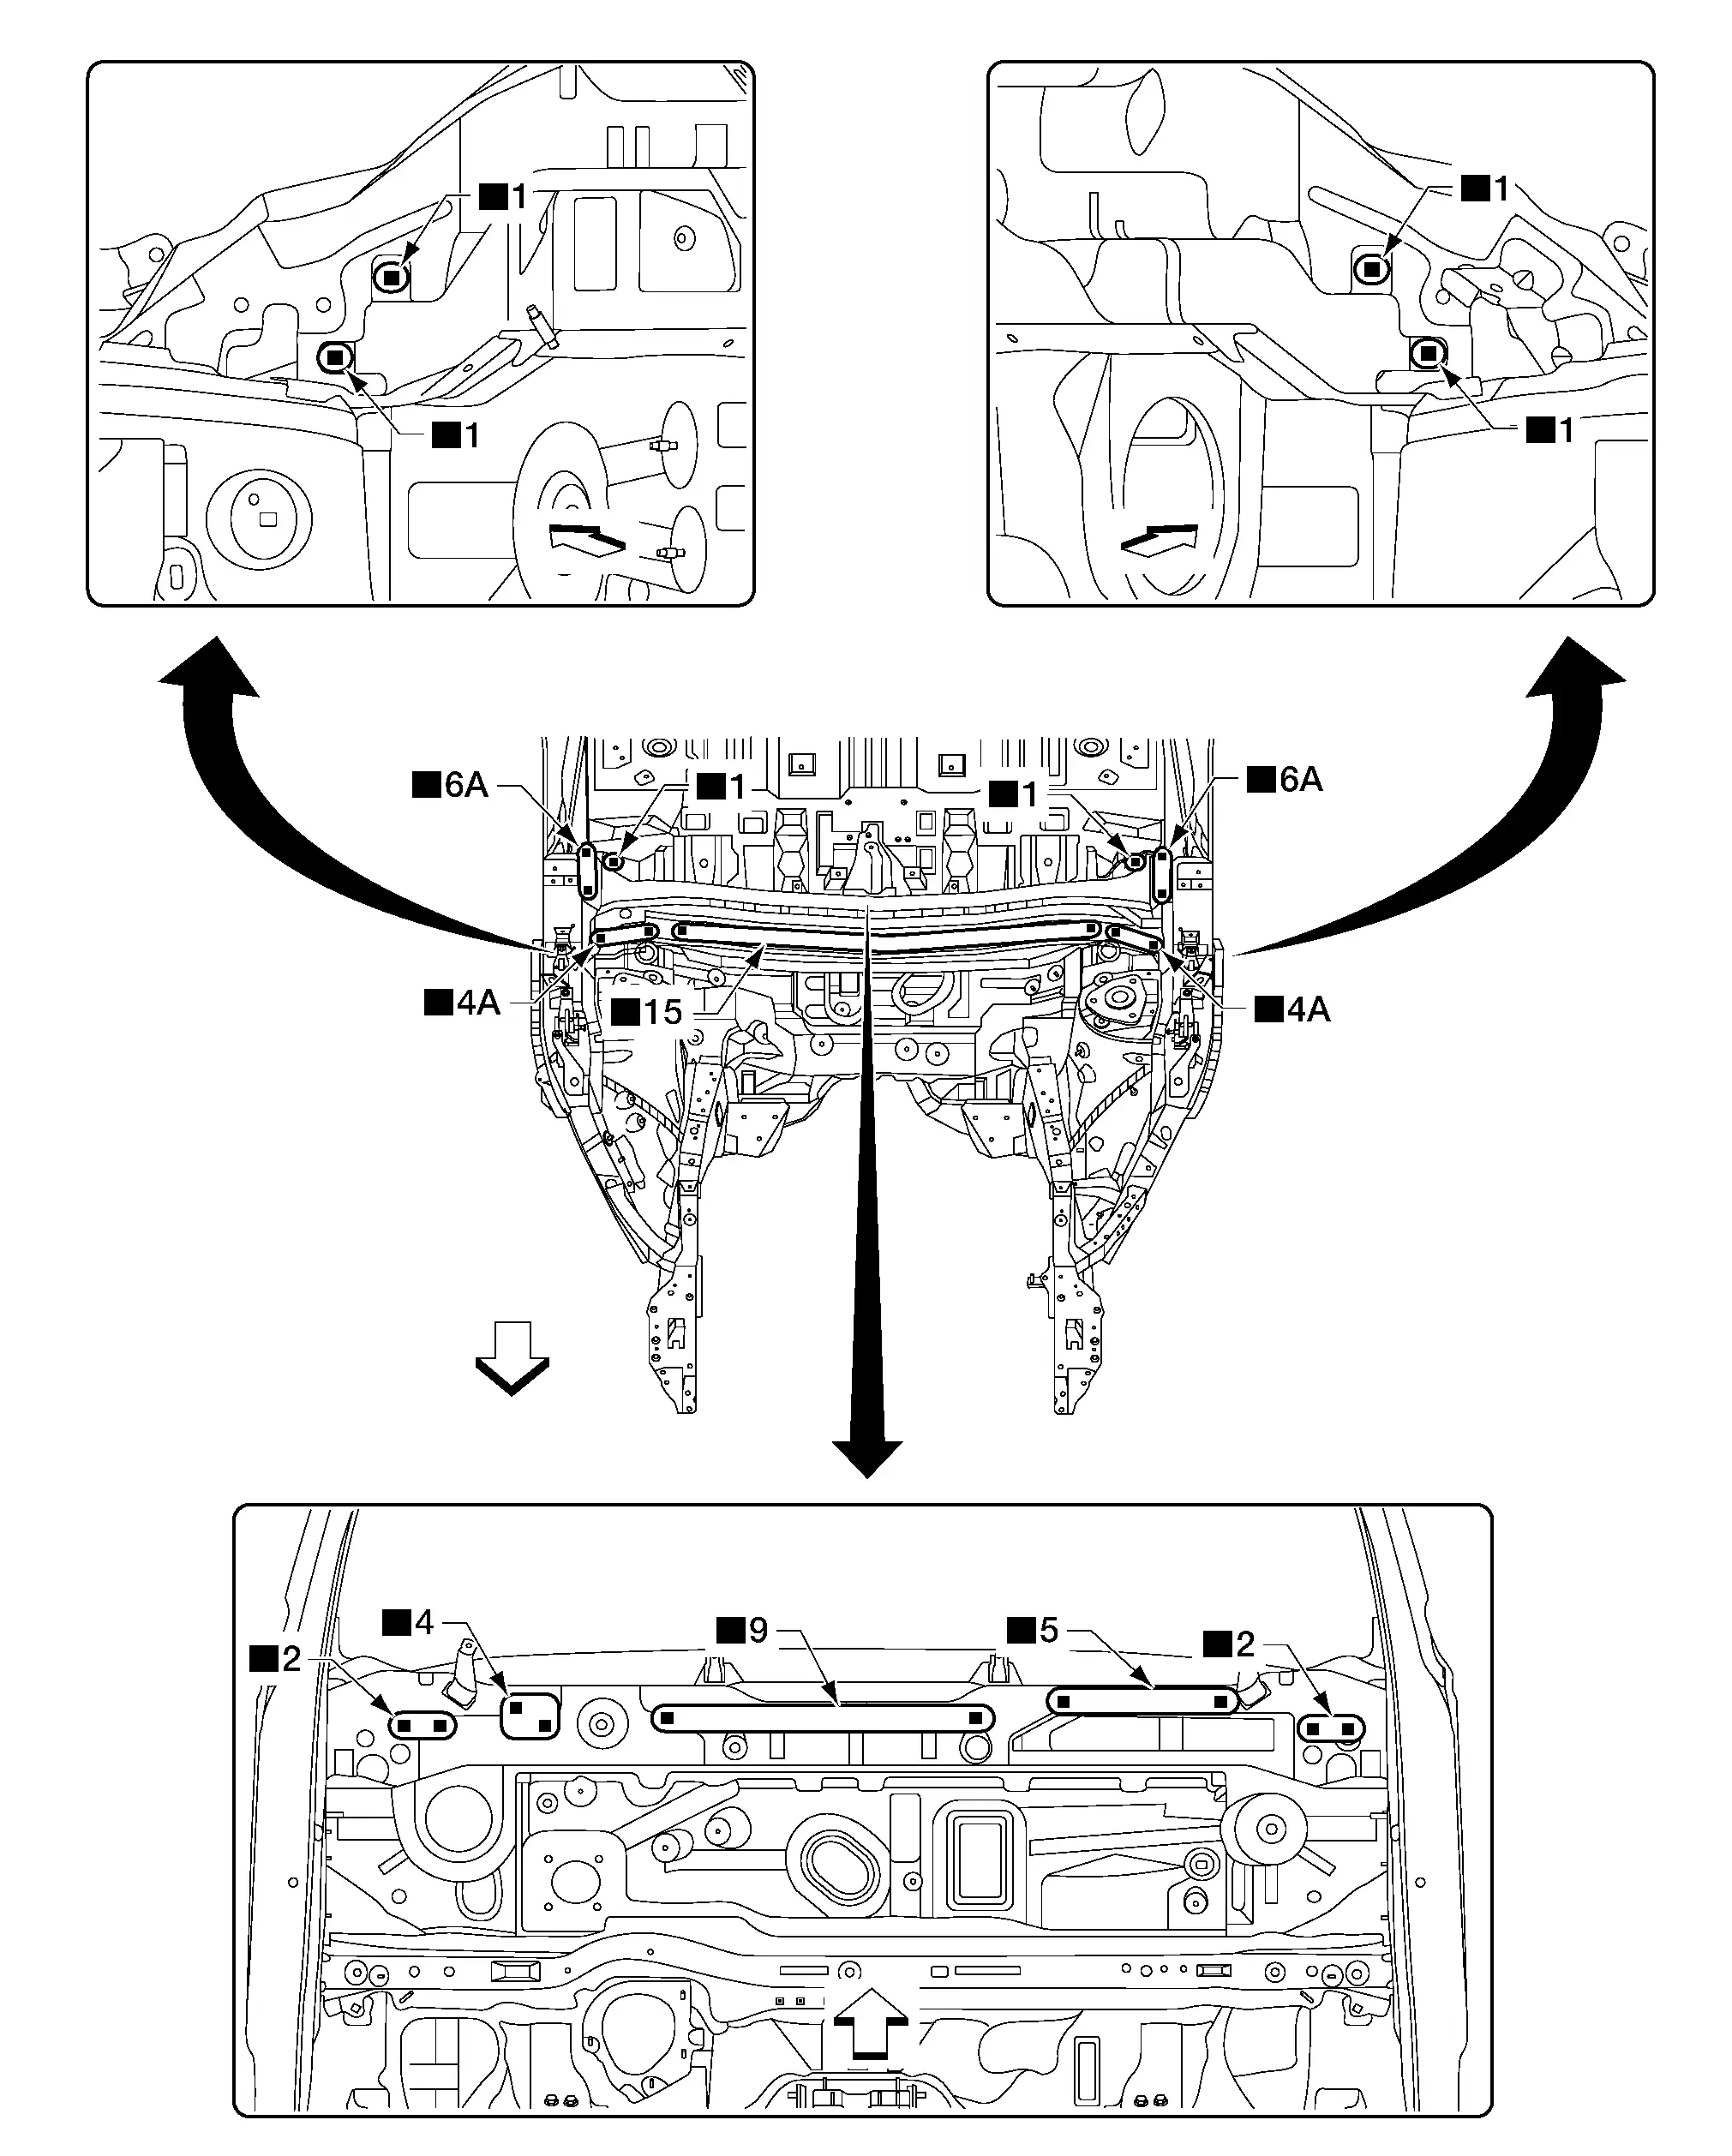
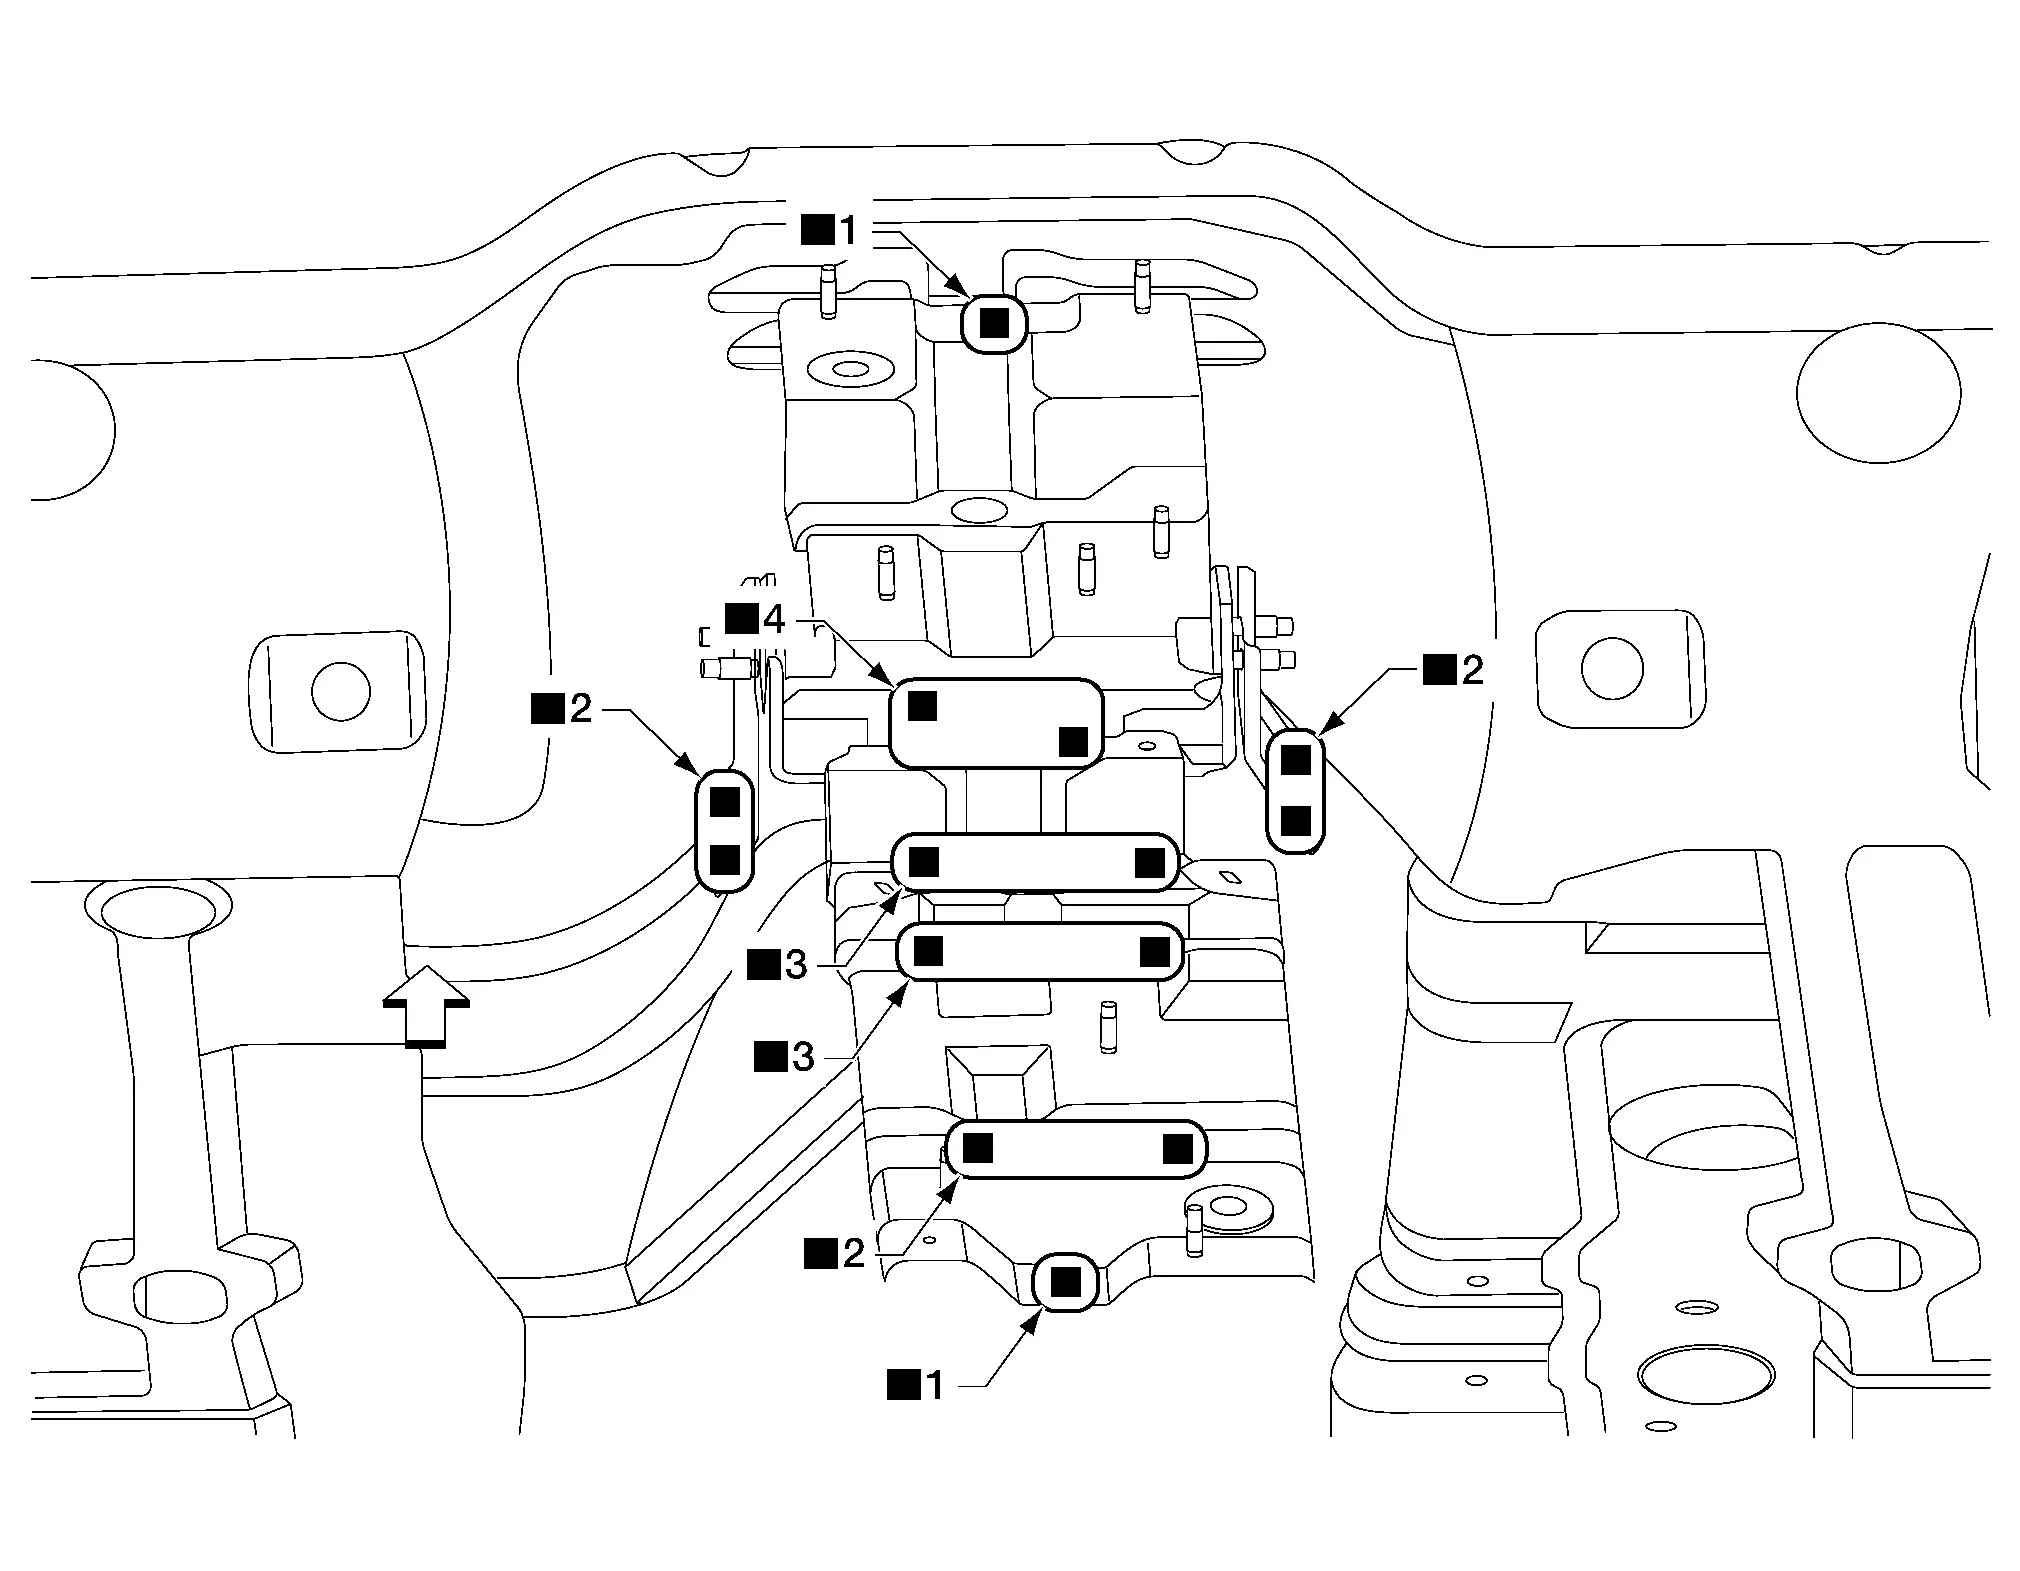
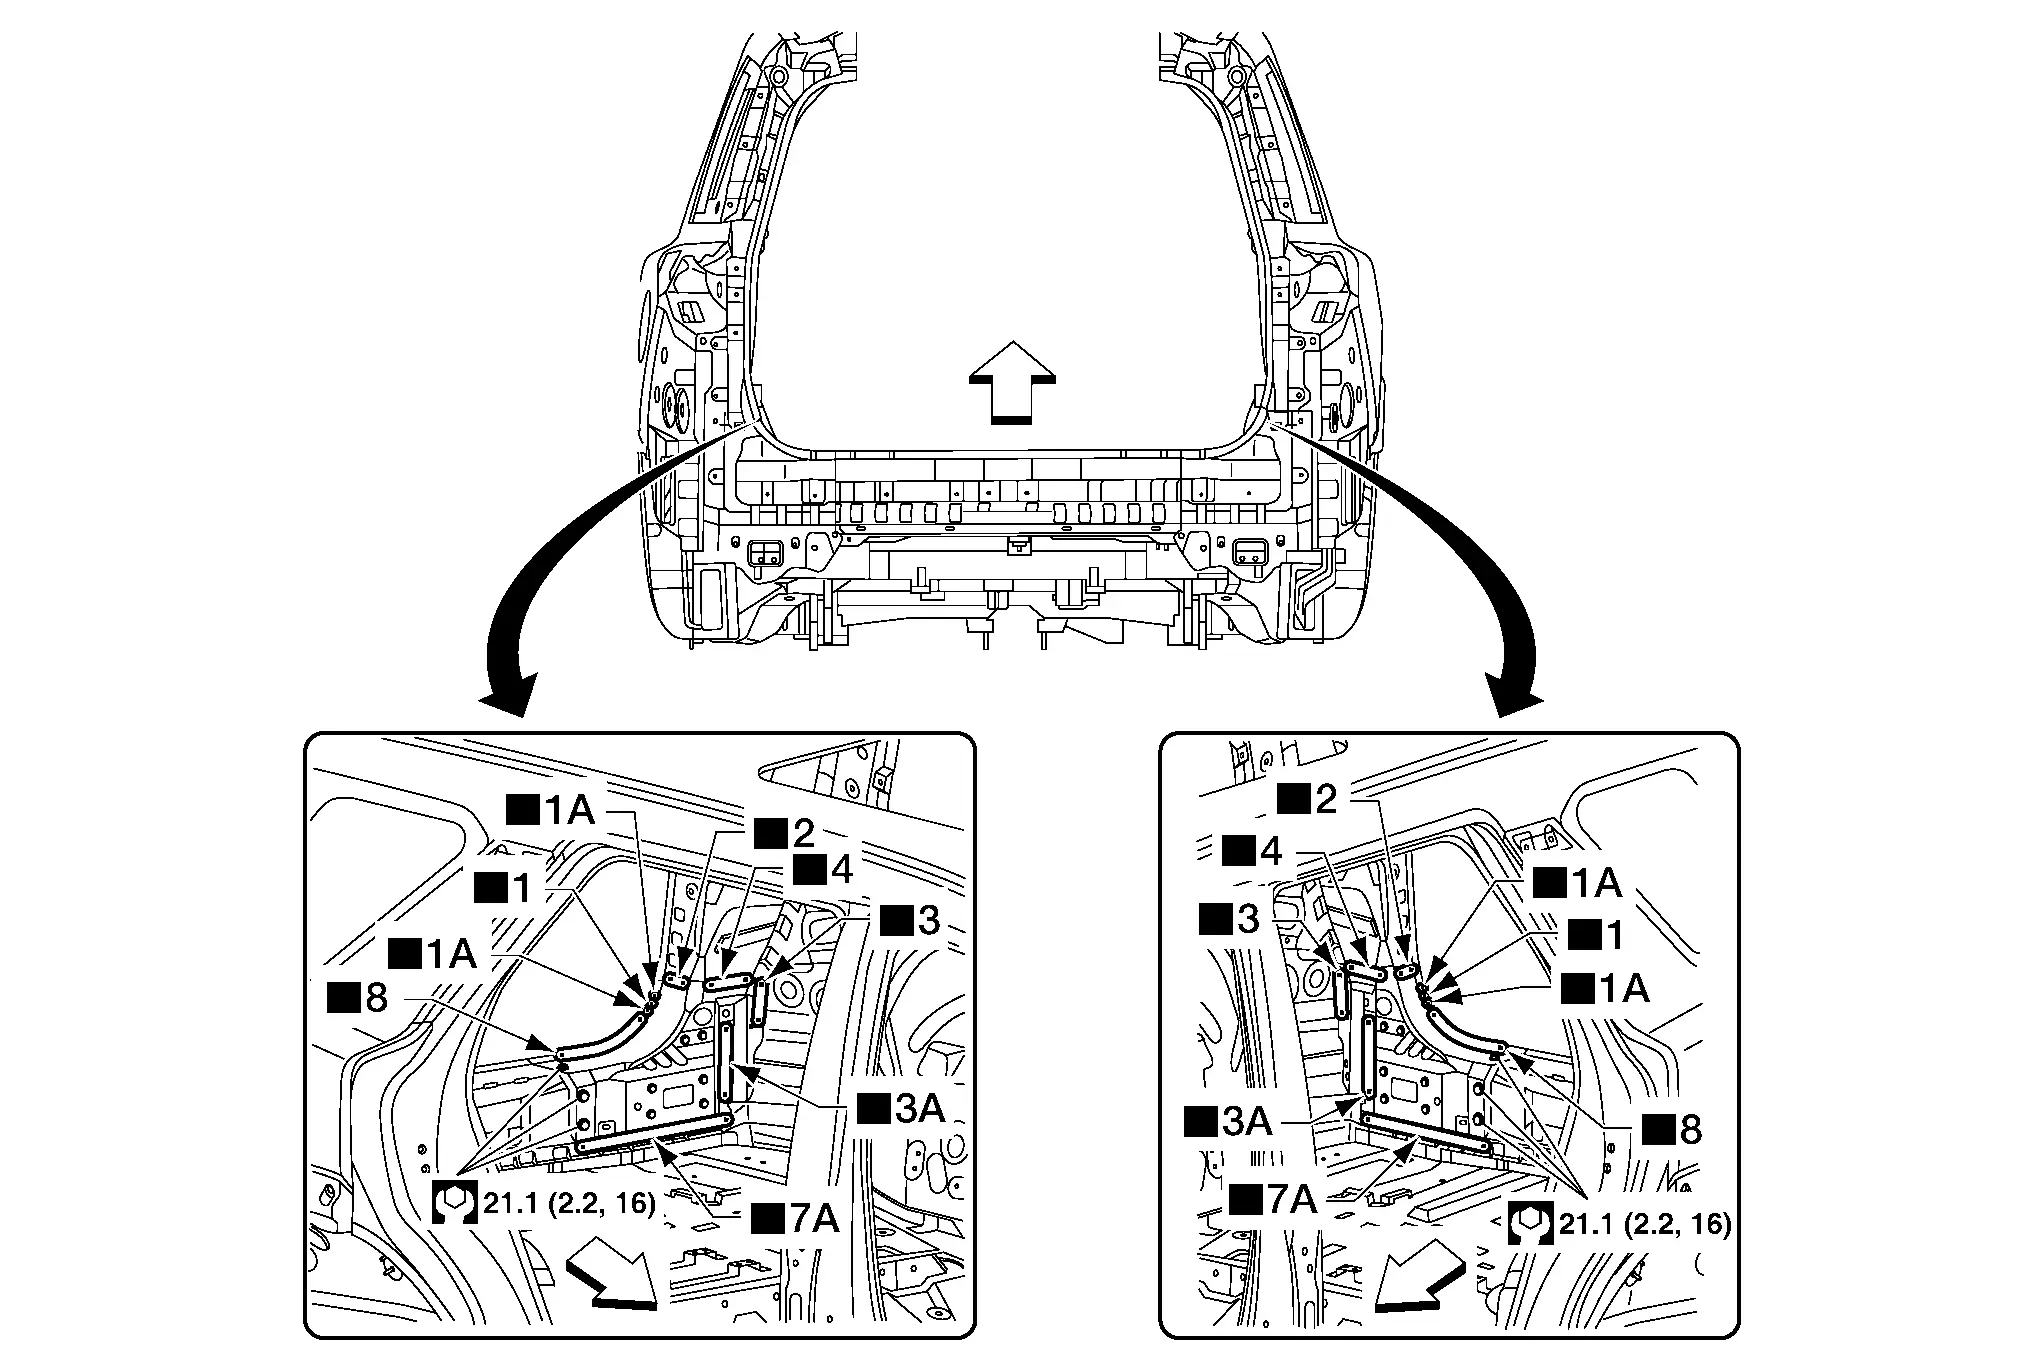
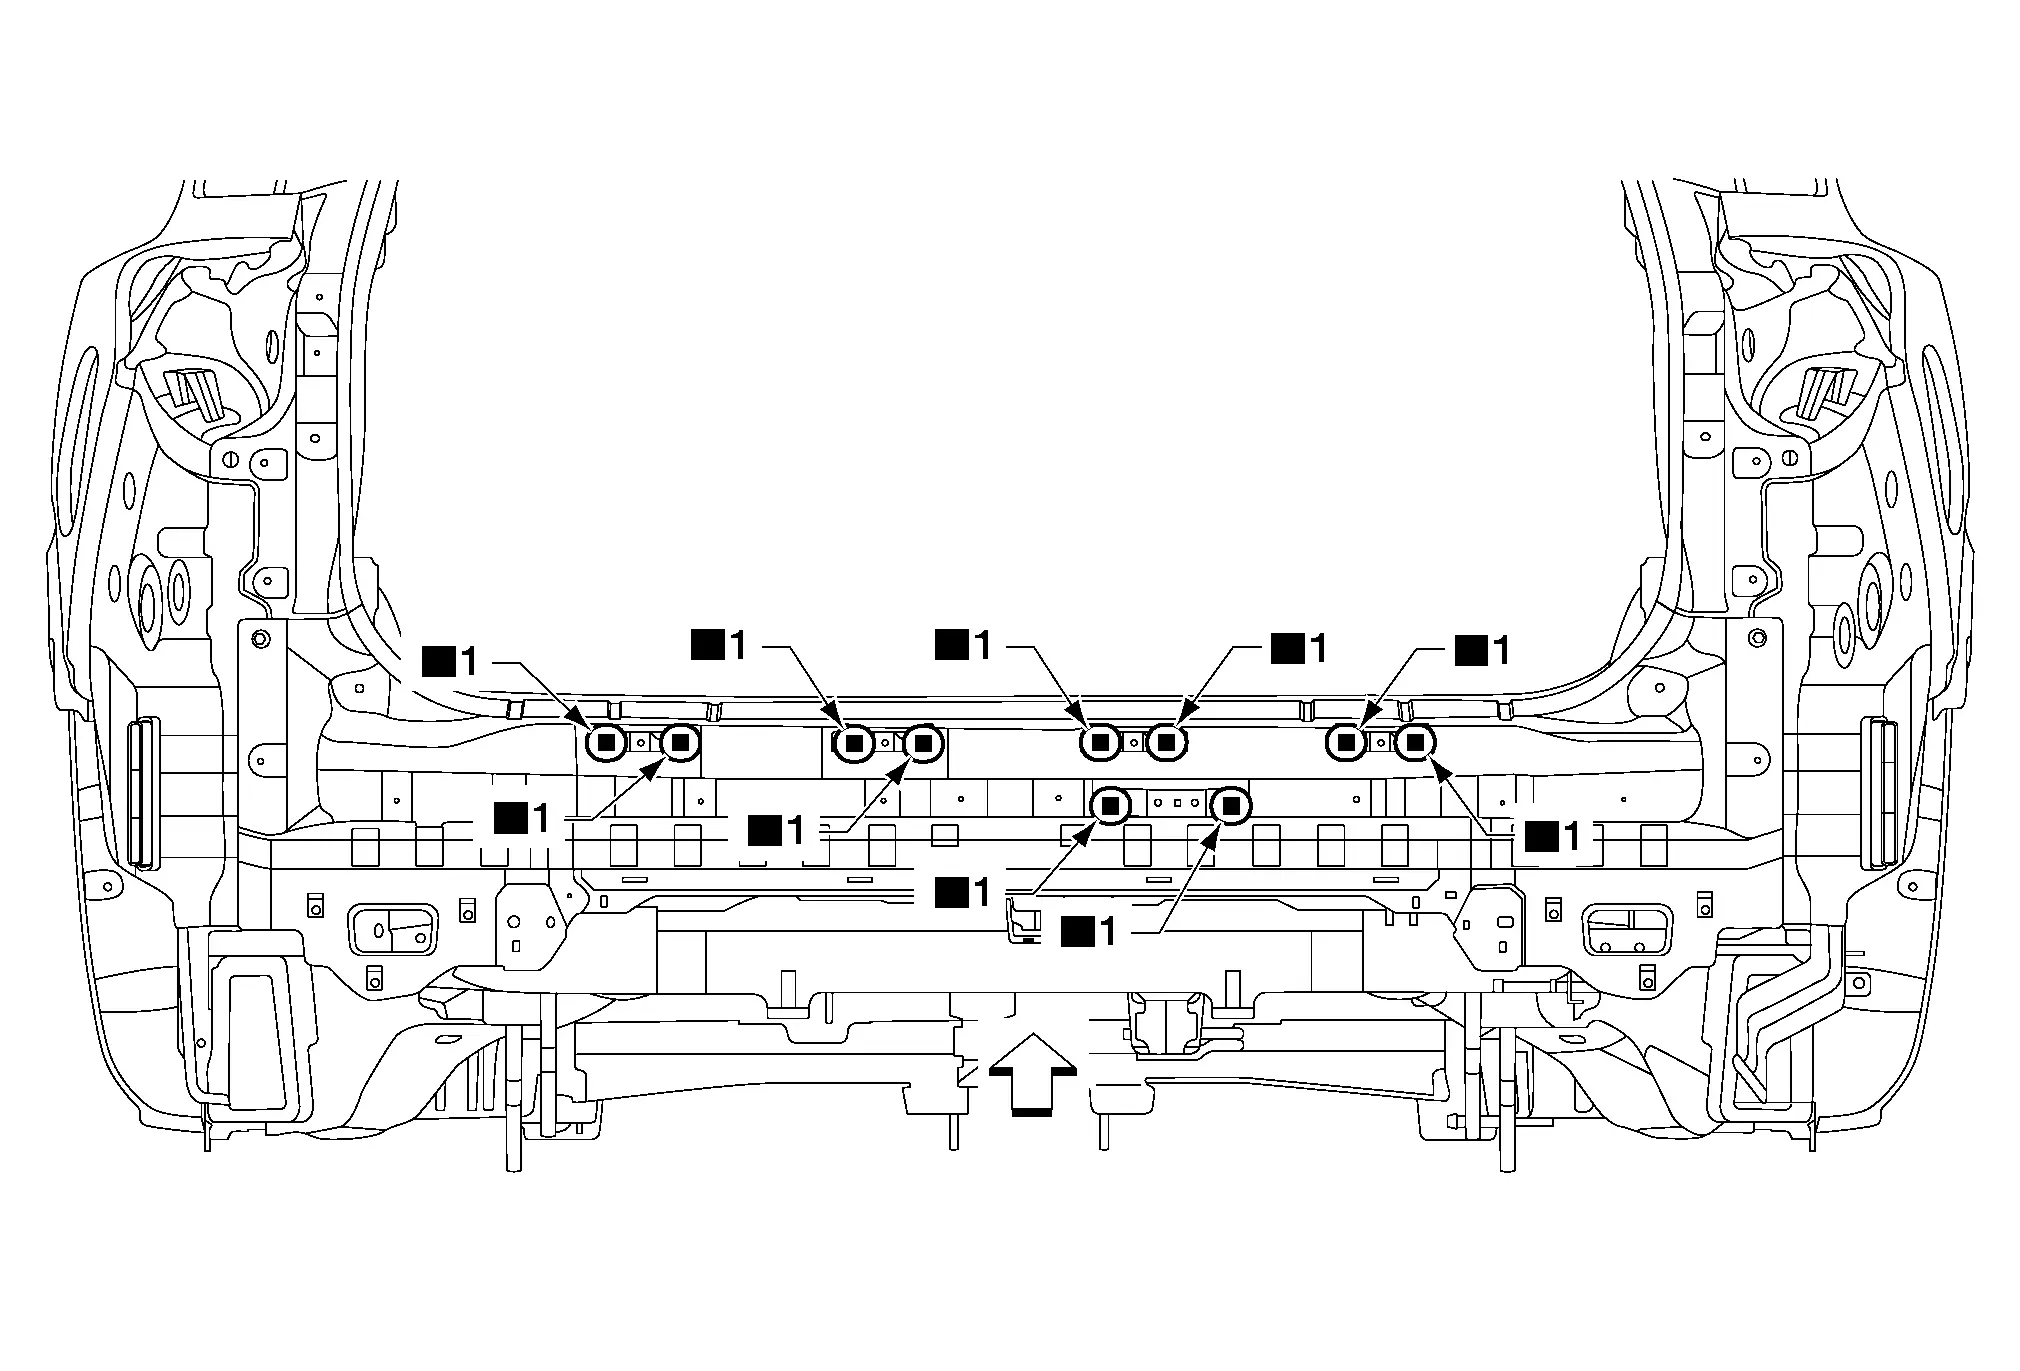
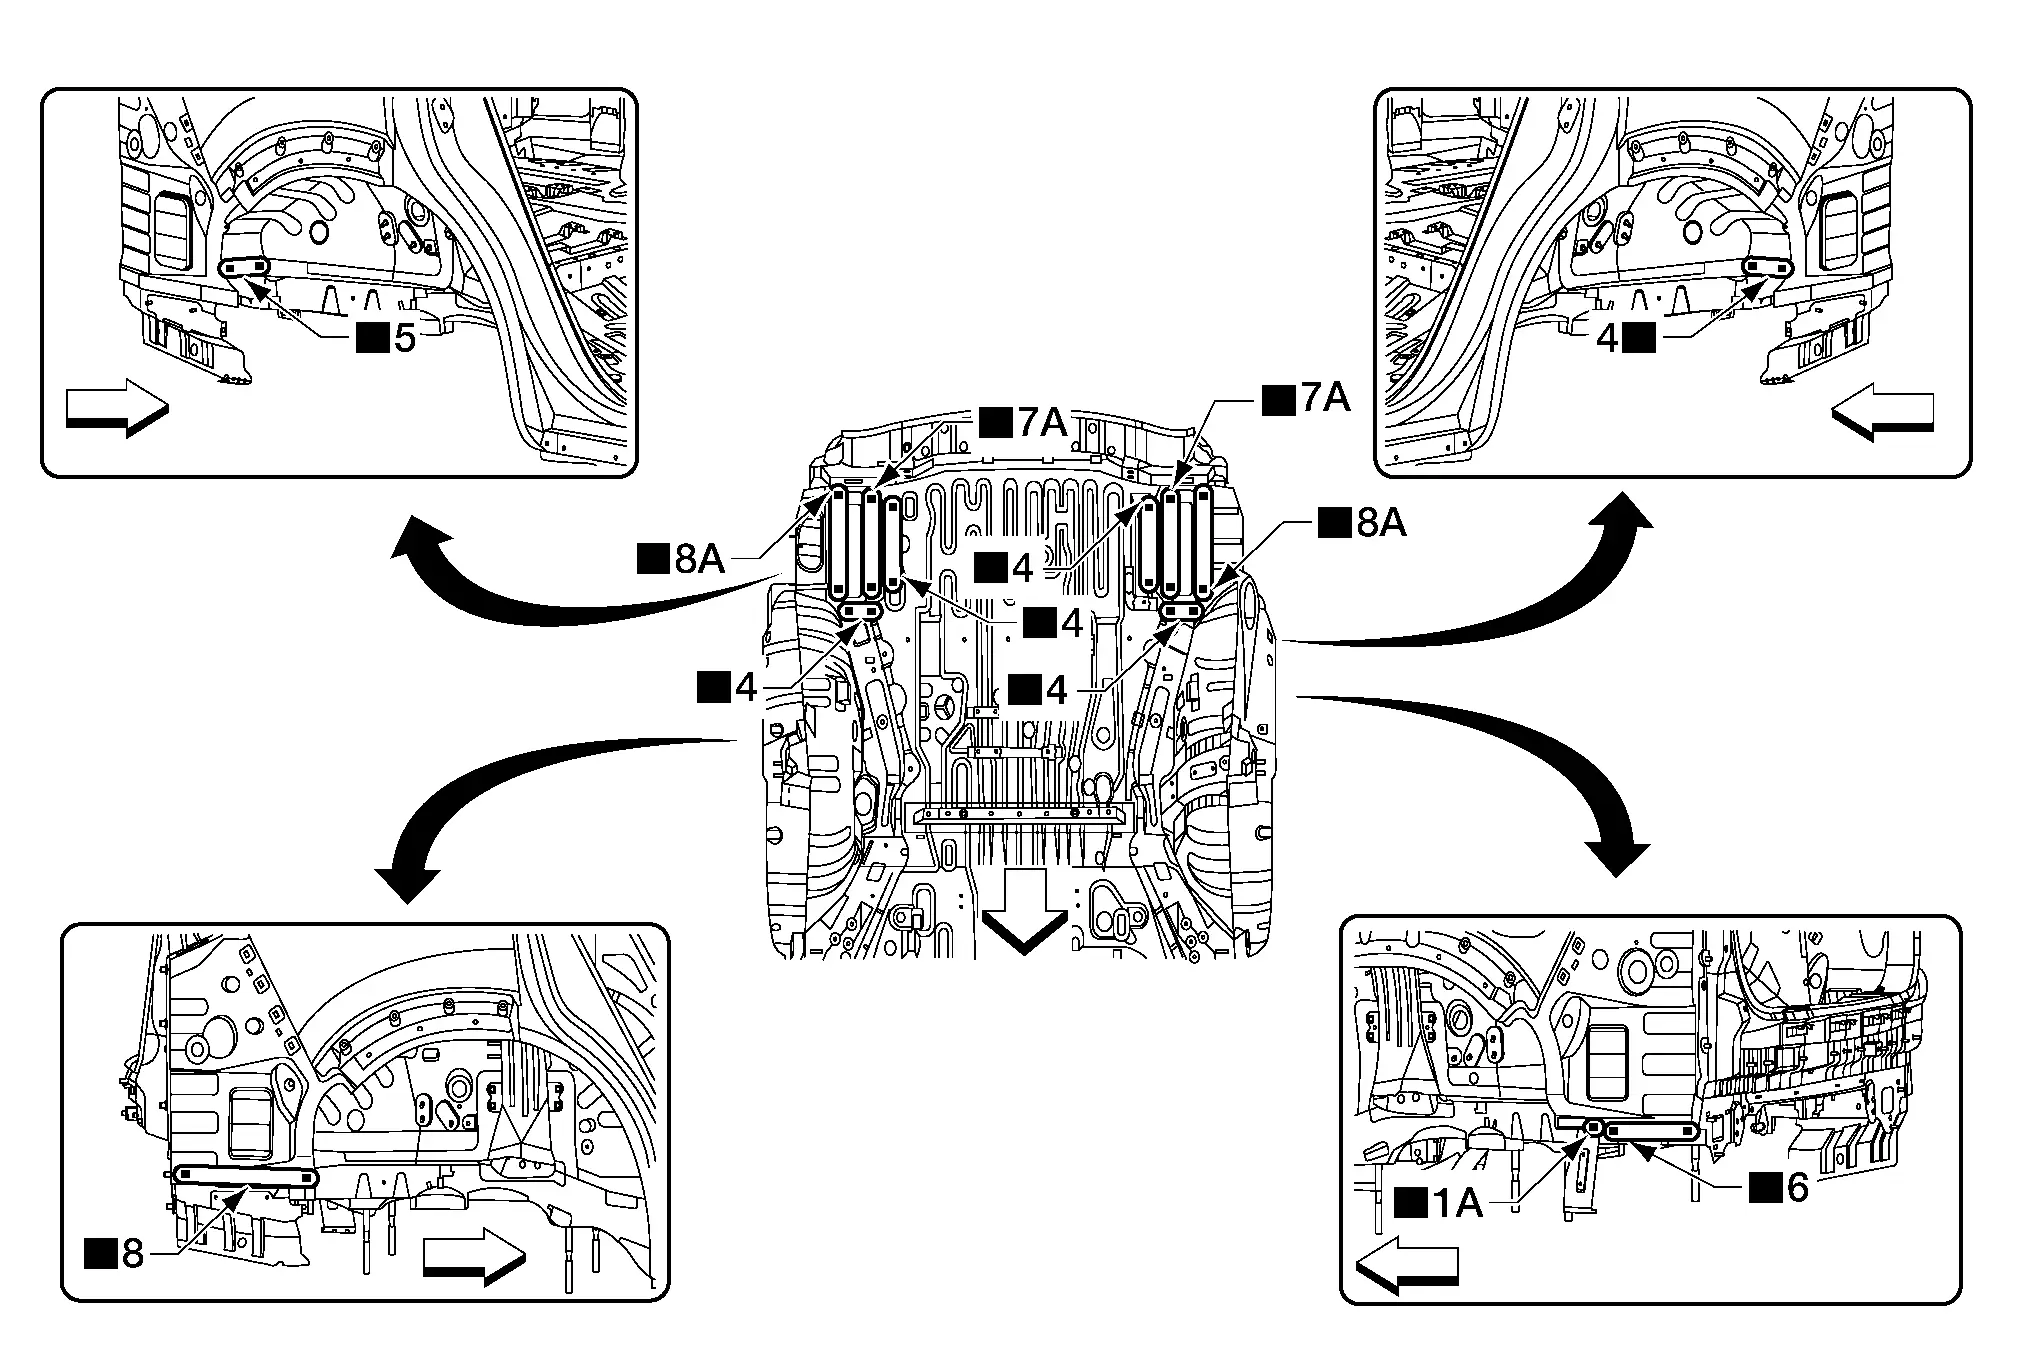
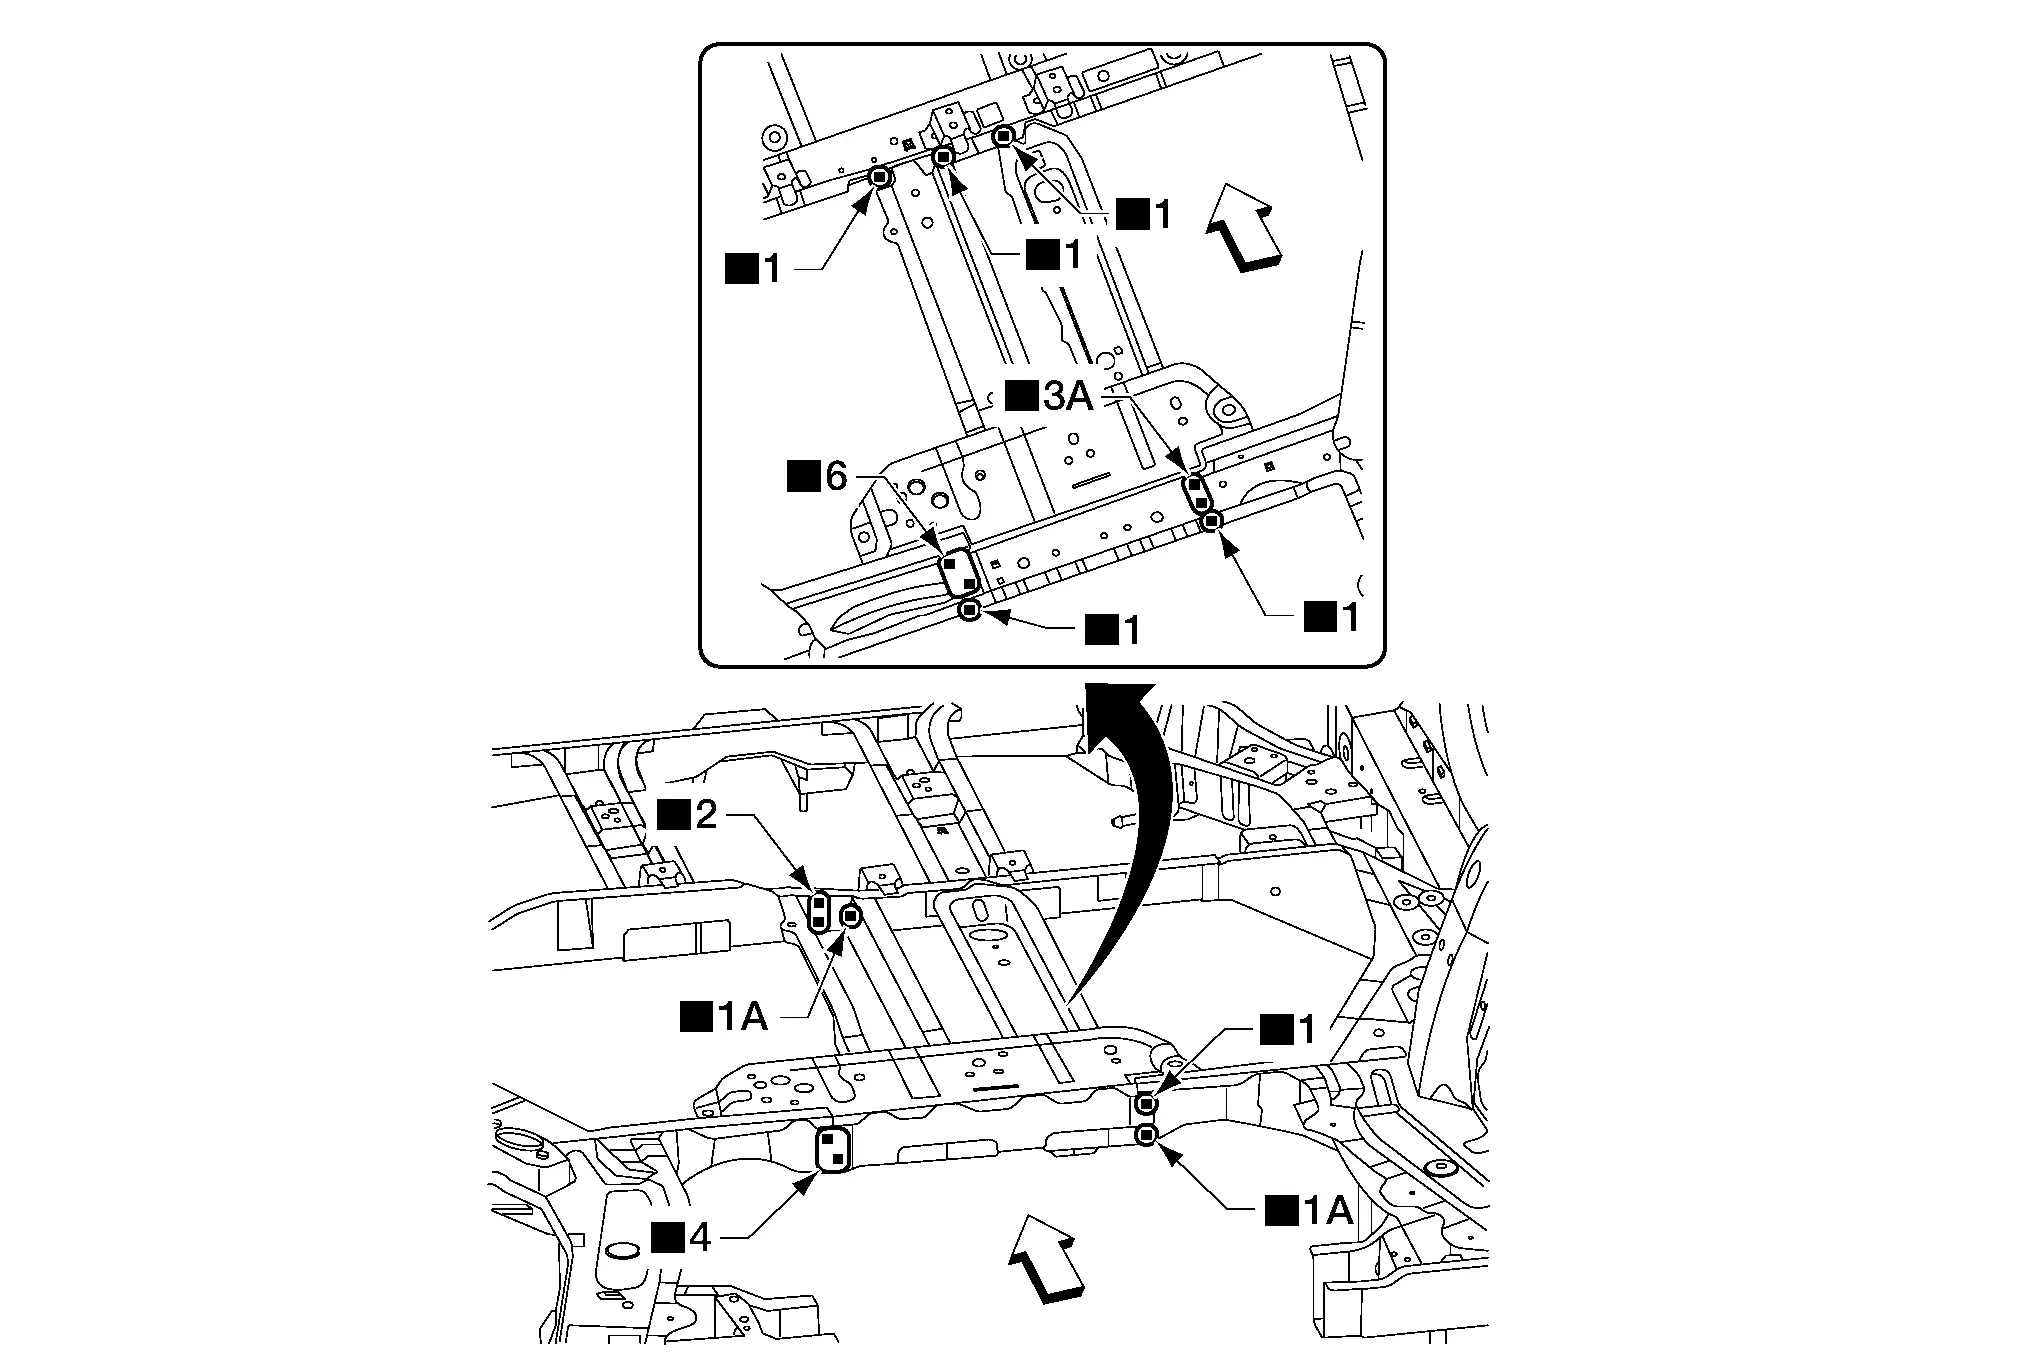
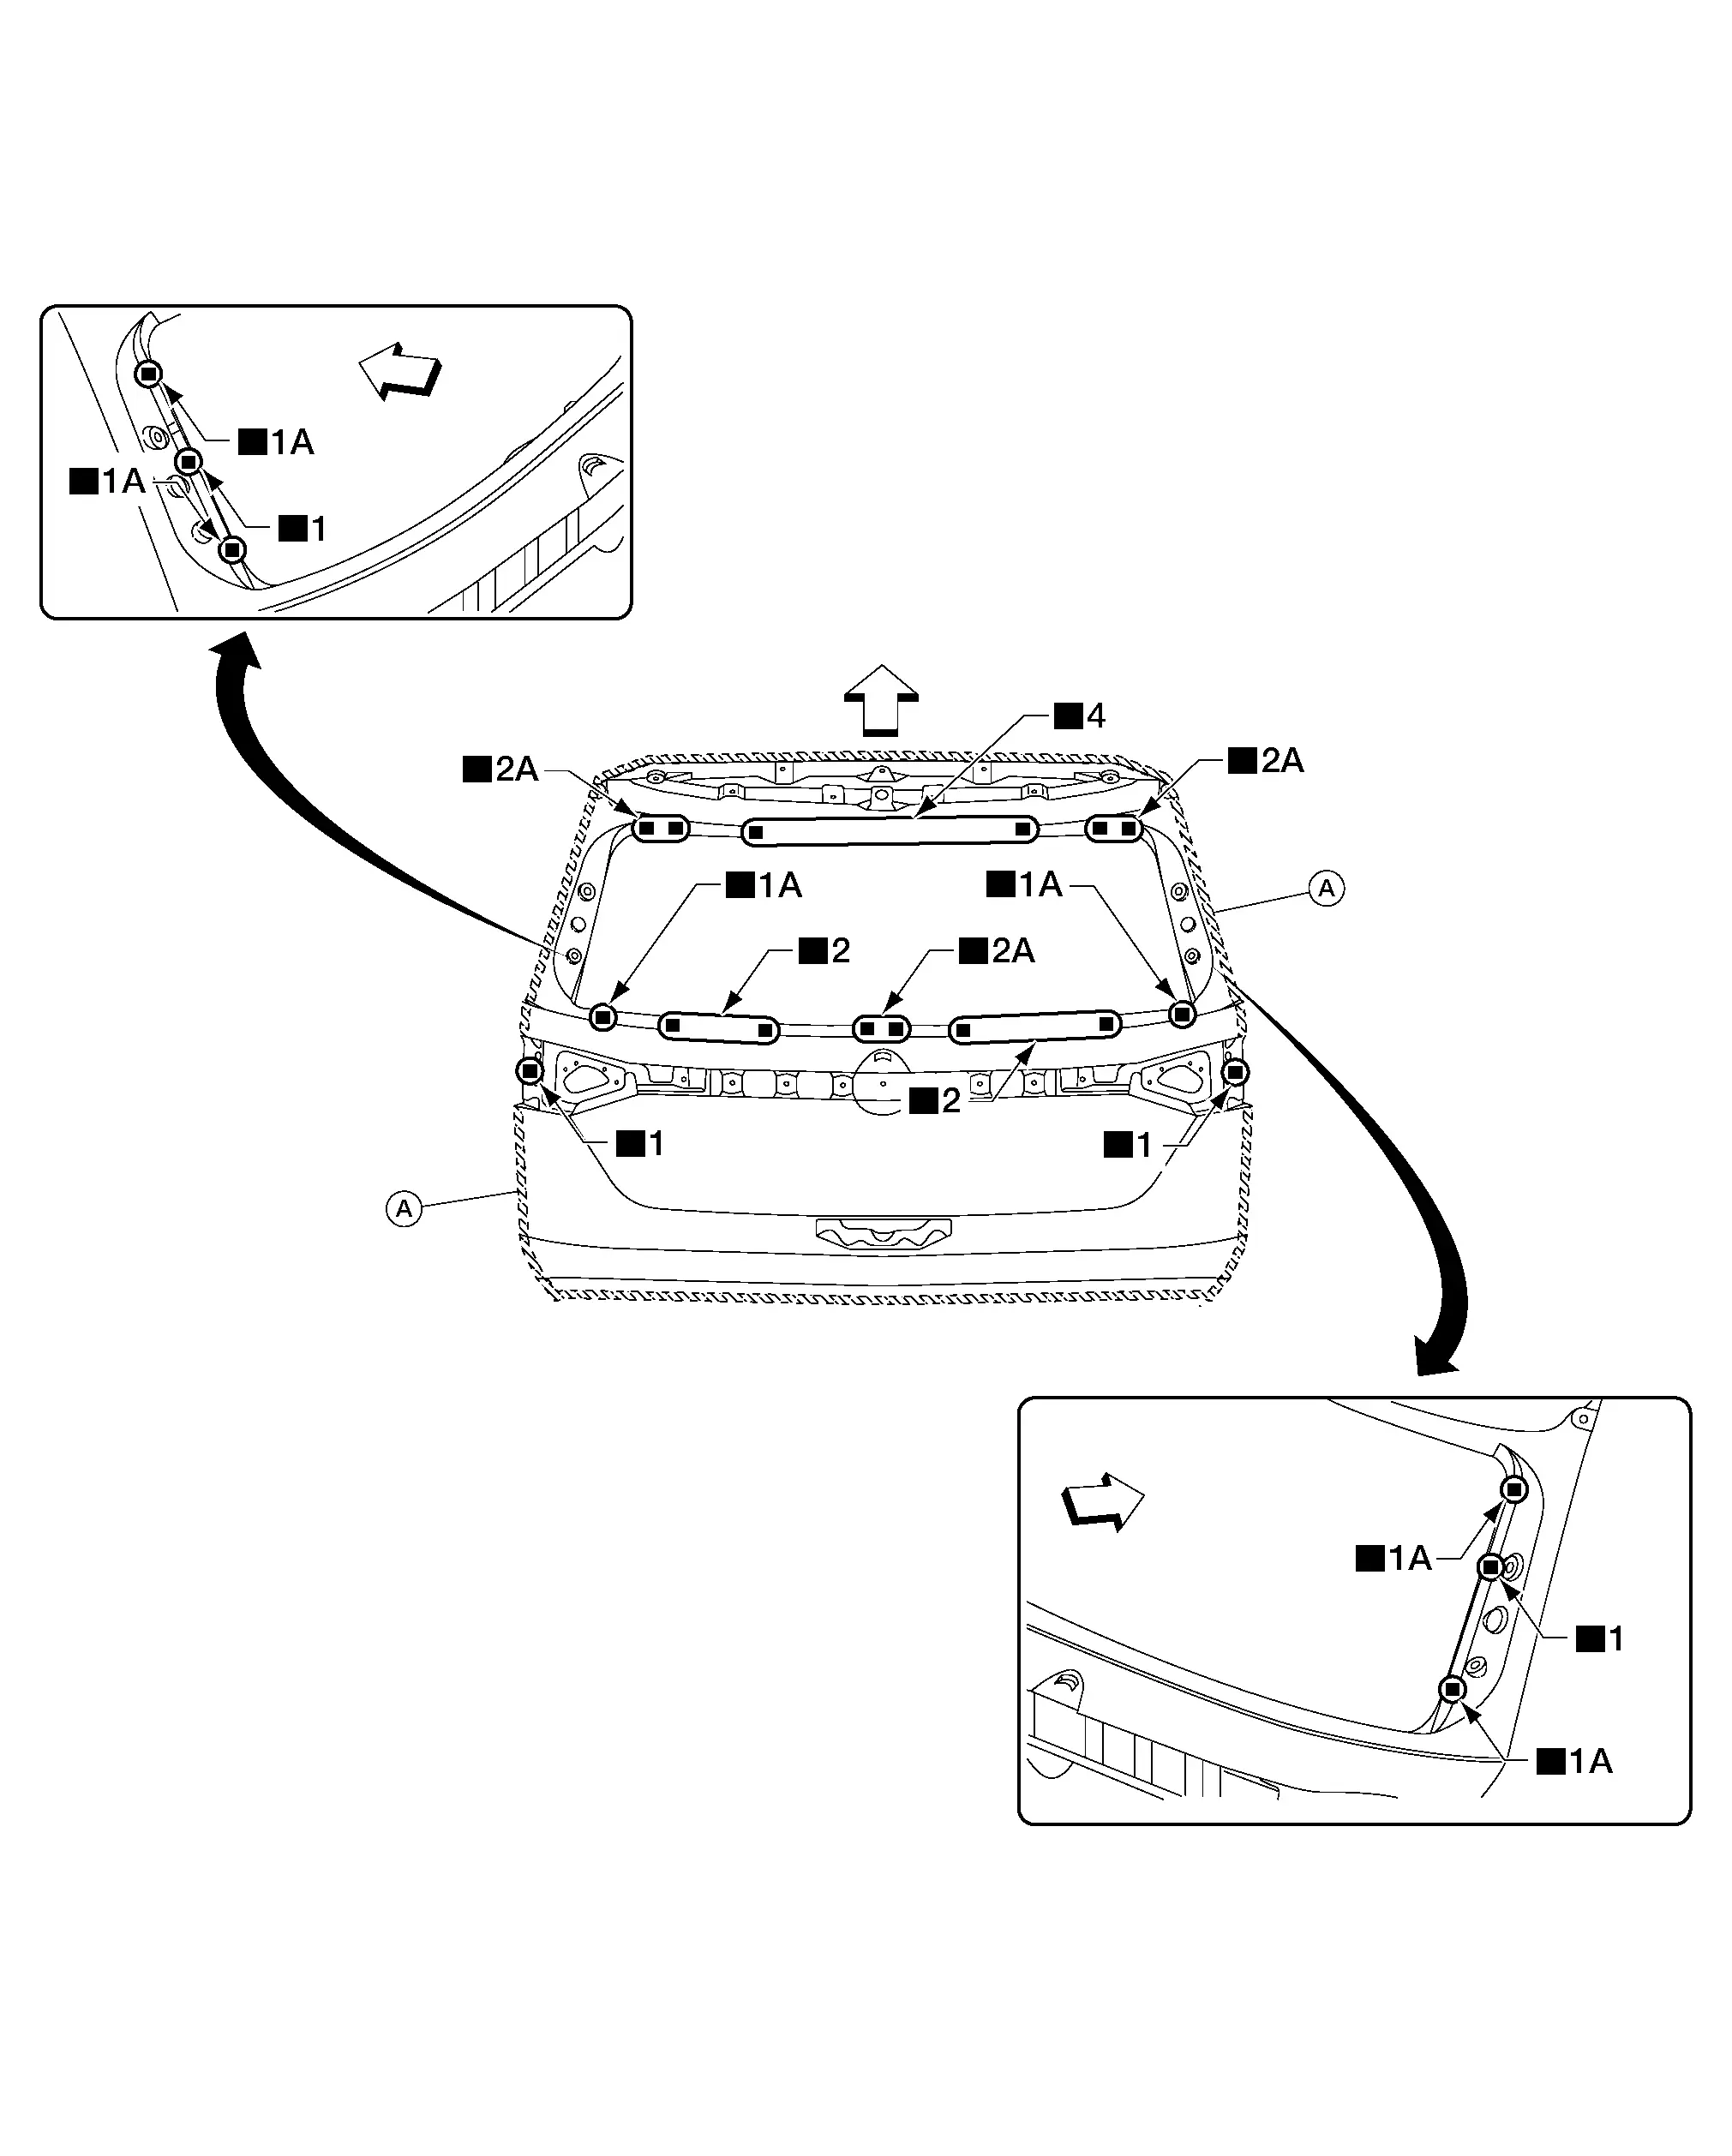
The symbols used in this section for welding operations are shown below.

Symbol marksDescription
"Number"

"Number" after symbol mark is the total number of welds to apply.

Example 1: ■"4"A = 4 MAG plug welds for 3-panel plug weld method.

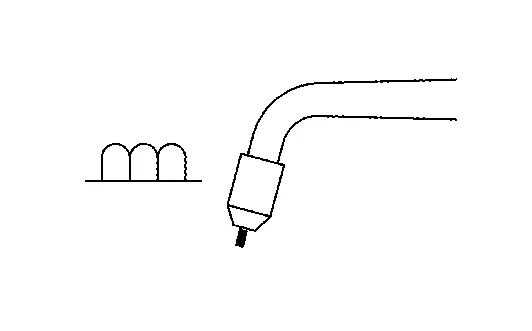
Example 2: "1" x20 (0.79) = 1 MAG seam weld by length 20 mm (0.79 in).
2-panel spot weld
3-panel spot weld
MAG plug weld

For 3-panel plug weld method

MAG seam weld / Point weld
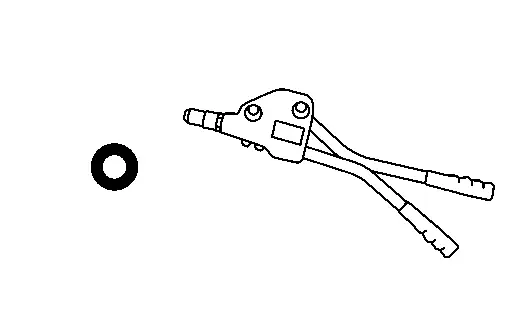
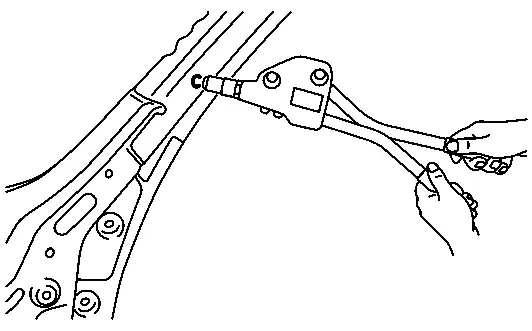
Rivet
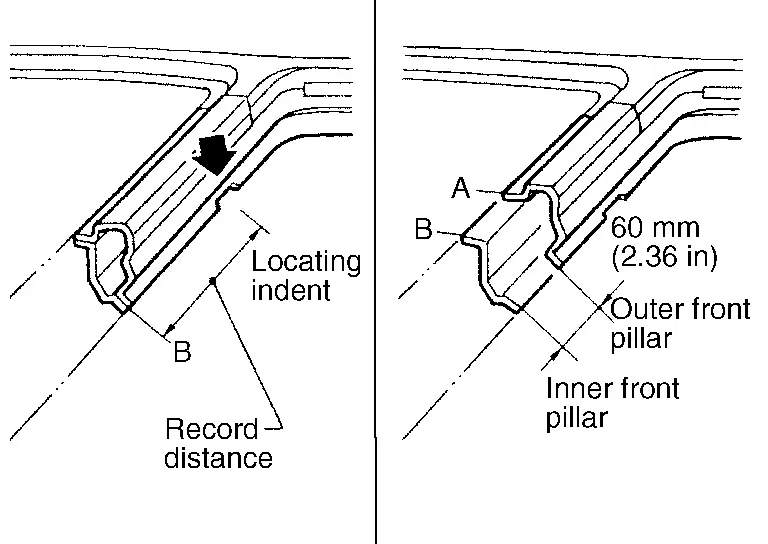
  • Front pillar butt joint can be determined anywhere within shaded area as shown in the figure. The best location for the butt joint is at position A due to the construction of the Nissan Pathfinder vehicle.
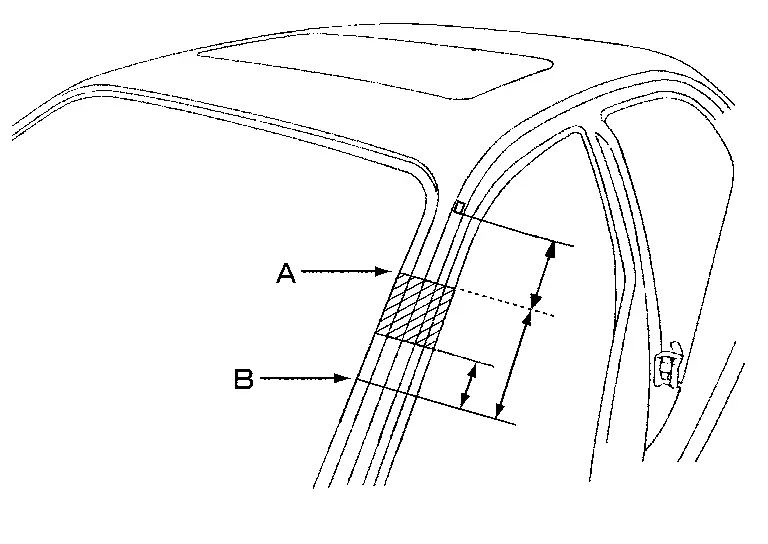
  • Determine cutting position and record distance from the locating indent. Use this distance when cutting the service part. Cut outer front pillar over 60 mm (2.36 in) above the inner front pillar cut position.
  • Prepare a cutting jig to make outer pillar easier to cut. Also, this will permit the service part to be accurately cut at the joint position.
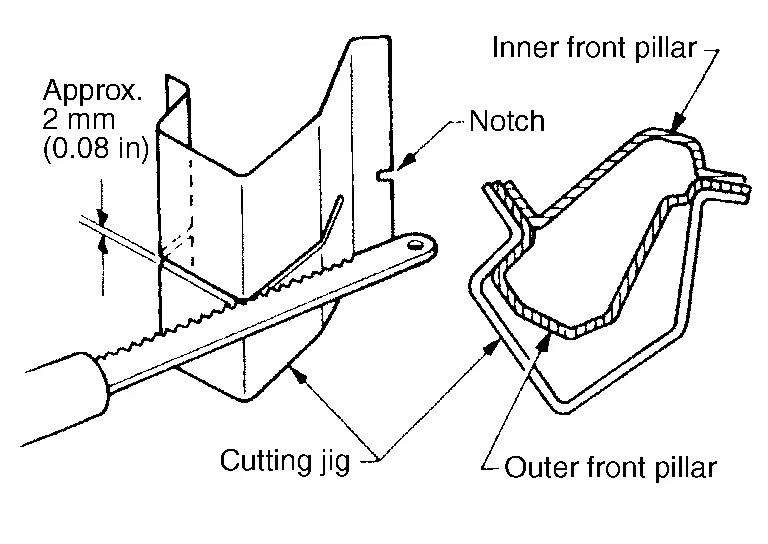
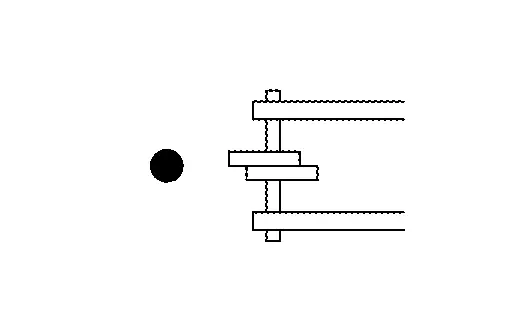
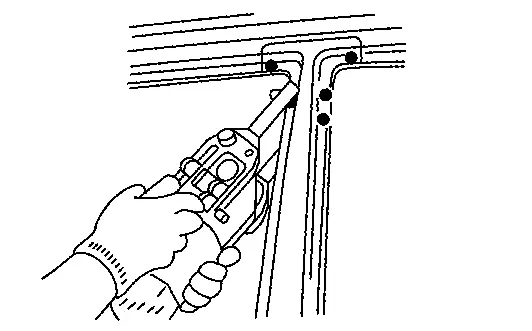
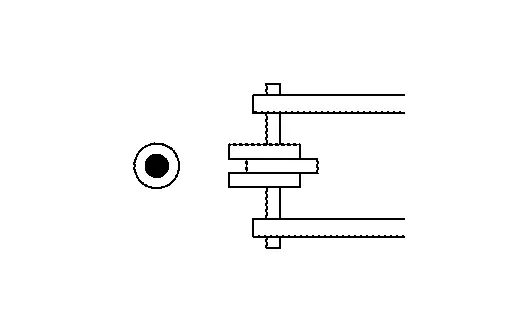
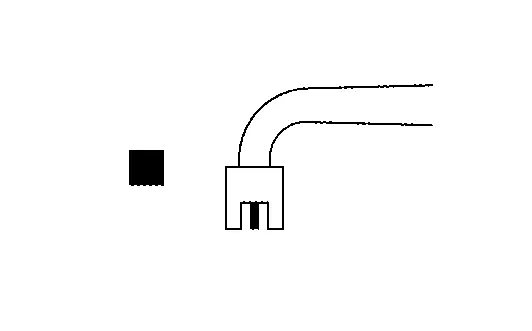
  • An example of cutting operation using a cutting jig is as per the following.
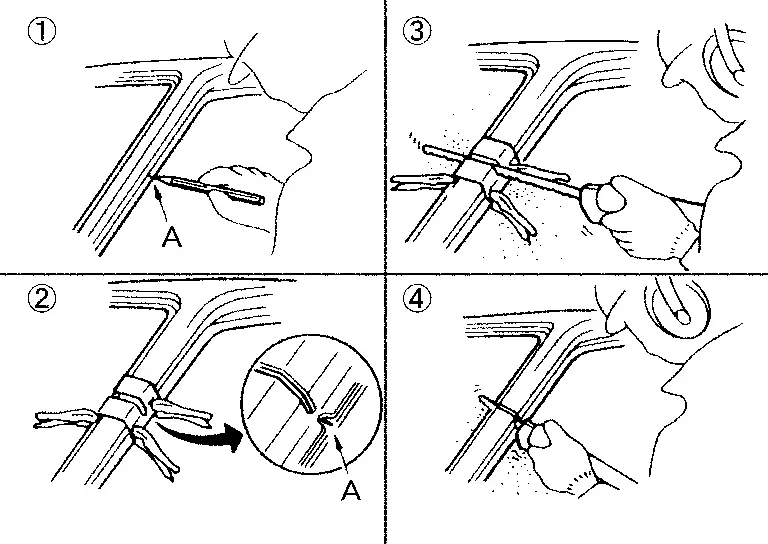
  1. Mark cutting lines.

    A: Cut position of outer pillar

    B: Cut position of inner pillar

  2. Align cutting line with notch on jig. Clamp jig to pillar.

  3. Cut outer pillar along groove of jig (at position A).

  4. Remove jig and cut remaining portions.

  5. Cut inner pillar at position B in same manner.

Roof

ROOF (WITH PANORAMIC ROOF GLASS)
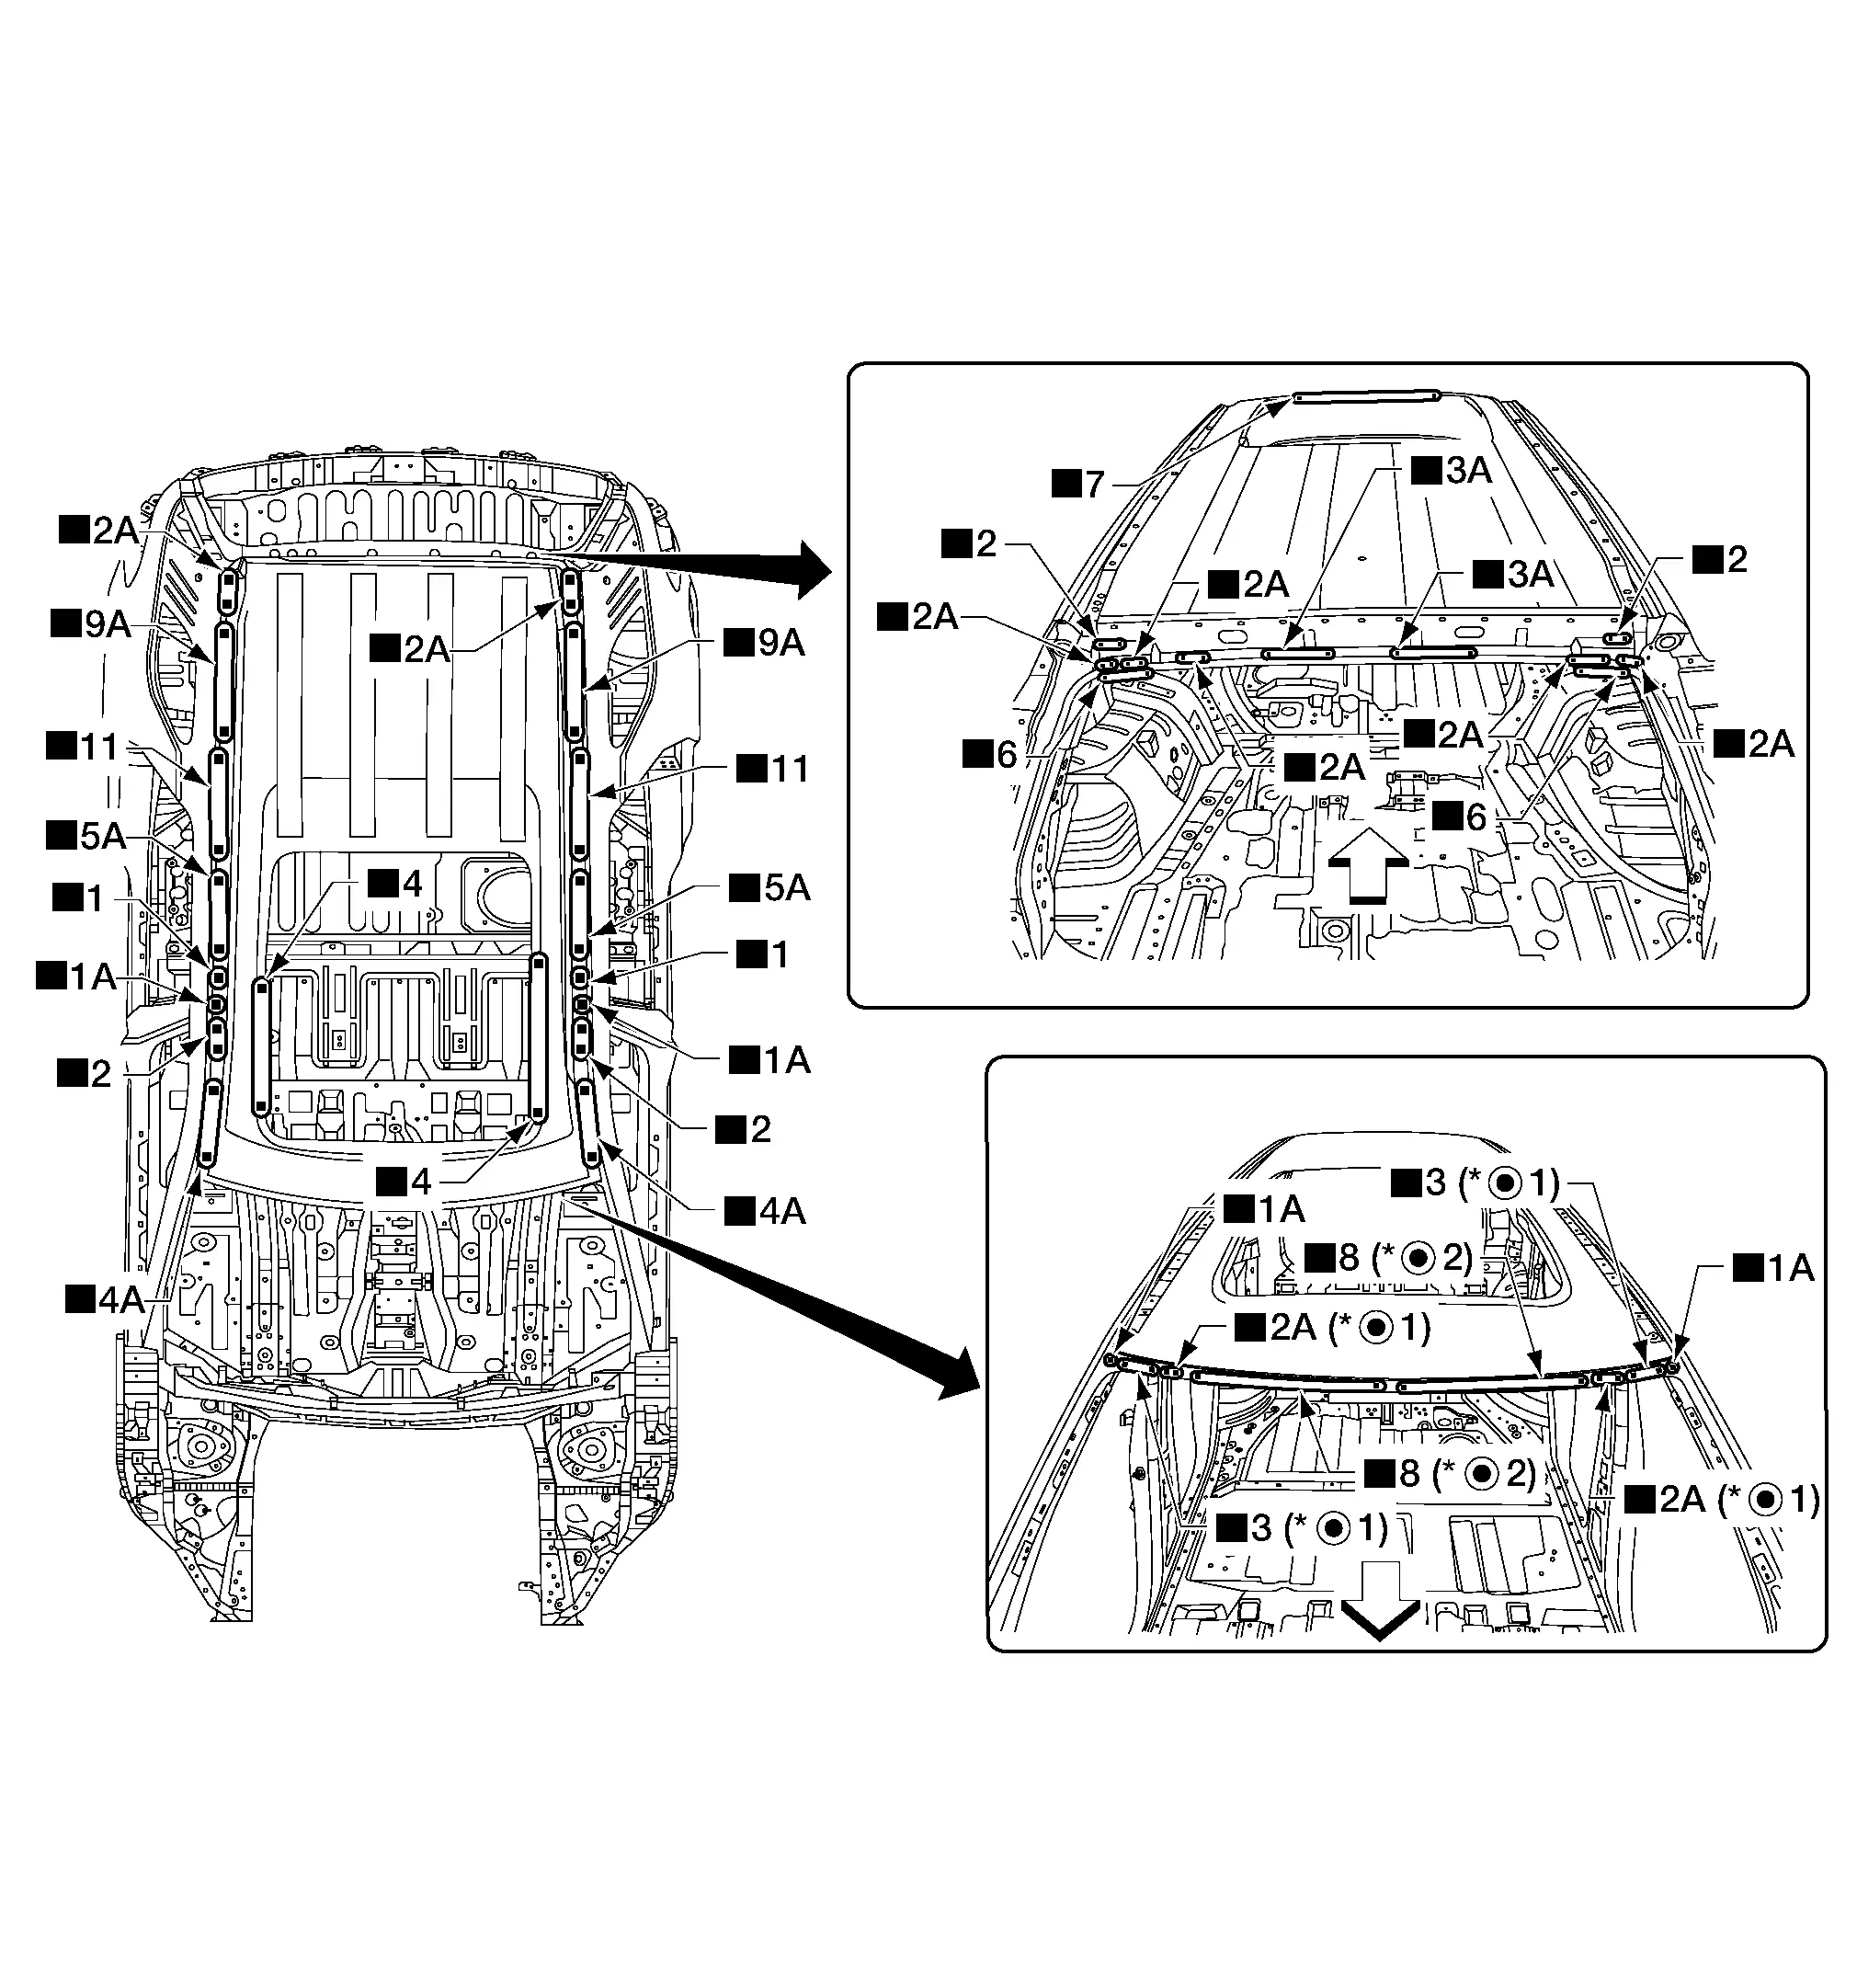
Front
Replacement parts
• Roof (with panoramic roof glass)
For spot welding of steel plate of strength 980 MPa, observe the indicated welding conditions. Refer to Welding of Ultra High Strength Steel.

ROOF (WITHOUT PANORAMIC ROOF GLASS)

Front
Replacement parts
• Roof (without panoramic roof glass)
For spot welding of steel plate of strength 980 MPa, observe the indicated welding conditions. Refer to Welding of Ultra High Strength Steel.

FRONT ROOF RAIL

Work after roof is removed.
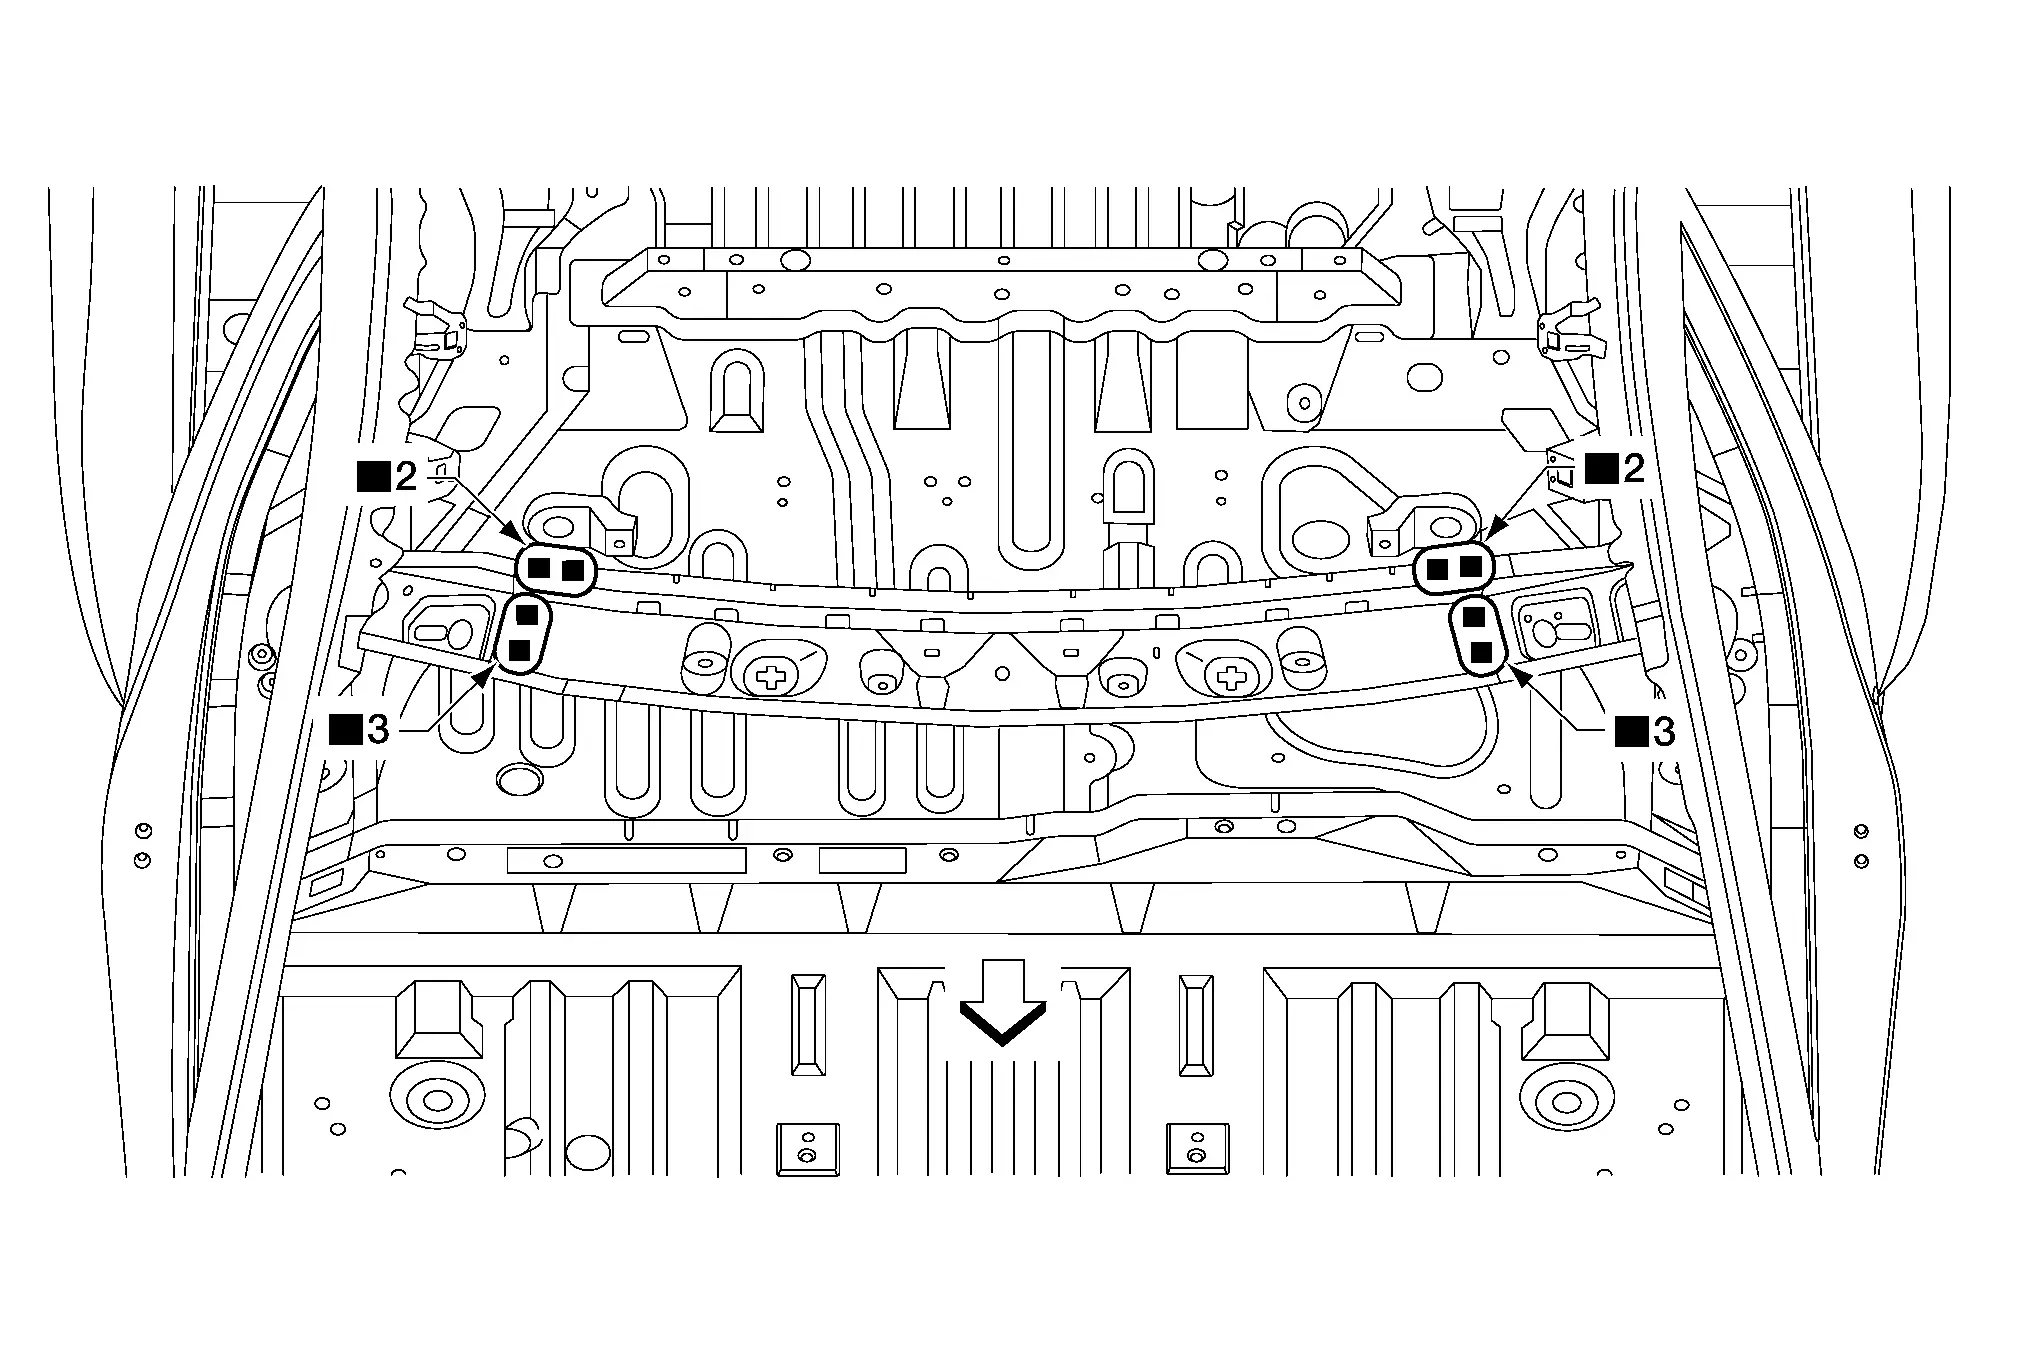
Front
Replacement parts
• Front roof rail

REAR ROOF RAIL

Work after roof is removed.

Front
Replacement parts
• Rear roof rail

ROOF BOW 5TH

Work after roof is removed.
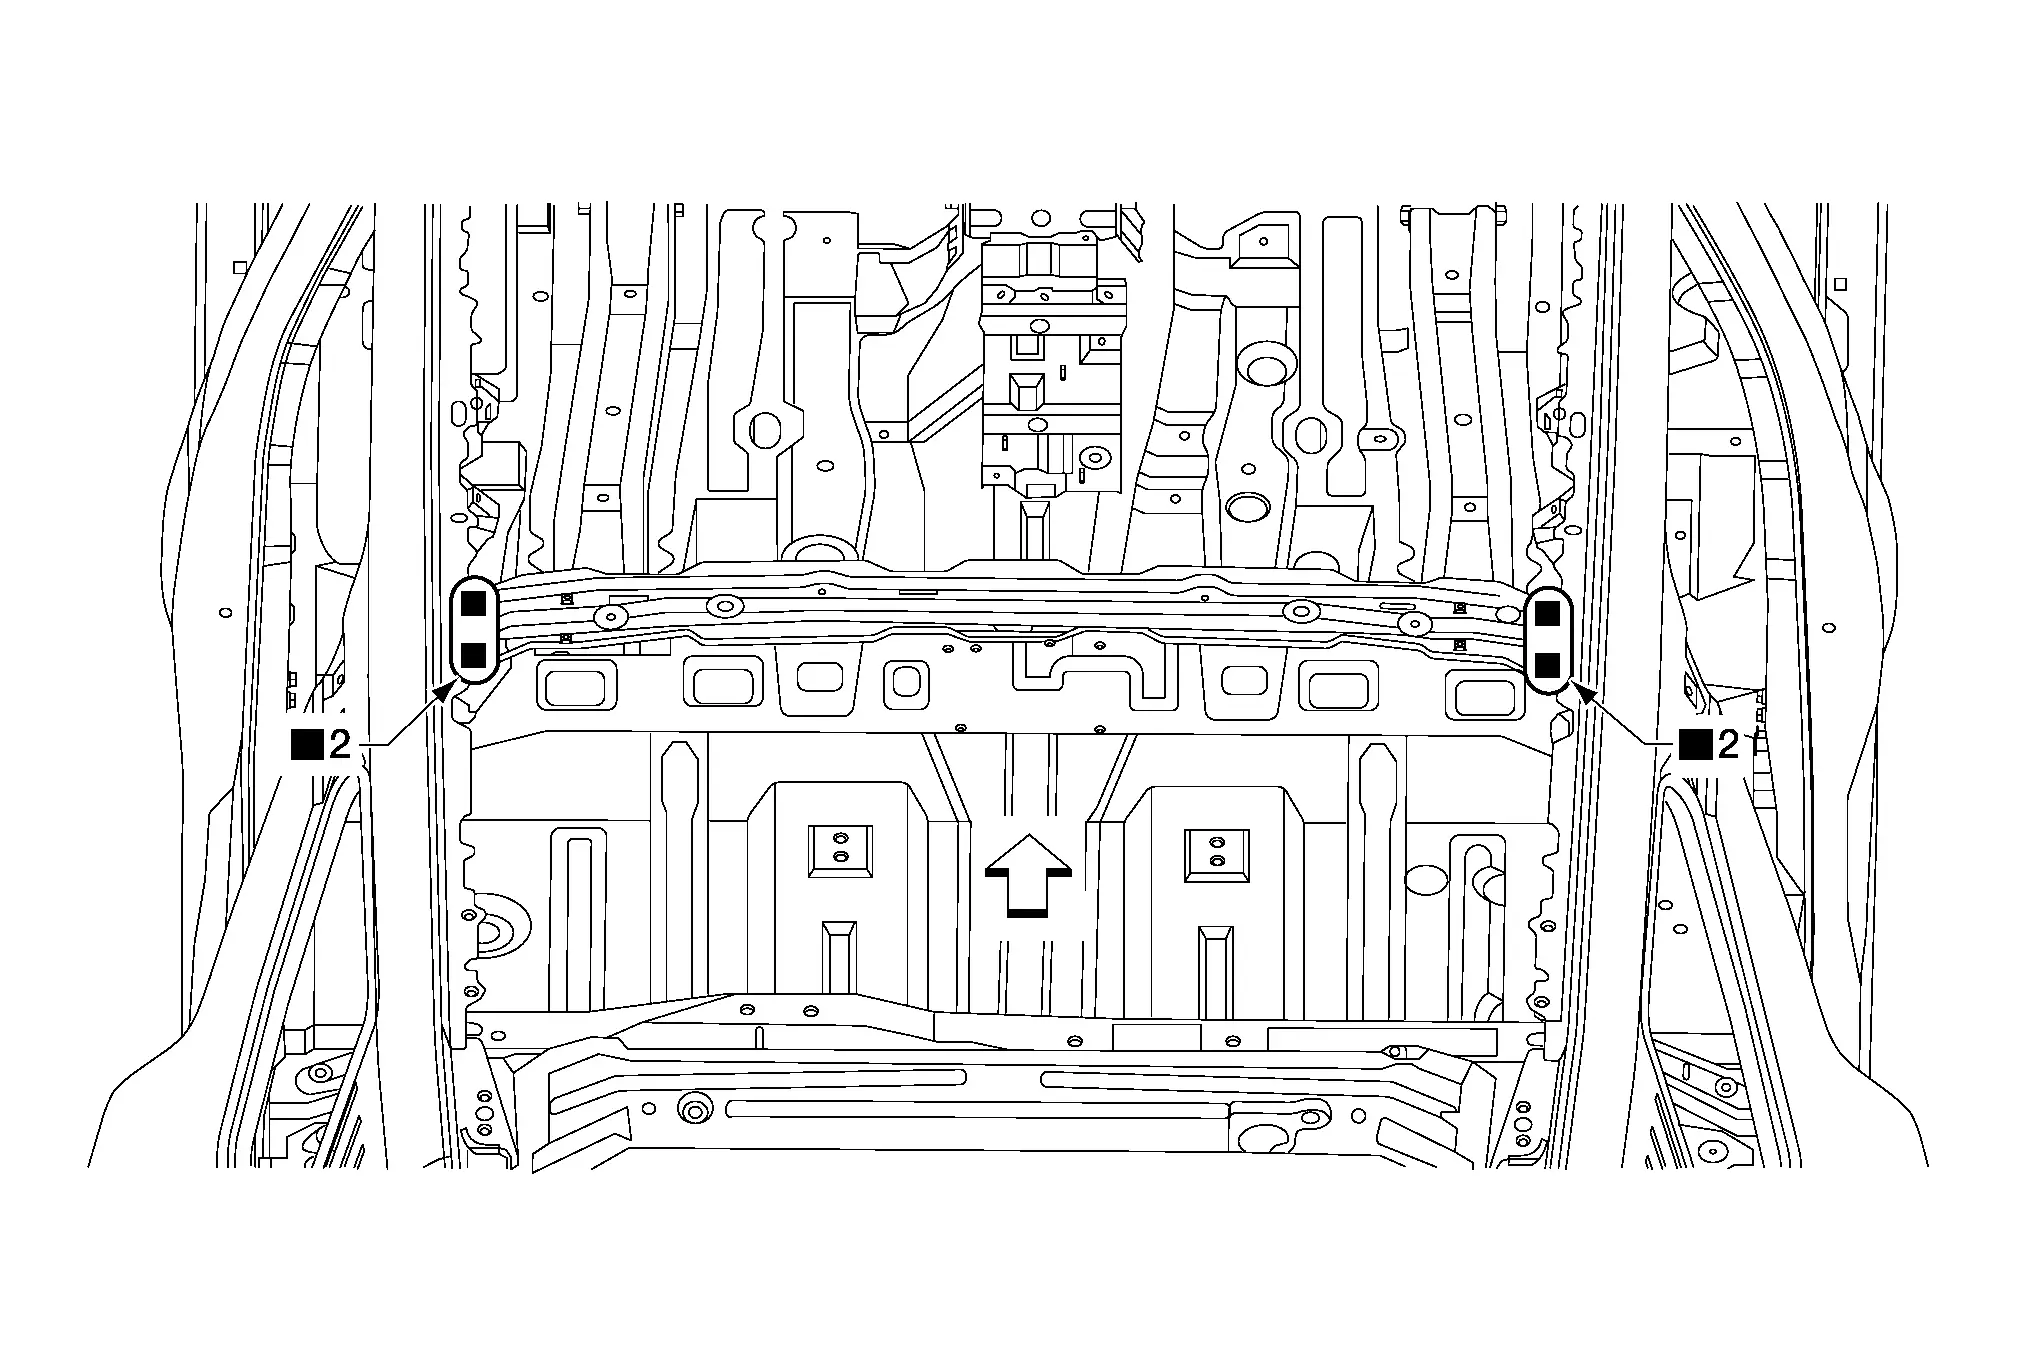
Front
Replacement parts
• Roof bow 5th

ROOF BOW 4TH [ROOF (WITHOUT PANORAMIC ROOF GLASS) ONLY]

Work after roof is removed.
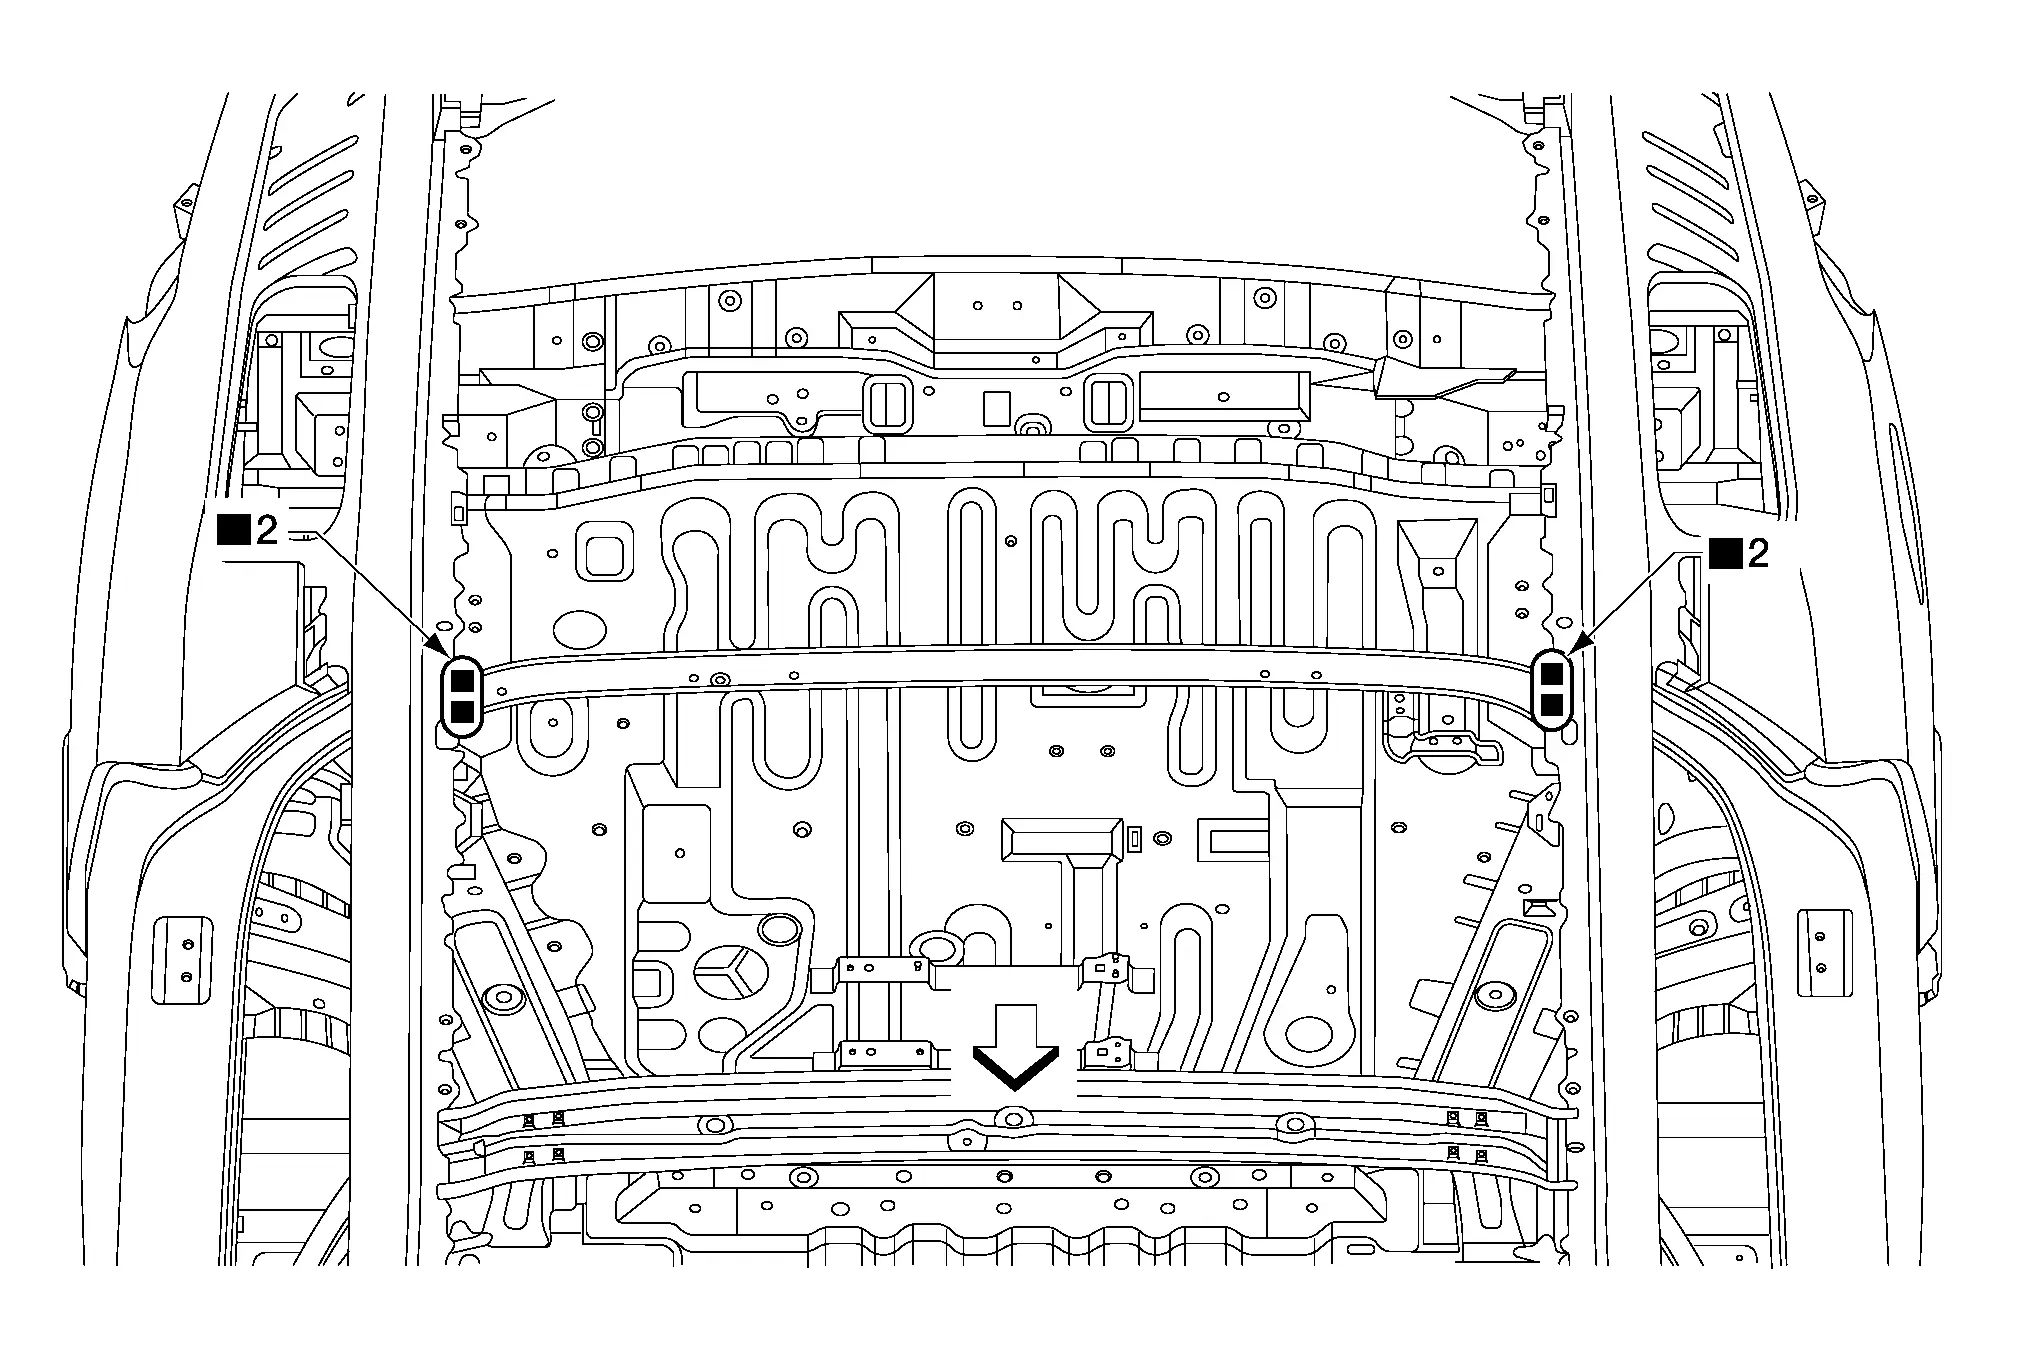
Front
Replacement parts
• Roof bow 4th

ROOF BOW 2ND [ROOF (WITHOUT PANORAMIC ROOF GLASS) ONLY]

Work after roof is removed.

Front
Replacement parts
• Roof bow 2nd

Front Side Member Connector

Front
Replacement parts
• Front side member connector

Radiator Core Support Side

Work after front side member connector is removed.

Front
Replacement parts
• Radiator core support side

Hoodledge

HOODLEDGE REINFORCEMENT

Work after radiator core support side is removed.
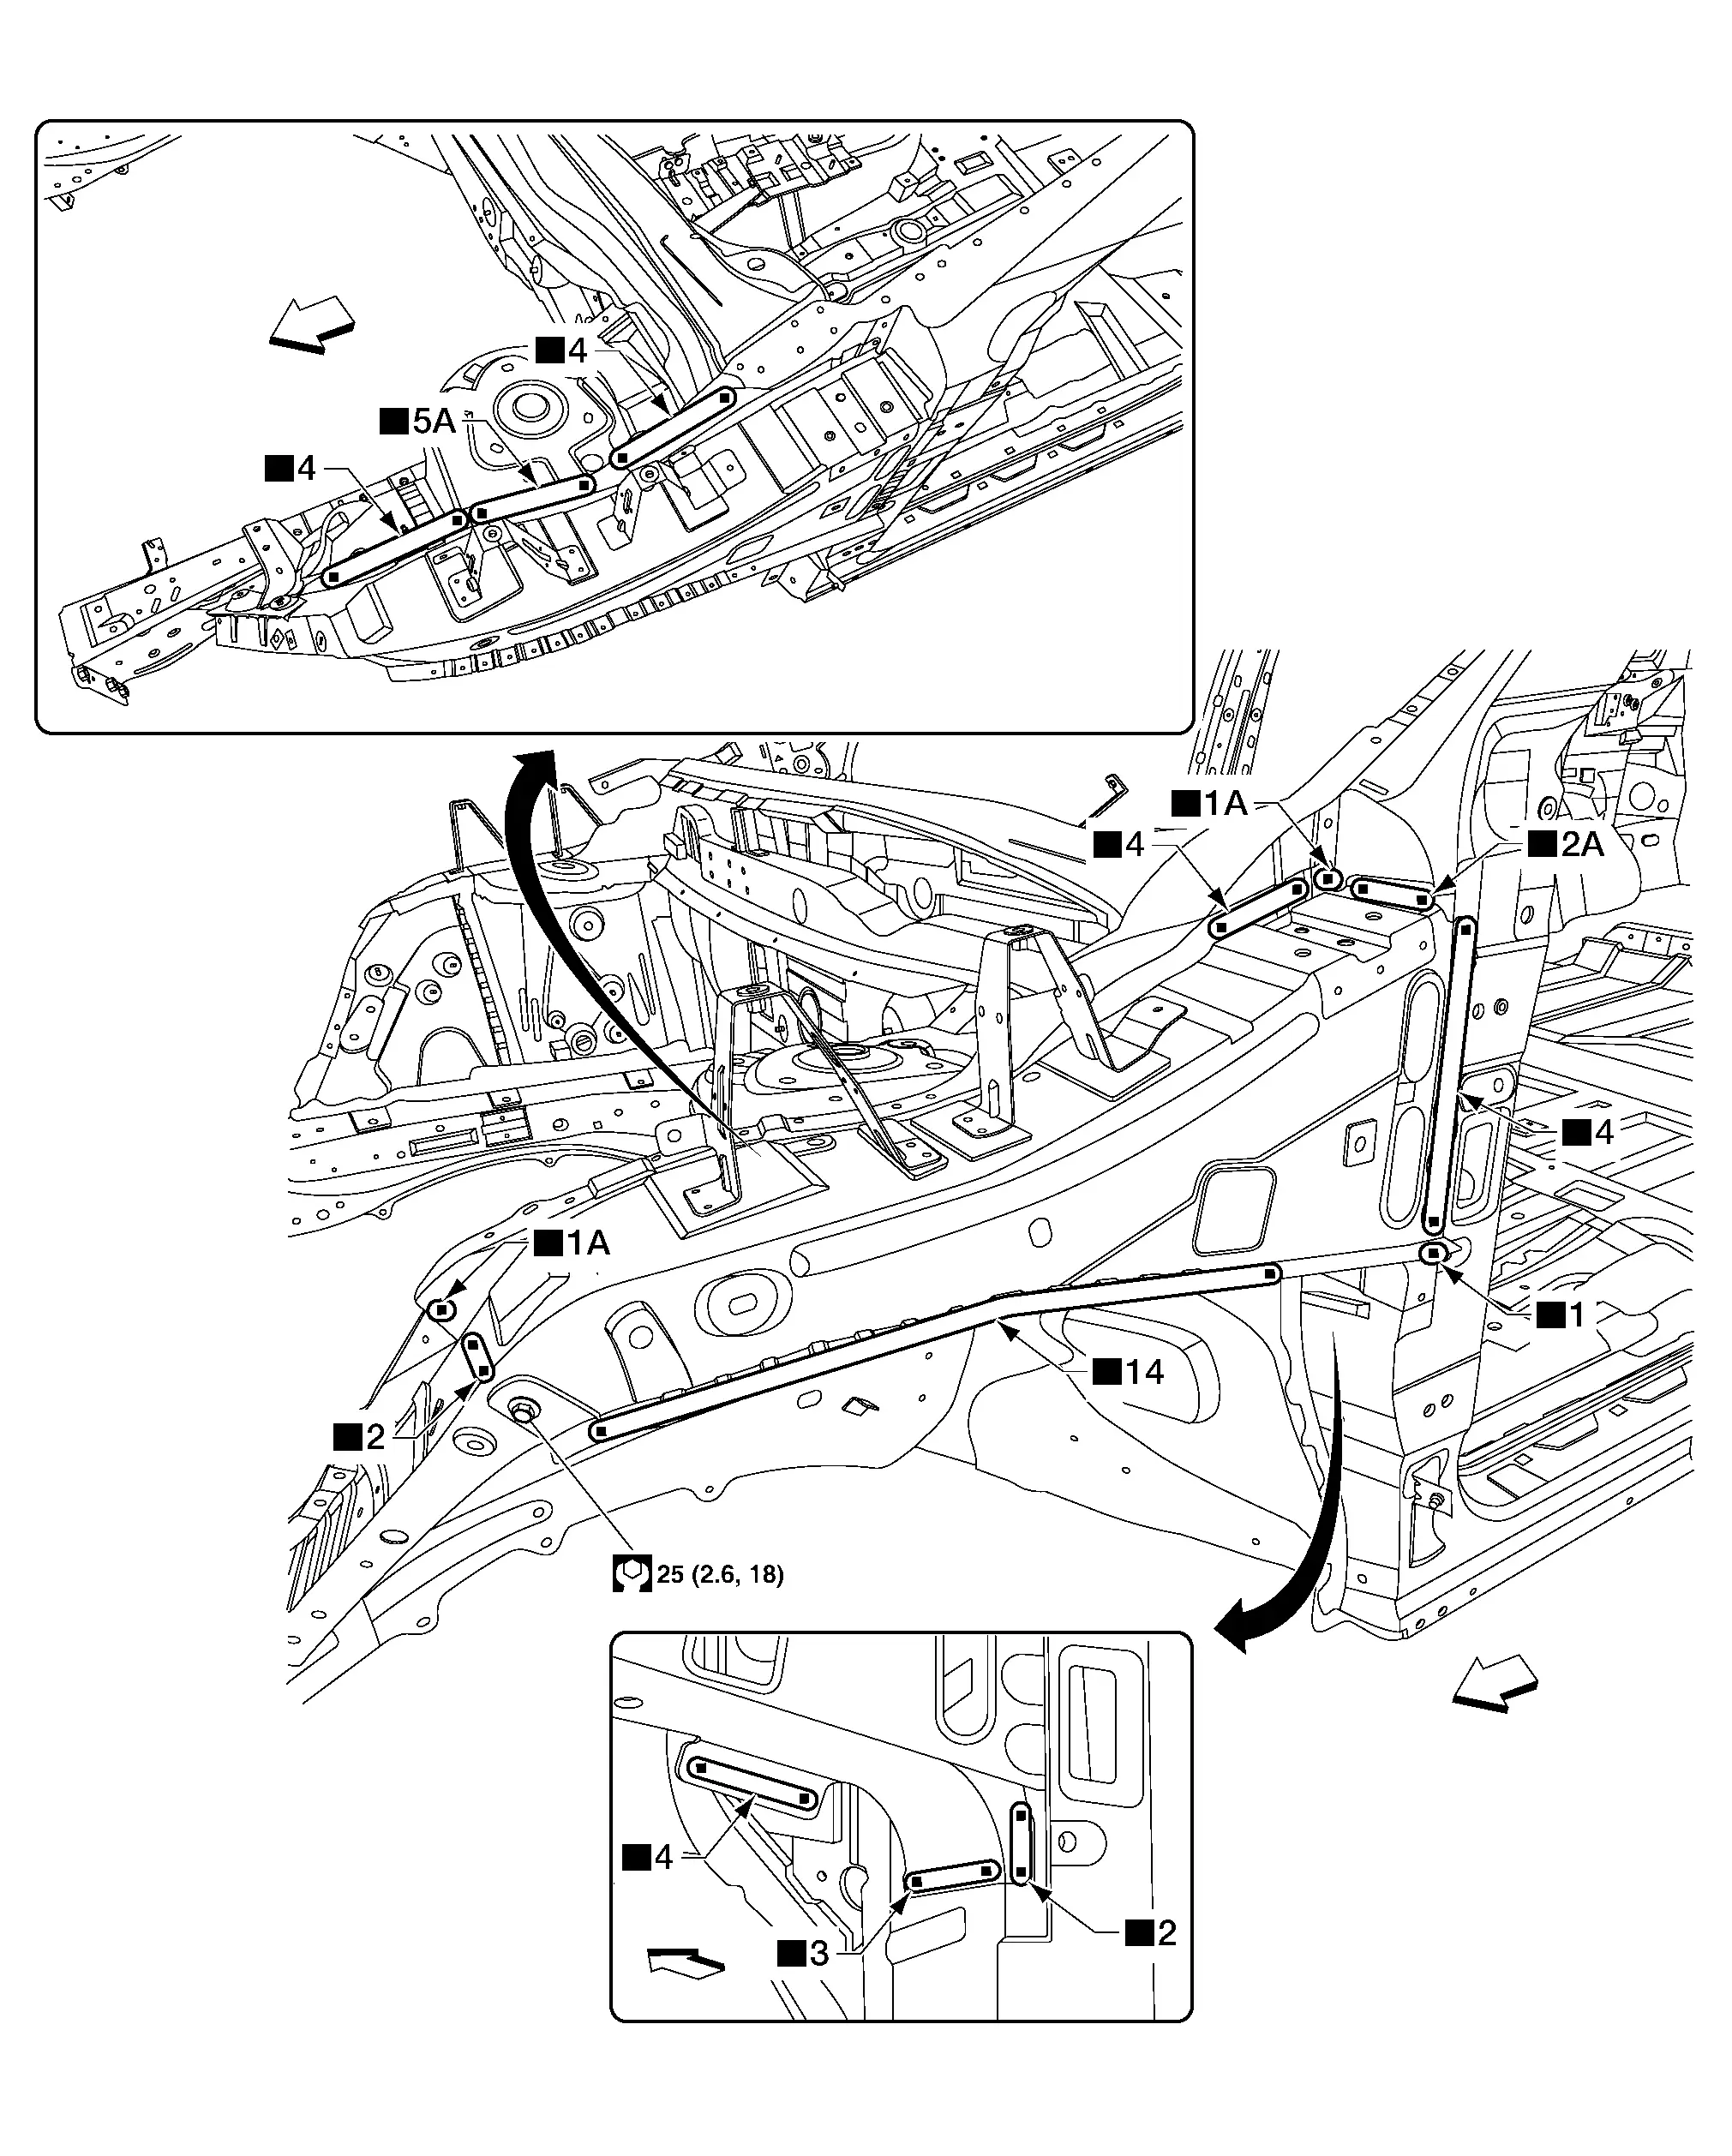
Front
Replacement parts
• Hoodledge reinforcement

HOODLEDGE UPPER

Work after hoodledge reinforcement is removed.
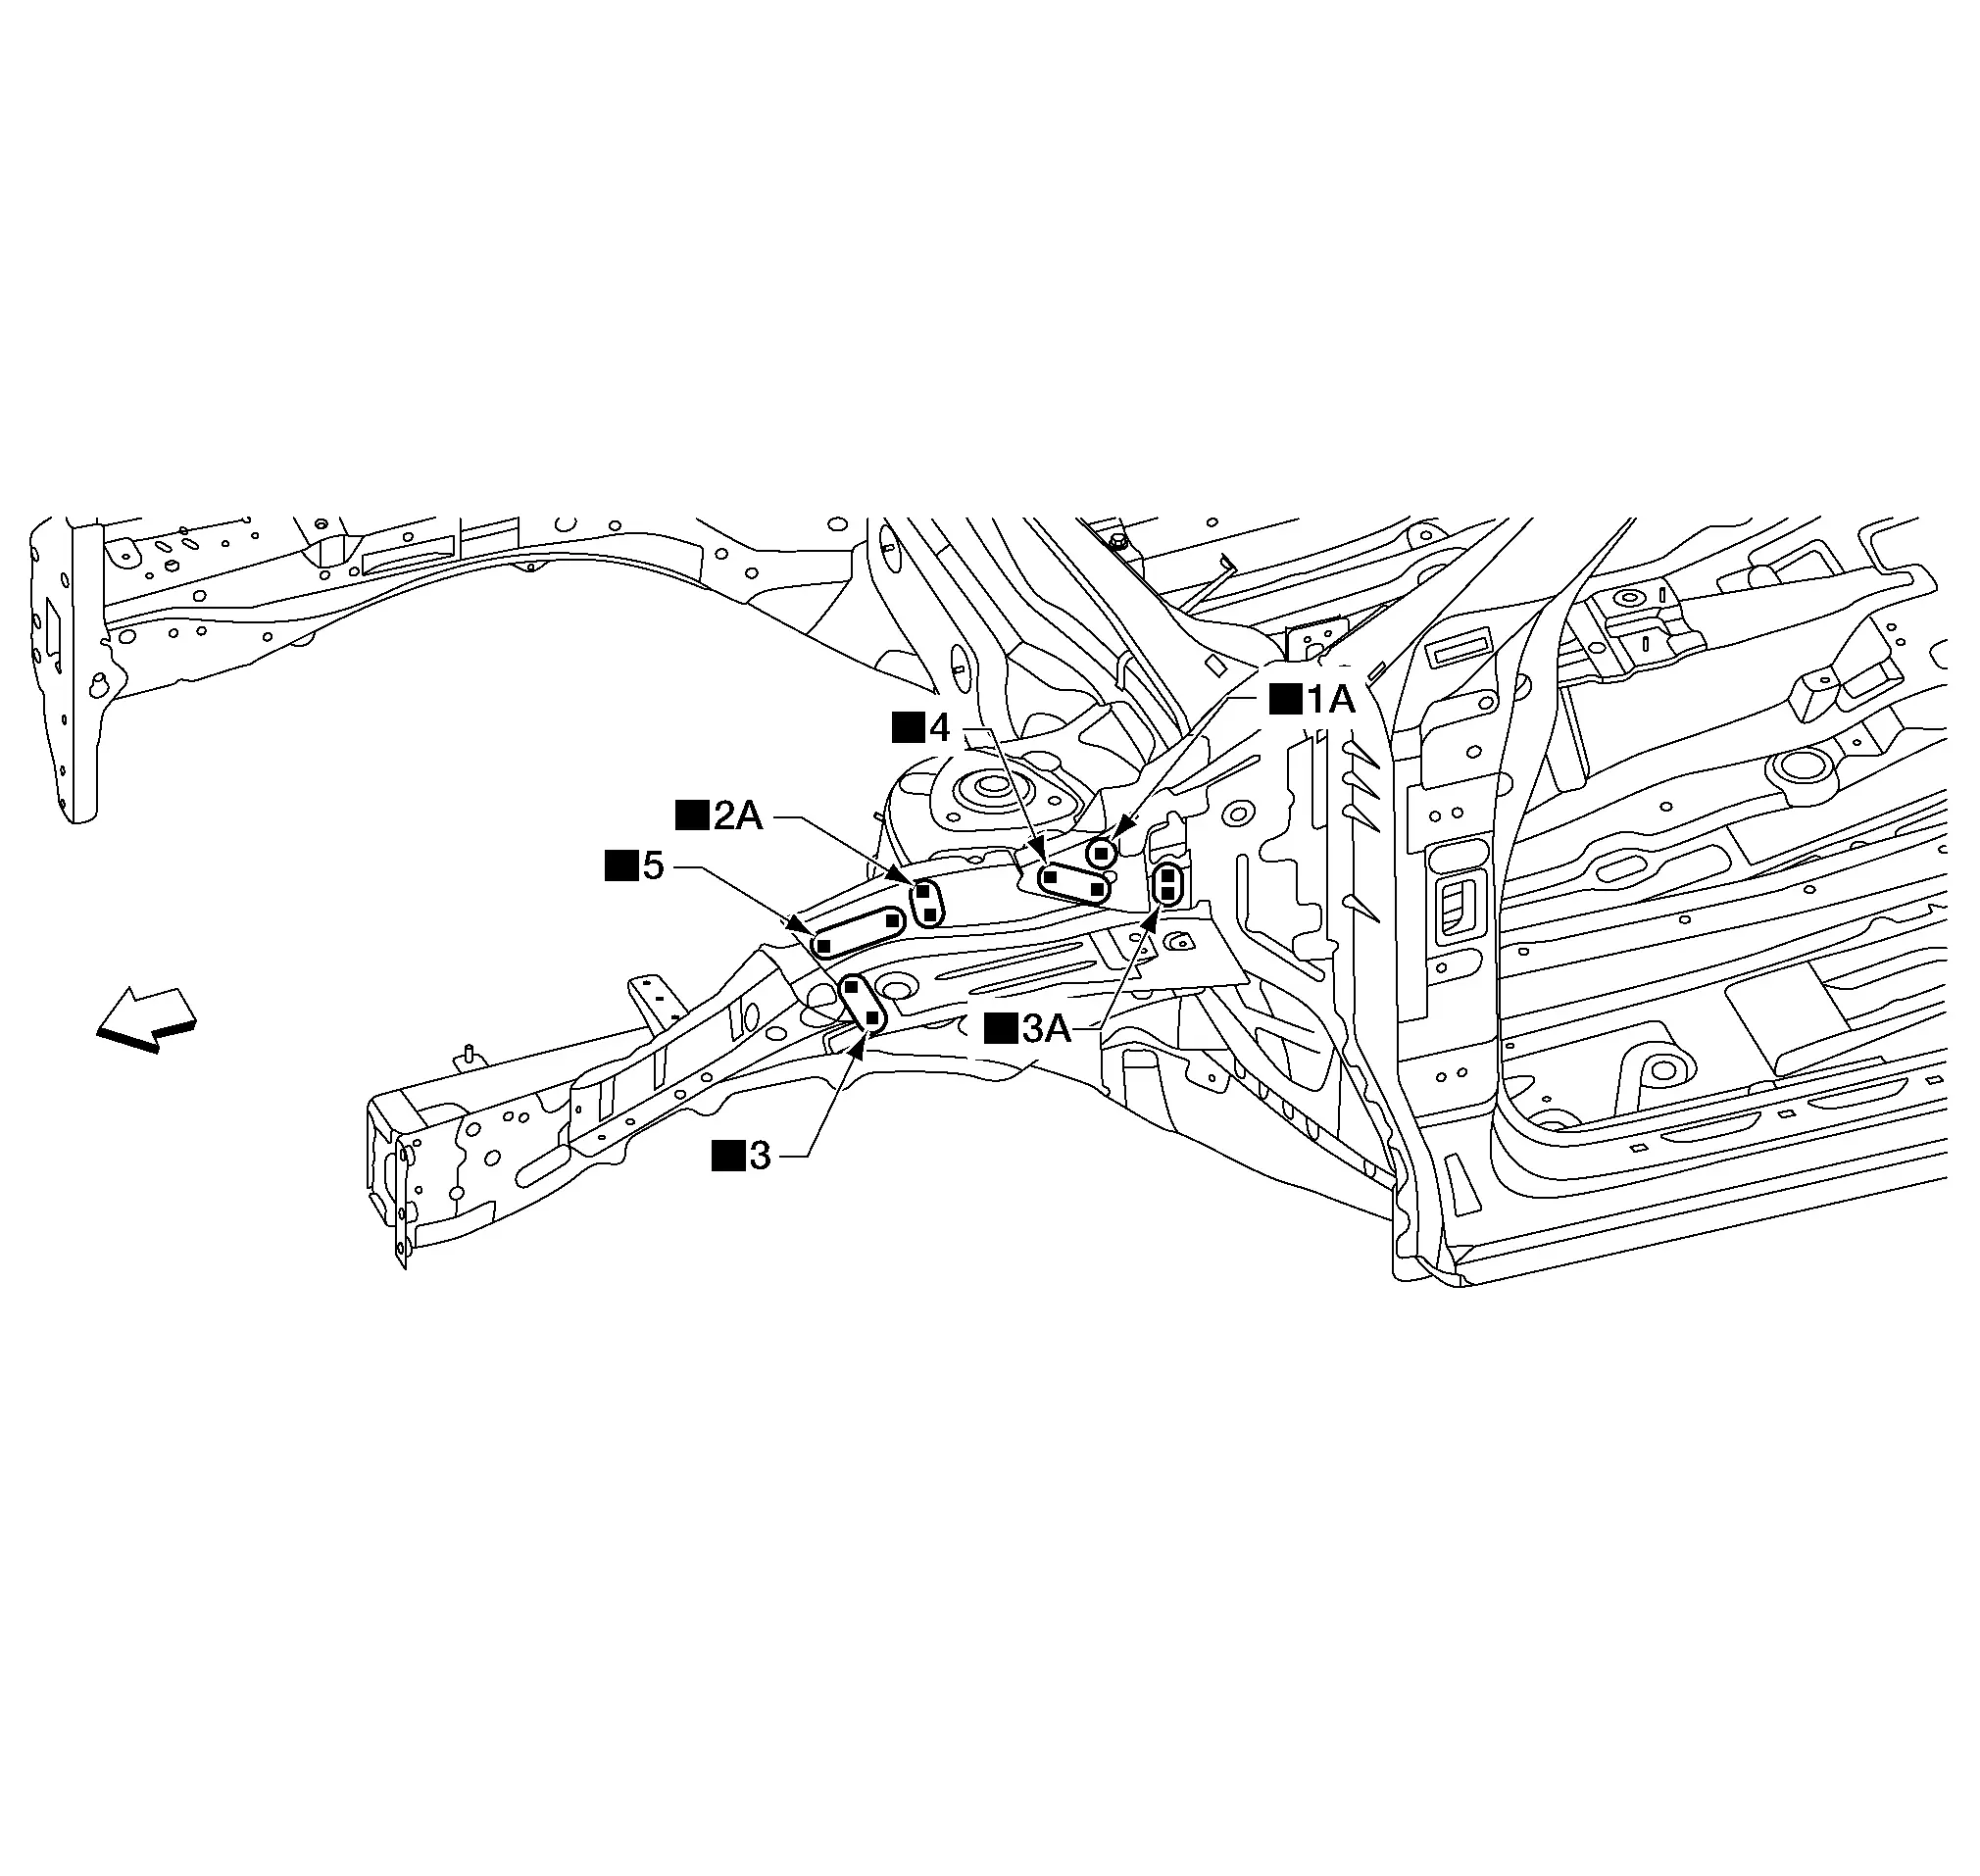
Front
Replacement parts
• Hoodledge upper

BATTERY SUPPORT BRACKET

Front
Replacement parts
• Battery support bracket

HOODLEDGE LOWER FRONT

Work after hoodledge upper is removed.
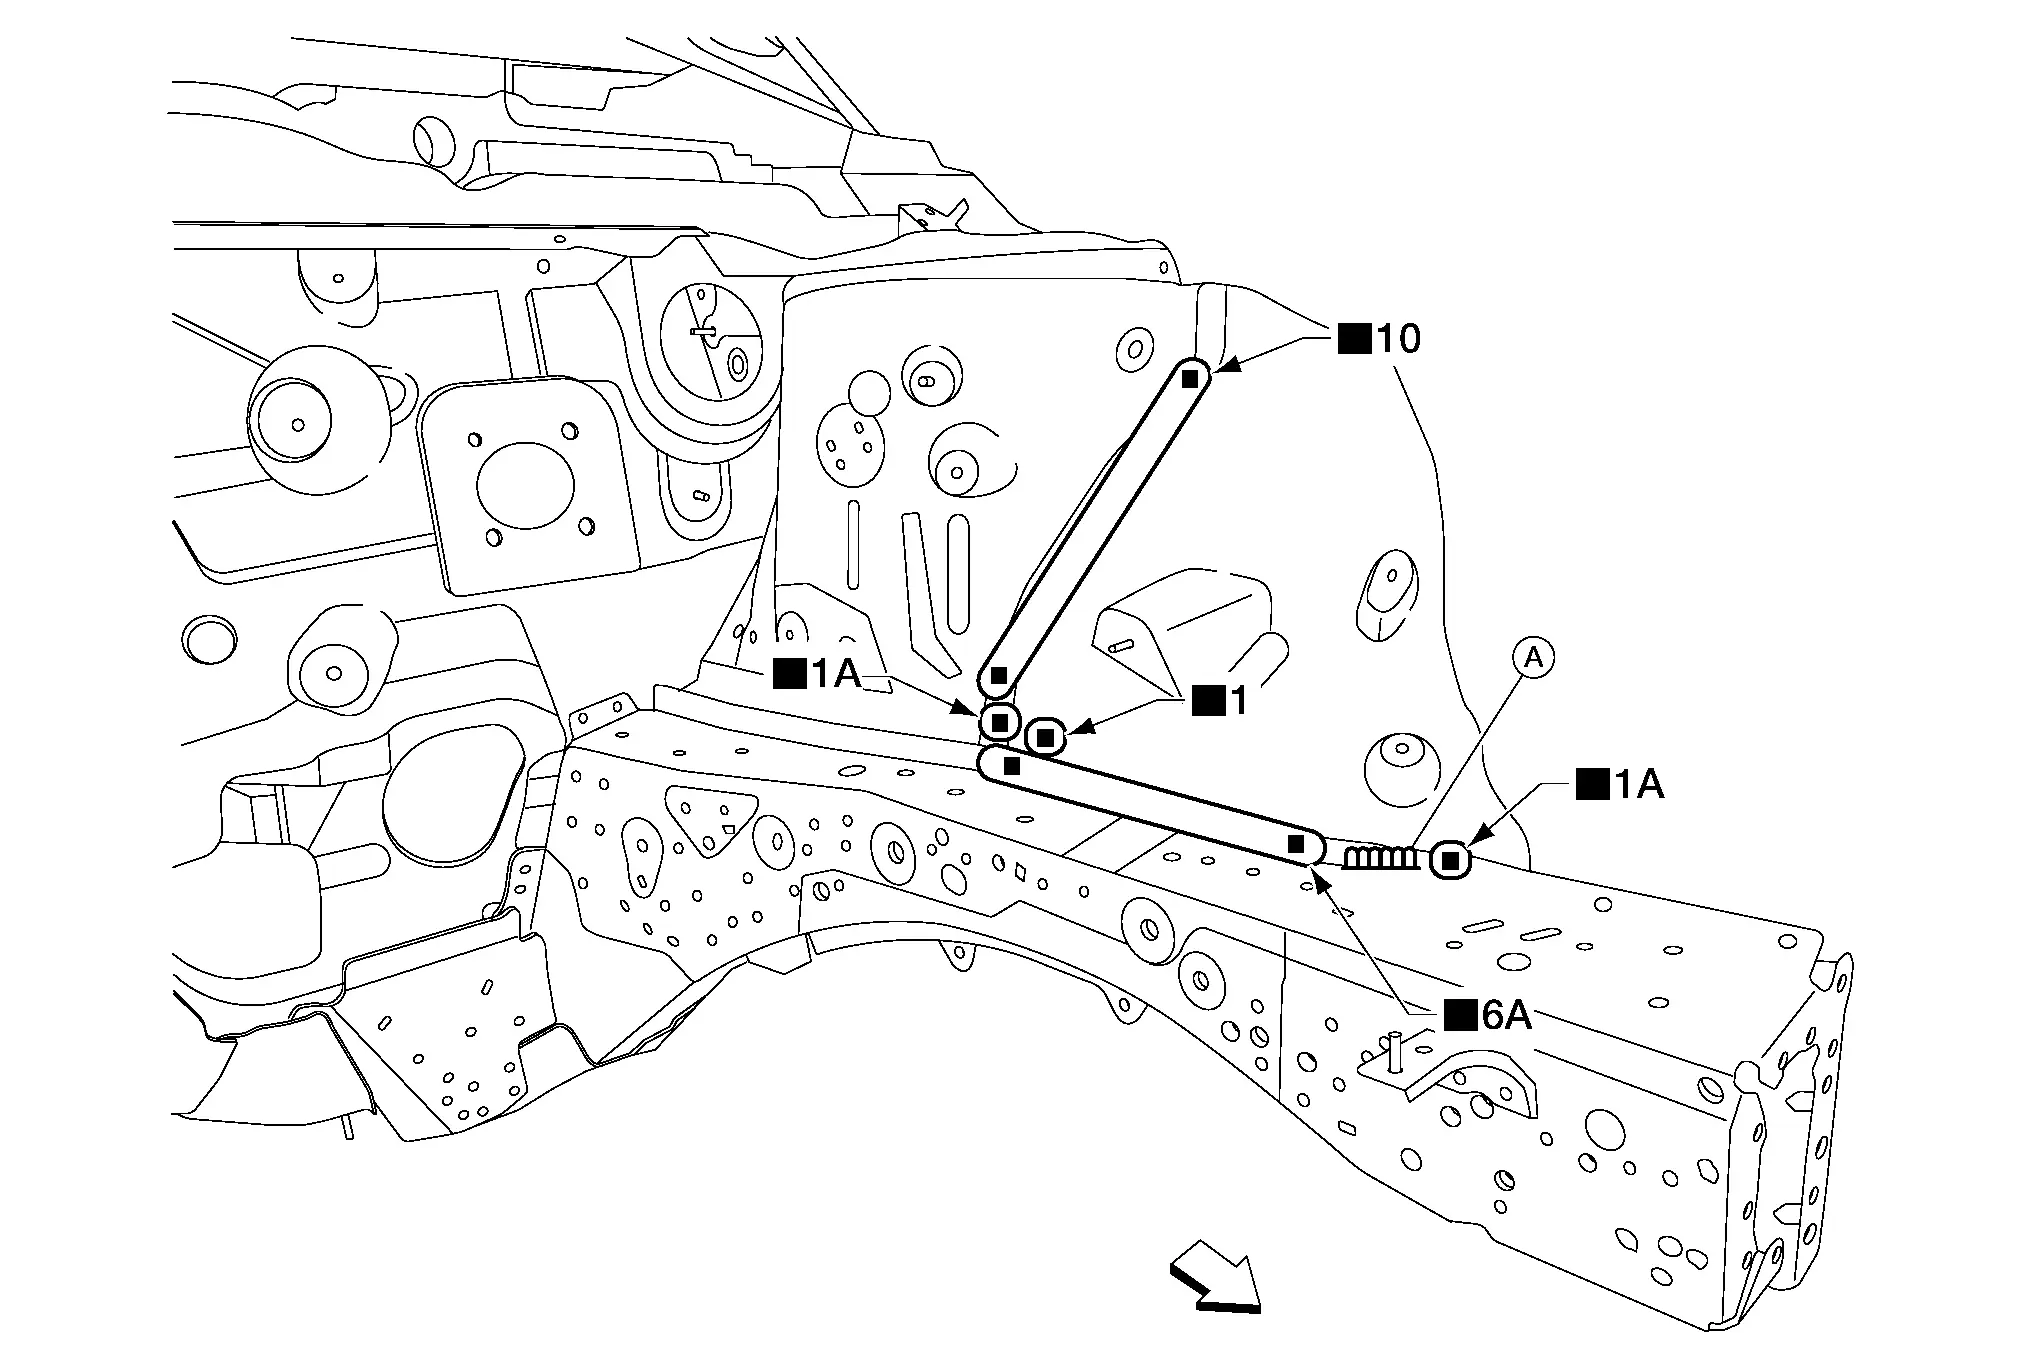
A. MAG weld
Front
Replacement parts
• Hoodledge lower front

HOODLEDGE LOWER REAR

Work after hoodledge lower front is removed.
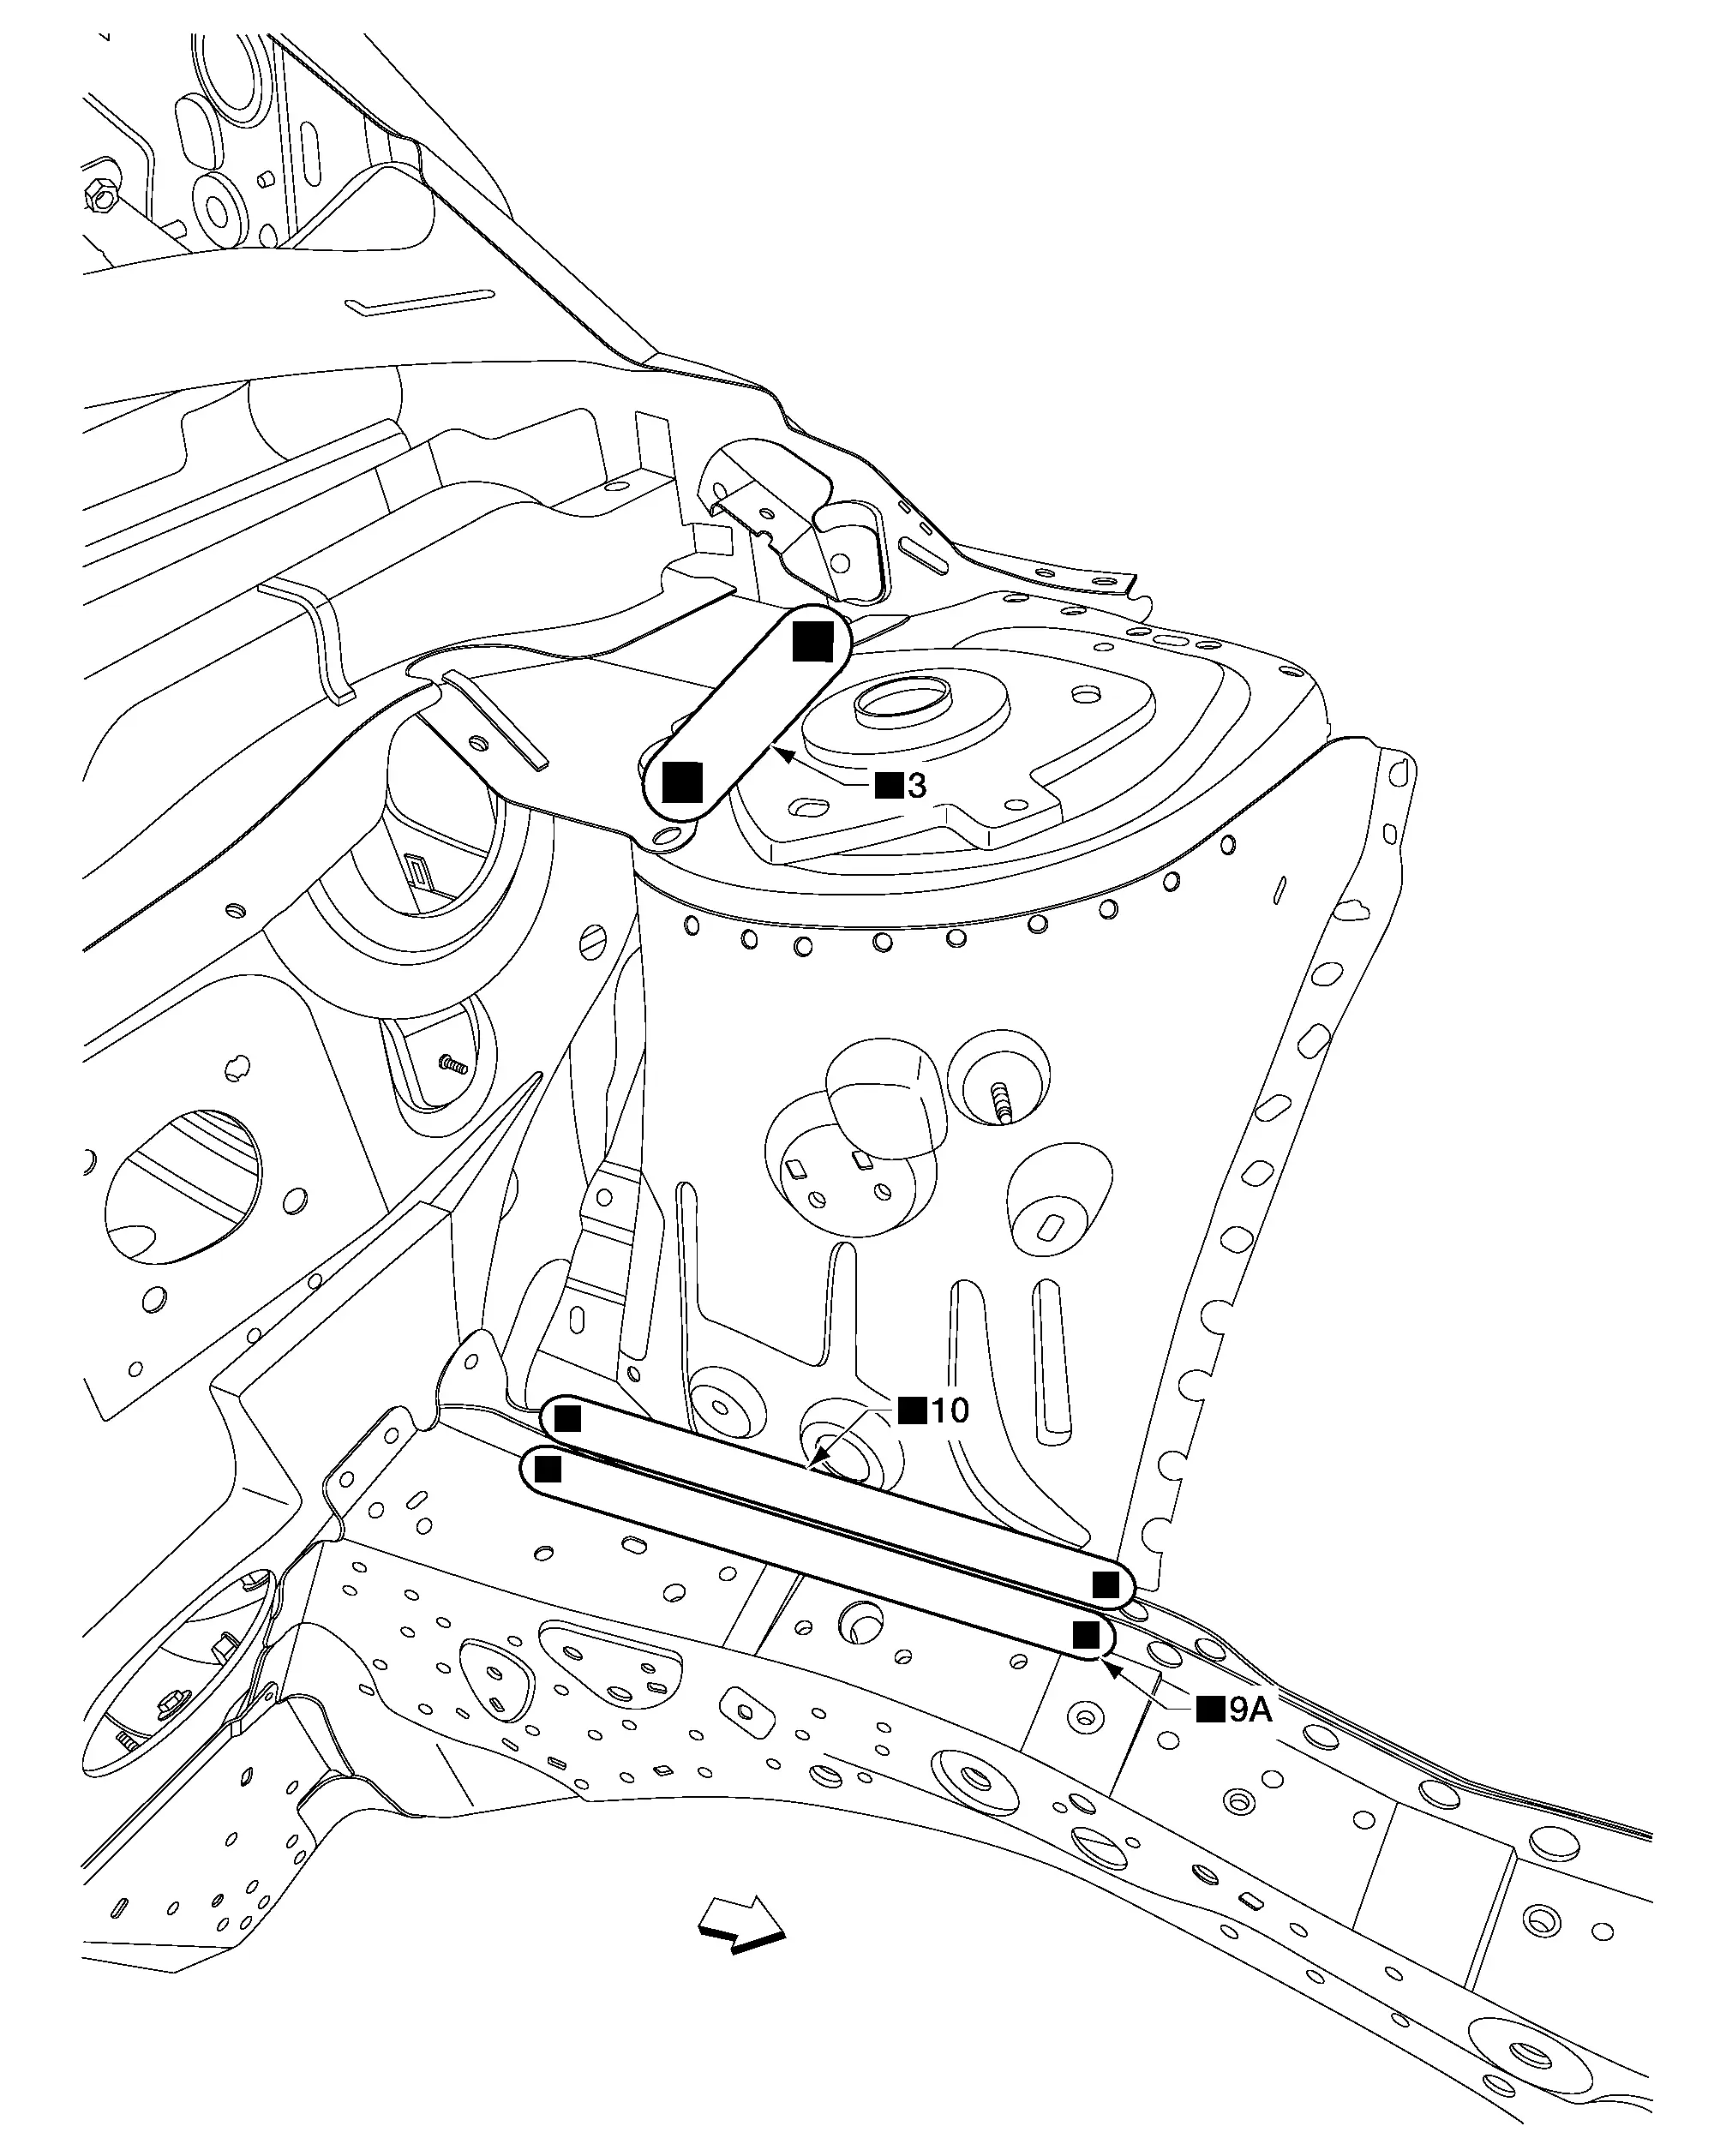
Front
Replacement parts
• Hoodledge lower rear

Front Side Member

FRONT SIDE MEMBER CLOSING PLATE

Work after hoodledge lower rear is removed.

A. MAG welds
Front
Replacement parts
• Front side member closing plate

FRONT SIDE MEMBER INNER

Work after front side member closing plate is removed.
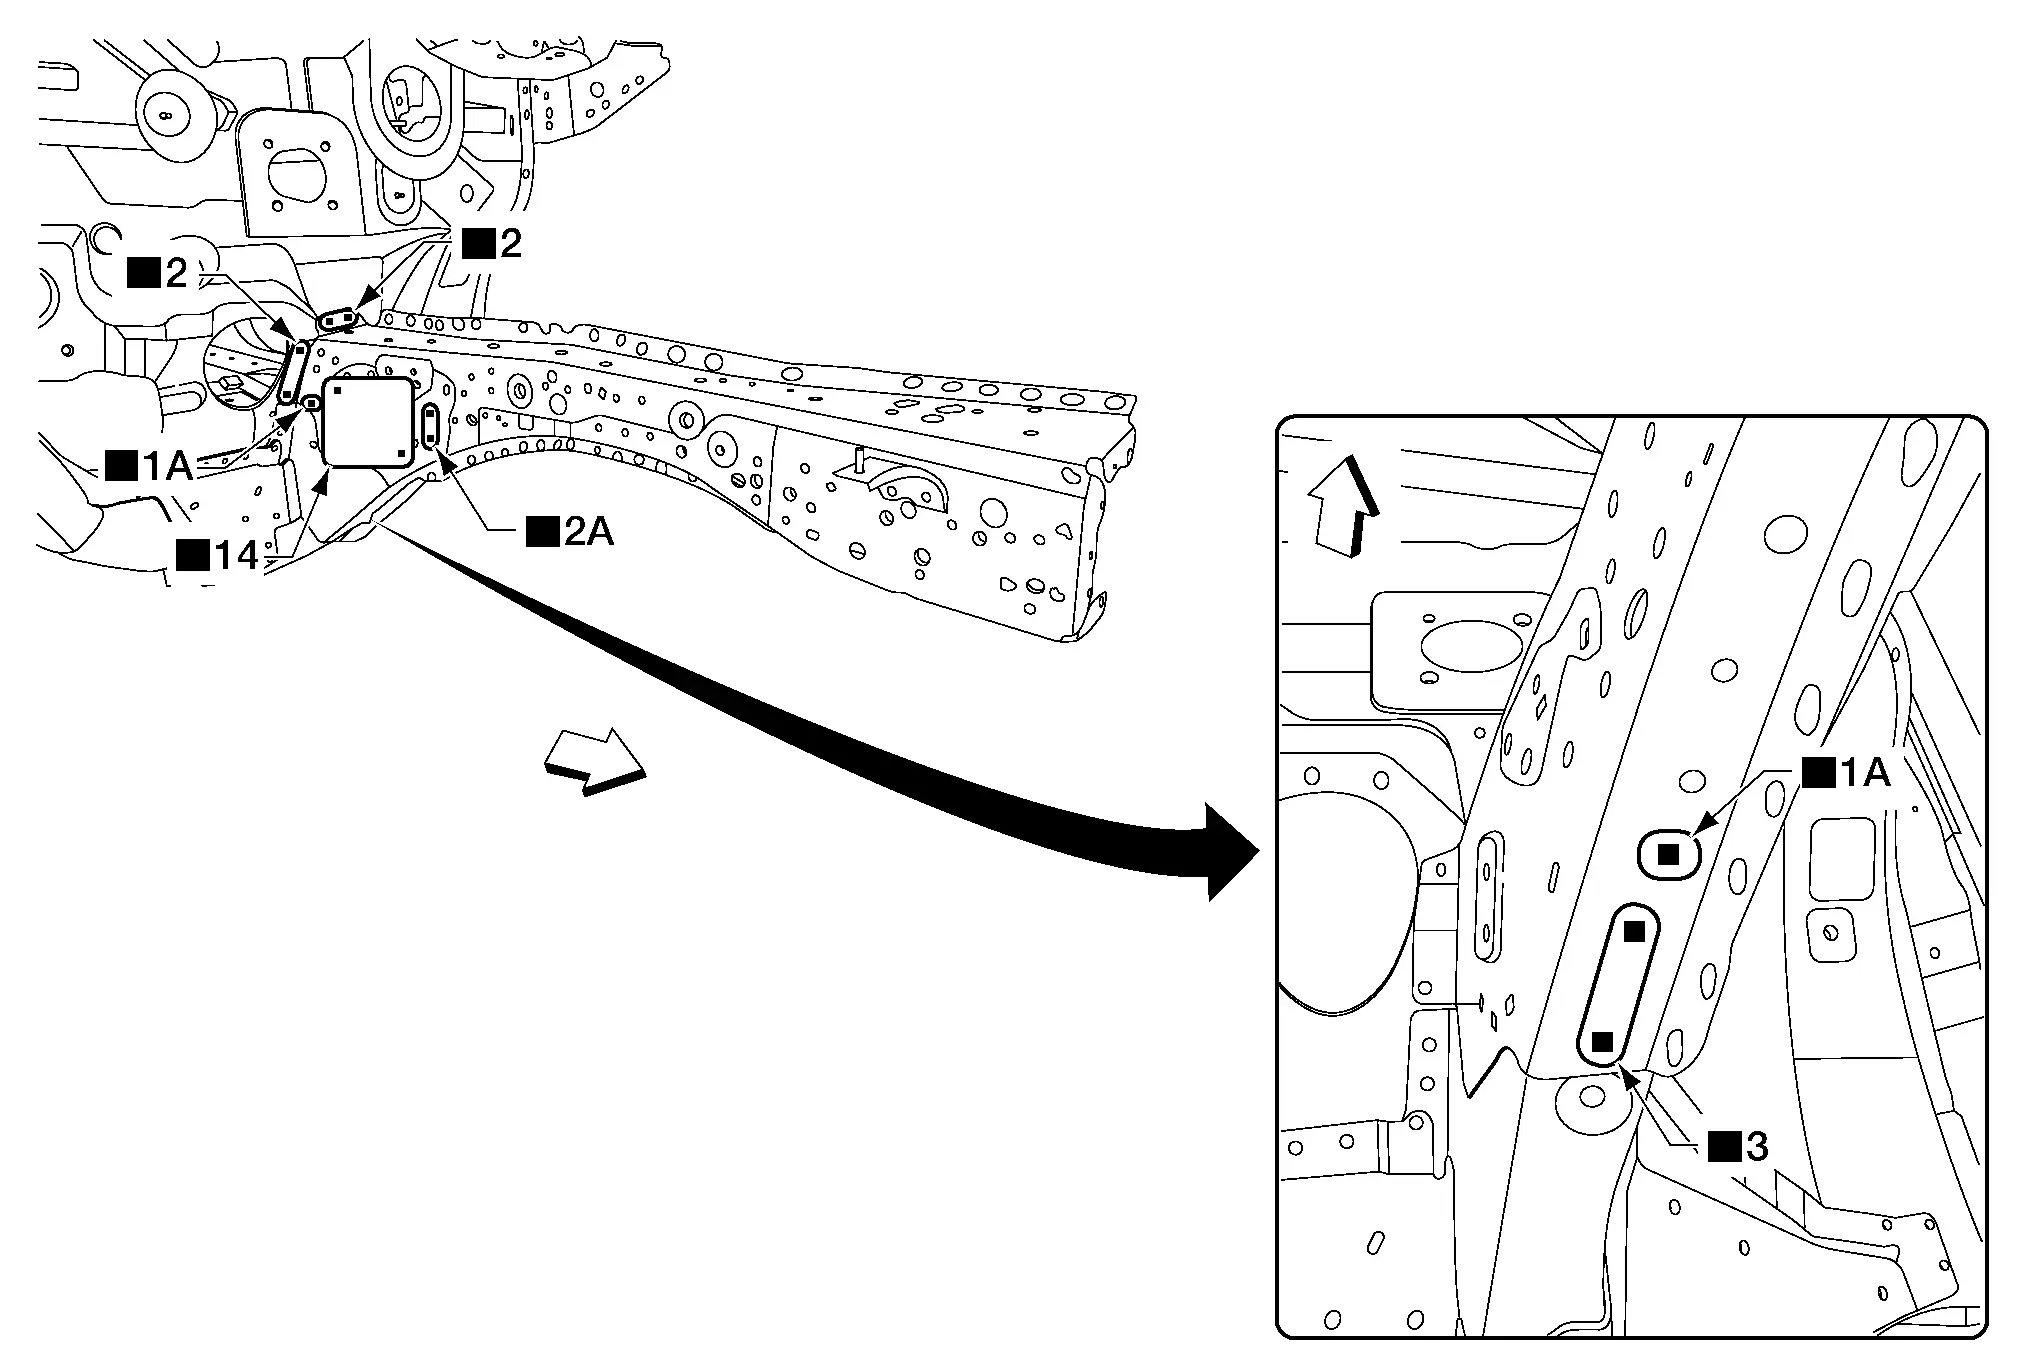
Front
Replacement parts
• Front side member inner

SIDE MEMBER OUTRIGGER

Work after front side member inner is removed.
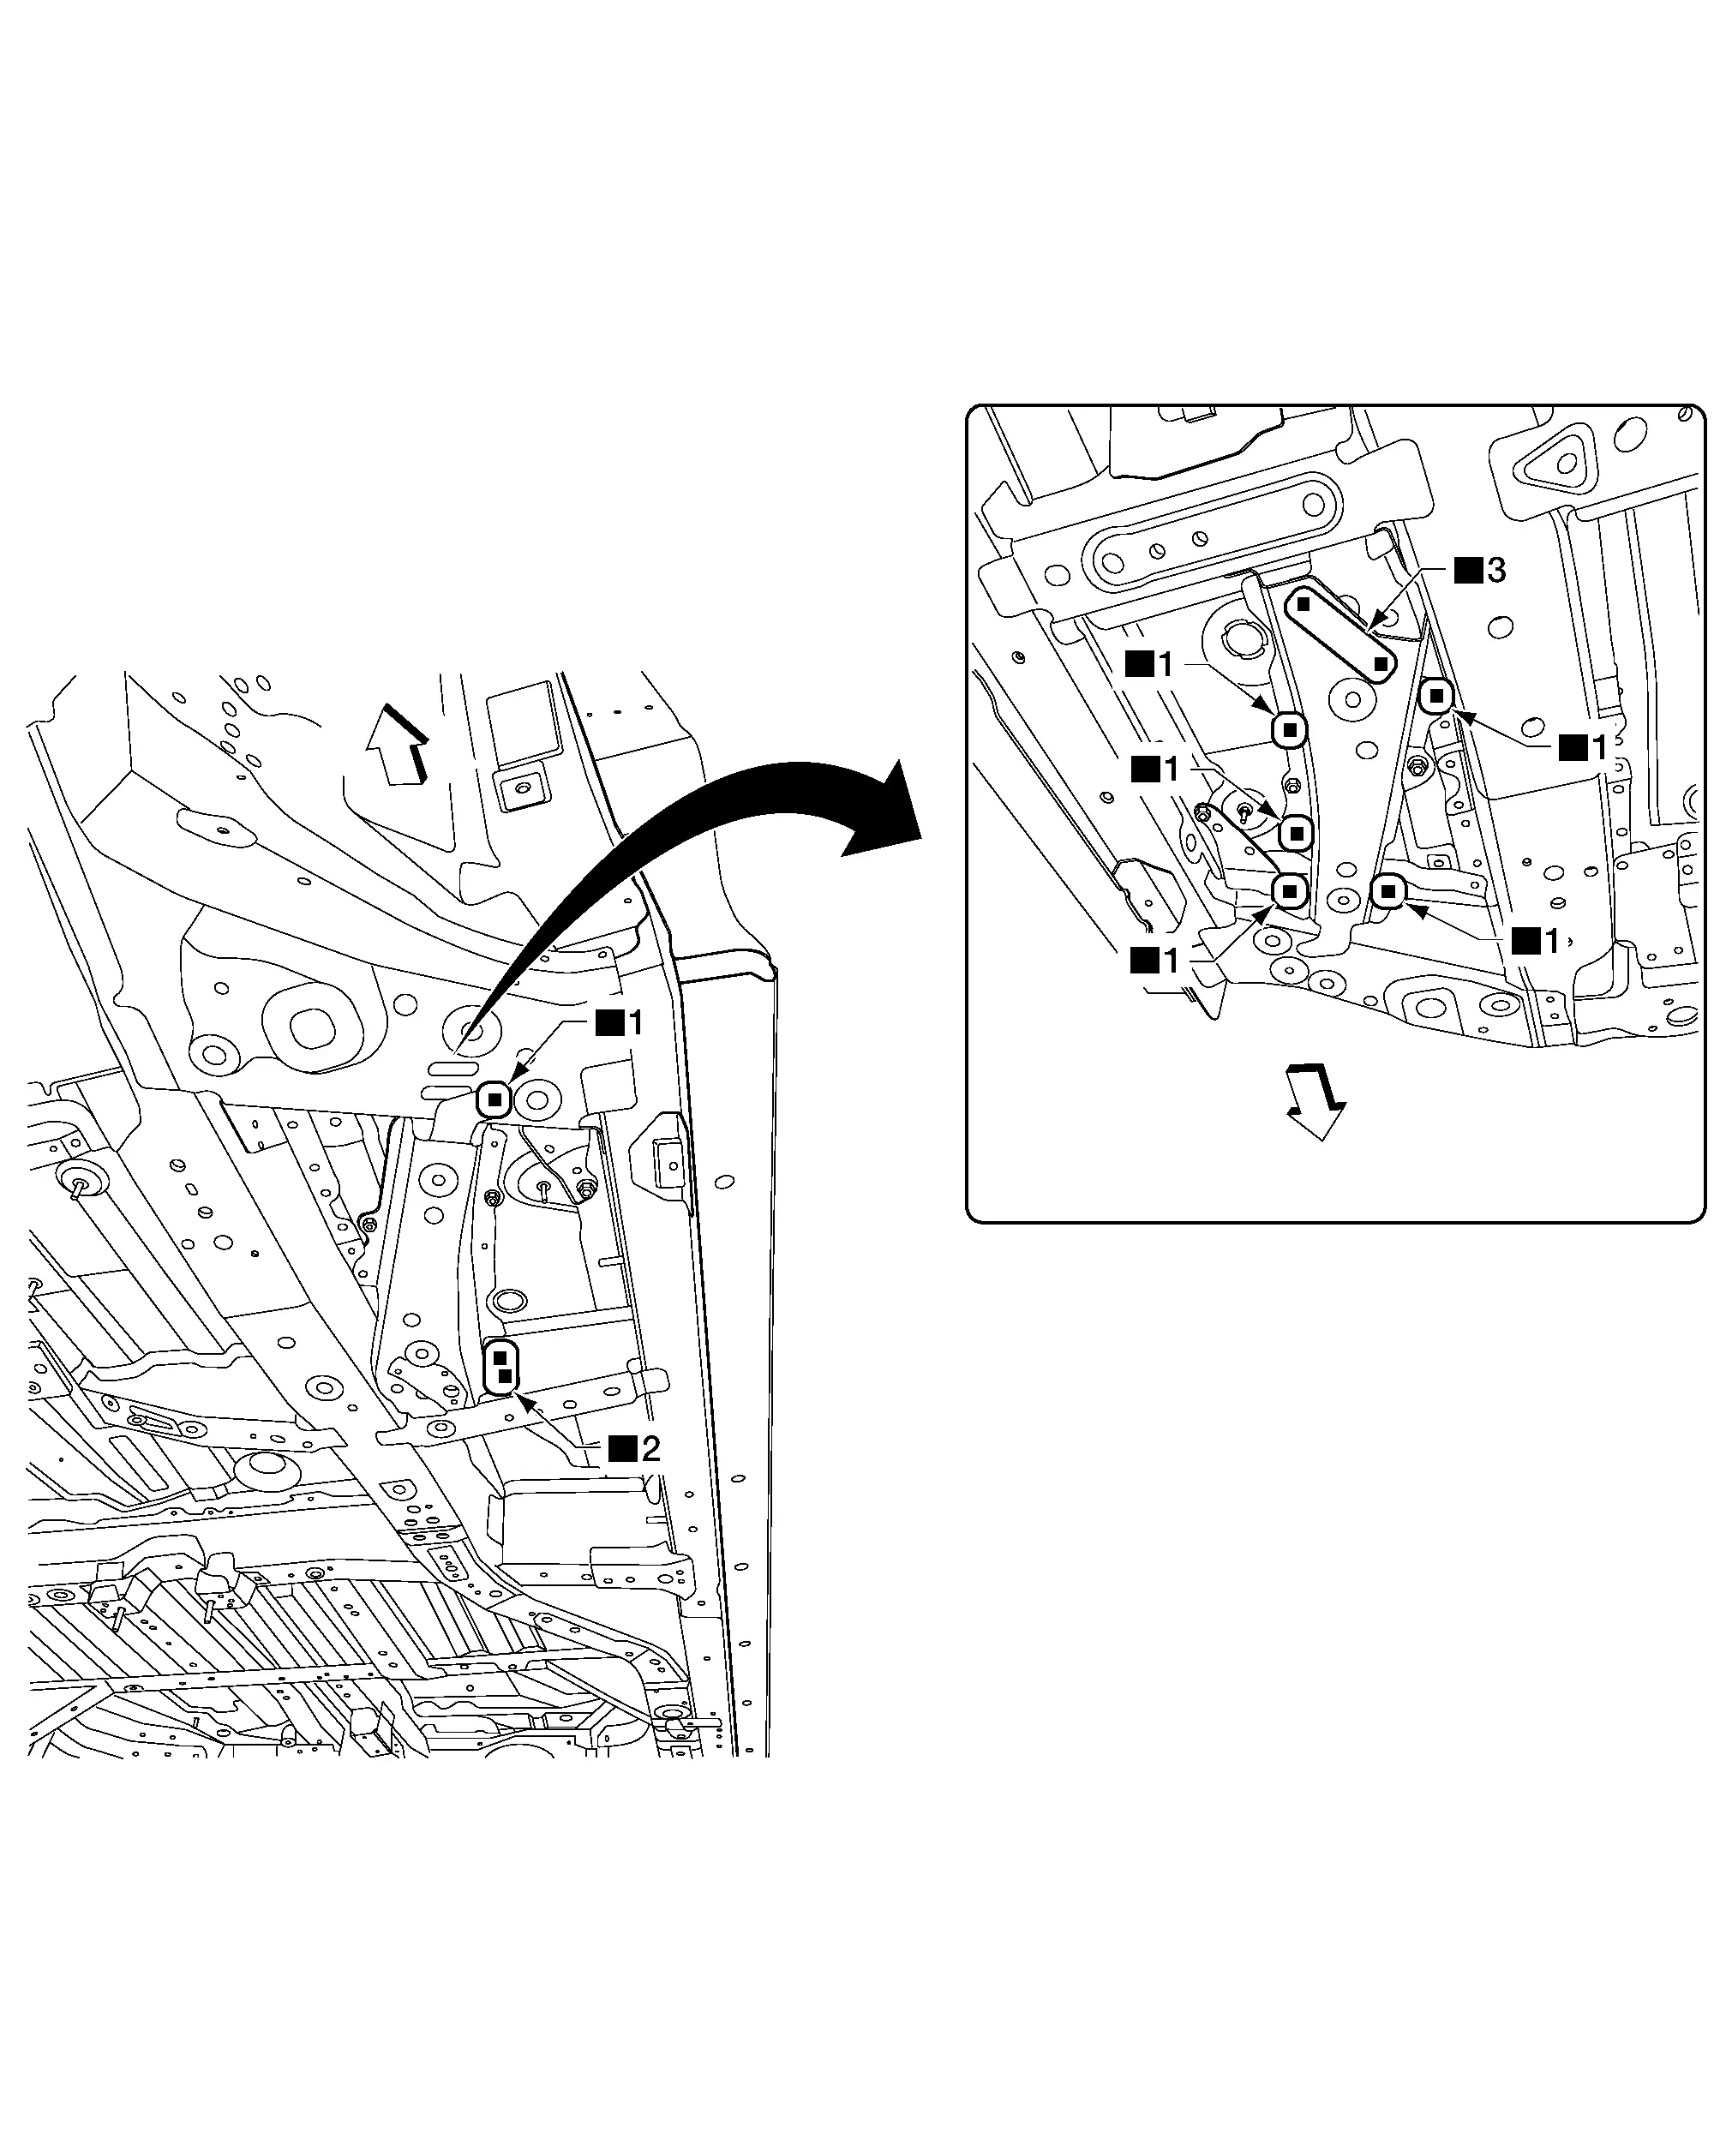
Front
Replacement parts
• Side member outrigger

FRONT SIDE MEMBER OUTRIGGER

Work after side member outrigger is removed.
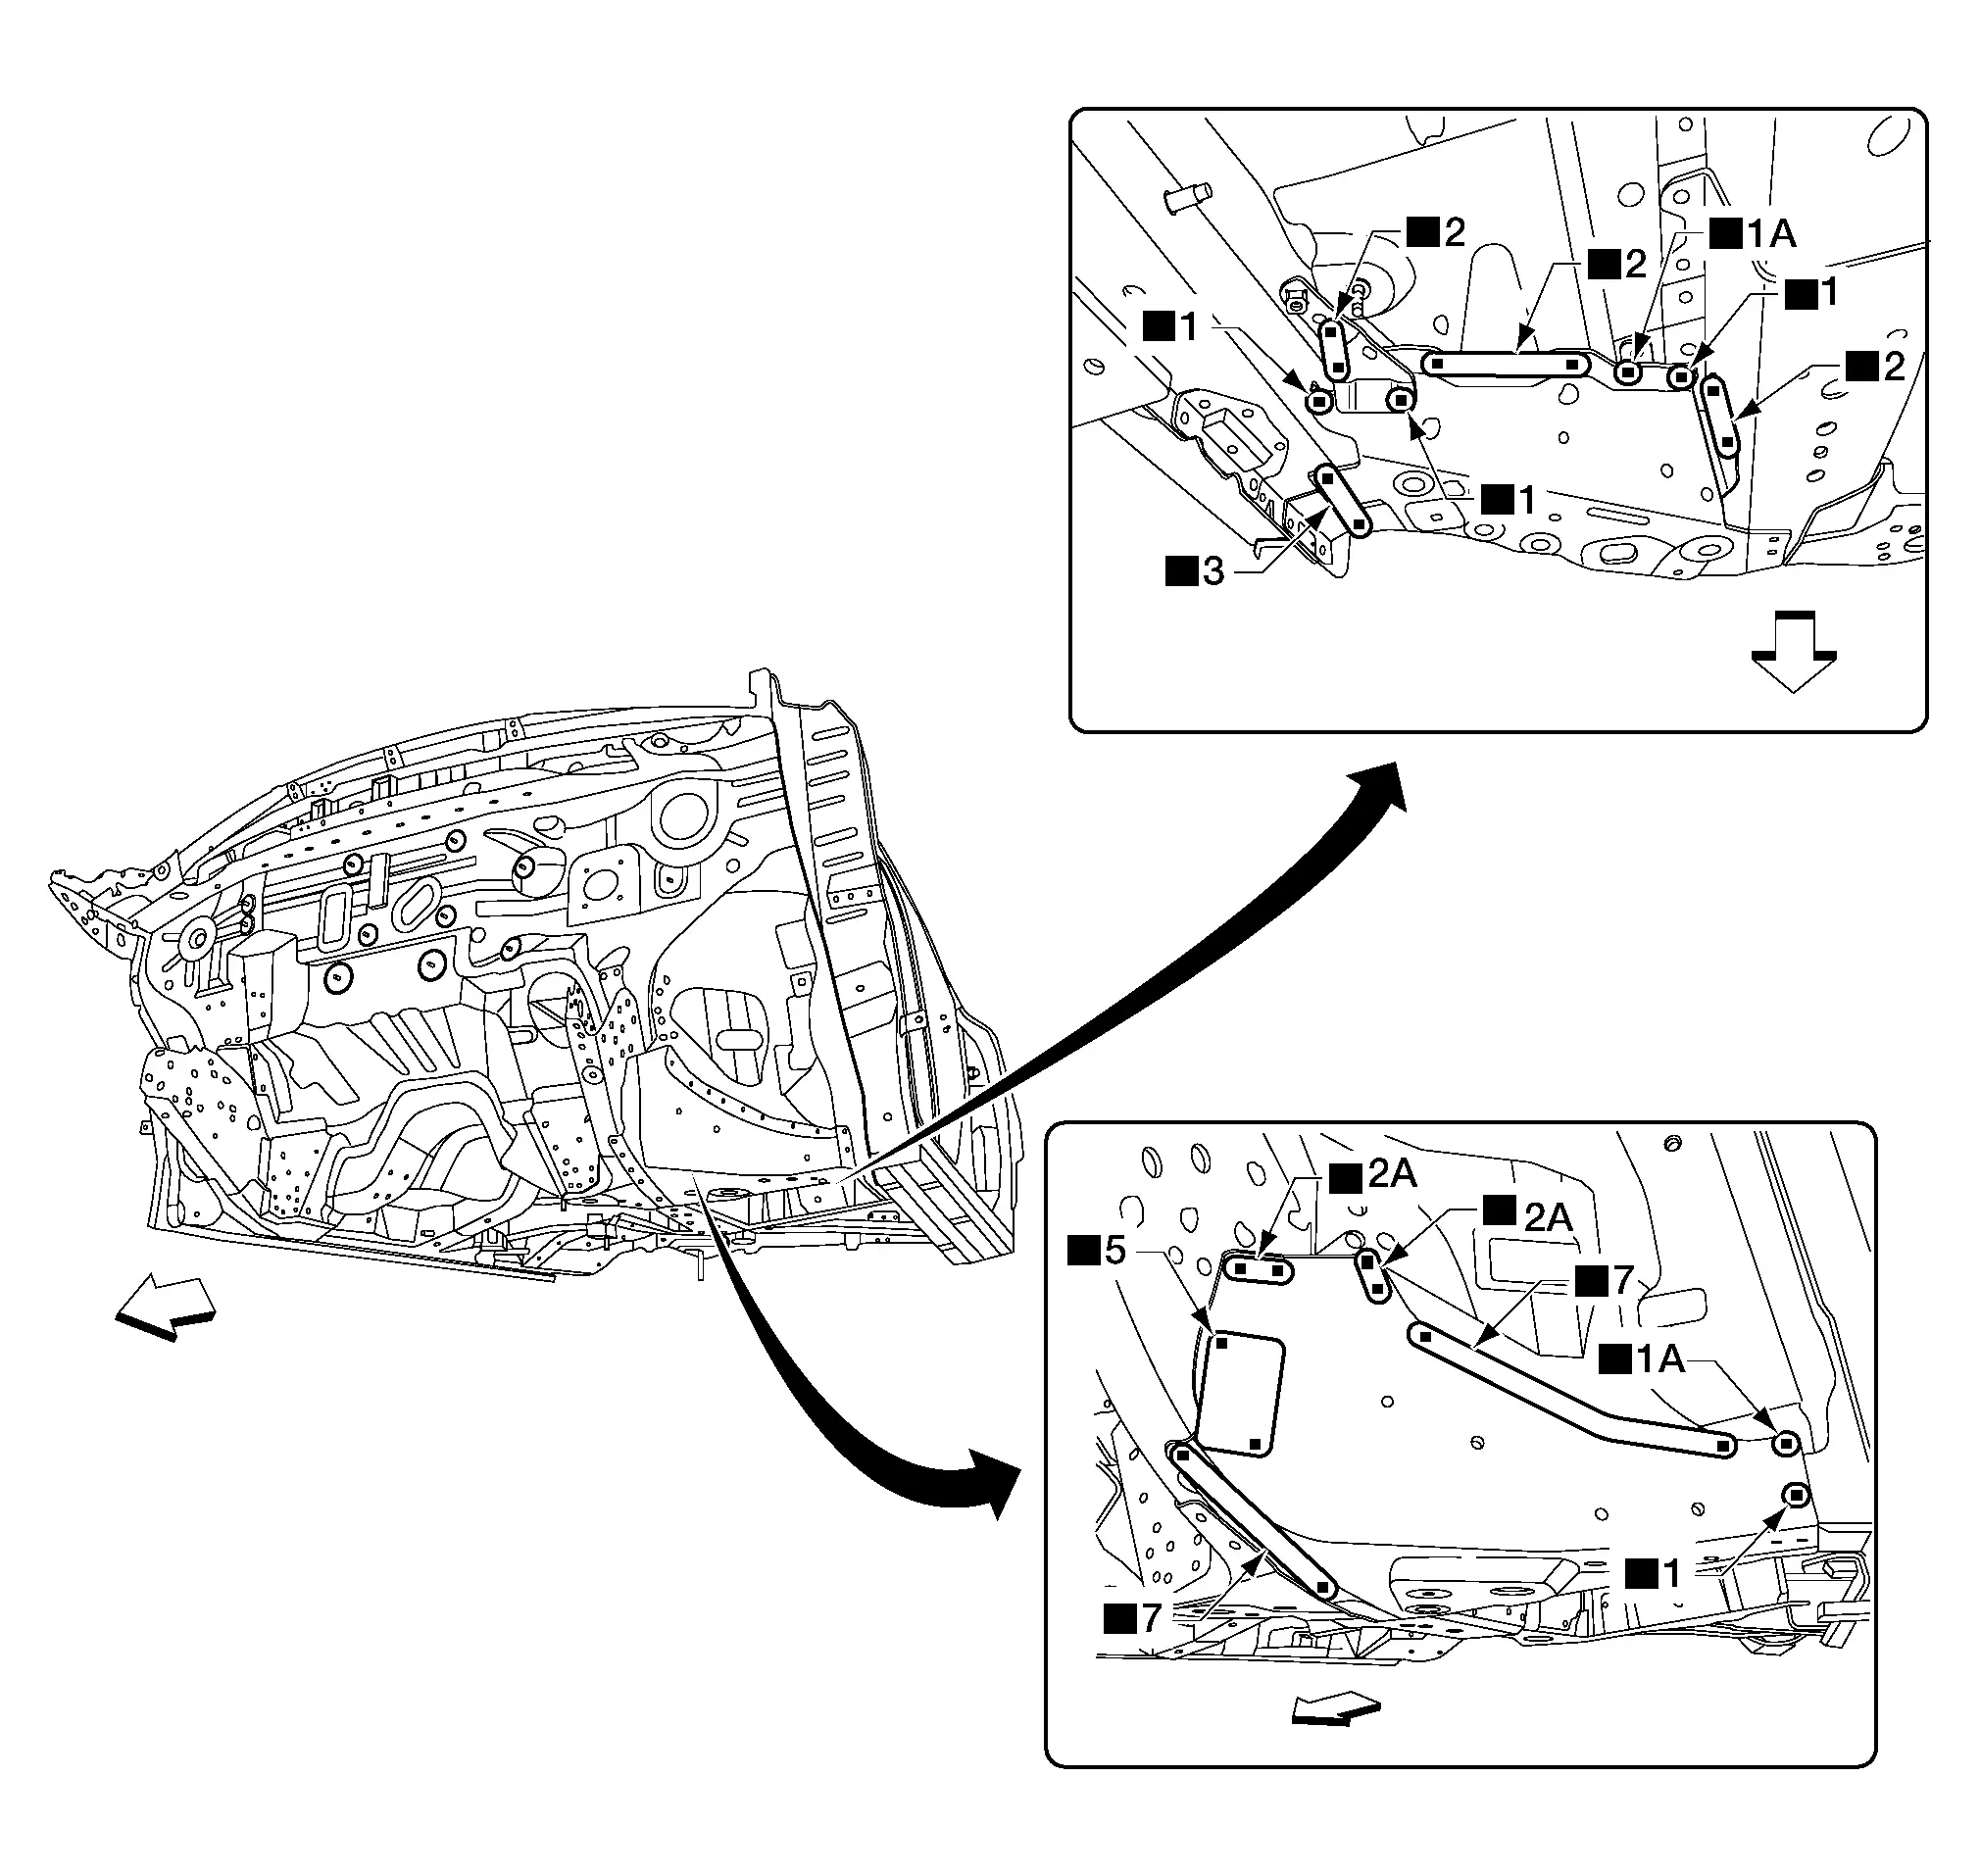
Front
Replacement parts
• Front side member outrigger

Cowl Top

Front
Replacement parts
• Cowl top

Upper Dash

Work after cowl top is removed.
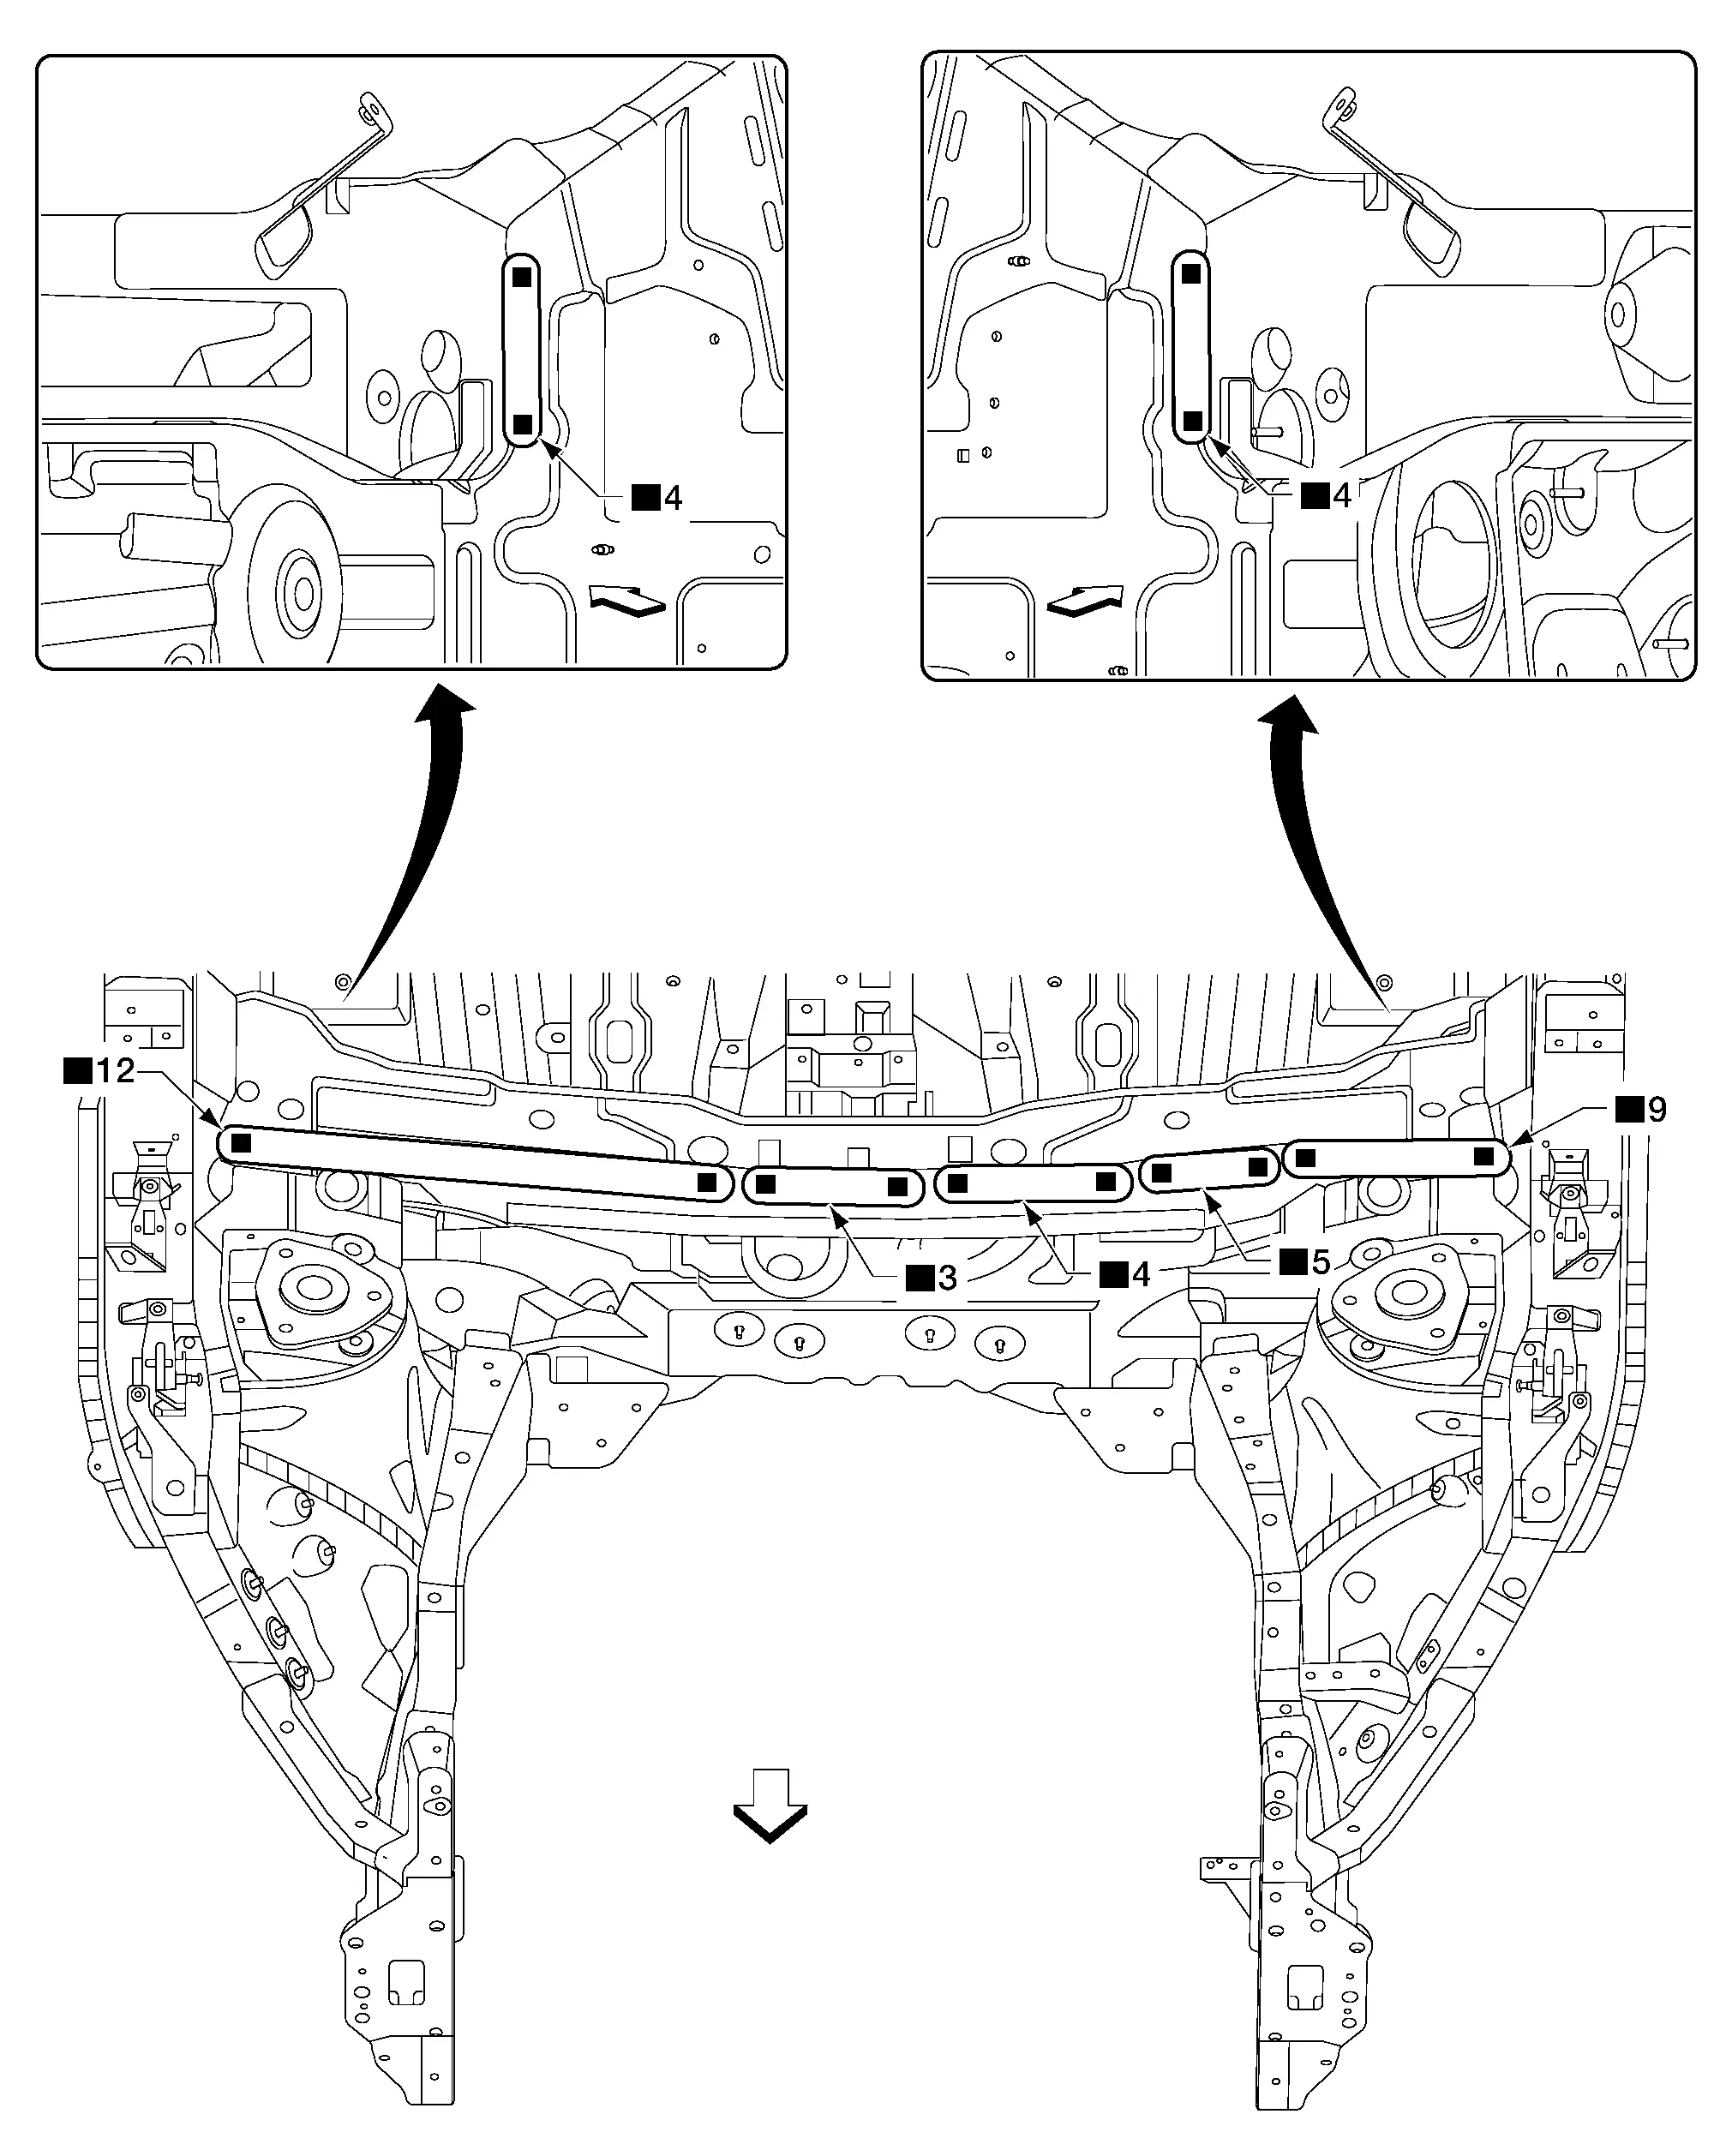
Front
Replacement parts
• Upper dash

Lower Dash

Work after upper dash and front side member stiffeners are removed.
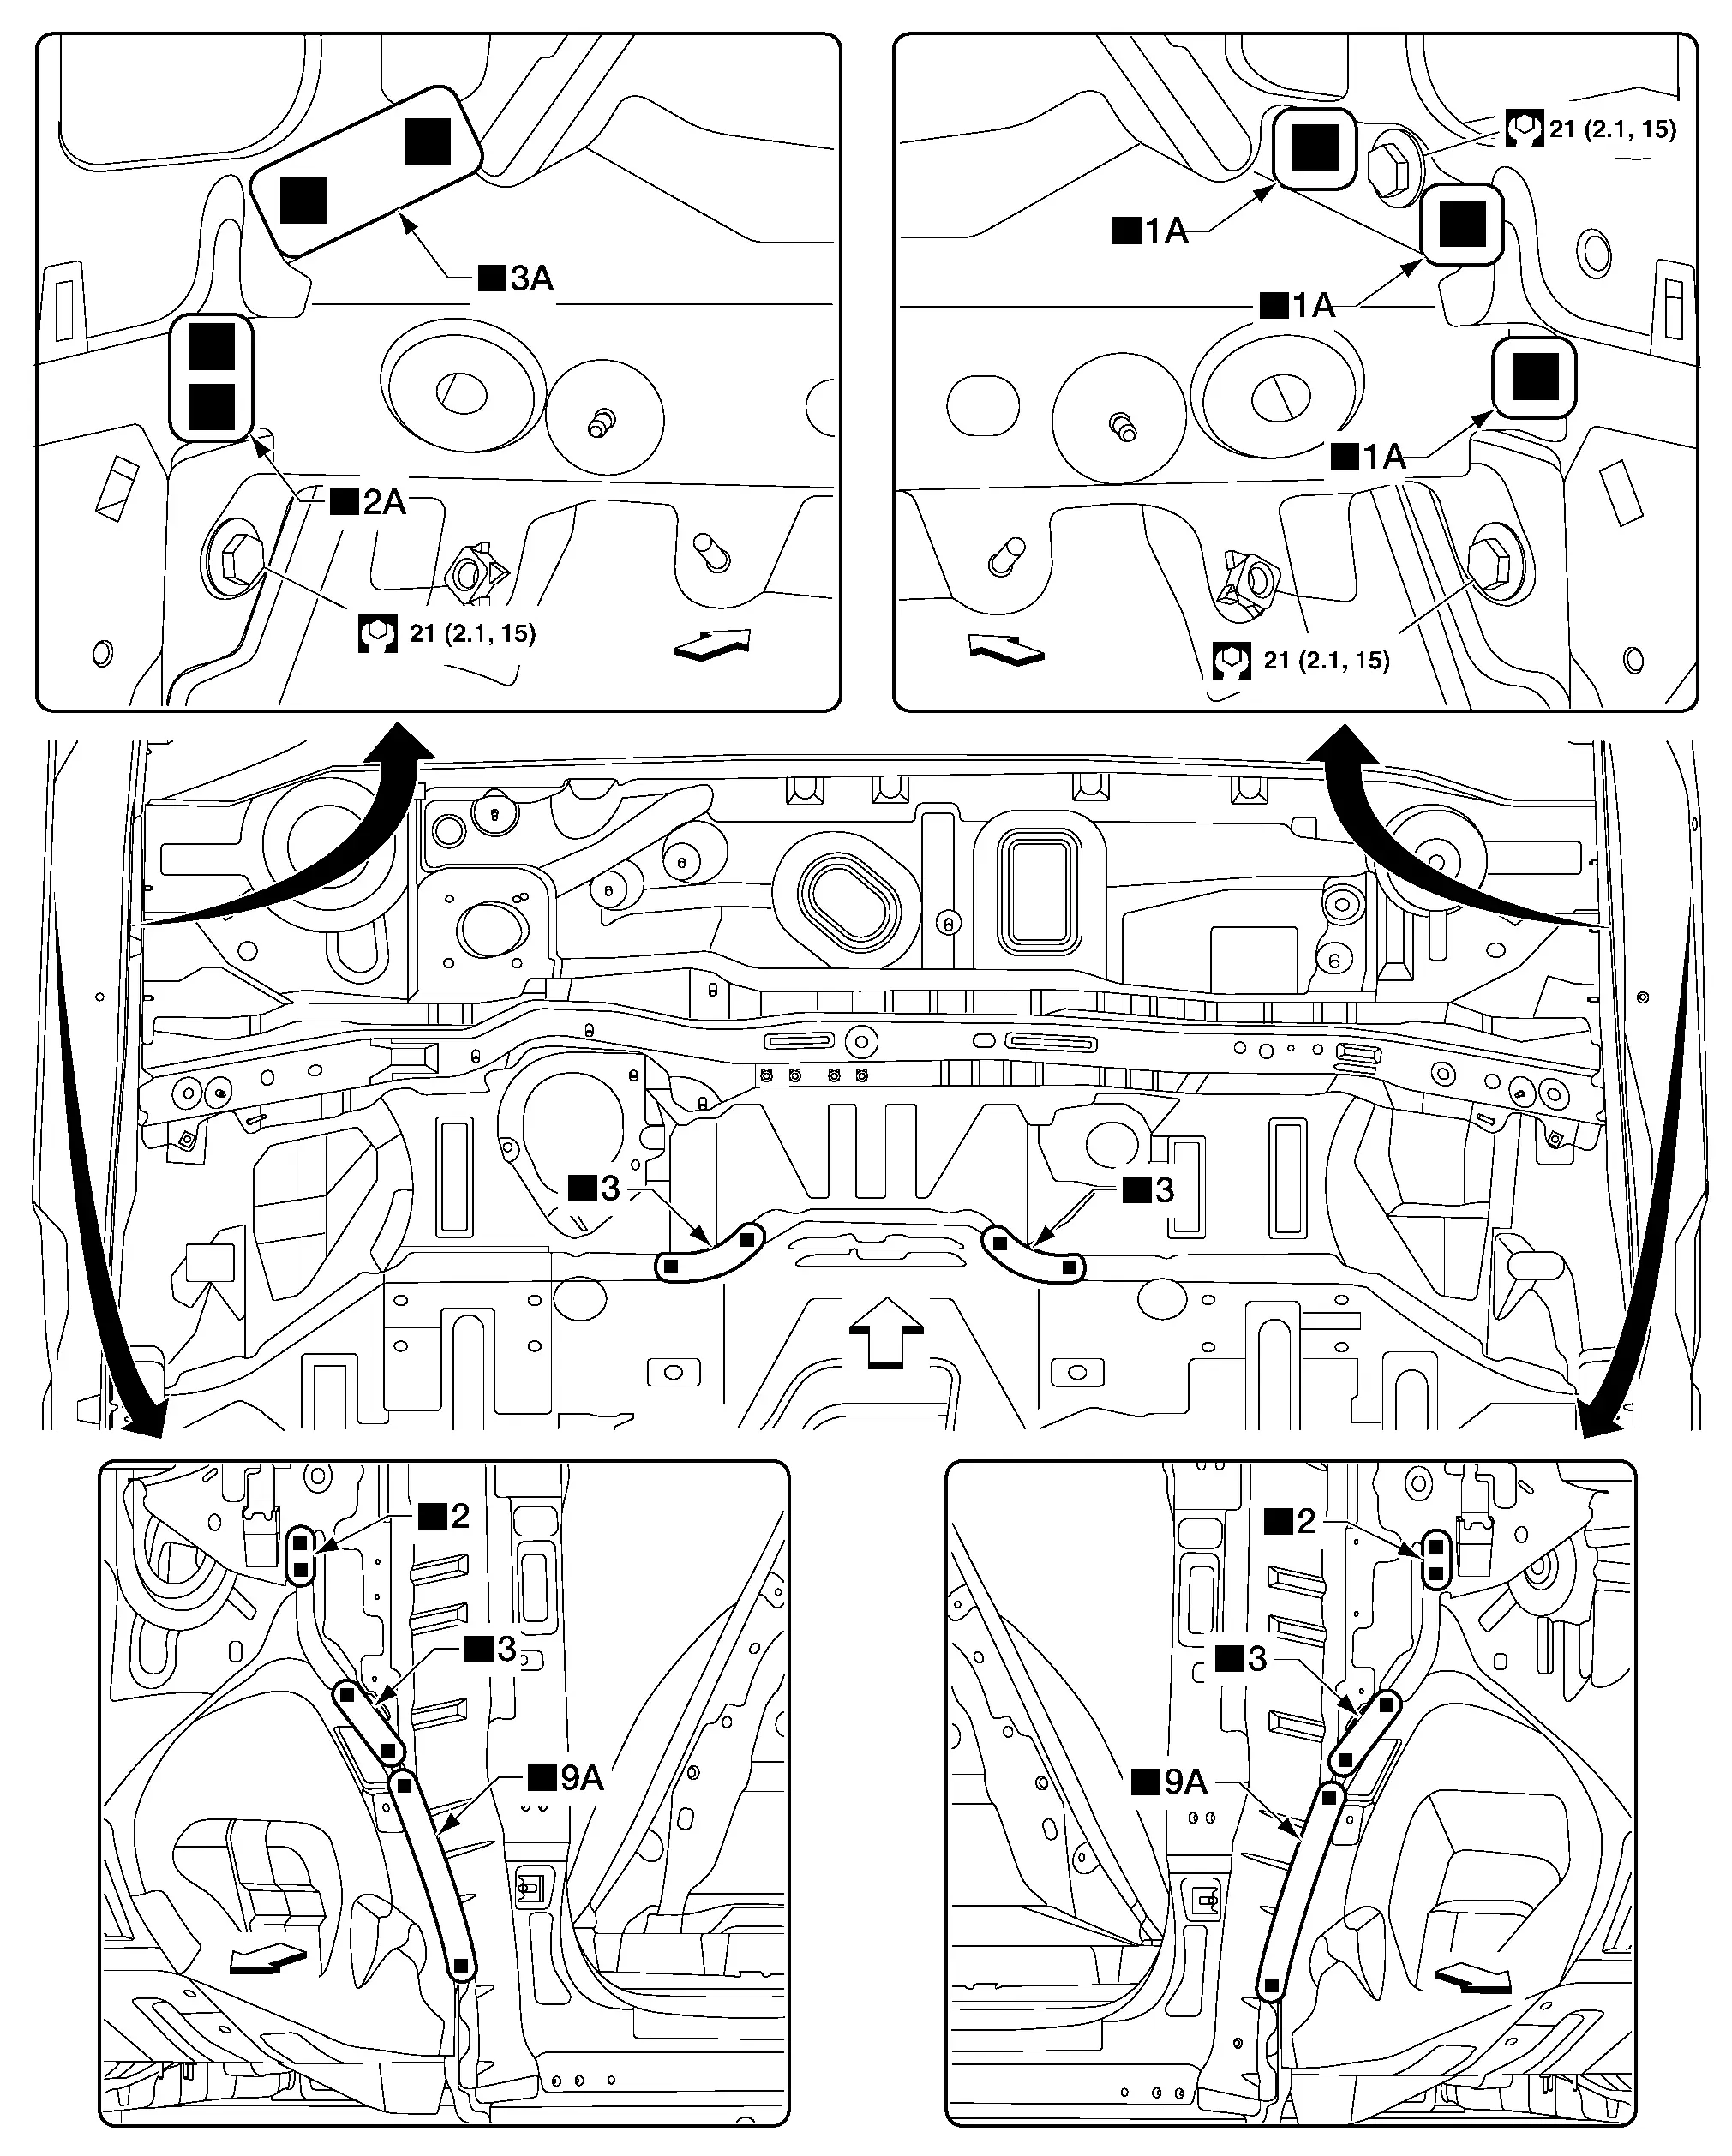
Front
Replacement parts
• Lower dash

Front Floor

FRONT SIDE MEMBER STIFFENER
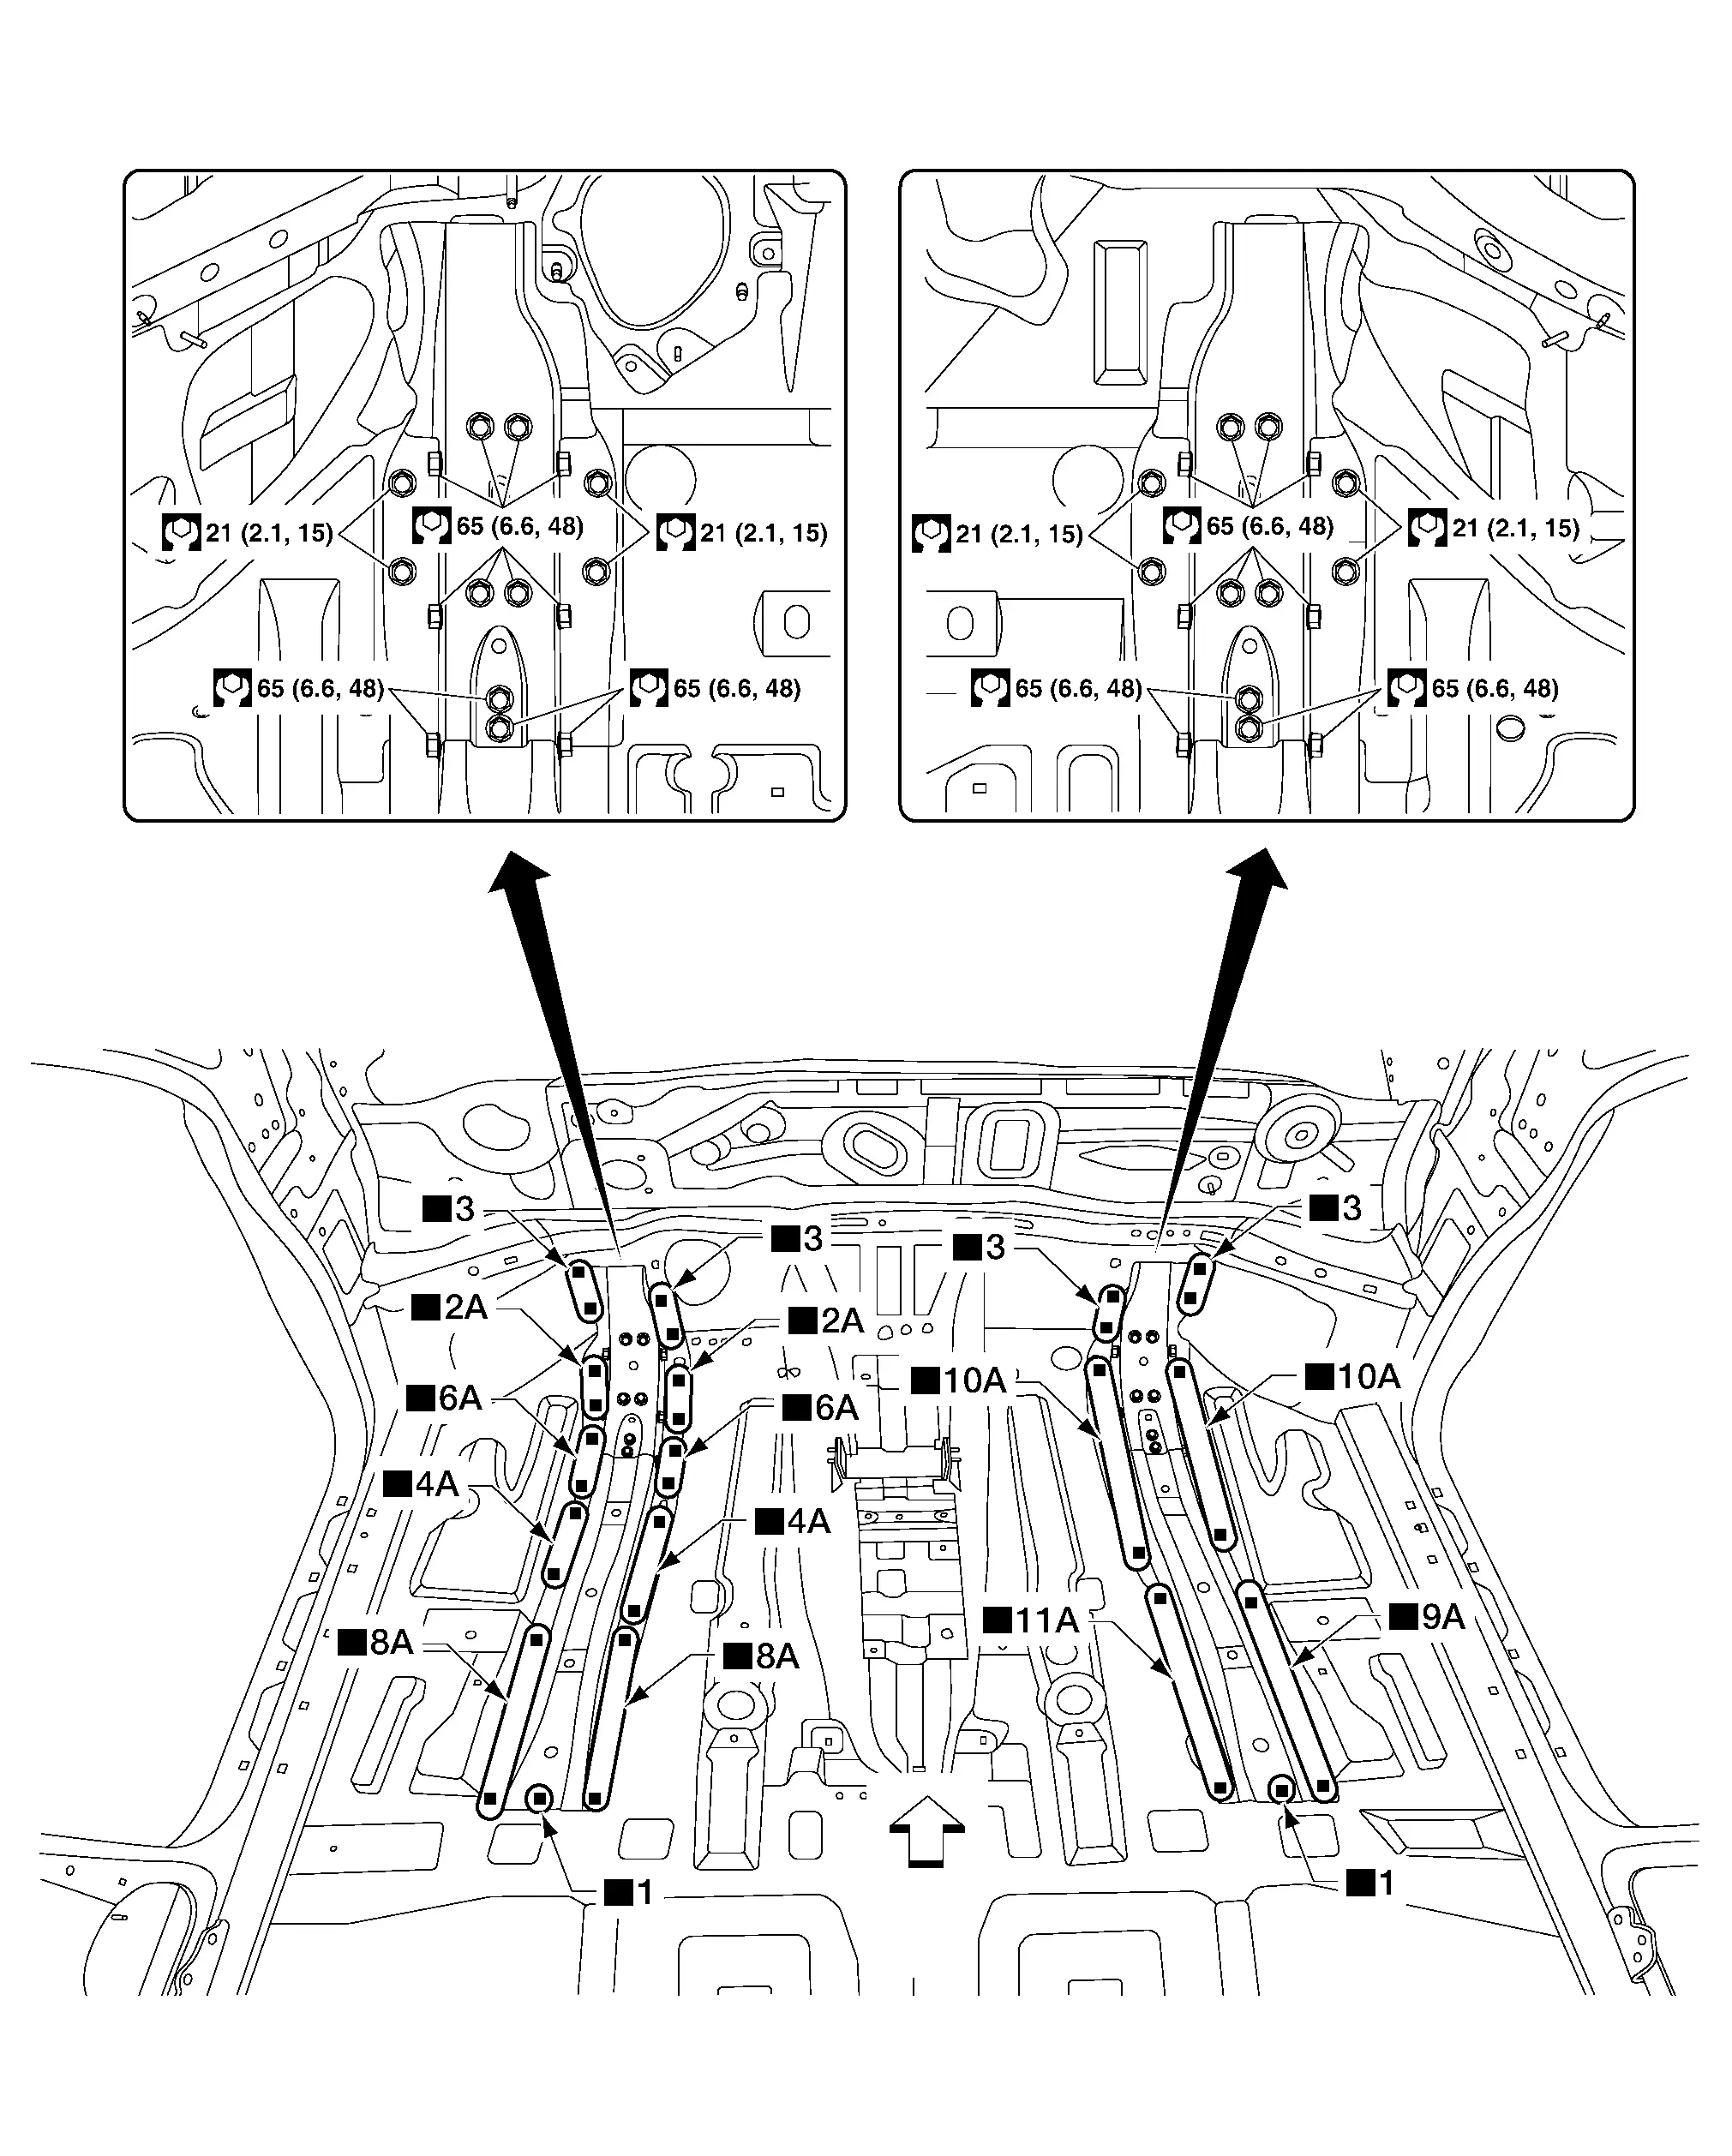
Front
Replacement parts
• Front side member stiffener

INSTRUMENT STAY BRACKET

Front
Replacement parts
• Instrument stay bracket

FRONT FLOOR PANEL

Work after lower dash, front side member stiffener and instrument stay bracket are removed.
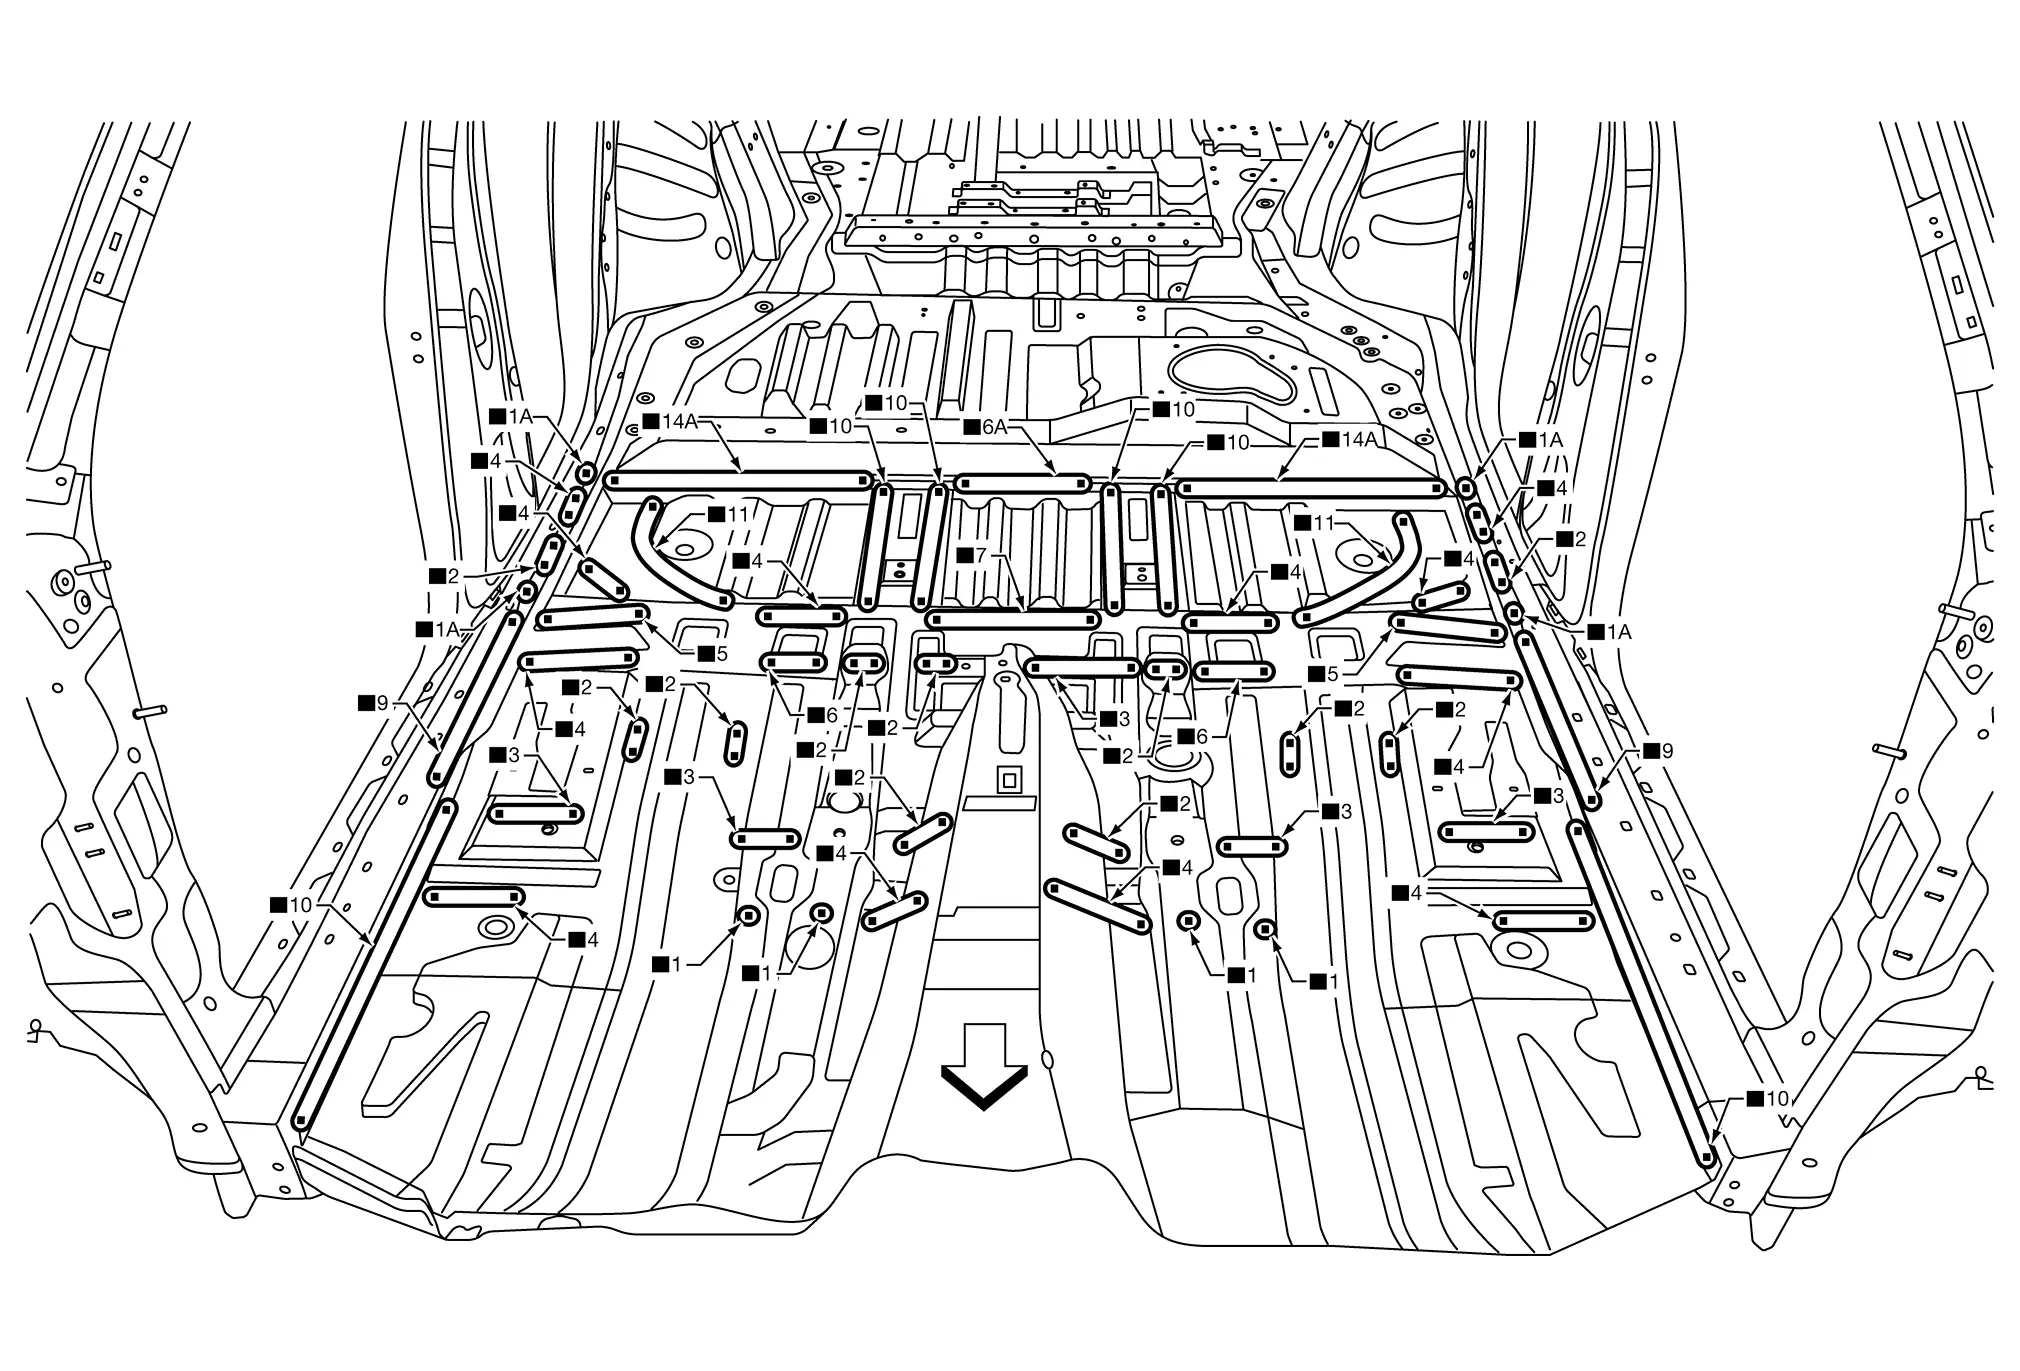
Front
Replacement parts
• Front floor panel

Rear Panel

REAR FENDER BRACES

Front
Replacement parts
• Rear fender braces

REAR PANEL BRACKETS

Front
Replacement parts
• Rear fascia center brackets • Automatic back door warning buzzer bracket

REAR PANEL

Work after rear fender braces are removed.
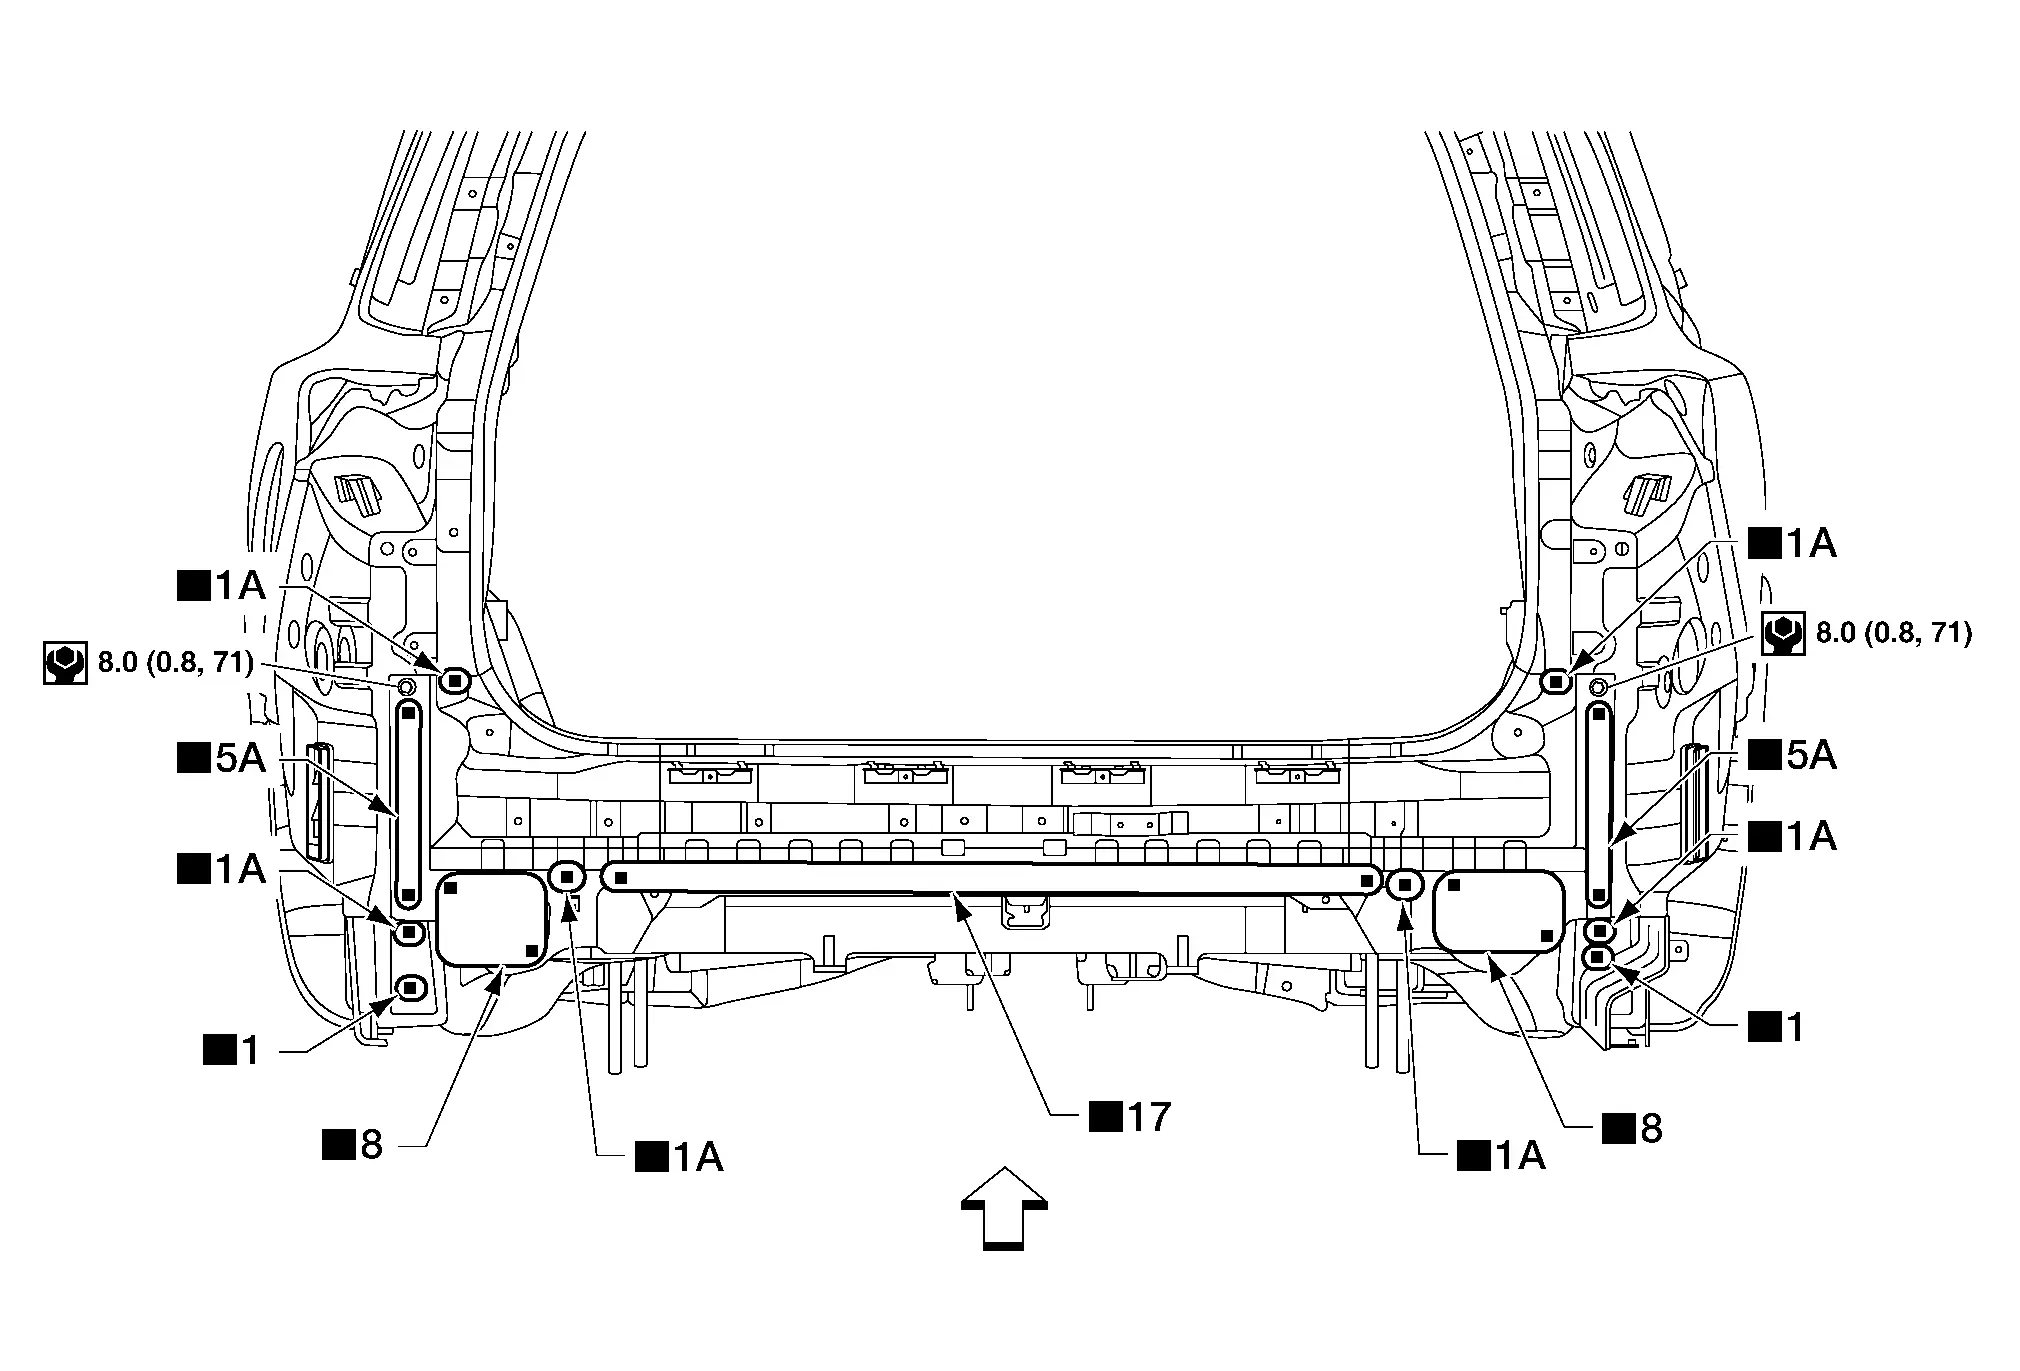
Front
Replacement parts
• Rear panel

Rear Floor

REAR FLOOR BRACKETS AND LOWER SEATBACK SUPPORT

Front
Replacement parts
• Woofer bracket (front/rear) • Amplifier bracket • Lower seatback support

REAR FLOOR SIDES

Front
Replacement parts
• Rear floor sides

REAR FLOOR FRONT EXTENSION

Work after front floor is removed.
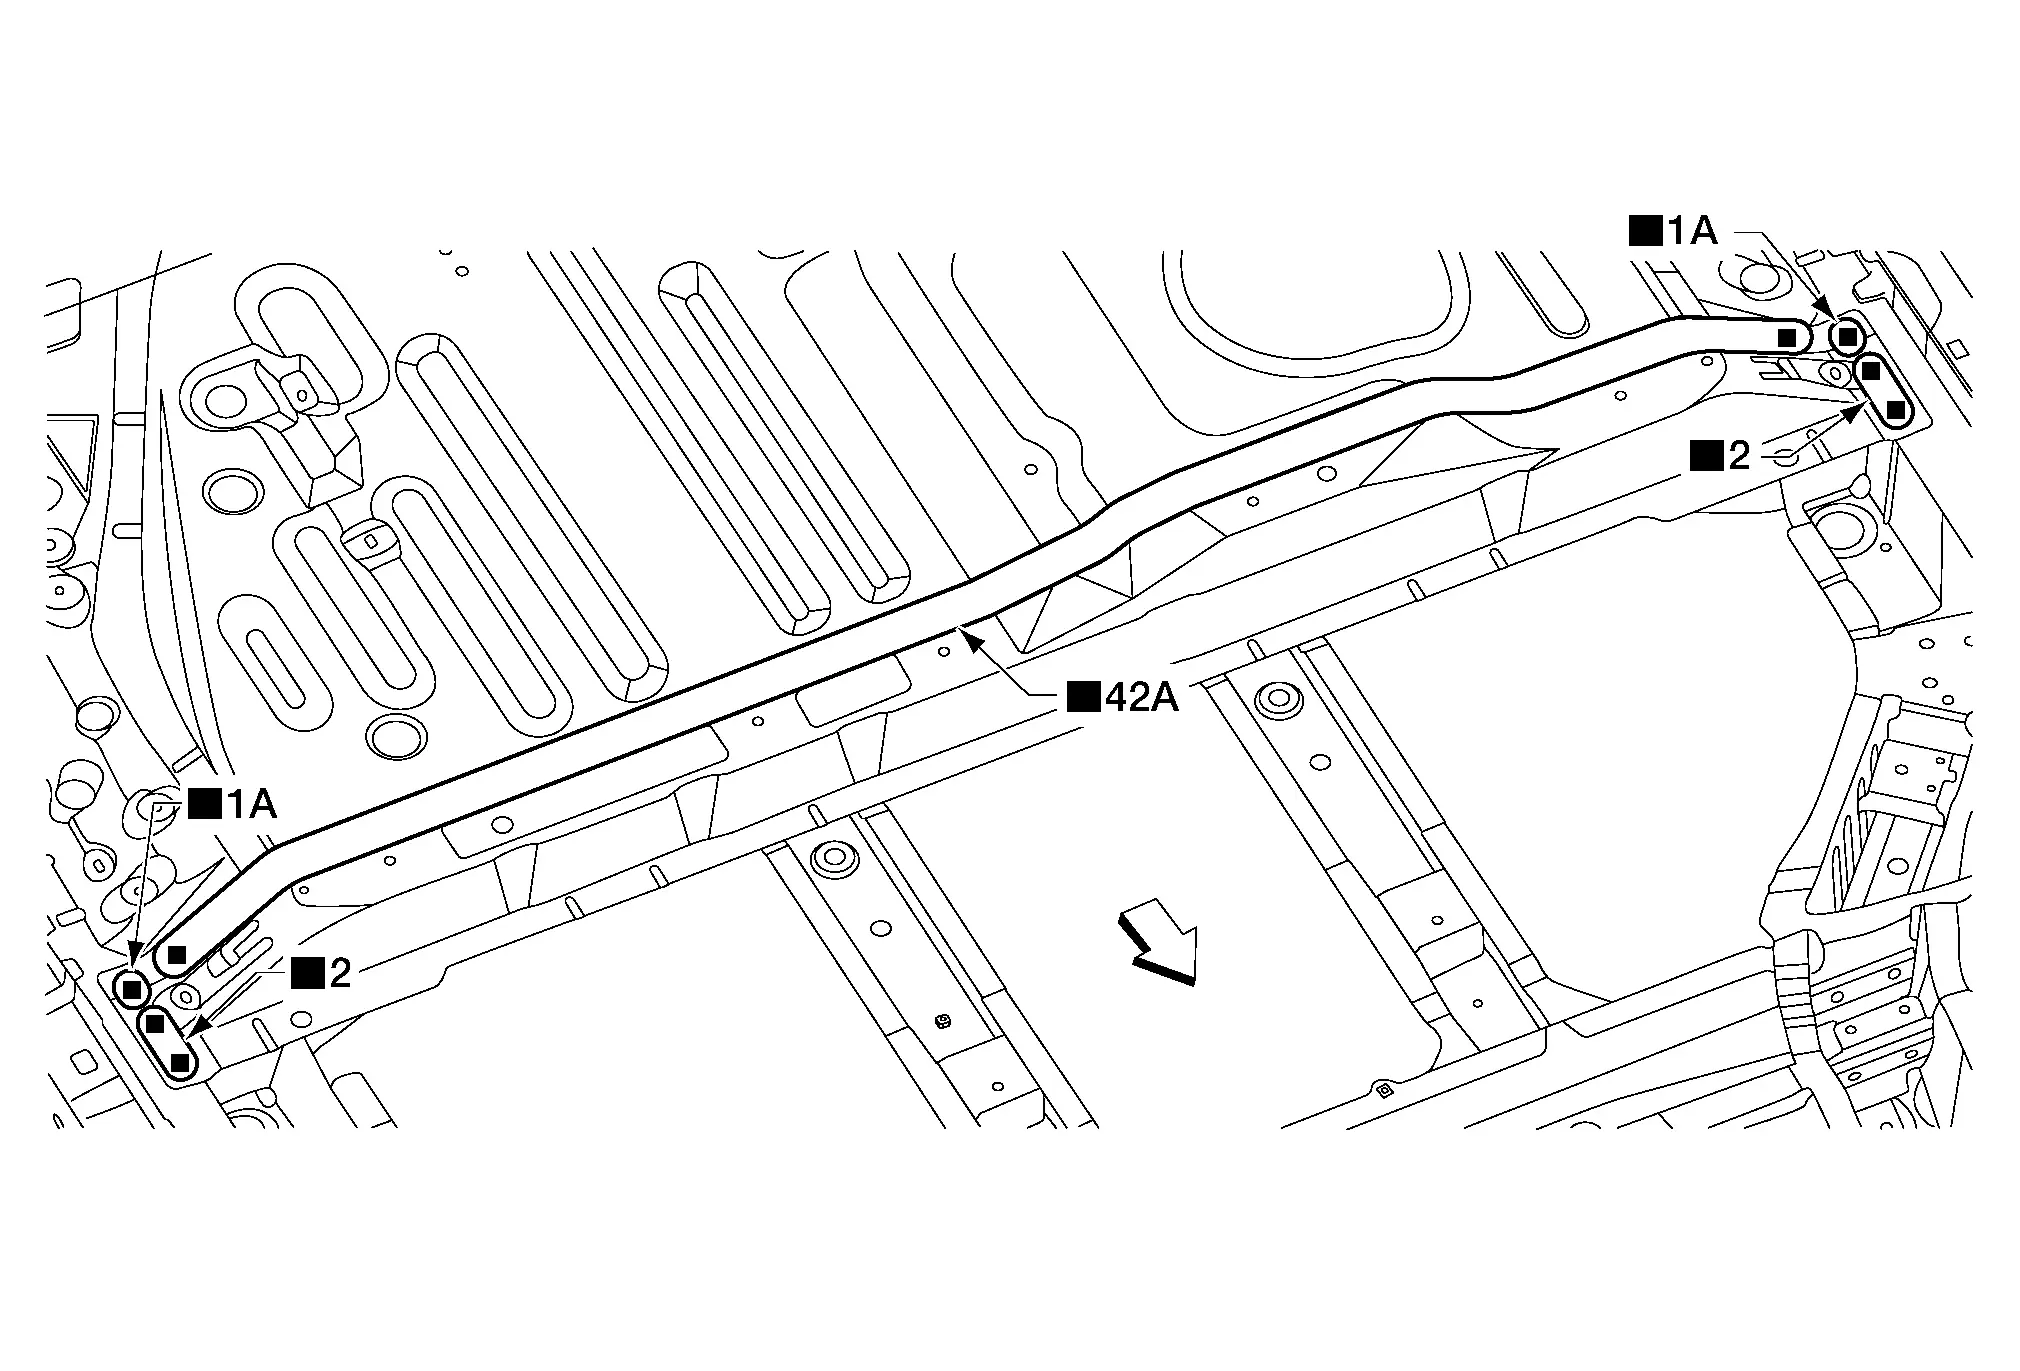
Front
Replacement parts
• Rear floor front extension

REAR FLOOR FRONT EXTENSION SIDES

Work after rear floor sides and rear floor front extension are removed.
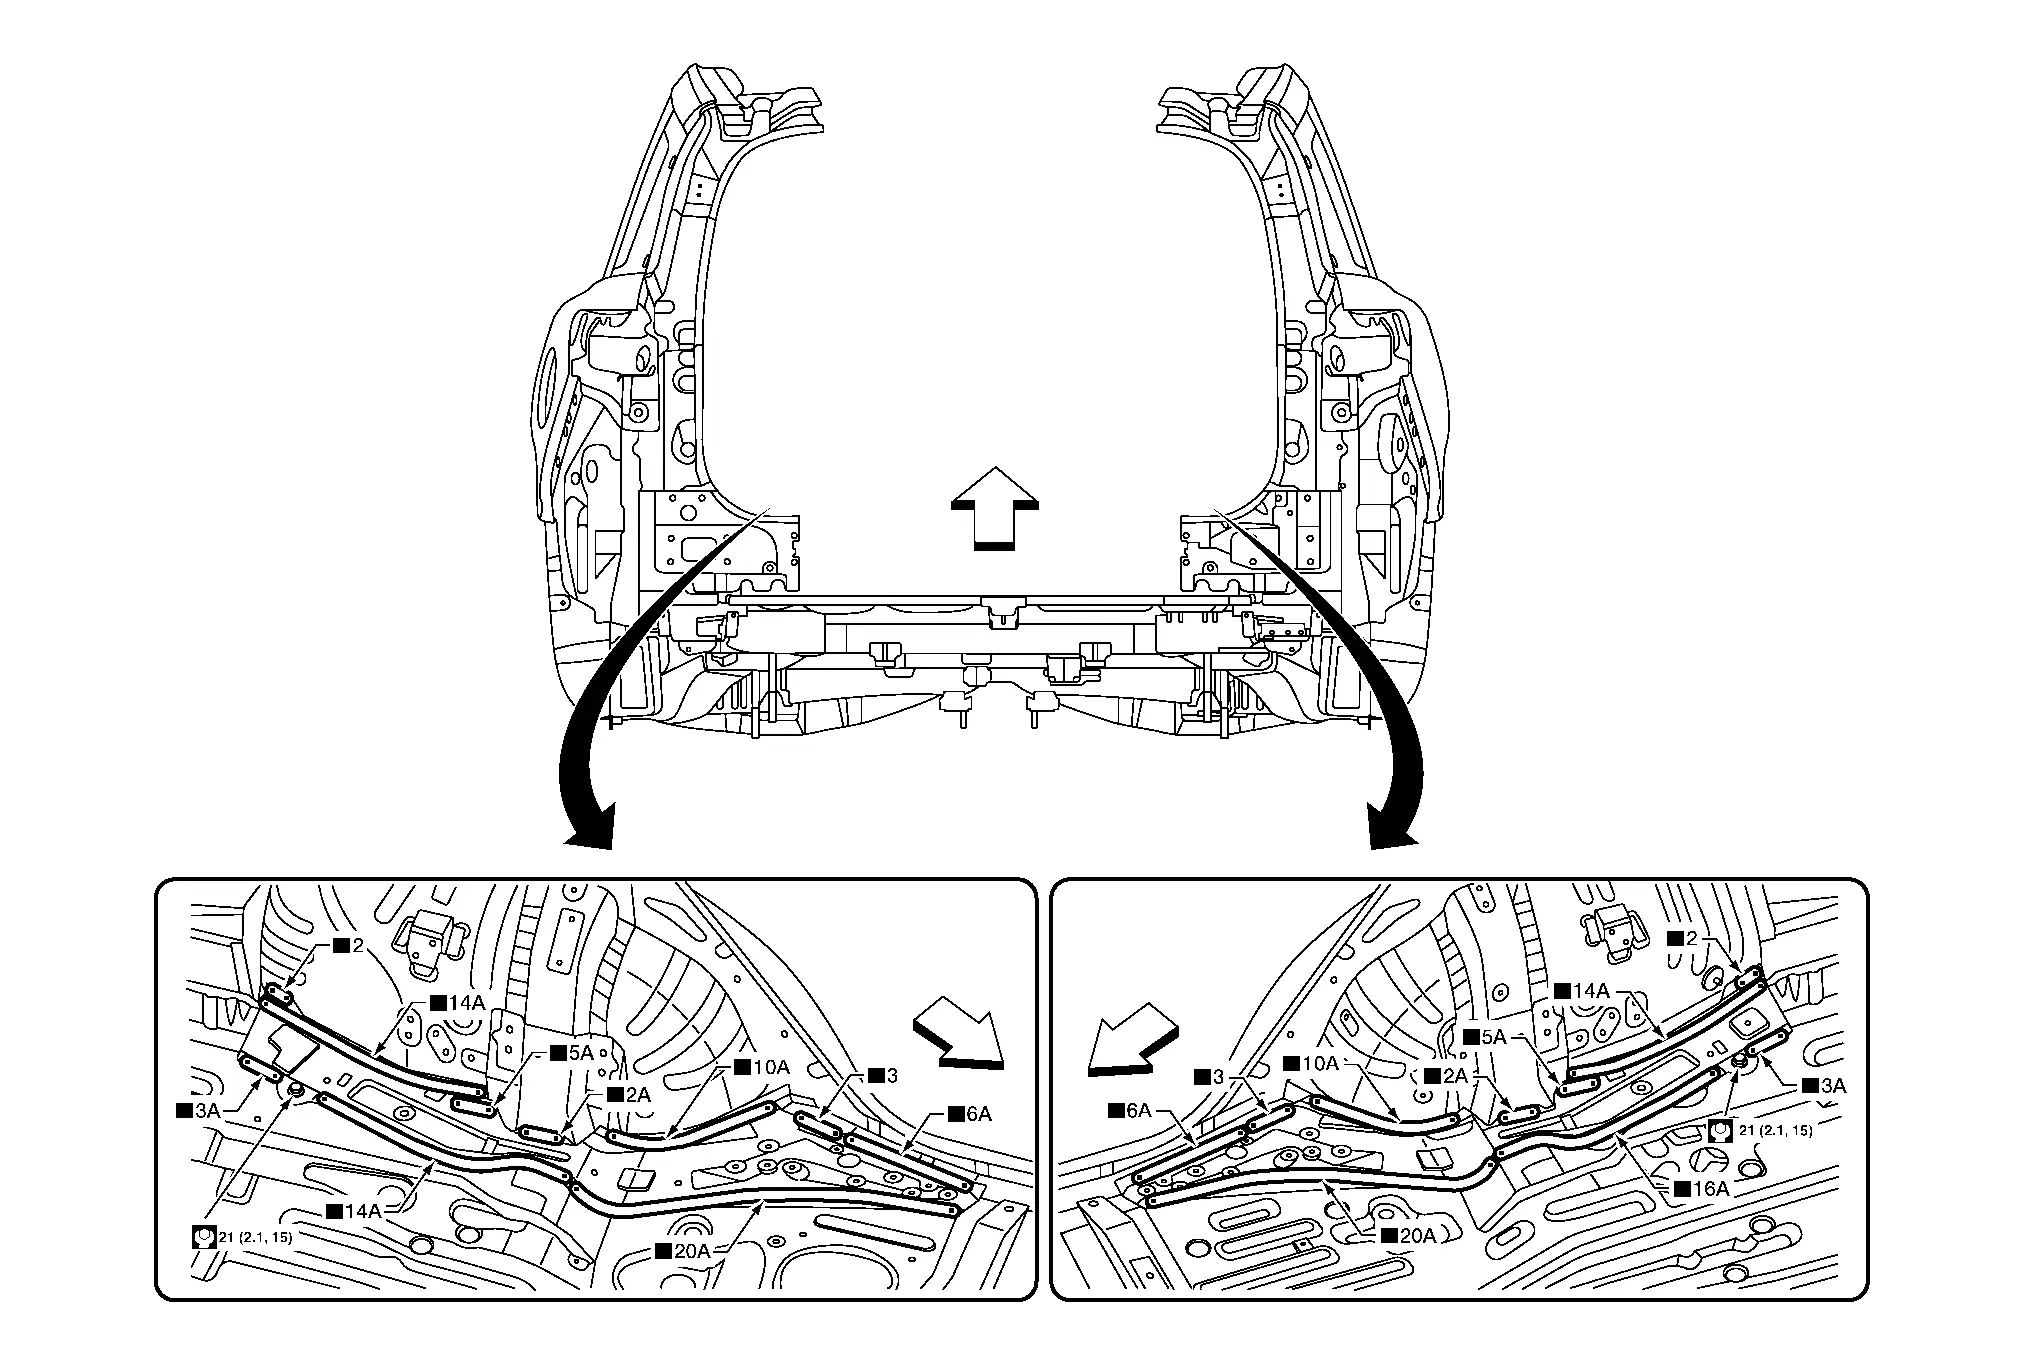
Front
Replacement parts
• Rear floor front extension sides

REAR FLOOR PANEL

Work after rear floor front extension sides are removed.
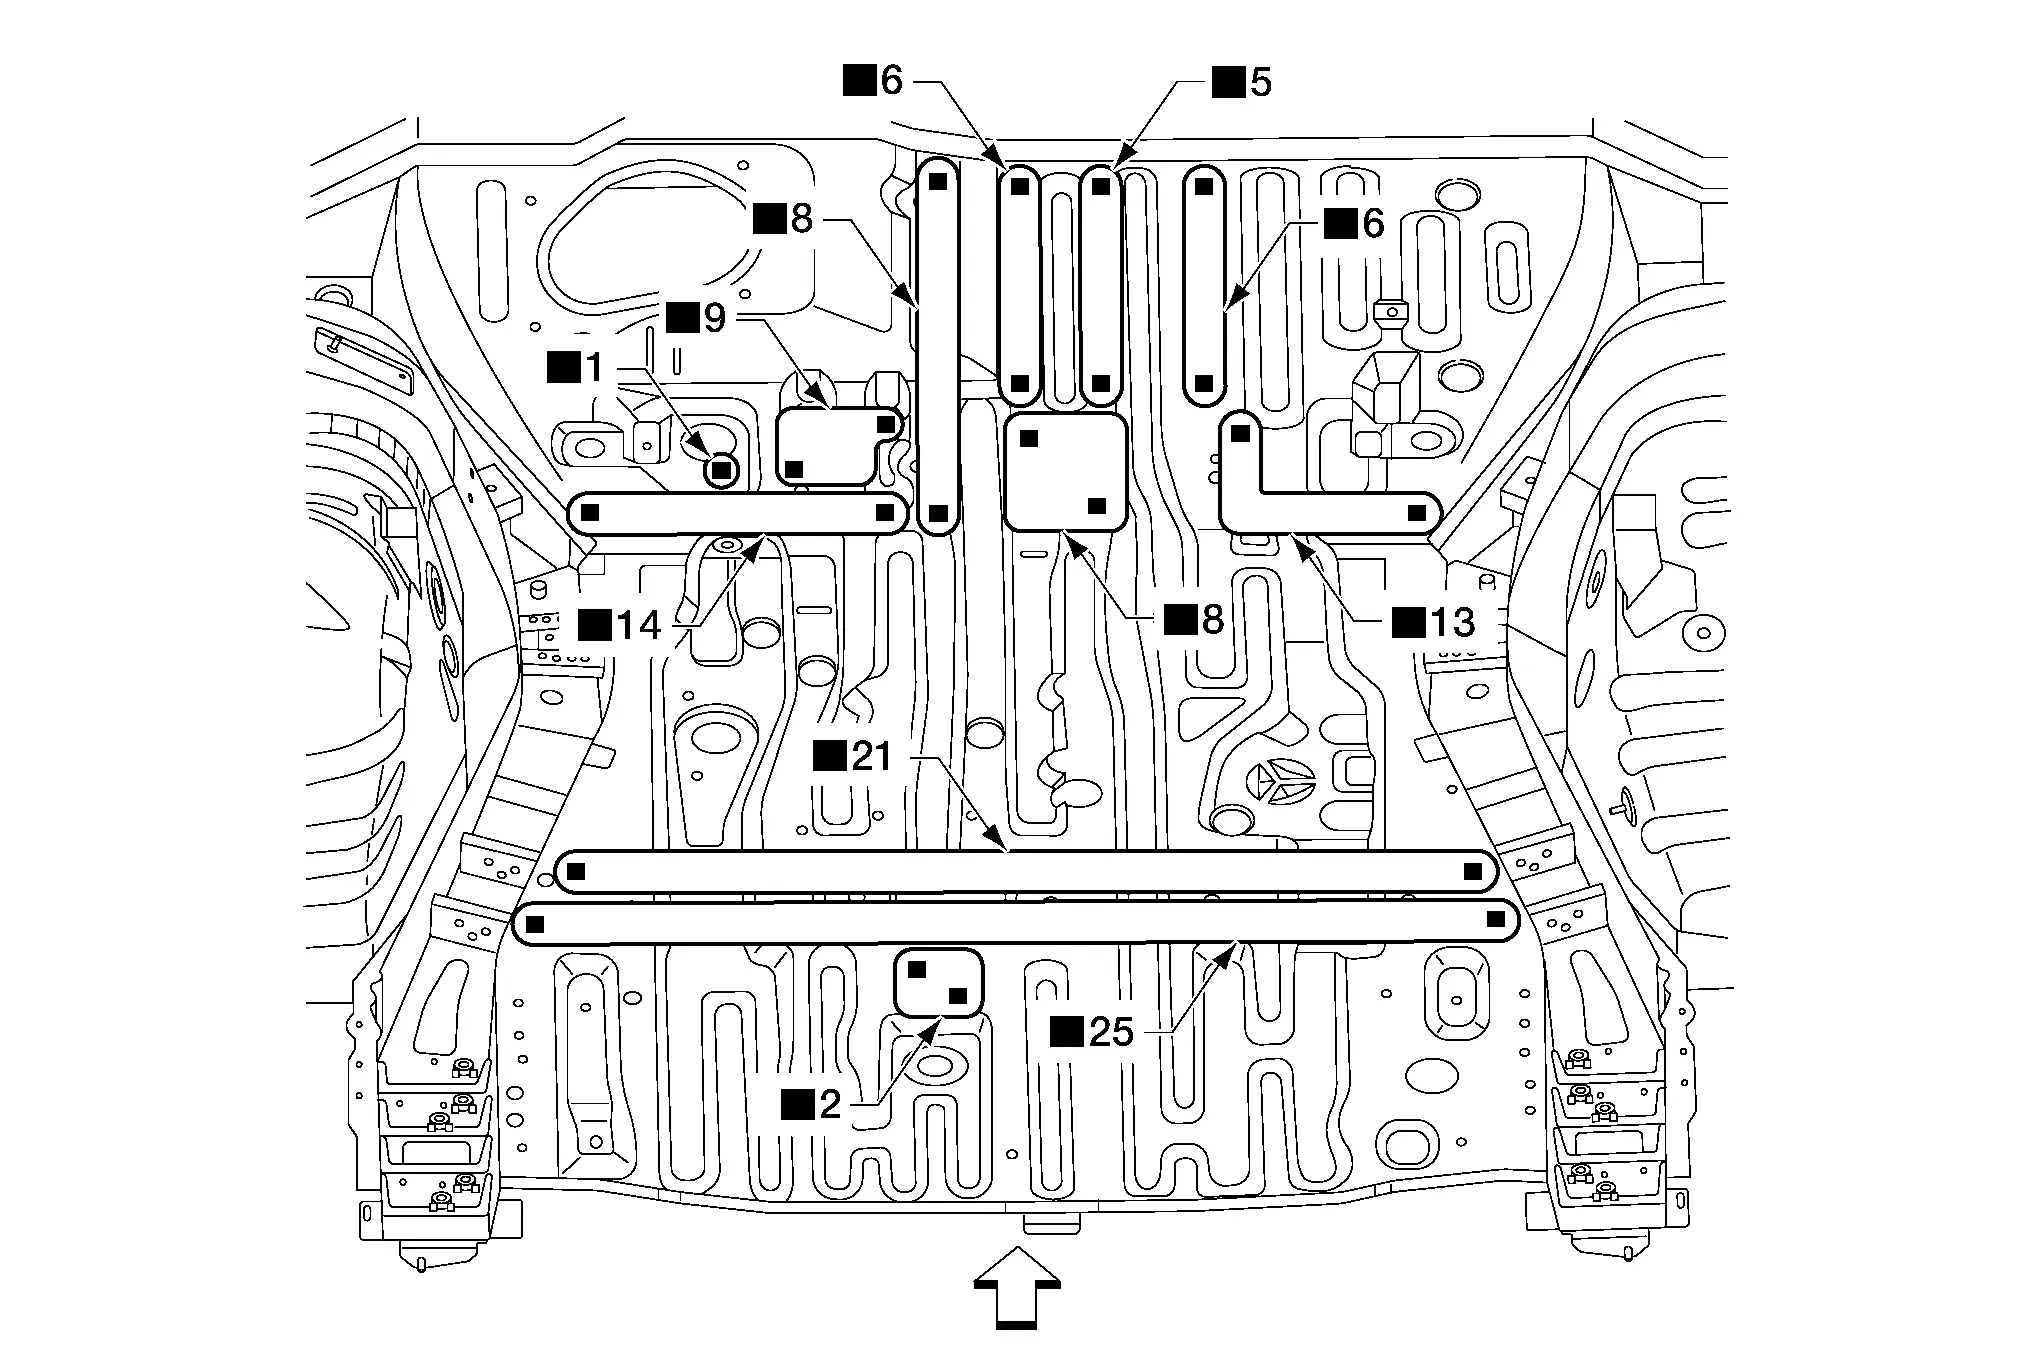
Front
Replacement parts
• Rear floor panel

Body Side Outer

BODY SIDE OUTER FRONT

Work after hoodledge outer and roof panel are removed.
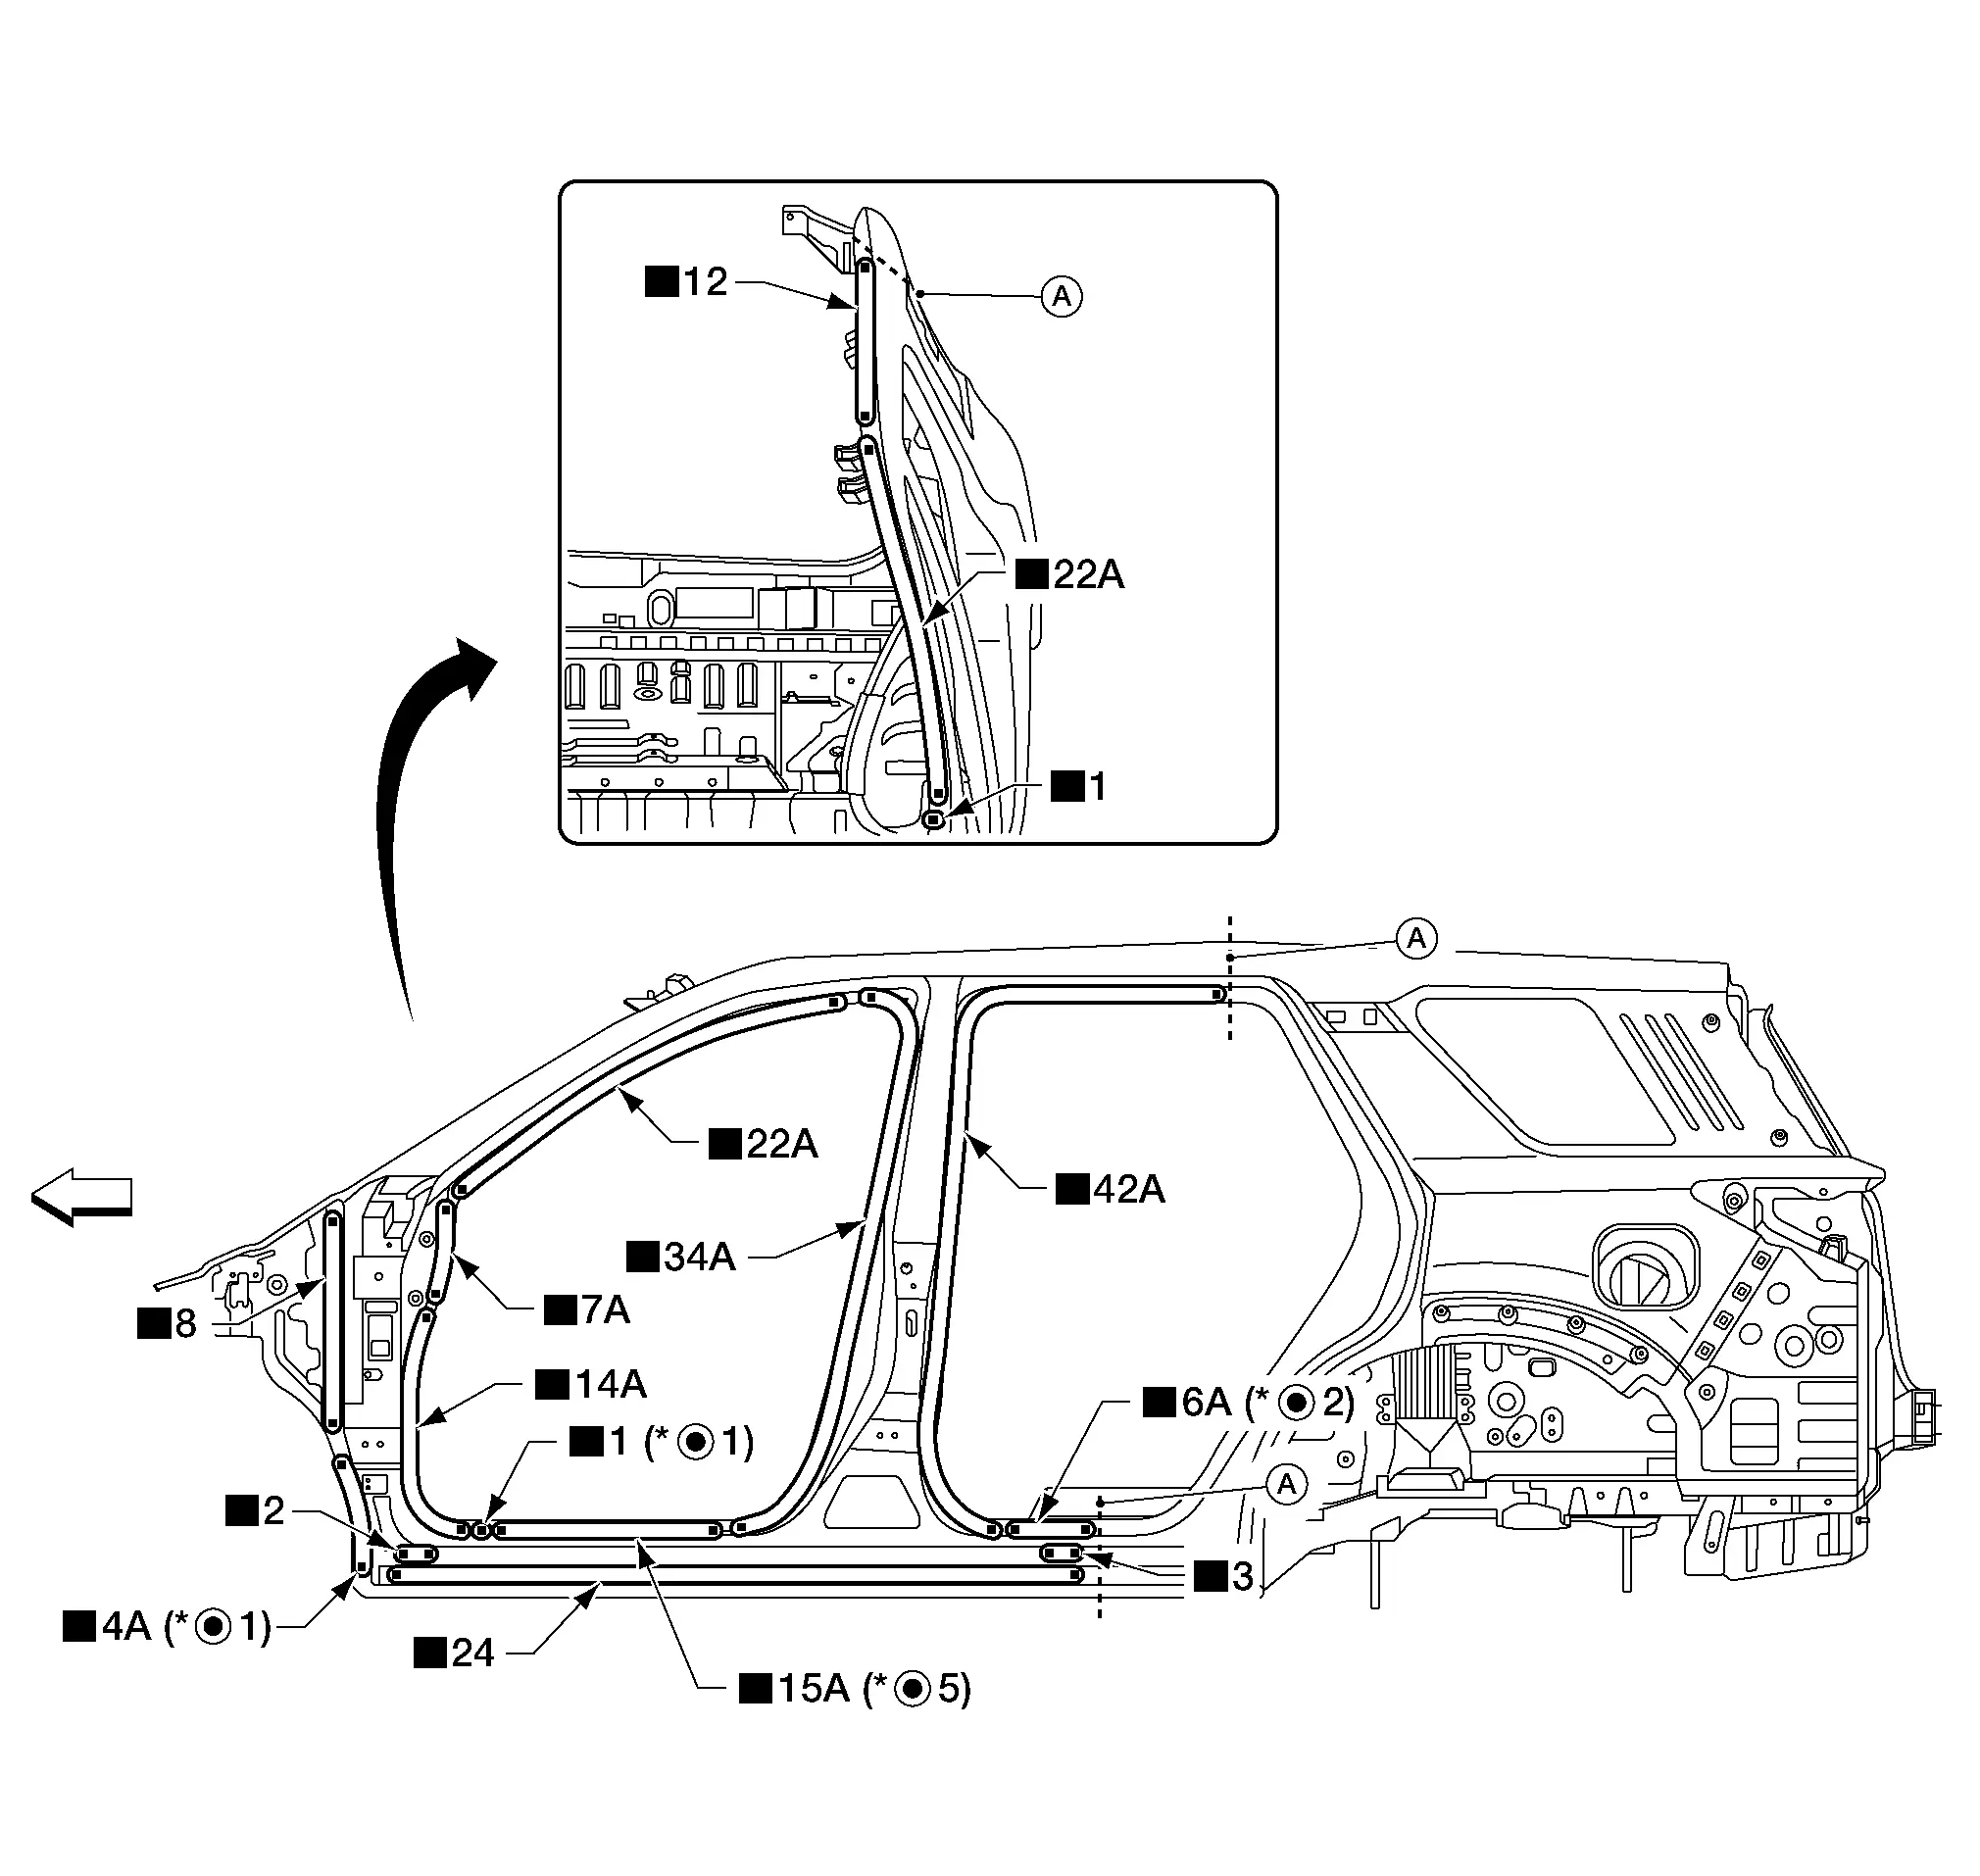
A. Sectioning locations
Front
Replacement parts
• Body side outer front
For spot welding of steel plate of strength 980 MPa, observe the indicated welding conditions. Refer to Welding of Ultra High Strength Steel.

BODY SIDE OUTER REAR

Work after roof panel is removed.
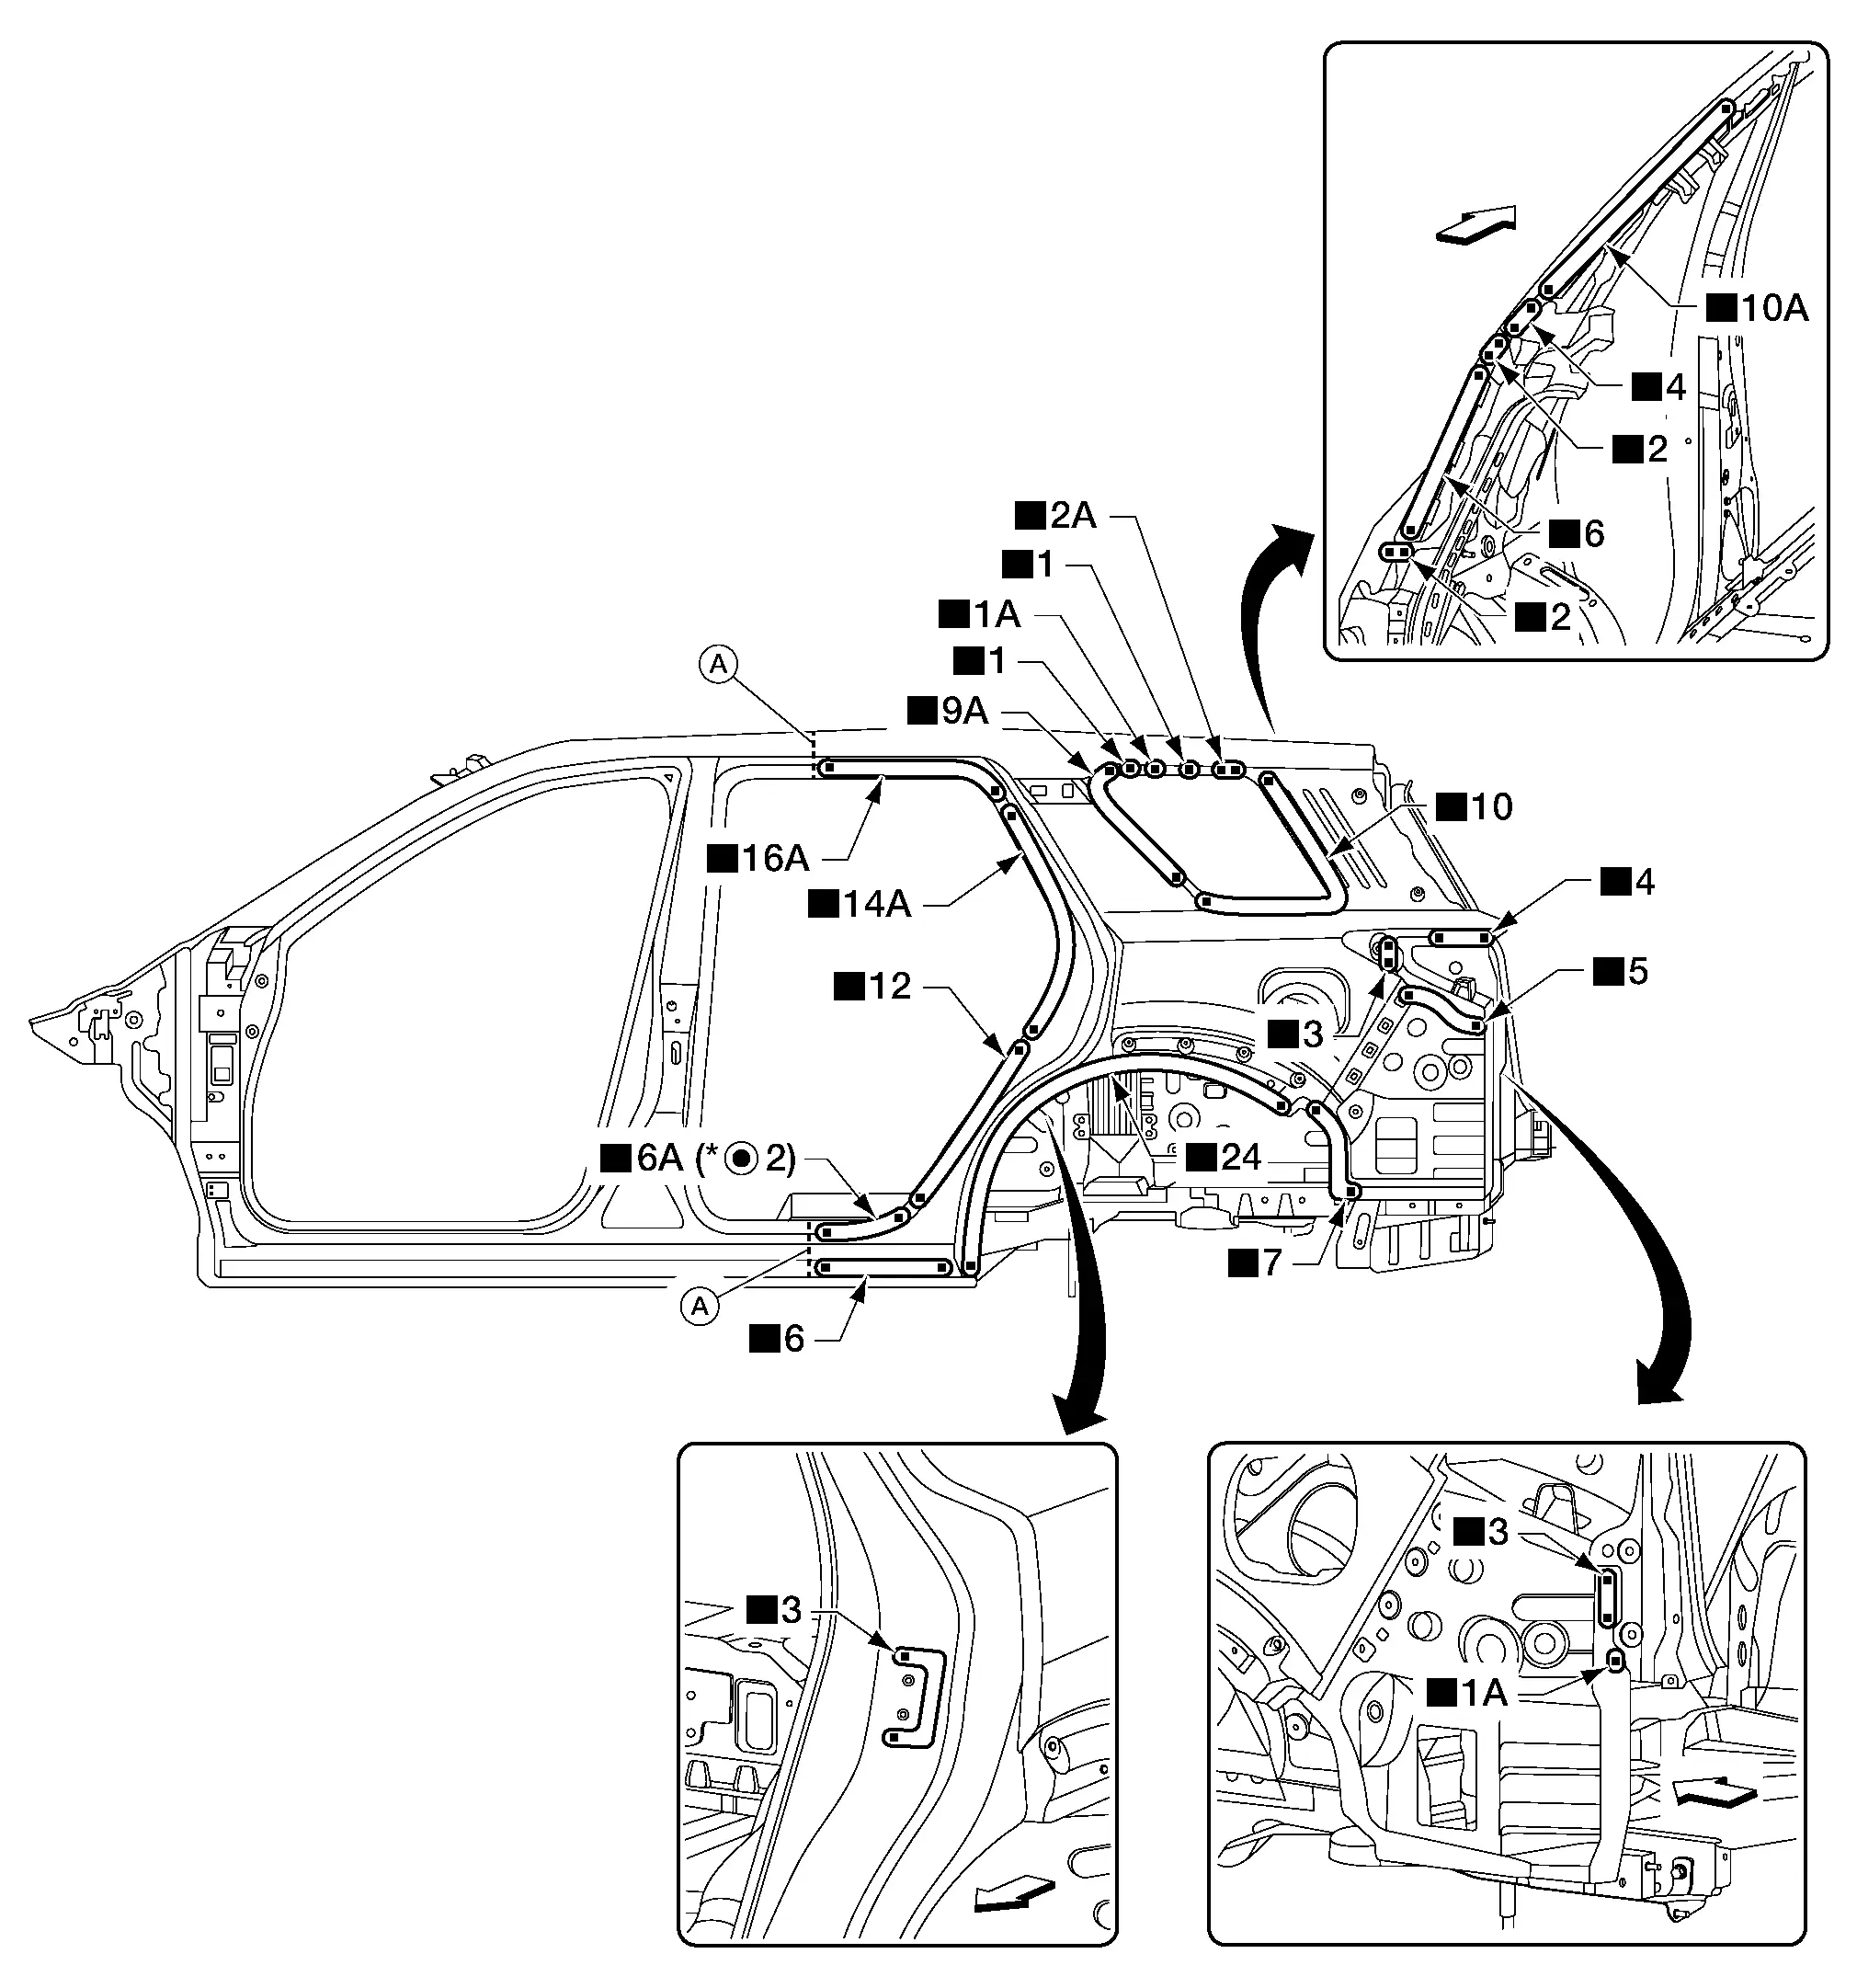
A. Sectioning locations
Front
Replacement parts
• Body side outer rear
For spot welding of steel plate of strength 980 MPa, observe the indicated welding conditions. Refer to Welding of Ultra High Strength Steel.

Front Pillar Outer (Partial)

Work after hoodledge outer is removed.
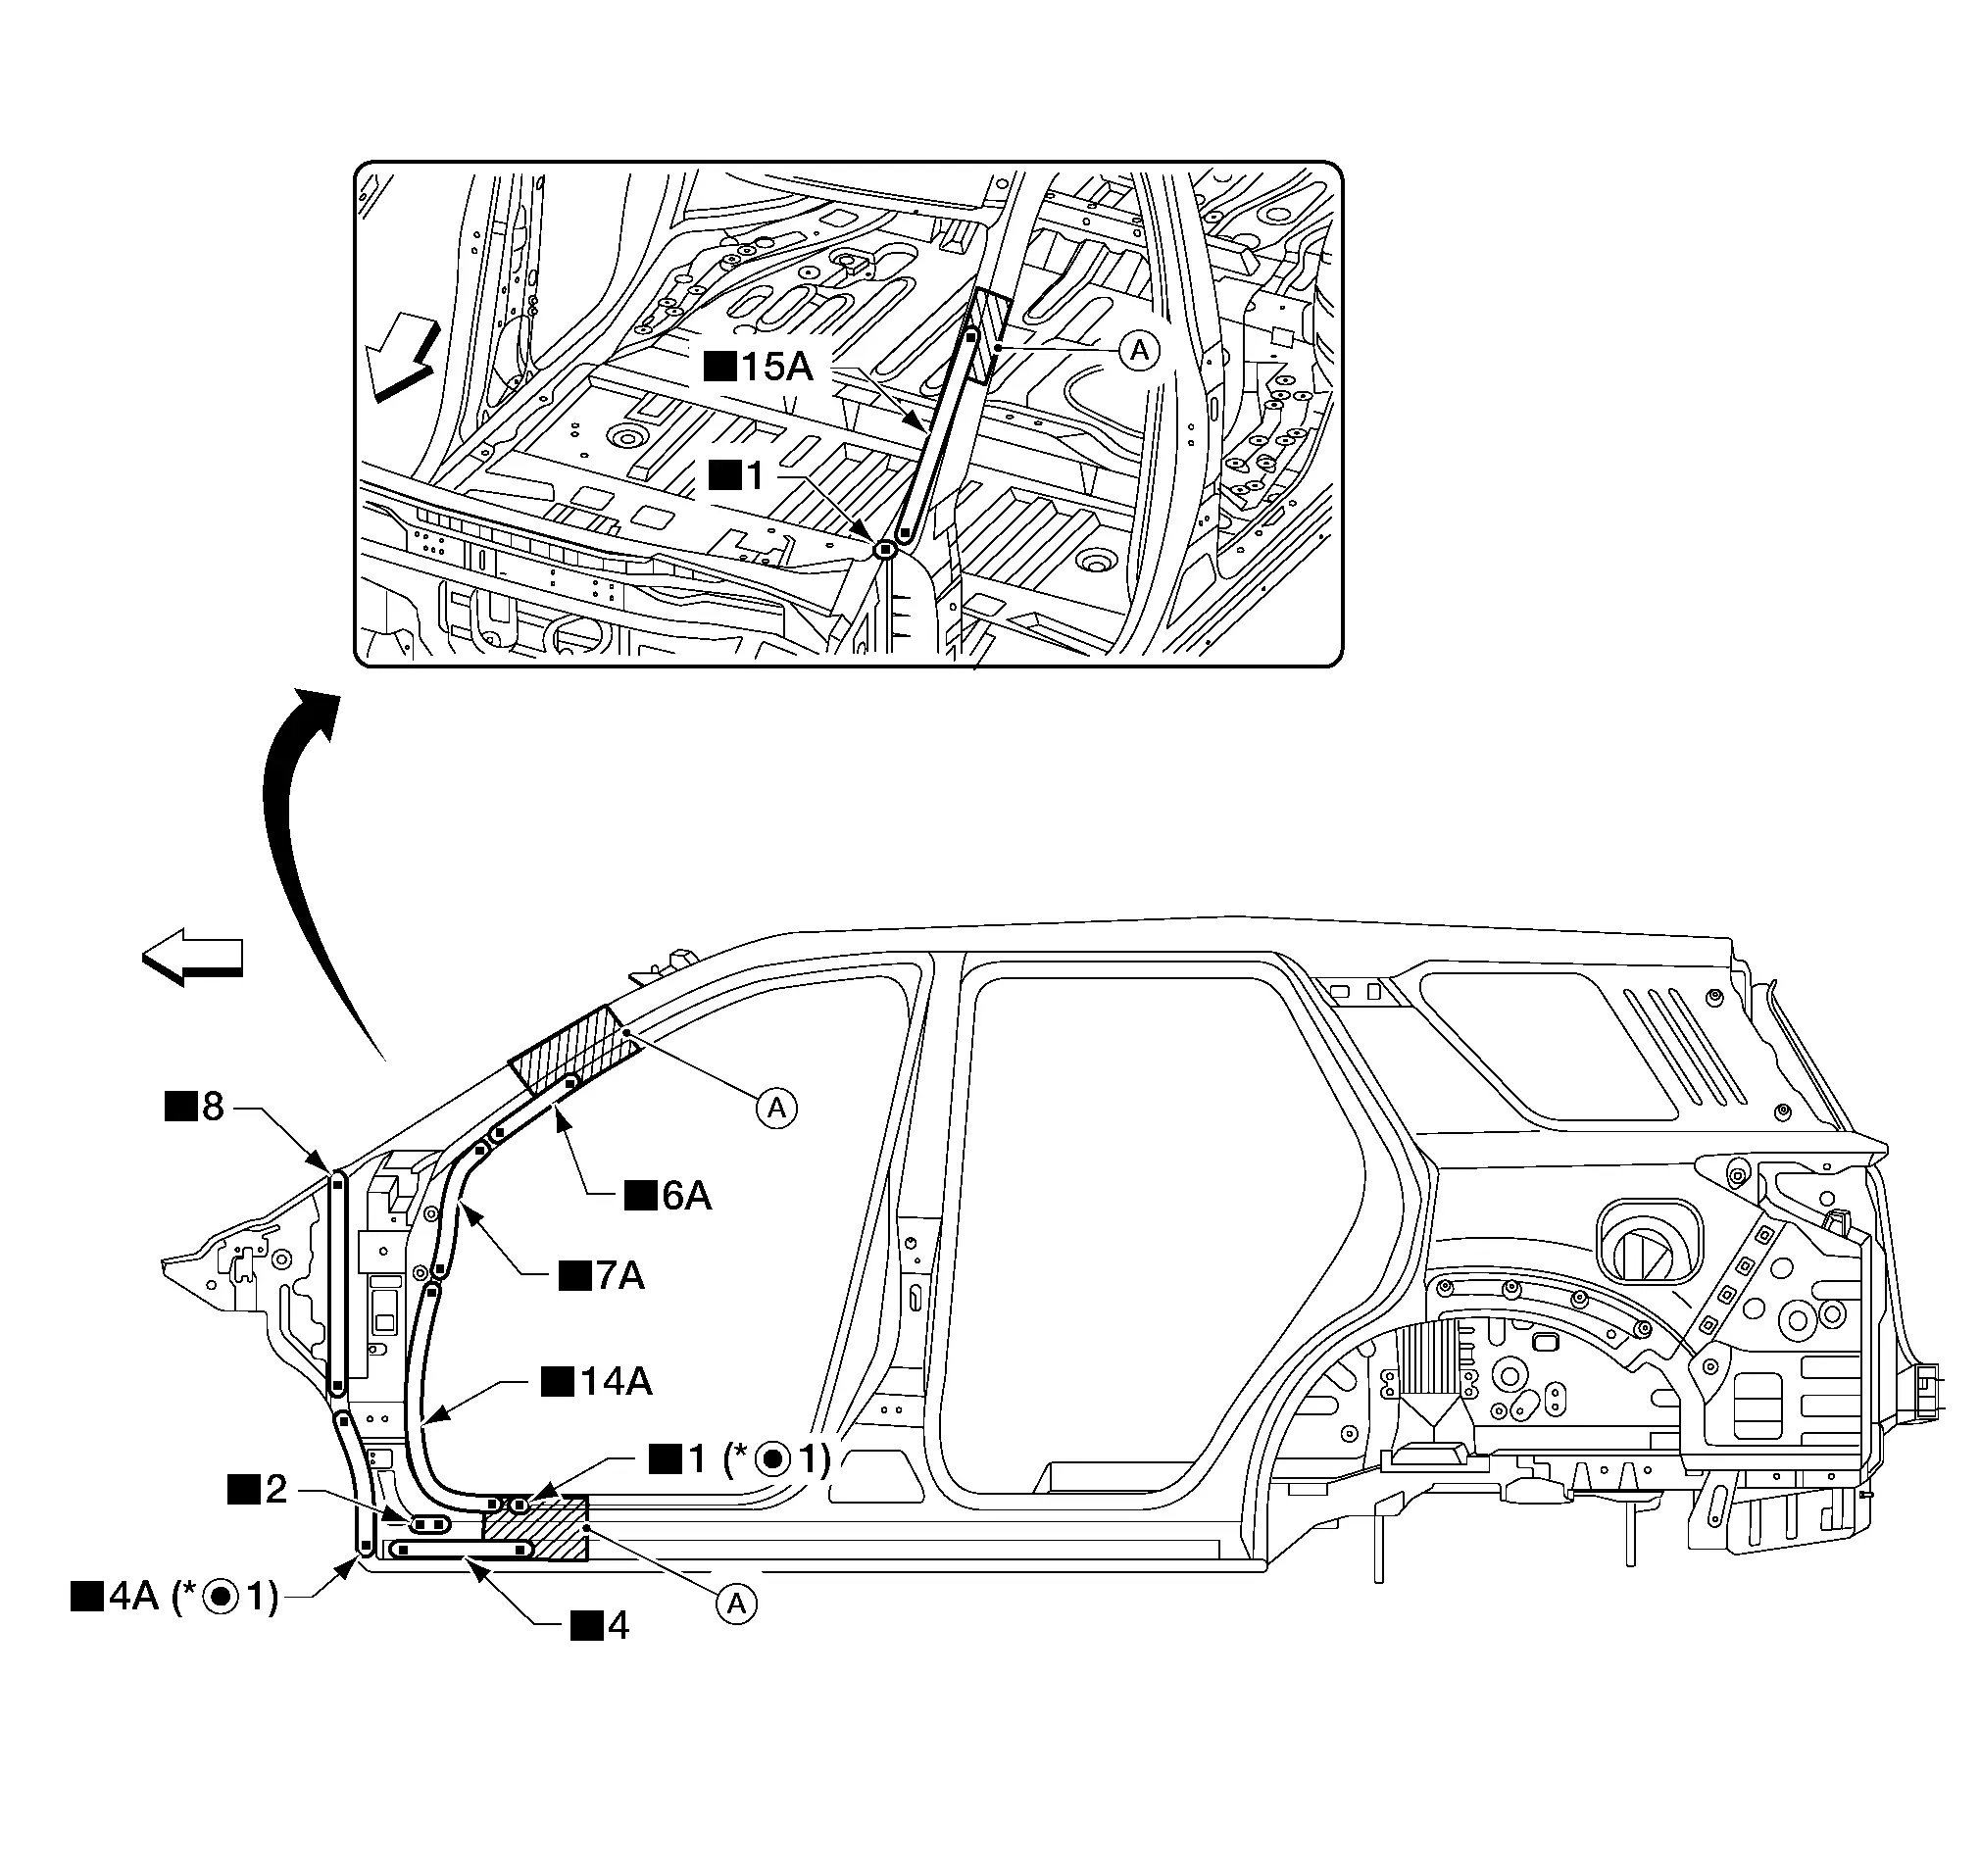
A. Sectioning location
Front
Replacement parts
• Front pillar outer (partial)
For spot welding of steel plate of strength 980 MPa, observe the indicated welding conditions. Refer to Welding of Ultra High Strength Steel.

Front Pillar Upper Hinge Brace

Work after front pillar outer (partial) is removed.
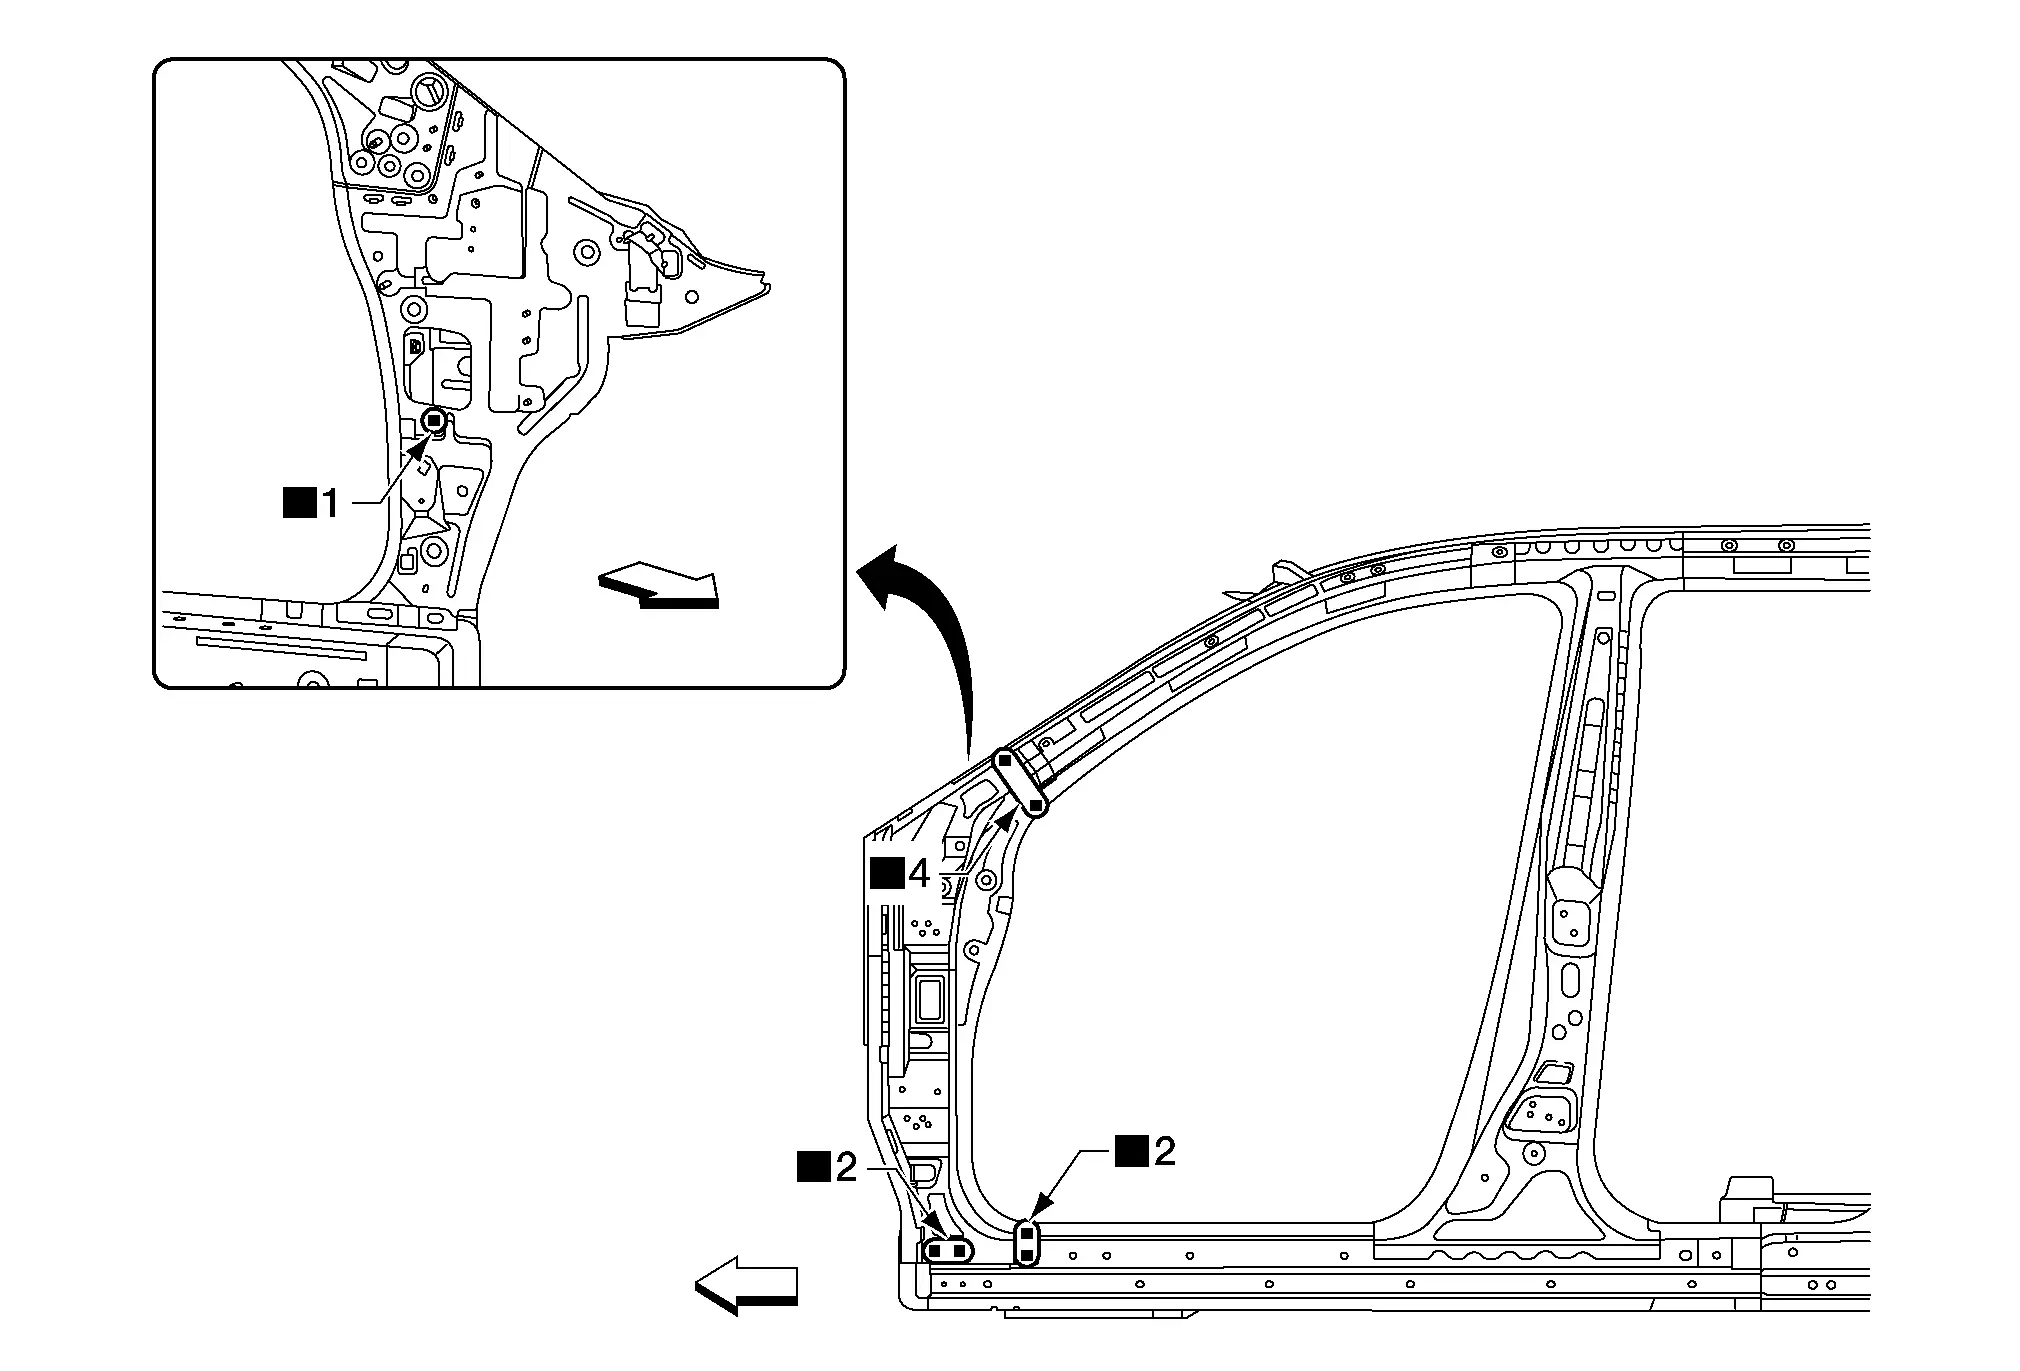
Front
Replacement parts
• Front pillar upper hinge brace

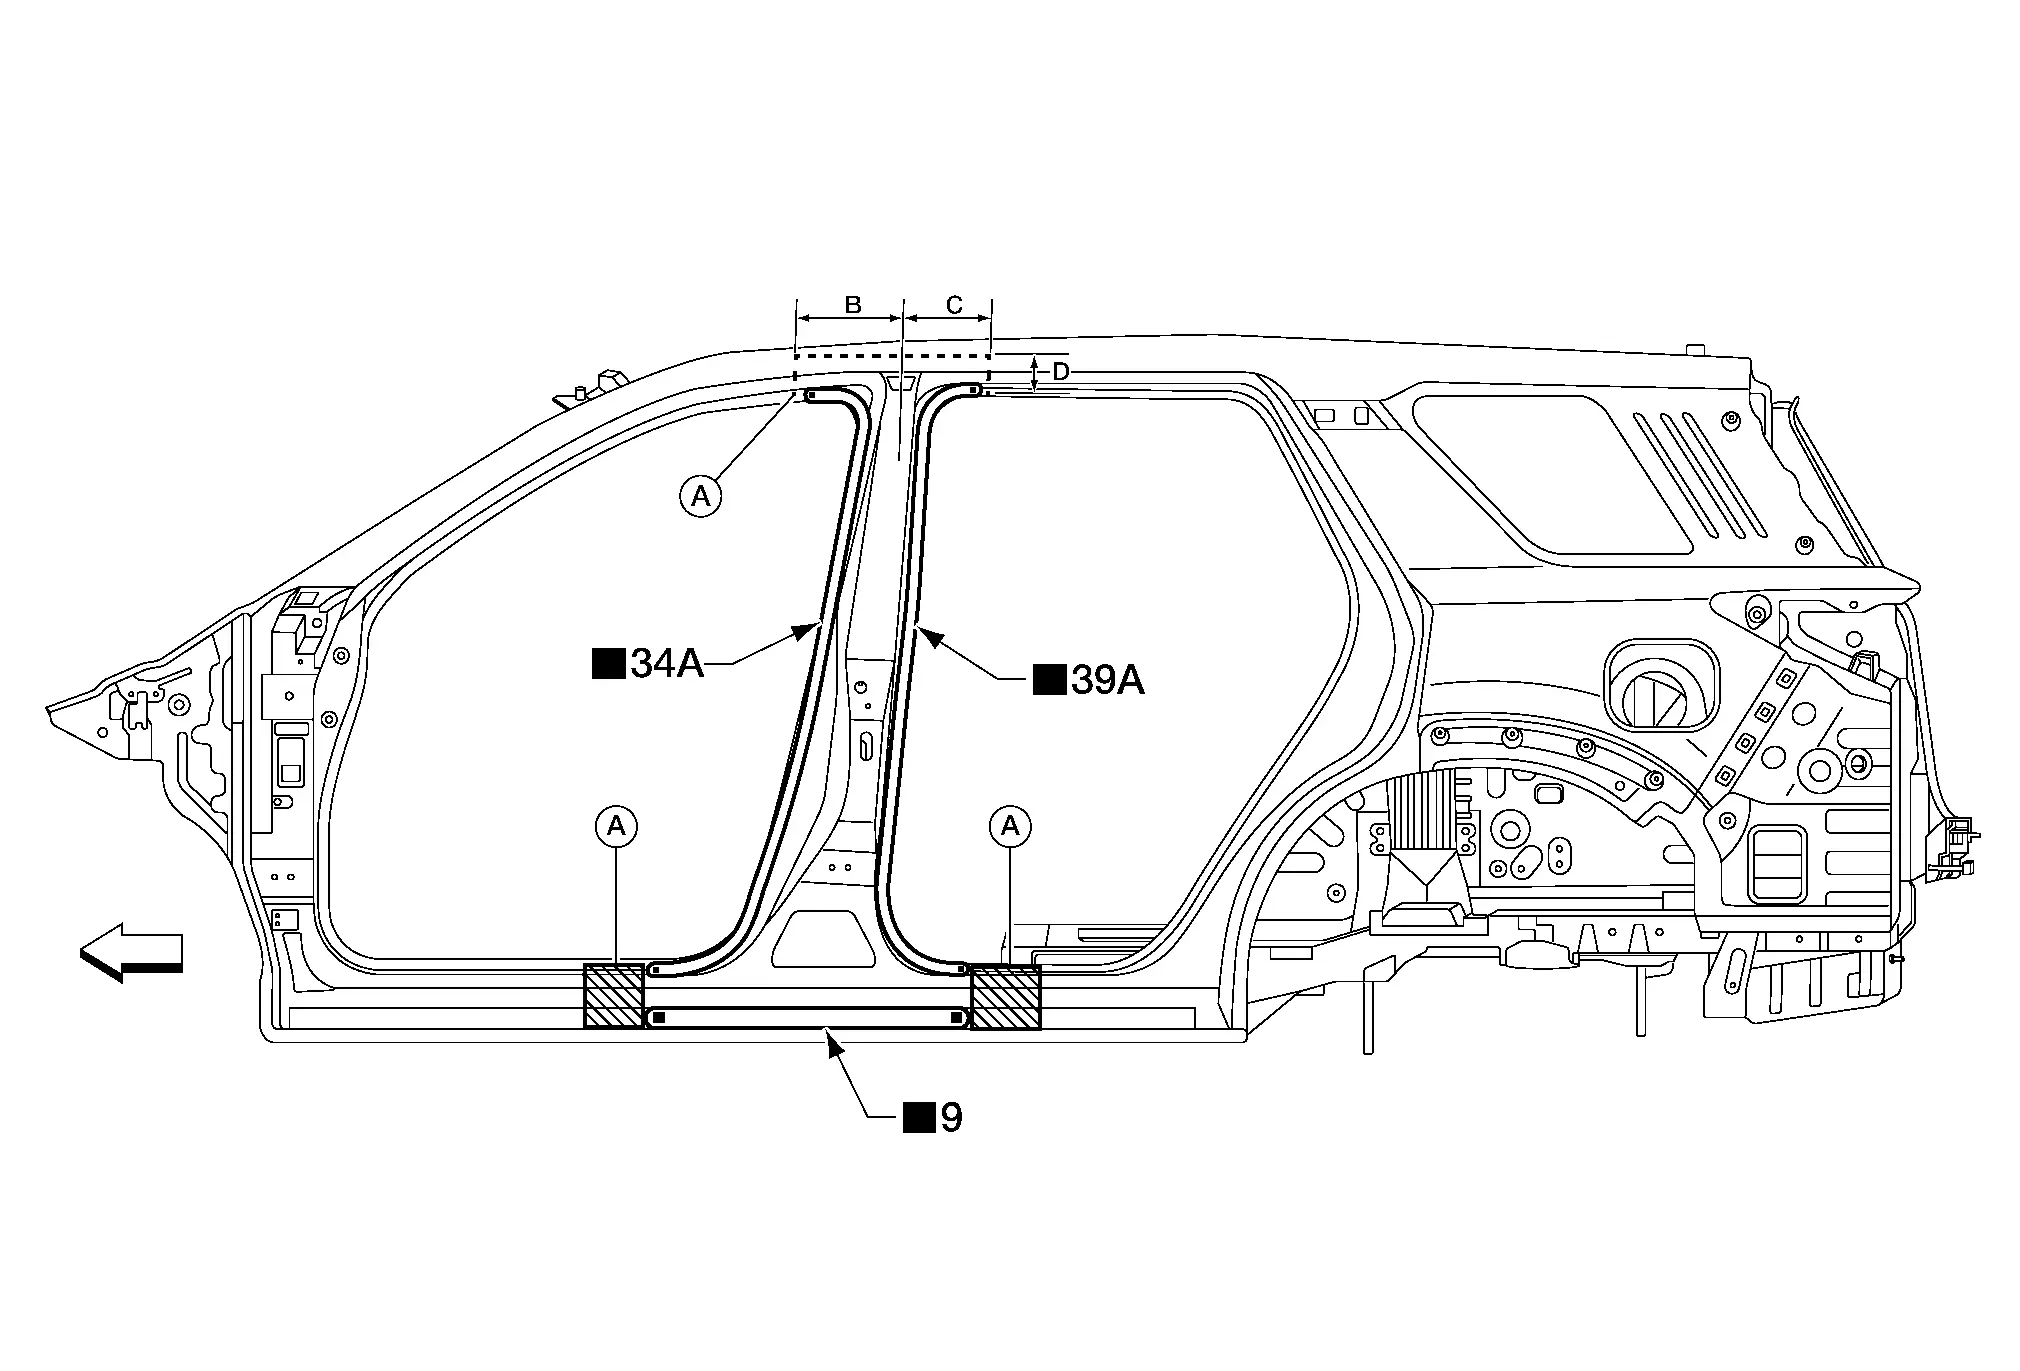
Center Pillar Outer (Partial)

Unit: mm (in)

A. Sectioning location B. 180.0 (7.09) C. 140.0 (5.51) D. 110.0 (4.33)
Front
Replacement parts
• Center pillar outer (partial)

Center Pillar Reinforcement

Work after center pillar outer (partial) is removed.
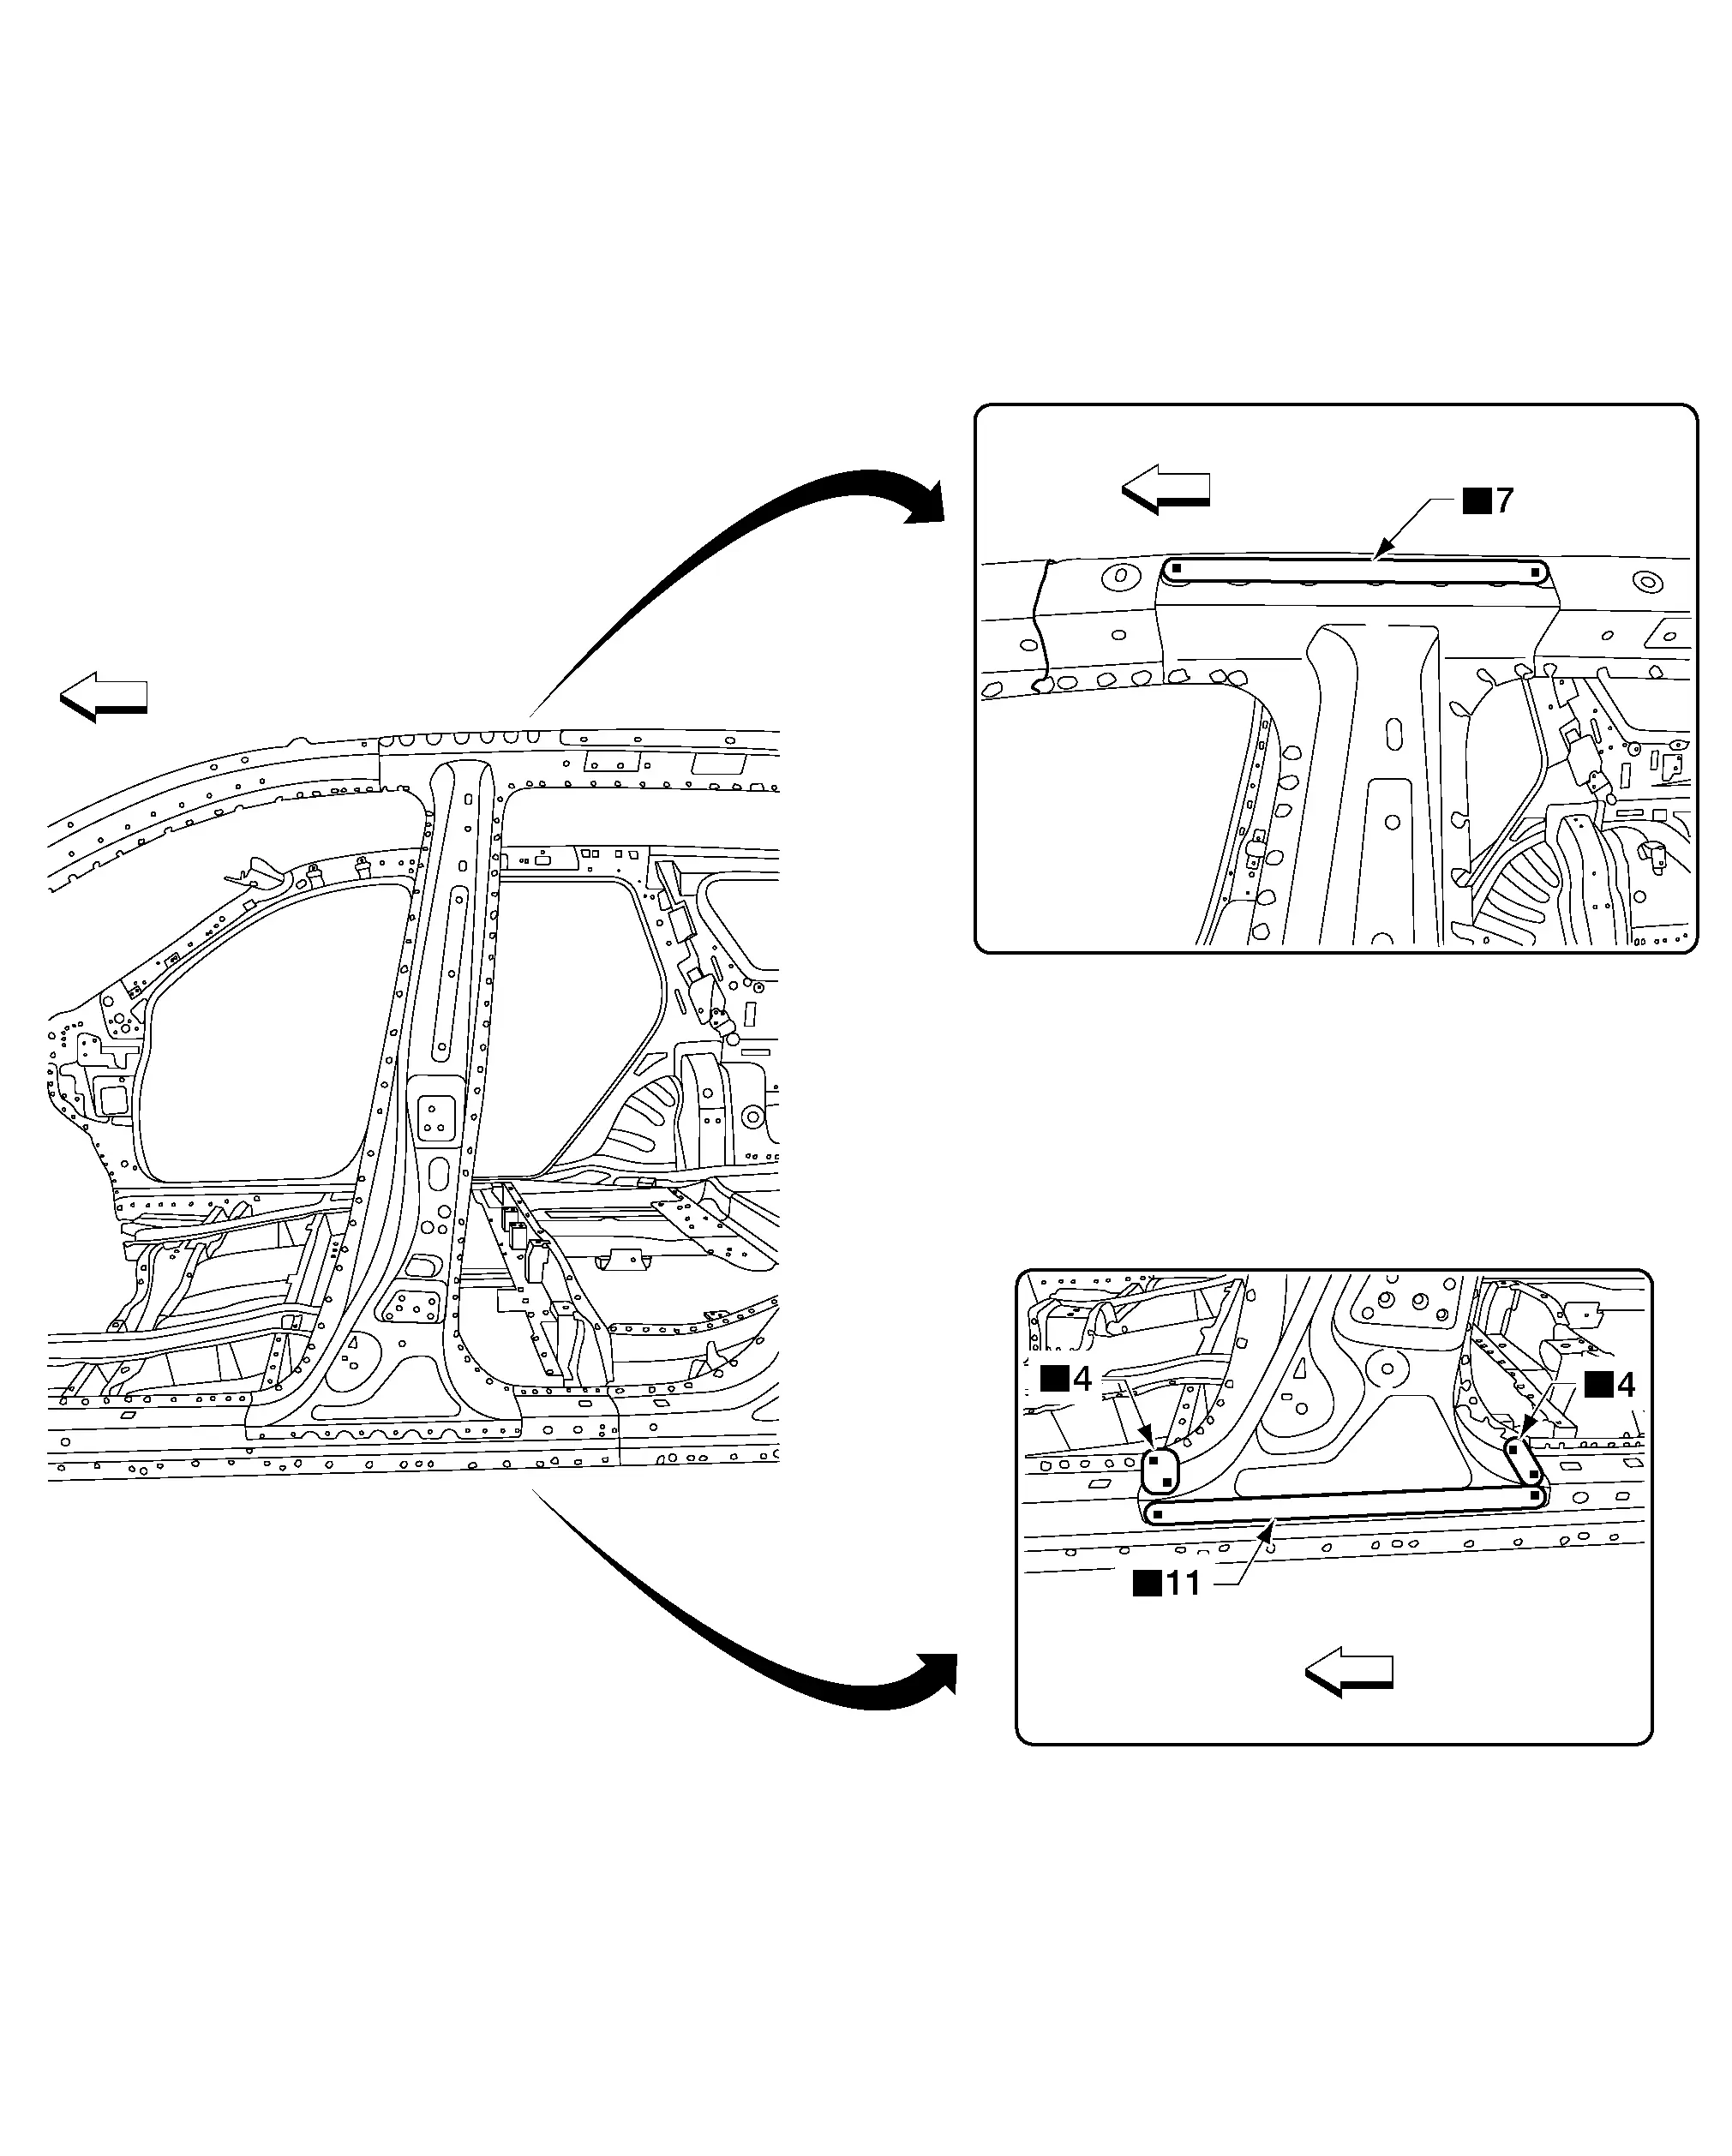
Front
Replacement parts
• Center pillar reinforcement

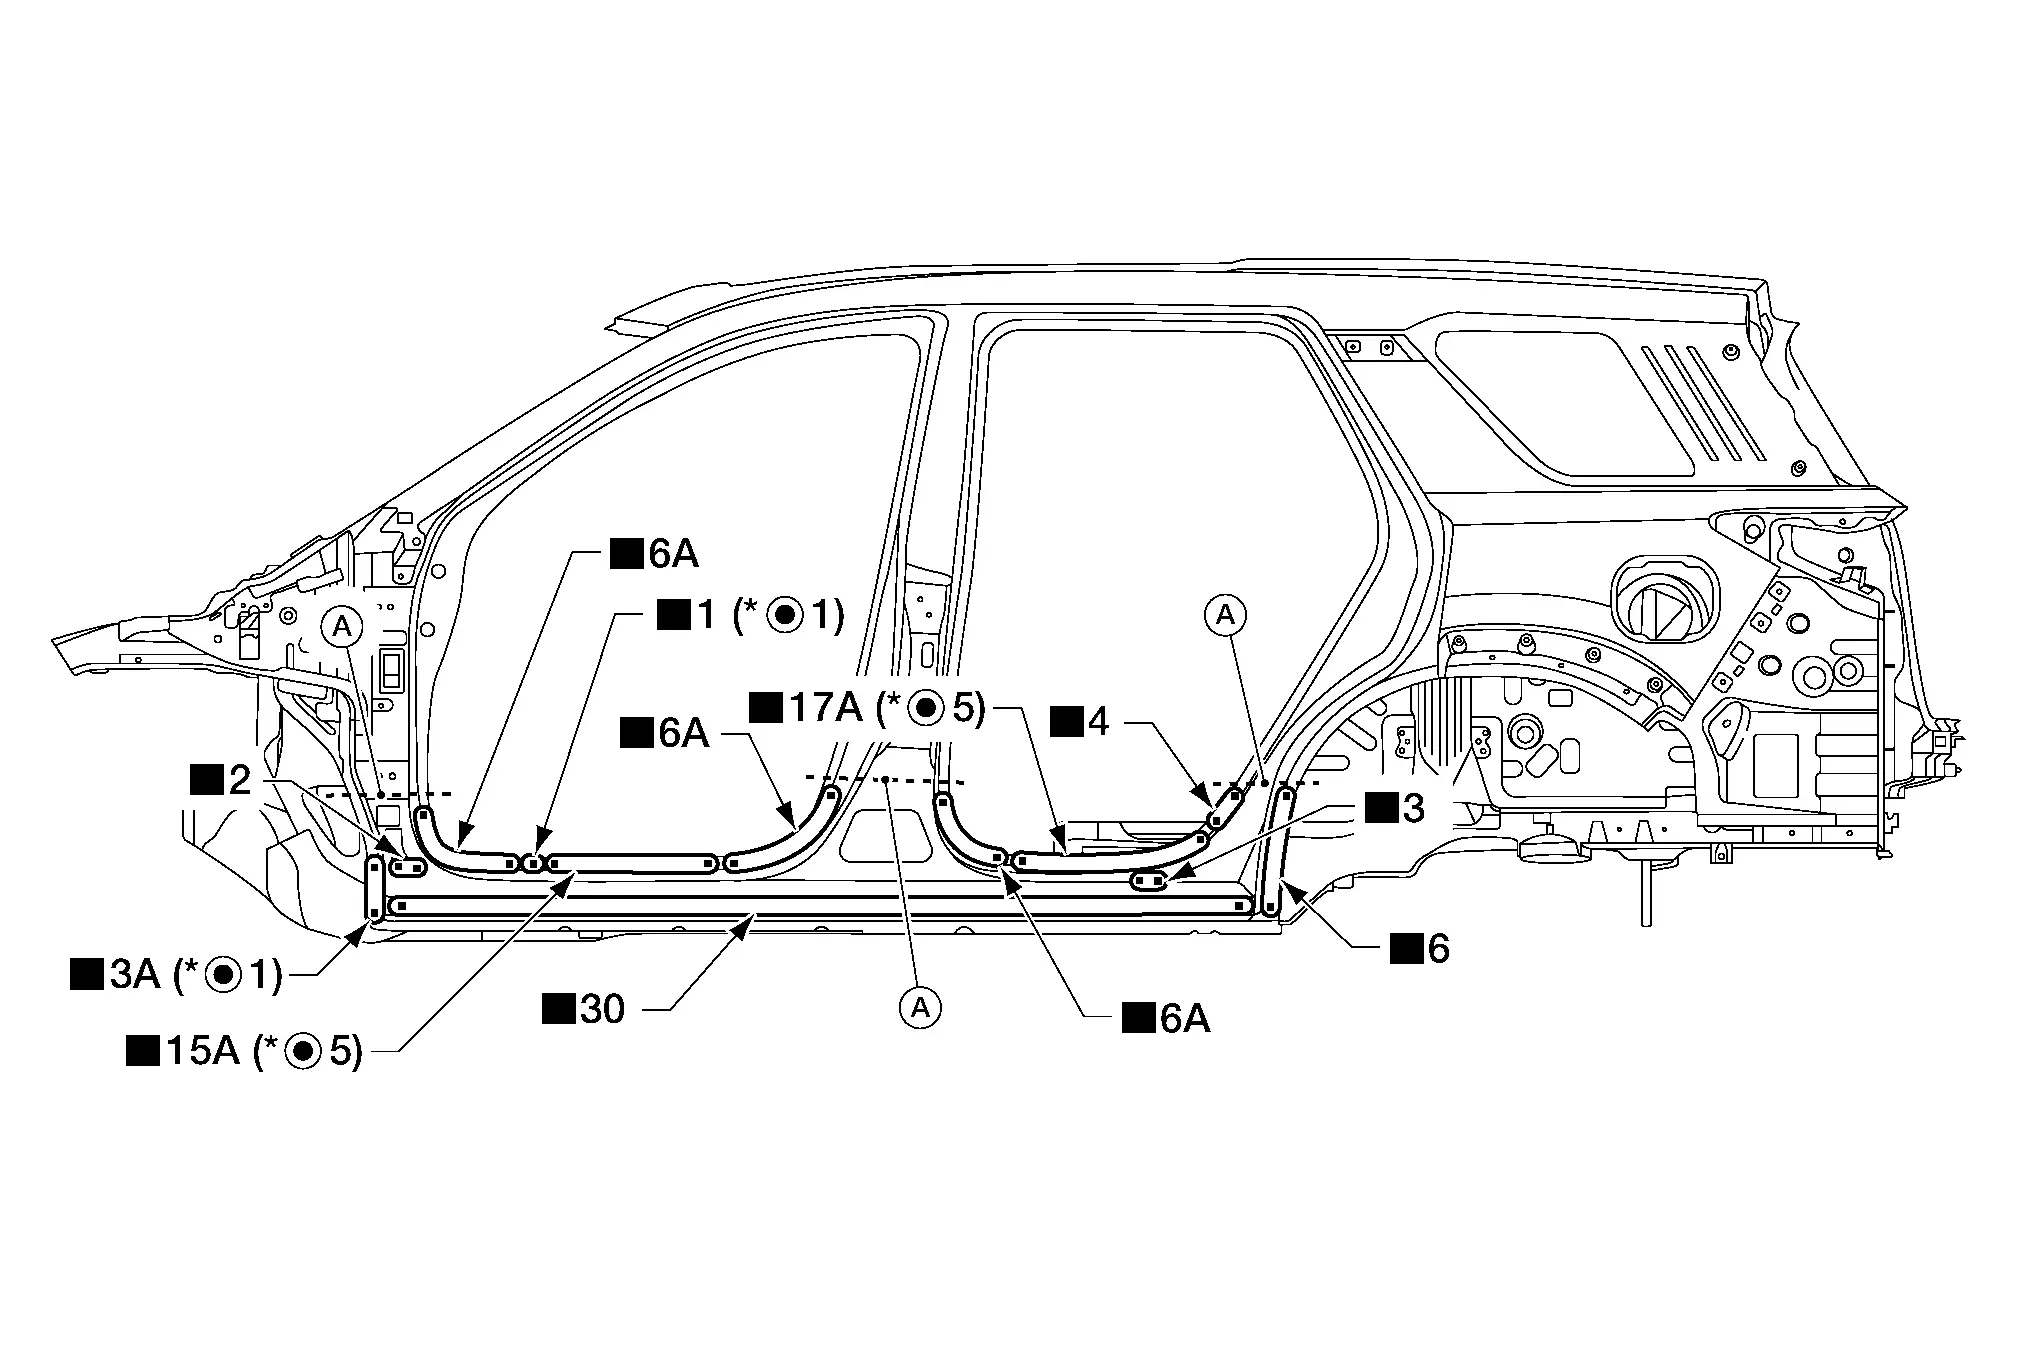
Sill Outer (Partial)

A. Sectioning location
Front
Replacement parts
• Sill outer (partial)
For spot welding of steel plate of strength 980 MPa, observe the indicated welding conditions. Refer to Welding of Ultra High Strength Steel.

Sill Outer Reinforcement

Work after sill outer (partial) is removed.
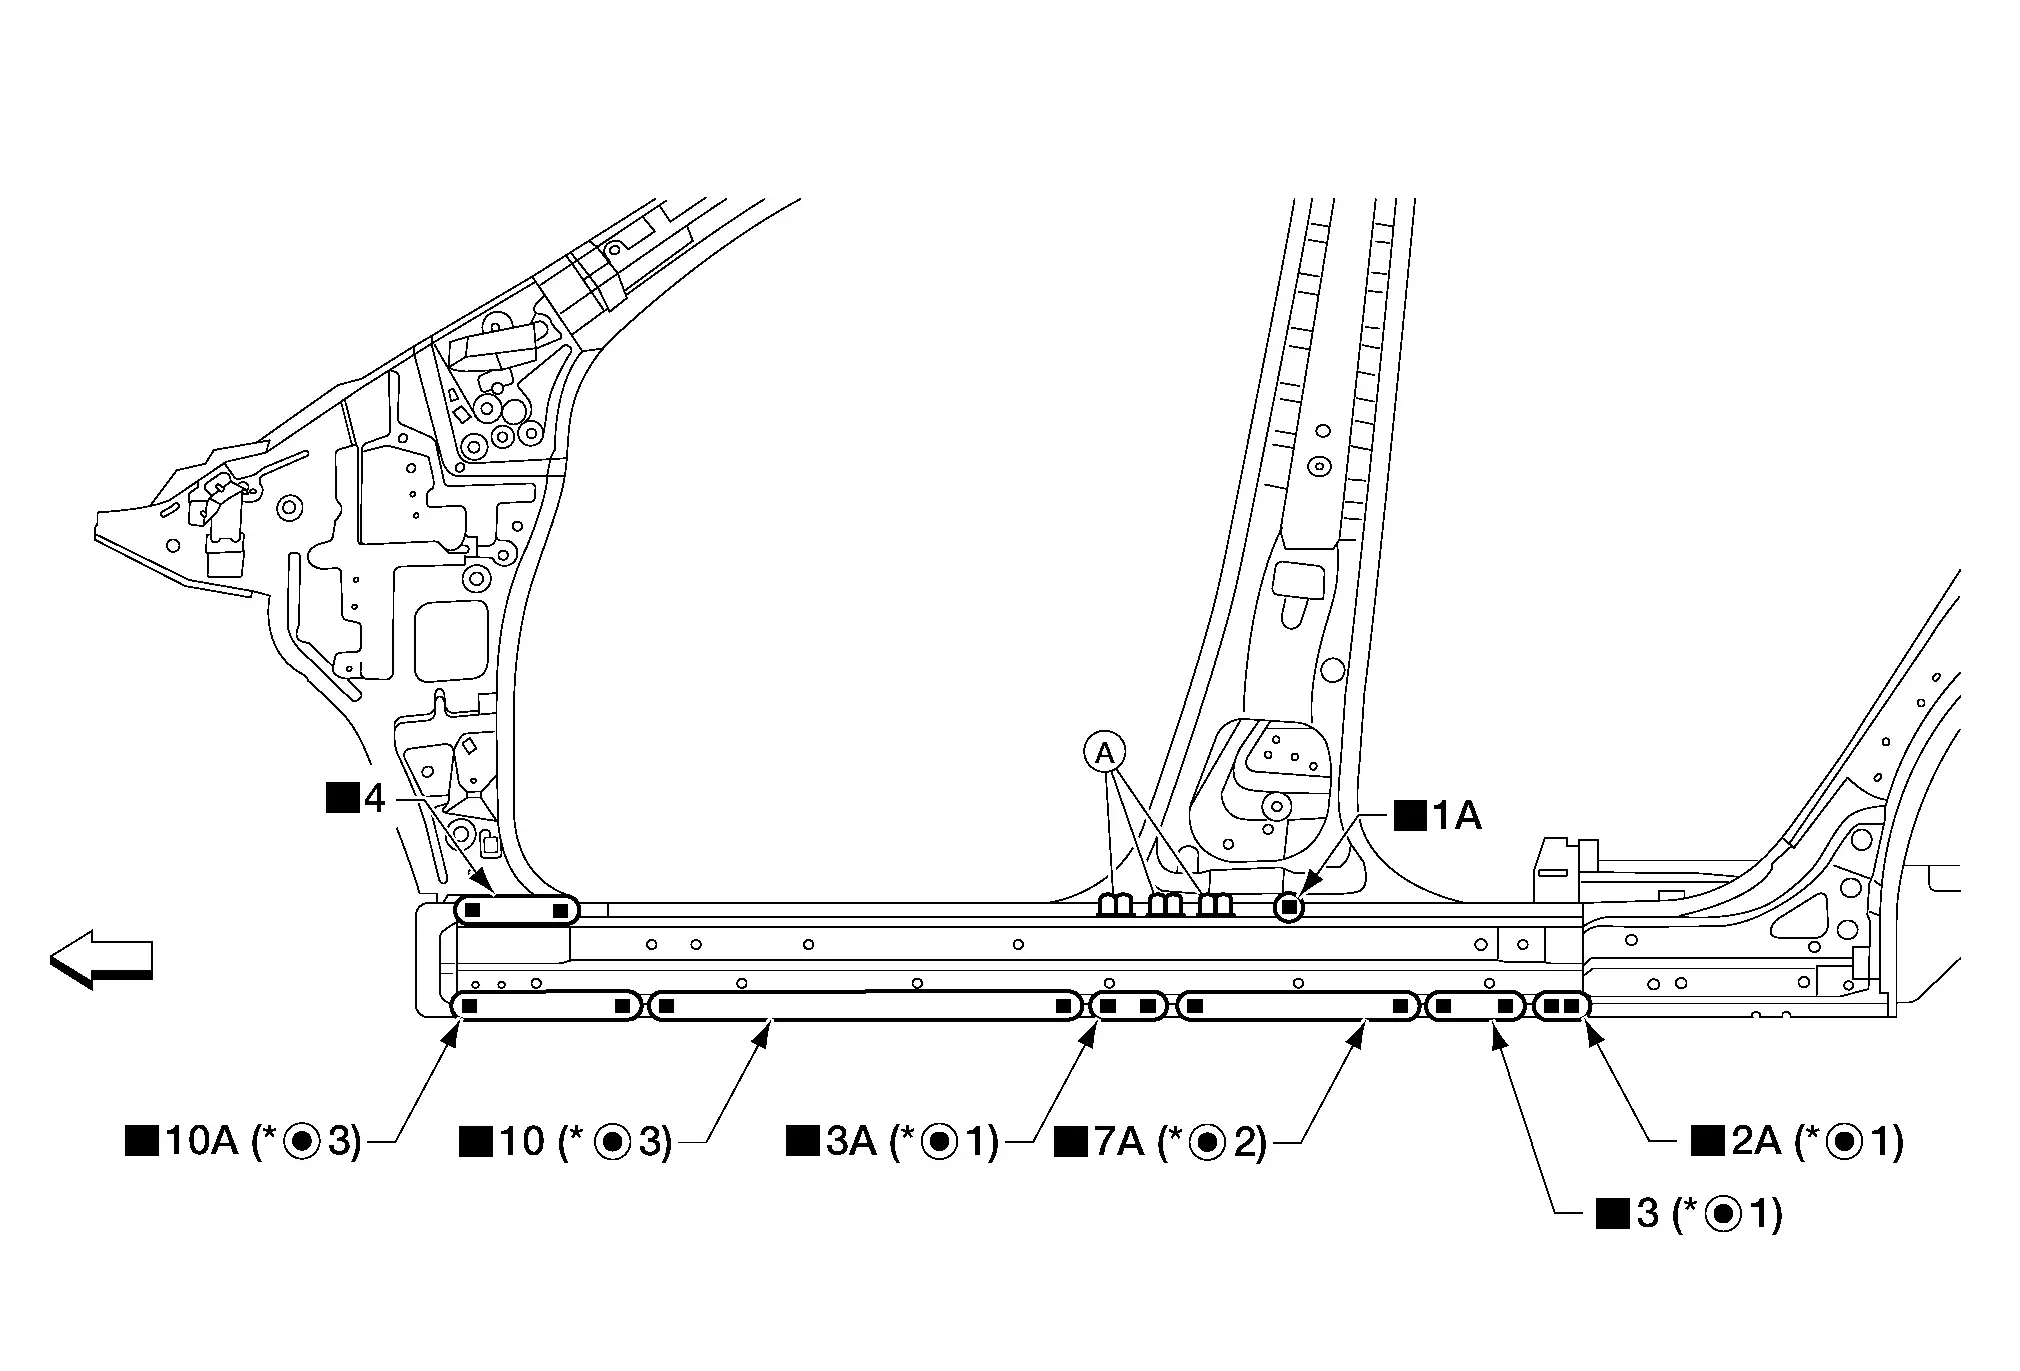
A. MAG welds
Front
Replacement parts
• Sill outer reinforcement
For spot welding of steel plate of strength 980 MPa, observe the indicated welding conditions. Refer to Welding of Ultra High Strength Steel.

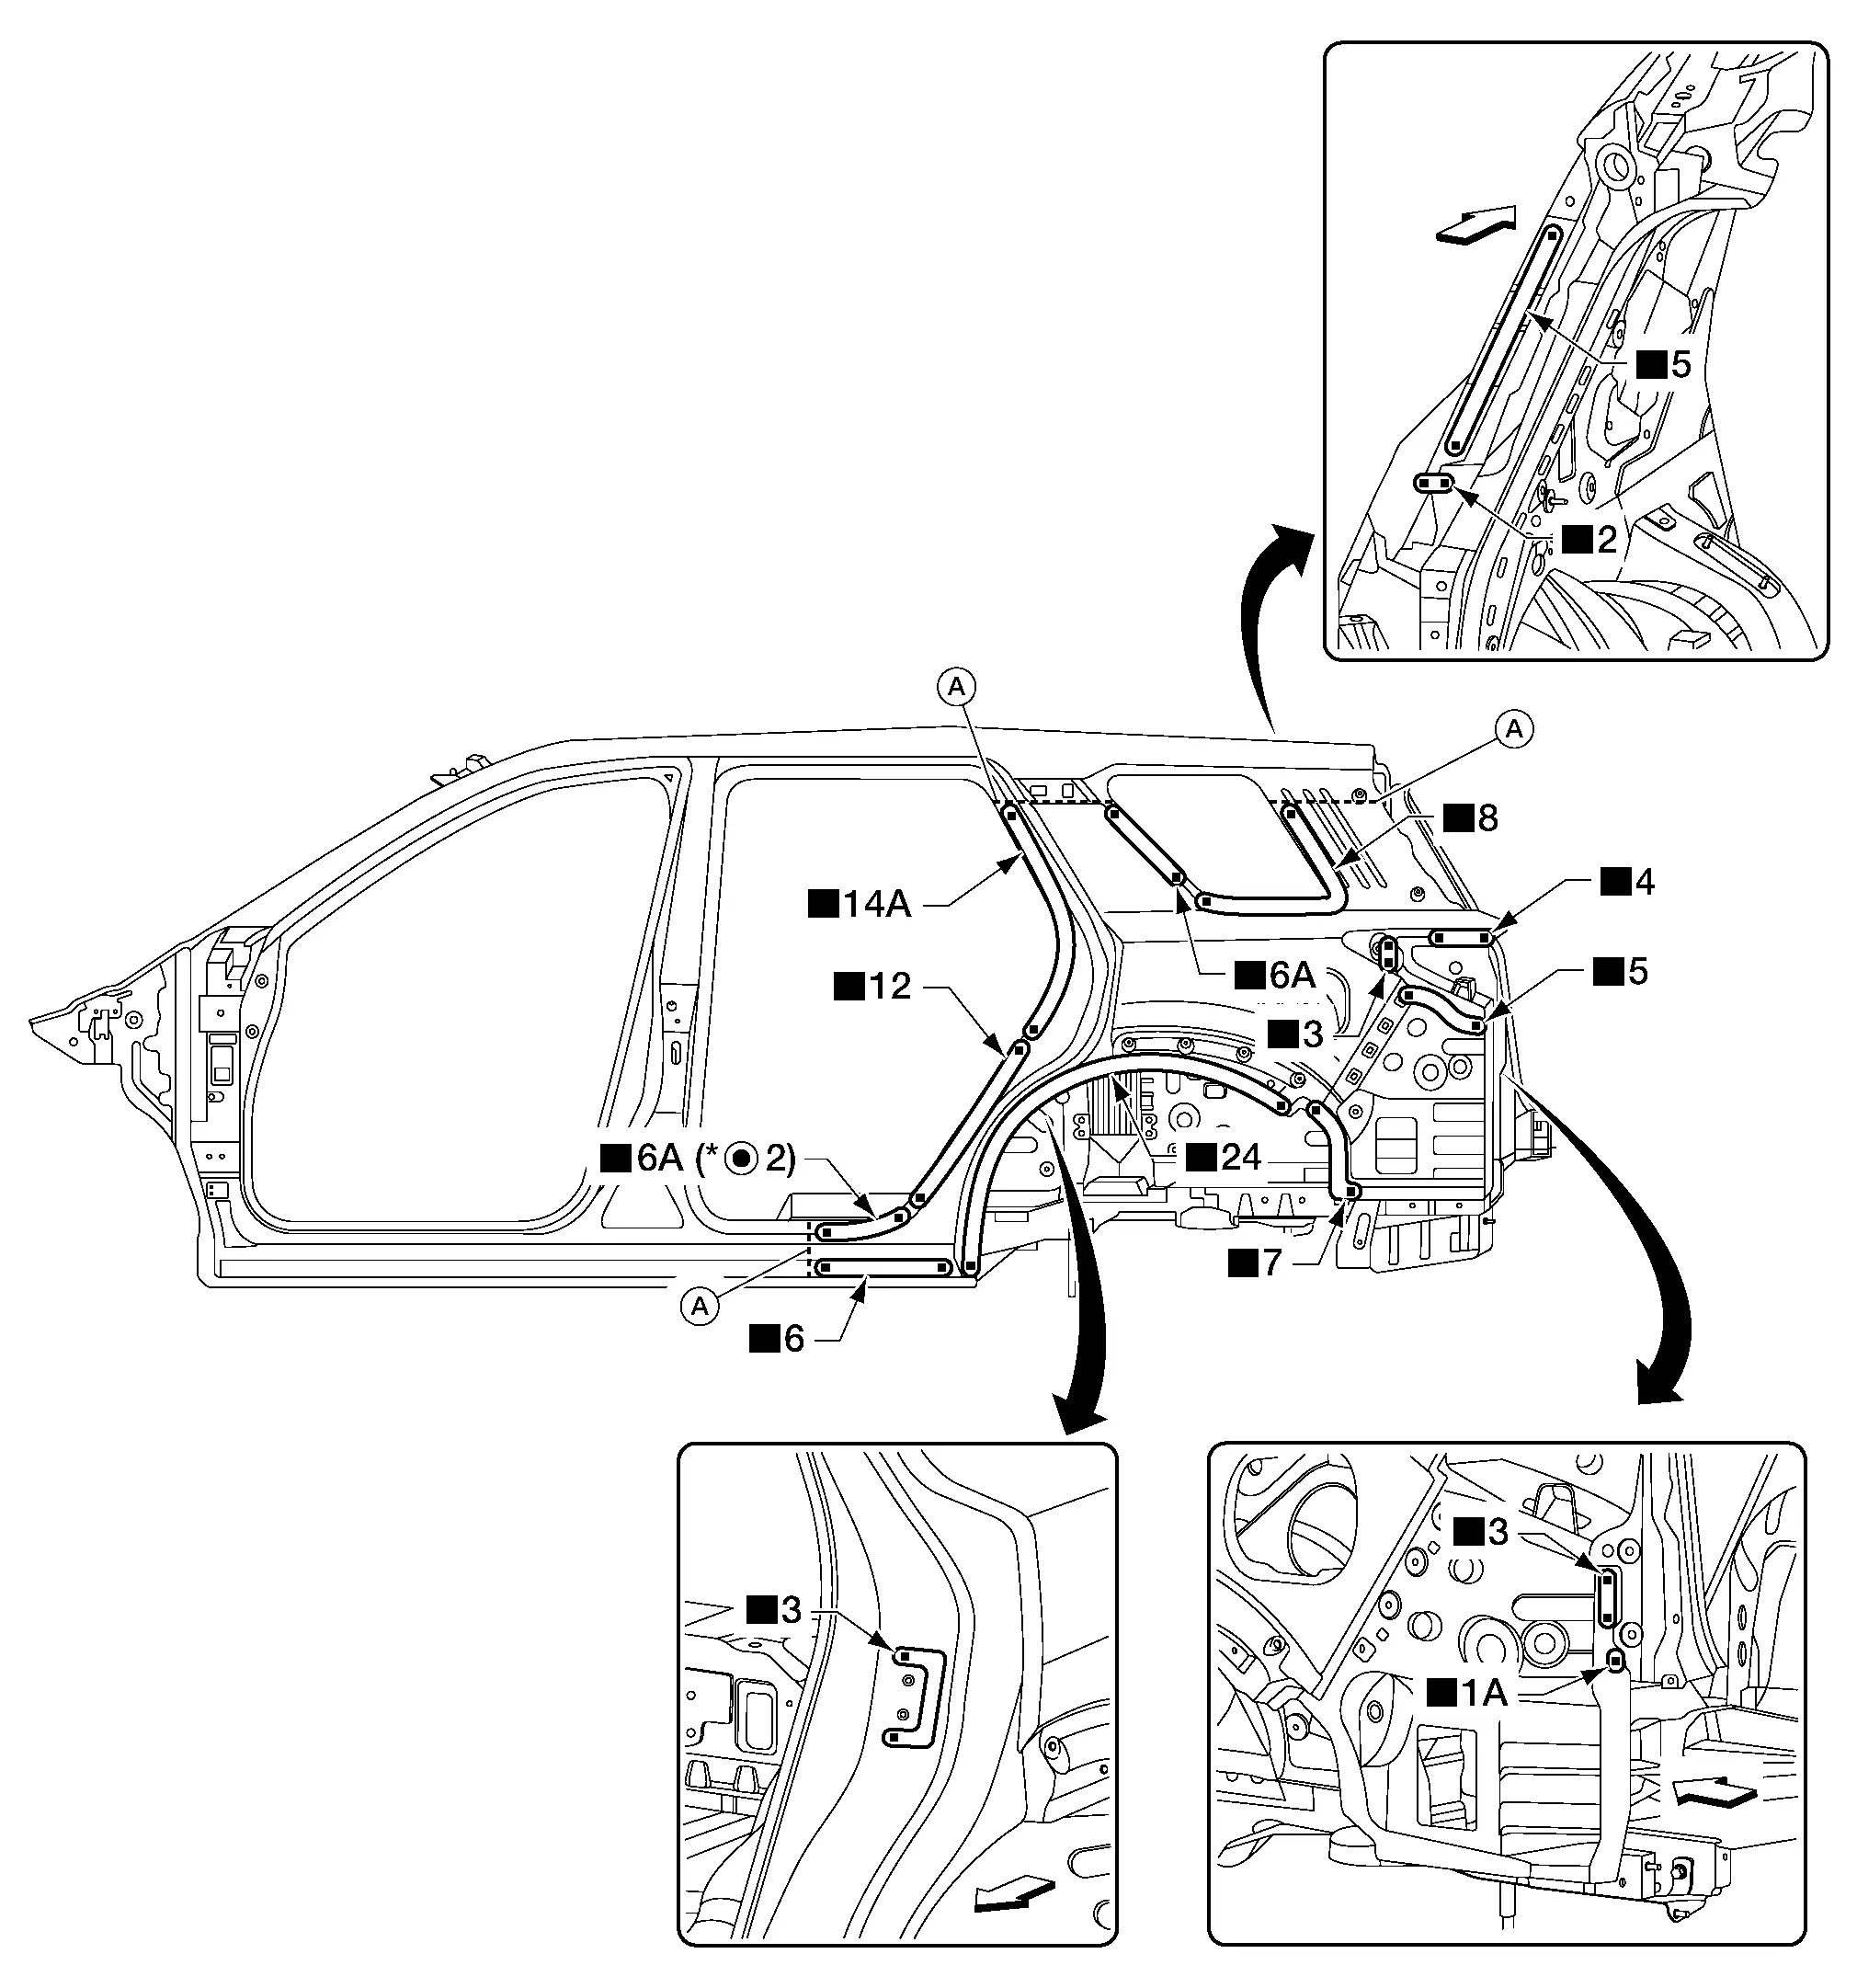
Rear Fender (Partial)

A. Sectioning location
Front
Replacement parts
• Rear fender (partial)
For spot welding of steel plate of strength 980 MPa, observe the indicated welding conditions. Refer to Welding of Ultra High Strength Steel.

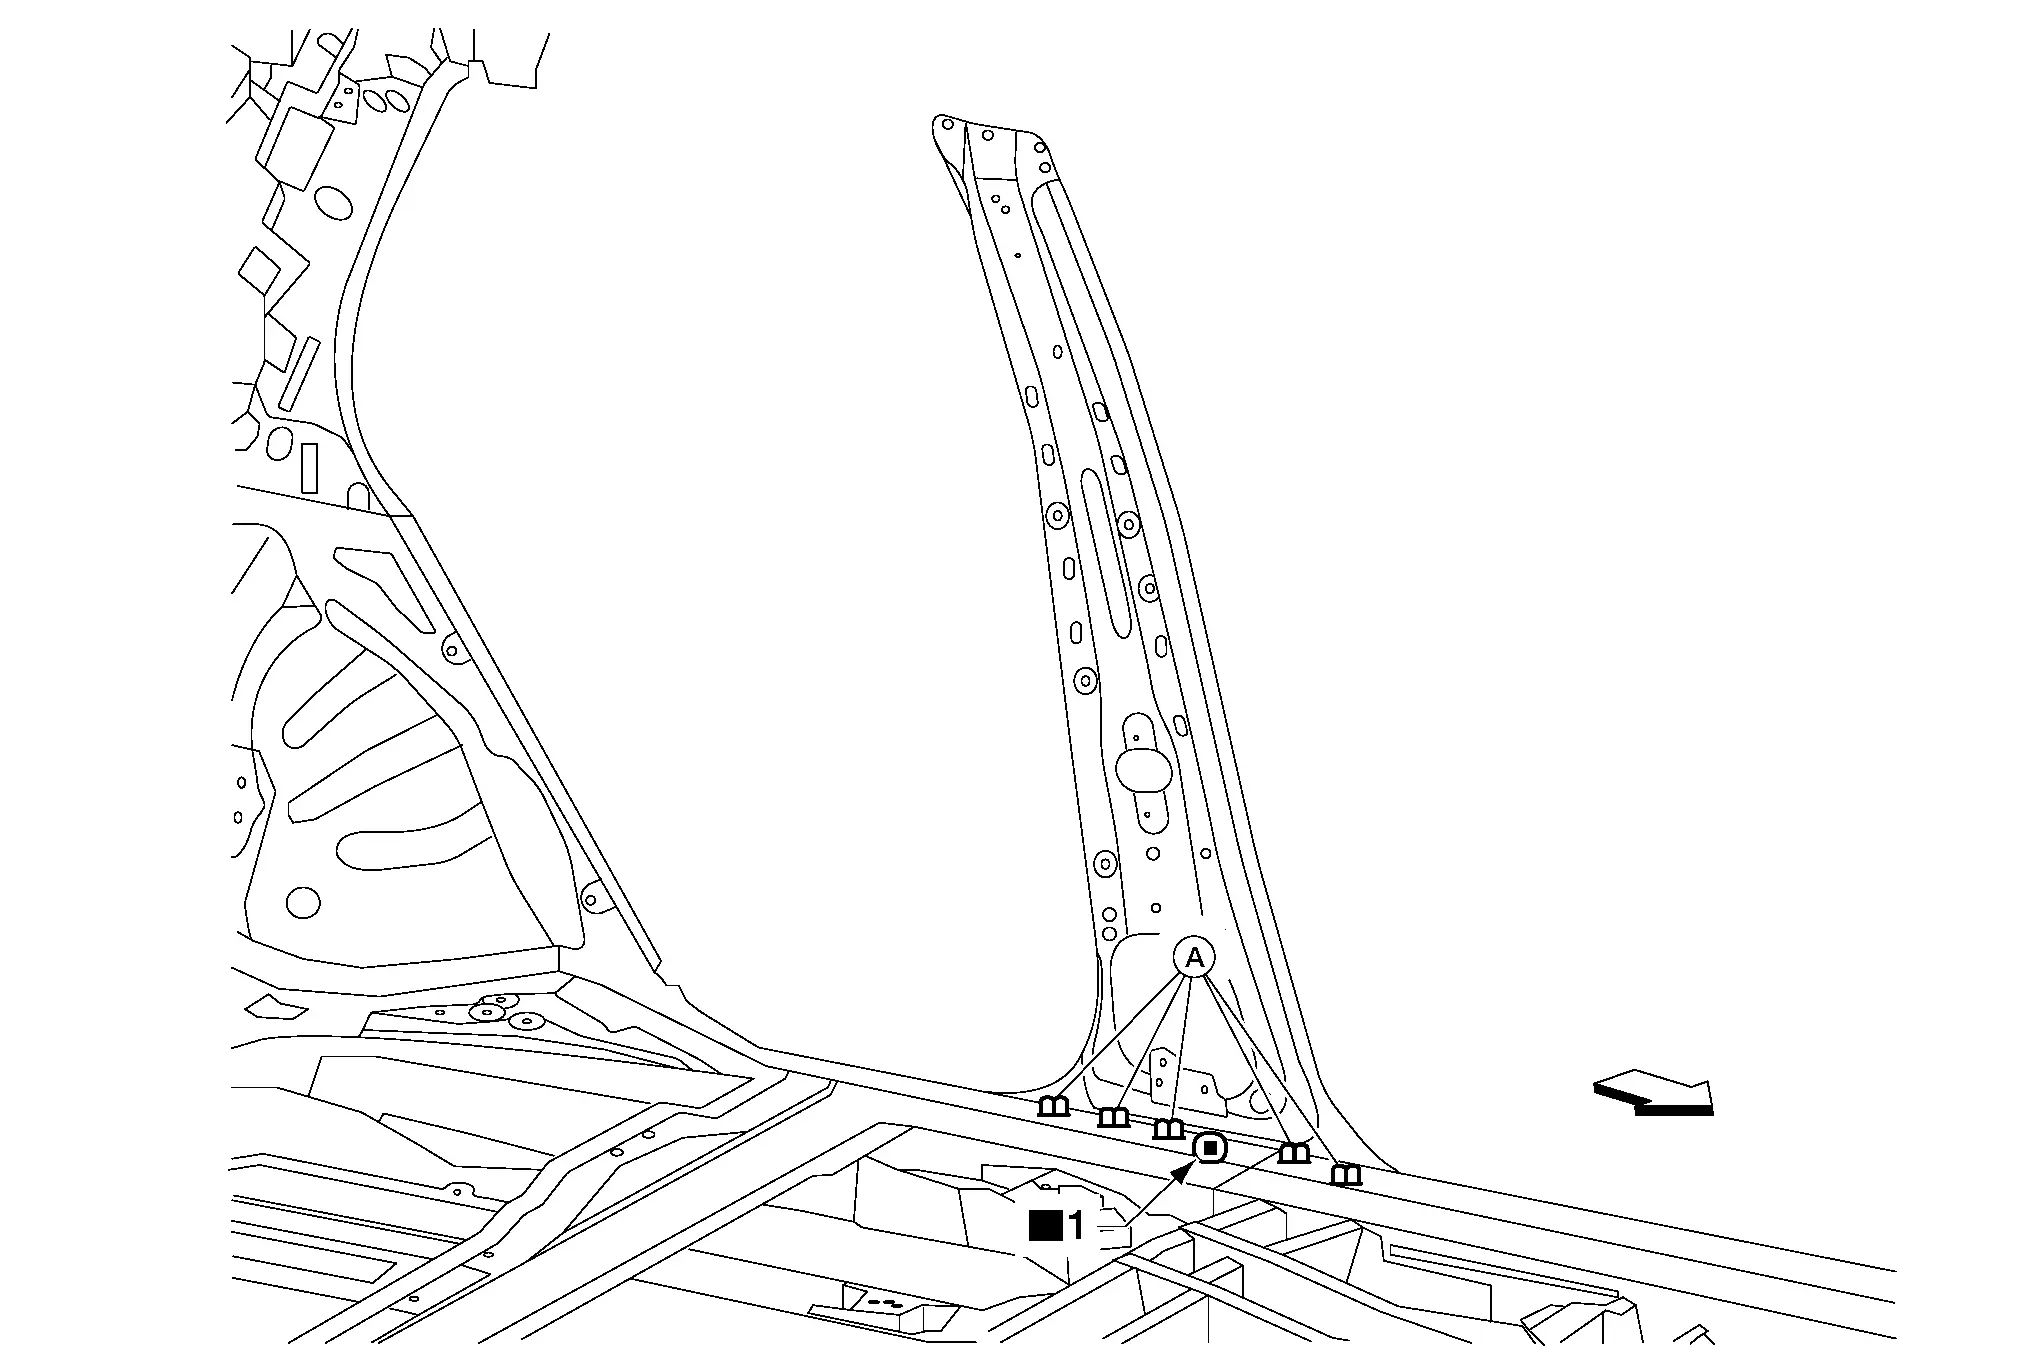
Rear Fender Extension (Partial)

Work after rear panel is removed.
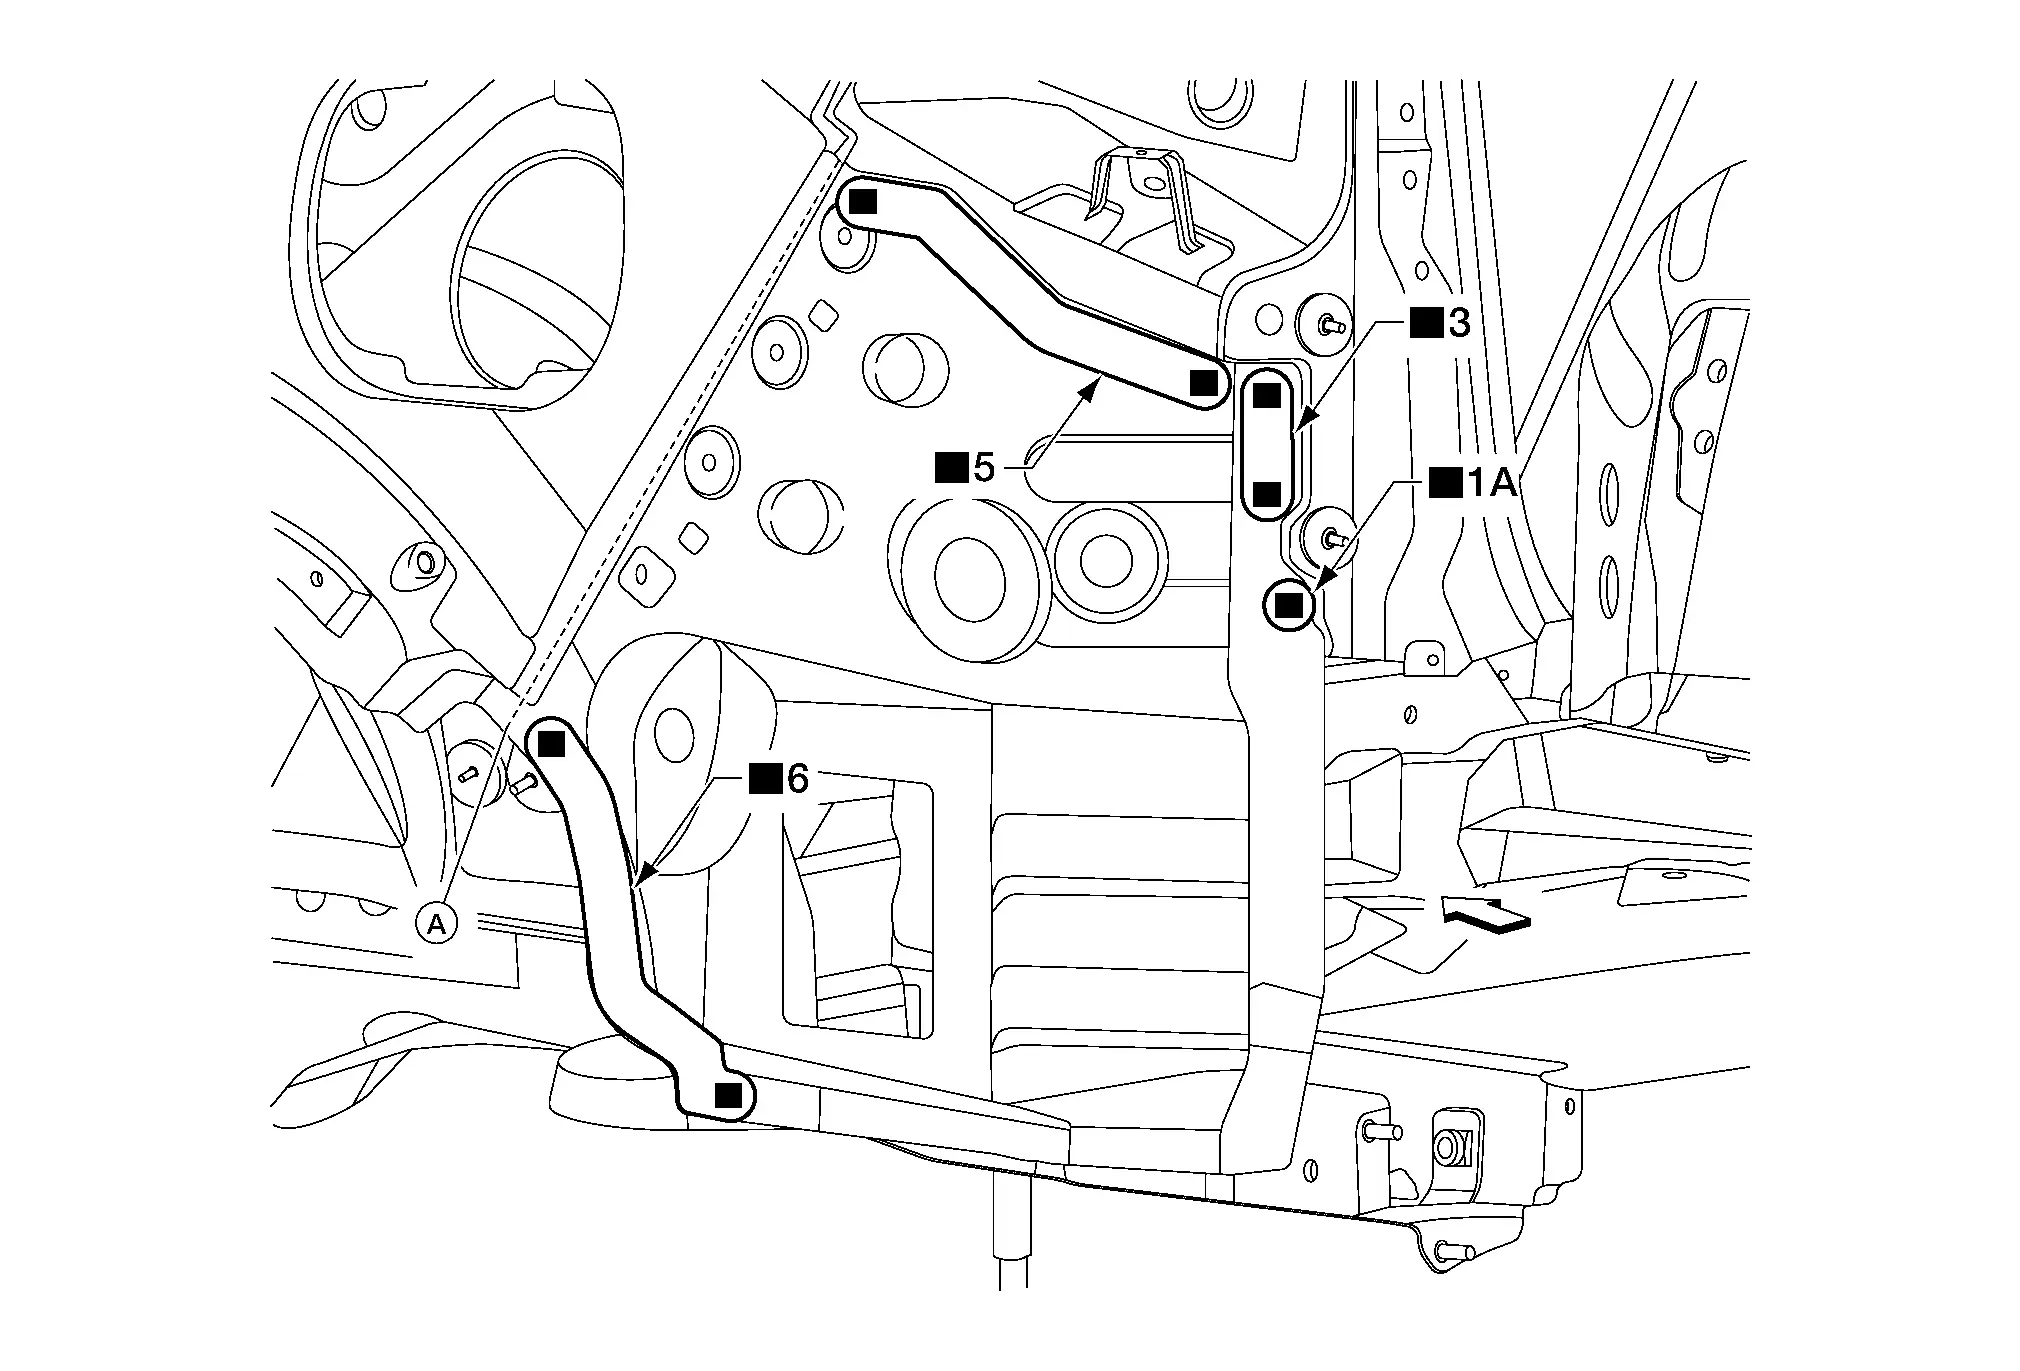
A. Sectioning location
Front
Replacement parts
• Rear fender extension (partial)

Rear Combination Lamp Base

Work after body side outer rear is removed.
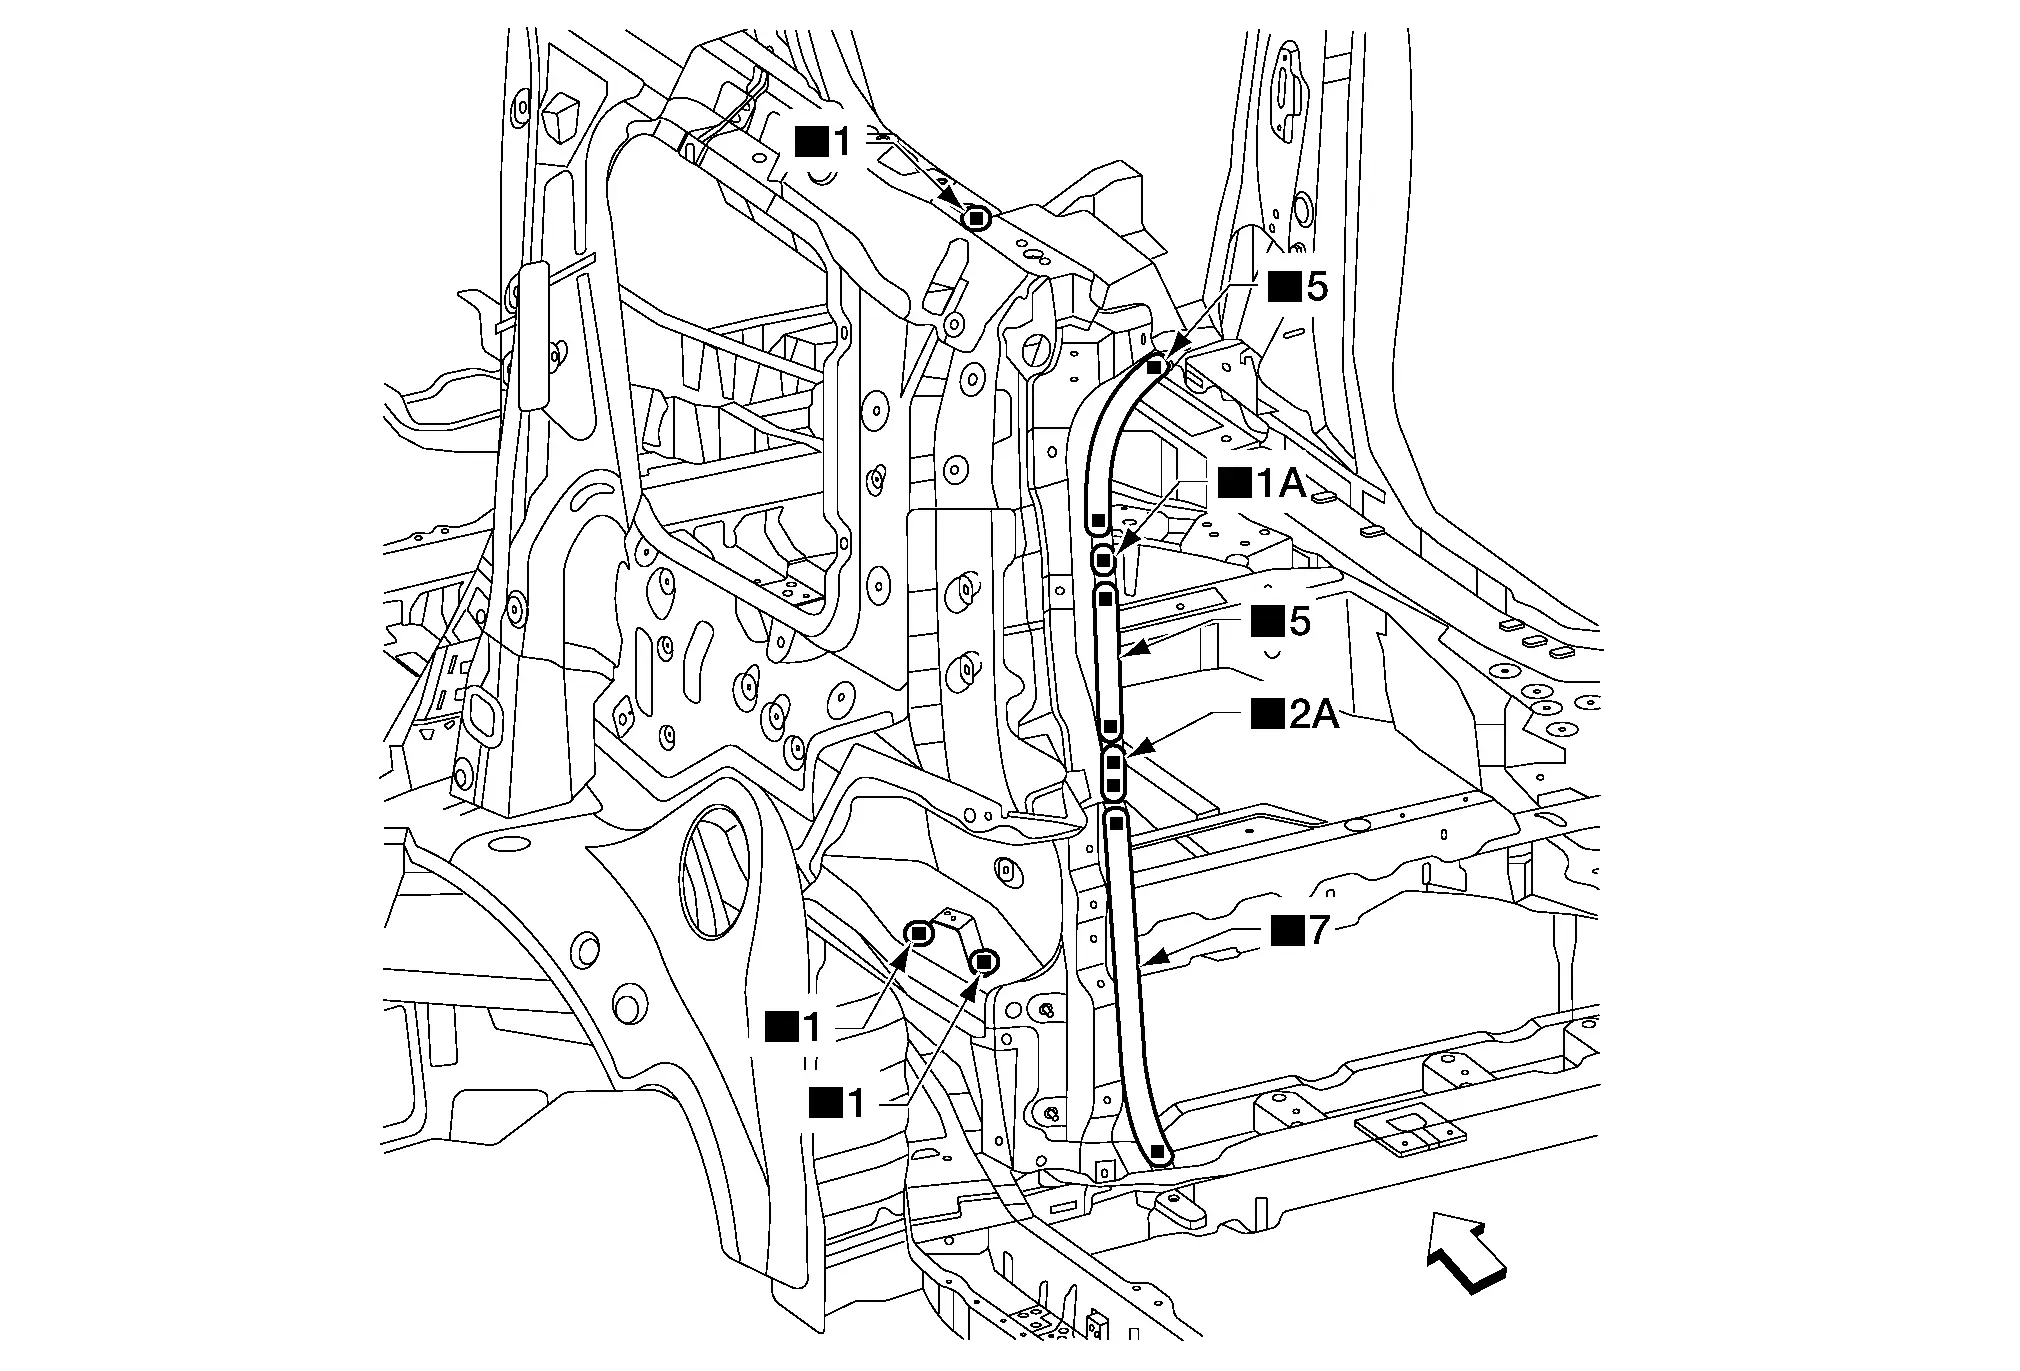
Front
Replacement parts
• Rear combination lamp base • Rear fascia bracket

Back Pillar Outer

Work after rear combination lamp base is removed.
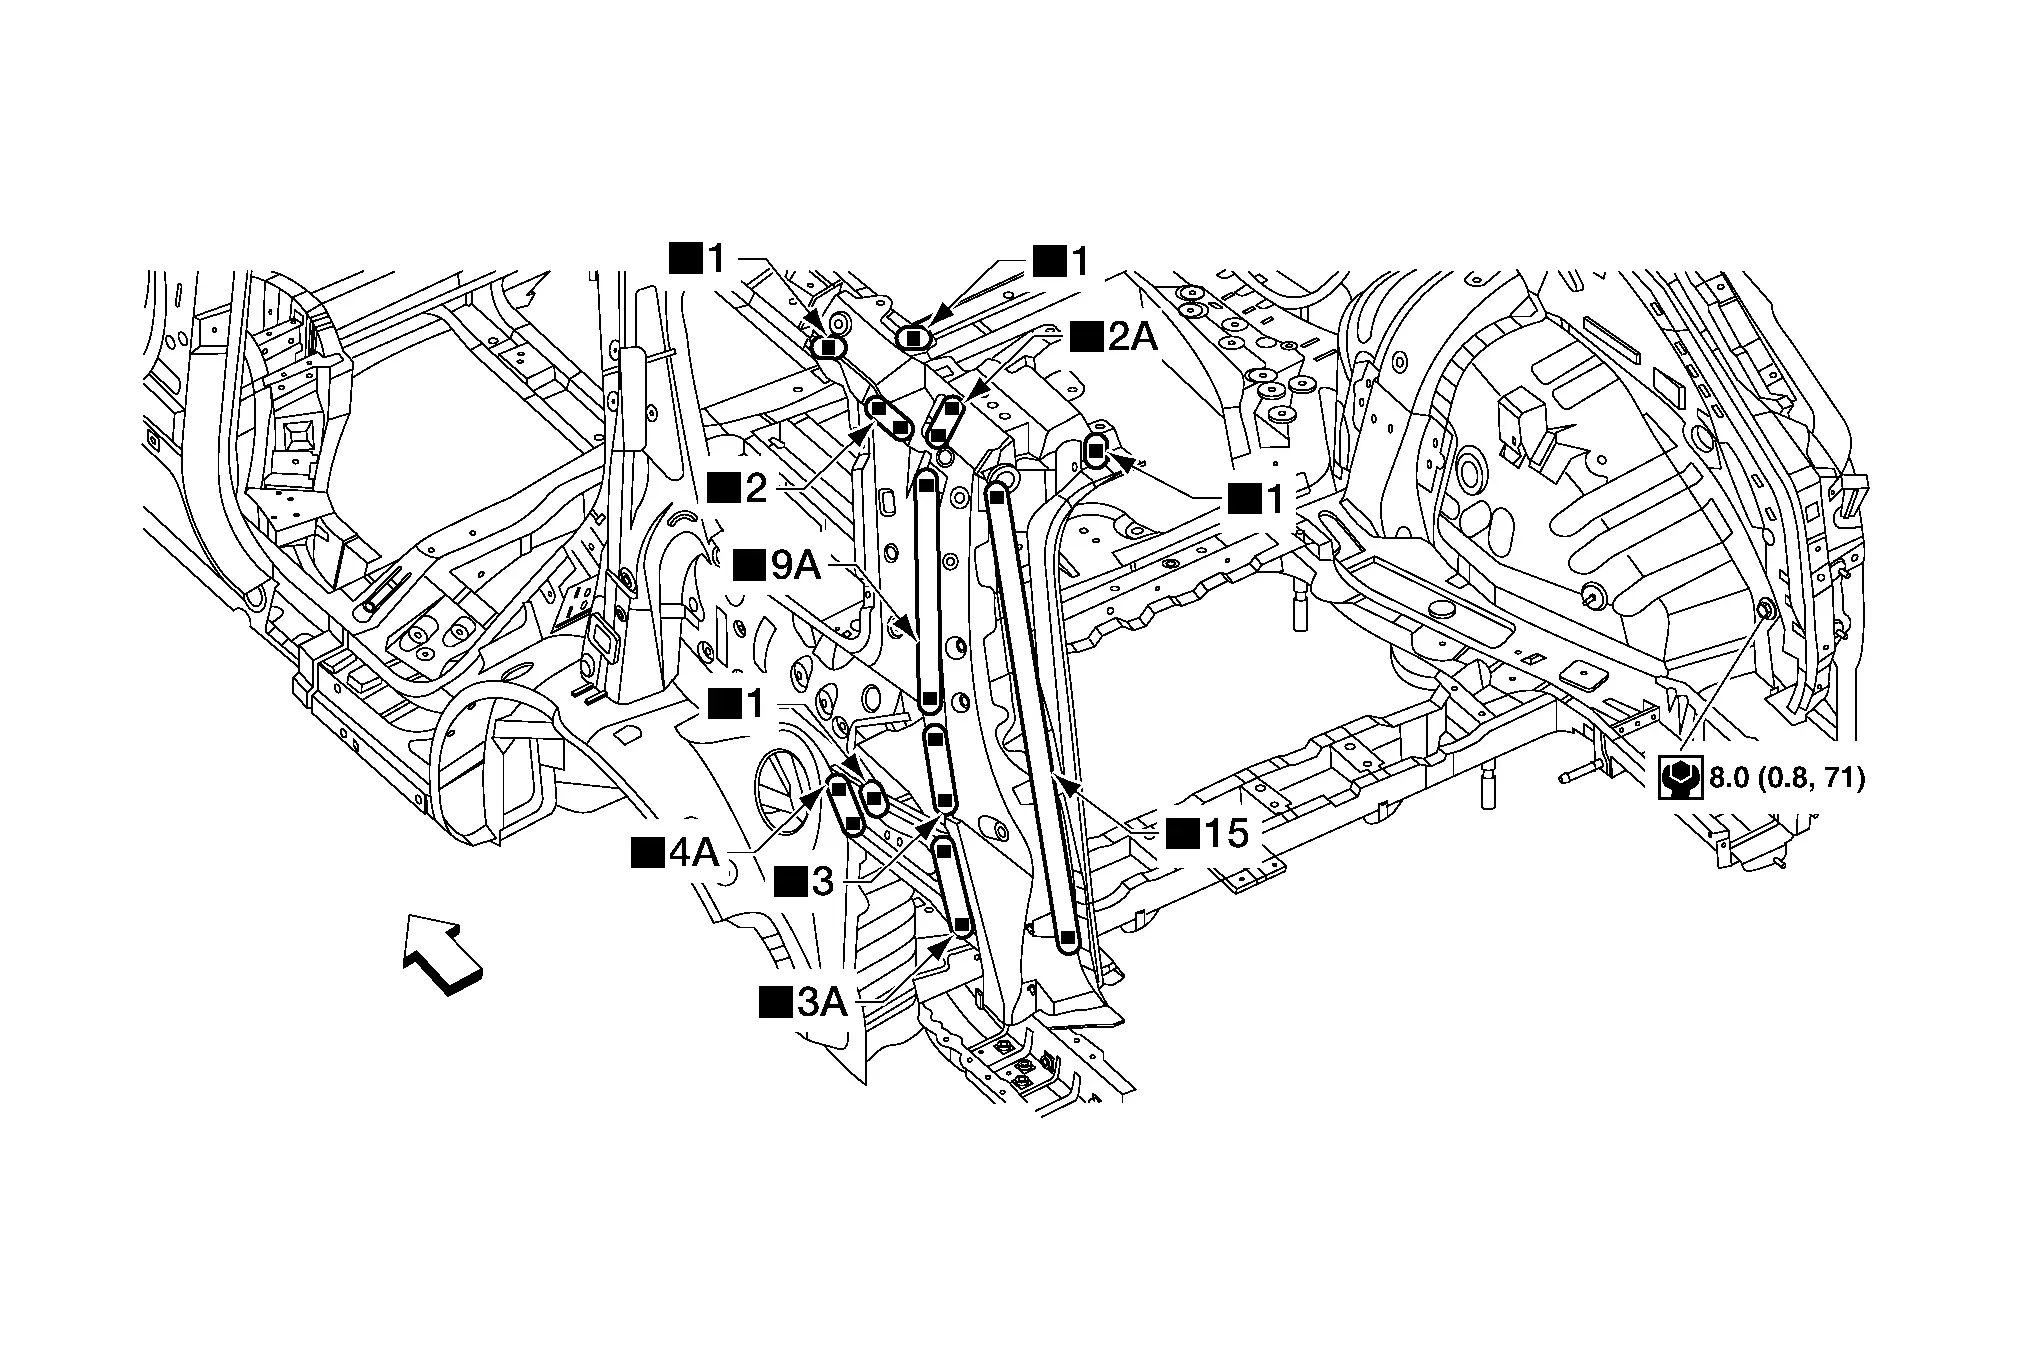
Front
Replacement parts
• Back pillar outer

Sill Outer Reinforcement Rear

Work after sill outer reinforcement is removed.
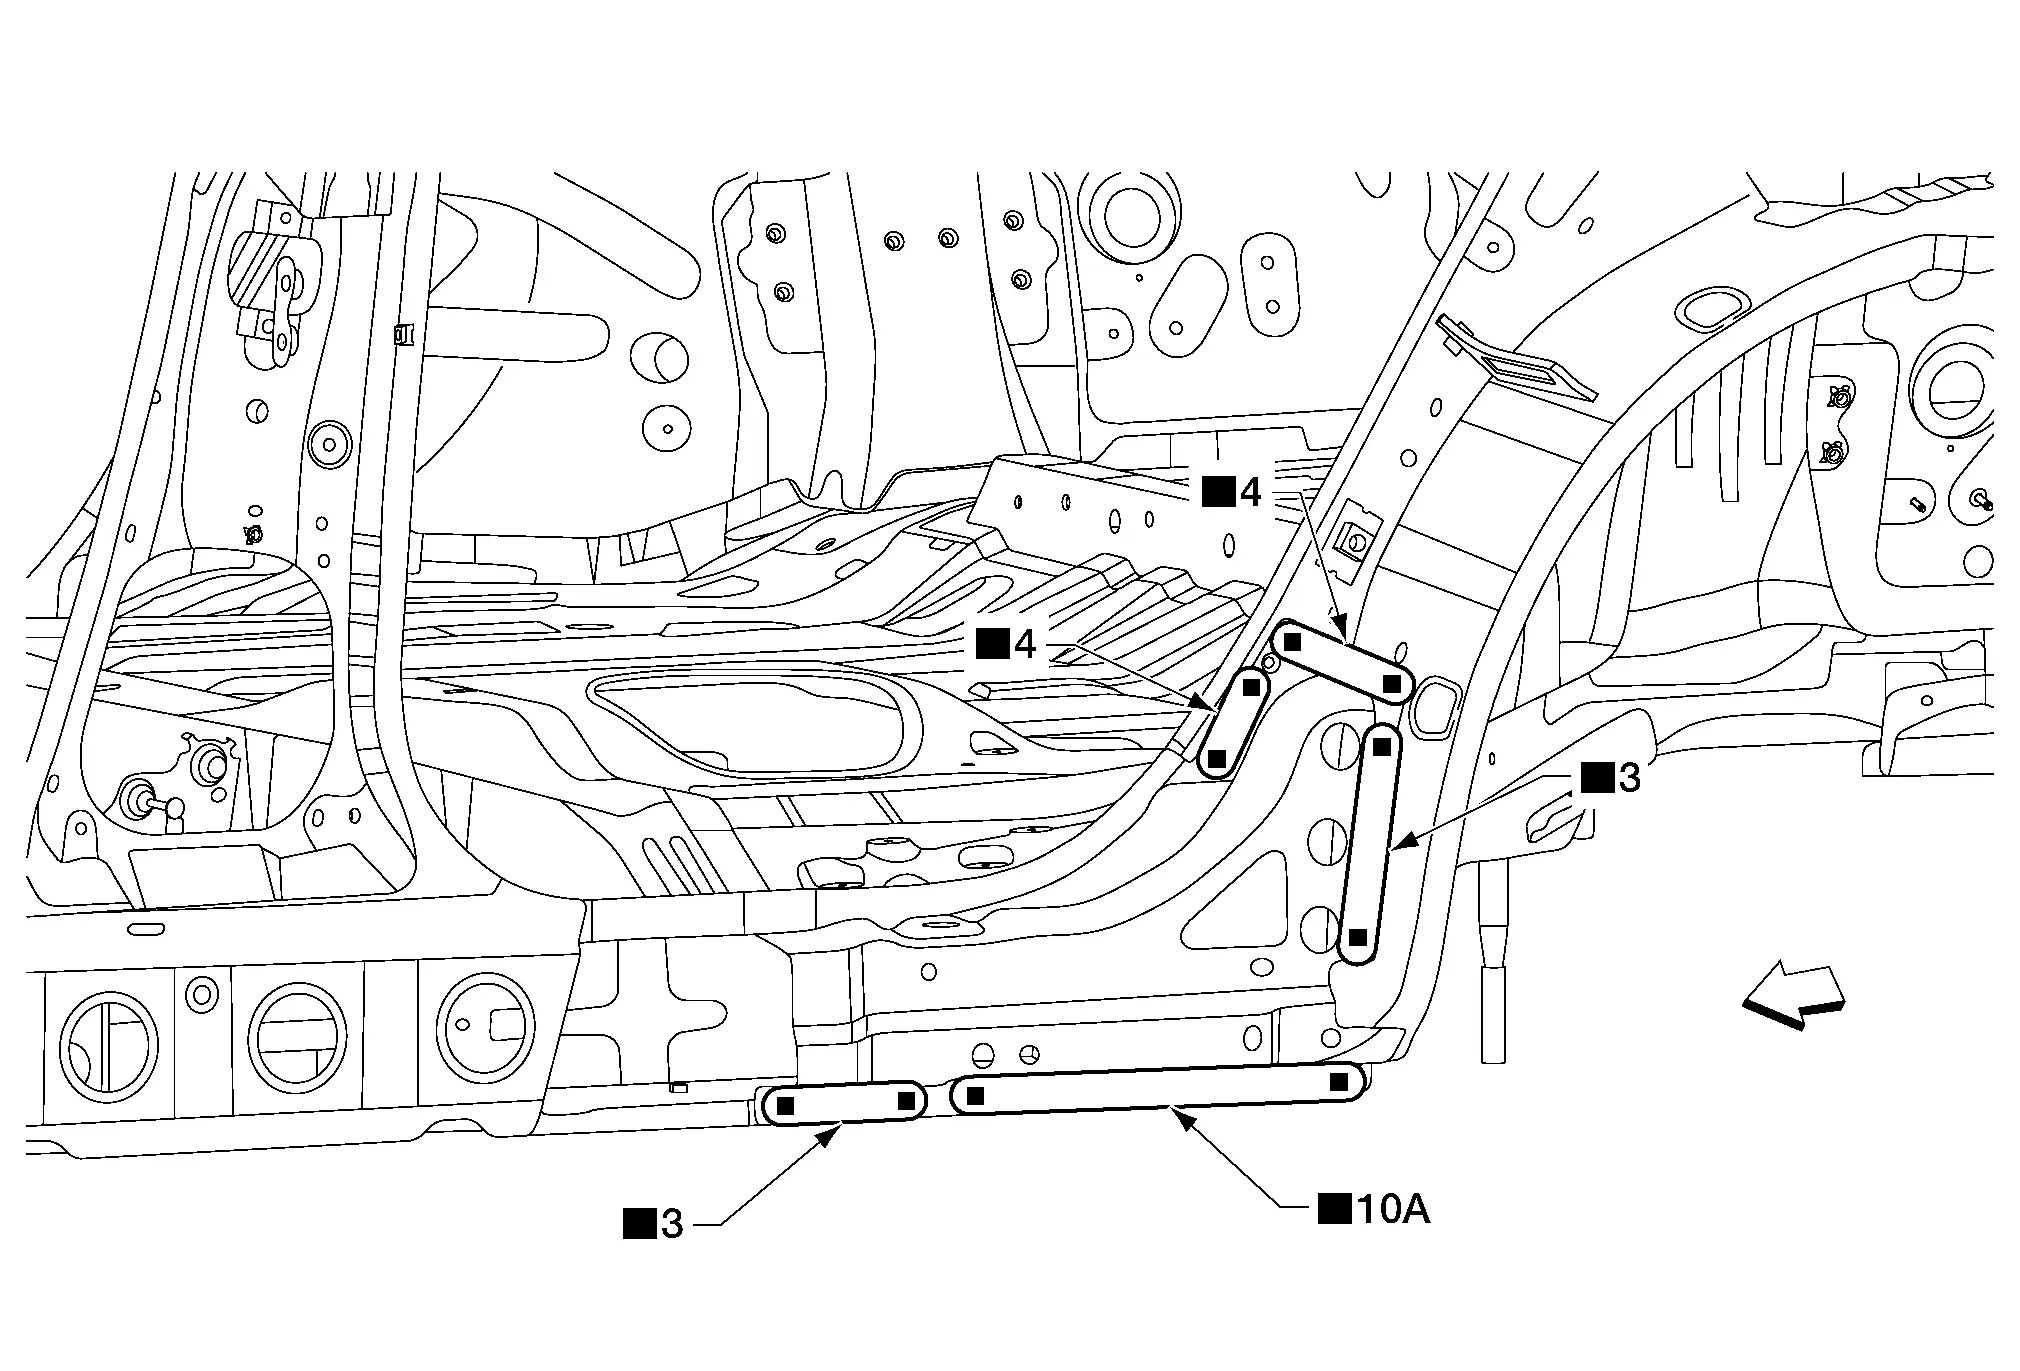
Front
Replacement parts
• Sill outer reinforcement rear

Back Pillar Inner

Work after back pillar outer is removed.
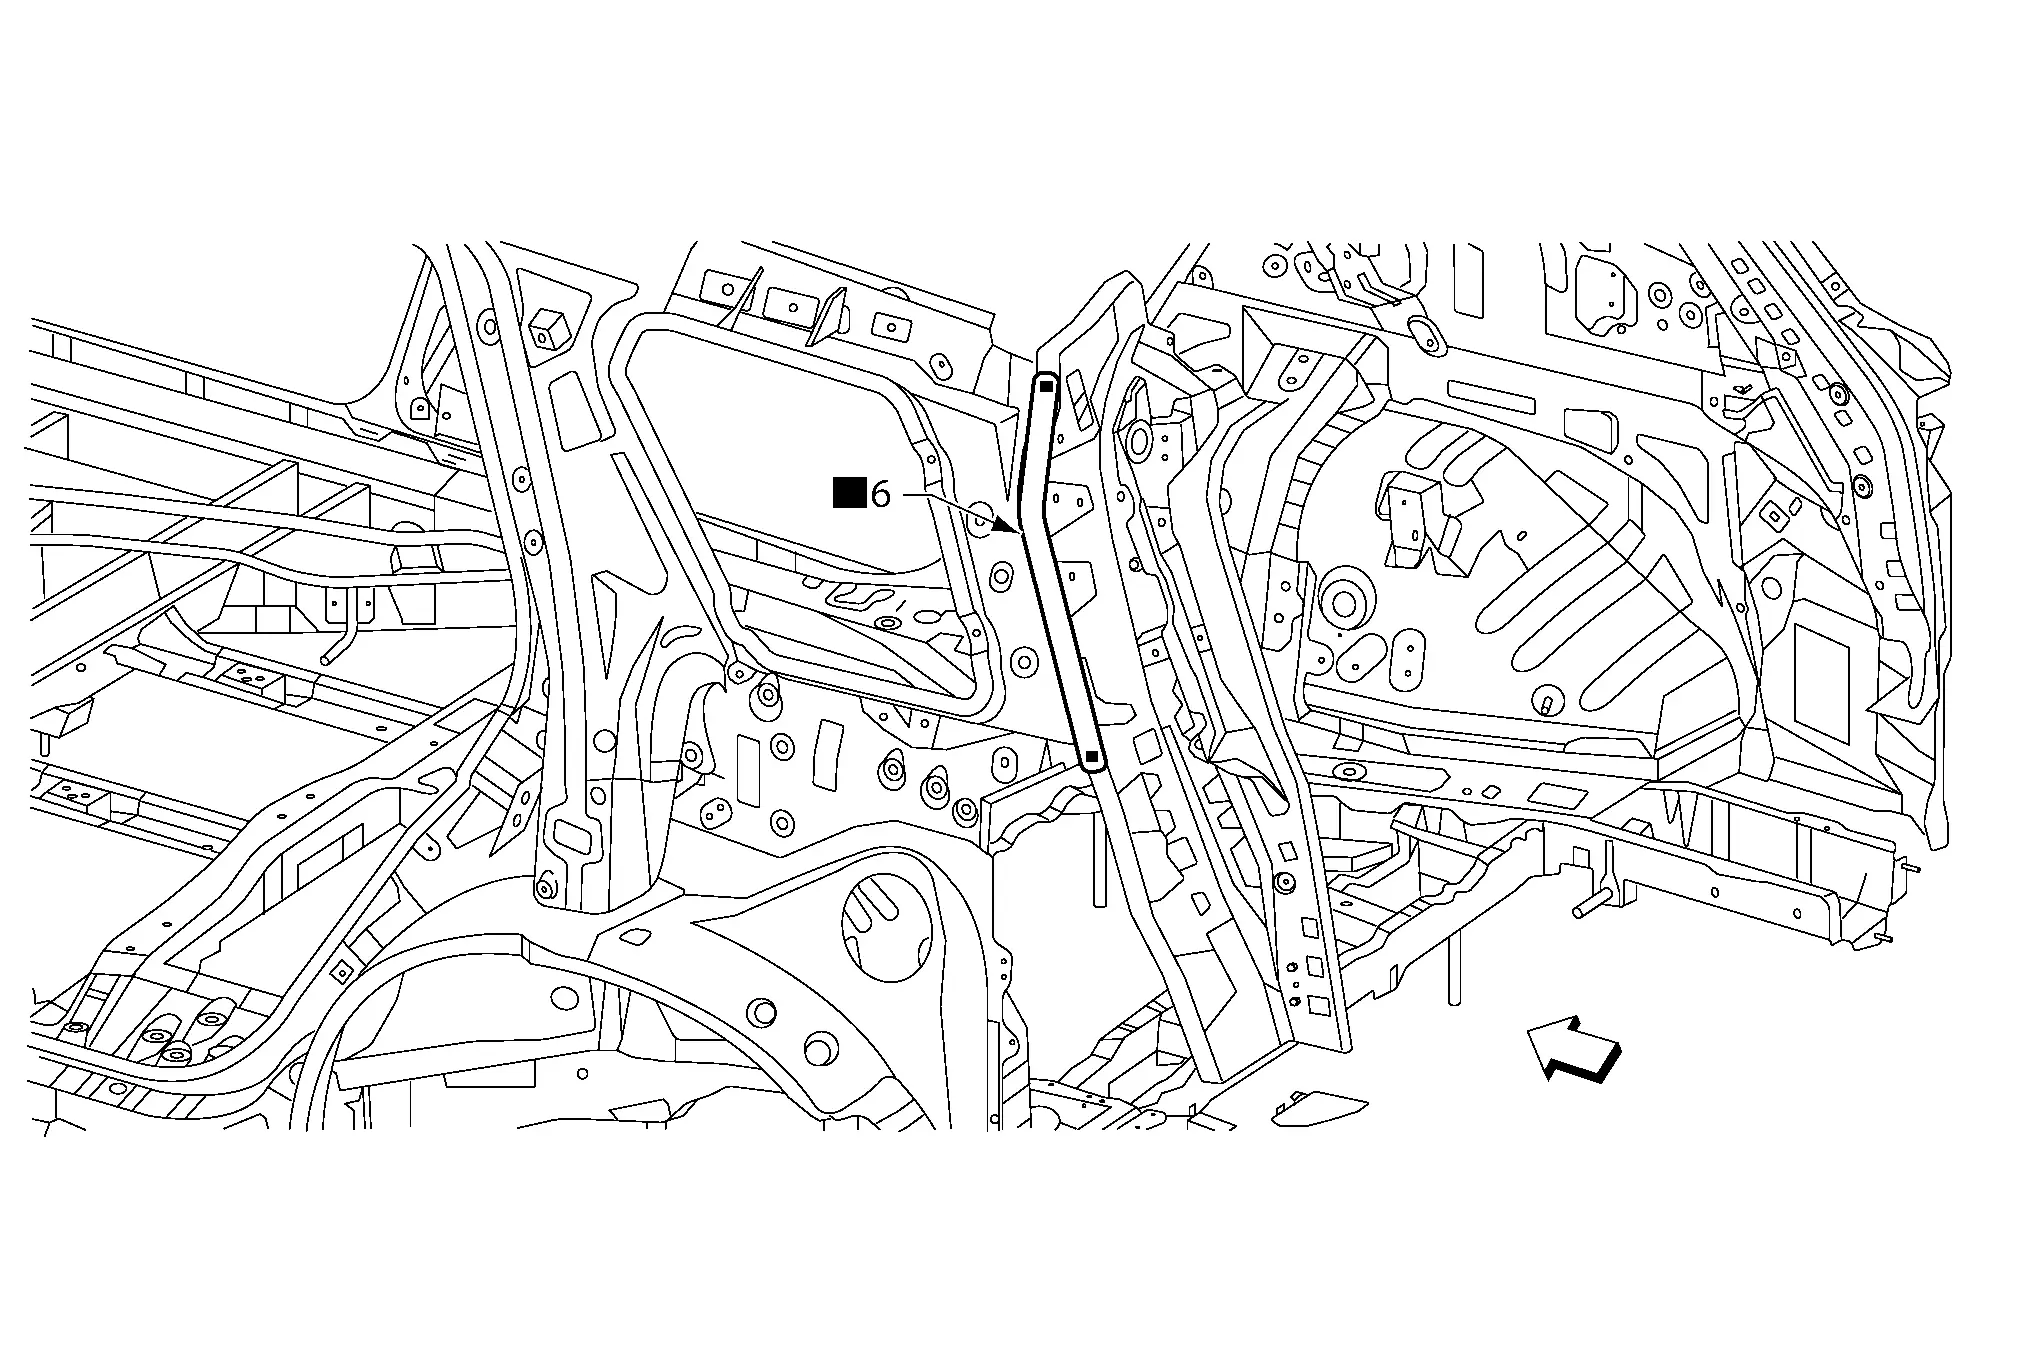
Front
Replacement parts
• Back pillar inner

Roof Side Rail

ROOF SIDE RAIL OUTER REINFORCEMENT

Work after center pillar reinforcement is removed.
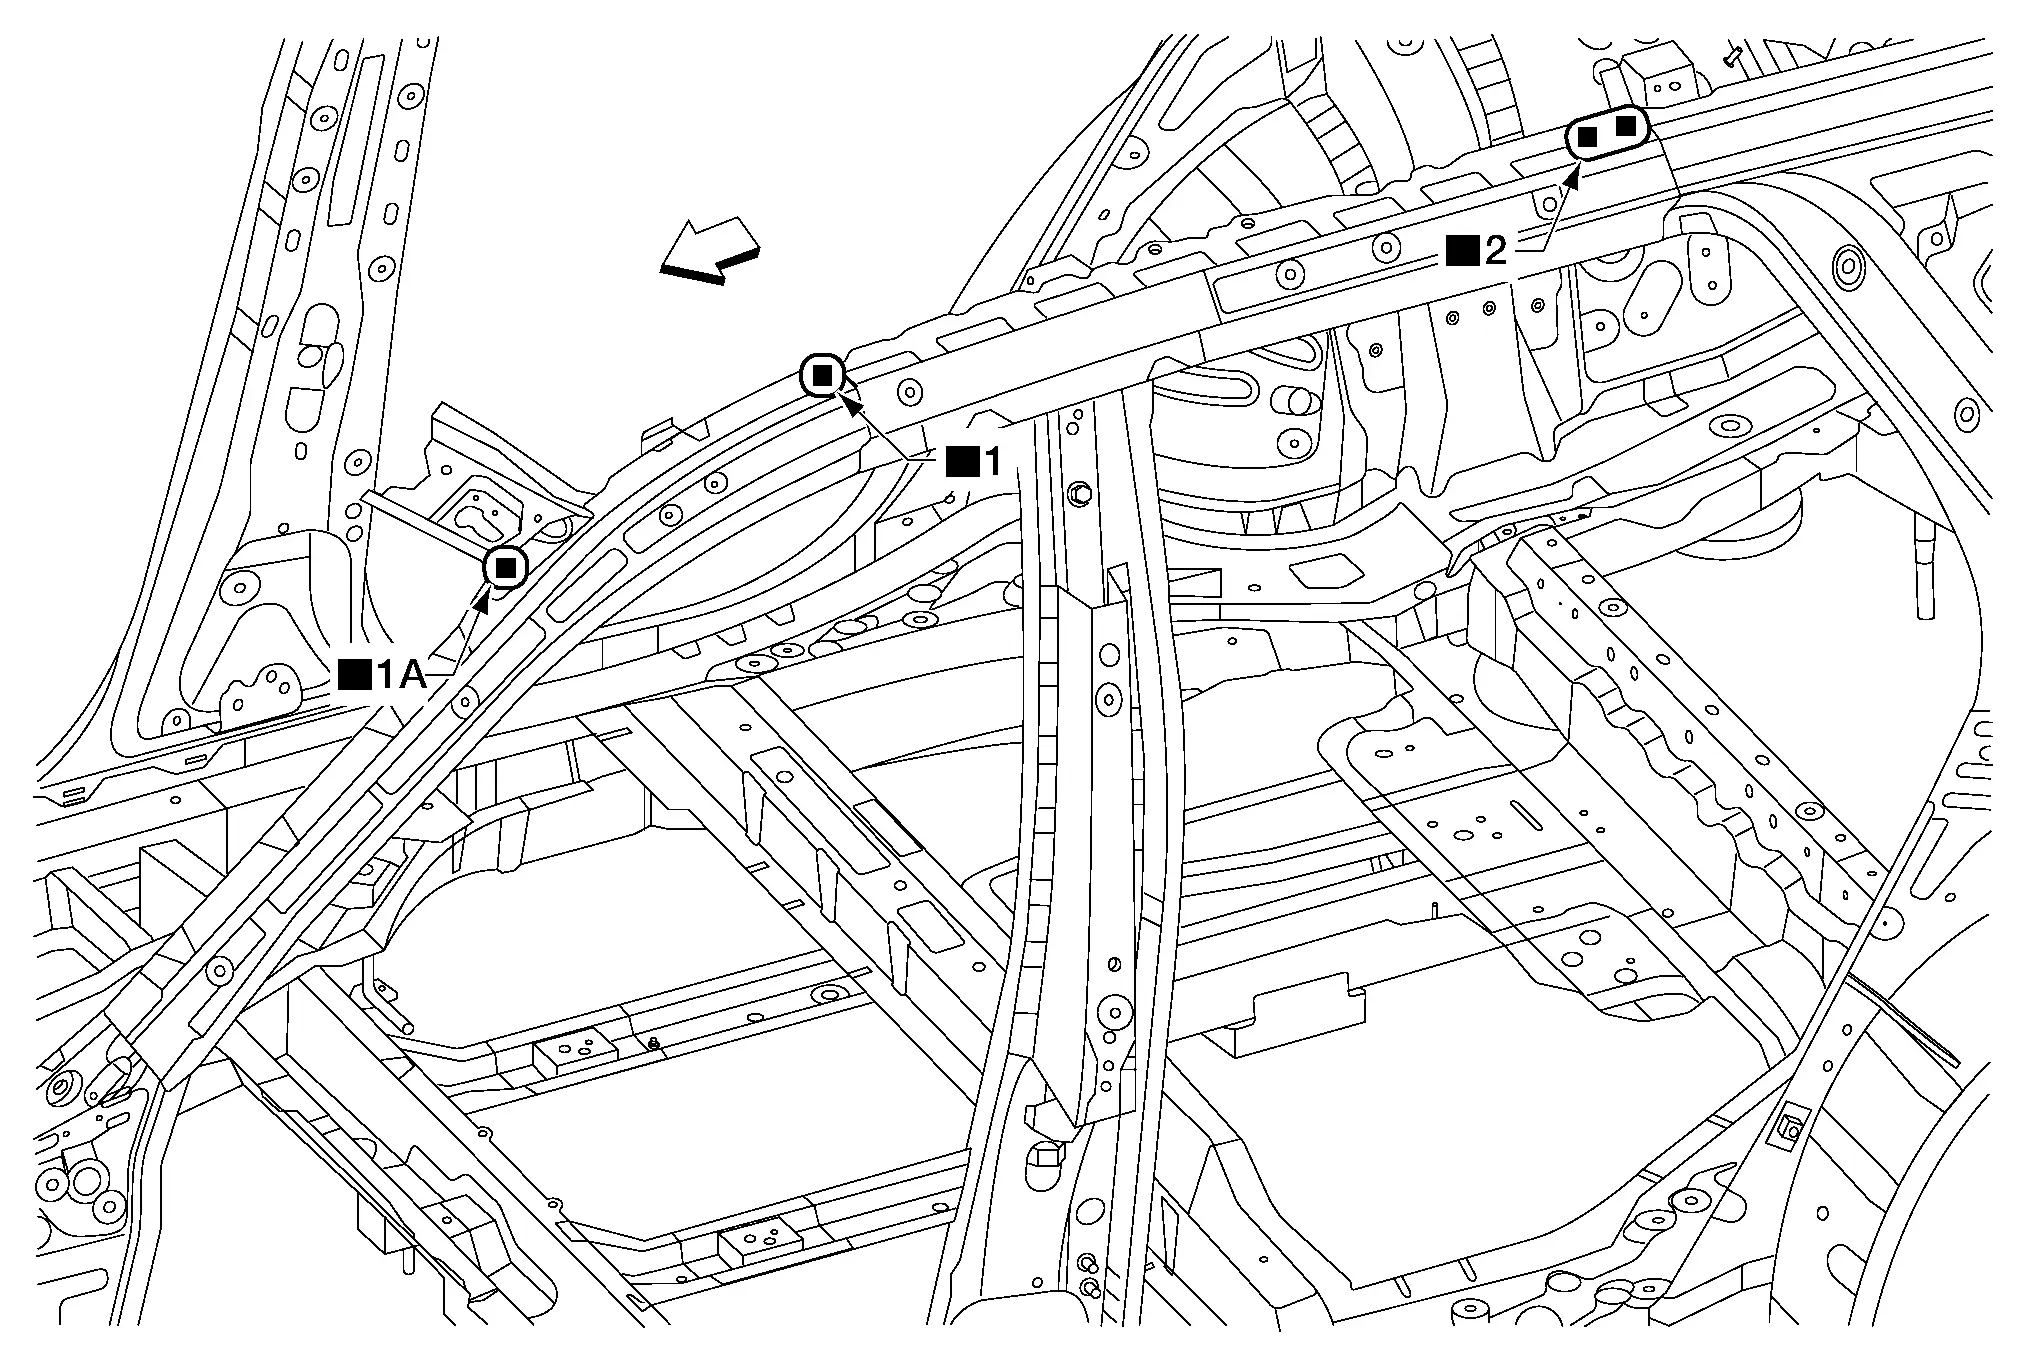
Front
Replacement parts
• Roof side rail outer reinforcement

ROOF SIDE RAIL INNER

Work after roof side rail outer reinforcement is removed.

A. MAG welds
Front
Replacement parts
• Roof side rail inner

Dash Side Inner

Work after roof side rail inner is removed.
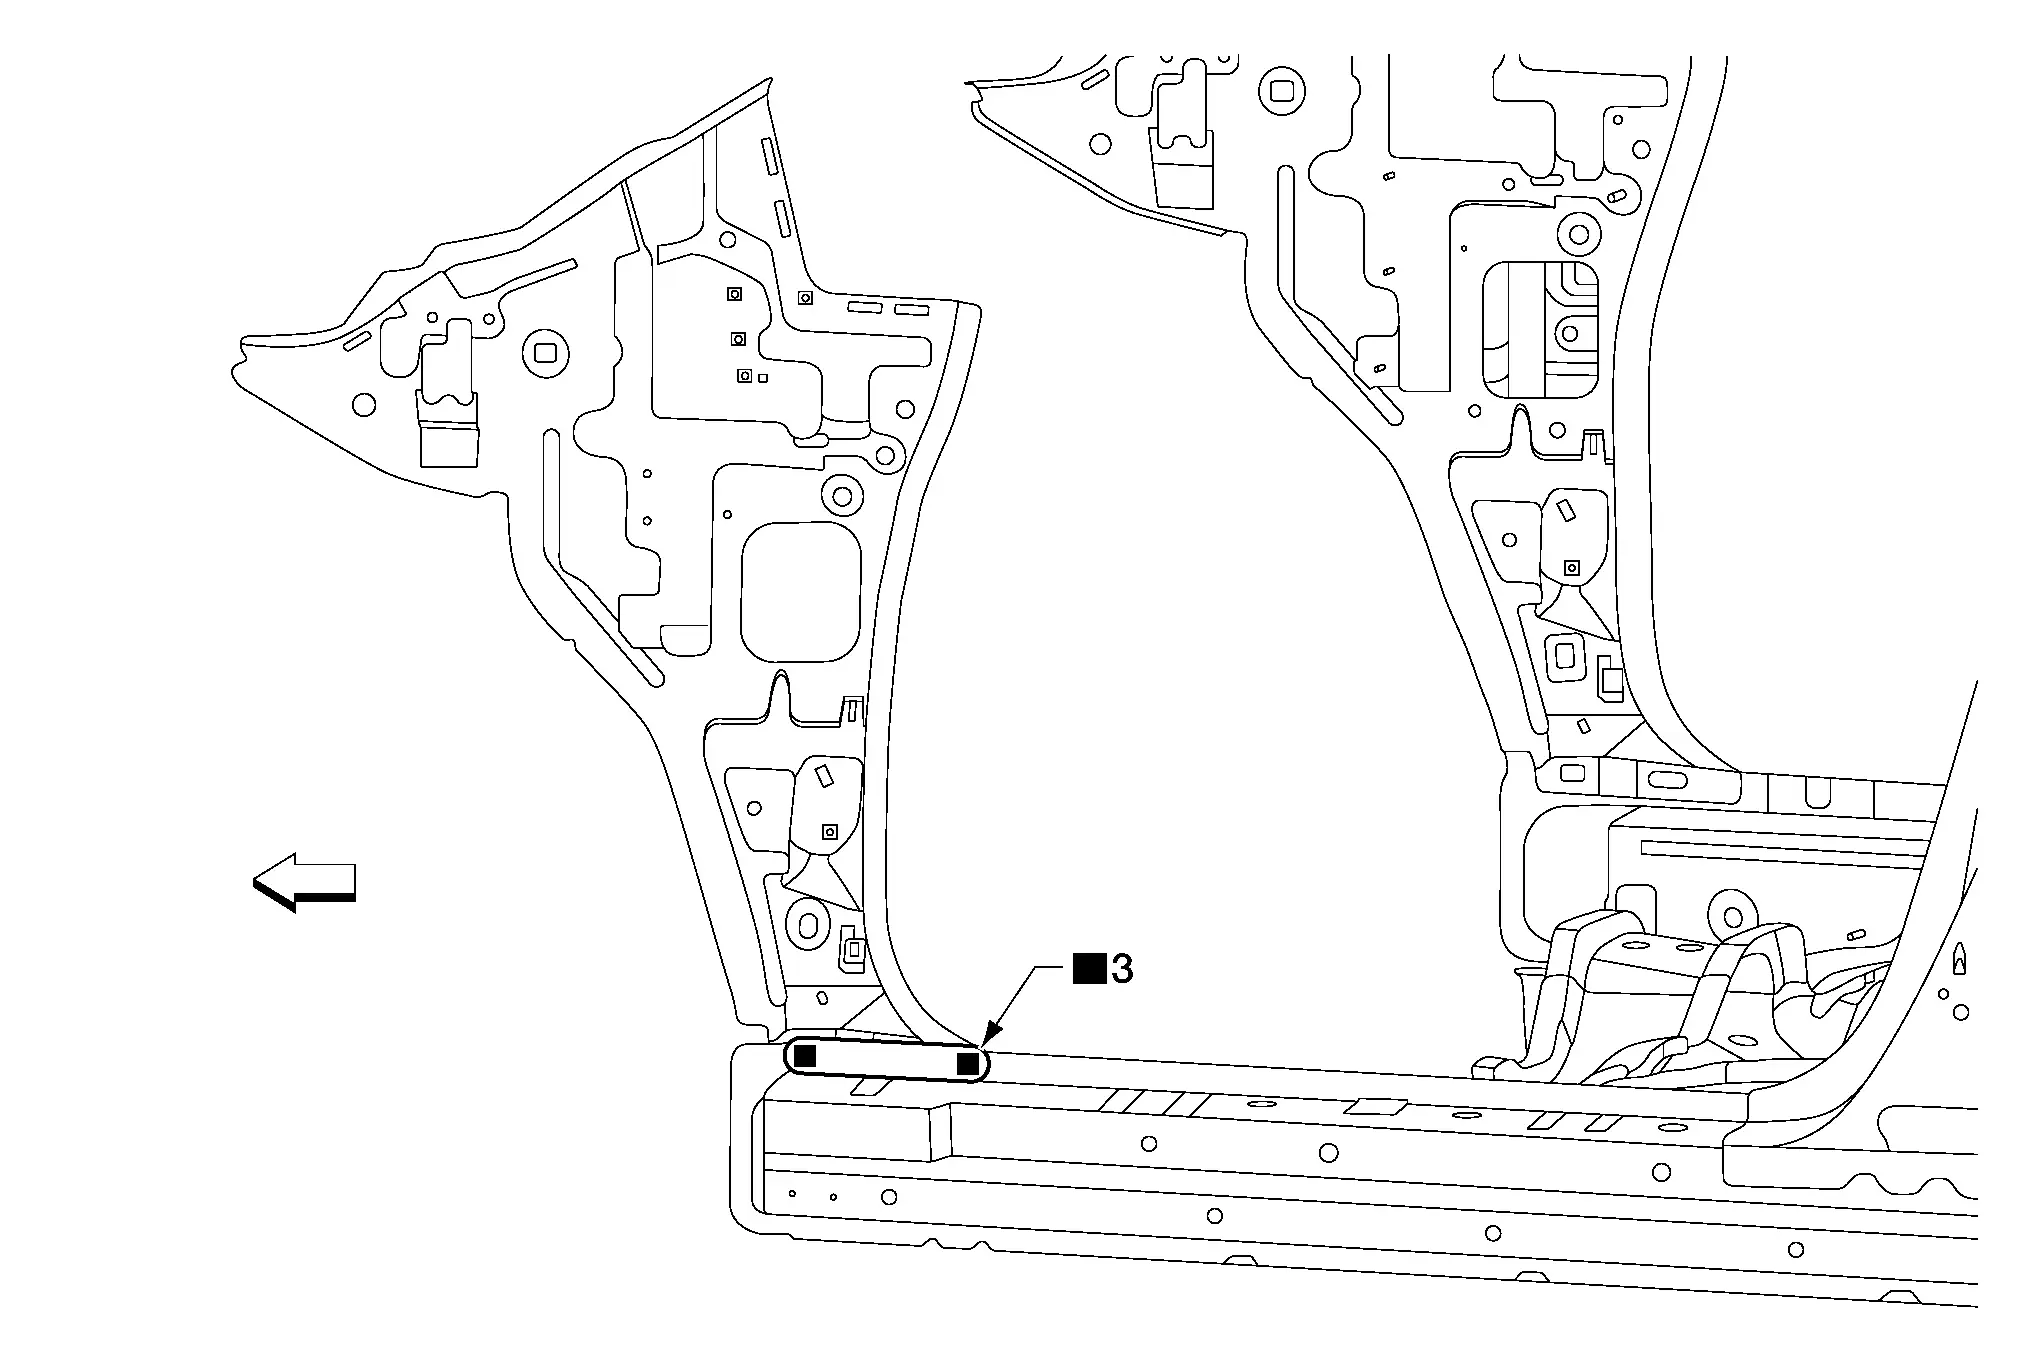
Front
Replacement parts
• Dash side inner

Center Pillar Inner Reinforcement

Work after roof side rail inner is removed.

A. MAG welds
Front
Replacement parts
• Center pillar inner reinforcement

Rear Pillar Inner

REAR PILLAR INNER REINFORCEMENT

Work after roof side rail outer is removed.
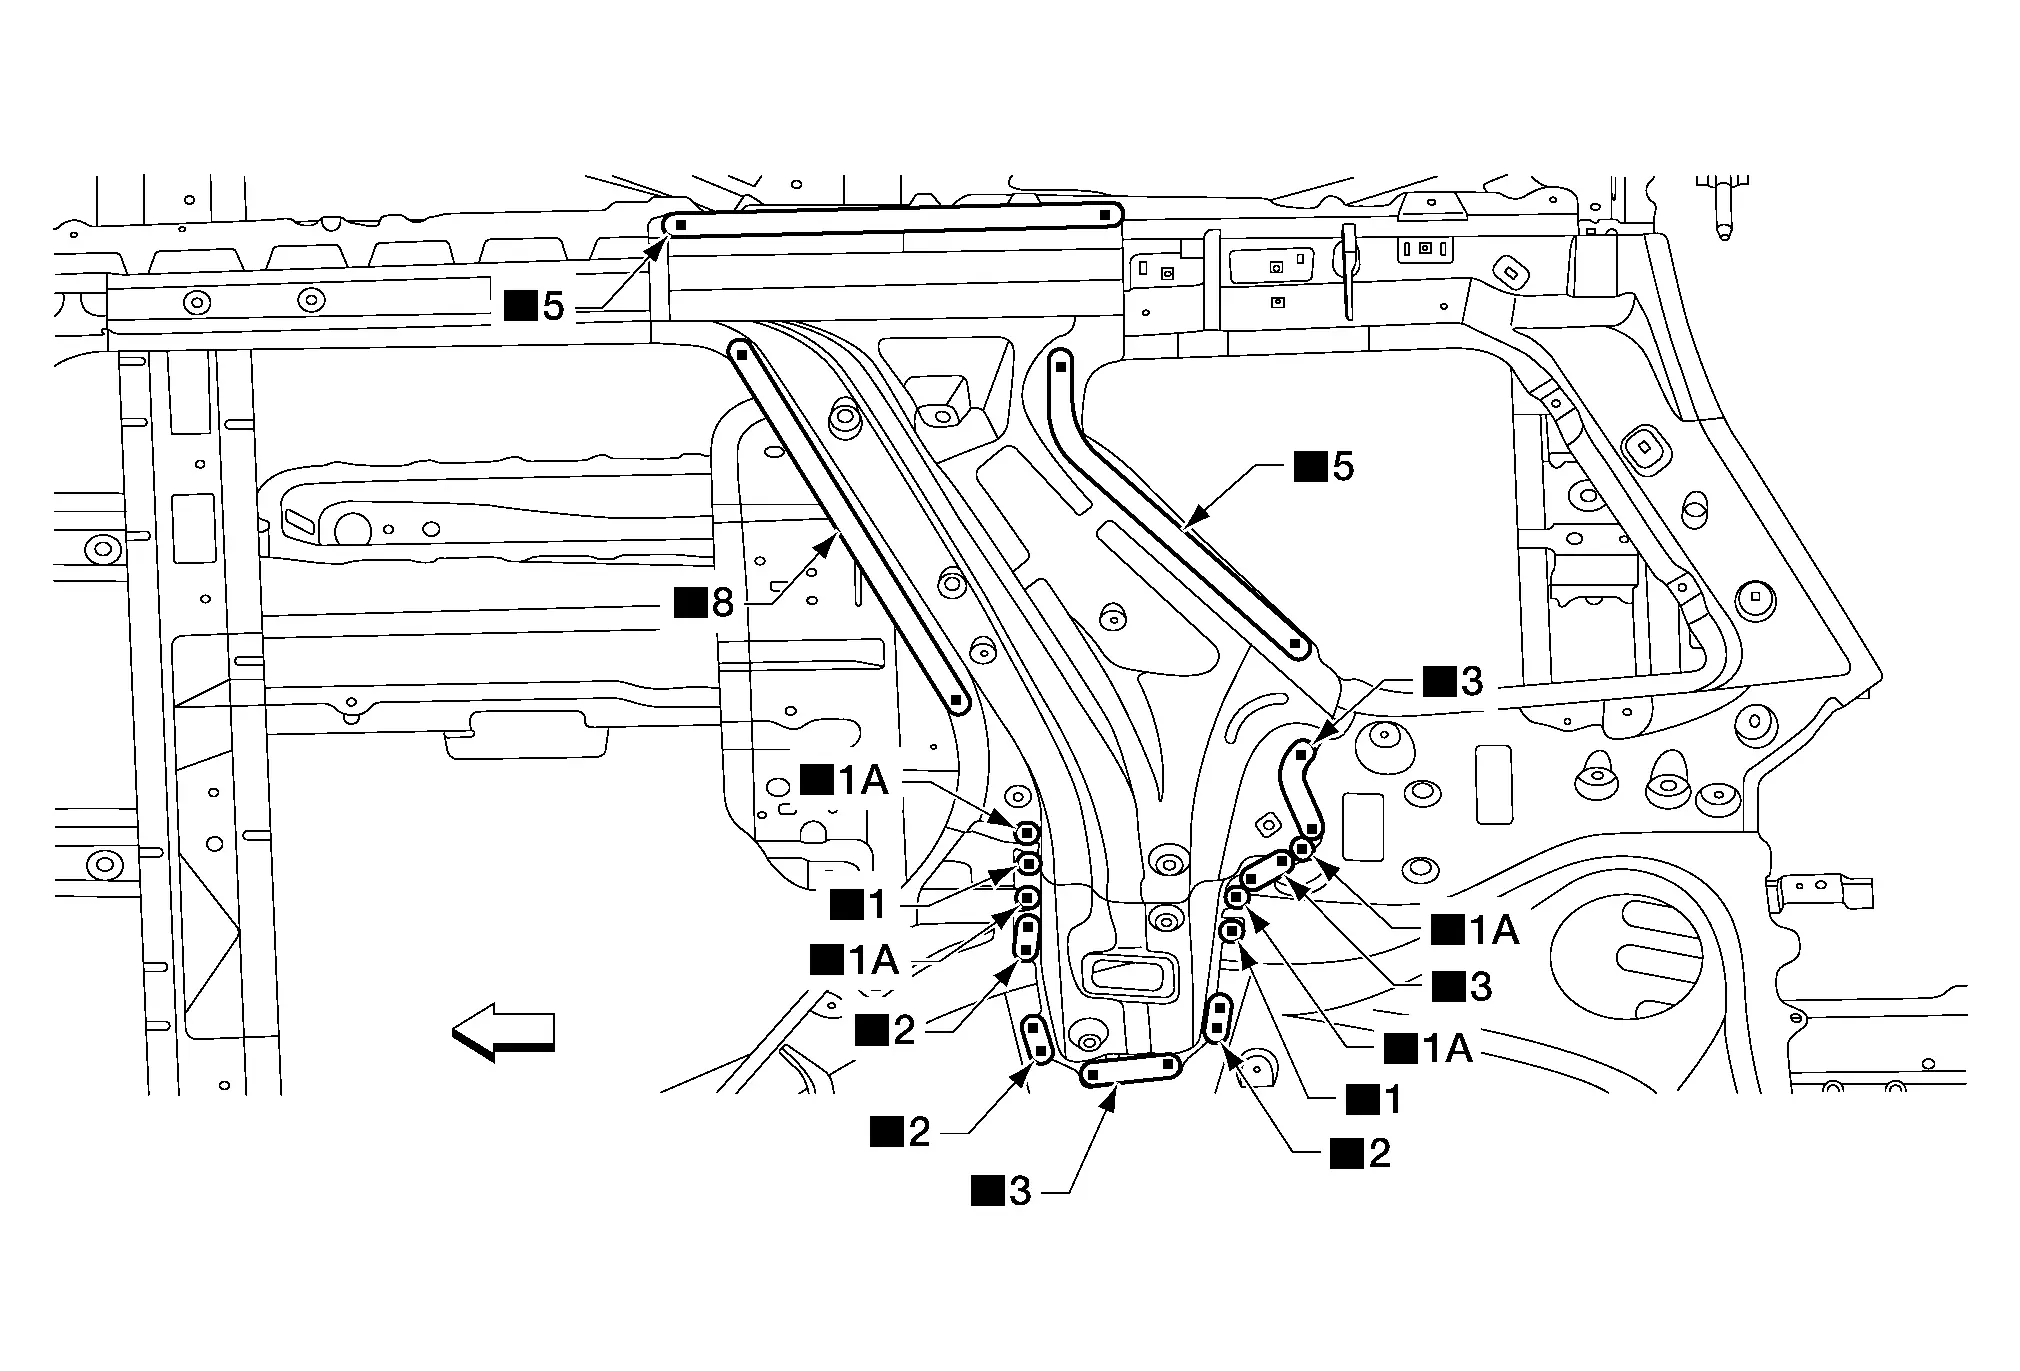
Front
Replacement parts
• Rear pillar inner reinforcement

REAR PILLAR INNER

Work after rear pillar inner reinforcement is removed.
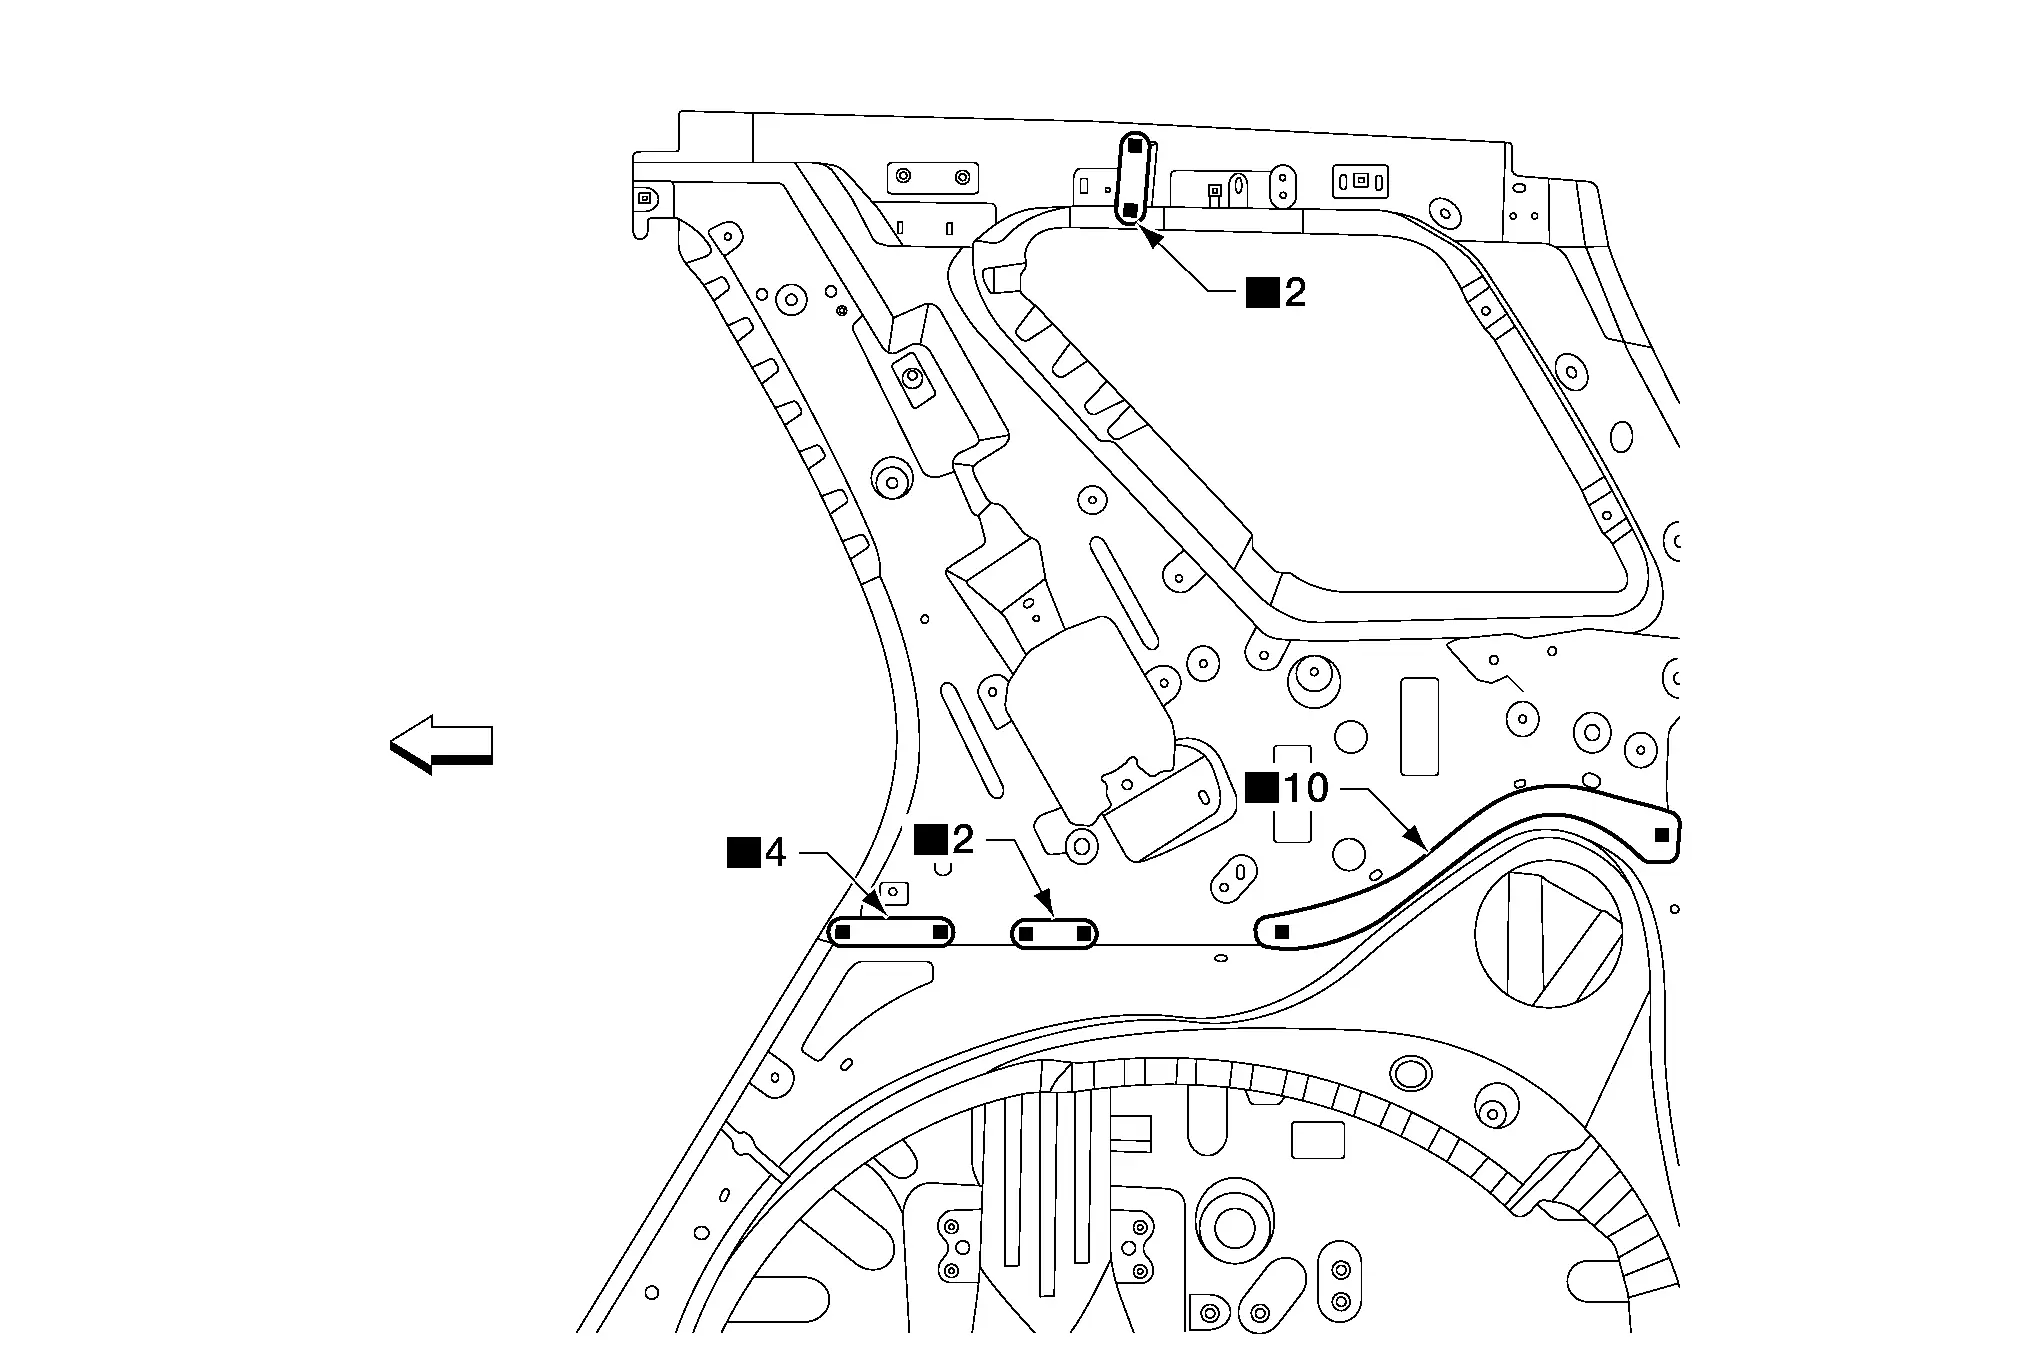
Front
Replacement parts
• Rear pillar inner

Rear Wheelhouse

REAR WHEELHOUSE OUTER

Work after sill outer reinforcement rear and rear pillar inner are removed.
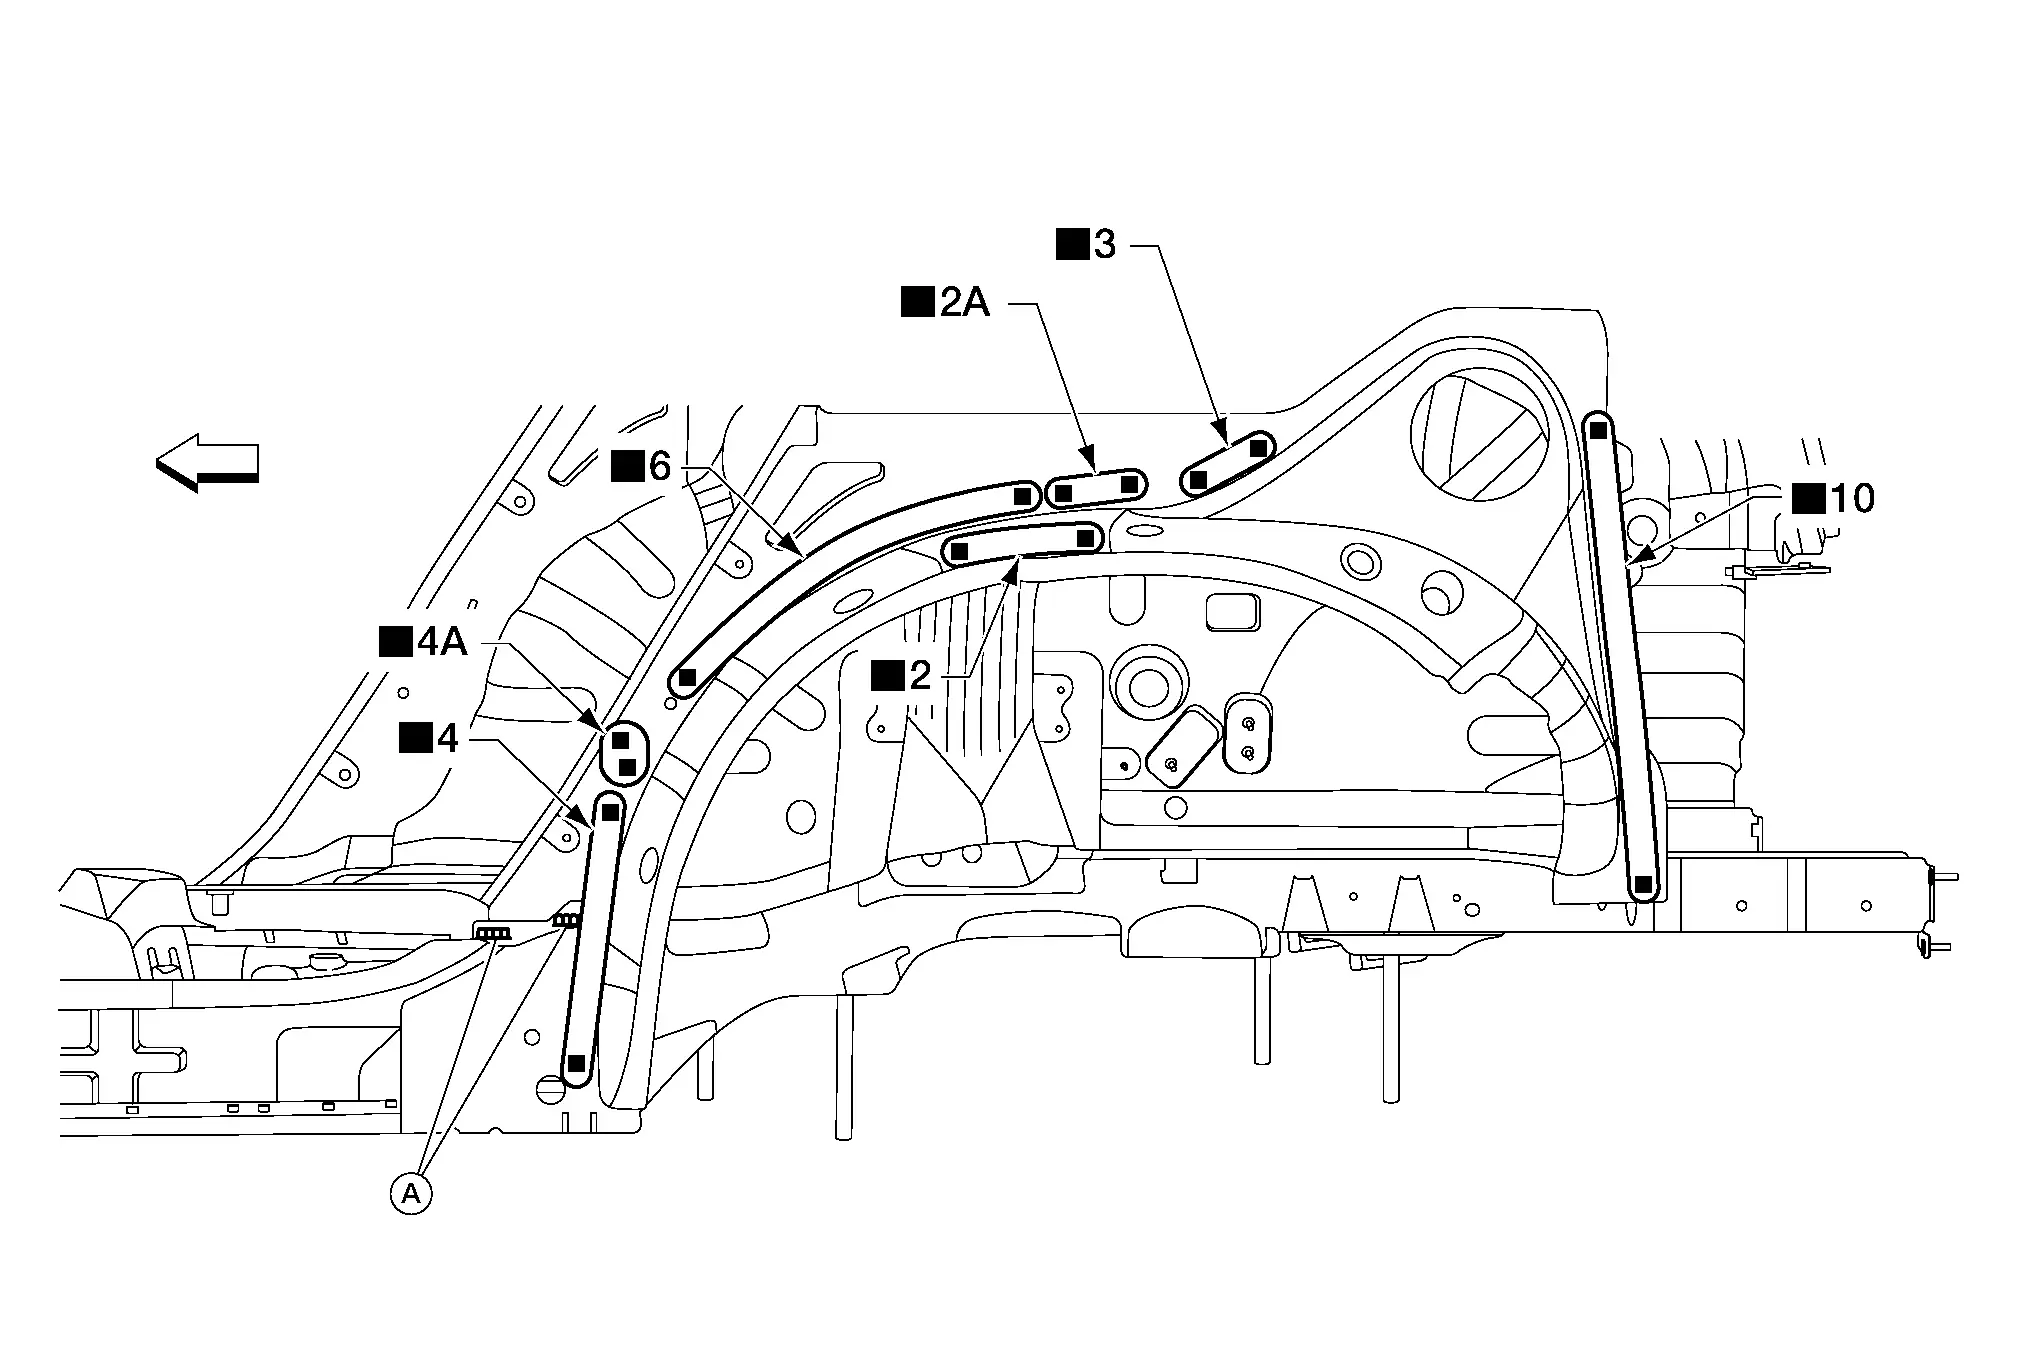
A. MAG welds
Front
Replacement parts
• Rear wheelhouse outer

REAR WHEELHOUSE INNER

Work after rear wheelhouse outer is removed.
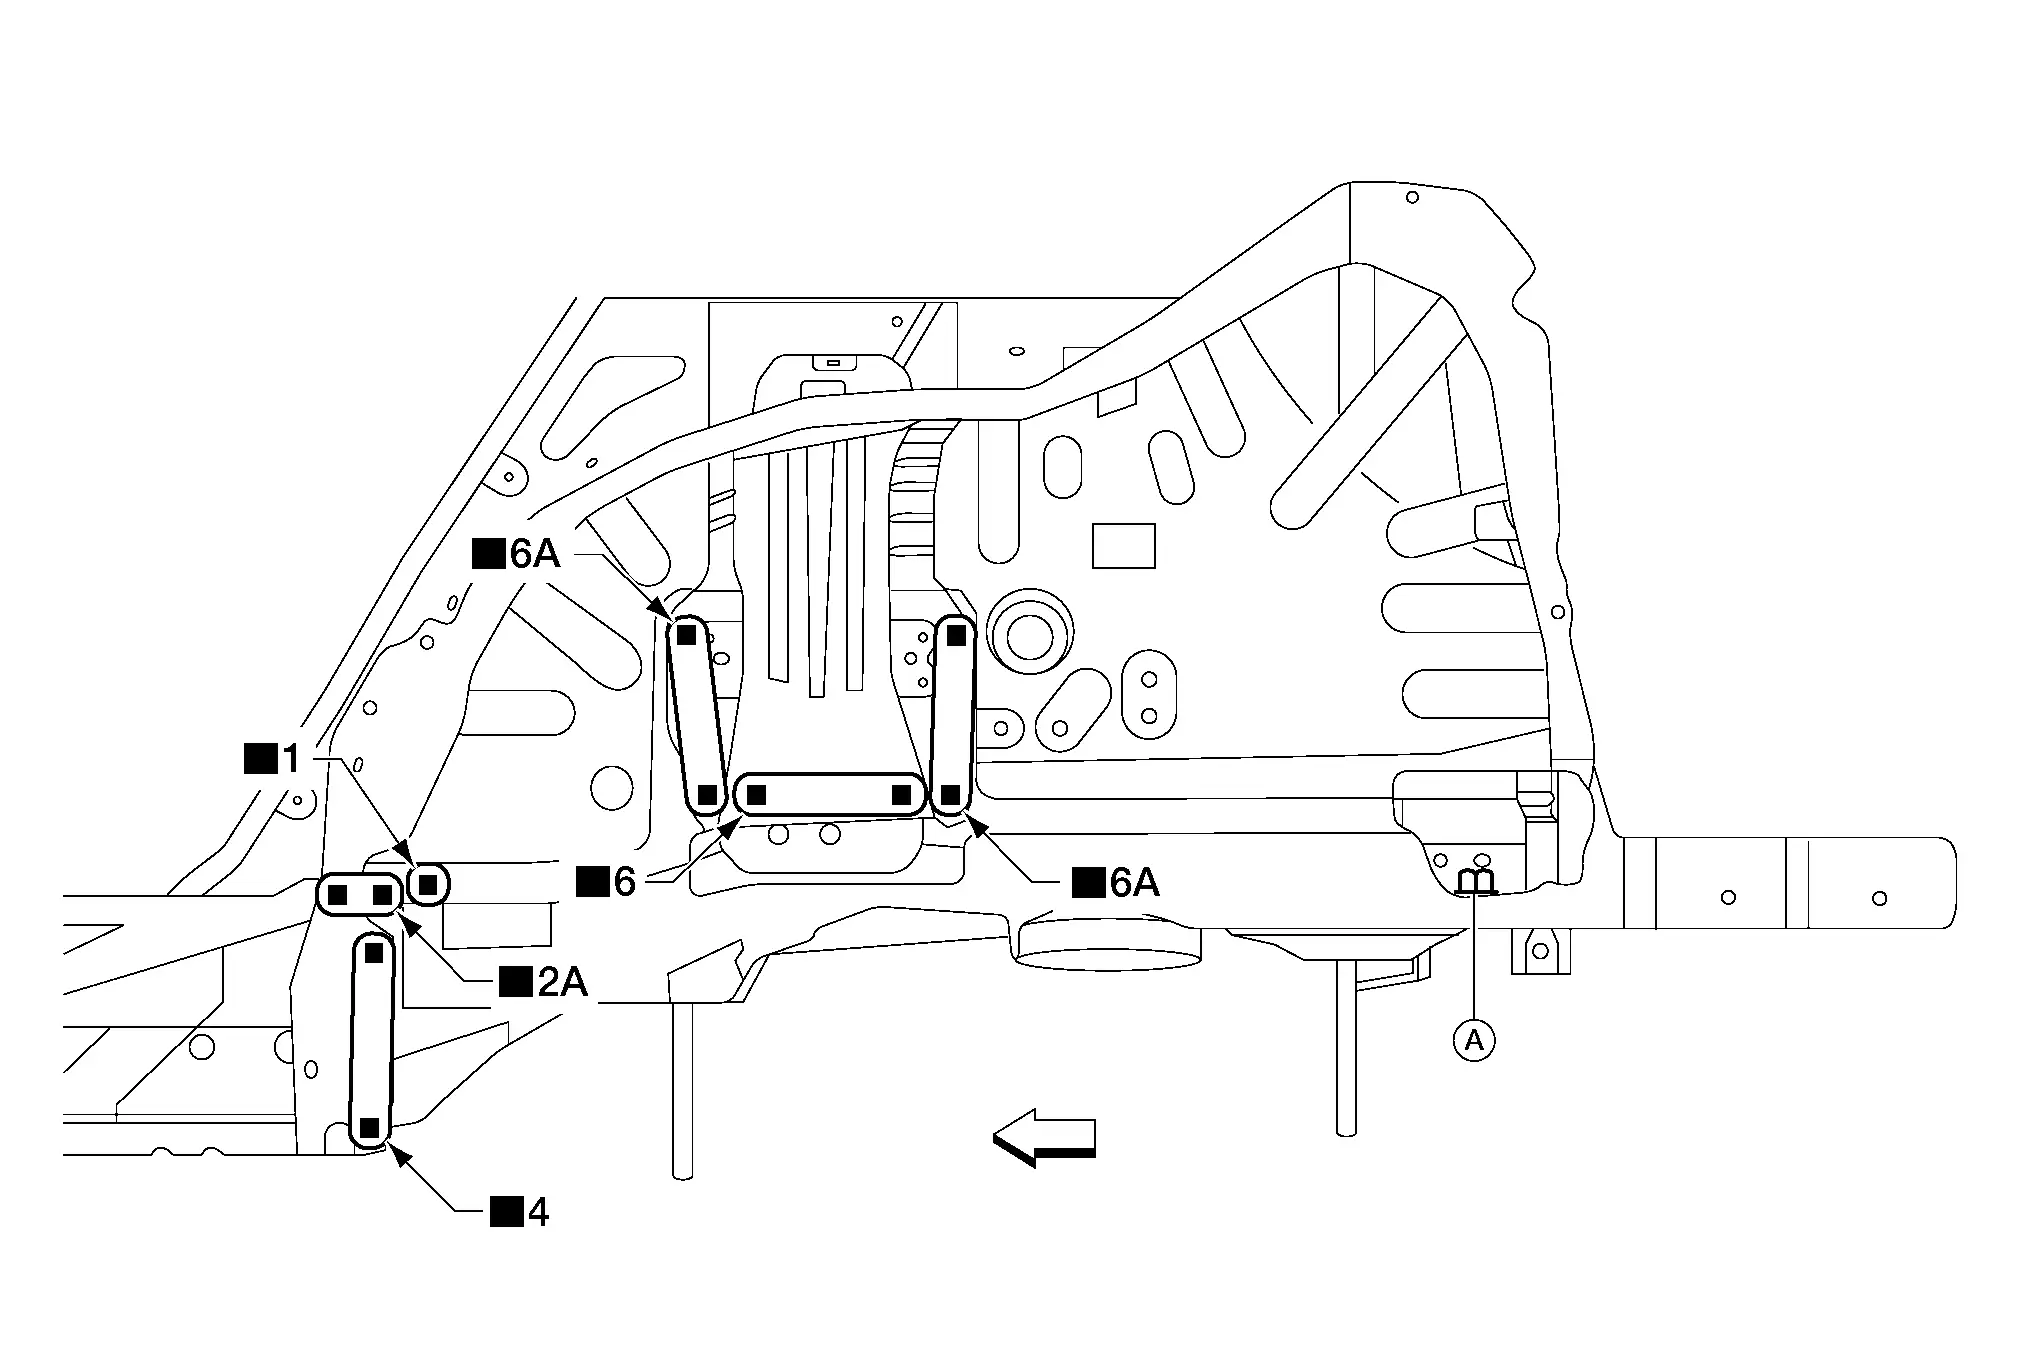
A. MAG weld
Front
Replacement parts
• Rear wheelhouse inner

7th Crossmember

Work after rear floor panel is removed.
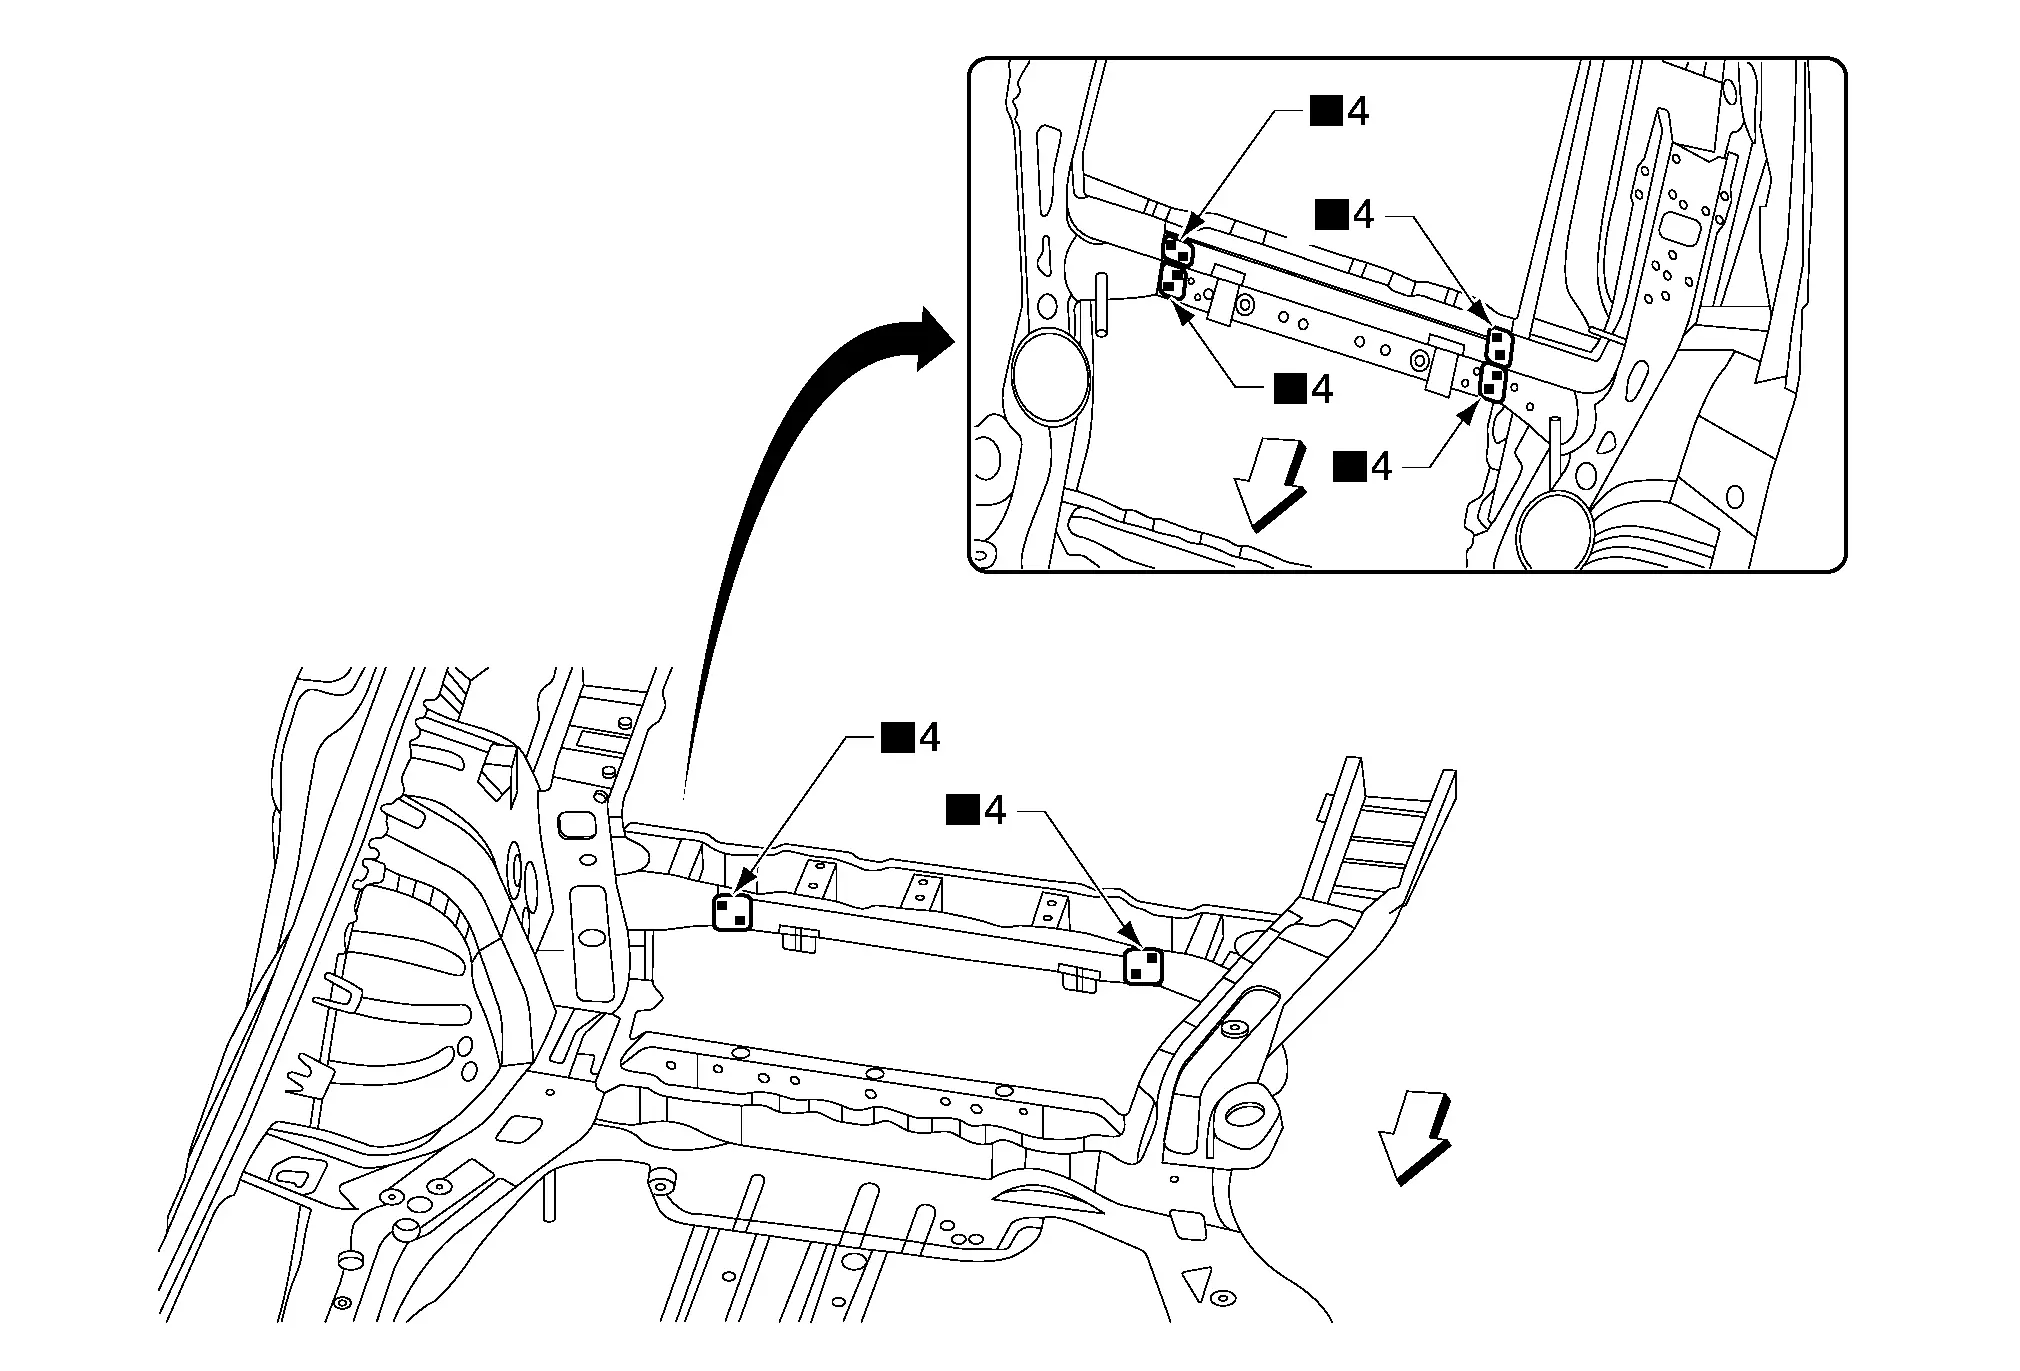
Front
Replacement parts
• 7th crossmember

5th Crossmember

Work after rear floor panel is removed.

Front
Replacement parts
• 5th crossmember

Rear Side Member

Work after 7th crossmember and 5th crossmember are removed.

Front
Replacement parts
• Rear side member

Rear Seat Belt Anchor Inner Reinforcement

Work after rear side member is removed.
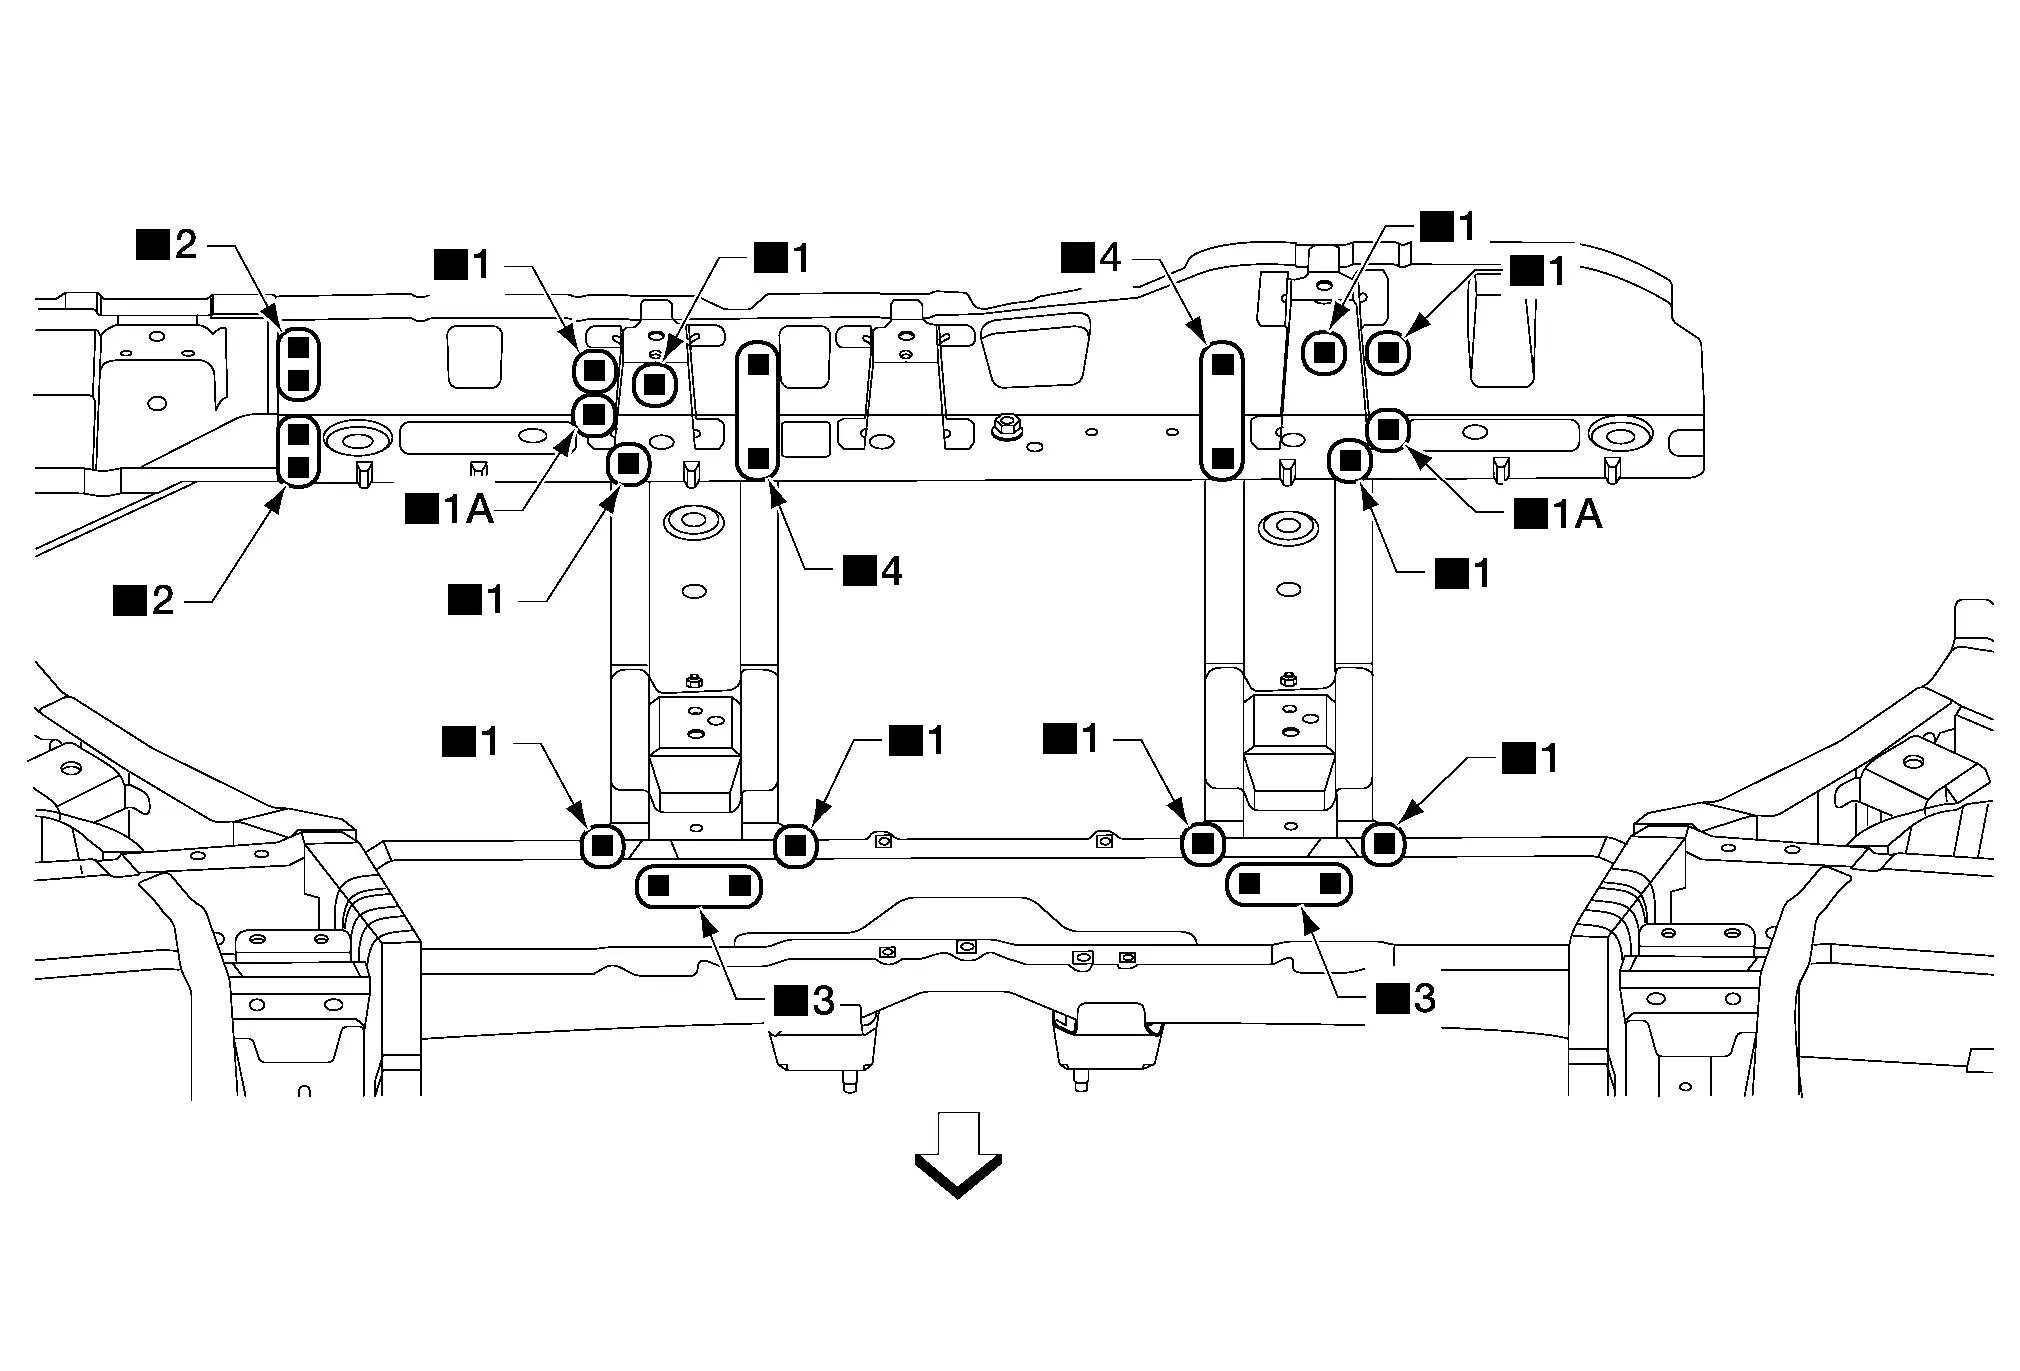
Front
Replacement parts
• Rear seat belt anchor inner reinforcement

2nd Crossmember

Work after front floor panel is removed.
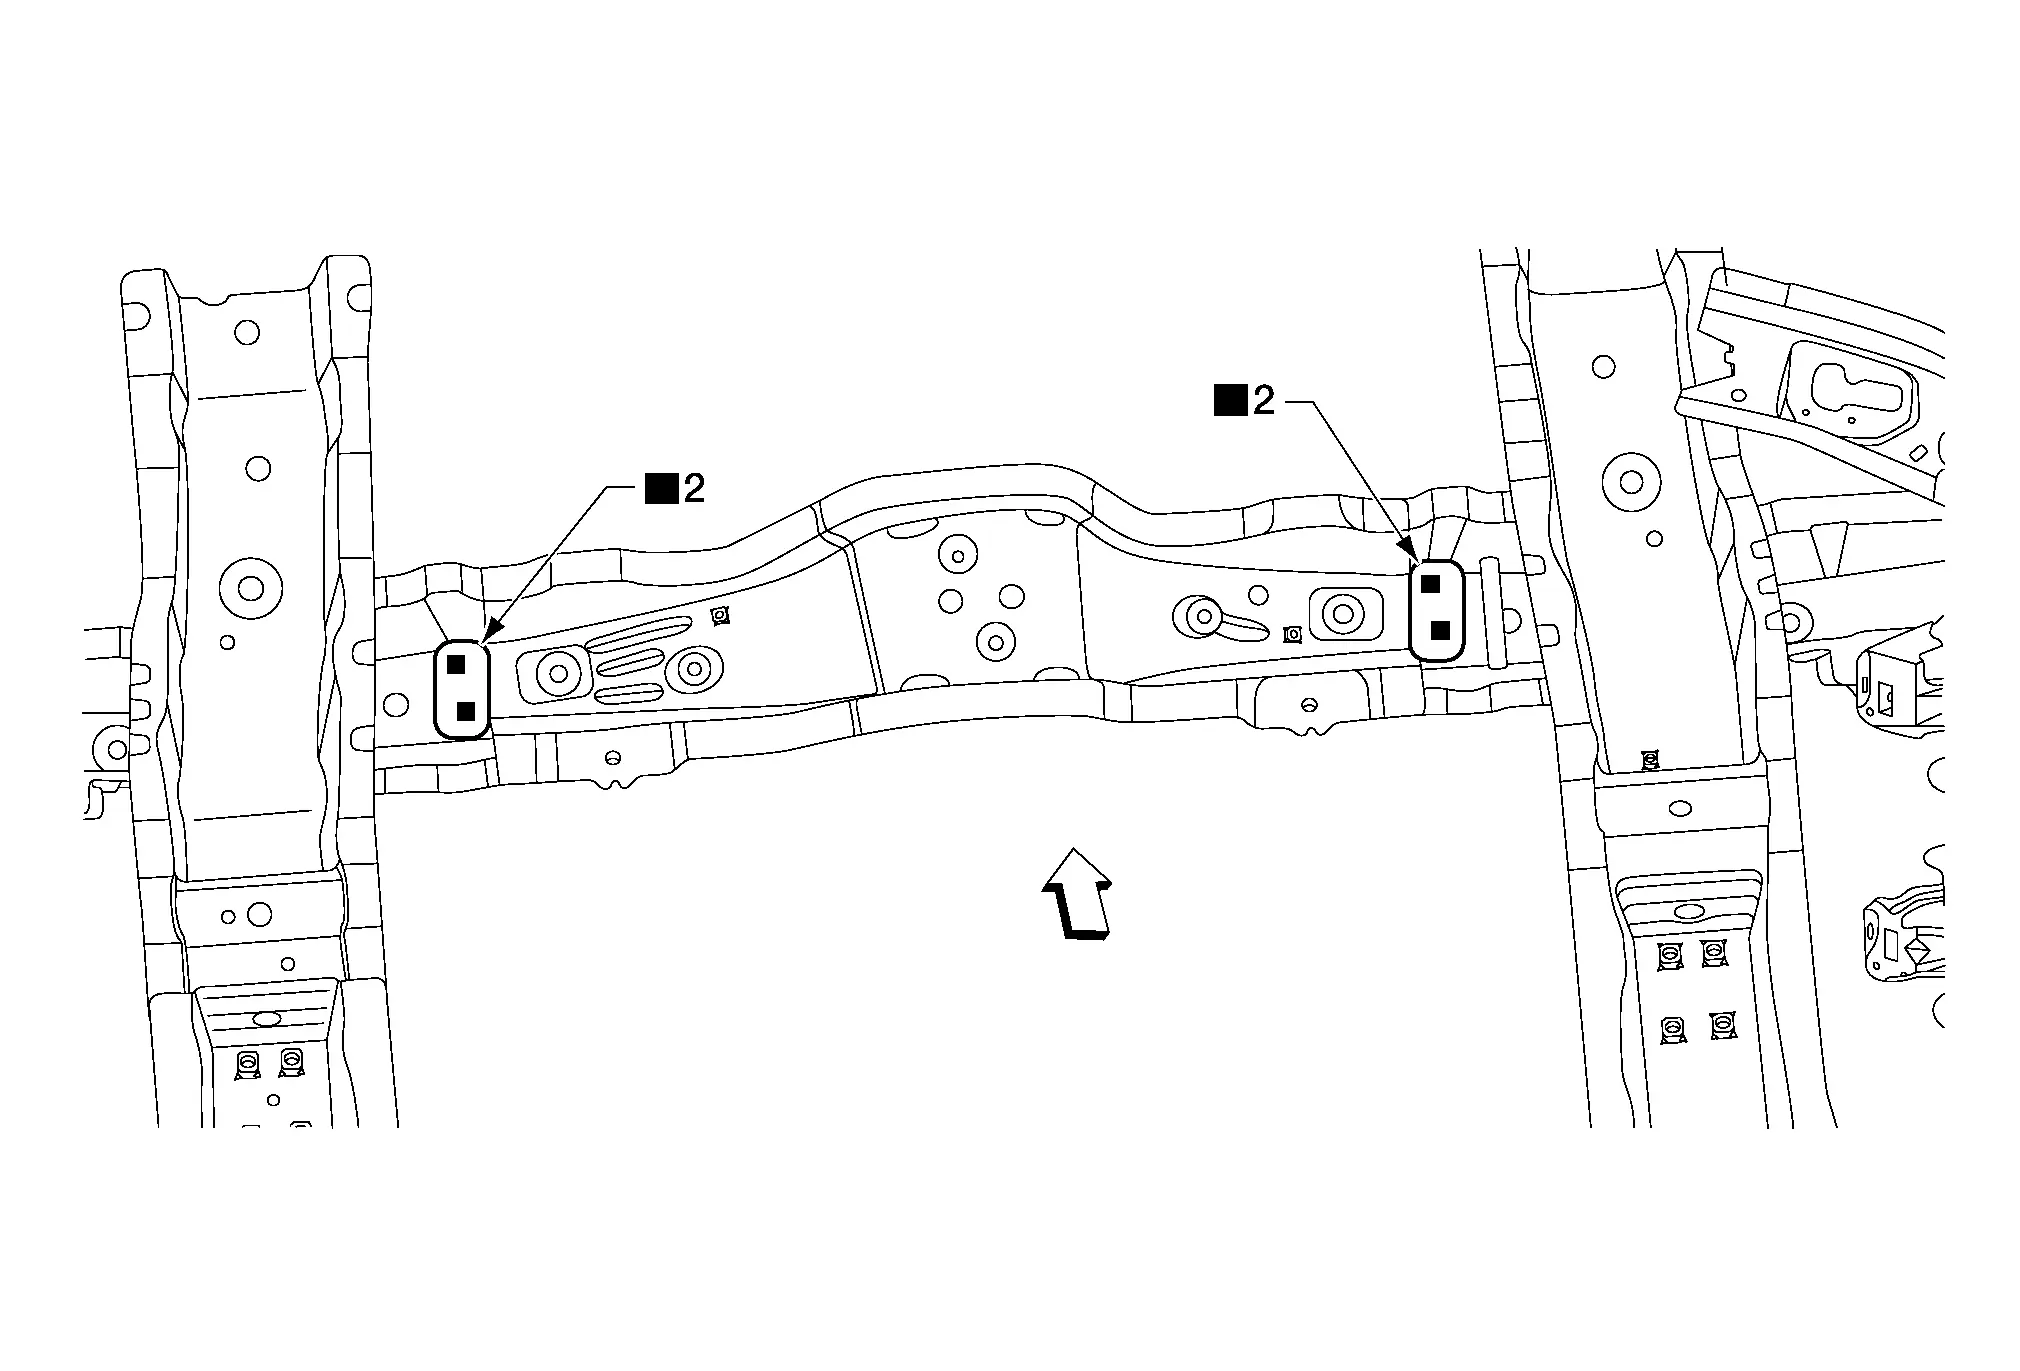
Front
Replacement parts
• 2nd crossmember

Front Side Member Center Extension

Work after 2nd crossmember is removed.

Front
Replacement parts
• Front side member center extension

Sill Inner Reinforcement

Work after front side member center extension is removed.
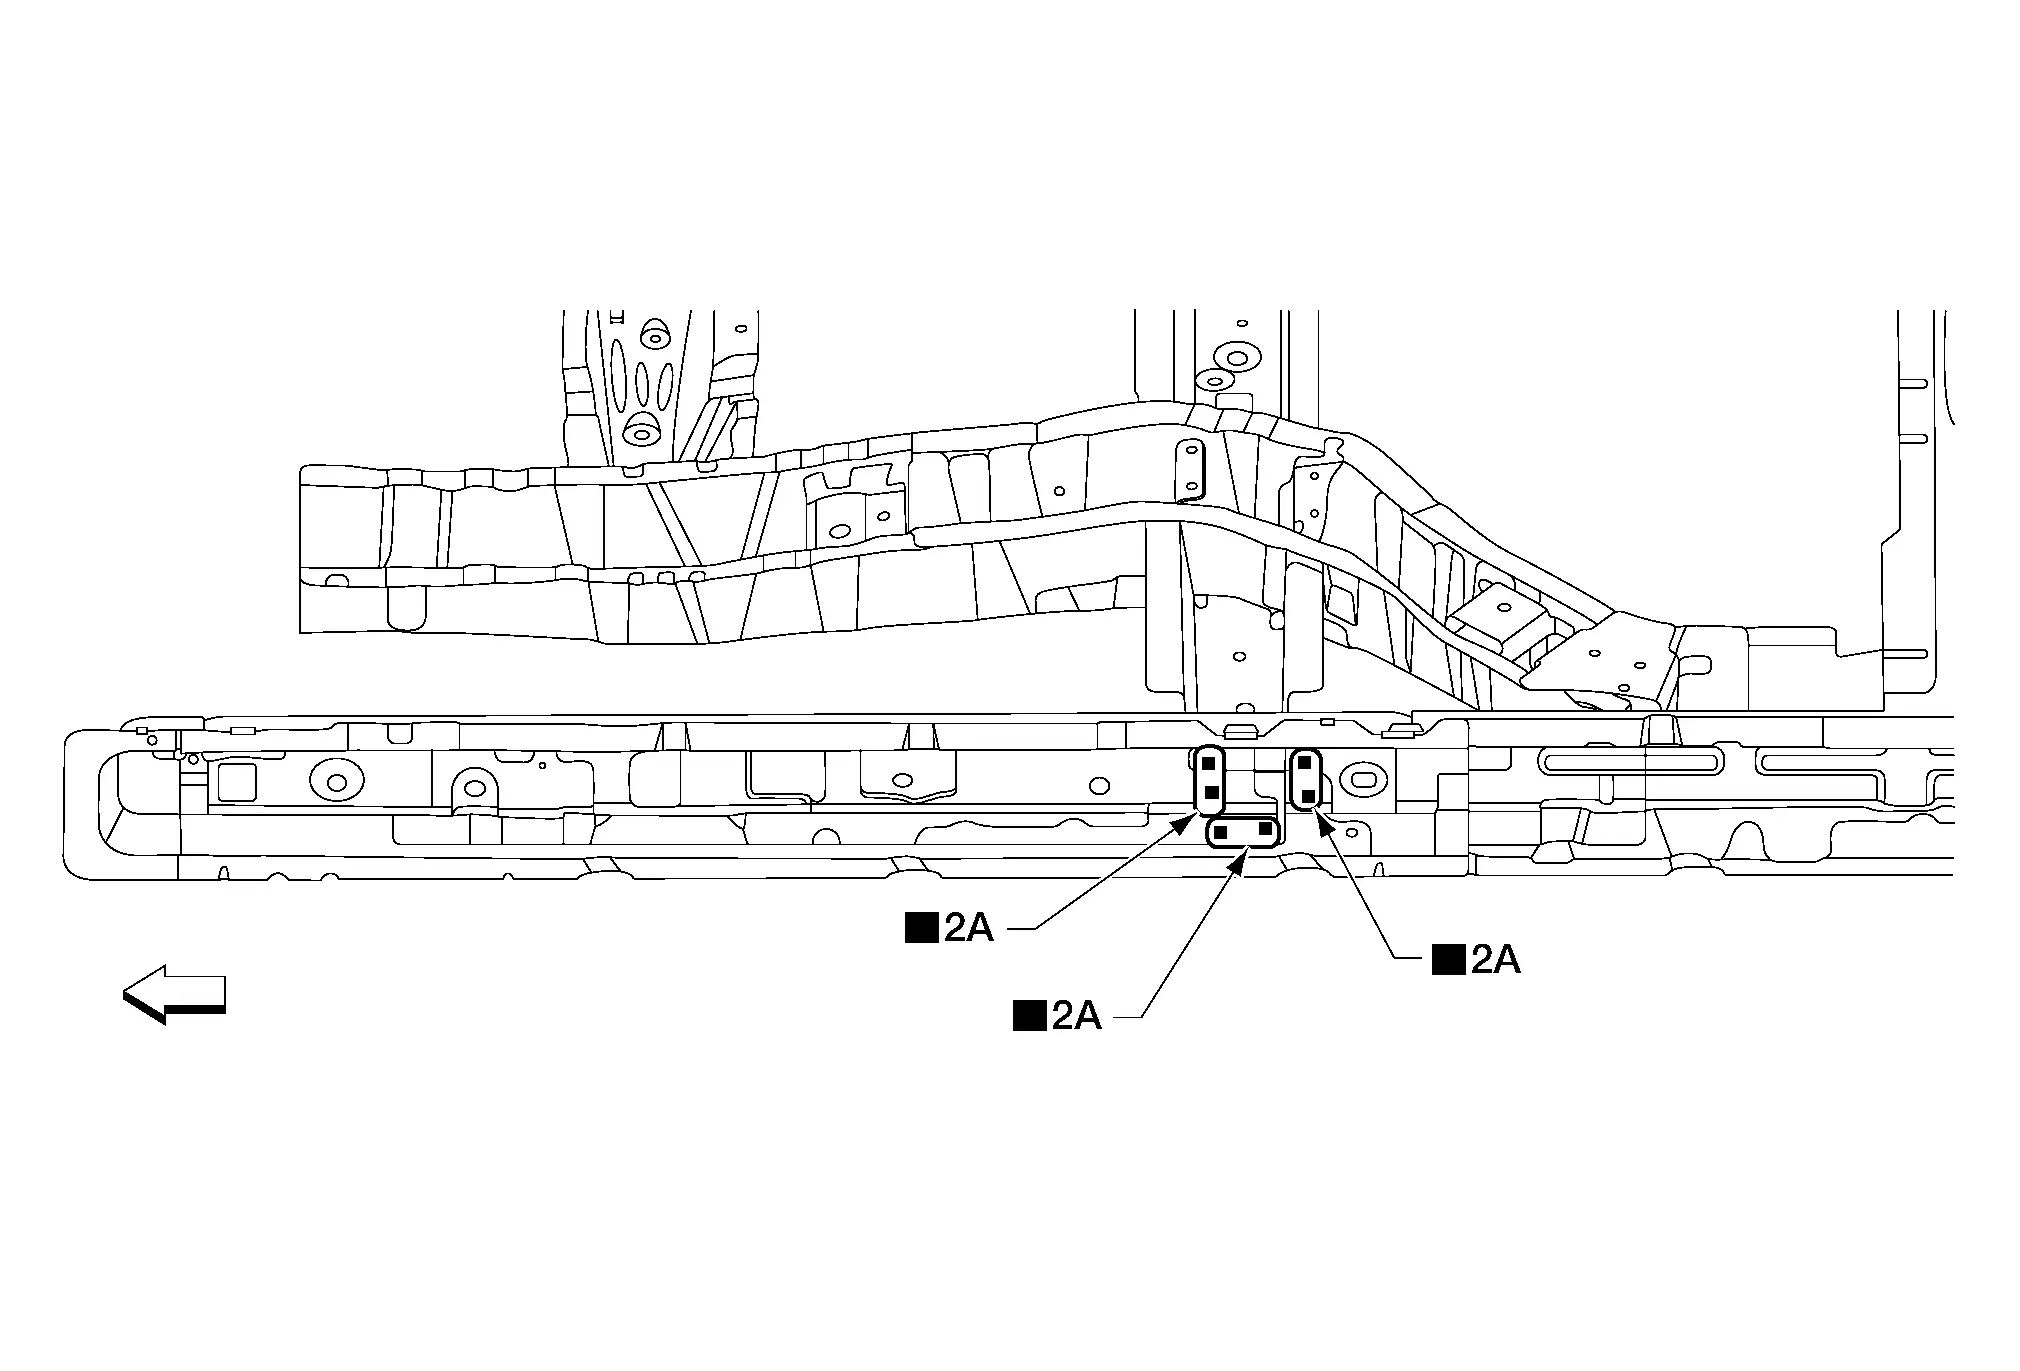
Front
Replacement parts
• Sill inner reinforcement

3rd Crossmember

Work after sill inner reinforcement is removed.
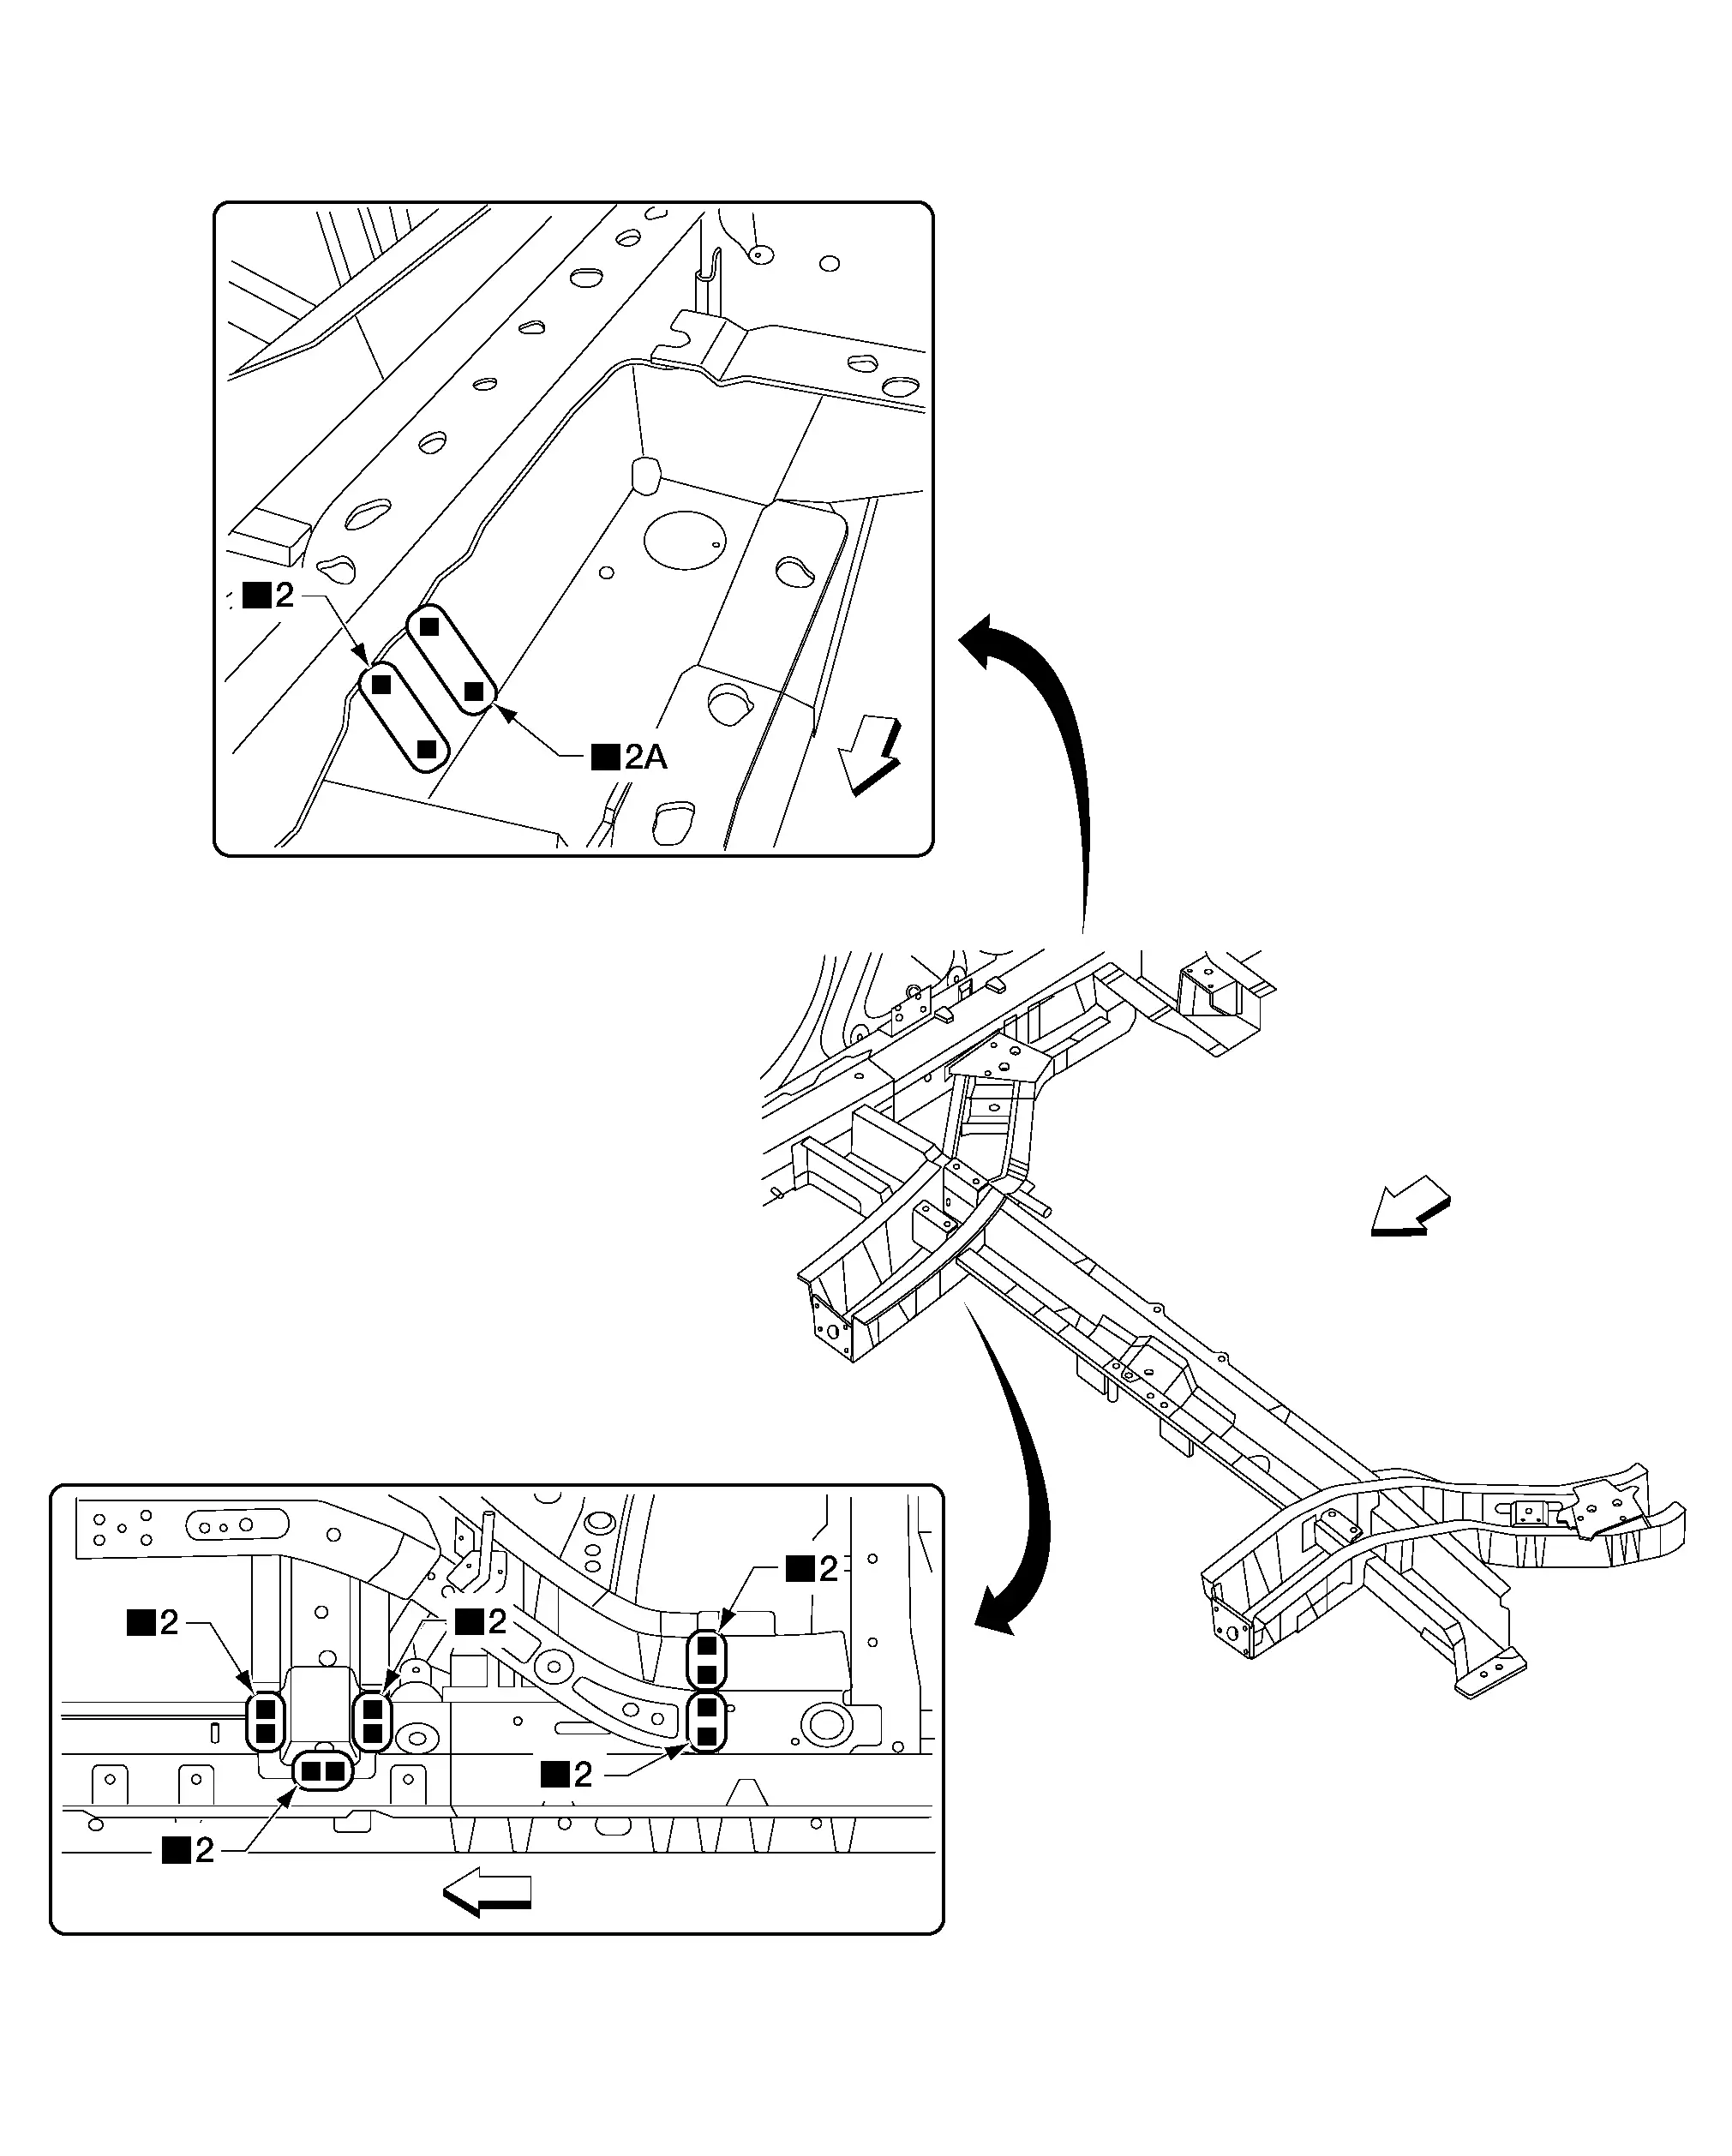
Front
Replacement parts
• 3rd crossmember

Back Door Outer

A. Adhesive
Front
Replacement parts
• Back door outer