Front Axle - Front Drive Shaft Boot
Exploded View
LH
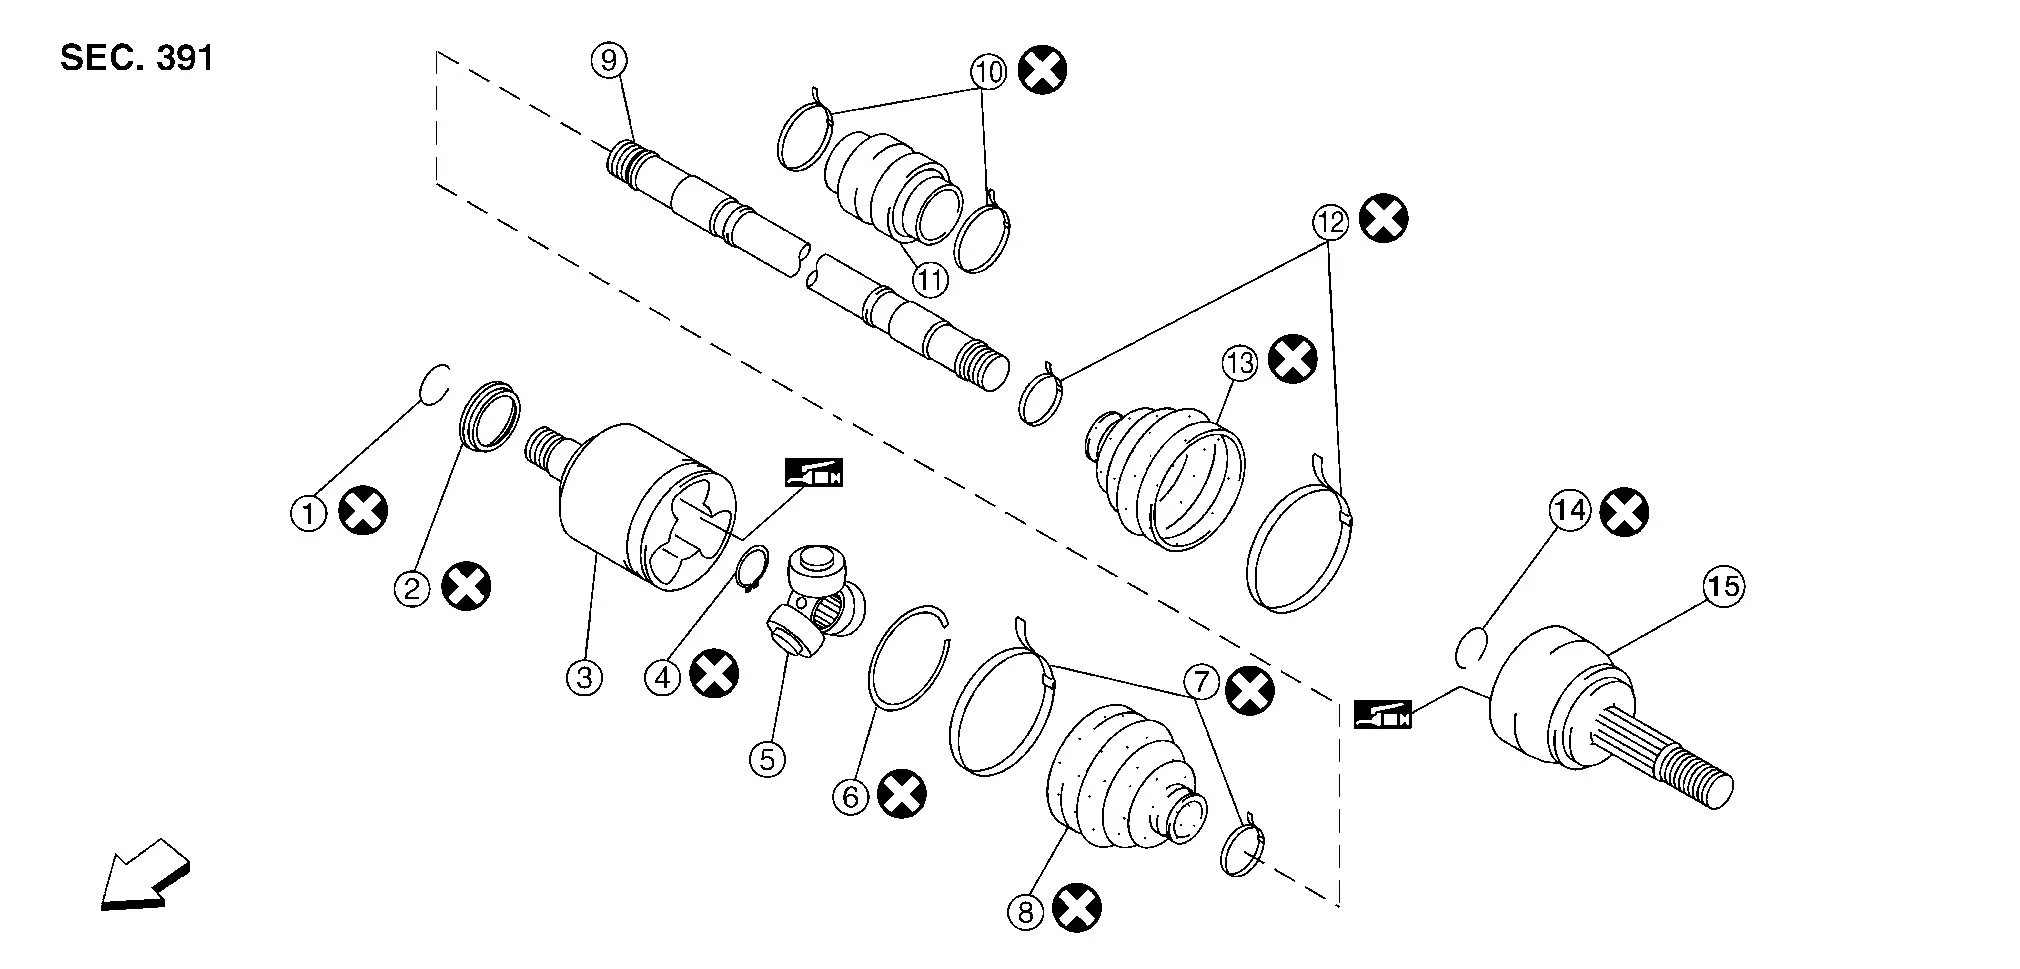
| 1. | Circlip | 2. | Dust shield | 3. | Slide joint housing |
| 4. | Snap ring | 5. | Spider assembly | 6. | Stopper ring |
| 7. | Boot band | 8. | Boot | 9. | Shaft |
| 10. | Damper band | 11. | Damper | 12. | Boot band |
| 13. | Boot | 14. | Circlip | 15. | Joint sub-assembly |
 |
Front |
RH
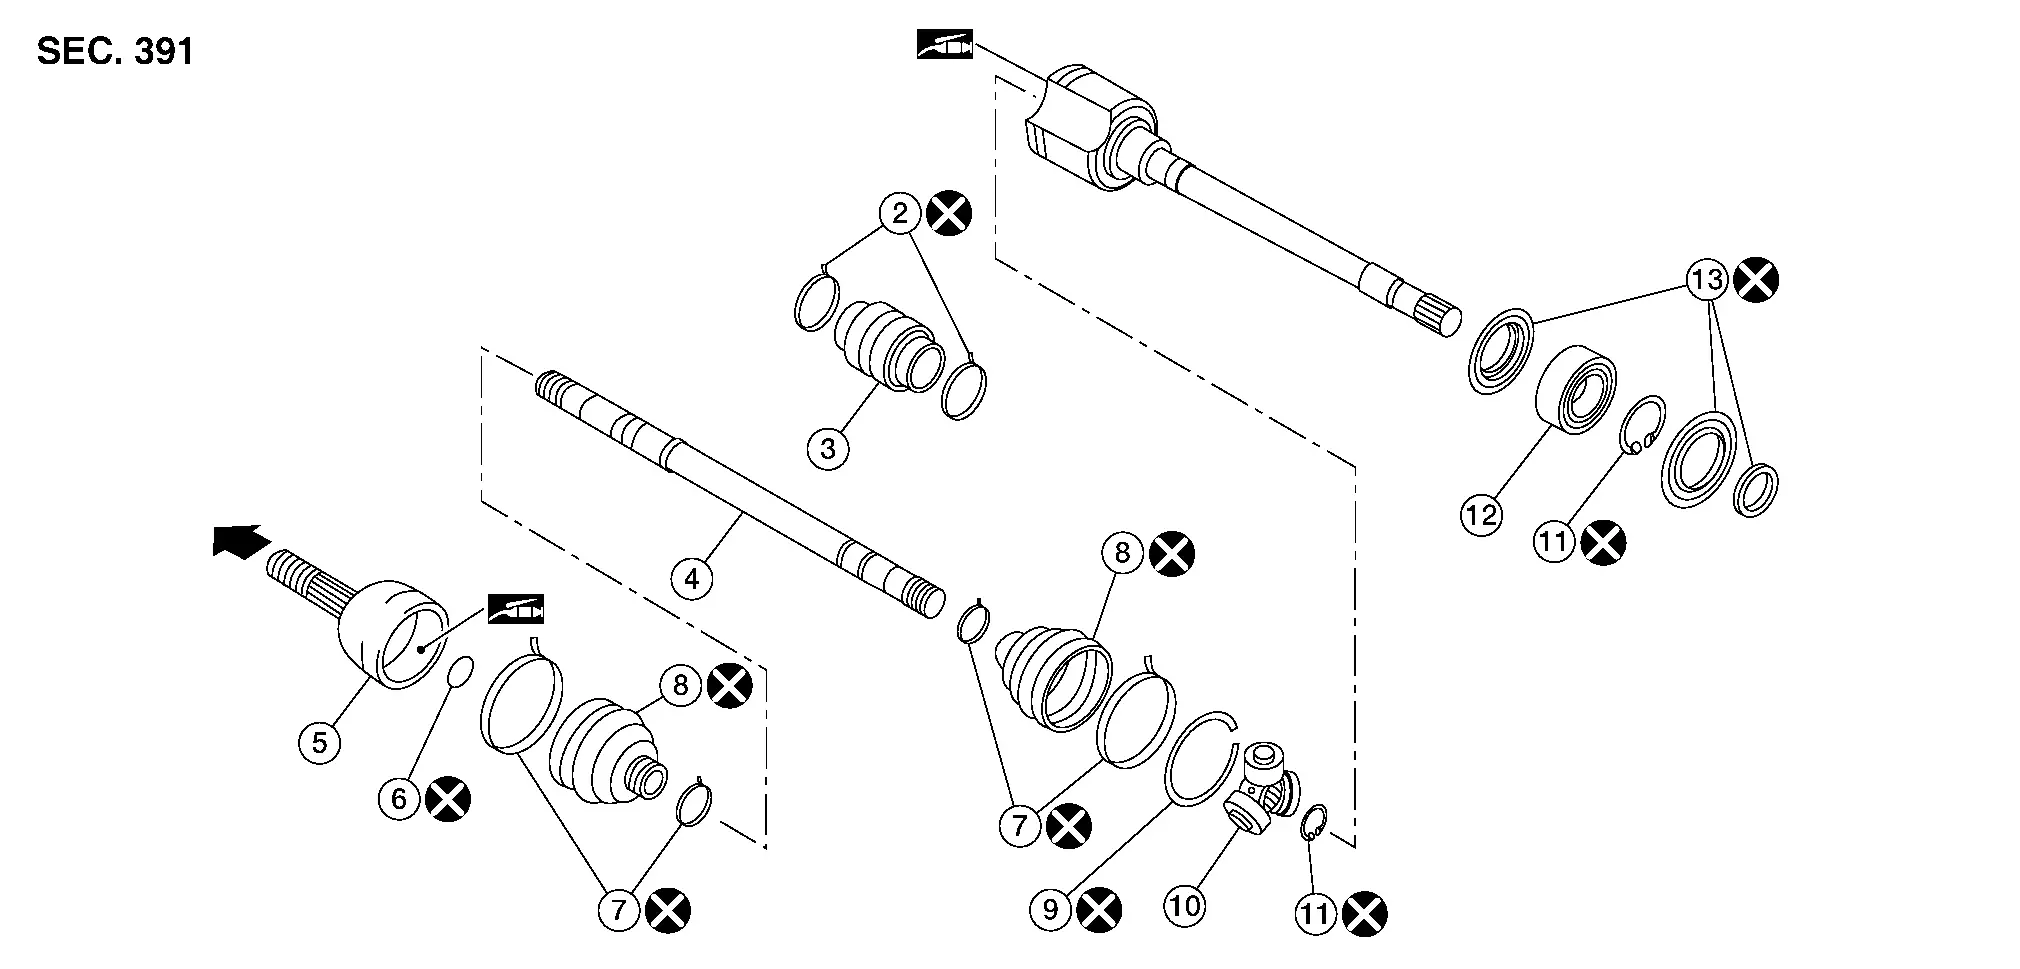
| 1. | Housing | 2. | Damper bands | 3. | Dynamic damper |
| 4. | Shaft | 5. | Joint sub-assembly | 6. | Circular clip |
| 7. | Boot bands | 8. | Boot | 9. | Stopper ring |
| 10. | Spider assembly | 11. | Snap ring | 12. | Support bearing |
| 13. | Dust shield |  |
Wheel side | ||
 |
Fill NISSAN Genuine grease or equivalent. | ||||
- Wheel Side
- Transaxle Side
Wheel Side Nissan Pathfinder 2022
Removal and Installation
REMOVAL
Remove front disc brake rotor. Refer to Removal and Installation.
Using suitable tool (A) and Tool (B) release staked area (C) of wheel hub lock nut (D).
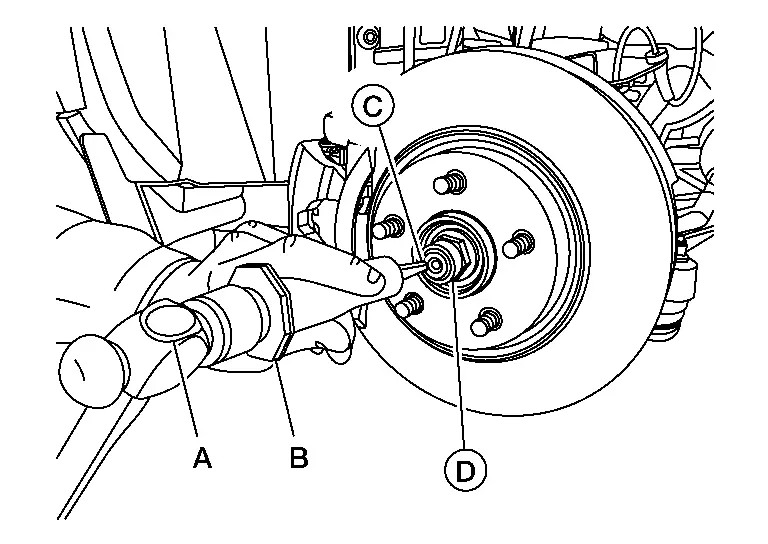
| Tool number (B) | : (NI-52982) |
Visually verify that staked area (A) of wheel hub lock nut (B) is completely released from front drive shaft (1) or damage to drive shaft can occur.
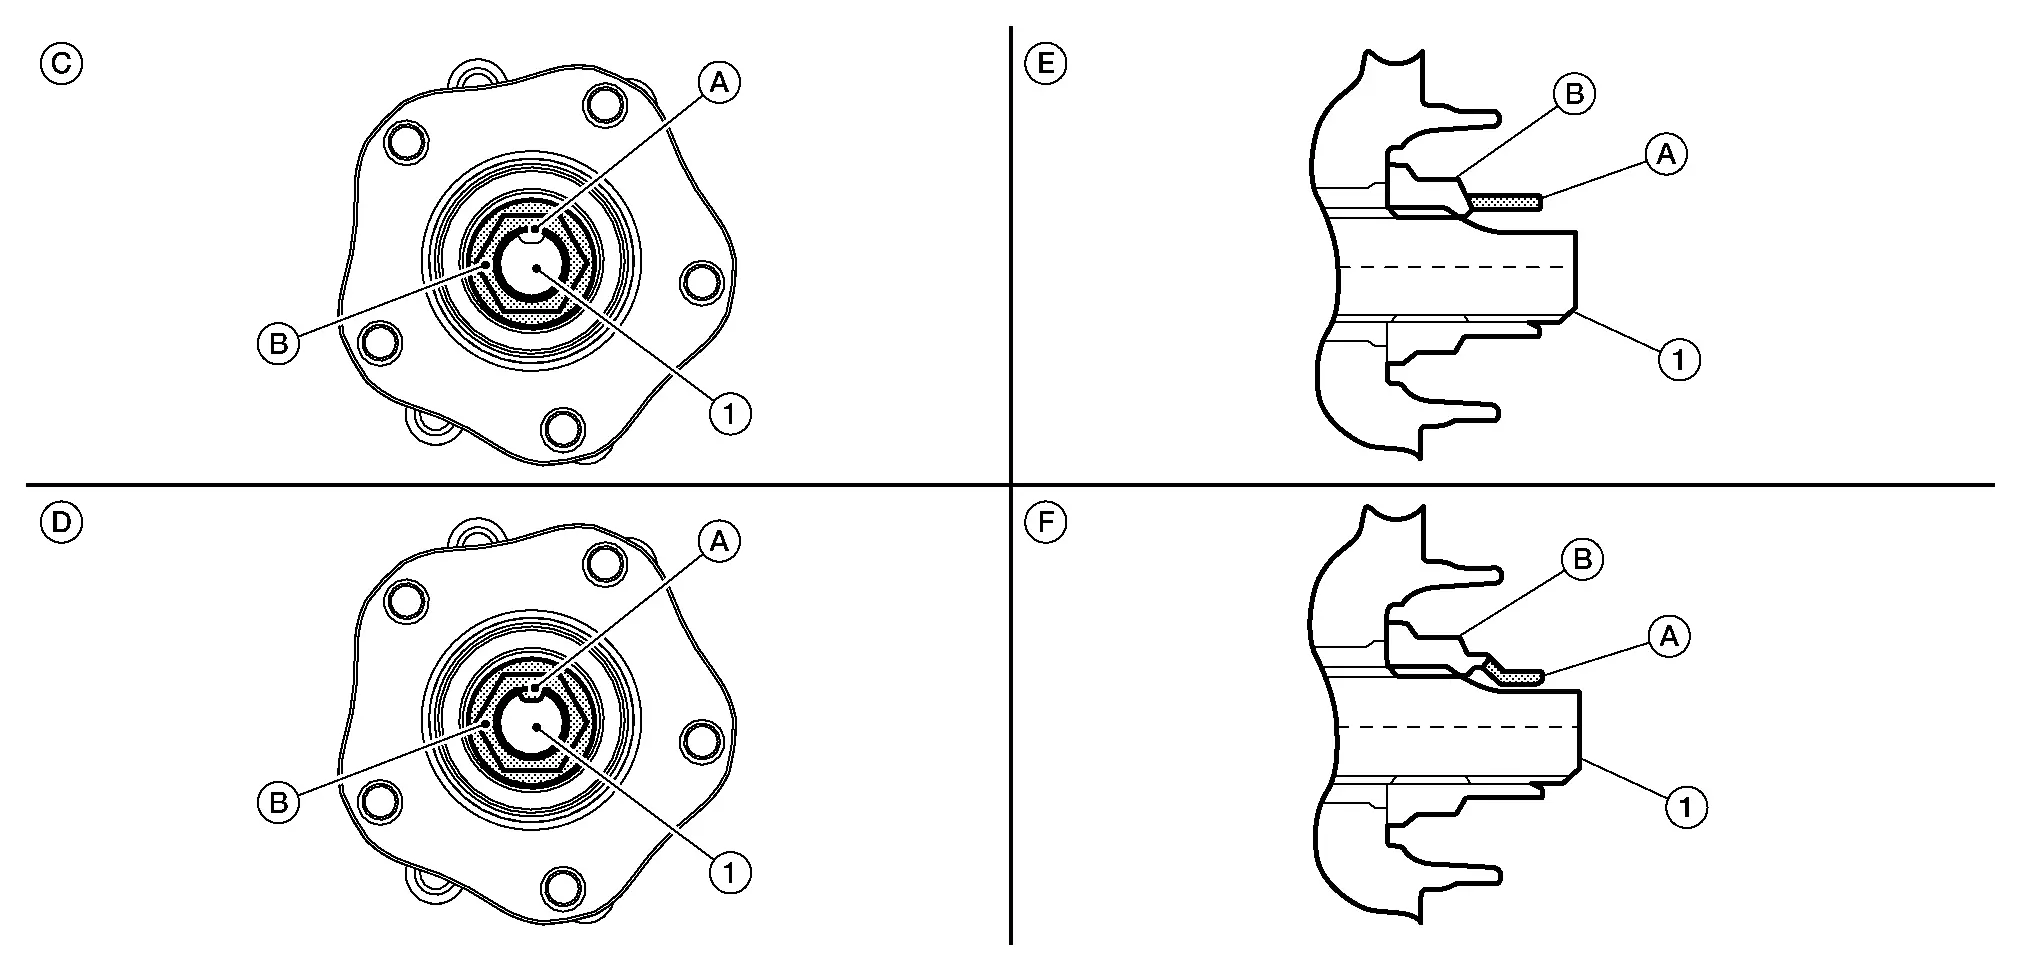
| (C) | : Fully released |
| (D) | : Not fully released |
| (E) | : Fully released (sectional view) |
| (F) | : Not fully released (sectional view) |
Be sure that staked area of wheel hub lock nut is fully released or damage to drive shaft can occur.
Do not damage front drive shaft threads.
Loosen wheel hub lock nut from drive shaft.
Do not use power tool.
Do not damage front drive shaft threads.
Do not reuse drive shaft lock nut.
When loosening lock nut, if it does not turn smoothly, verify that staked area is completely released.
Using a piece of wood and a suitable tool, tap on the lock nut to disengage drive shaft from wheel hub.
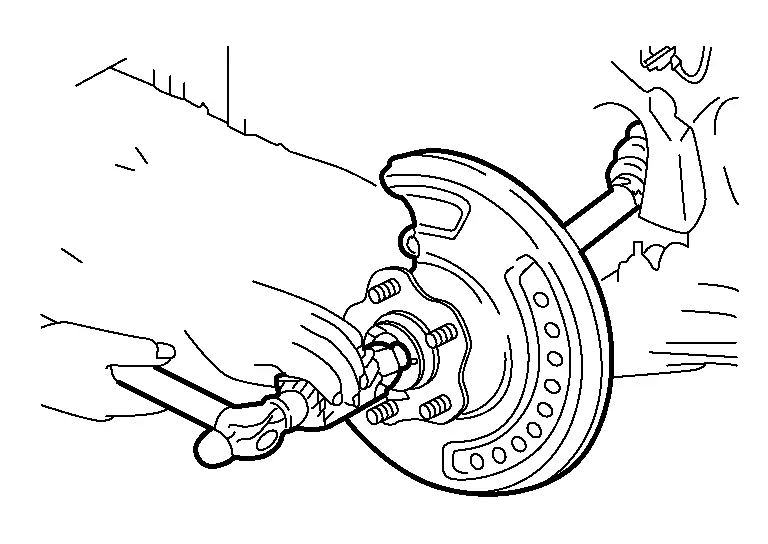
Do not place drive shaft joint at an extreme angle. Be careful not to over extend slide joint.
Do not allow drive shaft to hang without support.
Remove wheel hub lock nut.
Do not reuse wheel hub lock nut.
Remove boot bands.
Remove boot from joint sub-assembly.
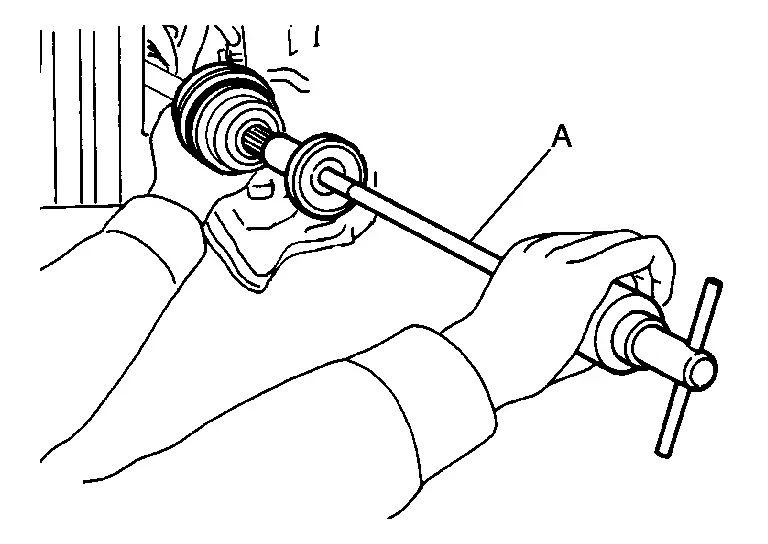
Screw sliding hammer or suitable tool (A) 30 mm (1.18 in) or more into threaded part of joint sub-assembly. Support drive shaft with one hand and pull out joint sub-assembly with a sliding hammer or suitable tool from housing assembly.
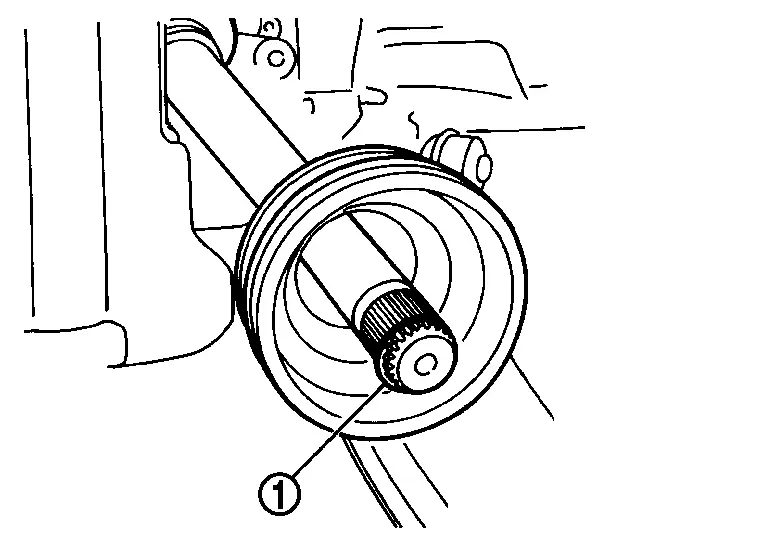
Remove circular clip (1) from housing assembly.
Remove boot from housing assembly.
Inspect the components. Refer to Inspection.
INSTALLATION
Clean the old grease on joint sub-assembly with paper shop cloth.
Fill serration slot joint sub-assembly with NISSAN genuine grease or equivalent.
Install boot and boot bands to housing assembly.
Remove the tape wrapped around the serration on housing assembly.
Position the circular clip on groove at the housing assembly edge.
Align both center axles of the housing assembly edge and joint sub-assembly. Install housing assembly with joint sub-assembly holding circular clip.
Install joint sub-assembly (1) to housing assembly using suitable tool.
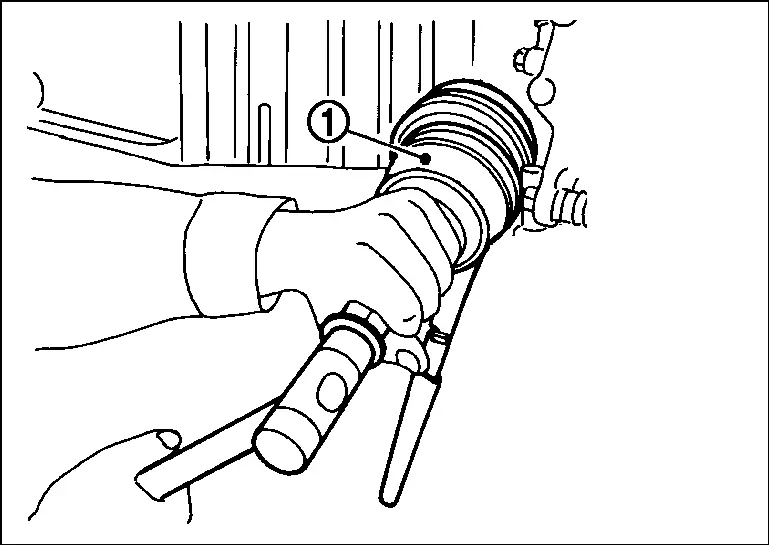
Pull the joint sub-assembly in the axial direction away from transaxle assembly. Confirm that the joint sub assembly cannot be pulled out.
Apply the specified amount of grease into the large diameter side opening of the boot.
| Grease amount | : Refer to Drive Shaft. |
Install the boot securely into grooves (indicated by “*” marks) shown in the figure.

Make sure boot installation length (L) is the specified length. Insert a suitable tool into the large end of boot. Bleed air from boot to prevent boot deformation.
| Boot installation length (L) | : Refer to Drive Shaft. |
Install new large and small boot bands securely using Tool.
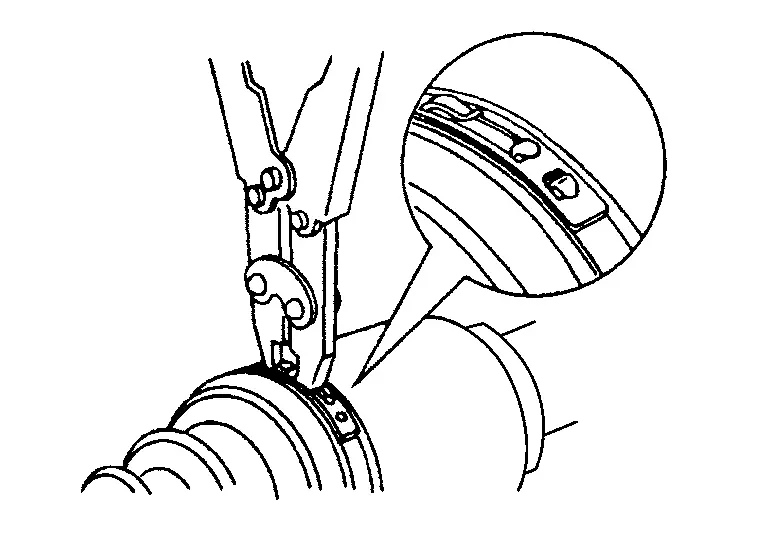
| Tool number | : KV40107300 (NI-51751) |
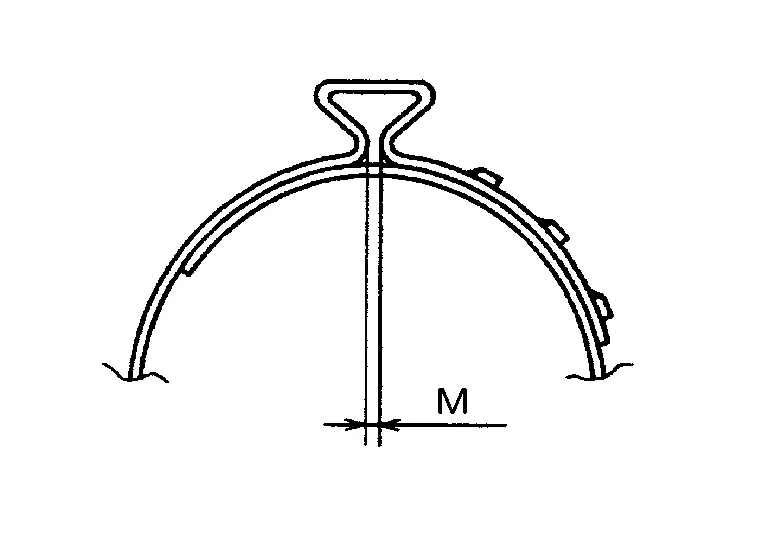
| Dimension (M) | : Refer to Boot Bands. |
Secure joint sub-assembly and housing assembly. Make sure that they are in the correct position when rotating boot. Reinstall them using boot bands when boot installation positions become incorrect.
Clean the mating surface of the wheel hub lock nut and the wheel hub and bearing.
Clean the mating surface of the drive shaft (A) and the wheel hub and bearing.

Using suitable tool (A) and cold chisel (B) stake the wheel hub lock nut (C) as shown.
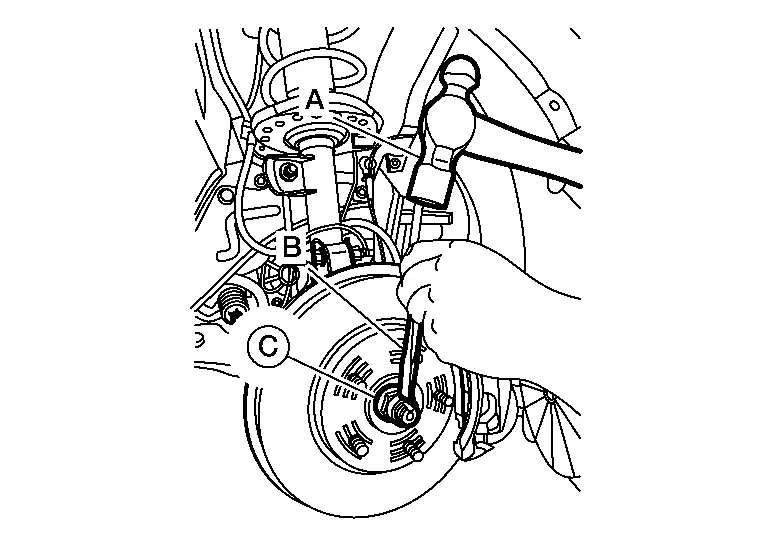
Use the following range when staking the wheel hub lock nut.
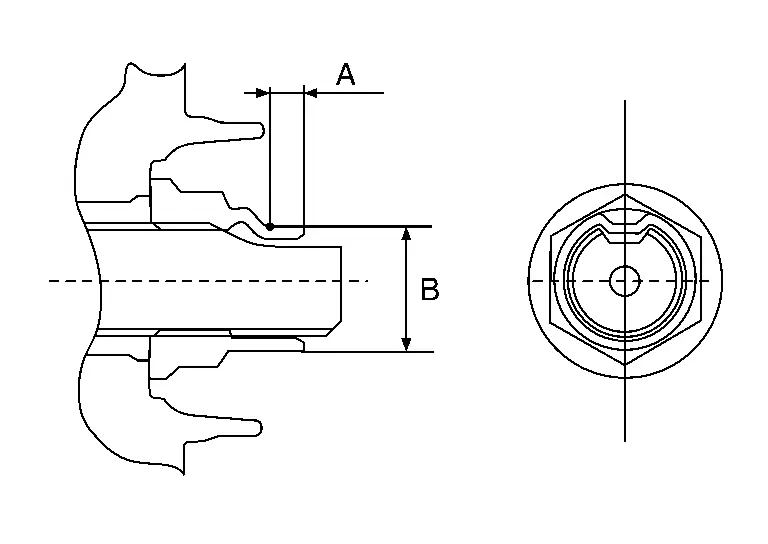
| (A) | : 6.2 mm (0.244 in) |
| (B) | : 26.4 - 27.8 mm (1.039 - 1.094 in) |
Install the remainder in reverse order of removal.
Transaxle Side Nissan Pathfinder
Removal and Installation
REMOVAL
Remove front drive shaft. Refer to Removal and Installation (LH) or Refer to Removal and Installation (RH).
Secure front drive shaft in a vise.
Remove boot bands and slide boot back.
Put matching marks on the slide joint housing and shaft before separating the slide joint housing.
Remove stopper ring using a suitable tool.
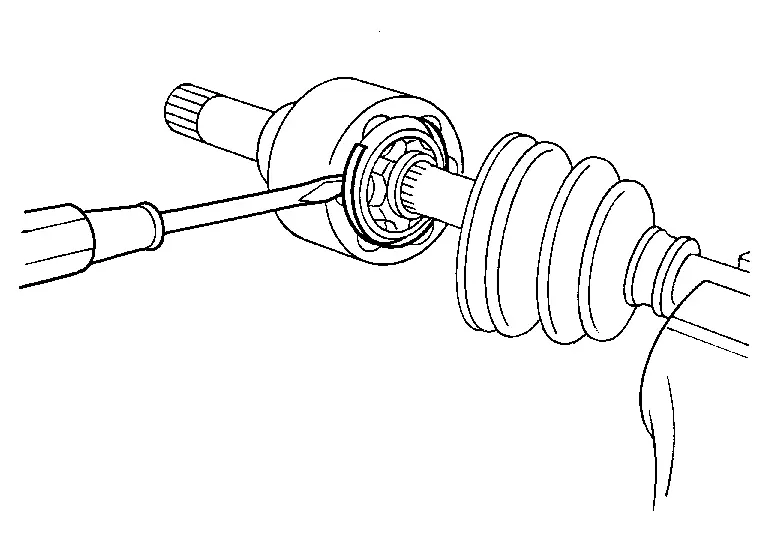
Pull out slide joint housing.
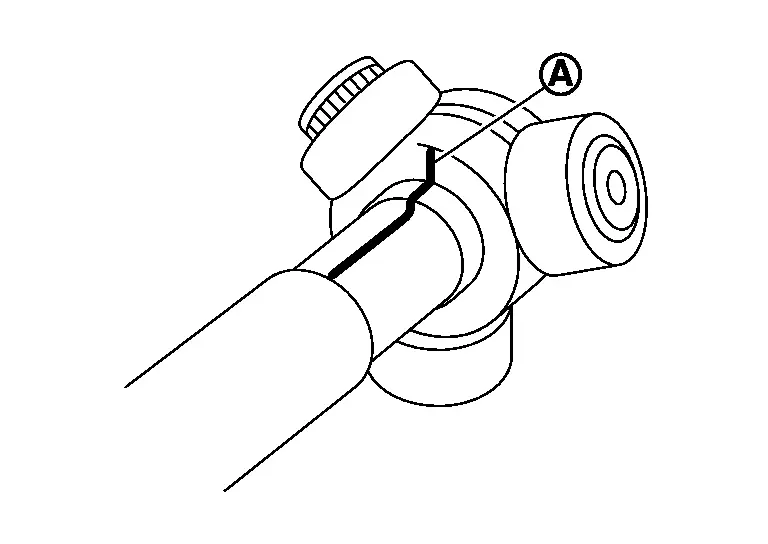
Put matching marks (A) on spider assembly and shaft.
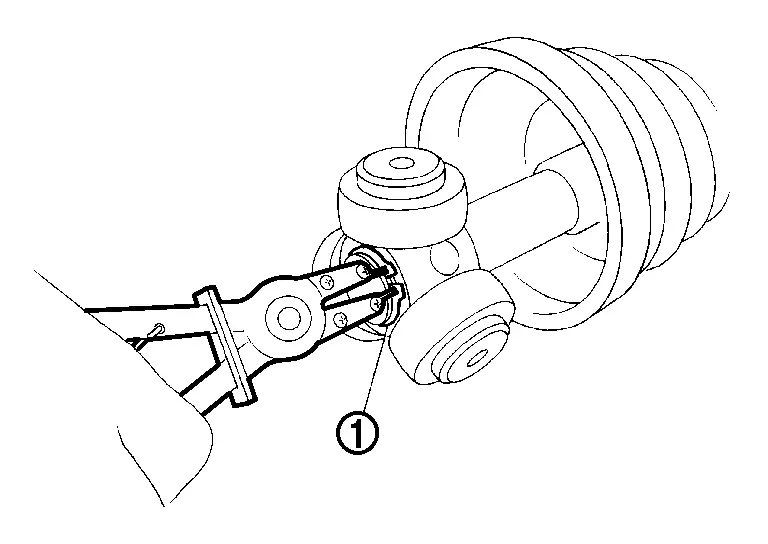
Remove snap ring (1) using a suitable tool.
Remove spider assembly from shaft.
Remove boot from shaft.
Remove circular clip from slide joint housing.
Remove dust shield from slide joint housing.
Clean old grease off slide joint housing.
INSTALLATION
Clean the old grease on joint sub-assembly with paper shop cloth.
Fill serration slot joint sub-assembly with NISSAN genuine grease or equivalent.
Install boot and boot bands to housing assembly.
Remove the tape wrapped around the serration on housing assembly.
Position the circular clip on groove at the housing assembly edge.
Align both center axles of the housing assembly edge and joint sub-assembly. Install housing assembly with joint sub-assembly holding circular clip.
Install joint sub-assembly (1) to housing assembly using suitable tool.
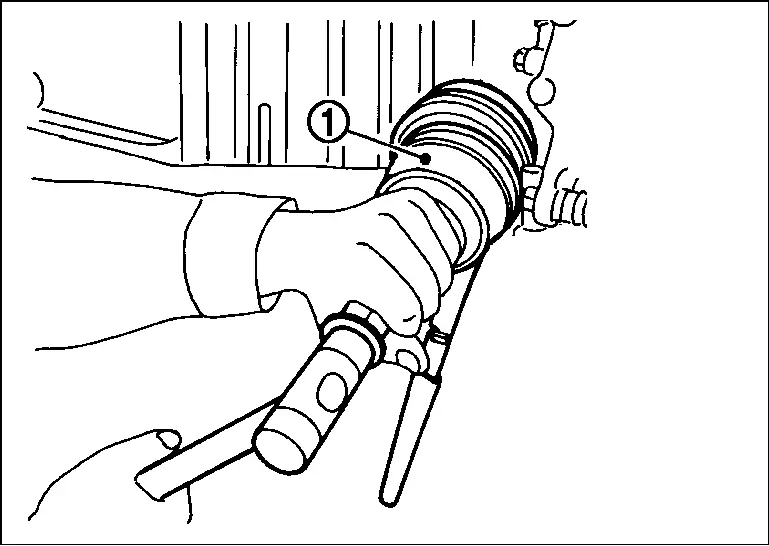
Pull the joint sub-assembly in the axial direction away from transaxle assembly. Confirm that the joint sub assembly cannot be pulled out.
Apply the specified amount of grease into the large diameter side opening of the boot.
| Grease amount | : Refer to Drive Shaft. |
Install the boot securely into grooves (indicated by “*” marks) shown in the figure.
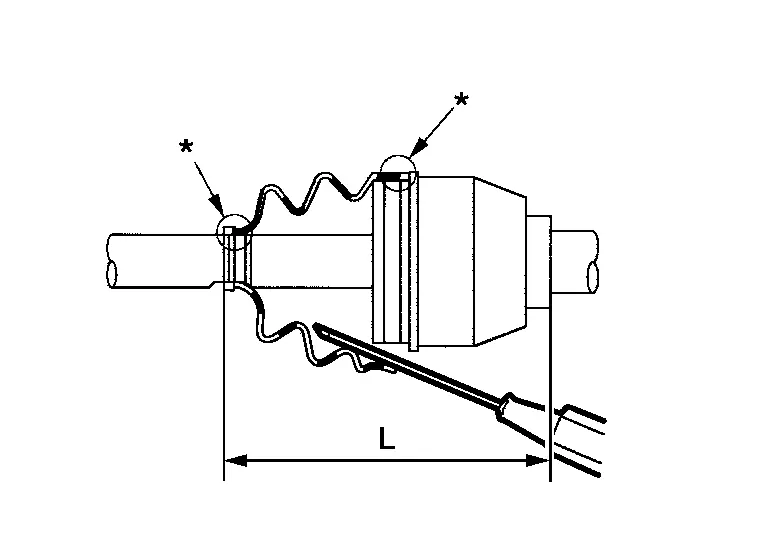
Make sure boot installation length (L) is the specified length. Insert a suitable tool into the large end of boot. Bleed air from boot to prevent boot deformation.
| Boot installation length (L) | : Refer to Drive Shaft. |
Install new large and small boot bands securely using Tool.
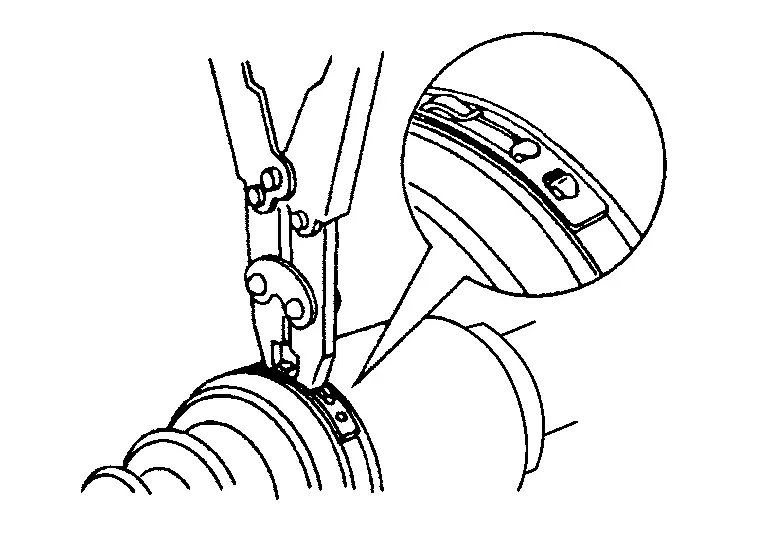
| Tool number | : KV40107300 (NI-51751) |
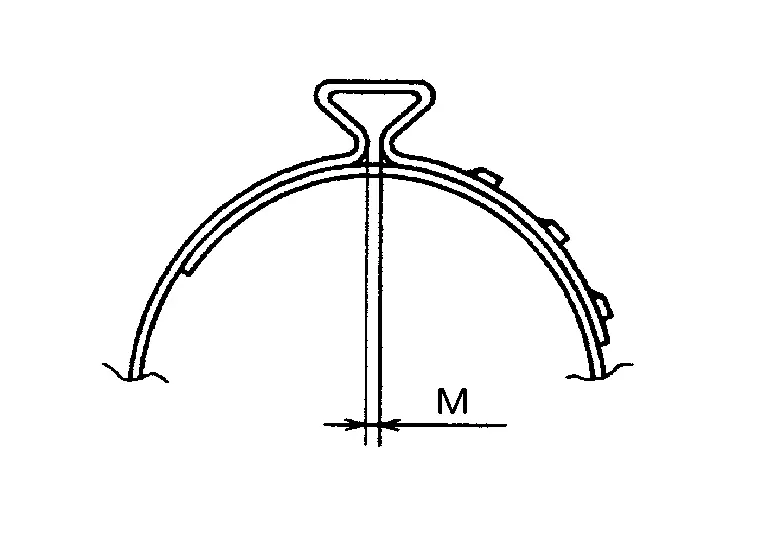
| Dimension (M) | : Refer to Boot Bands. |
Secure joint sub-assembly and housing assembly. Make sure that they are in the correct position when rotating boot. Reinstall them using boot bands when boot installation positions become incorrect.
Clean the mating surface of the wheel hub lock nut and the wheel hub and bearing.
Clean the mating surface of the drive shaft (A) and the wheel hub and bearing.
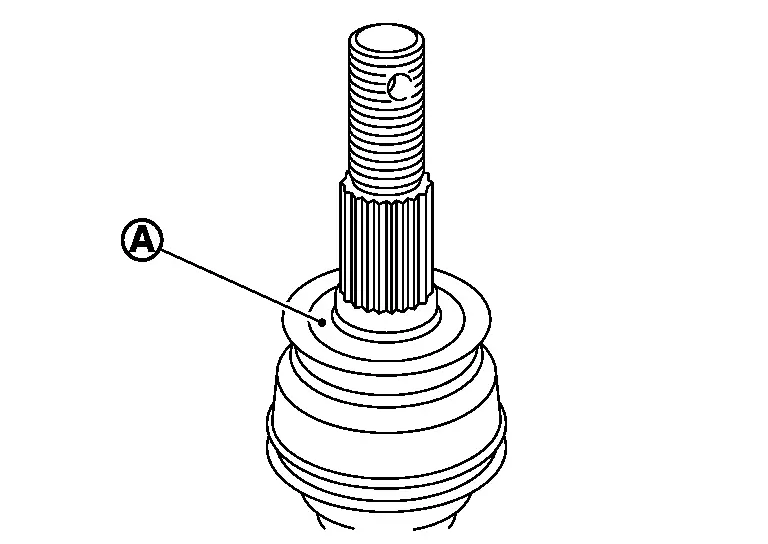
Install the remainder in reverse order of removal.
Inspection
Inspection After Removal
Move joint up/down, left/right, and in the axial directions. Check for motion that is not smooth and for significant looseness.
Check boot for cracks, damage, and leakage of grease.
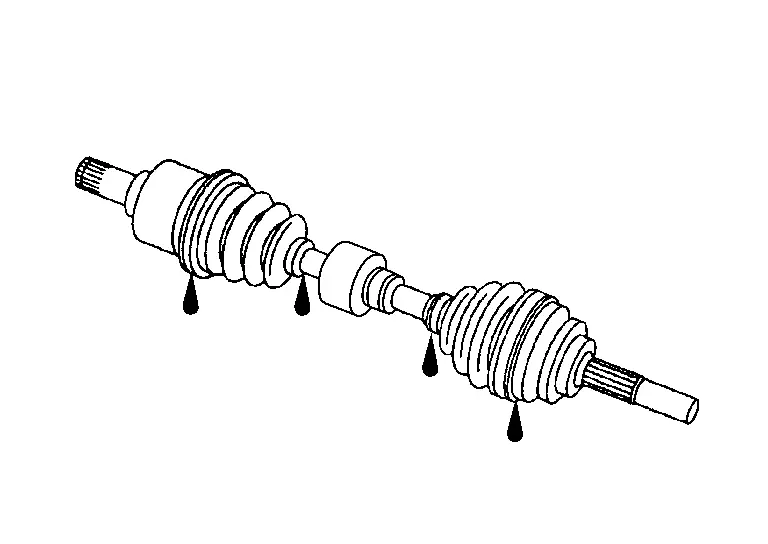
Disassemble drive shaft and exchange malfunctioning part if there is a non-standard condition.