Exterior - Removal and Installation
- Front Bumper
- Rear Bumper
- Front Grille
- Active Grille Shutter
- Cowl Top
- Roof Side Molding
- Door Outside Molding
- Rear Pillar Finisher (outer)
- Door Outside Lower Molding
- Rear Spoiler
- Back Door Outer Finisher
- Running Board
- Tow Hitch
- Emblem
Front Bumper Nissan Pathfinder SUV
Exploded View
WITH ROCK CREEK® 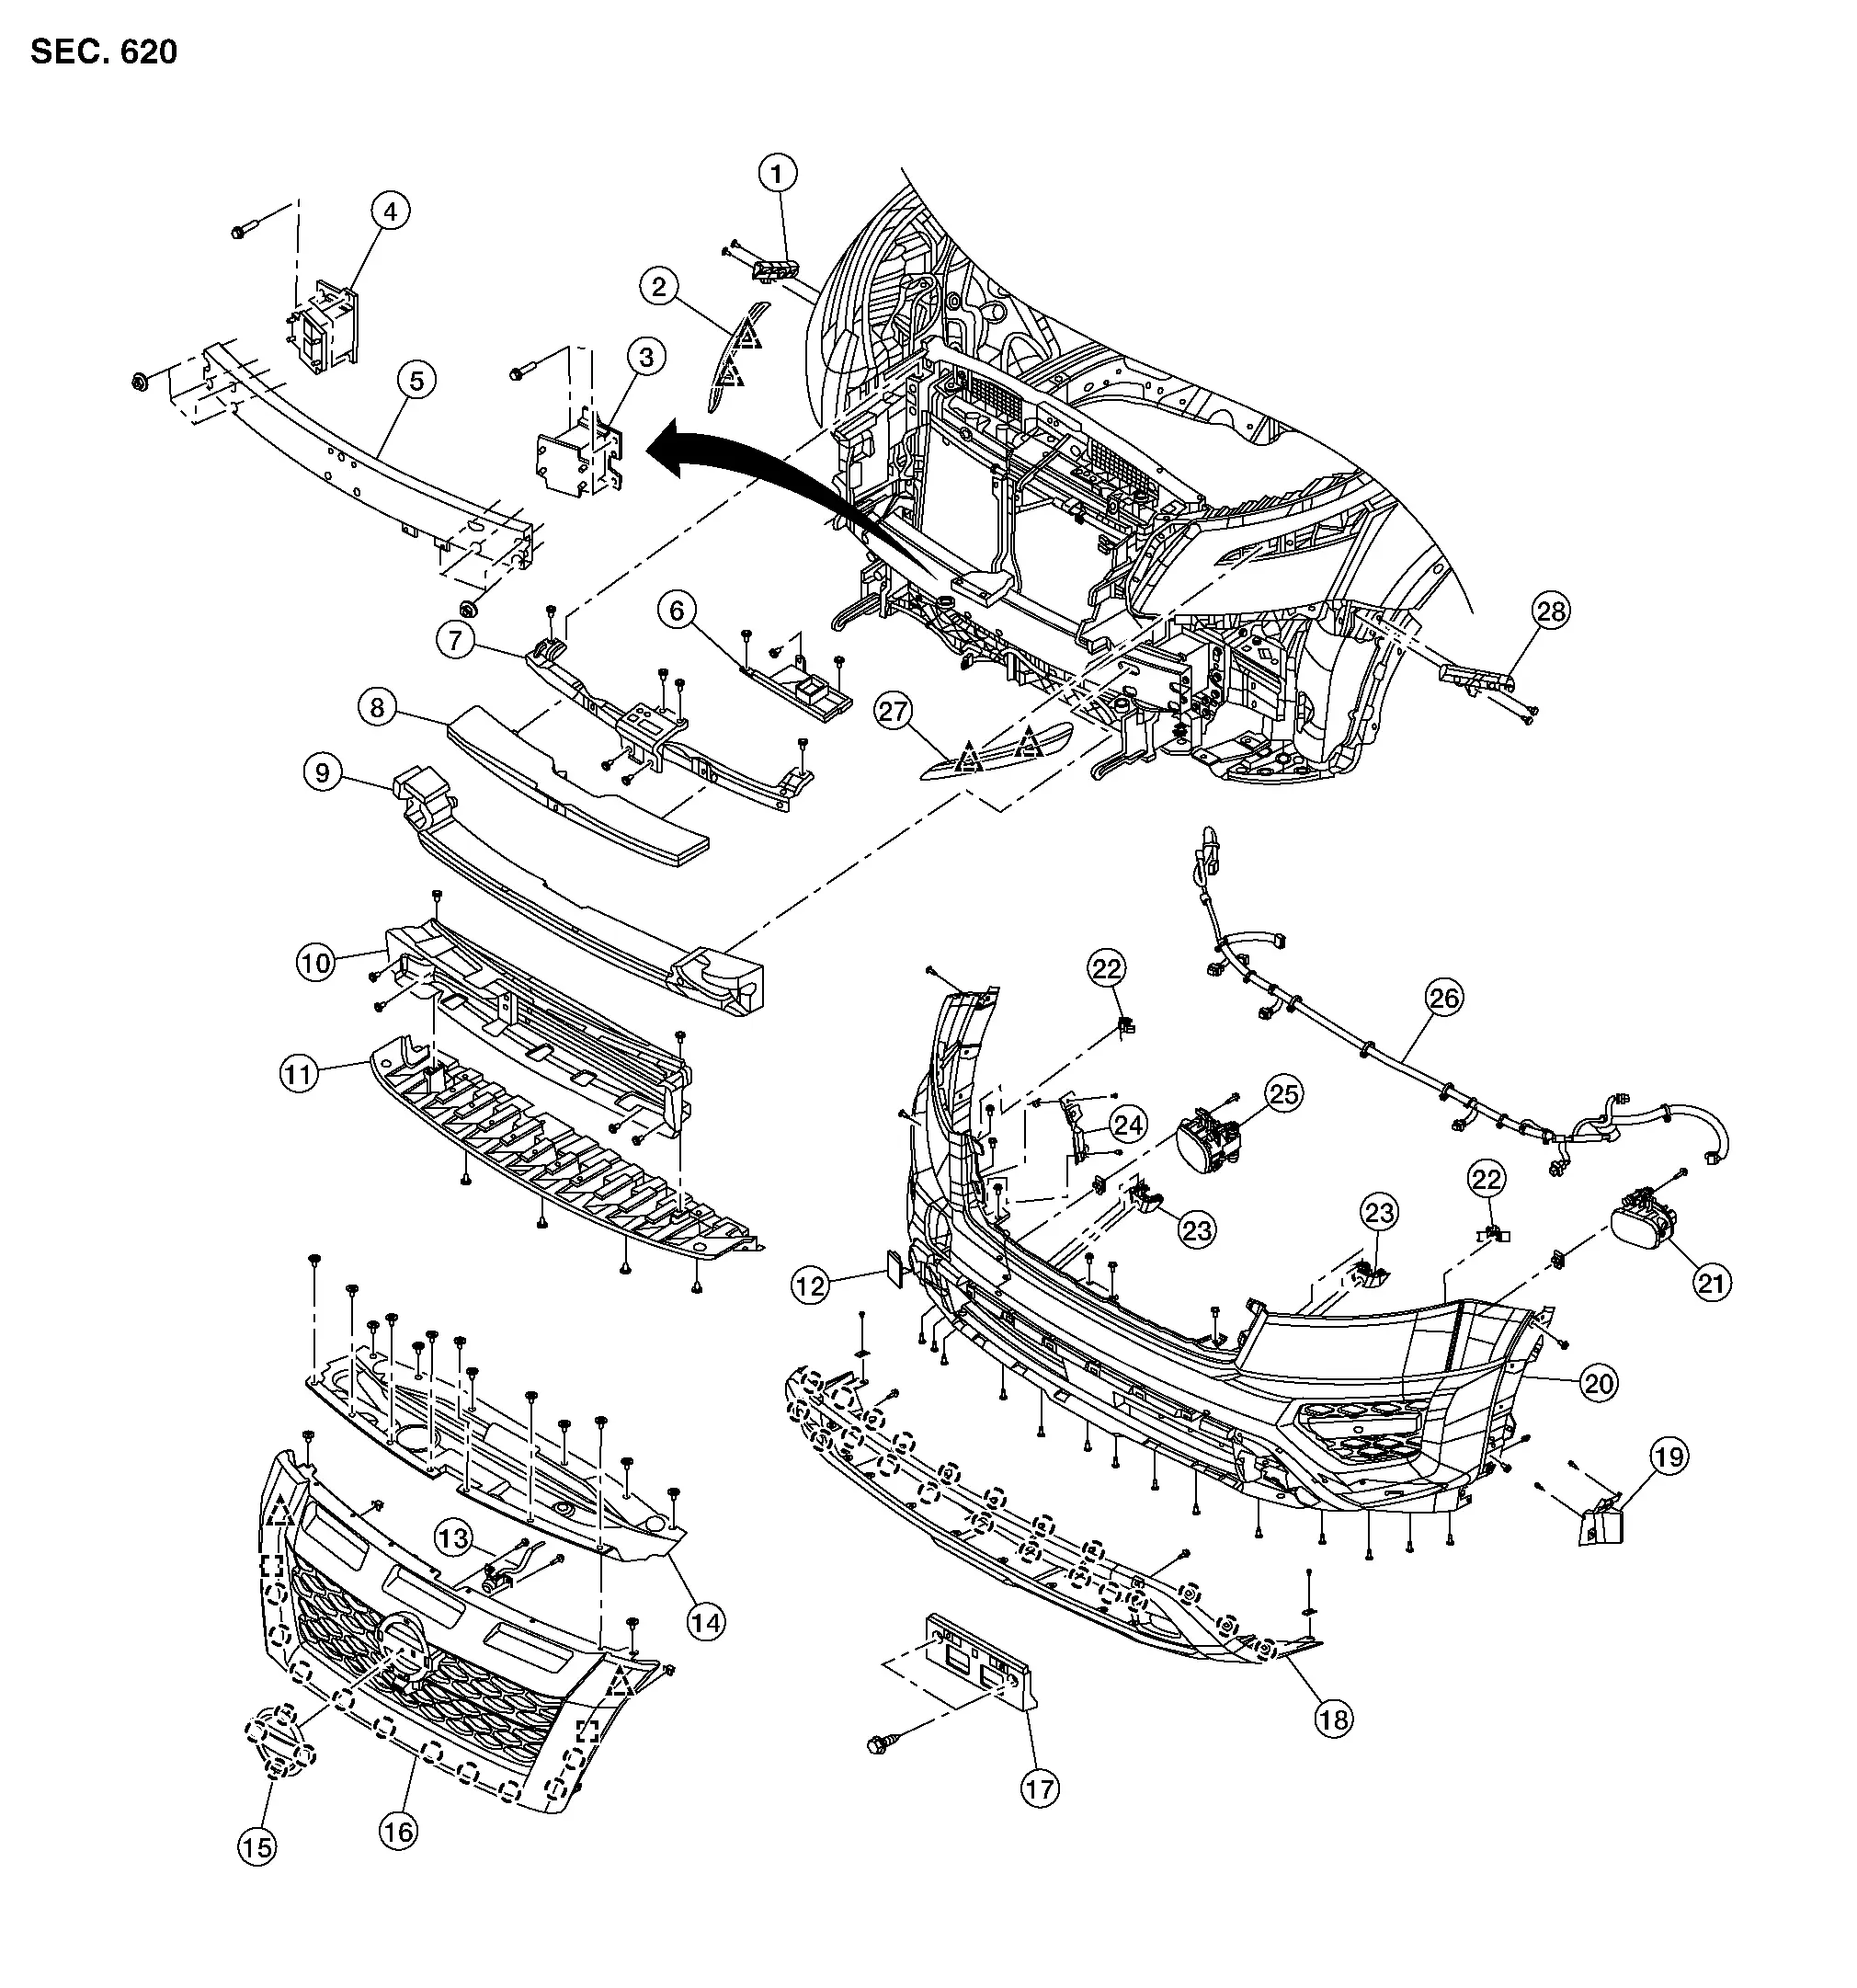
| 1. | Front bumper fascia side bracket (RH) | 2. | Grille molding (RH) | 3. | Front bumper reinforcement support (LH) |
| 4. | Front bumper reinforcement support (RH) | 5. | Front bumper reinforcement | 6. | Splash guard |
| 7. | Front bumper retainer | 8. | Front bumper energy absorber | 9. | Front bumper energy absorber (lower) |
| 10. | Active grille shutter | 11. | Apron bracket | 12. | Tow cover |
| 13. | Front camera | 14. | Core support cover | 15. | Emblem |
| 16. | Front grille | 17. | Front license plate bracket | 18. | Front bumper finisher |
| 19. | Side deflector (LH) | 20. | Front bumper fascia | 21. | Front fog lamp (LH) |
| 22. | Front sonar sensor | 23. | Front sonar sensor | 24. | Side deflector (RH) |
| 25. | Front fog lamp (RH) | 26. | Front bumper harness | 27. | Grille molding (LH) |
| 28. | Front bumper fascia side bracket (LH) |  |
Pawl |  |
Locator pin |
 |
Clip |
WITHOUT ROCK CREEK® 
| 1. | Front bumper fascia side bracket (RH) | 2. | Grille molding (RH) | 3. | Front bumper reinforcement support (LH) |
| 4. | Front bumper reinforcement support (RH) | 5. | Front bumper reinforcement | 6. | Splash guard |
| 7. | Front bumper retainer | 8. | Front bumper energy absorber | 9. | Front bumper energy absorber (lower) |
| 10. | Active grille shutter | 11. | Apron bracket | 12. | Tow cover |
| 13. | Front camera | 14. | Core support cover | 15. | Emblem |
| 16. | Front grille | 17. | Front license plate bracket | 18. | Front air spoiler (upper) |
| 19. | Front sonar sensor | 20. | Front bumper fascia | 21. | Front sonar sensor |
| 22. | Fog lamp bracket (LH) | 23. | Fog lamp bracket (RH) | 24. | Front bumper finisher (LH) |
| 25. | Front fog lamp (LH) | 26. | Front fog lamp (RH) | 27. | Front bumper finisher (RH) |
| 28. | Front bumper harness | 29. | Grille molding (LH) | 30. | Front bumper fascia side bracket (LH) |
 |
Pawl |  |
Locator Pin |  |
Clip |
Removal and Installation
REMOVAL
Remove front over fender (LH/RH). Refer to Removal and Installation.
Partially remove front fender protector (LH/RH). Refer to Removal and Installation.
Remove front grille. Refer to Removal and Installation.
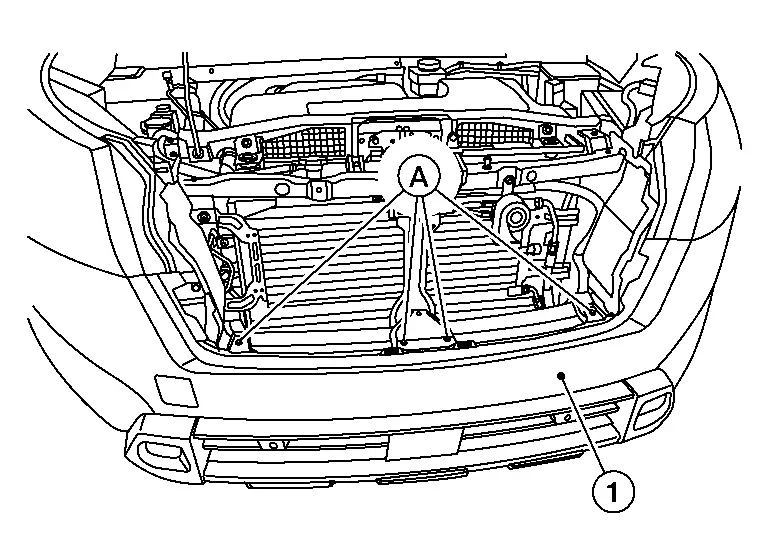
Remove clips (A) from front bumper fascia (1).
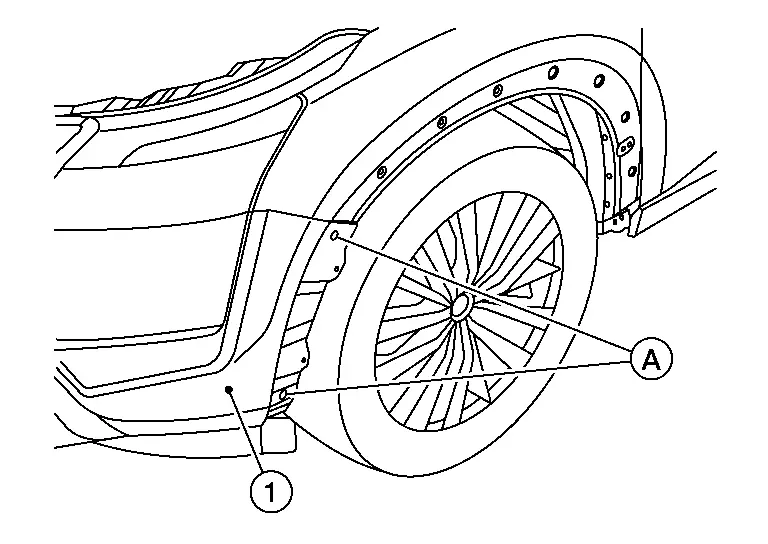
Remove side clips (A) from front bumper fascia [1 (LH/RH)].
Disconnect the harness connector from fog lamp [(LH/RH) (if so equipped)].
Remove lower fascia clips from front apron bracket. Refer to Exploded View.
Pull front bumper fascia outward as shown, releasing pawls from front bumper fascia side bracket (LH/RH).
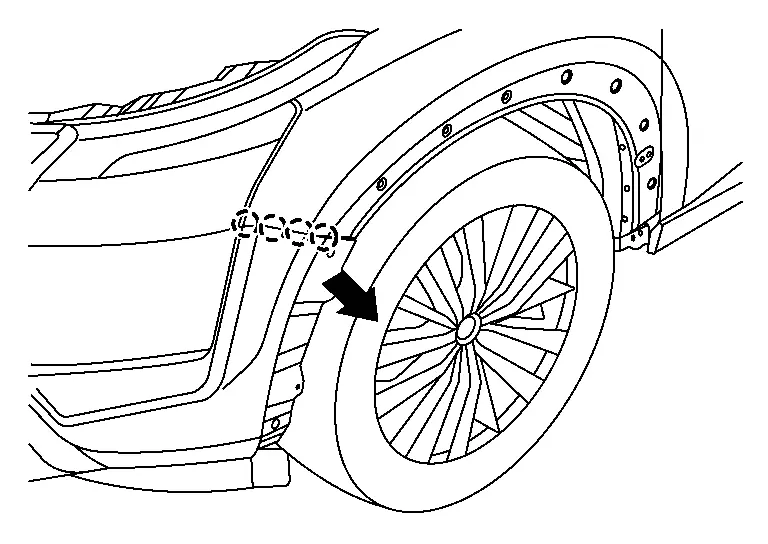
 |
: Pawl |
Remove the front bumper fascia.
Remove the following parts (if necessary) after removing front bumper fascia:
Front fog lamp (LH/RH)
Front license plate bracket
Sonar sensors
Front bumper harness
Side deflector (LH/RH)
Remove front bumper energy absorbers.
INSTALLATION
Installation is in the reverse order of removal.
WITH ROCK CREEK® 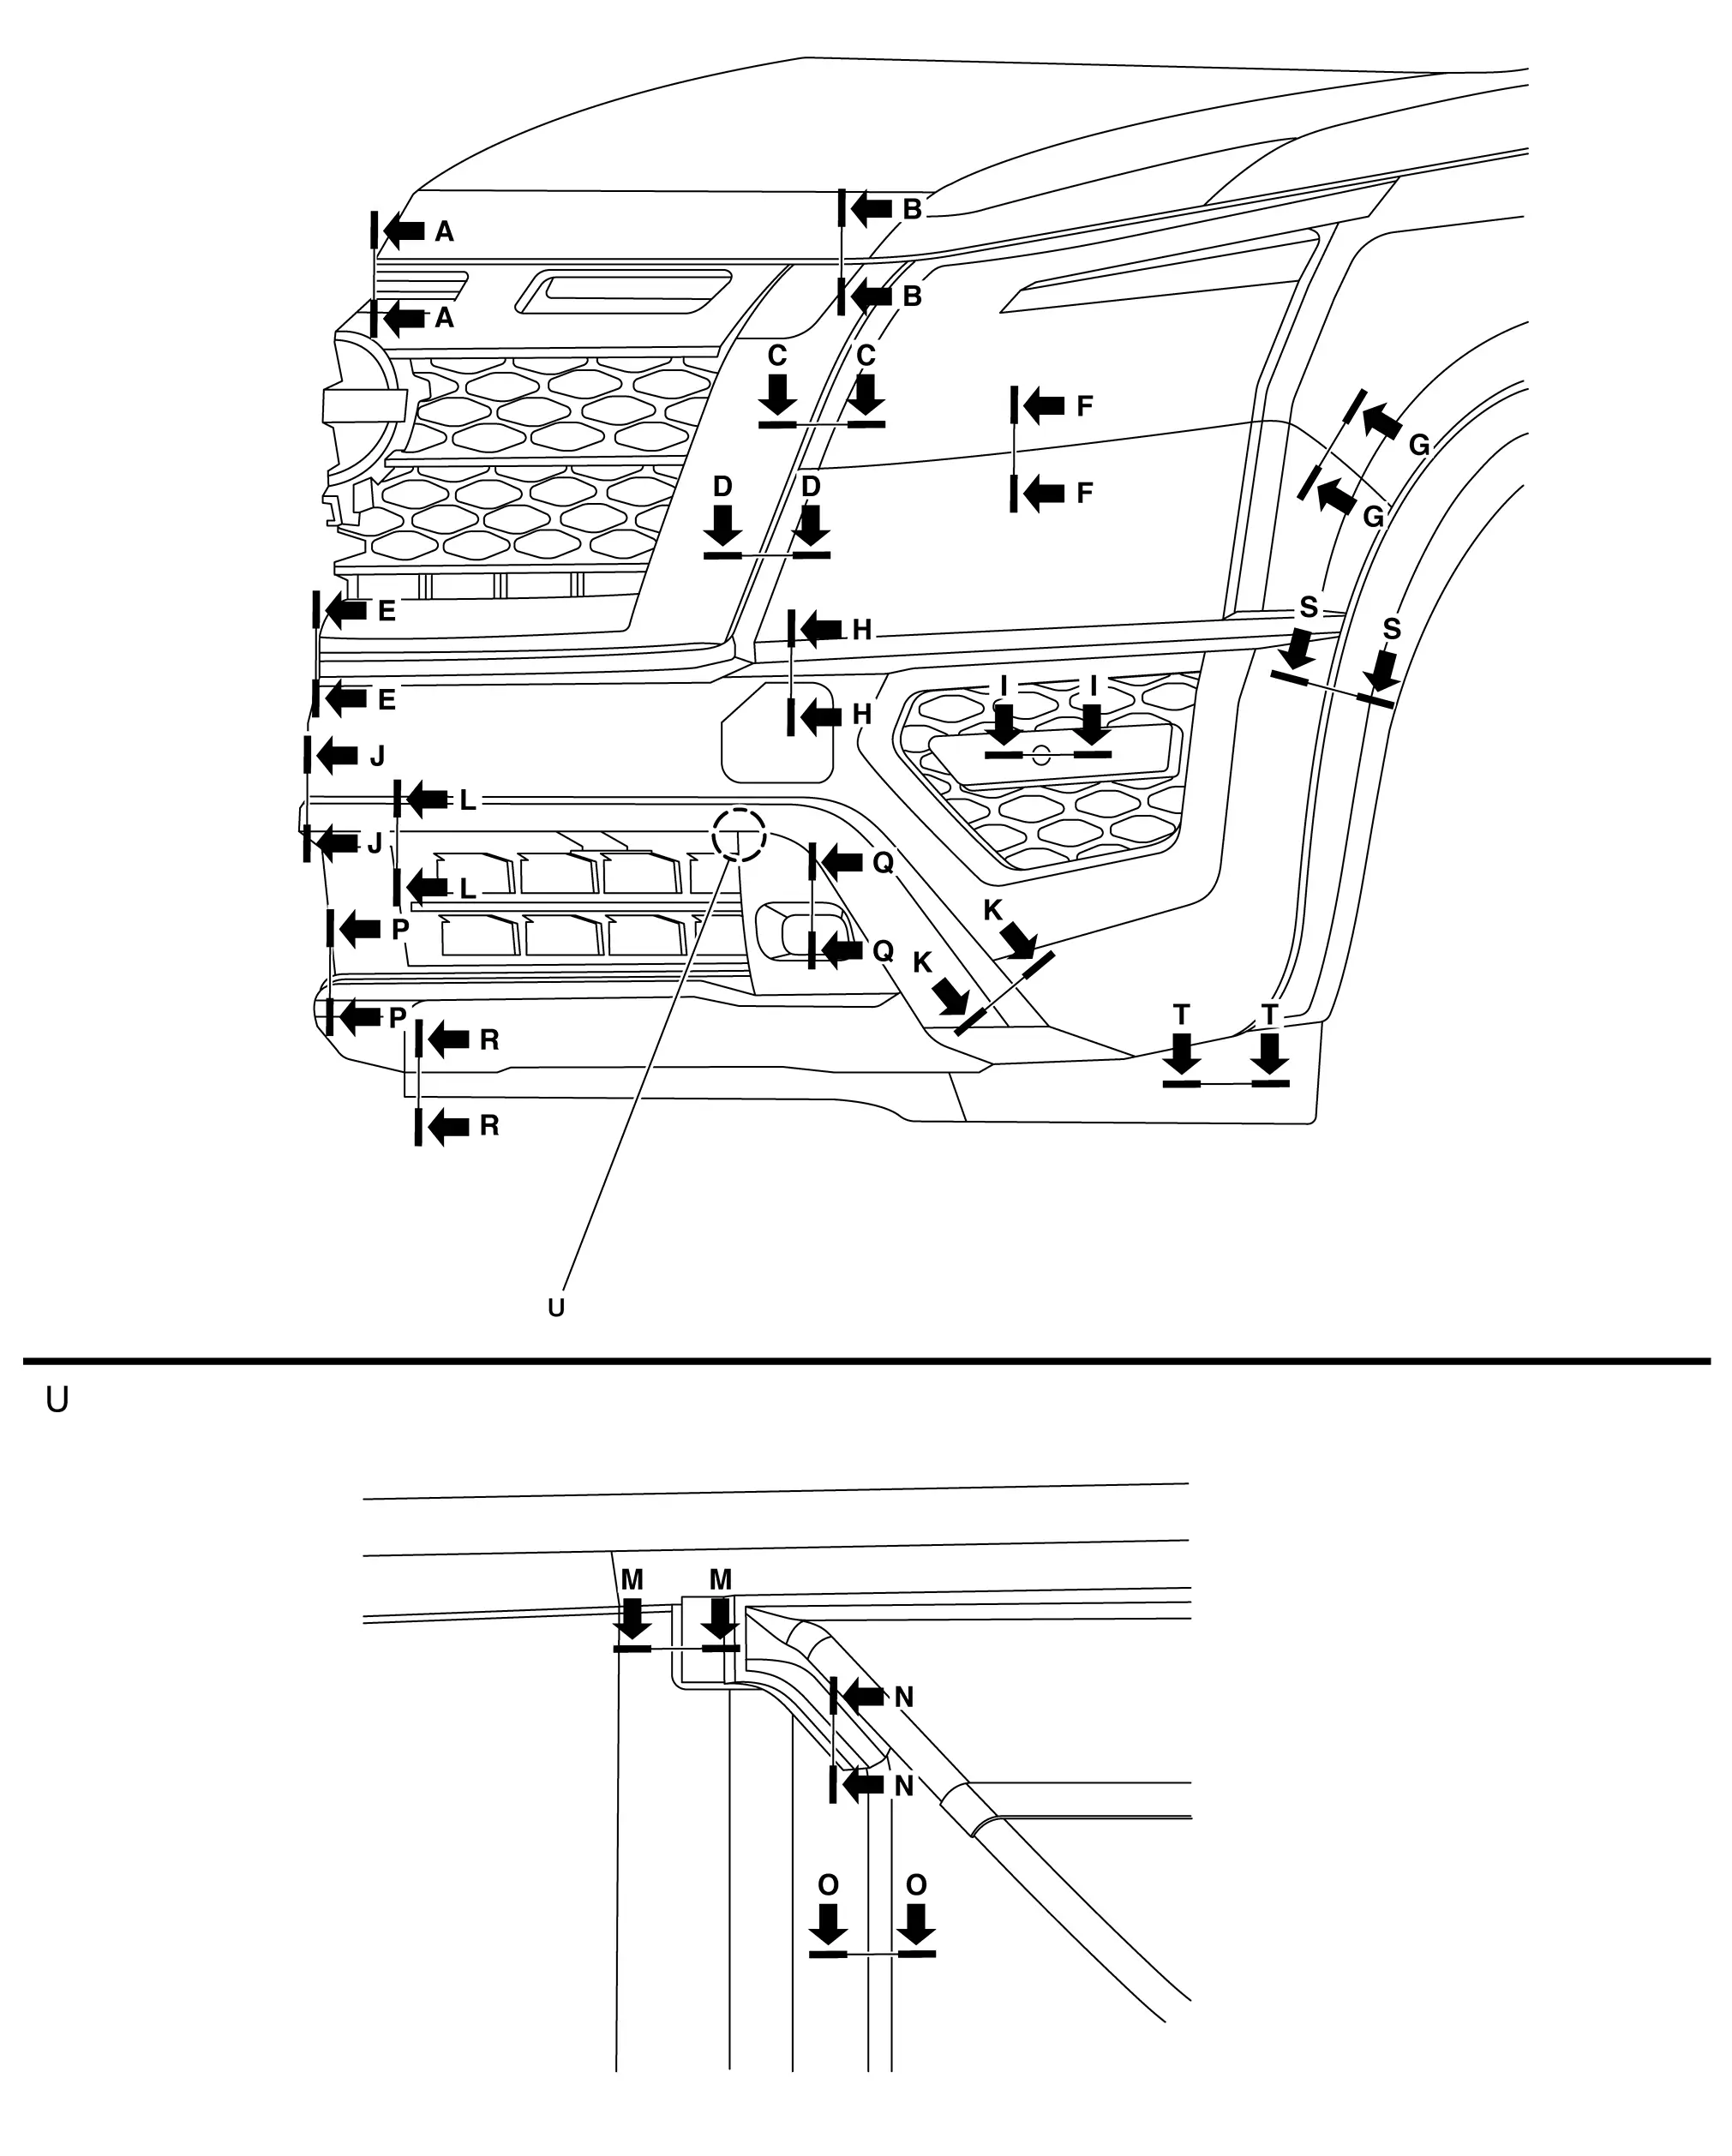
Unit: mm (in)
| Section | Measurement | Minimum | Target Value | Maximum |
|---|---|---|---|---|
| A-A | Clearance | 4.0 (0.16) | 6.0 (0.24) | 8.0 (0.32) |
| A-A | Surface height | -2.0 (-0.08) | 0.0 (0.00) | 2.0 (0.08) |
| B-B | Clearance | 4.0 (0.16) | 6.0 (0.24) | 8.0 (0.32) |
| B-B | Surface height | 3.5 (0.14) | 5.5 (0.21) | 7.5 (0.30) |
| C-C | Clearance | 1.3 (0.05) | 3.0 (0.12) | 4.7 (0.19) |
| D-D | Clearance | 0.7 (0.03) | 2.0 (0.08) | 3.3 (0.13) |
| E-E | Clearance | 0.2 (0.01) | 1.5 (0.06) | 2.8 (0.11) |
| F-F | Clearance | 0.3 (0.01) | 1.5 (0.06) | 2.7 (0.11) |
| G-G | Clearance | 0.1 (0.00) | 0.3 (0.01) | 1.1 (0.04) |
| G-G | Surface height | -1.5 (-0.06) | –0.5 (–0.02) | 1.5 (0.06) |
| H-H | Clearance | 0.0 (0.00) | 0.5 (0.02) | 1.0 (0.04) |
| H-H | Surface height | -0.8 (0.03) | –0.3 (–0.01) | 0.2 (0.01) |
| I-I | Clearance | 0.1 (0.00) | 0.4 (0.02) | 0.7 (0.03) |
| I-I | Surface height | 0.0 (0.00) | 0.5 (0.01) | 1.0 (0.04) |
| J-J | Clearance | 0.0 (0.00) | 0.5 (0.02) | 1.0 (0.04) |
| K-K | Clearance | 0.7 (0.03) | 1.2 (0.05) | 2.4 (0.09) |
| L-L | Clearance | 0.0 (0.00) | 0.5 (0.02) | 1.5 (0.06) |
| L-L | Surface height | -0.2 (0.01) | 1.0 (0.04) | 1.5 (0.06) |
| M-M | Clearance | 1.8 (0.07) | 3.0 (0.12) | 4.2 (0.17) |
| M-M | Surface height | -1.0 (-0.04) | 0.0 (0.00) | 1.0 (0.04) |
| N-N | Clearance | 0.0 (0.00) | 0.5 (0.02) | 1.5 (0.06) |
| N-N | Surface height | -0.7 (-0.03) | 0.5 (0.02) | 1.0 (0.04) |
| O-O | Clearance | 0.0 (0.00) | 0.5 (0.02) | 1.5 (0.06) |
| O-O | Surface height | 0.5 (0.02) | 1.0 (0.04) | 2.2 (0.09) |
| P-P | Clearance | 0.0 (0.00) | 0.8 (0.03) | 1.6 (0.06) |
| Q-Q | Clearance | 0.5 (0.02) | 2.0 (0.08) | 3.5 (0.14) |
| R-R | Clearance | 0.0 (0.00) | 0.5 (0.02) | 1.5 (0.06) |
| S-S | Clearance | 0.0 (0.00) | 0.5 (0.02) | 1.5 (0.06) |
| T-T | Clearance | 0.0 (0.00) | 0.5 (0.02) | 1.0 (0.04) |
| T-T | Surface height | -1.0 (-0.04) | 0.0 (0.00) | 1.0 (0.04) |
WITHOUT ROCK CREEK® 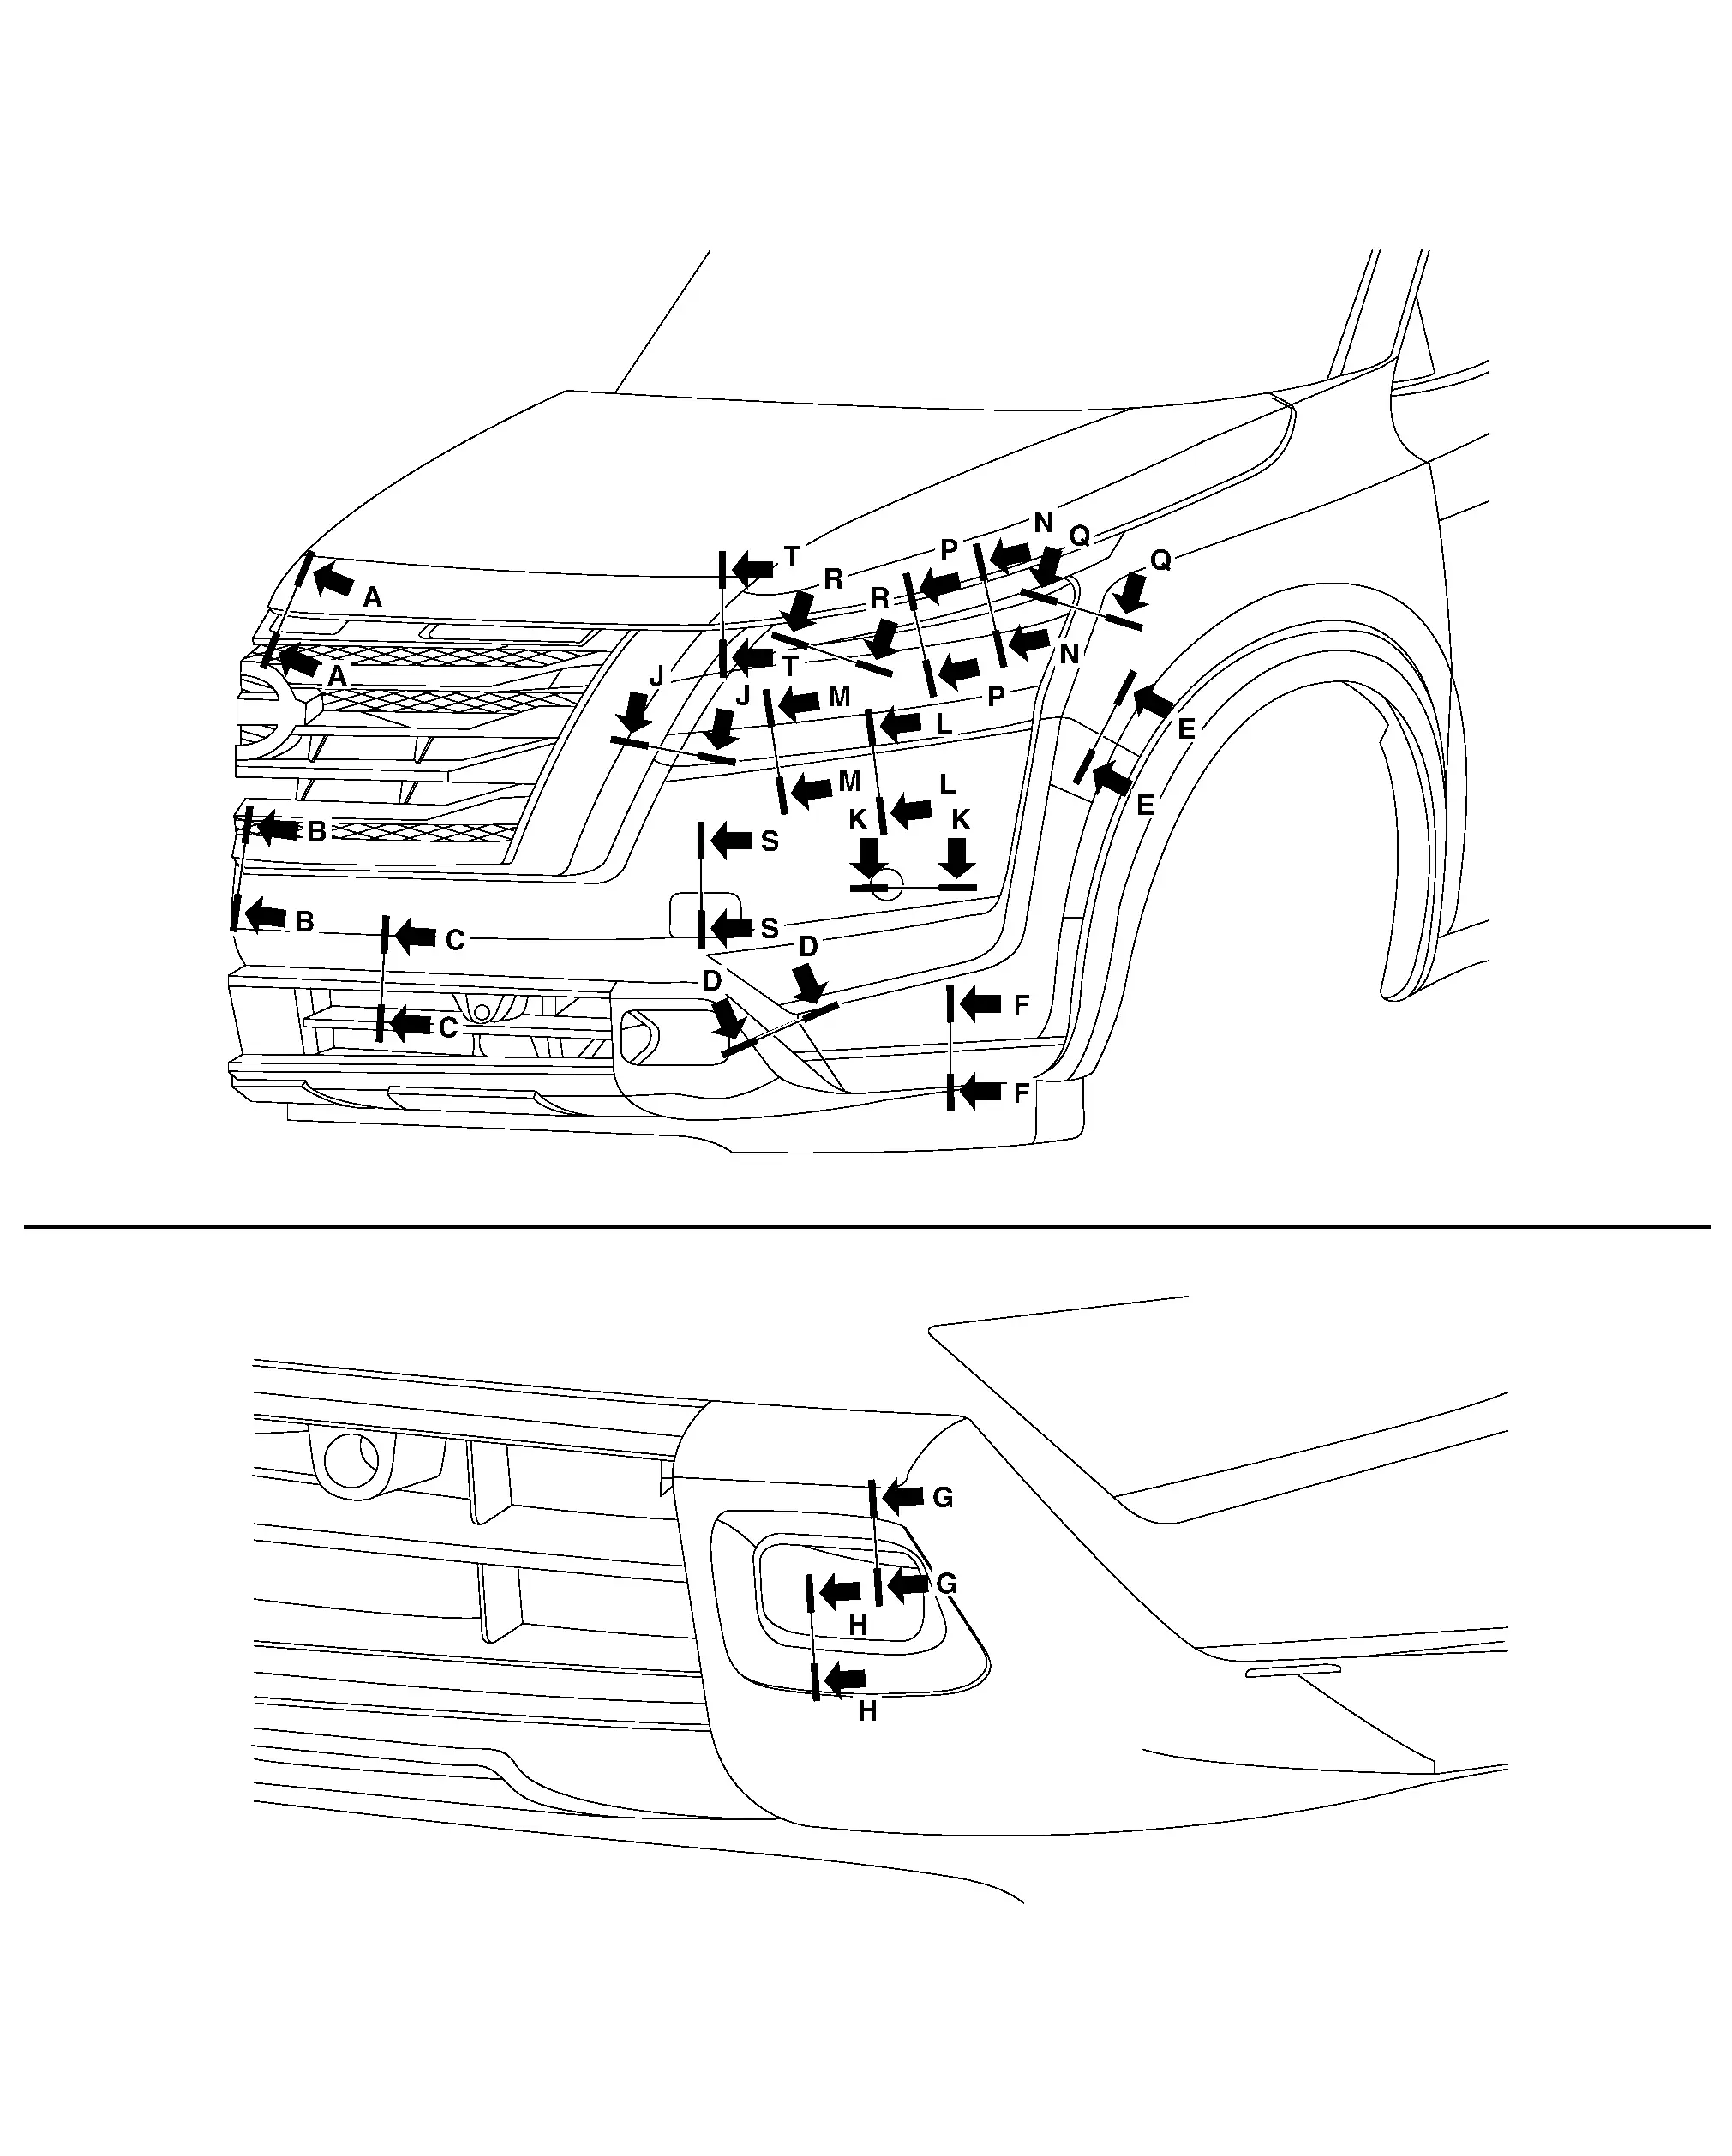
Unit: mm (in)
| Section | Measurement | Minimum | Target Value | Maximum |
|---|---|---|---|---|
| A-A | Clearance | 4.0 (0.16) | 6.0 (0.24) | 8.0 (0.32) |
| A-A | Surface height | -2.0 (-0.08) | 0.0 (0.00) | 2.0 (0.08) |
| B-B | Clearance | 0.2 (0.01) | 1.5 (0.06) | 2.8 (0.11) |
| B-B | Surface height | 0.0 (0.00) | 0.0 (0.00) | 0.0 (0.00) |
| C-C | Clearance | 0.0 (0.00) | 0.5 (0.02) | 1.5 (0.06) |
| D-D | Surface height | 0.0 (0.00) | 0.5 (0.02) | 1.5 (0.06) |
| E-E | Clearance | 0.1 (0.00) | 0.3 (0.01) | 1.1 (0.04) |
| E-E | Surface height | -0.5 (-0.02) | 0.5 (0.02) | 1.5 (0.06) |
| F-F | Clearance | 0.0 (0.00) | 0.0 (0.00) | 0.7 (0.03) |
| G-G | Clearance | 0.0 (0.00) | 1.0 (0.04) | 2.0 (0.08) |
| H-H | Clearance | 0.5 (0.02) | 2.0 (0.08) | 3.5 (0.13) |
| J-J | Clearance | -1.3 (0.05) | 3.0 (0.12) | 4.7 (0.19) |
| J-J | Surface height | 0.0 (0.00) | 0.0 (0.00) | 0.0 (0.00) |
| K-K | Clearance | 0.1 (0.00) | 0.4 (0.01) | 0.7 (0.03) |
| K-K | Surface height | 0.0 (0.00) | 0.5 (0.02) | 1.0 (0.04) |
| L-L | Clearance | 0.2 (0.01) | 1.0 (0.04) | 1.8 (0.07) |
| L-L | Surface height | -0.8 (-0.03) | -0.4 (-0.02) | 0.0 (0.00) |
| M-M | Clearance | 0.3 (0.01 | 1.5 (0.06) | 2.7 (0.11) |
| M-M | Surface height | 0.0 (0.00) | 0.0 (0.00) | 0.0 (0.00) |
| N-N | Clearance | 0.1 (0.00) | 1.5 (0.06) | 2.9 (0.11) |
| P-P | Clearance | 0.1 (0.00) | 1.5 (0.06) | 2.9 (0.11) |
| Q-Q | Clearance | 0.1 (0.00) | 1.5 (0.06) | 2.9 (0.11) |
| Q-Q | Surface height | -1.2 (-0.05) | 0.0 (0.00) | 1.2 (0.05) |
| R-R | Clearance | 0.1 (0.00) | 1.5 (0.06) | 2.9 (0.11) |
| S-S | Clearance | 0.0 (0.00) | 0.5 (0.02) | 1.0 (0.04) |
| S-S | Surface height | -0.2 (-0.01) | 0.3 (0.01) | 0.8 (0.03) |
| T-T | Clearance | 4.0 (0.16) | 6.0 (0.24) | 8.0 (0.32) |
| T-T | Surface height | 3.5 (0.14) | 5.5 (0.21) | 7.5 (0.30) |
Rear Bumper Nissan Pathfinder 2022
Exploded View
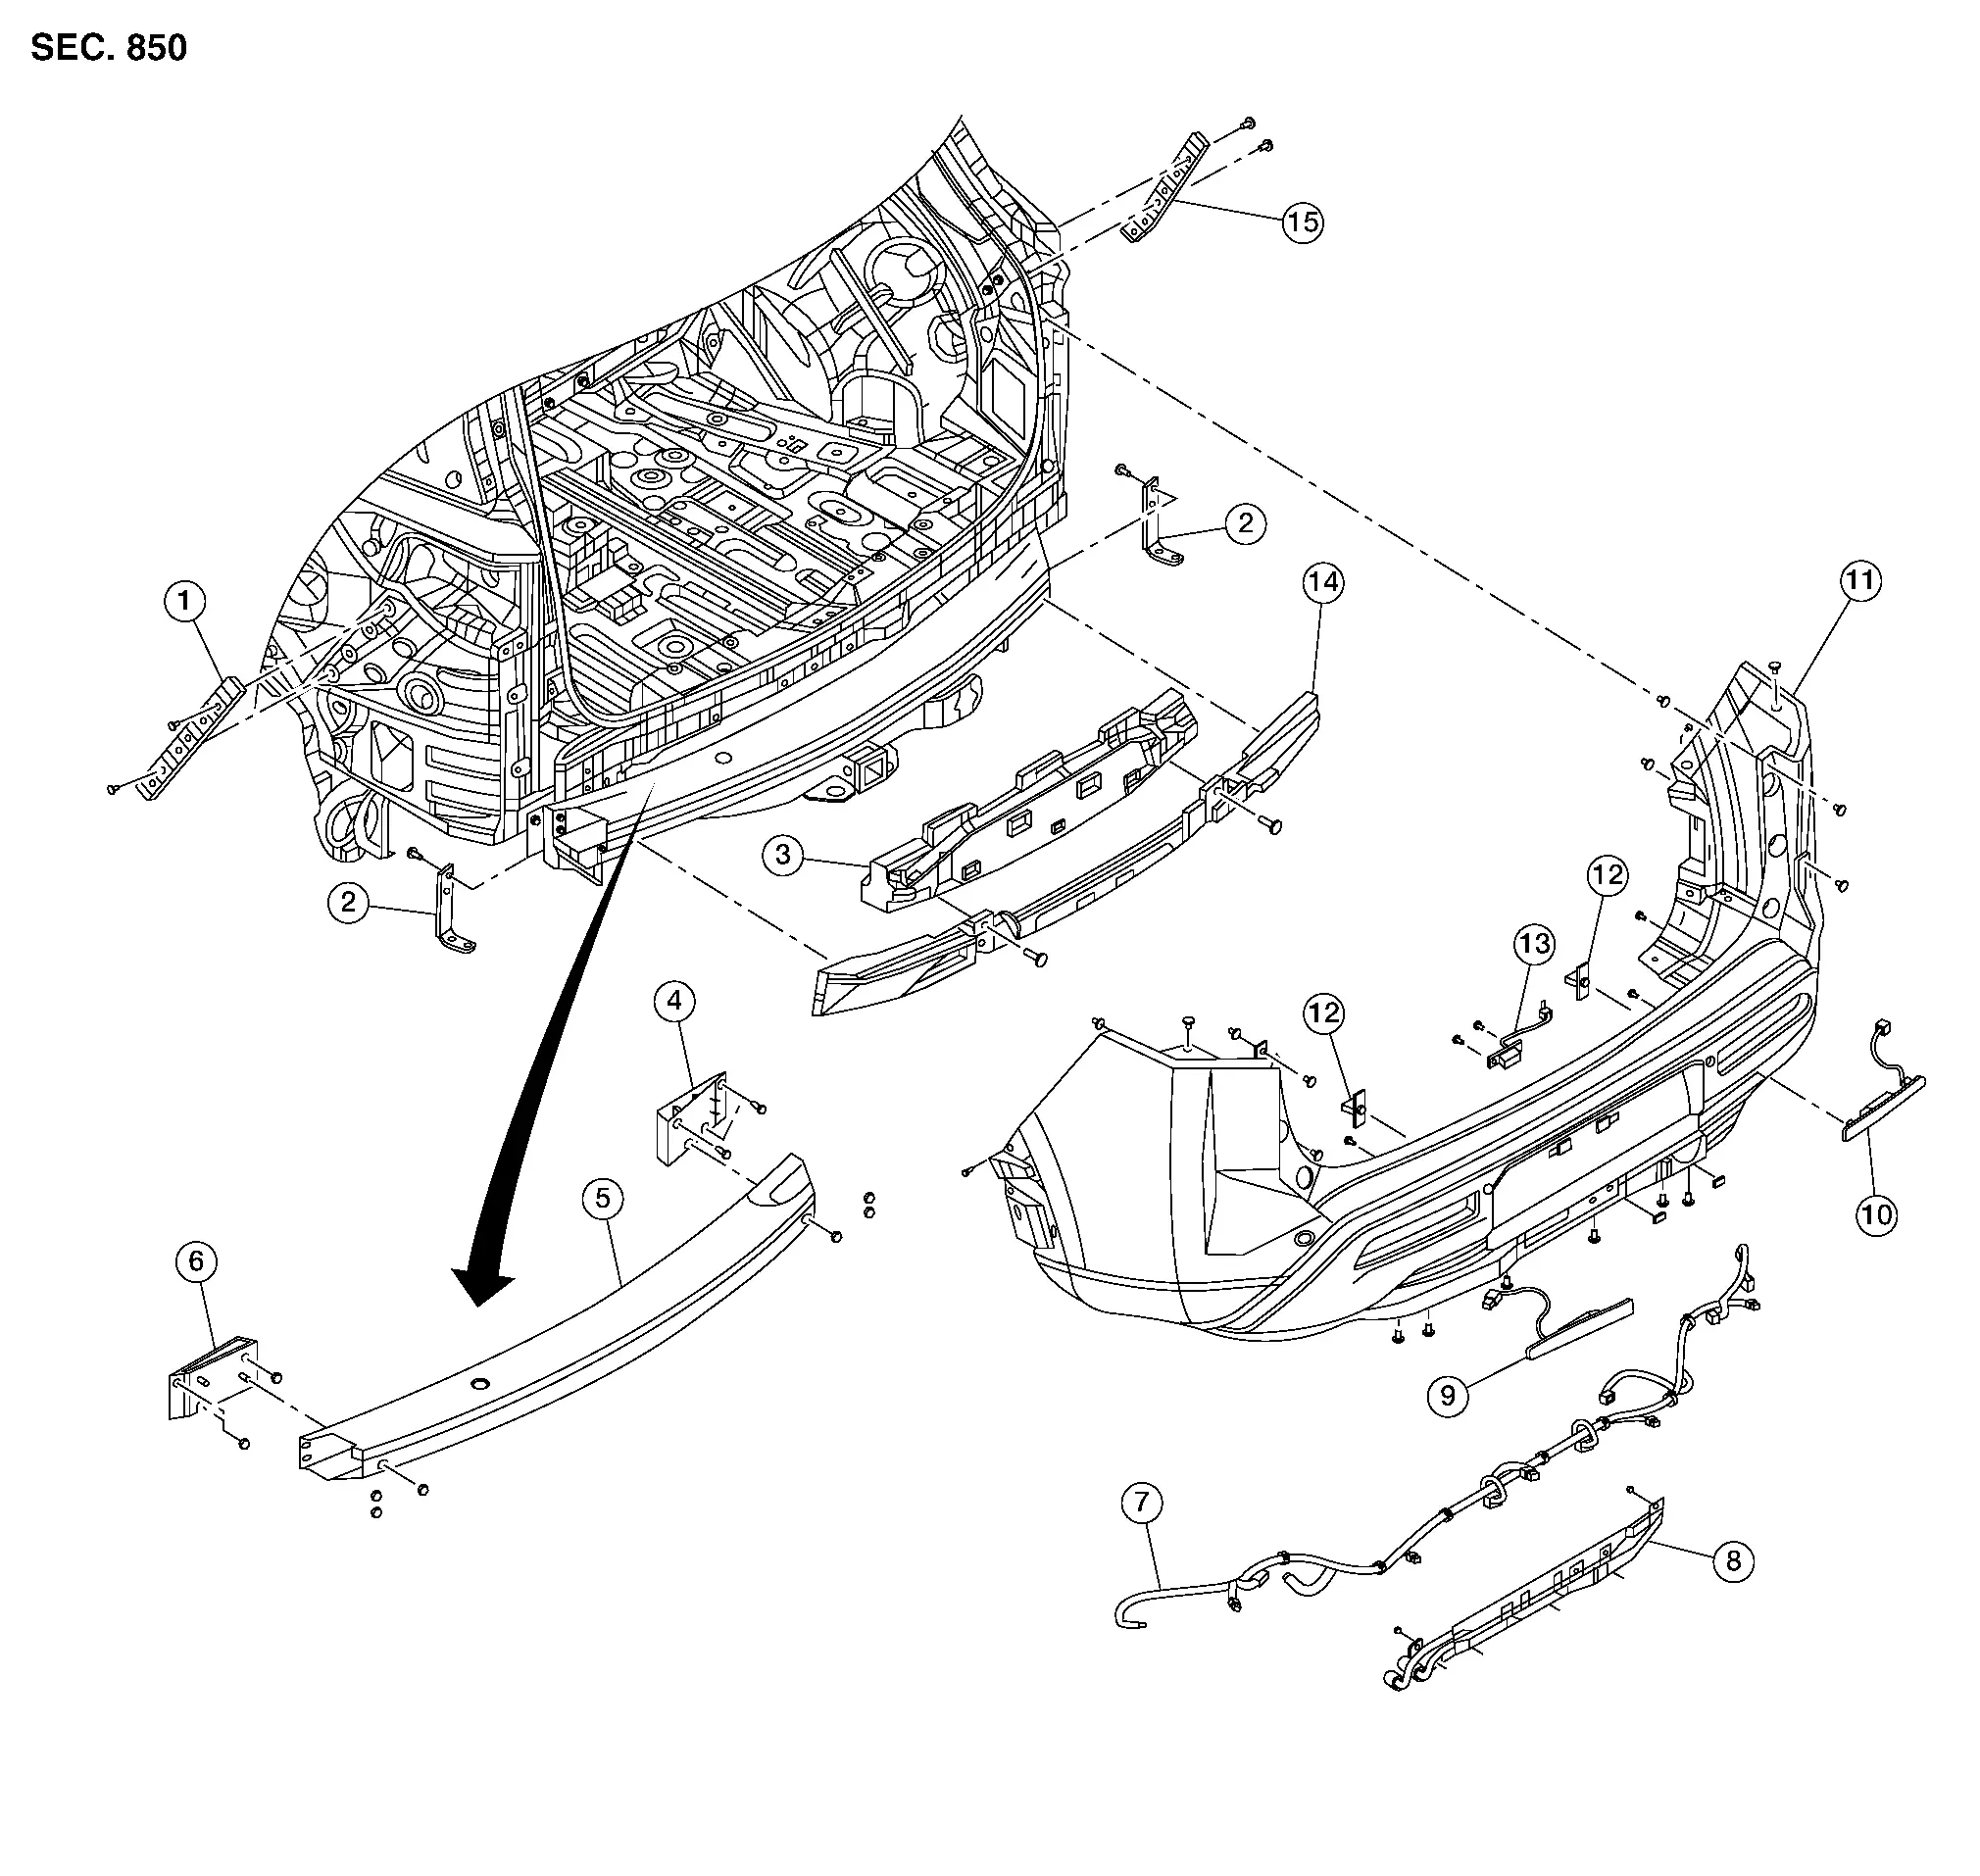
| 1. | Rear bumper side bracket (LH) | 2. | Rear bumper lower retainer (LH) | 3. | Rear bumper energy absorber |
| 4. | Rear bumper reinforcement support (RH) | 5. | Rear bumper reinforcement | 6. | Rear bumper reinforcement support (LH) |
| 7. | Rear bumper harness | 8. | Rear bumper stiffener | 9. | Reflector (LH) |
| 10. | Reflector (RH) | 11. | Rear bumper fascia | 12. | Rear sonar sensor |
| 13. | Rear view camera | 14. | Rear bumper energy absorber (lower) | 15. | Rear bumper side bracket (RH) |
Removal and Installation
REMOVAL
Open back door.
Remove rear combination lamp (LH/RH). Refer to Removal and Installation.
Remove upper clips (A) and screws (B) from rear bumper fascia [1 (LH/RH)].
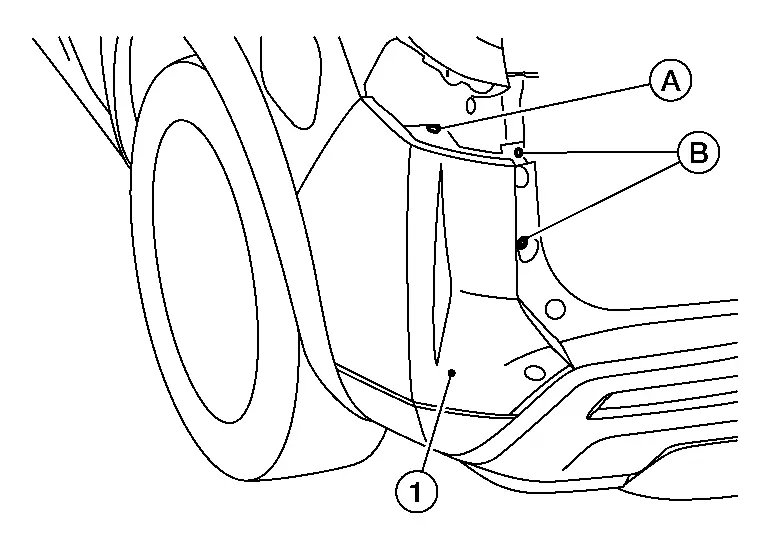
Remove rear over fender [body side (LH/RH)]. Refer to Removal and Installation.
Remove screw (A) from rear bumper fascia [1 (LH/RH)].

Remove lower clips (A) from rear bumper fascia (1).
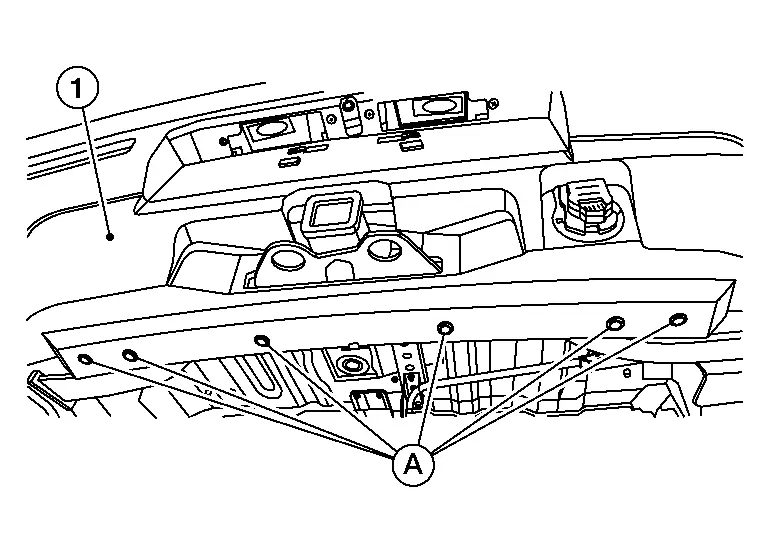
Disconnect rear bumper harness (RH).
Pulling outward as shown, release rear bumper fascia pawls from rear bumper fascia side bracket (LH/RH).
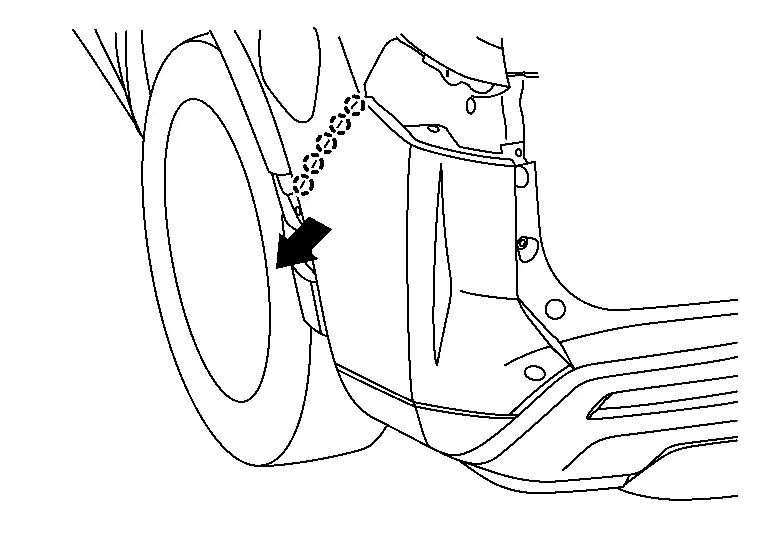
 |
: Pawl |
Remove the rear bumper fascia.
Remove the following parts (if necessary) after removing rear bumper fascia:
Rear bumper side bracket (LH/RH)
Rear bumper fascia reflector (LH/RH)
Rear sonar sensors
Rear view camera
Rear bumper harness
Hands free sensor
Remove rear bumper energy absorbers.
INSTALLATION
Installation is in the reverse order of removal.
Blind Spot Warning (BSW): Refer to Work Procedure.
Rear Cross Traffic Alert (RCTA): Refer to Work Procedure.
Perform CALIBRATING CAMERA IMAGE (INTELLIGENT AROUND VIEW MONITOR). Refer to Work Procedure.
mm (in)
| Section | Measurement | Minimum | Target Value | Maximum |
|---|---|---|---|---|
| A-A | Clearance | 4.9 (0.19) | 7.0 (0.28) | 9.1 (0.36) |
| B-B | Clearance | 3.0 (0.12) | 5.0 (0.20) | 7.0 (0.28) |
| B-B | Surface height | -1.0 (0.04) | 1.0 (0.04) | 3.0 (0.12) |
| C-C | Clearance | 0.0 (0.00) | 1.5 (0.06) | 3.0 (0.12) |
| D-D | Clearance | 0.0 (0.00) | 0.3 (0.01) | 1.1 (0.04) |
| D-D | Surface height | -0.2 (0.00) | 0.8 (0.03) | 1.8 (0.07) |
| E-E | Clearance | 0.0 (0.00) | 1.0 (0.04) | 2.0 (0.08) |
| F-F | Clearance | 0.0 (0.00) | 1.0 (0.04) | 2.0 (0.08) |
| G-G | Clearance | 0.0 (0.00) | 0.0 (0.00) | 0.5 (0.02) |
| H-H | Clearance | 0.1 (0.00) | 0.4 (0.02) | 0.7 (0.03) |
| H-H | Surface height | 0.0 (0.00) | 0.5 (0.02) | 1.0 (0.04) |
Front Grille Nissan Pathfinder R53
Exploded View
WITH ROCK CREEK® 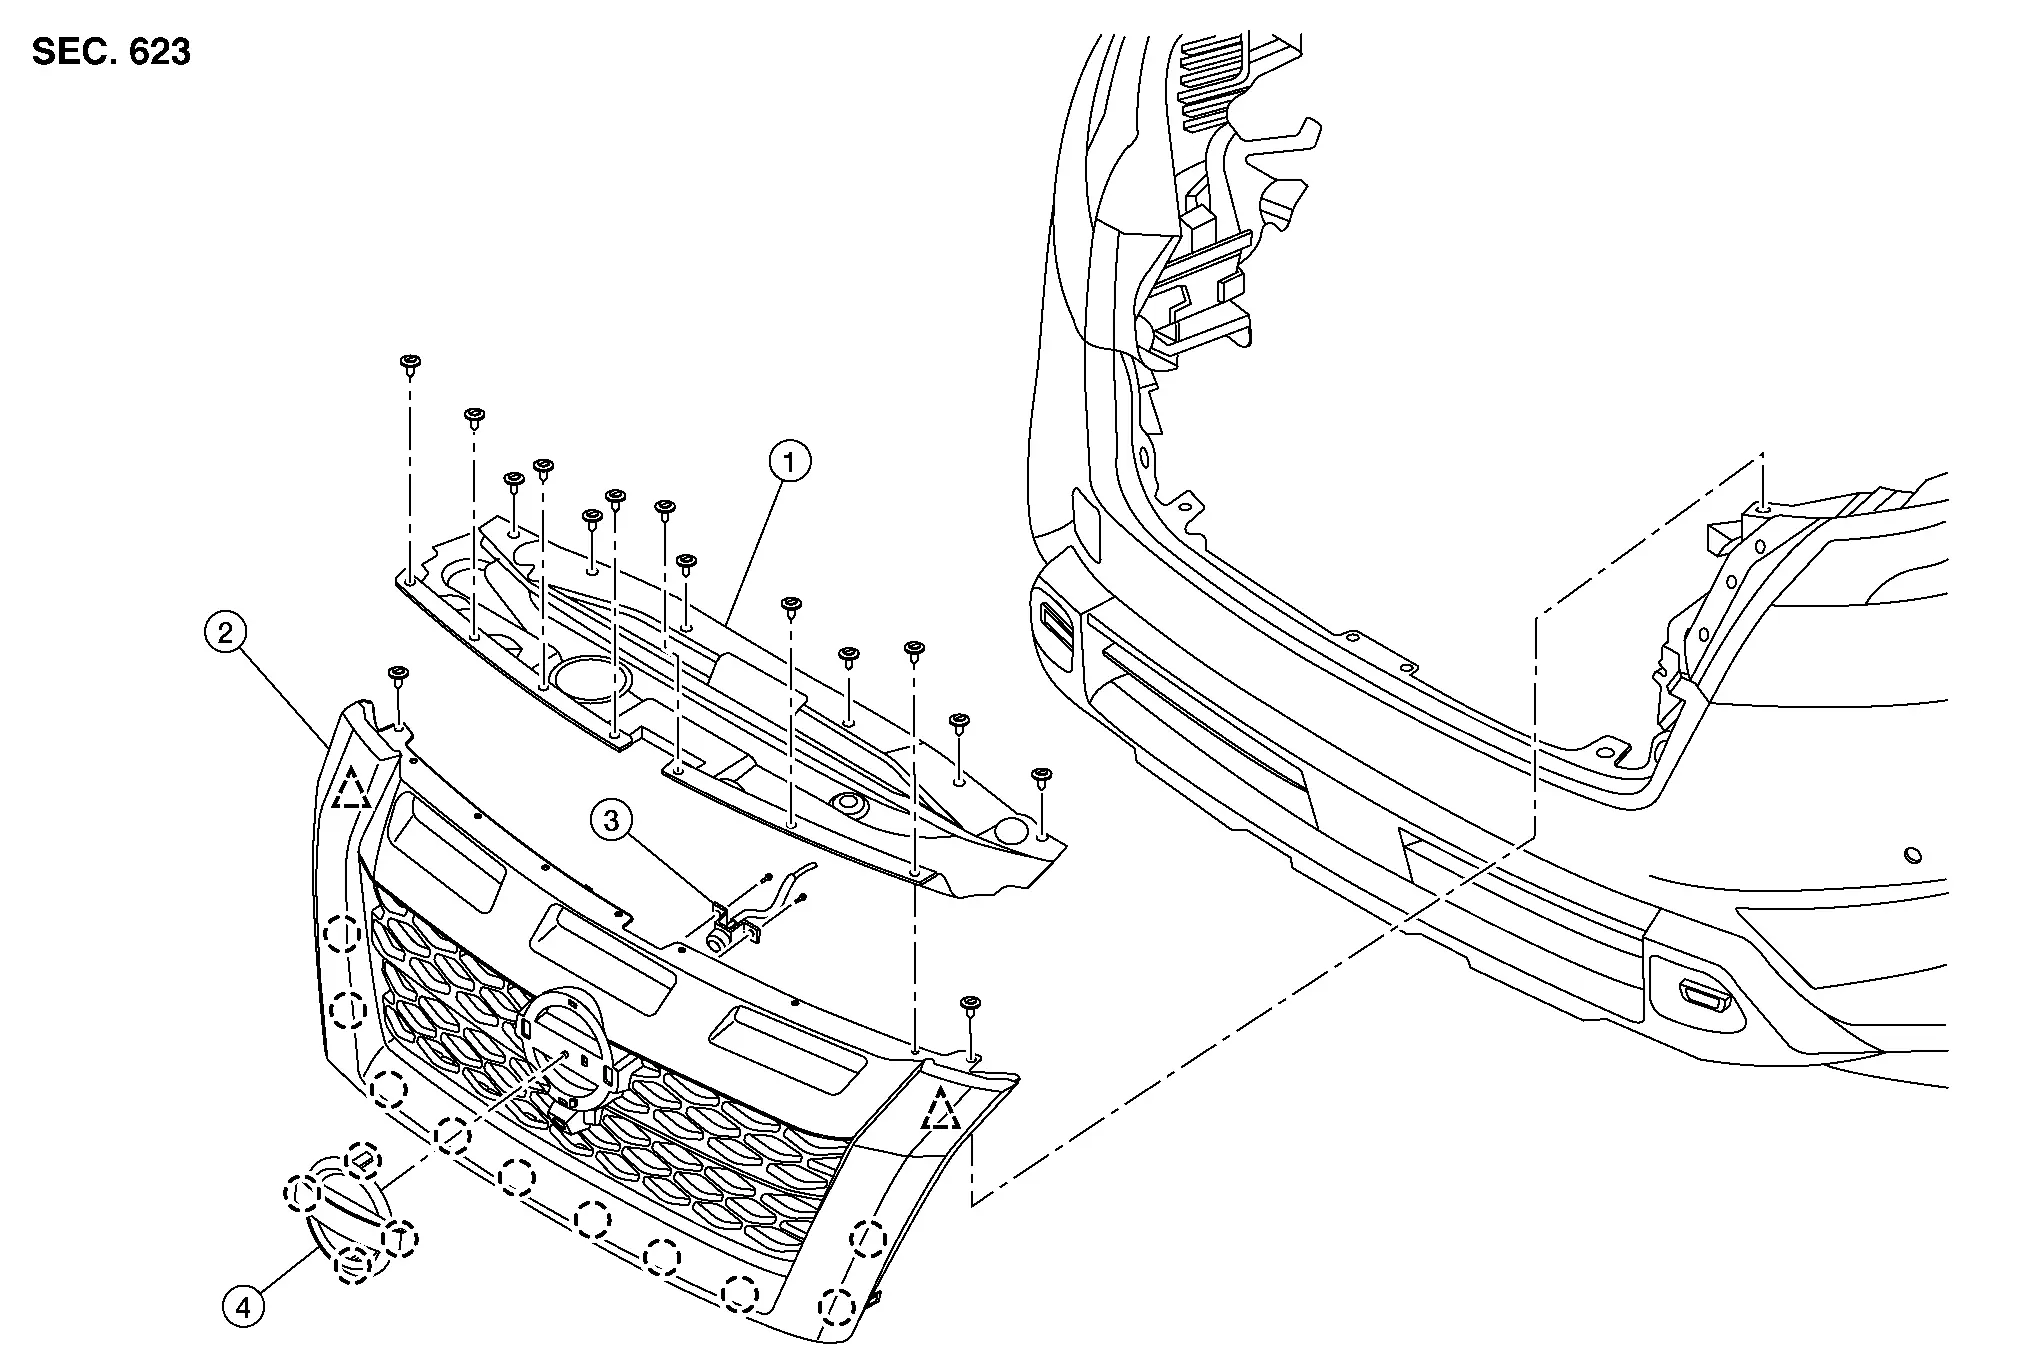
| 1. | Core support cover | 2. | Front grille | 3. | Front camera |
| 4. | Emblem |  |
Clip |  |
Pawl |
WITHOUT ROCK CREEK® 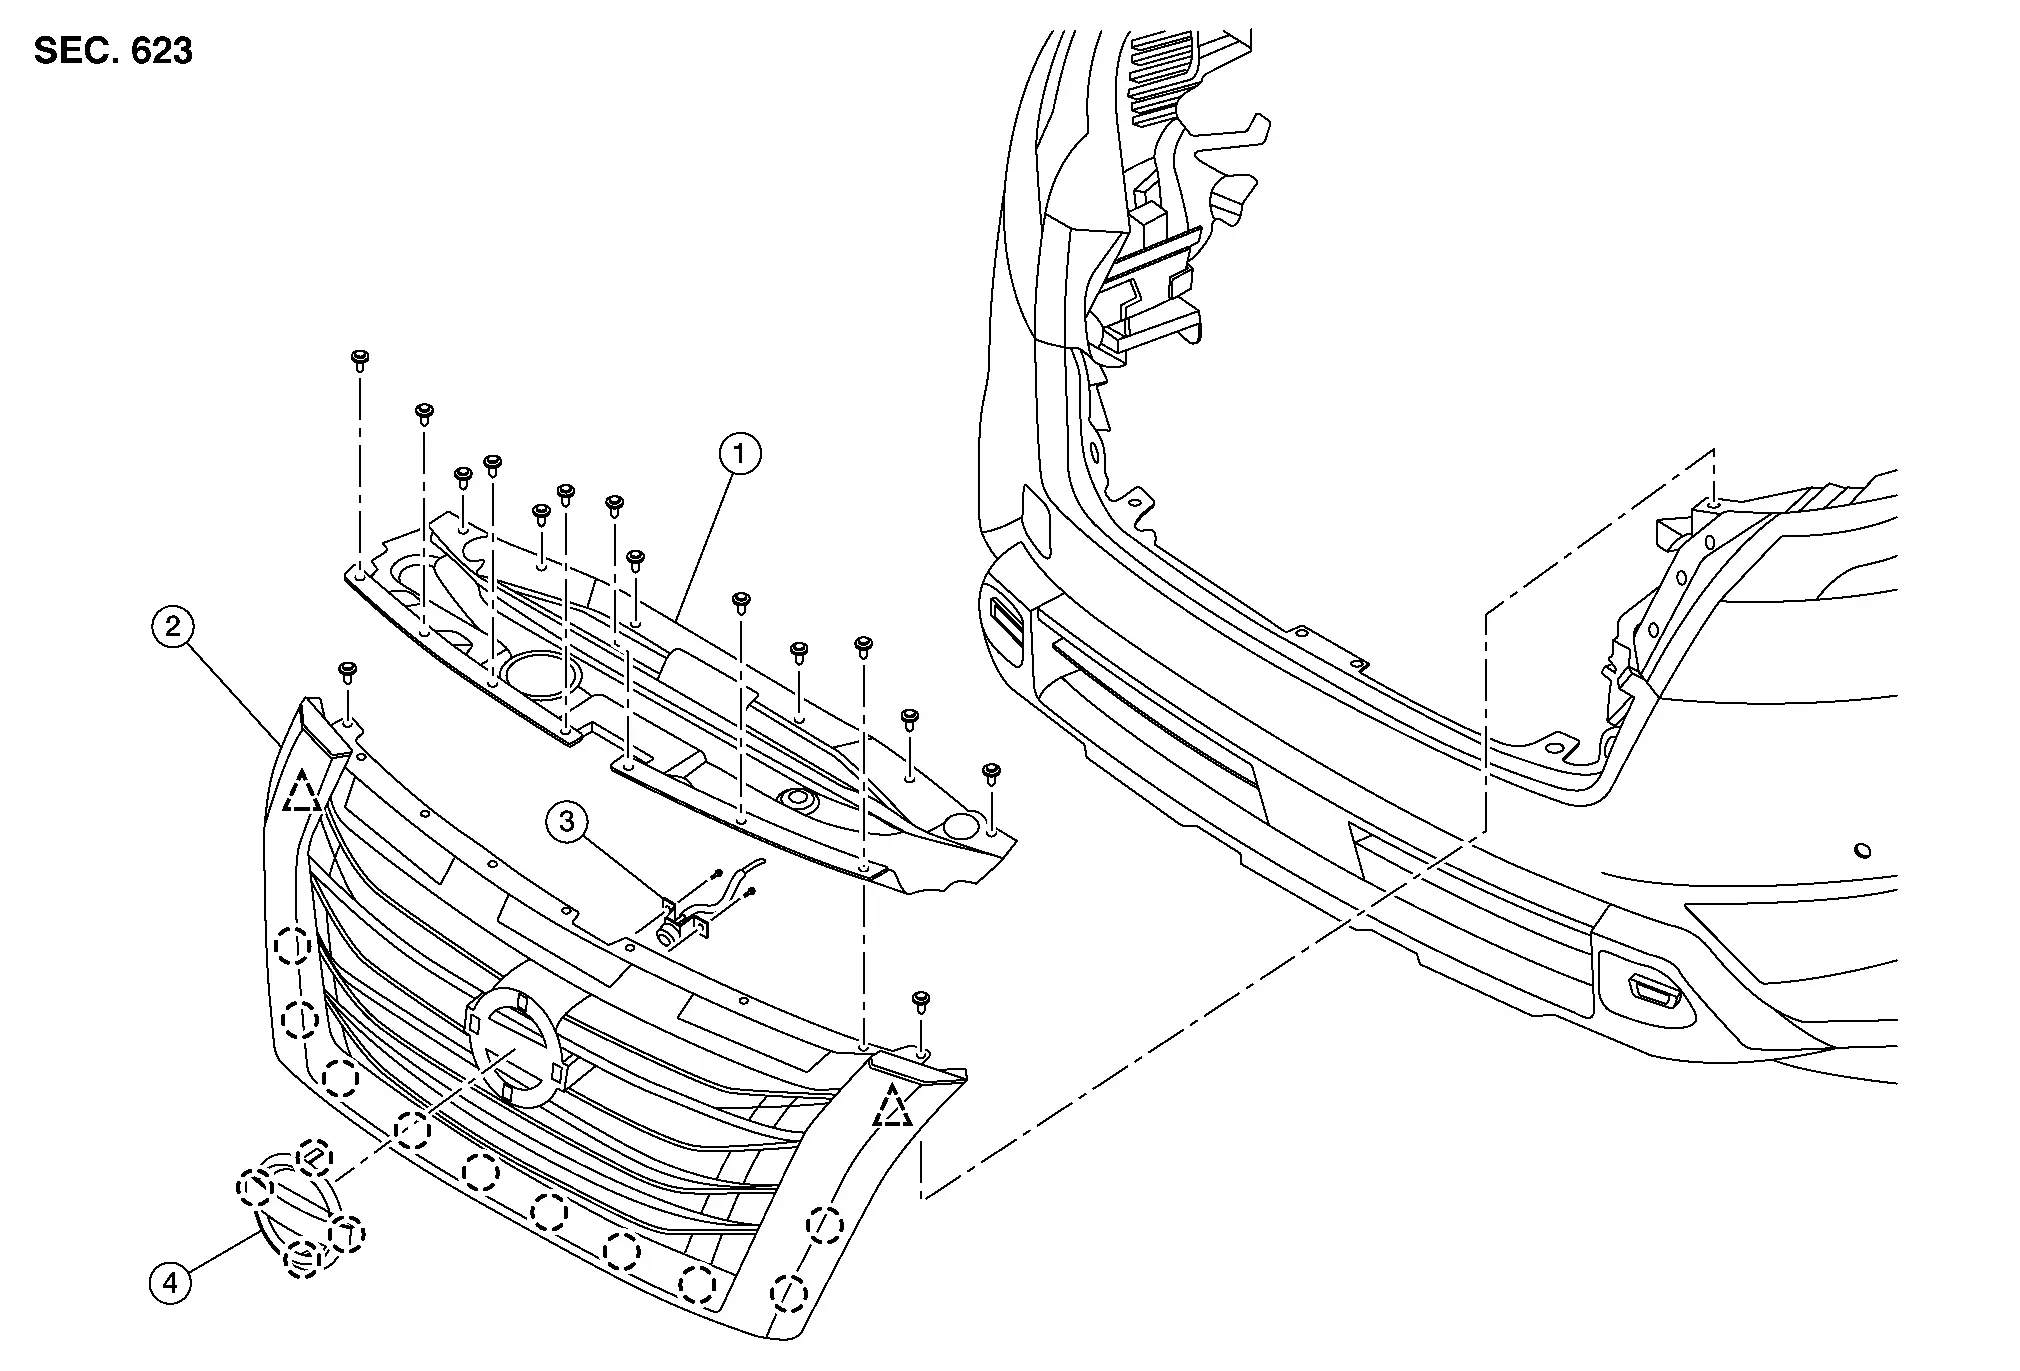
| 1. | Core support cover | 2. | Front grille | 3. | Front camera |
| 4. | Emblem |  |
Clip |  |
Pawl |
Removal and Installation
REMOVAL
Open hood.
Remove clips (A) and core support cover (1).
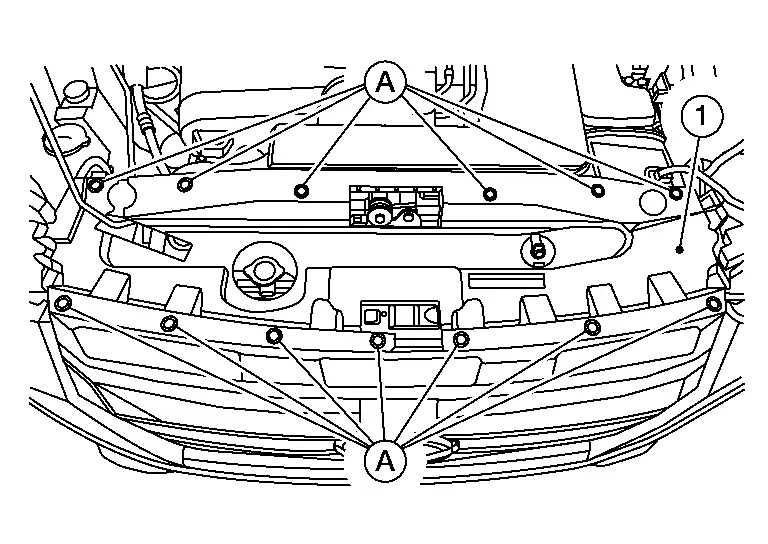
Disconnect the harness connector from front camera (if equipped).
Remove upper clips (A) from front grille (1).
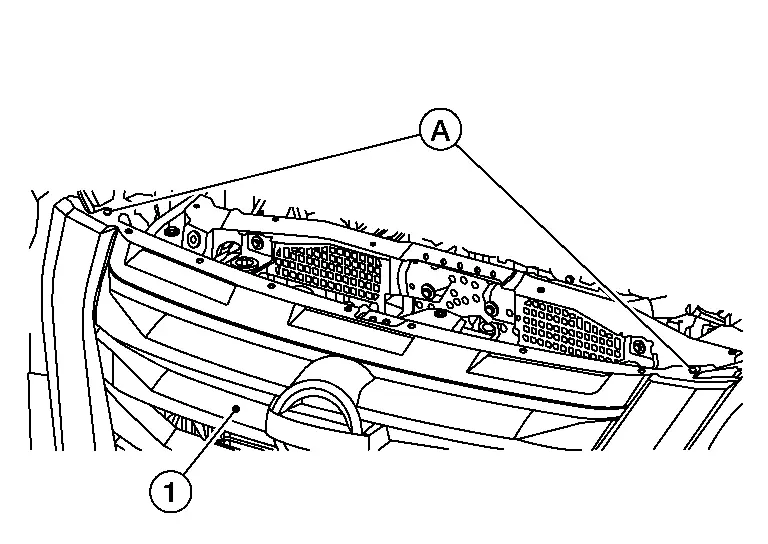
Release pawls and remove front grille. Refer to Exploded View.
If necessary, remove the following parts from front grille:
Front emblem
Front camera
INSTALLATION
Installation is in the reverse order of removal.
Active Grille Shutter Nissan Pathfinder SUV
Exploded View
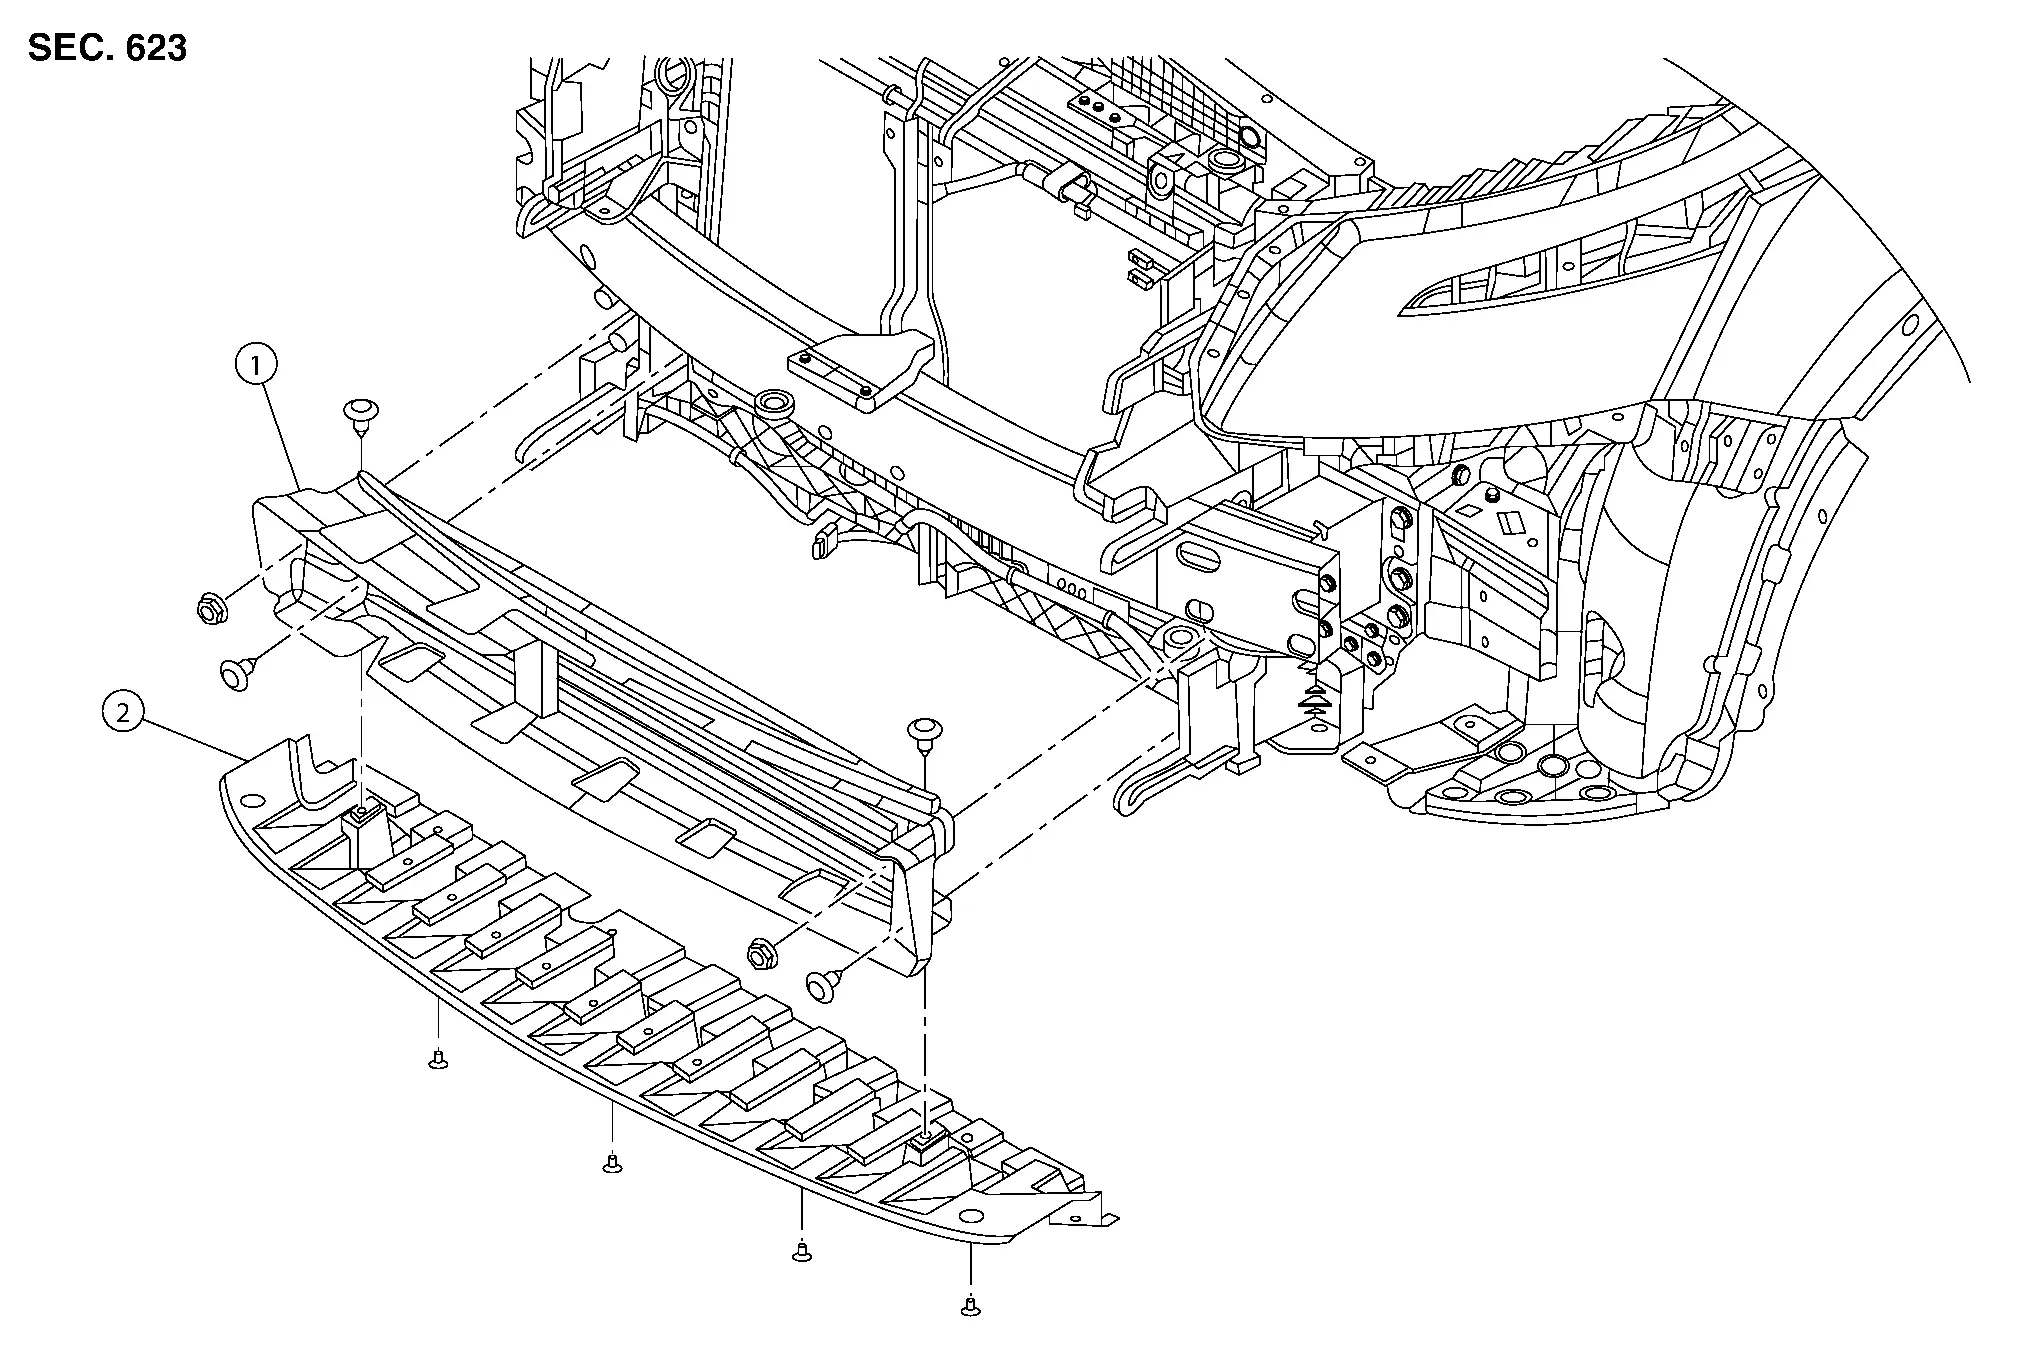
| 1. | Active grille shutter | 2. | Apron bracket |
Removal and Installation
REMOVAL
Remove front bumper fascia. Refer to Removal and Installation.
Remove active grille shutter nuts and clips. Refer to Exploded View.
Disconnect harness connector and remove active grille shutter.
INSTALLATION
Installation is in the reverse order of removal.
Cowl Top Nissan Pathfinder SUV
Exploded View
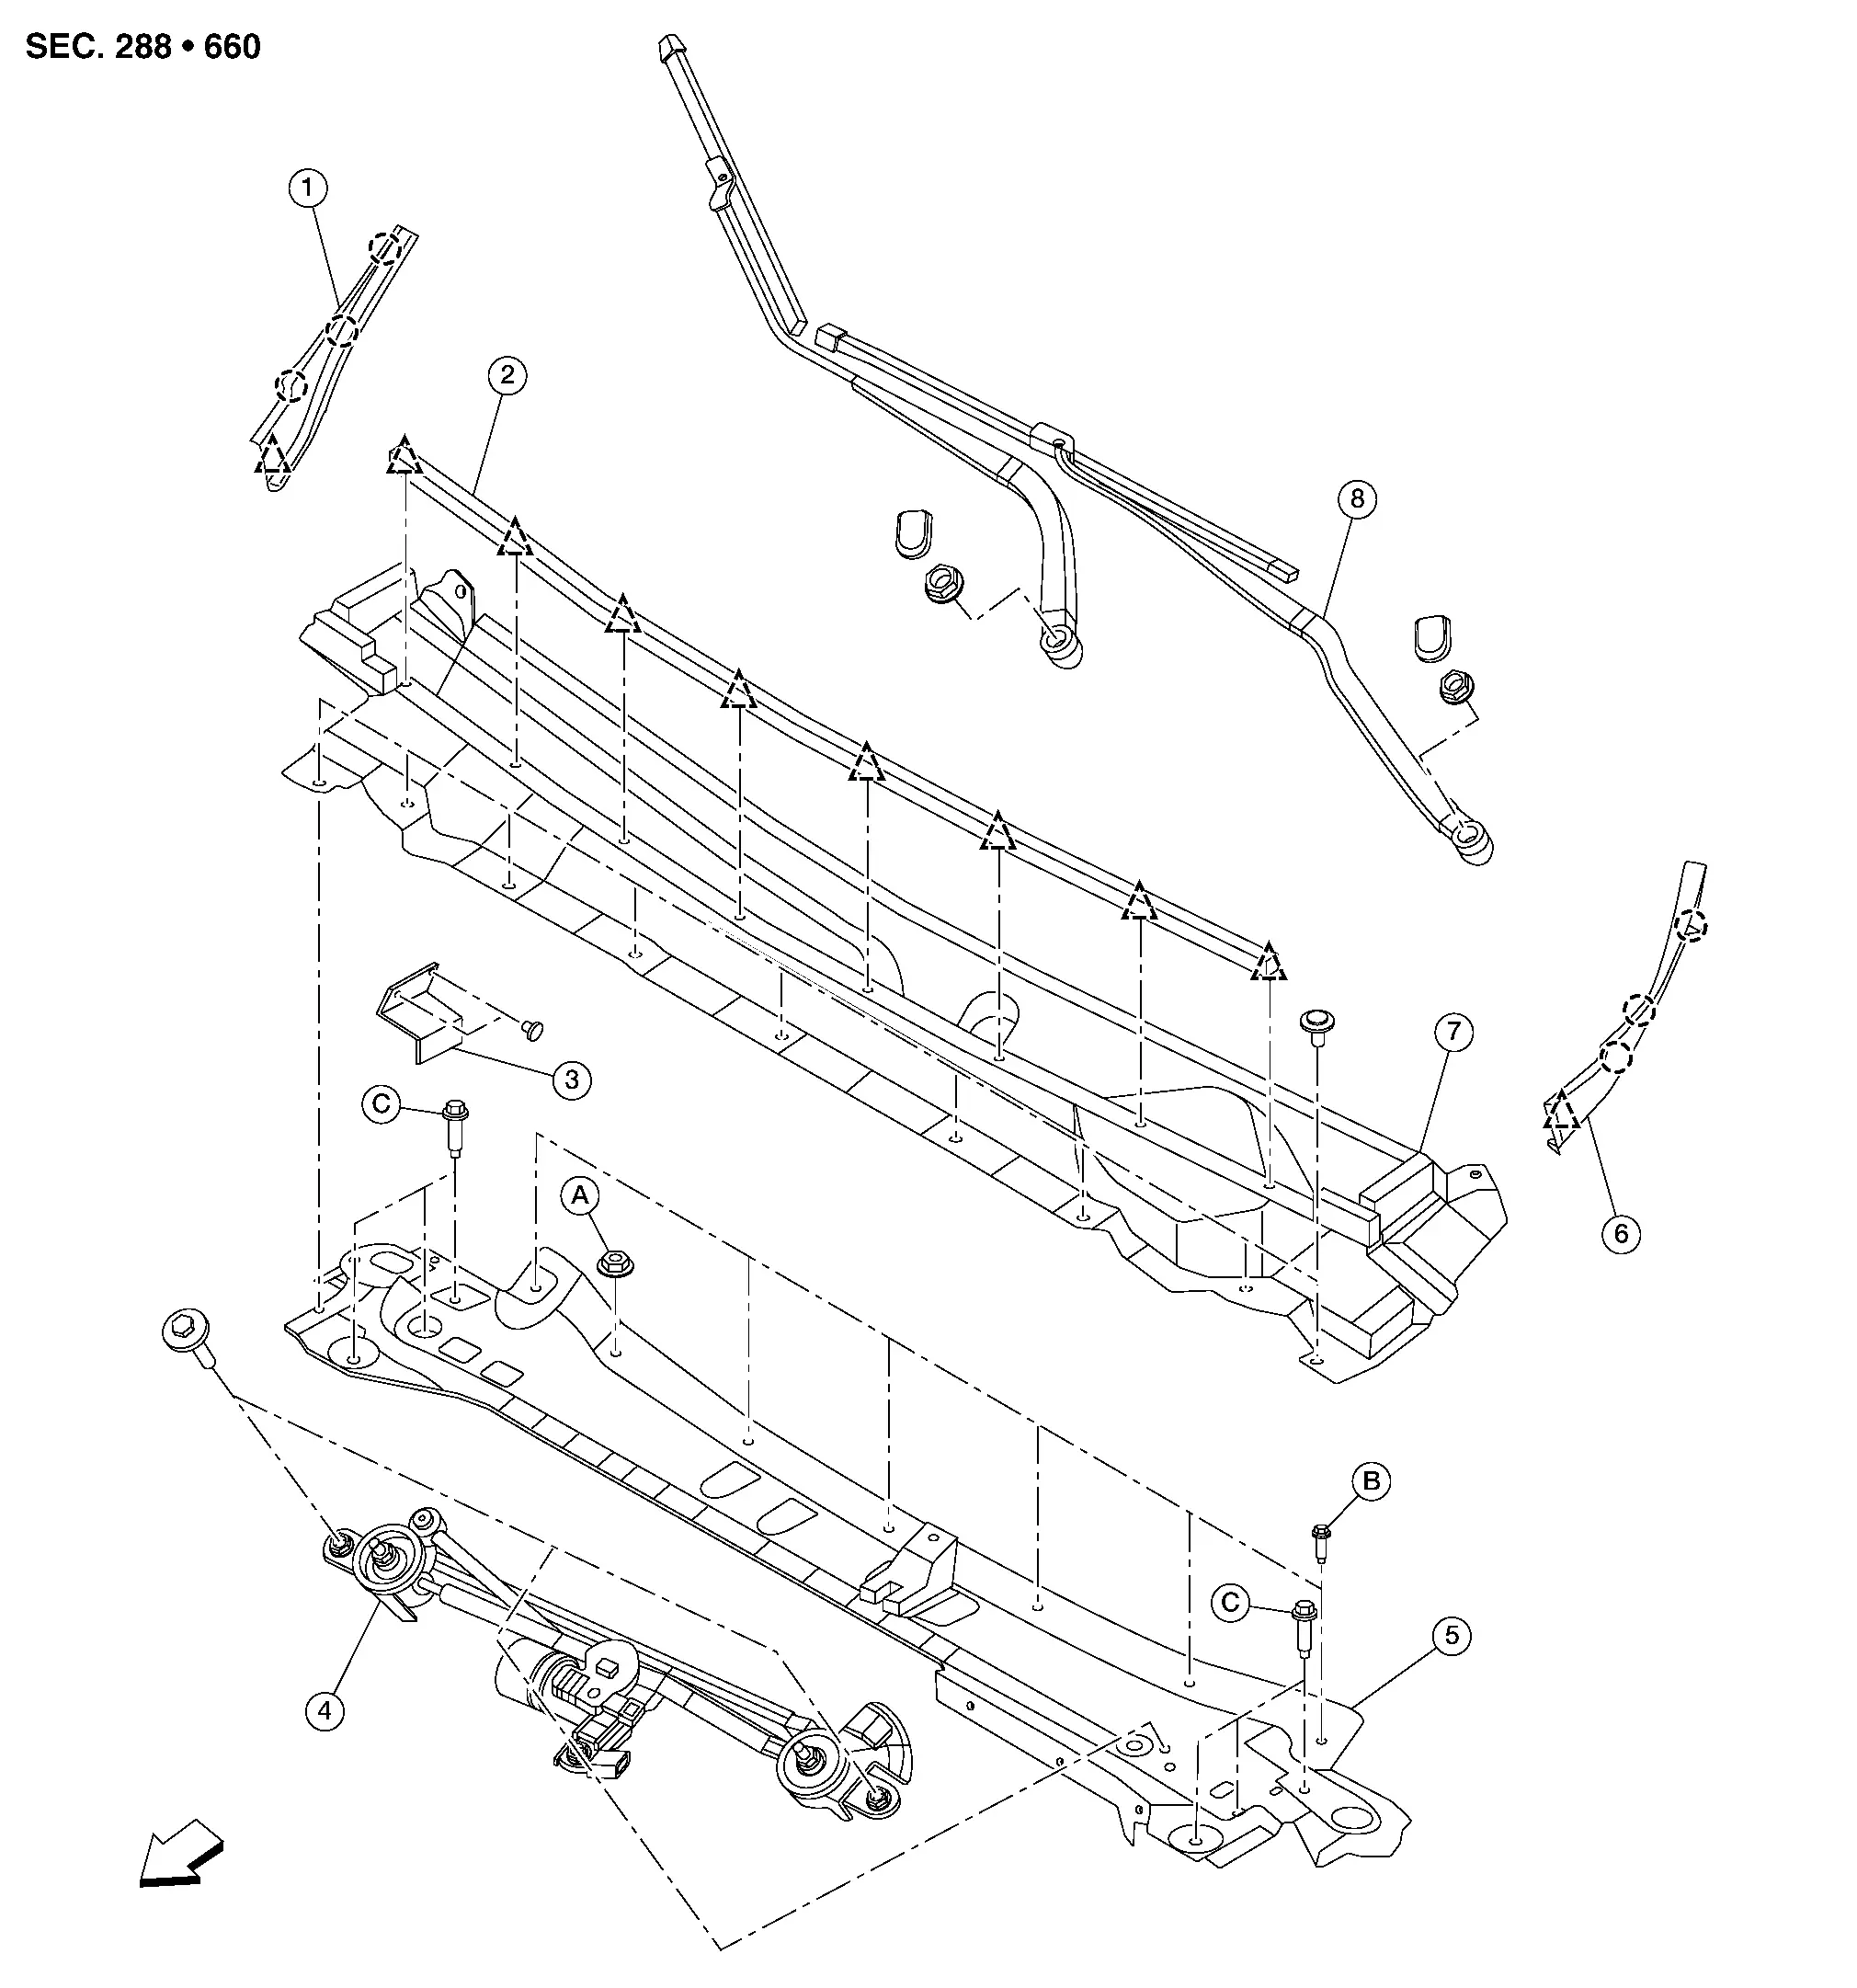
| 1. | Cowl top side trim cover (RH) | 2. | Cowl top seal | 3. | Air intake bracket |
| 4. | Front wiper drive assembly | 5. | Cowl top extension | 6. | Cowl top side trim cover (LH) |
| 7. | Cowl top cover | 8. | Front wiper arm | A. | Refer to Installation. |
| B. | Refer to Installation. | C. | Refer to Installation. |  |
Clip |
 |
Pawl |  |
Front |
Removal and Installation
COWL TOP COVER
REMOVAL
Remove front wiper arm (LH/RH). Refer to Removal and Installation.
Remove cowl top cover clips. Refer to Exploded View.
Pull cowl top cover forward to release and remove from Nissan Pathfinder vehicle.
Using suitable tool, release clips and remove cowl top seal (if necessary). Refer to Exploded View.
INSTALLATION
Installation is in the reverse order of removal.
COWL TOP EXTENSION
REMOVAL
Remove the front wiper drive assembly. Refer to Removal and Installation.
Separate harness retainer (A) from cowl top extension (1).

Remove the nuts and separate the reservoir tank bracket from the cowl top extension. Refer to Exploded View.
Remove bolts and cowl top extension. Refer to Exploded View.
INSTALLATION
Installation is in the reverse order of removal.
Install cowl top extension (1) with nut (A) finger tight, then install bolts (B) and bolts (C) finger tight.

Tighten nut (A) first, then bolts (B) and bolts (C) to specification:
Nut (A) : 7 N·m Bolts (B) : 5,5 N·m Bolts (C) : 35 N·m
Roof Side Molding Nissan Pathfinder R53
Exploded View

| 1. | Roof side molding | 2. | Back door hinge cover |  |
Clip |
 |
Pawl |
Removal and Installation
REMOVAL
Using suitable tool (A), release roof side molding clips. Refer to Exploded View.

 |
: Clip |
Remove roof side molding.
INSTALLATION
Installation is in the reverse order of removal.
Door Outside Molding Nissan Pathfinder Fifth generation
Exploded View

| 1. | Front door outside molding | 2. | Rear door outside molding |  |
Pawl |
Removal and Installation
FRONT DOOR OUTSIDE MOLDING
REMOVAL
Rotate and lift as shown to remove the front door outside molding (1).
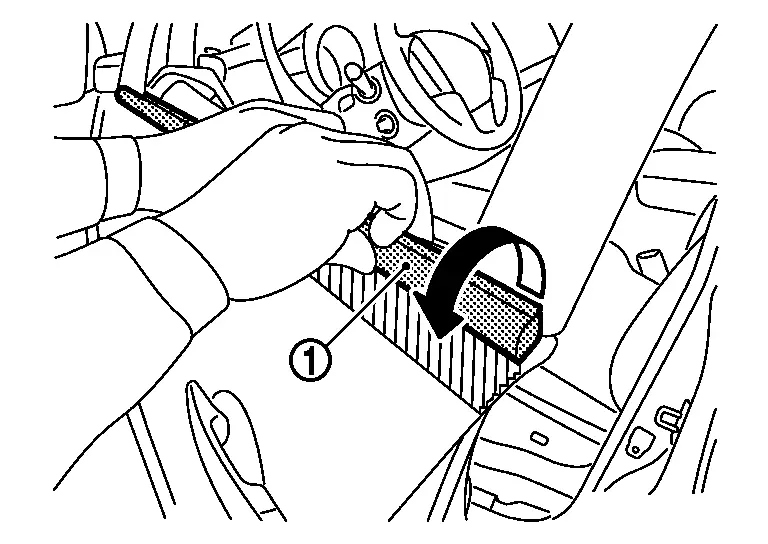
INSTALLATION
Installation is in the reverse order of removal.
REAR DOOR OUTSIDE MOLDING
REMOVAL
Rotate and lift as shown to remove the rear door outside molding (1).
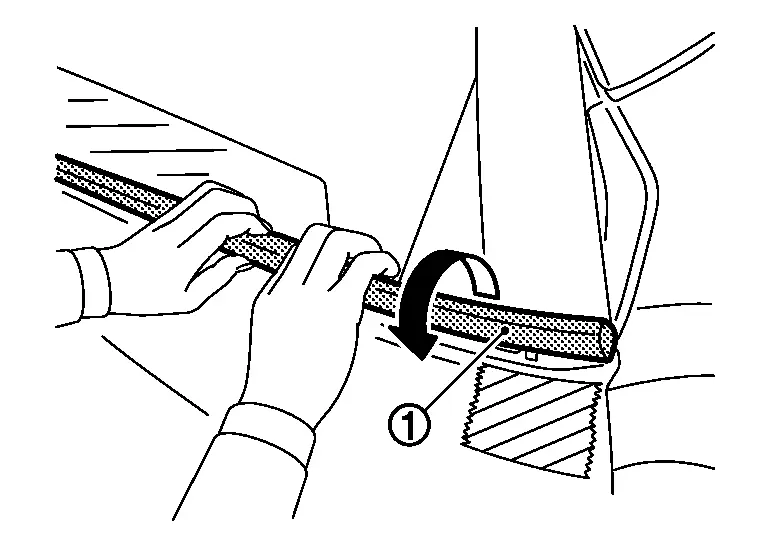
INSTALLATION
Installation is in the reverse order of removal.
Rear Pillar Finisher (outer) Nissan Pathfinder R53
Exploded View
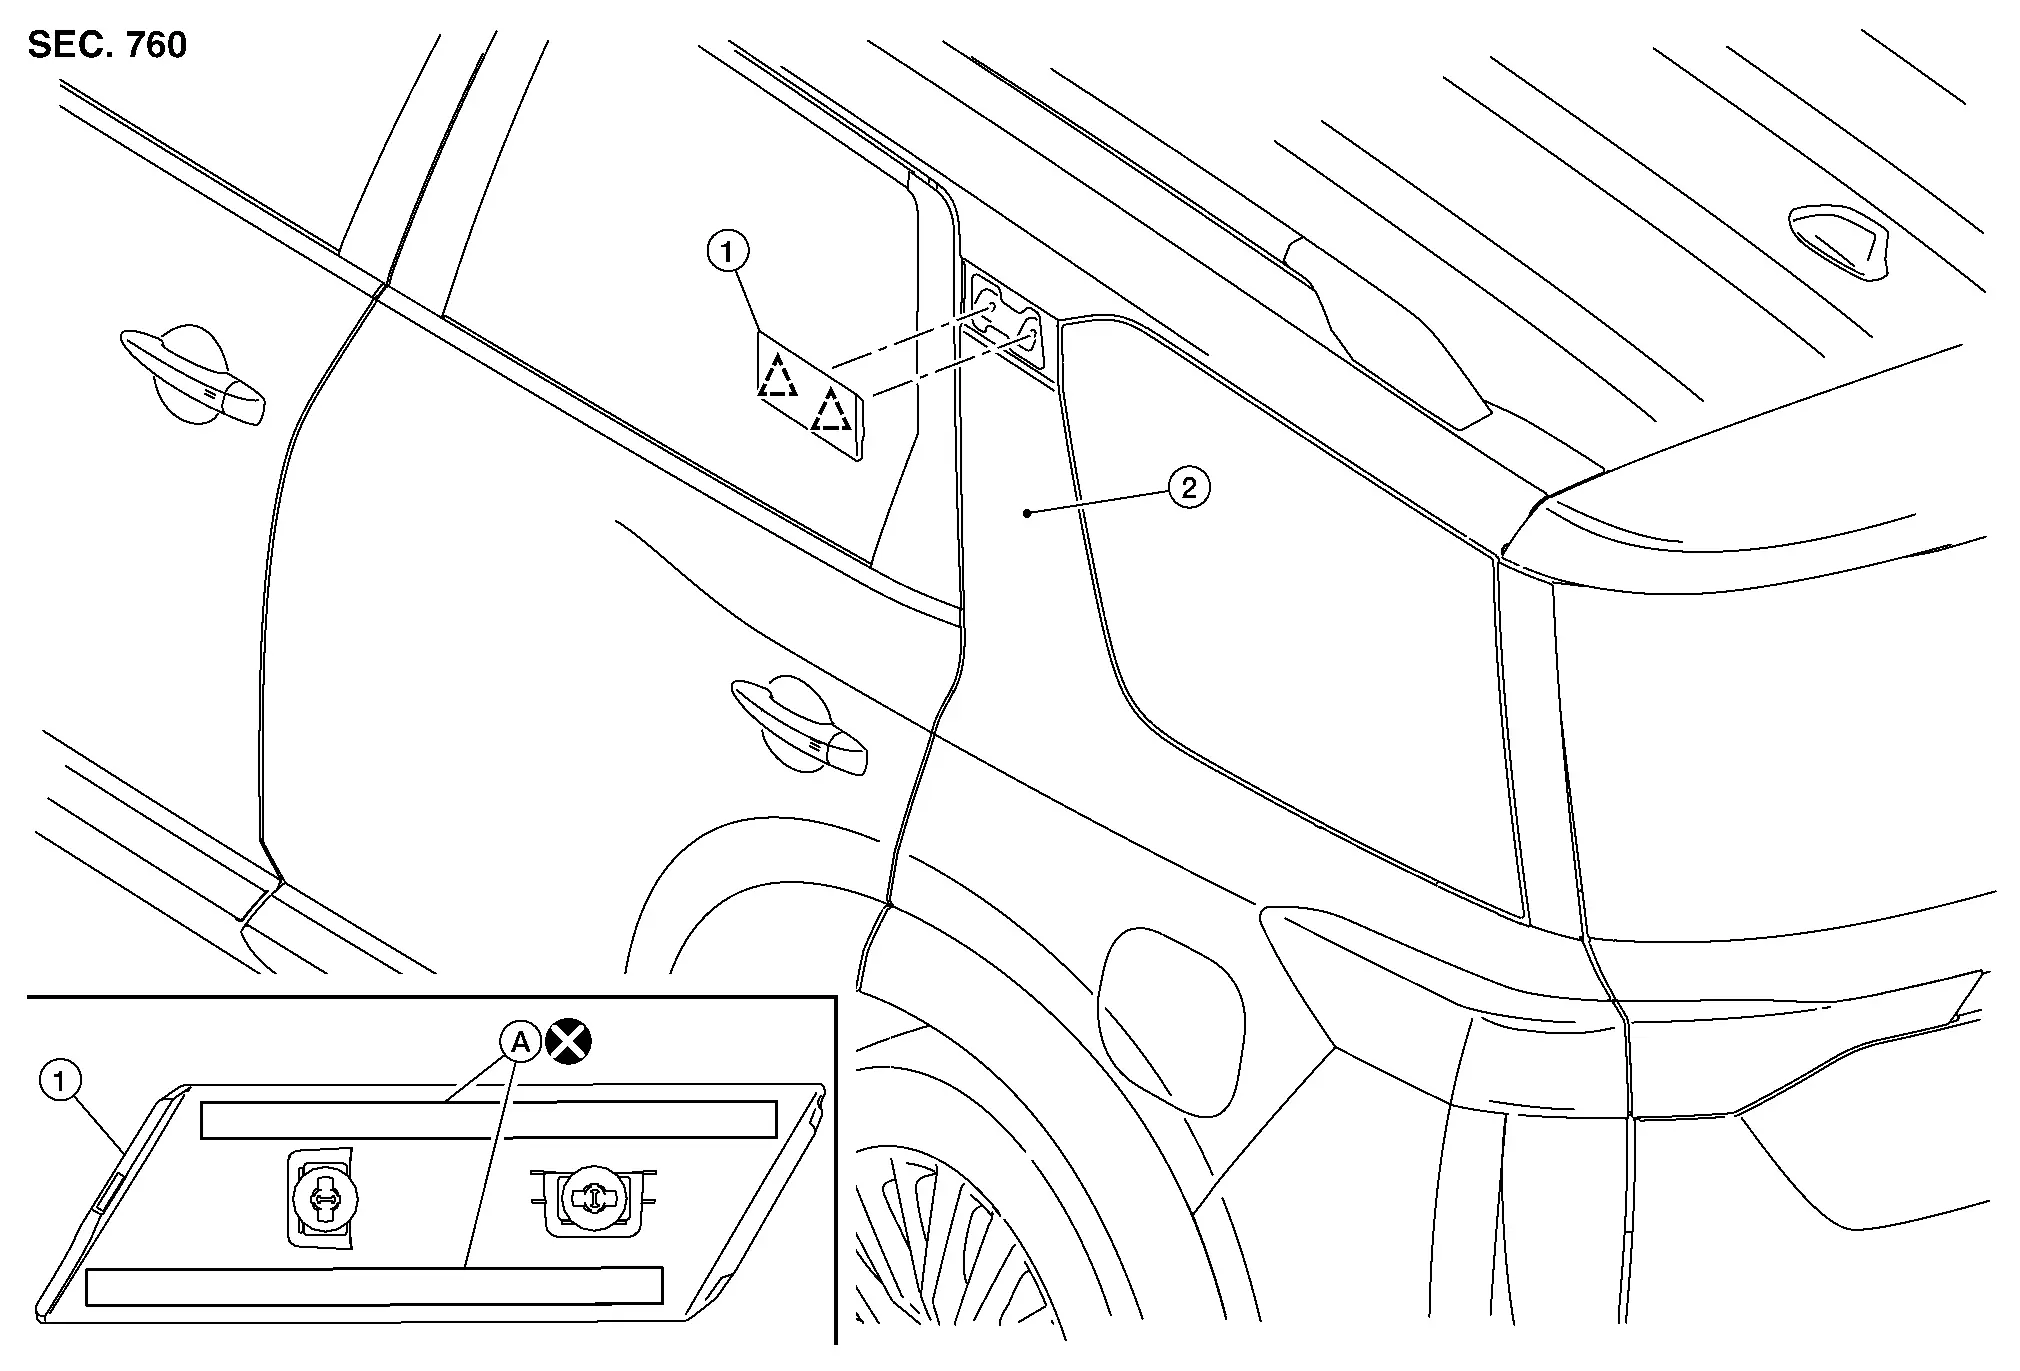
| 1. | Rear pillar finisher (outer) | 2. | Body side outer | A. | Adhesive tape |
 |
Clip |
Removal and Installation
REMOVAL
Using suitable tool, release clips and adhesive tape. Refer to Exploded View.
Remove rear pillar finisher (outer).
INSTALLATION
Installation is in the reverse order of removal.
Door Outside Lower Molding Nissan Pathfinder 2026
Exploded View
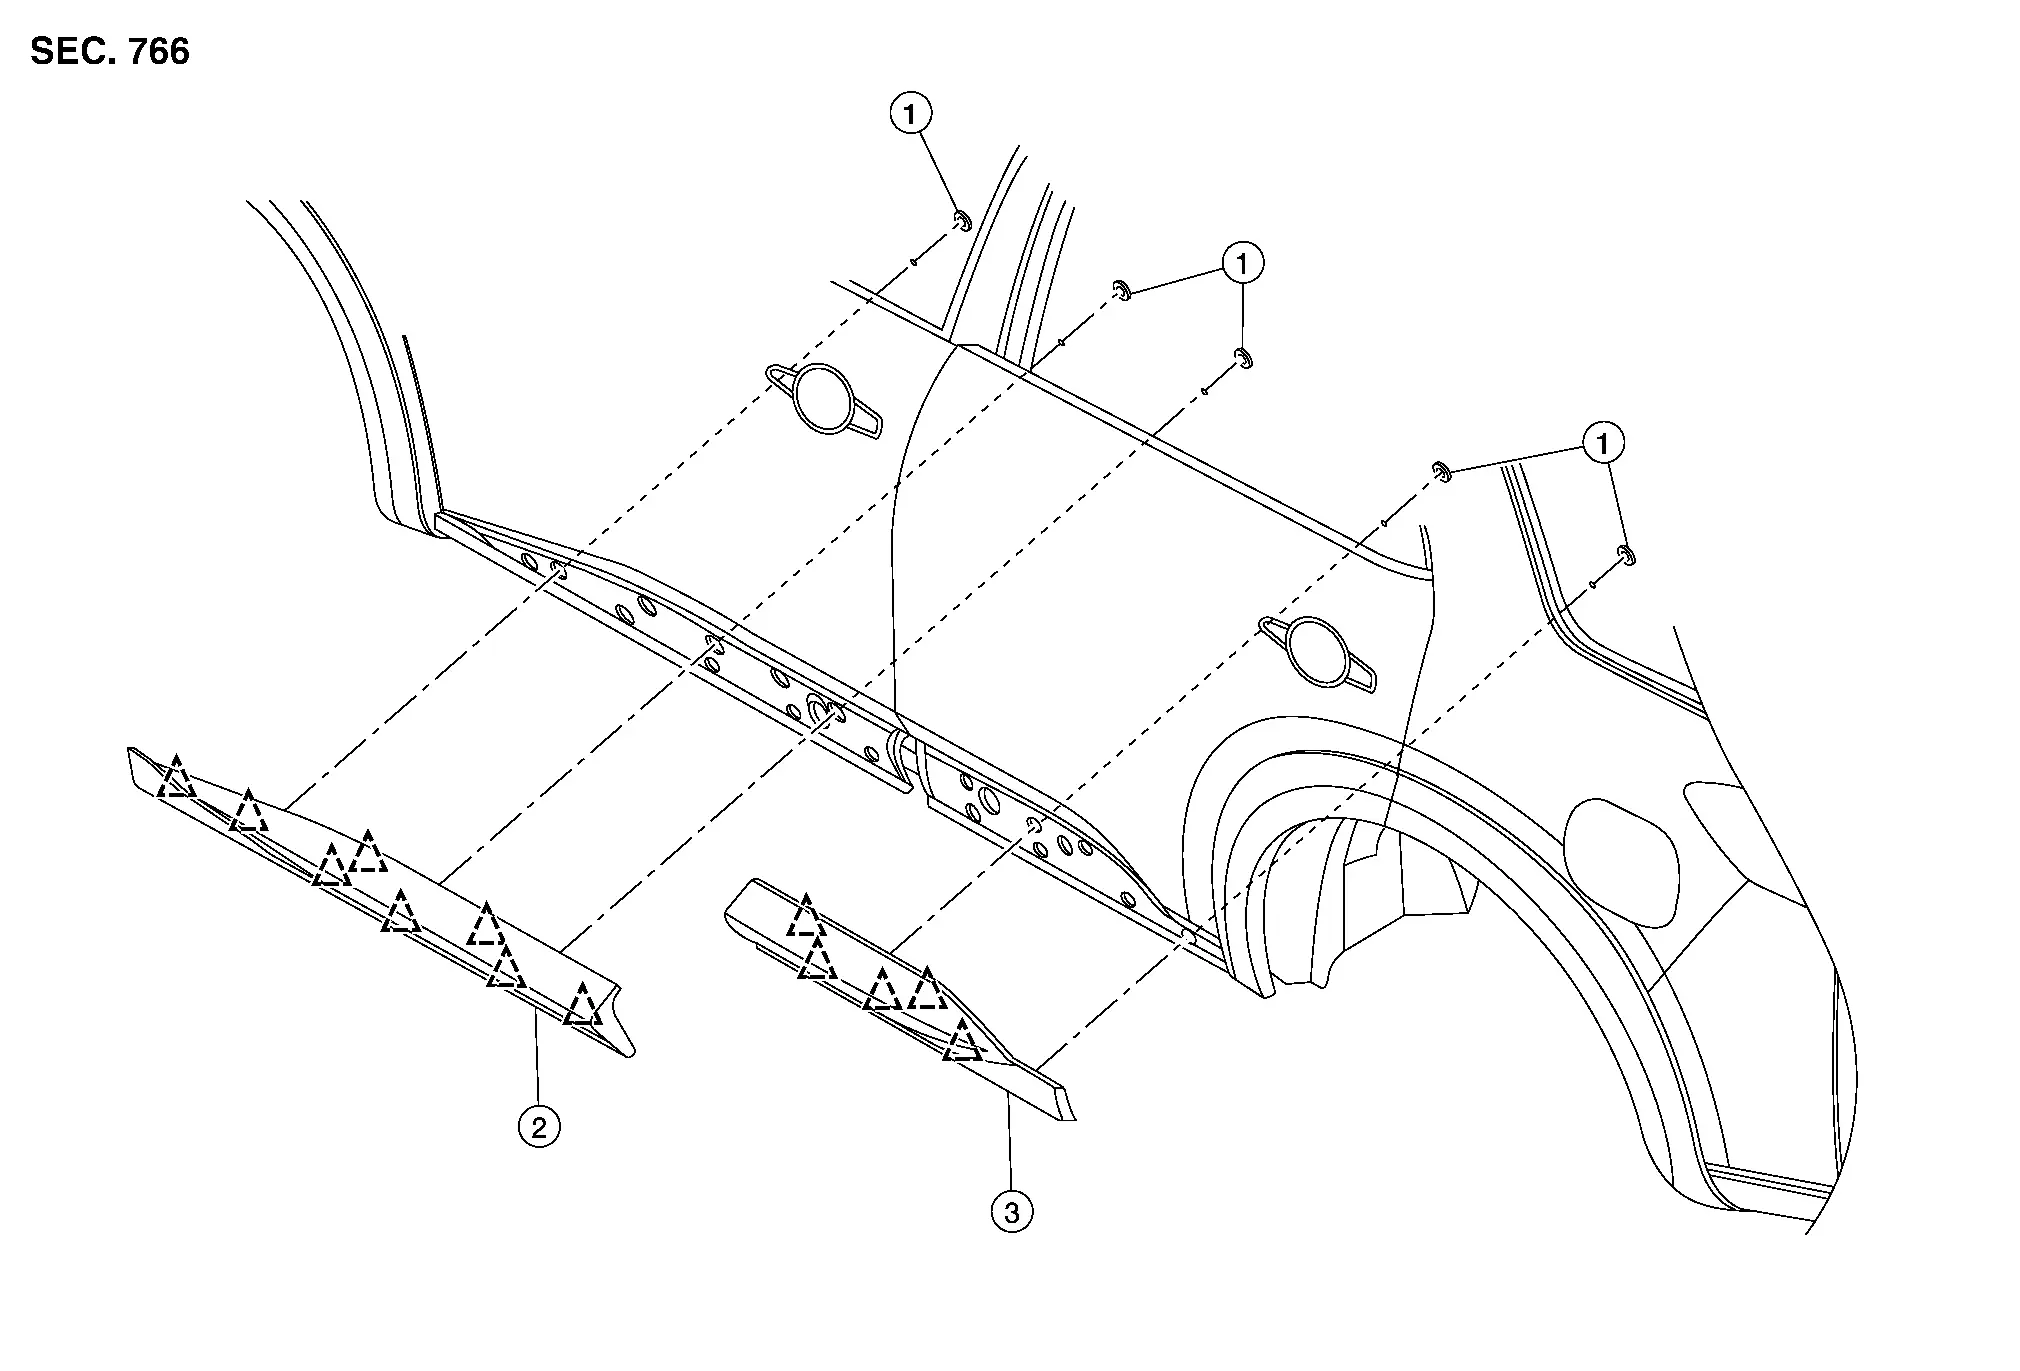
| 1. | Plug | 2. | Front door outside lower molding (LH) | 3. | Rear door outside lower molding (LH) |
 |
Clip |
Removal and Installation
FRONT DOOR OUTSIDE LOWER MOLDING
Removal
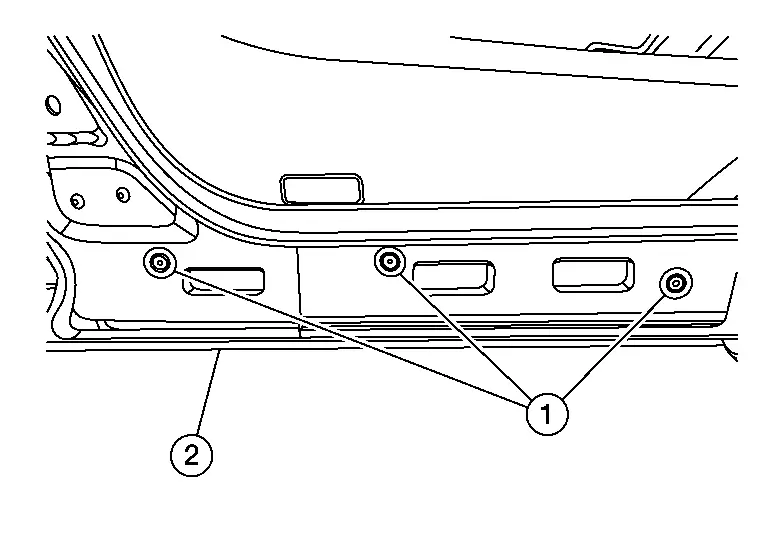
Remove plugs (1) from front door inner panel (2).
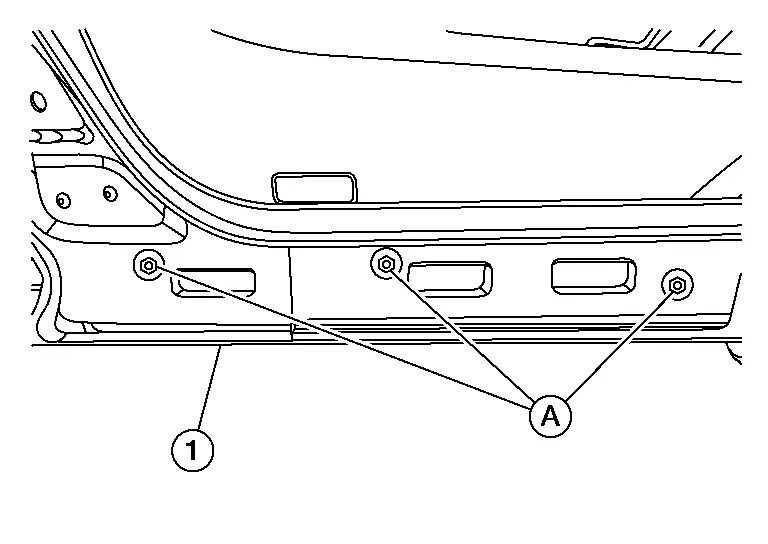
Remove front door outside lower molding nuts (A) from front door (1).
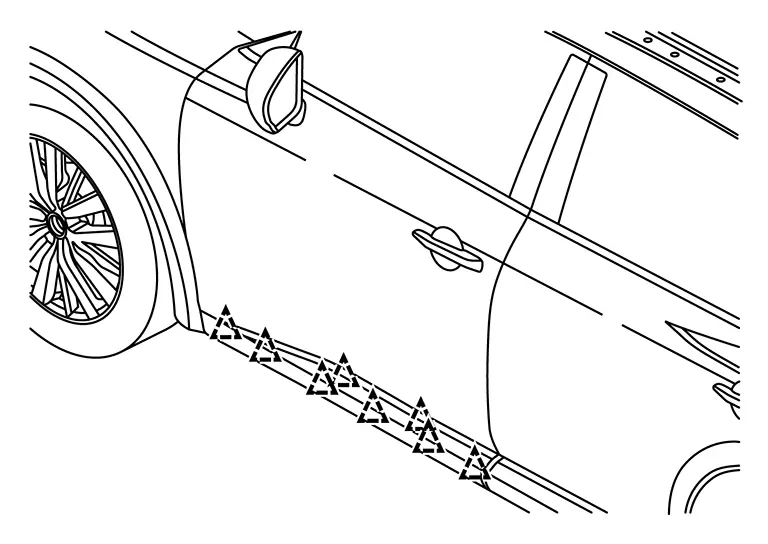
Using suitable tool, release clips and remove front door outside lower molding.
 |
: Clip |
Installation
Installation is in the reverse order of removal.
REAR DOOR OUTSIDE LOWER MOLDING
REMOVAL
Remove plugs (1) from rear door inner panel (2).

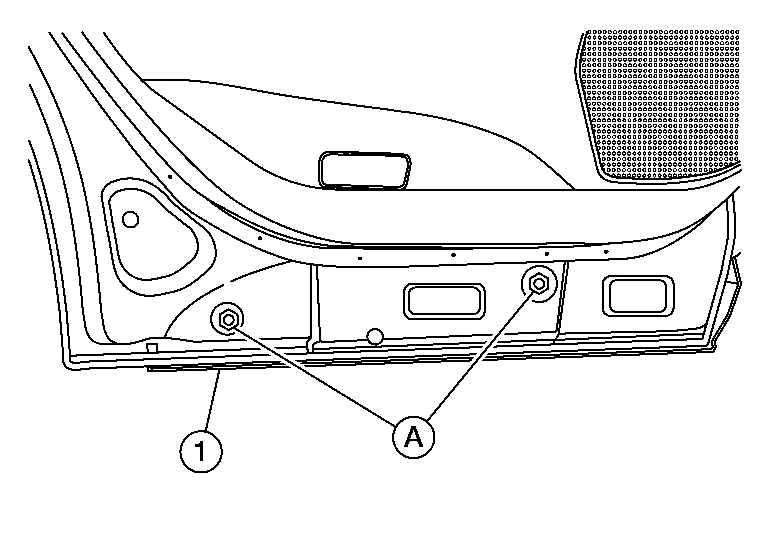
Remove rear door outside lower molding nuts (A) from rear door (1).
Using suitable tool, release clips and remove rear door outside lower molding.
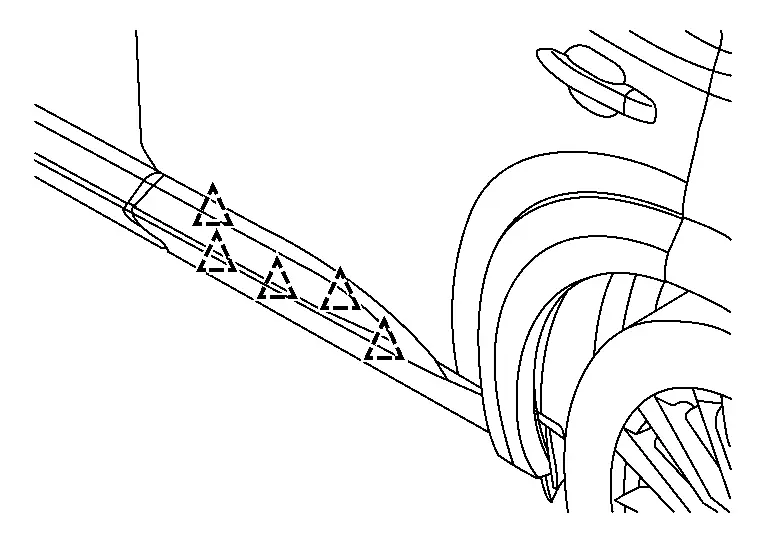
 |
: Clip |
INSTALLATION
Installation is in the reverse order of removal.
Rear Spoiler Nissan Pathfinder 5th Gen
Exploded View
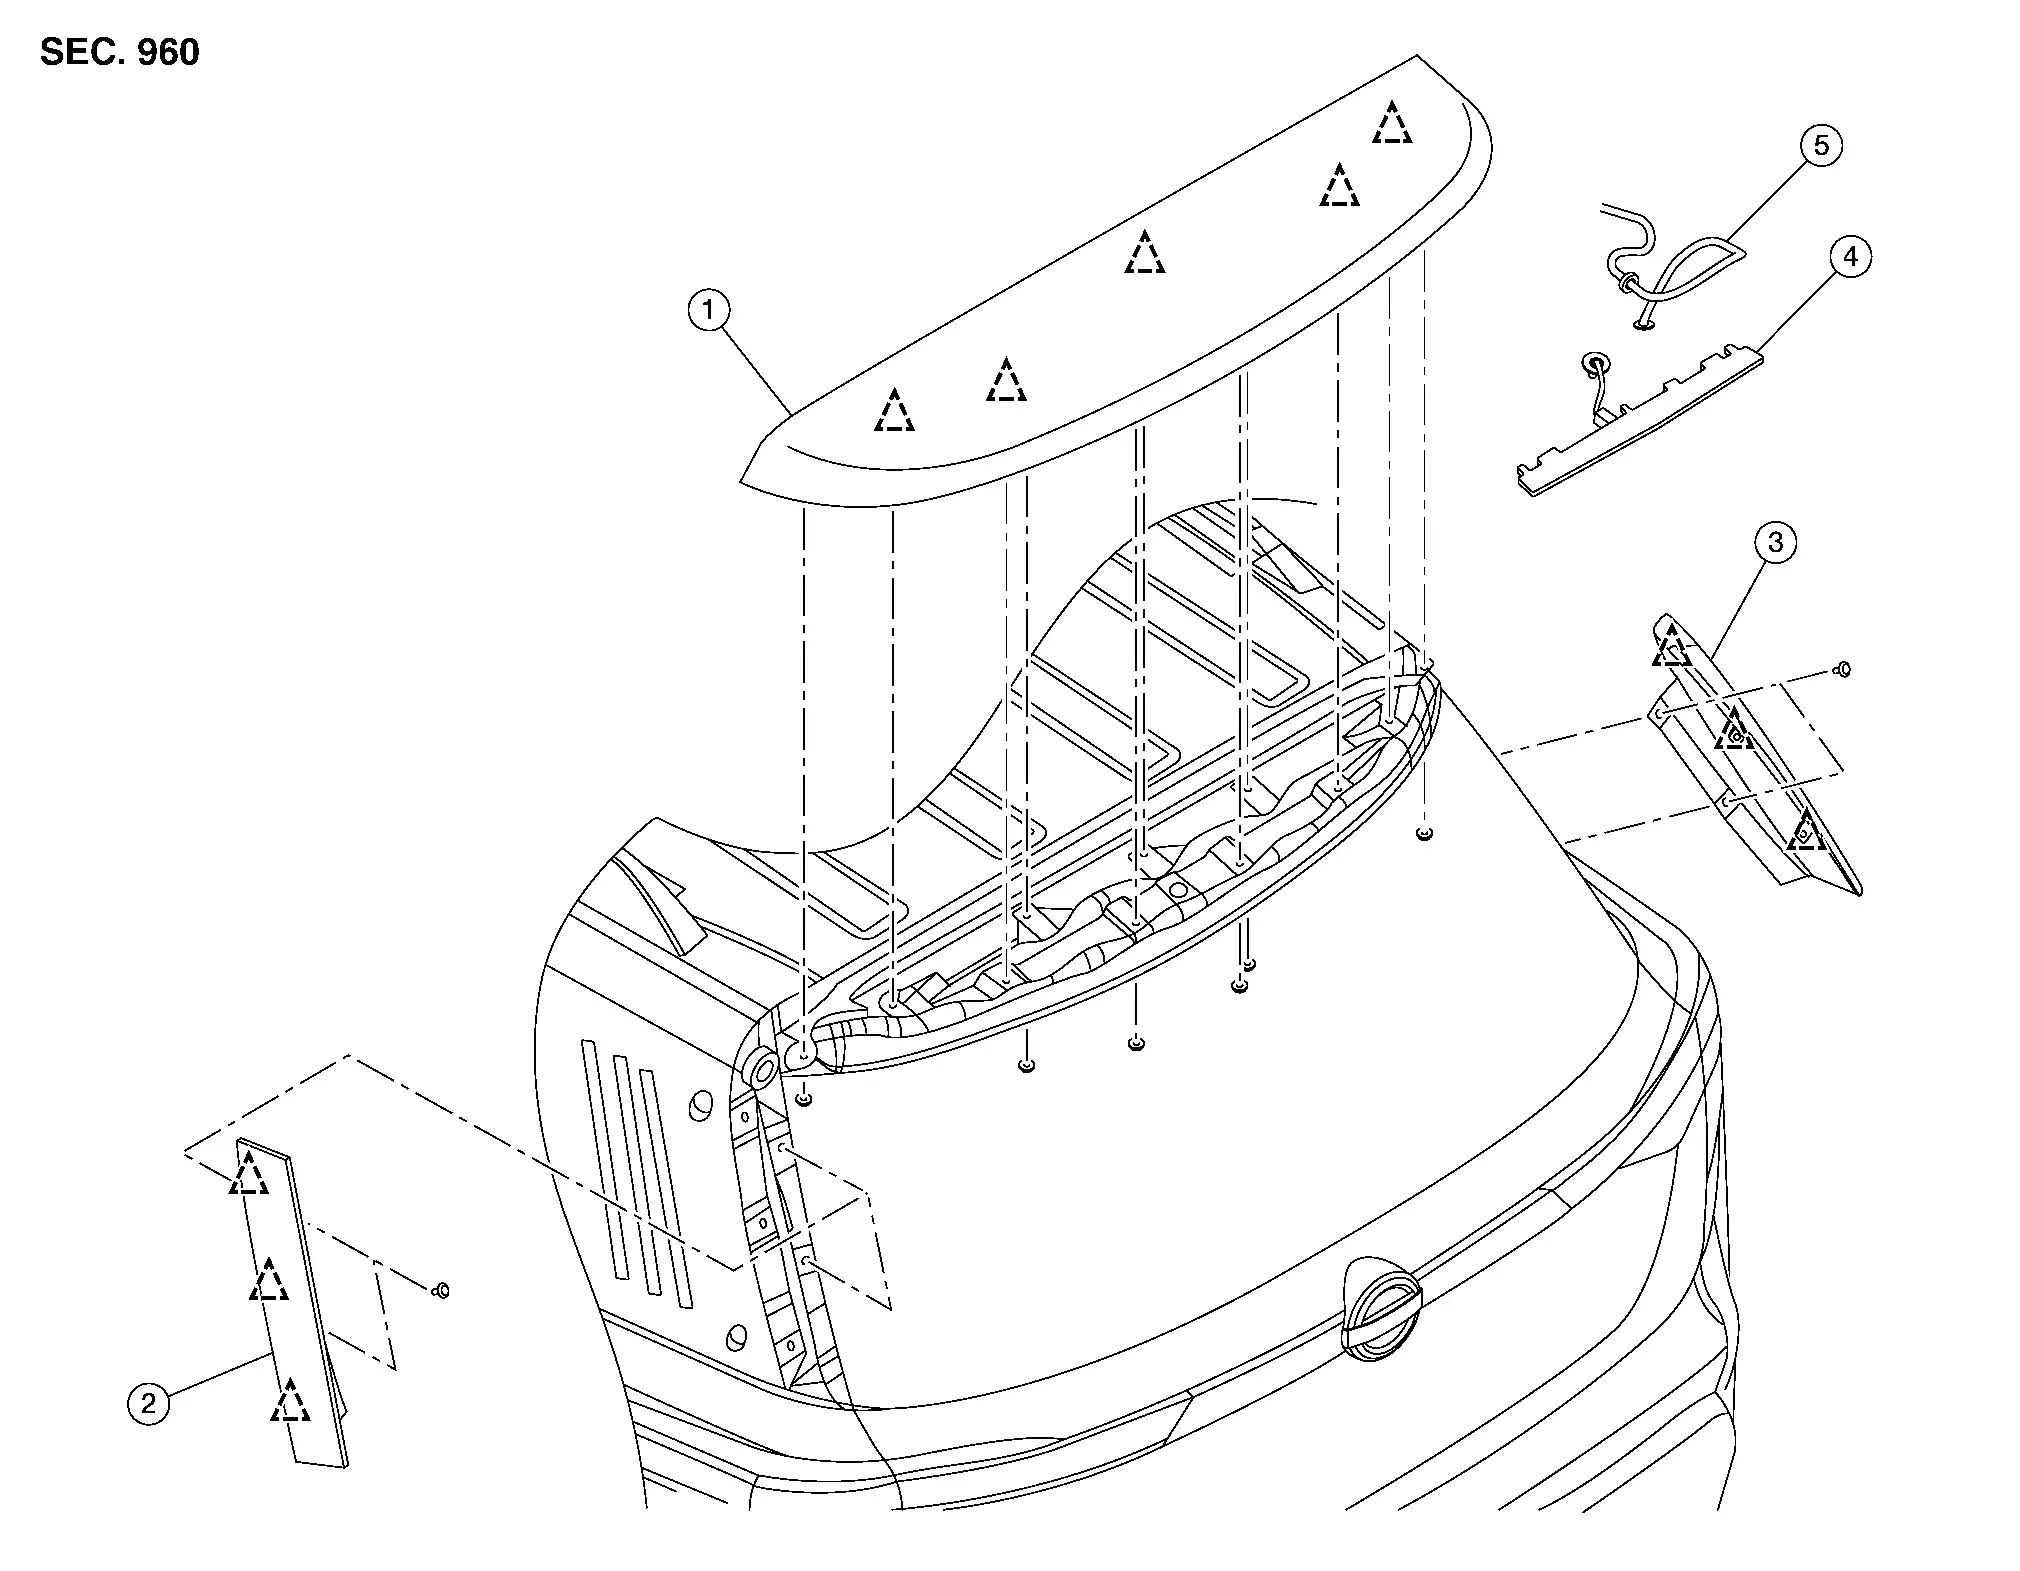
| 1. | Rear spoiler | 2. | Rear spoiler side trim cover (LH) | 3. | Rear spoiler side trim cover (RH) |
| 4. | High-mounted stop lamp | 5. | Rear washer nozzle |  |
Clip |
Removal and Installation
REMOVAL
Remove back door upper finisher. Refer to Removal and Installation.
Remove the rear spoiler nuts. Refer to Exploded View.
Disconnect the harness connector from high-mounted stop lamp.
Release the rear washer nozzle tube.
Release the rear spoiler clips with a suitable tool (A), and then remove the rear spoiler.
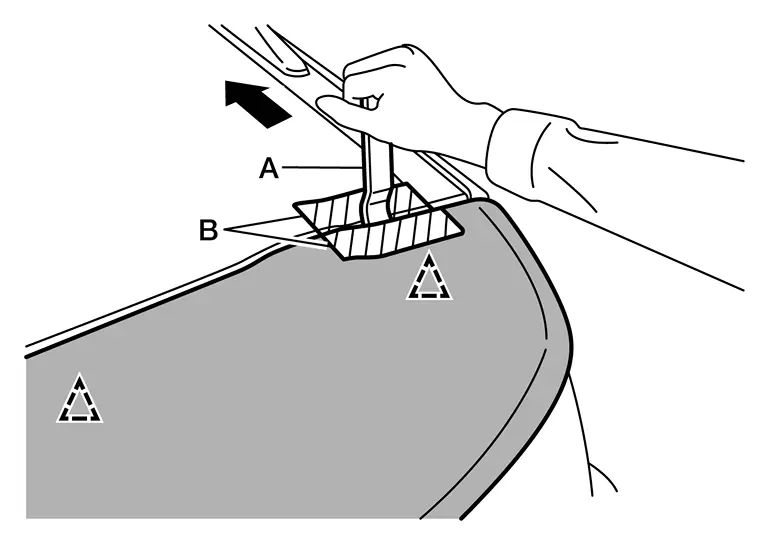
 |
: Clip |
Remove following parts (if necessary) after removing rear spoiler:
High-mounted stop lamp
Rear spoiler side trim covers (LH/RH)
Rear washer nozzle
INSTALLATION
Installation is in the reverse order of removal.
Back Door Outer Finisher Nissan Pathfinder SUV
Exploded View

| 1. | Back door outer finisher |  |
Clip |
Removal and Installation
REMOVAL
Remove the back door lower finisher. Refer to Removal and Installation.
Disconnect the harness connectors from rear view camera (if equipped) and back door opener switch.
Remove the back door outer finisher nuts. Refer to Exploded View.
Using suitable tool, release clips and remove back door outer finisher. Refer to Exploded View.
Remove the back door opener switch (if necessary).
INSTALLATION
Installation is in the reverse order of removal.
Running Board Nissan Pathfinder R53
Removal and Installation
REMOVAL
Remove running board bolts (A) and running board (1).

Remove running board bracket nut (A), bolt (B), and running board bracket (front, center, and rear).
- : Running board bracket (front, center, and rear)
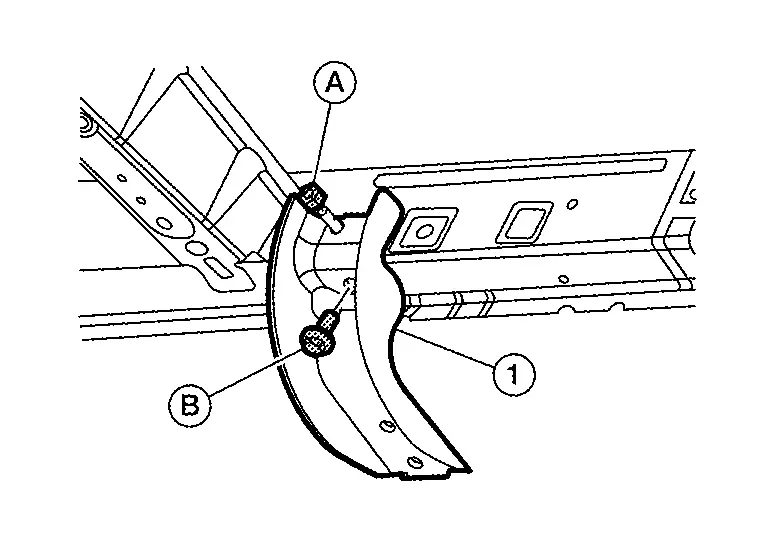
INSTALLATION
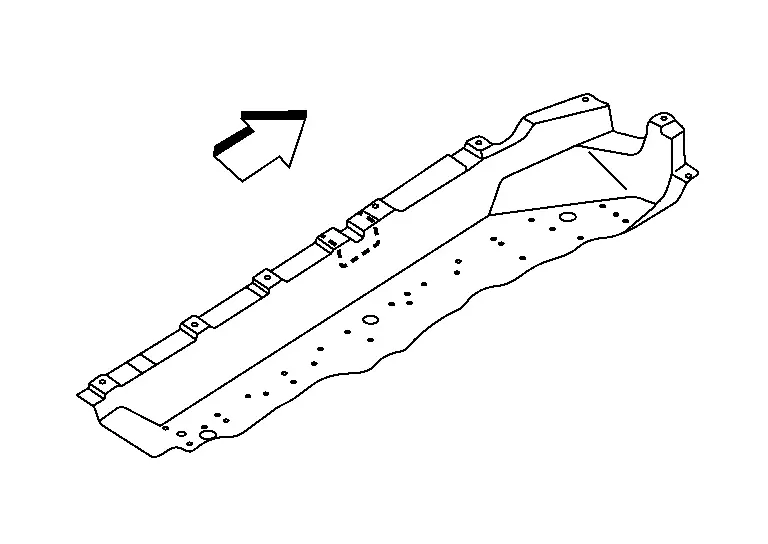
Remove floor under cover (LH). Refer to Removal and Installation.
Using suitable tool, cut notch in floor under cover (LH) as shown.

 |
: Front |
Remove floor under cover (RH). Refer to Removal and Installation.
Using suitable tool, cut notch in floor under cover (RH) as shown.
 |
: Front |
Locate running board bracket mounting holes and studs on underbody. Clean threads of holes and studs if necessary.
Install front, center, and rear running board brackets (1) to underbody with nut (A) and bolt (B) finger tight.

Install floor under covers. Refer to Removal and Installation.
Install running board to running board brackets with bolts finger tight.
Tighten running board bracket nuts to specification:
| Nuts | : 14 N-m (10 ft-lb) |
Tighten running board bracket bolts to specification:
| Bolts | : 24 N-m (18 ft-lb) |
Tighten running board bolts to specification.
| Bolts | : 14 N-m (10 ft-lb) |
Using suitable tool, release clips and remove door parting seal (1) from sill (2).
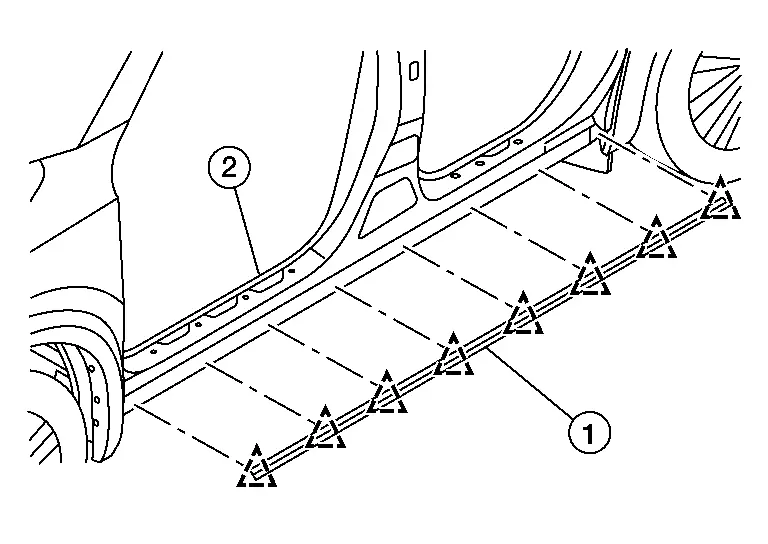
 |
: Clip |
Wipe sill surface clean using alcohol solution of 90% or greater to remove any dirt or debris.
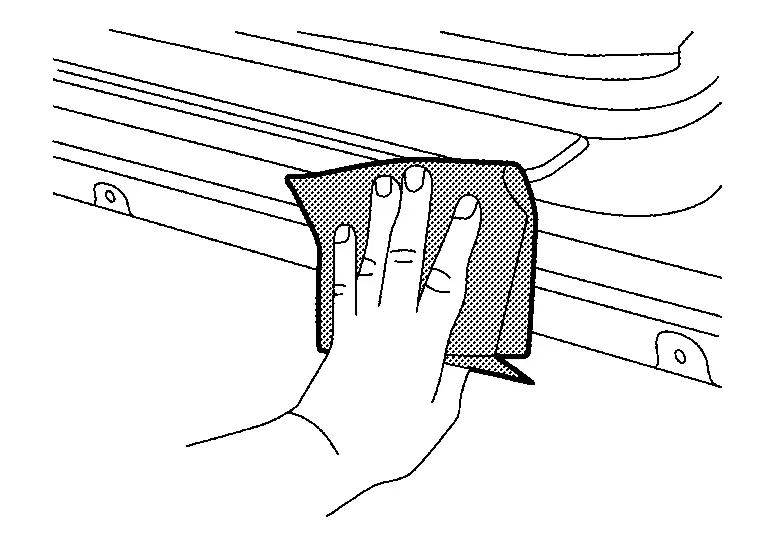
Install new door parting seal (1) by first engaging front clip in designated hole in body sill (2). Work rearward, firmly securing clips and adhesive tape.
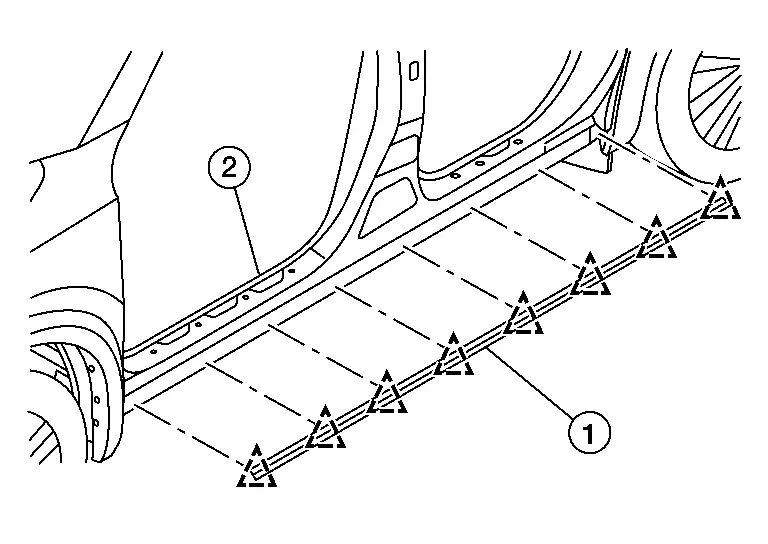
 |
: Clip |
Tow Hitch Nissan Pathfinder 2022
Exploded View

| 1. | Tow hitch |
Removal and Installation
REMOVAL
Lower the spare tire.
Disconnect the harness connectors from the trailer receptacle.
Remove tow hitch bolts. Refer to Exploded View.
Remove tow hitch.
Remove the trailer receptacle from the tow hitch (if necessary).
INSTALLATION
Installation is in the reverse order of removal.
Emblem Nissan Pathfinder R53
Exploded View
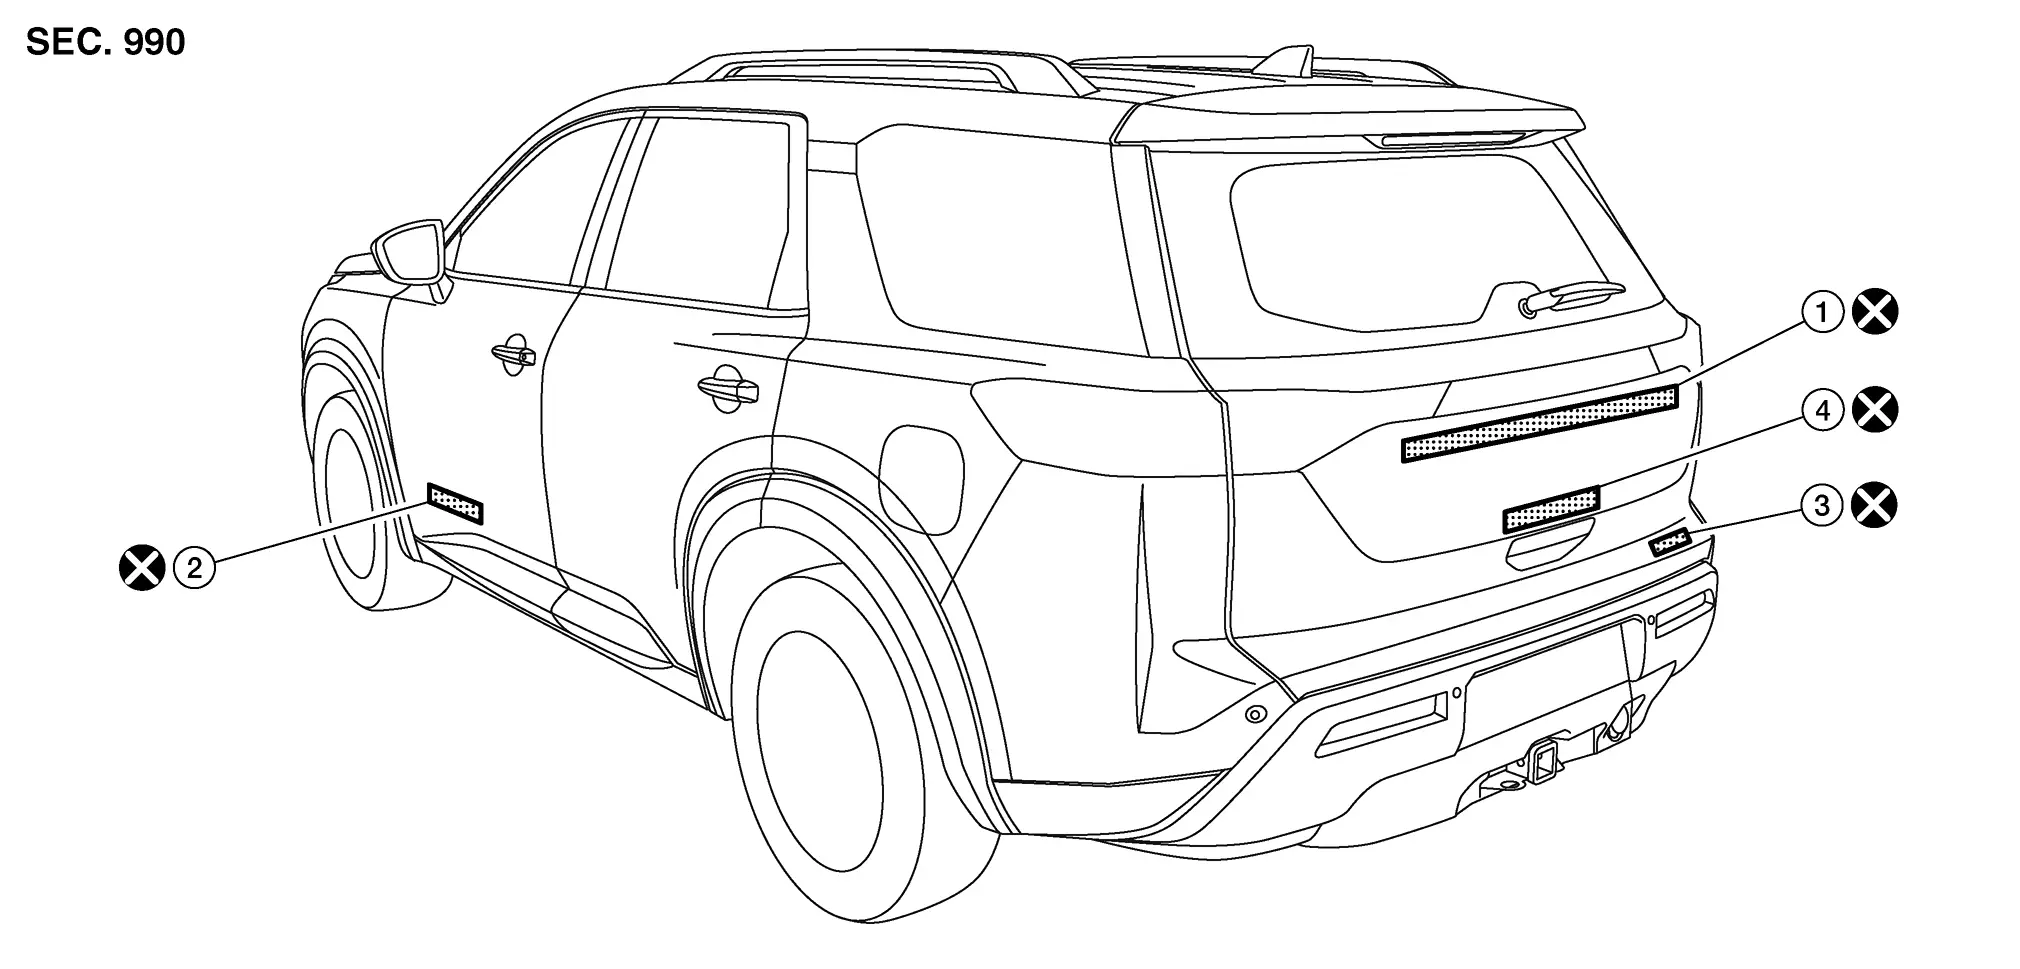
| 1. | Emblem A | 2. | Emblem B (if equipped) | 3. | Emblem C/D/E/F/G (if equipped) | 4. | Emblem H (if equipped) |
Removal and Installation
REMOVAL
Remove the emblem from the panel heating with a heat gun.
INSTALLATION
Remove grease, dust, etc. from the emblem and vehicle surface.
Install the emblem to the vehicle surface.
Using a roller, or suitable tool, apply even pressure to firmly affix the emblem to Nissan Pathfinder vehicle surface.
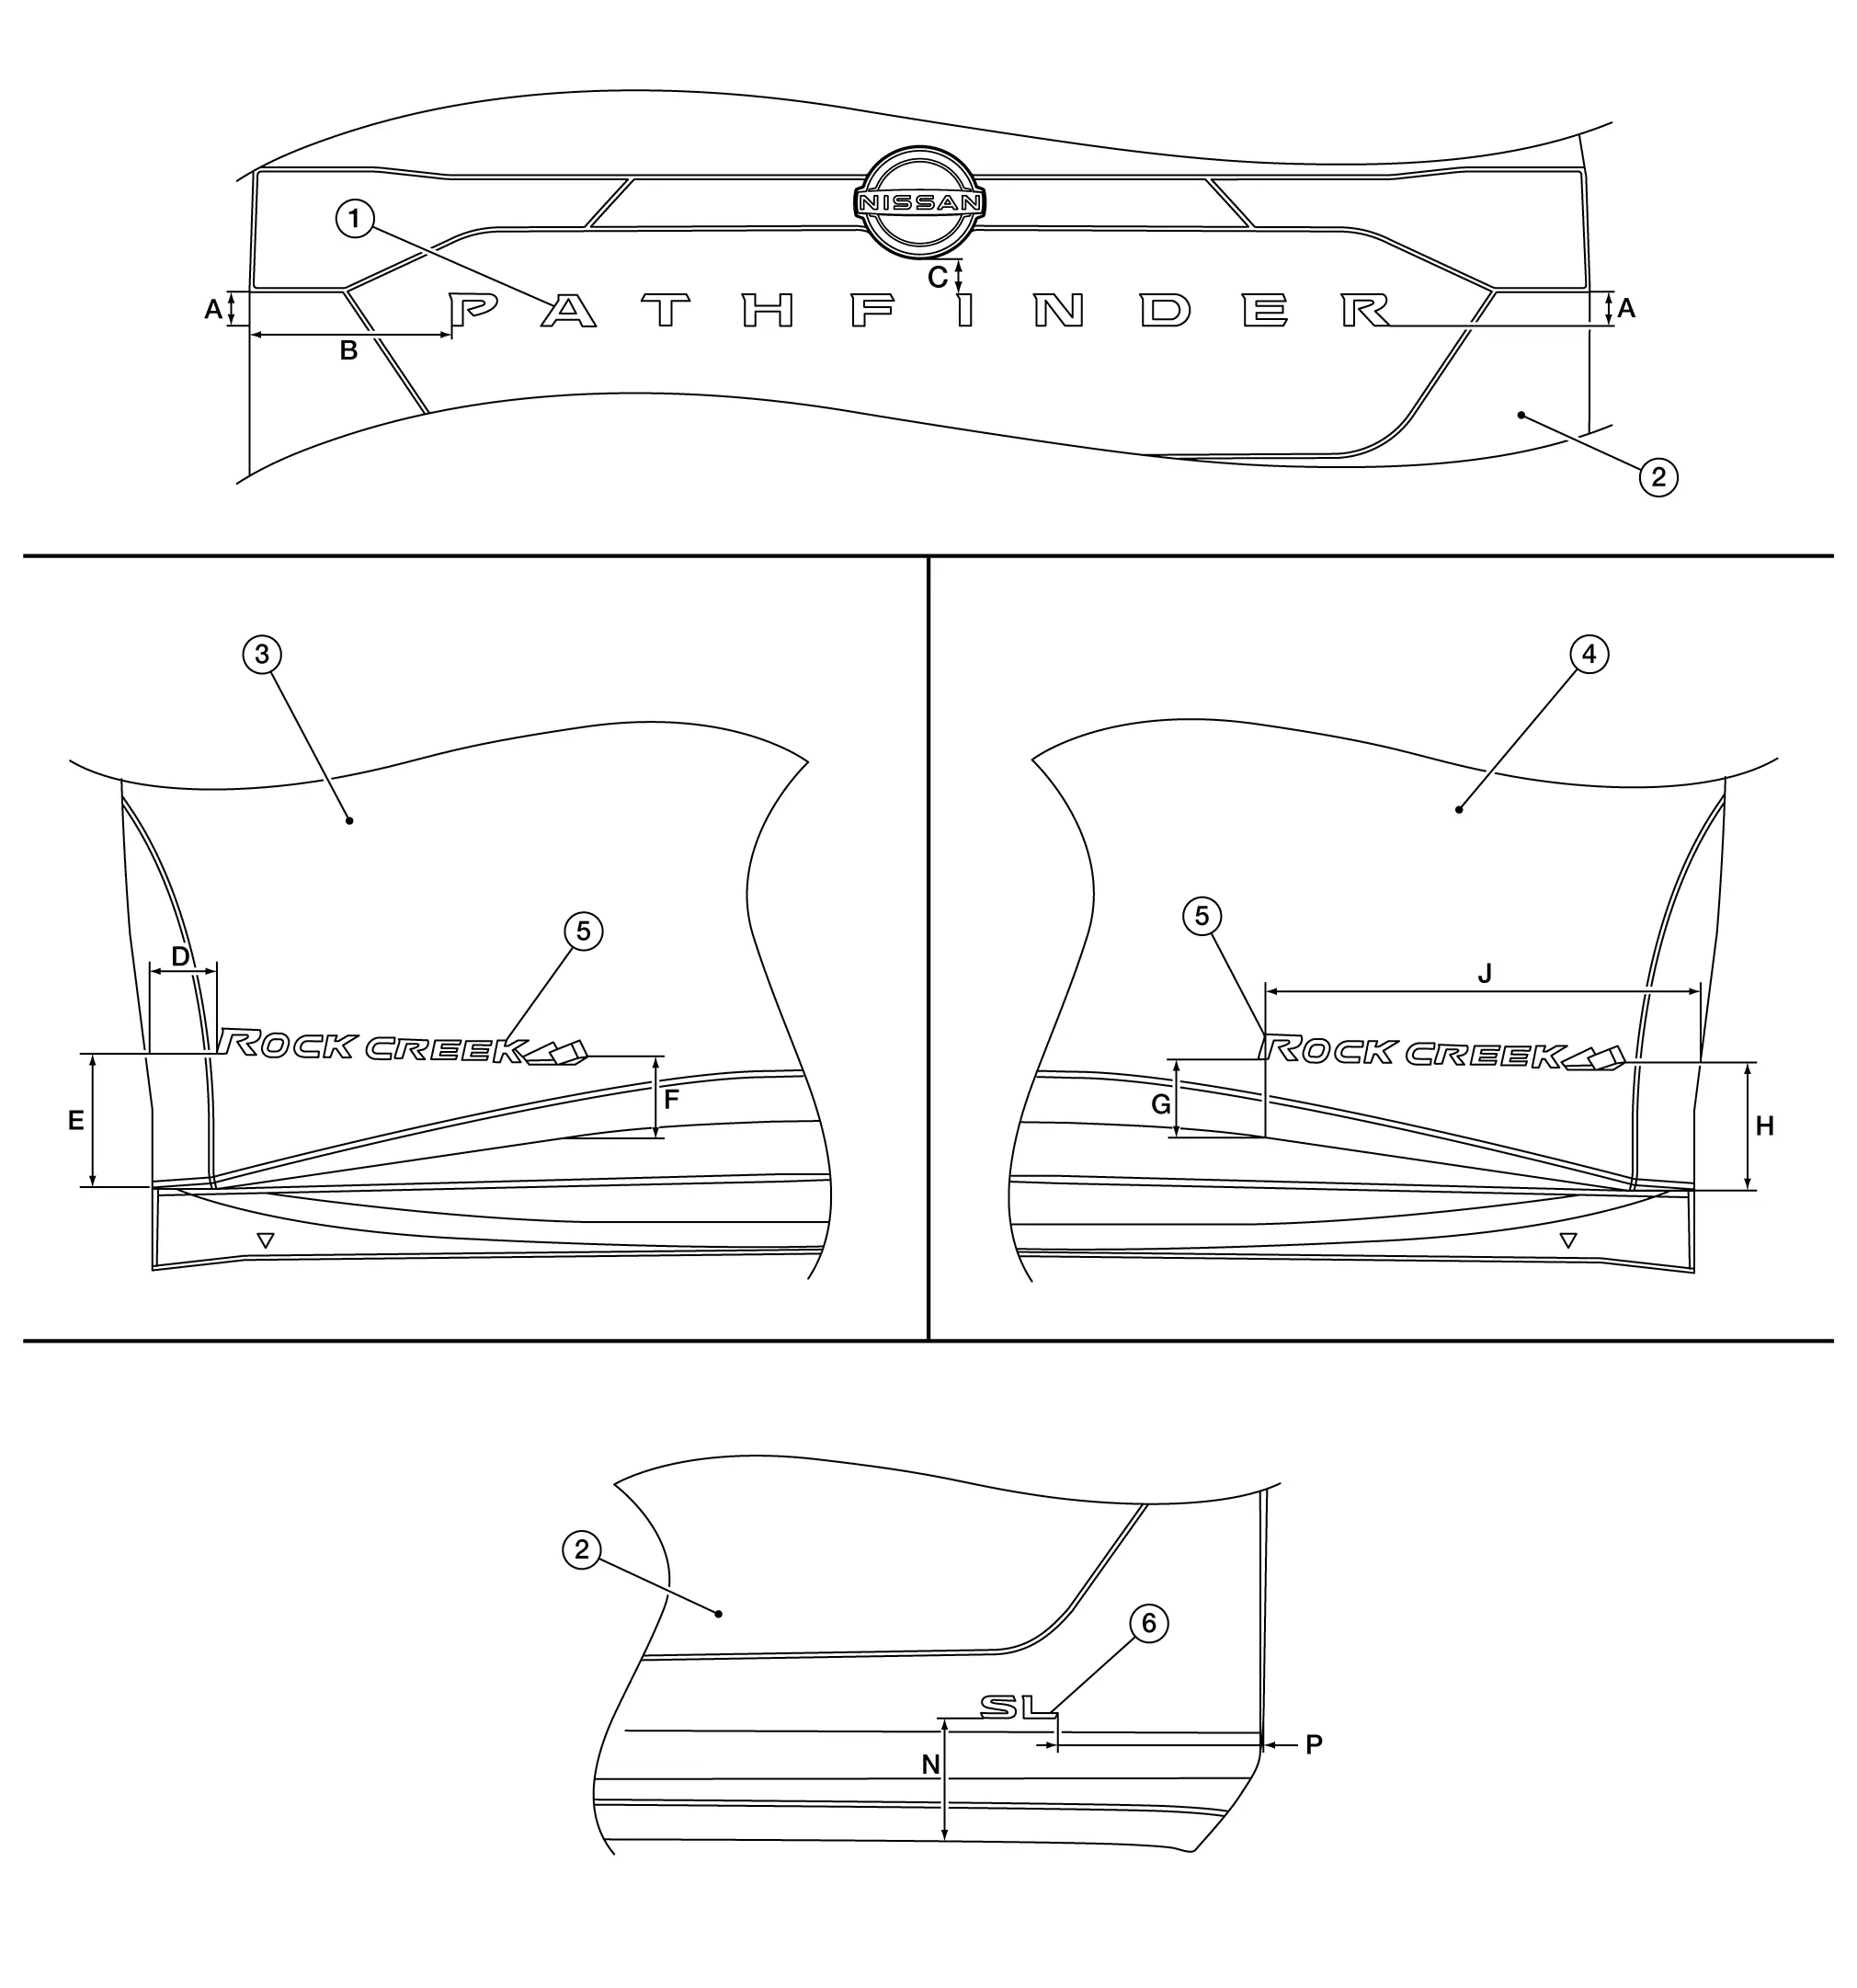
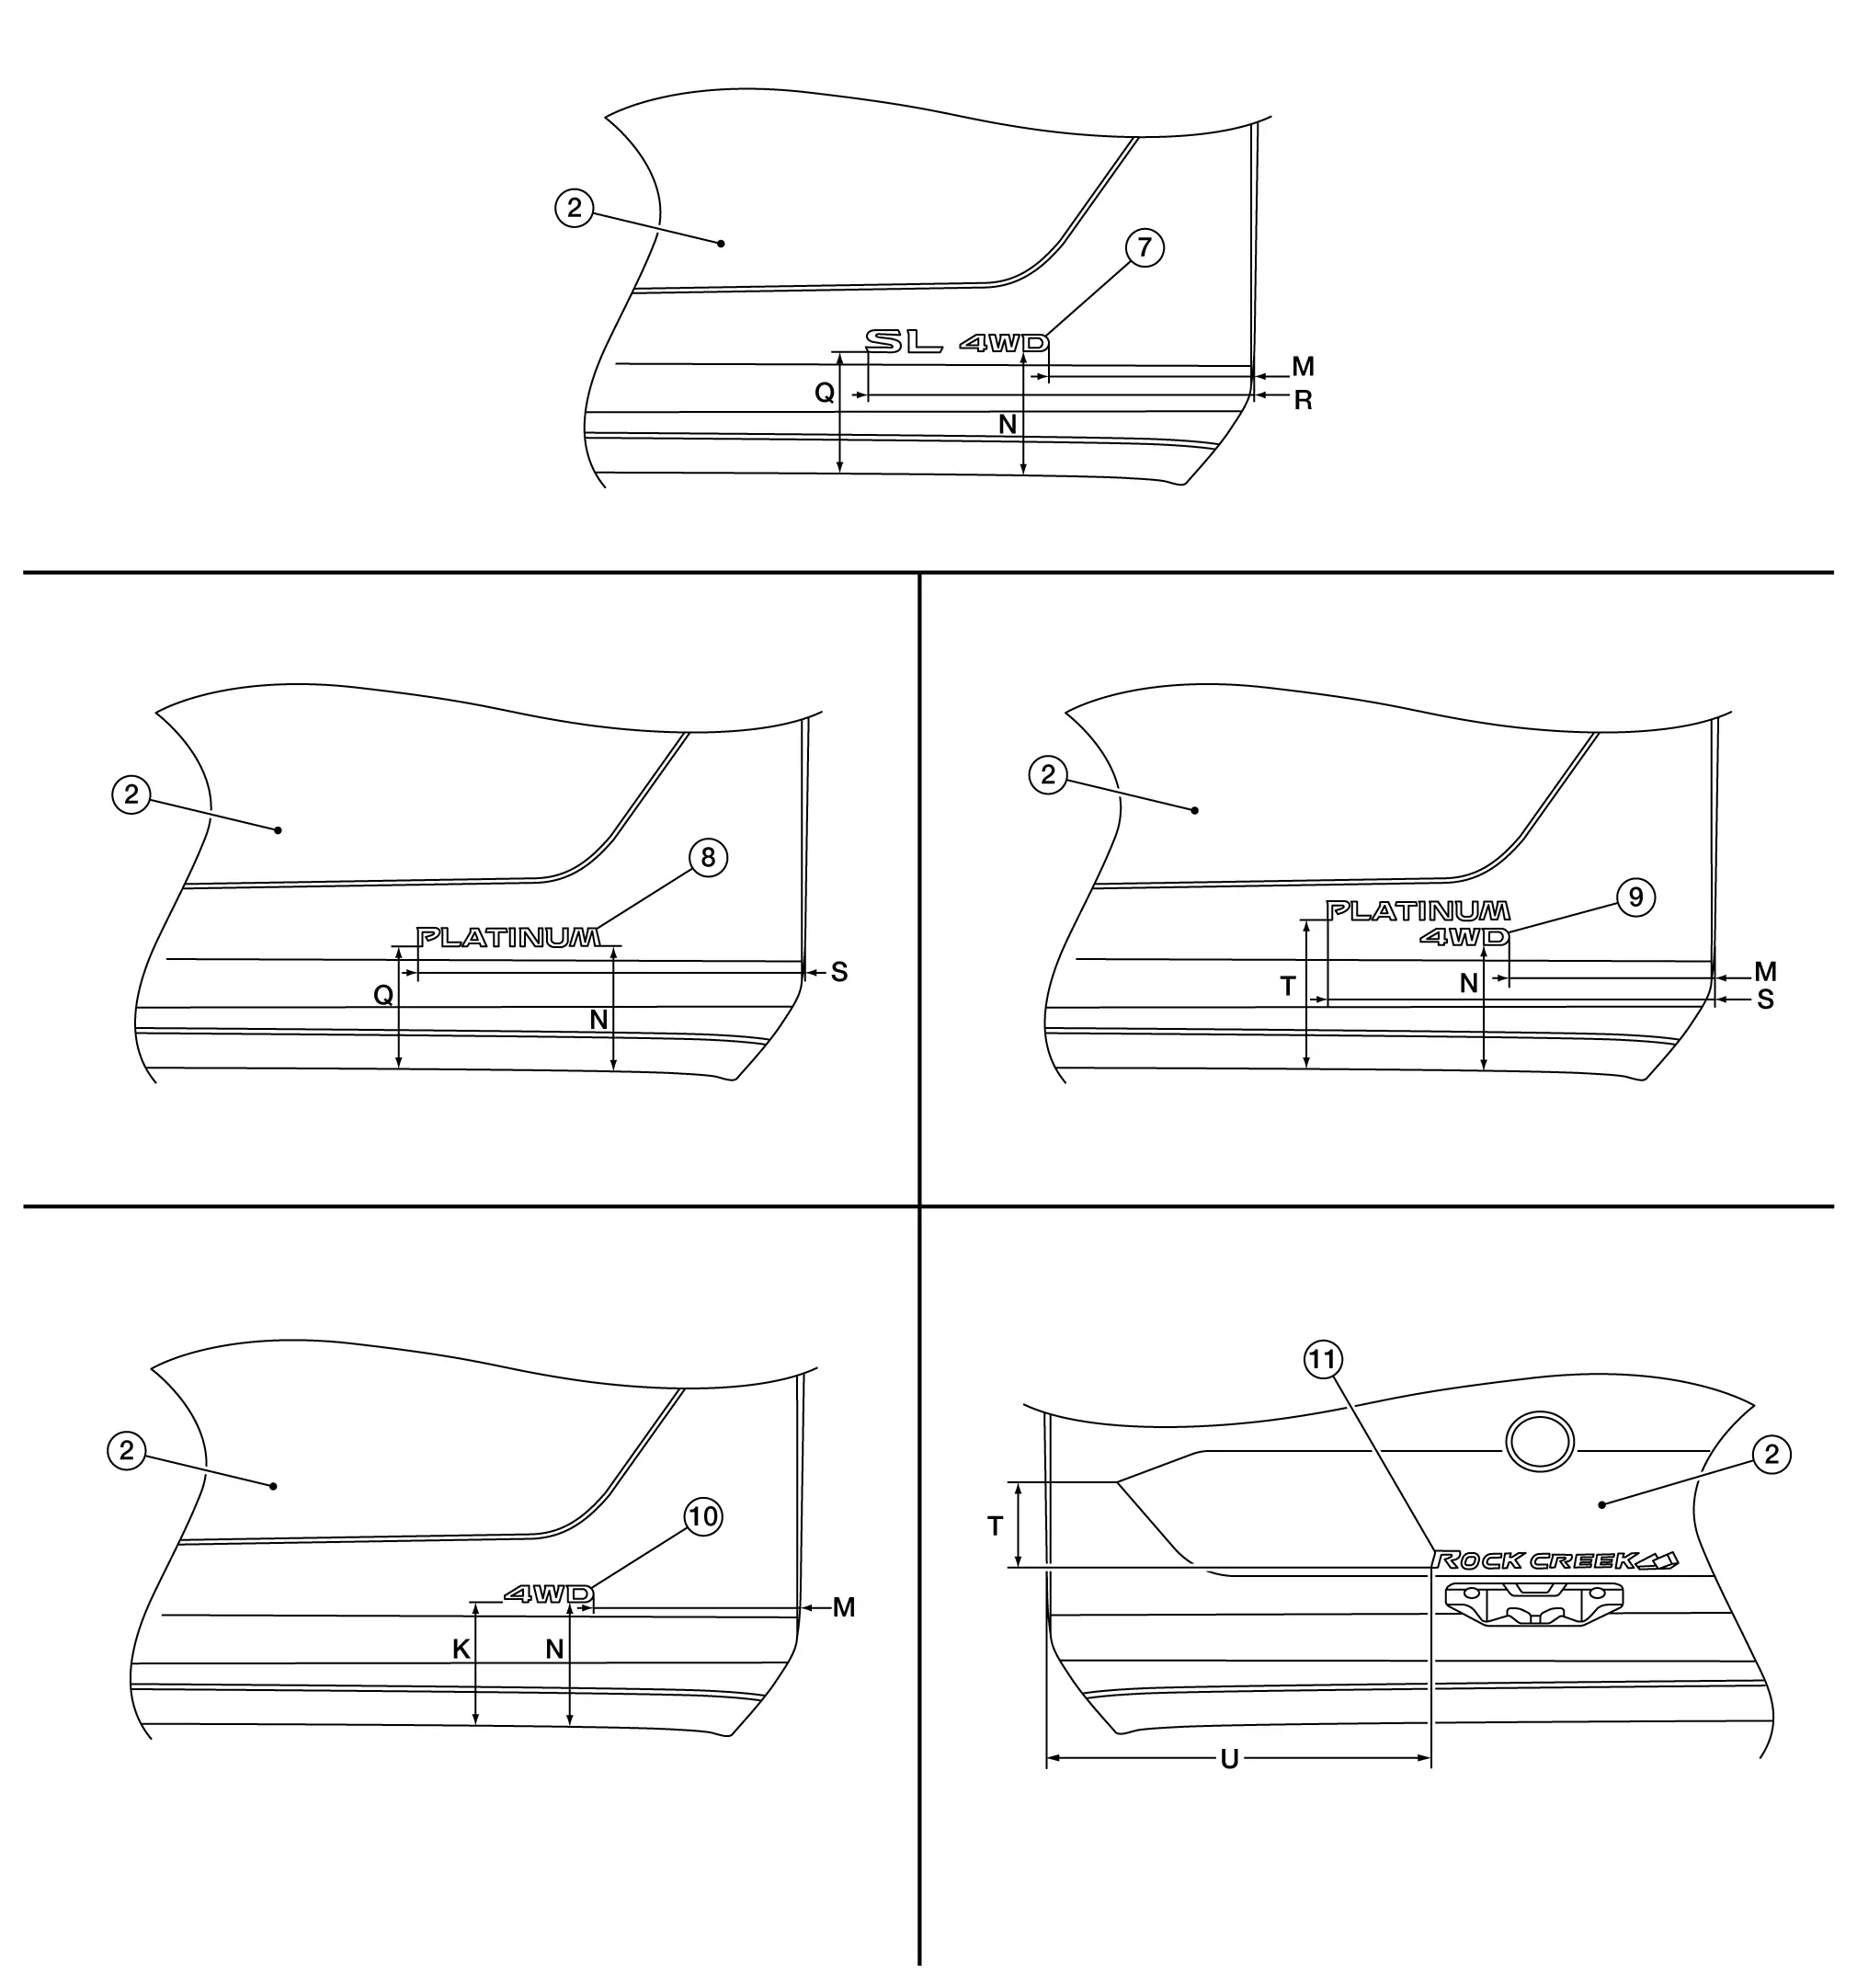
| 1. | Emblem A | 2. | Back door assembly | 3. | Driver door assembly |
| 4. | Passenger door assembly | 5. | Emblem B (if equipped) | 6. | Emblem C (if equipped) |
| 7. | Emblem D (if equipped) | 8. | Emblem E (if equipped) | 9. | Emblem F (if equipped) |
| 10. | Emblem G (if equipped) | 11. | Emblem H (if equipped) |
Unit: mm (in)
| A | : 36 (1.42) | B | : 218 (8.58) | C | : 33 (1.30) | D | : 67 (2.64) |
| E | : 130 (5.12) | F | : 93 (3.66) | G | : 86 (3.39) | H | : 138 (5.43) |
| J | : 437 (17.20) | K | : 127 (5.0) | M | : 202 (7.95) | N | : 128 (5.04) |
| P | : 207 (8.15) | Q | : 126 (4.96) | R | : 380 (14.96) | S | : 382 (15.04) |
| T | : 152 (5.98) | U | : 572 (22.52) |