Rear Suspension - Rear Suspension Assembly
On-vehicle Service
Check the suspension parts for excessive play, cracks, wear or damage. Shake each rear wheel to check for excessive play.
Retighten all nuts and bolts to the specified torque.
Make sure that each cotter pin is installed (if equipped).
Check the wheelarch height. Refer to Wheelarch Height.
Check the suspension ball joint for grease leakage and the ball joint dust cover for cracks or other damage.
Inspection
COMPONENT PART
Check the rear suspension for the following:
Check each component for looseness or play.
Inspect each component for abnormal wear or damage.
Ball Joint Axial End Play

Check ball joint boots for cracks or other damage. If there are cracks or other damage, replace the rear suspension arm.
Move axle side of rear suspension arm up and down by hand.

Oil Leakage Inspection
If oil (A) does not extend beyond the spring seat (B) or upper half (C) of the strut/shock absorber (1), this is slight oil seepage and the strut/shock absorber should not be replaced.
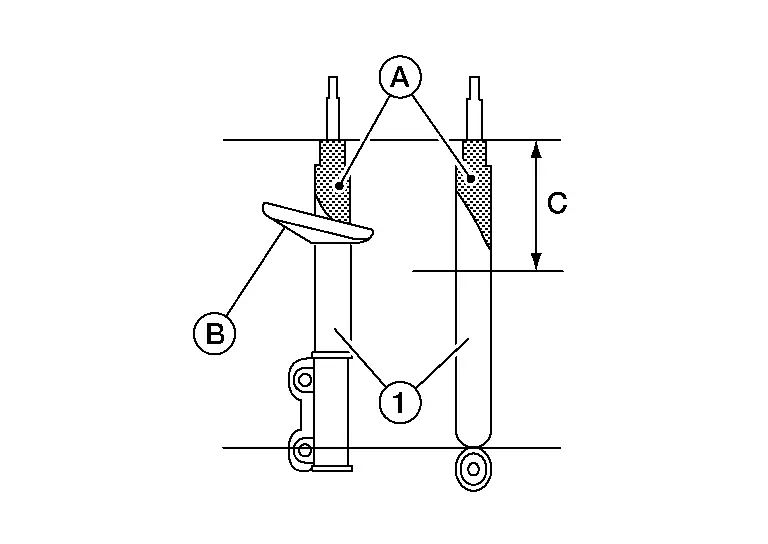
If oil (A) does extend beyond the spring seat (B) or upper half (C) of strut/shock absorber (1) as shown, perform the following.

Use a finger to touch the oil that has extended beyond the spring seat or upper half of the strut/ shock absorber.
If the oil layer is thick and contains large pieces of dust and debris, replace the strut/shock absorber.
If the oil layer is thin and does not contain large pieces of dust and debris, do not replace the strut/shock absorber.
Suspension Arm
Check the suspension arm for damage, cracks, deformation and replace if necessary.
Check the rubber bushings for damage, cracks, or deformation. Replace suspension arm if necessary.
Radius Rod
Check the radius rod for any deformation, cracks, or damage and replace if necessary.
After installing the radius rod, check the wheel alignment and adjust if necessary. Refer to Wheel Alignment (Unladen*).
Front Lower Link
Check the front lower link for any deformation, cracks, or damage and replace if necessary.
Upper And Lower Rubber Seats
Check the upper and lower rubber seats for deterioration or cracks and replace if necessary.
Rear Lower Link And Coil Spring
Check the rear lower link and coil spring for any deformation, cracks, or other damage and replace if necessary.
Stabilizer Bar
Check the stabilizer bar and clamps for any deformation, cracks or damage and replace if necessary.
Check the rubber bushings for deterioration or cracks, and replace if necessary.
Inspection and Adjustment
Before checking the rear wheel alignment, make a preliminary inspection.
Measure the wheel alignment under unladen conditions.
PRELIMINARY INSPECTION
Check the tires for wear and for improper inflation.
Check the wheels for deformation, cracks, and other damage. Remove the wheel and check the wheel runout. Refer to Adjustment.
Check the rear wheel bearings for looseness.
Check the rear suspension for looseness.
Check that the rear shock absorbers work properly.
Check the wheelarch height in the unladen condition. Refer to Wheelarch Height.
GENERAL INFORMATION AND RECOMMENDATIONS
A Four-Wheel Thrust Alignment should be performed.
This type of alignment is recommended for any NISSAN/INFINITI Nissan Pathfinder vehicle.
The four-wheel “thrust” process helps ensure that the vehicle is properly aligned and the steering wheel is centered.
The alignment machine itself should be capable of accepting any NISSAN/INFINITI Nissan Pathfinder vehicle.
The alignment machine should be checked to ensure that it is level.
Make sure the alignment machine is properly calibrated.
Your alignment machine should be regularly calibrated in order to give correct information.
Check with the manufacturer of your specific alignment machine for their recommended Service/Calibration Schedule.
THE ALIGNMENT PROCESS
IMPORTANT: Use only the alignment specifications listed in this Service Manual. Refer to Wheel Alignment (Unladen*).
When displaying the alignment settings, many alignment machines use “indicators”: (Green/red, plus or minus, Go/No Go). Do NOT use these indicators.
The alignment specifications programmed into your alignment machine that operate these indicators may not be correct.
This may result in an ERROR.
Most camera-type alignment machines are equipped with both "Rolling Compensation" method and optional "Jacking Compensation" method to "compensate" the alignment targets or head units.
"Rolling Compensation" is the preferred method.
If using the "Rolling Compensation" method, after installing the alignment targets or head units, push or pull on the rear wheel to move the Nissan Pathfinder vehicle. Do not push or pull the vehicle body.
If using the "Jacking Compensation" method, after installing the alignment targets or head units, raise the Nissan Pathfinder vehicle and rotate the wheels 1/2 turn both ways.
Follow all instructions for the alignment machine you're using for more information.
CAMBER
Measure the camber of both the right and left wheels using a suitable alignment gauge and adjust using the following procedure.
Camber : Refer to Wheel Alignment (Unladen*). If the camber is not within specification, adjust the camber by turning the adjusting bolts (A) in the same direction.
Turn the adjusting bolts (A) in the same direction to calibrate.
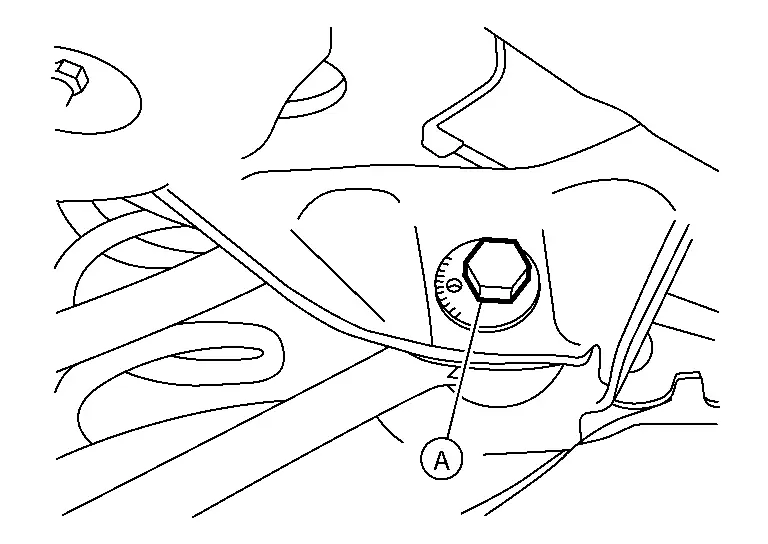
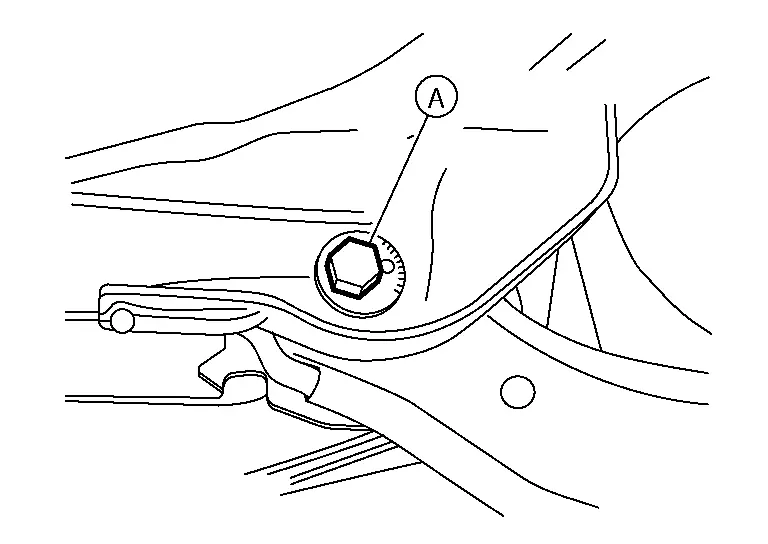
Tighten the adjusting bolt nuts to the specified torque.
| Adjusting bolt nuts | : Refer to Exploded View. |
TOE-IN
Measure the toe-in of the rear wheels. If out of specification, inspect and replace any damaged or worn rear suspension parts before adjusting.
Total toe-in : Refer to Wheel Alignment (Unladen*). Adjust toe-in by turning adjusting bolt (A) on rear lower link.

After adjusting, tighten the adjusting bolt nut to the specified torque.
Adjusting bolt nut : Refer to Exploded View.