Interior Lighting System - Dtc/circuit Diagnosis

In this manual: Interior Lighting System - Dtc/circuit Diagnosis
General Information — 8Engine :: Engine Mechanical — 19Engine Lubrication System - Precautions. Preparation — 1Engine Lubrication System - Lubrication System (System Description). Engine Oil Pressure (Basic Inspection). Service Data and Specifications (SDS) — 1Engine Cooling System - Precautions. Preparation. Service Data and Specifications (SDS) — 1Engine Cooling System - Engine Coolant — 1Engine Control System - System Description — 1System Description - Component Parts ++ — 1System Description - System ++ — 1Engine Control System - Ecu Diagnosis Information — 1Ecu Diagnosis Information - Ecm ++ — 1Engine Control System - Basic Inspection — 1Basic Inspection - Diagnosis and Repair Workflow ++ — 1Basic Inspection - Basic Inspection ++ — 1Basic Inspection - Additional Service When Replacing Ecm ++ — 1Basic Inspection - Fuel Pressure Check ++ — 1Basic Inspection - How to Set Srt Code ++ — 1Basic Inspection - How to Erase Permanent Dtc ++ — 1Engine Control System - Dtc/circuit Diagnosis — 1Engine Control System - Symptom Diagnosis — 1Engine Control System - Periodic Maintenance — 1Engine Control System - Removal and Installation — 1Fuel System - Precautions. Preparation. Service Data and Specifications (SDS) — 1Fuel System - Fuel System (Periodic Maintenance). Fuel Level Sensor Unit (Disassembly and Assembly) — 1Exhaust System - Precautions. Preparation — 1Exhaust System - Exhaust System (Periodic Maintenance). Exhaust System (Removal and Installation) — 1Starting System - Precautions. Preparation. Starter Motor (Service Data and Specifications (sds)) — 1Starting System - Diagnosis and Repair Work Flow — 1Starting System - Starting System (Symptom Diagnosis). Starter Motor (Removal and Installation) — 1Accelerator Control System - Precautions. Service Data and Specifications (SDS) — 1Accelerator Control System - Accelerator Pedal Assembly — 1Transmission & Driveline :: Transaxle & Transmission — 21Driveline - System Description — 1Transfer: Ty92b - Ecu Diagnosis Information. Awd Control Unit ++ — 1Driveline - Basic Inspection — 1Driveline - Dtc/circuit Diagnosis — 1Driveline - Symptom Diagnosis — 1Driveline - Removal and Installation — 1Transfer: Ty92b - Unit Removal and Installation. Transfer Assembly ++ — 1Driveline - Unit Disassembly and Assembly — 1Driveline - Basic Inspection — 1Driveline - Removal and Installation — 1Driveline - Unit Disassembly and Assembly — 1Front Axle - Precautions. Preparation — 1Front Axle - Noise, Vibration and Harshness (nvh) Troubleshooting (Symptom Diagnosis). Service Data and Specifications (SDS) — 1Front Axle - Front Drive Shaft Boot — 1Front Axle - Front Drive Shaft — 1Rear Axle - Precautions. Preparation. Service Data and Specifications (SDS) — 1Rear Axle - Noise, Vibration and Harshness (nvh) Troubleshooting — 1Rear Axle - Rear Drive Shaft — 1Suspension :: Front Suspension — 7Rear Suspension - Precautions. Preparation — 1Rear Suspension - Noise, Vibration and Harshness (nvh) Troubleshooting (Symptom Diagnosis). Service Data and Specifications (SDS) — 1Rear Suspension - Rear Suspension Assembly — 1Road Wheels & Tires - Precautions — 1Road Wheels & Tires - Preparation. Bcm (Ecu Diagnosis Information). Service Data and Specifications (SDS) — 1Road Wheels & Tires - System — 1Brakes :: Brake System — 9Parking Brake System - Precautions. Preparation — 1Parking Brake System - System — 1Vdc/tcs/abs - Precautions ++ — 1Brake Control System - System Description — 1System Description - Component Parts ++ — 1System Description - System ++ — 1Brake Control System - Basic Inspection — 1Brake Control System - Symptom Diagnosis — 1Brake Control System - Removal and Installation — 1Brake Control System - System Description — 1Brake Control System - Dtc/circuit Diagnosis — 1Brake Control System - Removal and Installation — 1Brake Control System - System Description — 1Brake Control System - Basic Inspection — 1Brake Control System - Symptom Diagnosis — 1Brake Control System - System Description — 1Brake Control System - Basic Inspection — 1Brake Control System - Symptom Diagnosis — 1Steering :: Steering System — 9Steering Control System - Precautions — 1Steering Control System - System — 1Steering Control System - Eps Control Unit (Ecu Diagnosis Information. Removal and Installation) — 1Restraints :: Seat Belt — 7Srs Air Bag - Precautions. Preparation — 1Srs Air Bag - Collision Diagnosis — 1Srs Air Bag - Occupant Classification System — 1Srs Air Bag Control System - Precautions — 1Srs Air Bag Control System - System — 1Srs Air Bag Control System - Diagnosis Sensor Unit — 1Srs Air Bag Control System - Inspection and Adjustment — 1Ventilation, Heater & Air Conditioner :: Ventilation System — 6Heater & Air Conditioning System - Precautions — 1Heater & Air Conditioning System - Preparation — 1Heater & Air Conditioning System - Component Parts — 1Heater & Air Conditioning System - Diagnosis and Repair Work Flow — 1Heater & Air Conditioning System - Compressor — 1Heater & Air Conditioning System - Cooler Pipe and Hose — 1Heater & Air Conditioning System - Condenser. Condenser — 1Heater & Air Conditioning System - Heating and Cooling Unit Assembly — 1Heater & Air Conditioning System - Service Data and Specifications (SDS) — 1Heater & Air Conditioning Control System - System Description — 1System Description - Component Parts ++ — 1System Description - System ++ — 1System Description - Operation ++ — 1Heater & Air Conditioning Control System - Ecu Diagnosis Information — 1Heater & Air Conditioning Control System - Basic Inspection — 1Heater & Air Conditioning Control System - Dtc/circuit Diagnosis — 1Heater & Air Conditioning Control System - Symptom Diagnosis — 1Heater & Air Conditioning Control System - Removal and Installation — 1Body Interior :: Interior — 8Instrument Panel - Precautions. Preparation. Clip List — 1Instrument Panel - Squeak and Rattle Trouble Diagnoses — 1Instrument Panel - Cluster Lid C — 1Seat - Precautions — 1Seat - Preparation. Clip List — 1Seat - Component Parts — 1Seat - System — 1Seat - Diagnosis and Repair Work Flow — 1Seat - Front Seat — 1Seat - Second Row Seats — 1Seat - Third Row Seats — 1Seat - Front Seat — 1Seat - Second Row Seat — 1Seat - Third Row Seat — 1Automatic Drive Positioner - Precautions. Preparation — 1Automatic Drive Positioner - System — 1Automatic Drive Positioner - Diagnosis and Repair Work Flow — 1Automatic Drive Positioner - Inspection and Adjustment — 1Body Exterior, Doors, Roof & Vehicle Security :: Door & Lock — 38Security Control System - Precautions — 1Security Control System - System — 1Security Control System - Ecm, Bcm, Intelligent Key Unit, Ipdm E/r — 1Security Control System - Vehicle Security System Cannot Be Set — 1Glass & Window System - Precautions. Preparation — 1Glass & Window System - Squeak and Rattle Trouble Diagnoses — 1Power Window Control System - Precautions. Preparation — 1Power Window Control System - Power Supply and Ground Circuit — 1Power Window Control System - Power Window Motor Circuit — 1Power Window Control System - Front Power Window Rh Alone Does Not Operate — 1Power Window Control System - Rear Lh Side Power Window Alone Does Not Operate — 1Power Window Control System - Rear Rh Side Power Window Alone Does Not Operate — 1Roof - Precautions. Preparation — 1Roof - Power Supply and Ground Circuit — 1Roof - Moonroof Switch Assembly — 1Roof - Lin Communication Circuit — 1Roof - Auto Operation Does Not Operate — 1Roof - Anti-Pinch Function Does Not Operate — 1Exterior - Precautions. Preparation. Clip List (Preparation) — 1Exterior - Squeak and Rattle Trouble Diagnoses — 1Exterior - Fender Protector — 1Exterior - Over Fender — 1Exterior - Under Cover — 1Exterior - Roof Side Rail — 1Body Repair - Service Information — 1Service Information - Sheet Metal Work ++ — 1Service Information - Body Welding and Precautions ++ — 1Service Information - Safety and Health ++ — 1Service Information - Repairing Procedures and Precautions ++ — 1Body Repair - Precaution — 1Body Repair - Preparation — 1Body Repair - Removal and Installation — 1Driver Controls :: Mirrors — 8Exterior Lighting System - System Description — 1System Description - Component Parts ++ — 1Exterior Lighting System - Basic Inspection — 1Exterior Lighting System - Dtc/circuit Diagnosis — 1Exterior Lighting System - Symptom Diagnosis — 1Exterior Lighting System - Periodic Maintenance — 1Exterior Lighting System - Removal and Installation — 1Interior Lighting System - Precautions. Preparation — 1Interior Lighting System - Component Parts. Interior Lighting System — 1Interior Lighting System - System — 1Interior Lighting System - Diagnosis and Repair Work Flow — 1Interior Lighting System - Interior Lighting System Symptoms (Symptom Diagnosis). Bcm (Ecu Diagnosis Information). Service Data and Specifications (SDS) — 1Interior Lighting System - Foot Lamp — 1Wiper & Washer - Precautions — 1Wiper & Washer - Preparation. Bcm, Ipdm E/r (Ecu Diagnosis Information). Service Data and Specifications (SDS) — 1Wiper & Washer - System — 1Wiper & Washer - Diagnosis and Repair Work Flow — 1Defogger - Precautions. Bcm, A/c Auto Amp. (Ecu Diagnosis Information) — 1Defogger - Diagnosis and Repair Work Flow — 1Horn - Precautions — 1Electrical & Power Control :: Power Outlet — 13Body Control System - Precautions. Preparation — 1Body Control System - Component Parts — 1Body Control System - System — 1Body Control System - Diagnosis System (bcm) — 1Body Control System - Bcm — 1Lan System - System Description — 1Lan System - System Description — 1Lan System - Dtc/circuit Diagnosis — 1Lan System - System Description — 1Lan System - Dtc/circuit Diagnosis — 1Power Control System - System Description — 1Power Control System - Basic Inspection — 1Power Control System - Dtc/circuit Diagnosis — 1Power Control System - System Description — 1Power Control System - Basic Inspection — 1Power Control System - Dtc/circuit Diagnosis — 1Power Control System - Removal and Installation — 1Charging System - Precautions. Preparation. Ecm, Ipdm E/r (Ecu Diagnosis Information) — 1Charging System - Diagnosis and Repair Work Flow — 1Charging System - Charging System (Symptom Diagnosis). Generator (Removal and Installation). Service Data and Specifications (SDS) — 1Power Supply, Ground & Circuit Elements - Precautions. Preparation. Service Data and Specifications (SDS) — 1Driver Information & Multimedia :: Meter, Warning Lamp & Indicator — 25Warning Chime System - Application Notice (How to Use This Manual). Precautions — 1Warning Chime System - System — 1Warning Chime System - Diagnosis System (combination Meter) — 1Warning Chime System - Bcm, Combination Meter (Ecu Diagnosis Information). Diagnosis and Repair Work Flow (Basic Inspection) — 1Sonar System - Precautions. Preparation — 1Sonar System - Sonar Control Unit — 1Dtc/circuit Diagnosis - B2720 Corner Sensor [rl] ++ — 1Audio, Visual & Navigation System - System Description — 1System Description - Component Parts ++ — 1System Description - System ++ — 1Audio, Visual & Navigation System - Ecu Diagnosis Information — 1Audio, Visual & Navigation System - Basic Inspection — 1Audio, Visual & Navigation System - Dtc/circuit Diagnosis — 1Dtc/circuit Diagnosis - Multi Av (av Control Unit) ++ — 1Audio, Visual & Navigation System - Symptom Diagnosis — 1Symptom Diagnosis - Multi Av System ++ — 1Audio, Visual & Navigation System - Removal and Installation — 1Audio, Visual & Navigation System - System Description — 1Audio, Visual & Navigation System - Ecu Diagnosis Information — 1Audio, Visual & Navigation System - Basic Inspection — 1Audio, Visual & Navigation System - Dtc/circuit Diagnosis — 1Audio, Visual & Navigation System - Symptom Diagnosis — 1Audio, Visual & Navigation System - Removal and Installation — 1Audio, Visual & Navigation System - System Description — 1Audio, Visual & Navigation System - Basic Inspection — 1Audio, Visual & Navigation System - Dtc/circuit Diagnosis — 1Audio, Visual & Navigation System - Symptom Diagnosis — 1Audio, Visual & Navigation System - Removal and Installation — 1Audio, Visual & Navigation System - System Description — 1Audio, Visual & Navigation System - Basic Inspection — 1Audio, Visual & Navigation System - Dtc/circuit Diagnosis — 1Audio, Visual & Navigation System - Symptom Diagnosis — 1Audio, Visual & Navigation System - Removal and Installation — 1Cruise Control & Driver Assistance :: Cruise Control System — 17Driver Assistance System - System Description — 1Driver Assistance System - Basic Inspection — 1Driver Assistance System - Dtc/circuit Diagnosis — 1Driver Assistance System - System Description — 1System Description - Component Parts ++ — 1System Description - System ++ — 1System Description - Operation ++ — 1System Description - Handling Precaution ++ — 1Driver Assistance System - Ecu Diagnosis Information — 1Driver Assistance System - Basic Inspection — 1Basic Inspection - Distance Sensor Alignment ++ — 1Basic Inspection - Camera Aiming Adjustment ++ — 1Basic Inspection - Action Test ++ — 1Driver Assistance System - Dtc/circuit Diagnosis — 1Dtc/circuit Diagnosis - Laser/radar (distance Sensor) ++ — 1Dtc/circuit Diagnosis - Lane Camera (front Camera Unit) ++ — 1Driver Assistance System - Symptom Diagnosis — 1Driver Assistance System - Removal and Installation — 1Driver Assistance System - System Description — 1System Description - System ++ — 1Driver Assistance System - Basic Inspection — 1Driver Assistance System - Dtc/circuit Diagnosis — 1Drive Mode System - Precautions — 1Drive Mode System - Component Parts. Drive Mode System — 1Drive Mode System - System — 1Drive Mode System - Diagnosis and Repair Work Flow — 1Drive Mode System - Drive Mode Select Switch Circuit — 1Maintenance - Precautions. Preparation — 1Maintenance - General Maintenance — 1Maintenance - Periodic Maintenance — 1Maintenance - Recommended Fluids and Lubricants — 1Maintenance - Engine Maintenance — 1Maintenance - Chassis and Body Maintenance — 1Engine Lubrication System - Periodic Maintenance — 1Engine Lubrication System - Removal and Installation — 1Engine Cooling System - System Description — 1Engine Cooling System - Removal and Installation — 1Engine Control System - Vq35dd — 1Fuel System - Removal and Installation — 1Starting System - System Description — 1Starting System - Dtc/circuit Diagnosis — 1Driveline - Transfer: Ty92b — 1Driveline - Rear Propeller Shaft: 3fcj-Cvj — 1Driveline - Rear Final Drive: R145 — 1Front Axle - Periodic Maintenance — 1Front Axle - Removal and Installation — 1Rear Axle - Periodic Maintenance — 1Rear Axle - Removal and Installation — 1Rear Suspension - Removal and Installation — 1Road Wheels & Tires - System Description — 1Road Wheels & Tires - Basic Inspection — 1Road Wheels & Tires - Dtc/circuit Diagnosis — 1Road Wheels & Tires - Symptom Diagnosis — 1Road Wheels & Tires - Periodic Maintenance — 1Road Wheels & Tires - Removal and Installation — 1Parking Brake System - System Description — 1Parking Brake System - Basic Inspection — 1Parking Brake System - Dtc/circuit Diagnosis — 1Parking Brake System - Symptom Diagnosis — 1Parking Brake System - Removal and Installation — 1Brake Control System - Vdc/tcs/abs — 1Brake Control System - Automatic Brake Hold — 1Brake Control System - Automatic Emergency Braking — 1Brake Control System - Rear Automatic Braking — 1Steering Control System - System Description — 1Steering Control System - Basic Inspection — 1Steering Control System - Dtc/circuit Diagnosis — 1Steering Control System - Symptom Diagnosis — 1Srs Air Bag - Removal and Installation — 1Srs Air Bag Control System - System Description — 1Srs Air Bag Control System - Basic Inspection — 1Srs Air Bag Control System - Symptom Diagnosis — 1Heater & Air Conditioning System - Symptom Diagnosis — 1Heater & Air Conditioning System - Periodic Maintenance — 1Heater & Air Conditioning Control System - Automatic Air Conditioning — 1Instrument Panel - Removal and Installation — 1Instrument Panel - Unit Disassembly and Assembly — 1Seat - Ecu Diagnosis Information — 1Seat - Dtc/circuit Diagnosis — 1Seat - Symptom Diagnosis — 1Automatic Drive Positioner - System Description — 1Automatic Drive Positioner - Ecu Diagnosis Information — 1Automatic Drive Positioner - Dtc/circuit Diagnosis — 1Automatic Drive Positioner - Symptom Diagnosis — 1Automatic Drive Positioner - Removal and Installation — 1Security Control System - System Description — 1Security Control System - Basic Inspection — 1Security Control System - Dtc/circuit Diagnosis — 1Security Control System - Symptom Diagnosis — 1Security Control System - Removal and Installation — 1Glass & Window System - Removal and Installation — 1Power Window Control System - System Description — 1Power Window Control System - Ecu Diagnosis Information — 1Power Window Control System - Basic Inspection — 1Power Window Control System - Dtc/circuit Diagnosis — 1Power Window Control System - Symptom Diagnosis — 1Power Window Control System - Removal and Installation — 1Roof - System Description — 1Roof - Ecu Diagnosis Information — 1Roof - Basic Inspection — 1Roof - Dtc/circuit Diagnosis — 1Roof - Symptom Diagnosis — 1Roof - Removal and Installation — 1Exterior - System Description — 1Exterior - Removal and Installation — 1Body Repair - Repair Information — 1Exterior Lighting System - Led Headlamp — 1Interior Lighting System - Dtc/circuit Diagnosis — 1Interior Lighting System - Removal and Installation — 1Wiper & Washer - System Description — 1Wiper & Washer - Dtc/circuit Diagnosis — 1Wiper & Washer - Symptom Diagnosis — 1Wiper & Washer - Removal and Installation — 1Defogger - System Description — 1Defogger - Dtc/circuit Diagnosis — 1Defogger - Symptom Diagnosis — 1Defogger - Removal and Installation — 1Horn - Removal and Installation — 1Body Control System - Basic Inspection — 1Body Control System - Dtc/circuit Diagnosis — 1Body Control System - Symptom Diagnosis — 1Body Control System - Removal and Installation — 1Lan System - Can Fundamental — 1Lan System - Can — 1Lan System - Can Gateway — 1Power Control System - Ipdm E/r — 1Power Control System - Power Distribution System — 1Charging System - System Description — 1Charging System - Dtc/circuit Diagnosis — 1Power Supply, Ground & Circuit Elements - System Description — 1Power Supply, Ground & Circuit Elements - Basic Inspection — 1Power Supply, Ground & Circuit Elements - Removal and Installation — 1Warning Chime System - System Description — 1Warning Chime System - Dtc/circuit Diagnosis — 1Warning Chime System - Symptom Diagnosis — 1Sonar System - System Description — 1Sonar System - Basic Inspection — 1Sonar System - Dtc/circuit Diagnosis — 1Sonar System - Symptom Diagnosis — 1Sonar System - Removal and Installation — 1Audio, Visual & Navigation System - Nissanconnect — 1Audio, Visual & Navigation System - Intelligent Around View Monitor System — 1Audio, Visual & Navigation System - Rear View Monitor System — 1Audio, Visual & Navigation System - Telematics System — 1Driver Assistance System - Adas Control Unit 2 — 1Driver Assistance System - Driver Assistance System — 1Driver Assistance System - Chassis Control — 1Drive Mode System - Removal and Installation — 1Dtc/circuit Diagnosis (C053c Wheel Speed Sensor ... U2141 Can Comm Circuit) — 1Dtc/circuit Diagnosis (P0011 Intake Valve Timing Control ... P0111 Iat Sensor) — 1Dtc/circuit Diagnosis (P0116 Engine Coolant Temperature Sensor ... P025b Fuel Pump Module a) — 1Dtc/circuit Diagnosis (P026b Injection Timing ... P0420 Three Way Catalyst Function) — 1Dtc/circuit Diagnosis (P0441 Evap Control System ... P0524 Engine Oil Pressure) — 1Dtc/circuit Diagnosis (P0532 A/c Refrigerant Pressure Sensor ... P064d Ecm) — 1Dtc/circuit Diagnosis (P06da Engine Oil Pressure Control Solenoid Valve ... P1217 Engine Over Temperature) — 1Dtc/circuit Diagnosis (P1220 Fuel Pump Control Module (fpcm) ... P1574 Ascd Vehicle Speed Sensor) — 1Dtc/circuit Diagnosis (P1575 Brake Switch ... P2101 Electric Throttle Control Function) — 1Dtc/circuit Diagnosis (P2118 Throttle Control Motor ... P34ac Electric Intake Valve Timing Control Actuator) — 1Dtc/circuit Diagnosis (Active Grille Shutter ... High Pressure Fuel Pump) — 1Dtc/circuit Diagnosis (Ignition Signal ... Variable Induction Air System) — 14012 C1040 Emergency Brake — 14013 C106a Wheel Sensor — 14014 C1078-55 Not Configuration — 14015 C10b4-98 Overheat — 14016 B1001 Lap Pre-Tensioner Lh — 14017 B0001 Driver Air Bag Module — 14018 B100e Knee Air Bag Module Rh — 14019 B142x Collision Detection — 1Dtc/circuit Diagnosis (B20c7-11 A/c Clutch ... B24a6-11 in-Vehicle Sensor) — 1Dtc/circuit Diagnosis (B24a6-15 in-Vehicle Sensor ... U2140-87 Can Comm Err (ecm)) — 1Dtc/circuit Diagnosis (C1f00-1c Control Unit ... C1f04-61 Brake Sw/stop Lamp Sw) — 1Dtc/circuit Diagnosis (C1f05-49 Front Camera Unit ... C1f70-87 Ethernet Circuit) — 1
105steps
~630min
5/5difficulty
Done 0 of 105
  • Interior Room Lamp Power Supply Circuit
  • Interior Room Lamp Control Circuit
  • Map Lamp Control Circuit
  • Personal Lamp Control Circuit
  • Luggage Room Lamp Circuit
  • Foot Lamp Circuit
  • Vanity Mirror Lamp Circuit
  • Mood Lamp Circuit
  • Push-Button Ignition Switch Illumination Circuit

Interior Room Lamp Power Supply Circuit Nissan Pathfinder SUV

Diagnosis Procedure

CHECK SYMPTOM

Check symptom (A or B).

A

All the following lamps do not turn ON:

  • Map lamps

  • Personal lamp LH

  • Personal lamp RH

  • Luggage room lamp

  • Cargo lamp

  • Foot lamp LH

  • Foot lamp RH

  • Mood lamps

  • Vanity mirror lamp LH

  • Vanity mirror lamp RH

B Interior room lamp battery saver does not activate.
A>>

GO TO 2.

B>>

GO TO 7.

CHECK FUSE

  1. Ignition switch OFF.

  2. Check that the following fuse is not blown (open).

    LocationFuse No.Capacity
    Fuse block (J/B) 24 10 A

Is the fuse blown (open)?

YES>>

Replace the blown (open) fuse after repairing the cause of blown (open).

NO>>

GO TO 3.

CHECK INTERIOR ROOM LAMP RELAY CONTROL CIRCUIT 1

  1. Disconnect interior room lamp relay connector.

  2. Check voltage between interior room lamp relay harness connector and ground.

(+)(-)

Voltage

(Approx.)
Interior room lamp relay
ConnectorTerminal
J-2 1 Ground Battery voltage
3

Is the inspection result normal?

YES>>

GO TO 4.

NO>>

Replace fuse block (J/B).

CHECK INTERIOR ROOM LAMP RELAY CONTROL CIRCUIT 2

  1. Connect interior room lamp relay connector.

  2. Disconnect BCM connector.

  3. Check voltage between BCM harness connector and ground.

(+)(-)

Voltage

(Approx.)
BCM
ConnectorTerminal
M18 37 Ground Battery voltage

Is the inspection result normal?

YES>>

Replace BCM. Refer to Removal and Installation.

NO>>

GO TO 5.

CHECK INTERIOR ROOM LAMP RELAY CONTROL CIRCUIT 3

  1. Disconnect interior room lamp relay connector.

  2. Check continuity between BCM harness connector and interior room lamp relay harness connector.

    BCMInterior room lamp relayContinuity
    ConnectorTerminalConnectorTerminal
    M18 37 J-2 2 Yes

Is the inspection result normal?

YES>>

GO TO 6.

NO>>

Repair or replace harness.

CHECK INTERIOR ROOM LAMP RELAY 1

Check interior room lamp relay. Refer to Component Inspection.

Is the inspection result normal?

YES>>

Replace fuse block (J/B).

NO>>

Replace interior room lamp relay.

CHECK INTERIOR ROOM LAMP RELAY 2

Check interior room lamp relay. Refer to Component Inspection.

Is the inspection result normal?

YES>>

GO TO 8.

NO>>

Replace interior room lamp relay.

CHECK INTERIOR ROOM LAMP RELAY CONTROL CIRCUIT 4

  1. Disconnect BCM connector and interior room lamp relay connector.

  2. Check continuity between BCM harness connector and ground.

    BCM(-)Continuity
    ConnectorTerminal
    M18 37 Ground No

Is the inspection result normal?

YES>>

GO TO 9.

NO>>

Repair or replace harnesses.

CHECK INTERIOR ROOM LAMP RELAY POWER SUPPLY CIRCUIT

Check voltage between interior room lamp relay harness connector and ground.

(+)(-)

Voltage

(Approx.)
Interior room lamp relay
ConnectorTerminal
J-2 5 Ground 0 V

Is the inspection result normal?

YES>>

Replace BCM. Refer to Removal and Installation.

NO>>

Repair or replace harnesses.

Component Inspection

CHECK INTERIOR ROOM LAMP RELAY

  1. Ignition switch OFF.

  2. Disconnect interior room lamp relay connector.

  3. Check continuity between interior room lamp relay terminals.
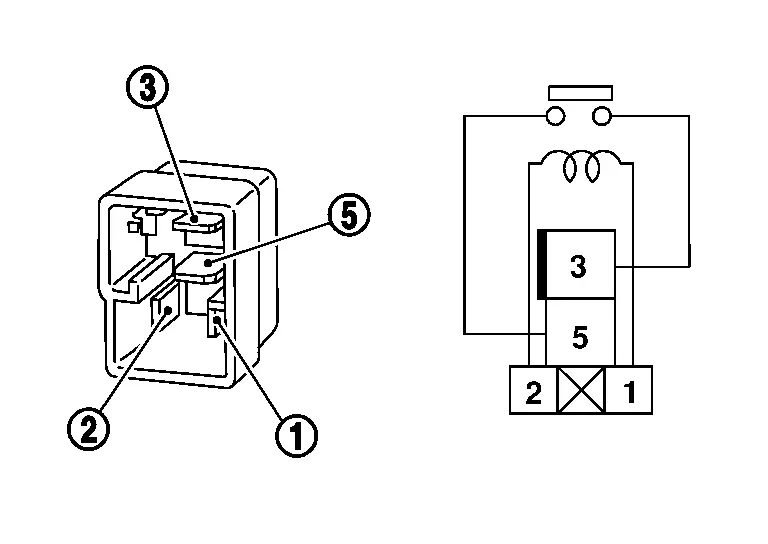
    Interior room lamp relayConditionContinuity
    Terminal
    12 V direct current supply between terminals and . Yes
    No current supply No

Is the inspection result normal?

YES>>

Inspection End.

NO>>

Replace interior room lamp relay.

Interior Room Lamp Control Circuit Nissan Pathfinder 5th Gen

Component Function Check

  • Interior room lamp power supply circuit

  • Each interior room lamp bulb

CHECK INTERIOR ROOM LAMP OPERATION

CONSULT

  1. Switch the map lamp switch to DOOR.

  2. Open the front door LH.

  3. Ignition switch ON.

  4. Select “INT LAMP” in "Active Test" mode of "BCM(INT LAMP)".

  5. With operating the test items, check that interior room lamp turns ON/OFF.

    On : Interior room lamp turns ON
    Off : Interior room lamp turns OFF

Does the interior room lamp turn ON/OFF?

YES>>

Interior room lamp control circuit is normal.

NO>>

Refer to Diagnosis Procedure.

Diagnosis Procedure

CHECK INTERIOR ROOM LAMP POWER SUPPLY CIRCUIT

  1. Ignition switch OFF.

  2. Disconnect following connectors:

    • Interior room lamp relay

    • Front room/map lamp assembly

    • Personal lamps 2nd row

    • Cargo lamp

  3. Check continuity between interior room lamp relay harness connector and each interior room lamp harness connector.

    Interior room lamp relayEach interior room lampContinuity
    ConnectorTerminalConnectorTerminal
    J-2 5 Front room/map lamp assembly R107 1 Yes
    Personal lamps 2nd row R106 2
    Cargo lamp R104 2

Is the inspection result normal?

YES>>

GO TO 2.

NO>>

Repair or replace harnesses.

CHECK INTERIOR ROOM LAMP GROUND CIRCUIT

Check continuity between each interior room lamp harness connector and ground.

Each interior room lamp(-)Continuity
ConnectorTerminal
Front room/map lamp assembly R107 2 Ground Yes
Personal lamps 2nd row R106 4
Cargo lamp R104 1

Is the inspection result normal?

YES>>

Map lamp: Replace corresponding front room/map lamp assembly bulb. Refer to Bulb or Lens Replacement.

YES>>

Personal lamp: Replace corresponding personal lamp bulb. Refer to Bulb or Lens Replacement.

YES>>

Cargo lamp: Replace cargo lamp bulb. Refer to Bulb or Lens Replacement.

NO>>

Repair or replace harnesses.

Map Lamp Control Circuit Nissan Pathfinder 5th Gen

Component Function Check

  • Interior room lamp power supply circuit

  • Interior room lamp control circuit

  • Front room/map lamp assembly bulb

CHECK MAP LAMP OPERATION

CONSULT

  1. Switch the map lamp switch to DOOR.

  2. Open the front door LH.

  3. Ignition switch ON.

  4. Select “INT LAMP” in "Active Test" mode of "BCM(INT LAMP)".

  5. With operating the test items, check that map lamp turns ON/OFF.

    On : Map lamp turns ON
    Off : Map lamp turns OFF

Does the map lamp turn ON/OFF?

YES>>

Map lamp control circuit is normal.

NO>>

Refer to Diagnosis Procedure.

Diagnosis Procedure

CHECK MAP LAMP CONTROL SIGNAL CIRCUIT 1

  1. Ignition switch OFF.

  2. Disconnect front room/map lamp assembly connector, personal lamps 2nd row connector and cargo lamp connector.

  3. Ignition switch ON.

  4. Check continuity between BCM harness connector and ground.

    BCM—ConditionContinuity
    ConnectorTerminal
    M81 130 Ground Front door LH Open Yes
    Close No

Is the inspection result normal?

YES>>

GO TO 2.

NO>>

Continuity exists and remains unchanged: GO TO 3.

NO>>

Continuity does not exist and remains unchanged: Replace BCM. Refer to Removal and Installation.

CHECK MAP LAMP CONTROL SIGNAL CIRCUIT 2

  1. Ignition switch OFF.

  2. Disconnect BCM connector.

  3. Check continuity between BCM harness connector and front room/map lamp assembly harness connector.

    BCMFront room/map lamp assemblyContinuity
    ConnectorTerminalConnectorTerminal
    M81 130 R107 4 Yes

Is the inspection result normal?

YES>>

Replace front room/map lamp assembly. Refer to Removal and Installation.

NO>>

Repair or replace harnesses.

CHECK MAP LAMP CONTROL SIGNAL CIRCUIT 3

  1. Ignition switch OFF.

  2. Disconnect BCM connector.

  3. Check continuity between BCM harness connector and ground.

    BCM—Continuity
    ConnectorTerminal
    M81 130 Ground No

Is the inspection result normal?

YES>>

Replace BCM. Refer to Removal and Installation.

NO>>

Repair or replace harnesses.

Personal Lamp Control Circuit Nissan Pathfinder 5th Gen

Component Function Check

  • Interior room lamp power supply circuit

  • Interior room lamp control circuit

  • Each personal lamp bulb

CHECK MAP LAMP OPERATION

  1. Switch the map lamp switch to DOOR.

  2. Check that map lamp turns ON when any door is opened (except back door).

Is the inspection normal?

YES>>

GO TO 2.

NO>>

Check map lamp control circuit. Refer to Component Function Check .

CHECK PERSONAL LAMP OPERATION

CONSULT

  1. Switch the map lamp switch and personal lamp switch to DOOR.

  2. Open the front door LH.

  3. Ignition switch ON.

  4. Select “INT LAMP” in "Active Test" mode of "BCM(INT LAMP)".

  5. With operating the test items, check that personal lamp turns ON/OFF.

    On : Personal lamp turns ON
    Off : Personal lamp turns OFF

Does the personal lamp turns ON/OFF?

YES>>

Personal lamp control circuit is normal.

NO>>

Refer to Diagnosis Procedure.

Diagnosis Procedure

CHECK PERSONAL LAMP CONTROL CIRCUIT

  1. Ignition switch OFF.

  2. Disconnect front room/map lamp assembly connector and personal lamps 2nd row connector.

  3. Check continuity between front room/map lamp assembly harness connector and personal lamps 2nd row harness connector.

    Front room/map lamp assemblyPersonal lamps 2nd rowContinuity
    ConnectorTerminalConnectorTerminal
    R107 8 R106 3 Yes

Is the inspection result normal?

YES>>

GO TO 2.

NO>>

Repair or replace harnesses.

CHECK MAP LAMP CIRCUIT

Check continuity between map lamp assembly terminals.

Front room/map lamp assemblyConditionContinuity
Terminal
4 8 Map lamp switch (DOOR) is "DOOR" position Yes
Map lamp switch (DOOR) is "OFF" position No

Is the inspection result normal?

YES>>

Replace corresponding personal lamp. Refer to Removal and Installation.

NO>>

Replace front room/map lamp assembly. Refer to Removal and Installation .

Luggage Room Lamp Circuit Nissan Pathfinder 2026

Component Function Check

  • Interior room lamp power supply circuit

  • Luggage room lamp bulb

CHECK LUGGAGE ROOM LAMP OPERATION

  1. Ignition switch ON.

  2. Check that the luggage room lamp turns on when the back door is open.

Does luggage room lamp turn ON/OFF?

YES>>

Luggage room lamp circuit is normal.

NO>>

Refer to Diagnosis Procedure.

Diagnosis Procedure

CHECK LUGGAGE ROOM LAMP POWER SUPPLY CIRCUIT

  1. Ignition switch OFF.

  2. Disconnect interior room lamp relay connector, foot lamp LH connector, foot lamp RH connector and luggage room lamp connector.

  3. Check continuity between interior room lamp relay harness connector and luggage room lamp harness connector.

    Interior room lamp relayLuggage room lampContinuity
    ConnectorTerminalConnectorTerminal
    J-2 5 D567 1 Yes

Is the inspection normal?

YES>>

GO TO 2.

NO>>

Repair or replace harness.

CHECK LUGGAGE ROOM LAMP CONTROL SIGNAL CIRCUIT 1

  1. Ignition switch ON.

  2. Check continuity between BCM harness connector and ground.

    BCM(-)ConditionContinuity
    ConnectorTerminal
    M18 30 Ground Back door Open Yes
    Close No
    B45 147

Is the inspection result normal?

YES>>

GO TO 3.

NO>>

Continuity exists and remains unchanged: GO TO 4.

NO>>

Continuity does not exist and remains unchanged: Replace BCM. Refer to Removal and Installation.

CHECK LUGGAGE ROOM LAMP CONTROL SIGNAL CIRCUIT 2

  1. Ignition switch OFF.

  2. Disconnect BCM connector.

  3. Check continuity between BCM harness connector and luggage room lamp harness connector.

    BCMLuggage room lampContinuity
    ConnectorTerminalConnectorTerminal
    M18 30 D567 2 Yes
    B45 147

Is the inspection result normal?

YES>>

Replace luggage room lamp bulb. Refer to Bulb Replacement.

NO>>

Repair or replace harnesses.

CHECK LUGGAGE ROOM LAMP CONTROL SIGNAL CIRCUIT 3

  1. Ignition switch OFF.

  2. Disconnect BCM connector.

  3. Check continuity between BCM harness connector and ground.

    BCM(-)Continuity
    ConnectorTerminal
    M18 30 Ground No
    B45 147

Is the inspection result normal?

YES>>

Replace BCM. Refer to Removal and Installation.

NO>>

Repair or replace harnesses.

Foot Lamp Circuit Nissan Pathfinder R53

Component Function Check

  • Interior room lamp power supply circuit

  • Each foot lamp bulb

CHECK FOOT LAMP OPERATION

  1. Ignition switch ON.

  2. Check that the foot lamp turns on when any door is opened (except back door).

Does foot lamp turn ON/OFF?

YES>>

Foot lamp circuit is normal.

NO>>

Refer to Diagnosis Procedure.

Diagnosis Procedure

CHECK FOOT LAMP POWER SUPPLY CIRCUIT

  1. Ignition switch OFF.

  2. Disconnect interior room lamp relay connector, luggage room lamp connector, foot lamp LH connector and foot lamp RH connector.

  3. Check continuity between interior room lamp relay harness connector and each foot lamp harness connector.

    Interior room lamp relayFoot lampContinuity
    ConnectorTerminalConnectorTerminal
    J-2 5 Foot lamp LH M99 1 Yes
    Foot lamp RH M100

Is the inspection normal?

YES>>

GO TO 2.

NO>>

Repair or replace harness.

CHECK FOOT LAMP CONTROL SIGNAL CIRCUIT 1

  1. Ignition switch ON.

  2. Check continuity between BCM harness connector and ground.

    BCM(-)ConditionContinuity
    ConnectorTerminal
    M18 30 Ground Front door LH Open Yes
    Close No
    B45 147

Is the inspection result normal?

YES>>

GO TO 3.

NO>>

Continuity exists and remains unchanged: GO TO 4.

NO>>

Continuity does not exist and remains unchanged: Replace BCM. Refer to Removal and Installation.

CHECK FOOT LAMP CONTROL SIGNAL CIRCUIT 2

  1. Ignition switch OFF.

  2. Disconnect BCM connector.

  3. Check continuity between BCM harness connector and each foot lamp harness connector.

    Foot lamp LH
    BCMFoot lamp LHContinuity
    ConnectorTerminalConnectorTerminal
    M18 30 M99 2 Yes
    B45 147
    Foot lamp RH
    BCMFoot lamp RHContinuity
    ConnectorTerminalConnectorTerminal
    M18 30 M100 2 Yes
    B45 147

Is the inspection result normal?

YES>>

Replace corresponding foot lamp bulb. Refer to Bulb Replacement (foot lamp LH) or Bulb Replacement (foot lamp RH).

NO>>

Repair or replace harnesses.

CHECK FOOT LAMP CONTROL SIGNAL CIRCUIT 3

  1. Ignition switch OFF.

  2. Disconnect BCM connector.

  3. Check continuity between BCM harness connector and ground.

    BCM(-)Continuity
    ConnectorTerminal
    M18 30 Ground No
    B45 147

Is the inspection result normal?

YES>>

Replace BCM. Refer to Removal and Installation.

NO>>

Repair or replace harnesses.

Vanity Mirror Lamp Circuit Nissan Pathfinder

Diagnosis Procedure

  • Interior room lamp power supply circuit

CHECK VANITY MIRROR LAMP POWER SUPPLY CIRCUIT 1

  1. Ignition switch OFF.

  2. Disconnect interior room lamp relay connector and sunvisor (vanity mirror lamp switch) connector.

  3. Check continuity between interior room lamp relay harness connector and each sunvisor (vanity mirror lamp switch) harness connector.

    Interior room lamp relaySunvisor (vanity mirror lamp switch)Continuity
    ConnectorTerminalConnectorTerminal
    J-2 5 RH R130 1 Yes
    LH R129

Is the inspection result normal?

YES>>

GO TO 2.

NO>>

Repair or replace harnesses.

CHECK VANITY MIRROR LAMP POWER SUPPLY CIRCUIT 2

  1. Disconnect vanity mirror lamp connector.

  2. Check continuity between each sunvisor (vanity mirror lamp switch) harness connector and each vanity mirror lamp harness connector.

    Sunvisor (vanity mirror lamp switch)Vanity mirror lampContinuity
    ConnectorTerminalConnectorTerminal
    RH R130 2 R102 2 Yes
    LH R129 R103

Is the inspection result normal?

YES>>

GO TO 3.

NO>>

Repair or replace harness.

CHECK VANITY MIRROR LAMP SWITCH

Check vanity mirror lamp switch. Refer to Component Inspection.

YES>>

GO TO 4.

NO>>

Replace corresponding sun visor (vanity mirror lamp switch). Refer to Removal and Installation.

CHECK VANITY MIRROR LAMP GROUND CIRCUIT

Check continuity between vanity mirror lamp harness connector and ground.

Vanity mirror lamp(-)Continuity
ConnectorTerminal
RH R102 3 Ground Yes
LH R103

Is the inspection result normal?

YES>>

Replace corresponding vanity mirror lamp. Refer to Removal and Installation.

NO>>

Repair or replace harnesses.

Component Inspection

CHECK VANITY MIRROR LAMP SWITCH

  1. Ignition switch OFF.

  2. Disconnect sunvisor (vanity mirror lamp switch) connector.

  3. Check continuity between sunvisor (vanity mirror lamp switch) terminals.

    Sunvisor (vanity mirror lamp switch)ConditionContinuity
    Terminal
    1 2 Sunvisor OPEN (vanity mirror lamp switch ON) Yes
    Sunvisor CLOSE (vanity mirror lamp switch OFF) No

Is the inspection result normal?

YES>>

Inspection End.

NO>>

Replace corresponding sunvisor (vanity mirror lamp switch). Refer to Exploded View.

Mood Lamp Circuit Nissan Pathfinder SUV

Component Function Check

  • Interior room lamp power supply circuit

CHECK MOOD LAMP OPERATION

CONSULT

  1. Open the front door LH.

  2. Ignition switch ON.

  3. Select “INT LAMP” in "Active Test" mode of "BCM(INT LAMP)".

  4. With operating the test items, check that mood lamp turns ON/OFF.

    On : Mood lamp turns ON
    Off : Mood lamp turns OFF

Does the mood lamp turns ON/OFF?

YES>>

Mood lamp circuit is normal.

NO>>

Refer to Diagnosis Procedure.

Diagnosis Procedure

CHECK MOOD LAMP POWER SUPPLY CIRCUIT

  1. Ignition switch OFF.

  2. Disconnect interior room lamp relay connector and mood lamp connector.

  3. Check continuity between interior room lamp relay harness connector and each mood lamp harness connector.

    Interior room lamp relayMood lampContinuity
    ConnectorTerminalConnectorTerminal
    J-2 5 Mood lamp (front door RH) D139 2 Yes
    Mood lamp (front door LH) D39
    Mood lamp (rear door RH) D318
    Mood lamp (rear door LH) D219
    Mood lamp (instrument panel RH) M196
    Mood lamp (instrument panel LH) M190
    Mood lamp (center console tray RH) M199
    Mood lamp (center console tray LH) M198
    Mood lamp (center console) M14 1

Is the inspection normal?

YES>>

GO TO 2.

NO>>

Repair or replace harness.

CHECK MOOD LAMP CONTROL SIGNAL CIRCUIT 1

  1. Ignition switch ON.

  2. Check continuity between BCM harness connector and ground.

    BCM(-)ConditionContinuity
    ConnectorTerminal
    B45 150 Ground Front door LH Open Yes
    Close No

Is the inspection result normal?

YES>>

GO TO 3.

NO>>

Continuity exists and remains unchanged: GO TO 4.

NO>>

Continuity does not exist and remains unchanged: Replace BCM. Refer to Removal and Installation.

CHECK MOOD LAMP CONTROL SIGNAL CIRCUIT 2

  1. Ignition switch OFF.

  2. Disconnect BCM connector.

  3. Check continuity between BCM harness connector and each mood lamp harness connector.

    BCMMood lampContinuity
    ConnectorTerminalConnectorTerminal
    B45 150 Mood lamp (front door RH) D139 3 Yes
    Mood lamp (front door LH) D39
    Mood lamp (rear door RH) D318
    Mood lamp (rear door LH) D219
    Mood lamp (instrument panel RH) M196
    Mood lamp (instrument panel LH) M190
    Mood lamp (center console tray RH) M199
    Mood lamp (center console tray LH) M198
    Mood lamp (center console) M14 2

Is the inspection result normal?

YES>>

Mood lamp (front door): Replace corresponding mood lamp (front door). Refer to Removal and Installation.

YES>>

Mood lamp (rear door): Replace corresponding mood lamp (rear door). Refer to Removal and Installation.

YES>>

Mood lamp (instrument panel): Replace corresponding mood lamp (instrument panel). Refer to Exploded View.

YES>>

Mood lamp (center console tray): Replace corresponding mood lamp (center console tray). Refer to Removal and Installation.

YES>>

Mood lamp (center console): Replace mood lamp (center console). Refer to Removal and Installation.

NO>>

Repair or replace harnesses.

CHECK MOOD LAMP CONTROL SIGNAL CIRCUIT 3

  1. Ignition switch OFF.

  2. Disconnect BCM connector.

  3. Check continuity between BCM harness connector and ground.

    BCM(-)Continuity
    ConnectorTerminal
    B45 150 Ground No

Is the inspection result normal?

YES>>

Replace BCM. Refer to Removal and Installation.

NO>>

Repair or replace harnesses.

Push-Button Ignition Switch Illumination Circuit Nissan Pathfinder 5th Gen

Diagnosis Procedure

CHECK PUSH-BUTTON IGNITION SWITCH ILLUMINATION POWER SUPPLY 1

  1. Ignition switch OFF.

  2. Disconnect Intelligent Key unit connector and push-button ignition switch connector.

  3. Check continuity between BCM harness connector and ground.

    Intelligent Key unit—Continuity
    ConnectorTerminal
    M38 10 Ground No

Is the inspection result normal?

YES>>

GO TO 2.

NO>>

Repair or replace harnesses.

CHECK PUSH-BUTTON IGNITION SWITCH ILLUMINATION POWER SUPPLY 2

  1. Connect Intelligent Key unit connector and push-button ignition switch connector.

  2. Ignition switch ON.

  3. Check voltage between Intelligent Key unit harness connector and the ground.

    (+)(–)Condition

    Voltage

    (Approx.)
    Intelligent Key unit
    ConnectorTerminal
    M38 10 Ground Push-button ignition switch illumination ON Battery voltage
    OFF 0 V

Is the inspection result normal?

YES>>

GO TO 3.

NO>>

Replace Intelligent Key unit. Refer to Removal and Installation.

CHECK PUSH-BUTTON IGNITION SWITCH ILLUMINATION CIRCUIT

  1. Ignition switch OFF.

  2. Disconnect Intelligent Key unit connector and push-button ignition switch connector.

  3. Check continuity between Intelligent Key unit harness connector and push-button ignition switch harness connector.

    Intelligent Key unitPush-button ignition switchContinuity
    ConnectorTerminalConnectorTerminal
    M38 10 M17 5 Yes

Is the inspection result normal?

YES>>

GO TO 4.

NO>>

Repair or replace harnesses.

CHECK PUSH-BUTTON IGNITION SWITCH ILLUMINATION GROUND CIRCUIT

Check continuity between push-button ignition switch harness connector and ground.

Push-button ignition switch—Continuity
ConnectorTerminal
M17 6 Ground Yes

Is the inspection result normal?

YES>>

Replace push-button ignition switch. Refer to Removal and Installation.

NO>>

Repair or replace harnesses.