Exterior Lighting System - Periodic Maintenance
- Headlamp Aiming Adjustment
- Front Fog Lamp Aiming Adjustment
Headlamp Aiming Adjustment Nissan Pathfinder SUV
Inspection
preparation before adjusting
Before performing aiming adjustment, check the following:
Make sure all tires are inflated to correct pressure.
Place vehicle and screen on level surface.
Make sure there is no load in Nissan Pathfinder vehicle other than the driver (or equivalent weight placed in driver's position).
Coolant and engine oil filled to correct level, and fuel tank full.
Remove cargo and/or luggage to maintain an unloaded Nissan Pathfinder vehicle condition.
Confirm spare tire, jack and tools are properly stowed.
Carefully wipe off any dirt from headlamp lens.
Place a driver or equivalent weight of 68.5 kg (150 lb) on the driver seat.
By hand, bounce the front and rear of the Nissan Pathfinder vehicle to settle the suspension and eliminate any static load.
Place the front tires in the straight ahead position.
Aim each headlamp individually and ensure other headlamp beam pattern is blocked from screen.
AIMING ADJUSTMENT SCREW
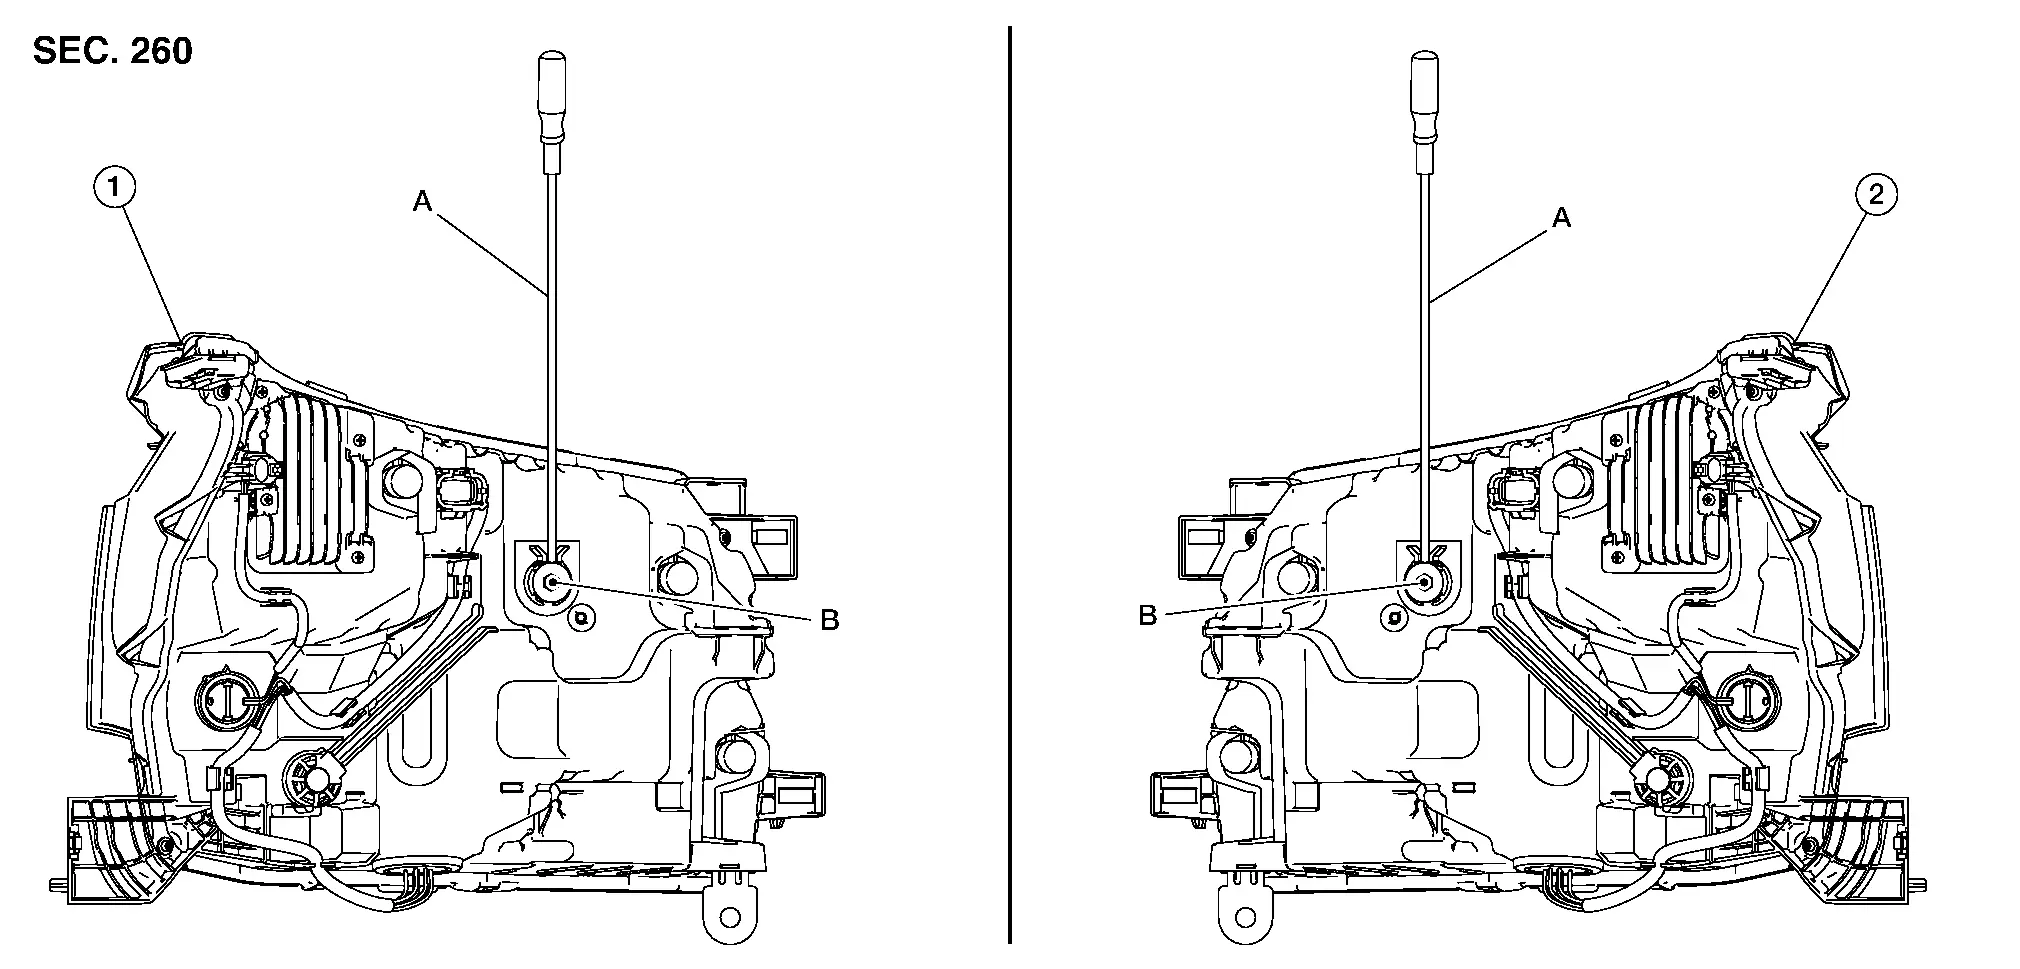
| 1. | Front combination lamp (LH) | 2. | Front combination lamp (RH) | A. | Suitable tool |
| B. | Headlamp HI/LO (UP/DOWN) adjustment screw |
Aiming Adjustment Procedure
Aiming Chart
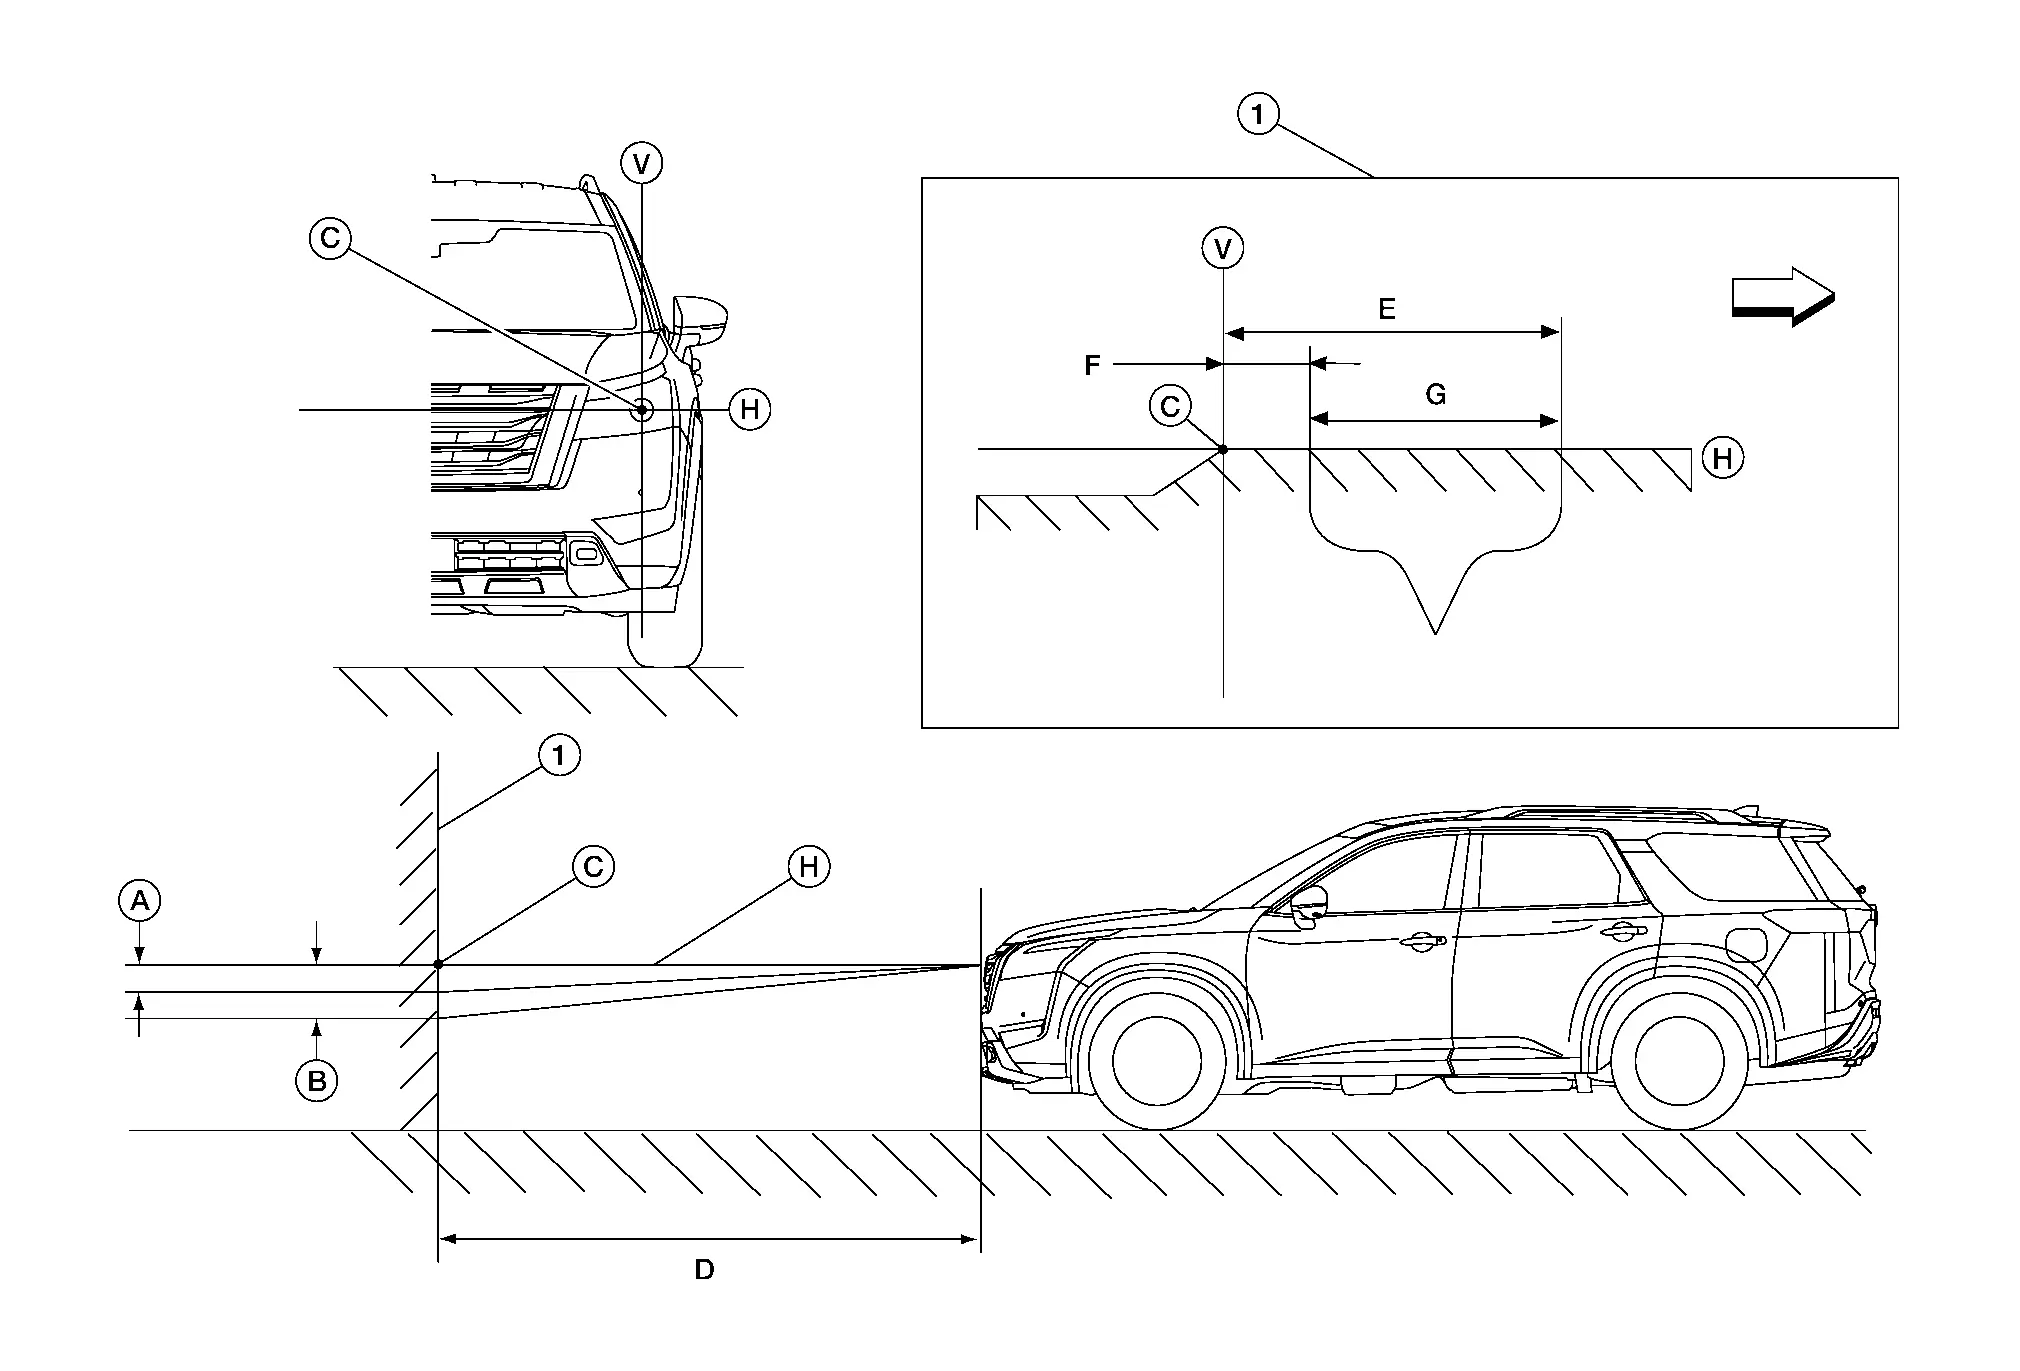
| 1. | Adjustment screen | A. | Highest cutoff line height | B. | Lowest cutoff line height |
| C. | Headlamp bulb center (H-V point) | D. | Distance of headlamp aiming screen from Nissan Pathfinder vehicle 7.62 m (25 ft) | E. | Maximum aim evaluation distance from vertical center on aiming screen 399 mm (3°R) |
| F. | Minimum aim evaluation distance from vertical center on aiming screen 133 mm (1°R) | G. | Aim evaluation area | H. | Horizontal aiming evaluation line |
| V. | Vertical aiming evaluation line |  |
Right |
| A (Highest cutoff line height) | —13.3 mm (0.52 in) | 0.1° up |
| B (Lowest cutoff line height) | 53.2 mm (2.09 in) | 0.4° down |
LOW BEAM AND HIGH BEAM
Use adjustment screw to perform aiming adjustment.
Ensure fog lamps are turned off (if equipped).
Block the opposite headlamp from projecting a beam pattern onto the adjustment screen, using a suitable object. Aim each headlamp individually.
Place the screen on the same level and flat surface as the Nissan Pathfinder vehicle.
Face the front of the Nissan Pathfinder vehicle to the screen and measure distance between the headlamp center and the screen surface.
| Distance between the headlamp center and the screen (D) | : 7.62 m (25 ft) |
Start the engine. Turn the headlamp on.
Determine the preferred vertical aim range dimensions, using the aiming chart.
Measure the projected beam within the aim evaluation segment on the screen.
Adjust the beam pattern of each headlamp until the aim evaluation segment (the area relative to both the highest and lowest cutoff line height) is positioned within the vertical aim range dimensions shown on the aiming chart.
Front Fog Lamp Aiming Adjustment Nissan Pathfinder Fifth generation
Aiming Adjustment
Keep all tires inflated to correct pressure.
Place vehicle on level ground.
See that Nissan Pathfinder vehicle is unloaded (except for full levels of coolant, engine oil and fuel, and spare tire, jack, and tools). Have the driver or equivalent weight placed in driver seat.
When performing adjustment, if necessary, cover the headlamps and opposite fog lamp.
Set the distance between the screen and the center of the fog lamp lens as shown.
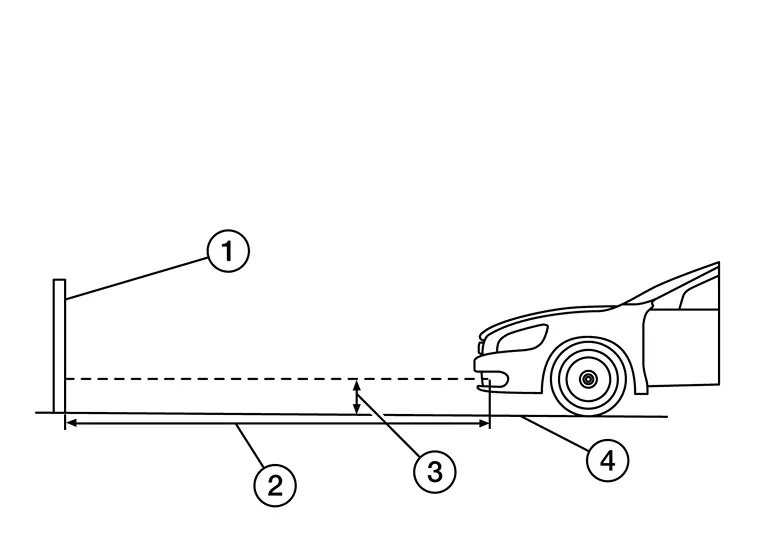
(1) Aiming screen or a matte white surface
(2) 10 m (33 ft)
(3) Floor to center of fog lamp lens
(4) Floor
Turn front fog lamps ON.
Turn adjustment screw (A) clockwise to raise pattern and counterclockwise to lower pattern.
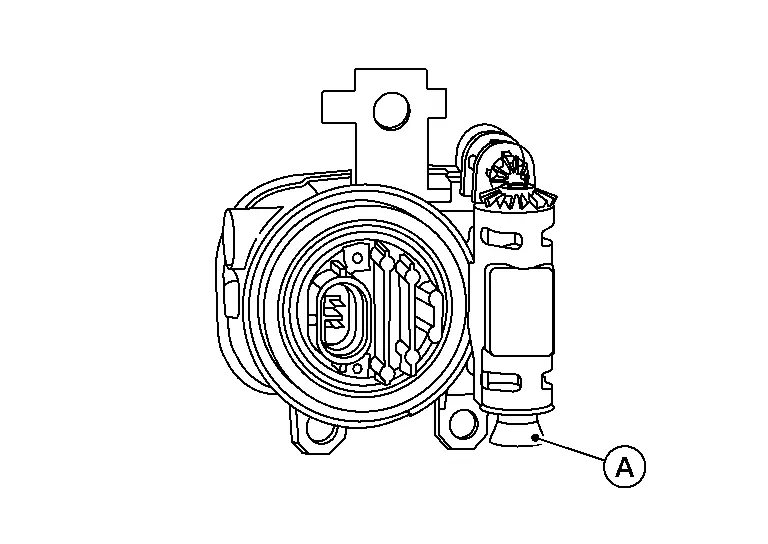
Adjust front fog lamp to specification.
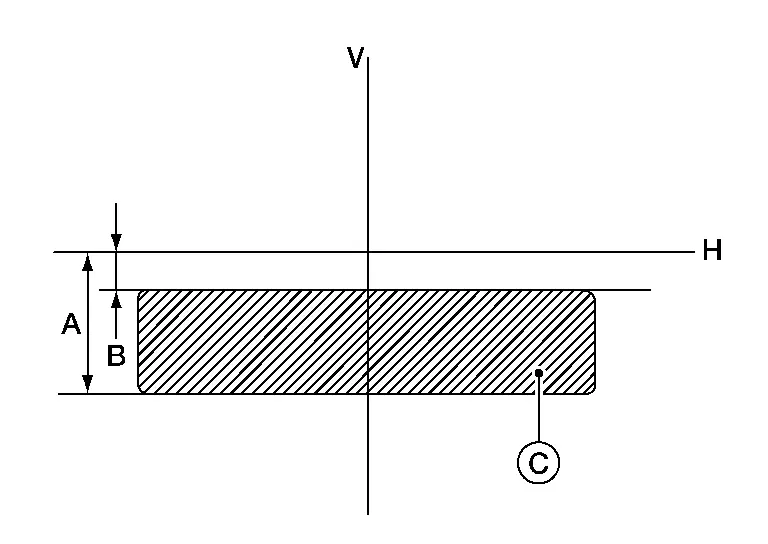
| A | : 360 mm (14.2 in, 2.06 degree) |
| B | : 150 mm (5.9 in, 0.86 degree) |
| C | : High illuminance area |
| H | : Horizontal center line of front fog lamp |
| V | : Vertical center line of front fog lamp |