Removal and Installation
- Brake Pedal
- Brake Piping
- Front Brake Piping
- Brake Master Cylinder
- Brake Booster
- Vacuum Lines
- Front Brake Pad
- Front Brake Caliper Assembly ➤
- Front Disc Brake Rotor
- Rear Brake Pad
- Rear Brake Caliper Assembly ➤
- Rear Disc Brake Rotor
Brake Pedal Nissan Pathfinder 2026
Exploded View
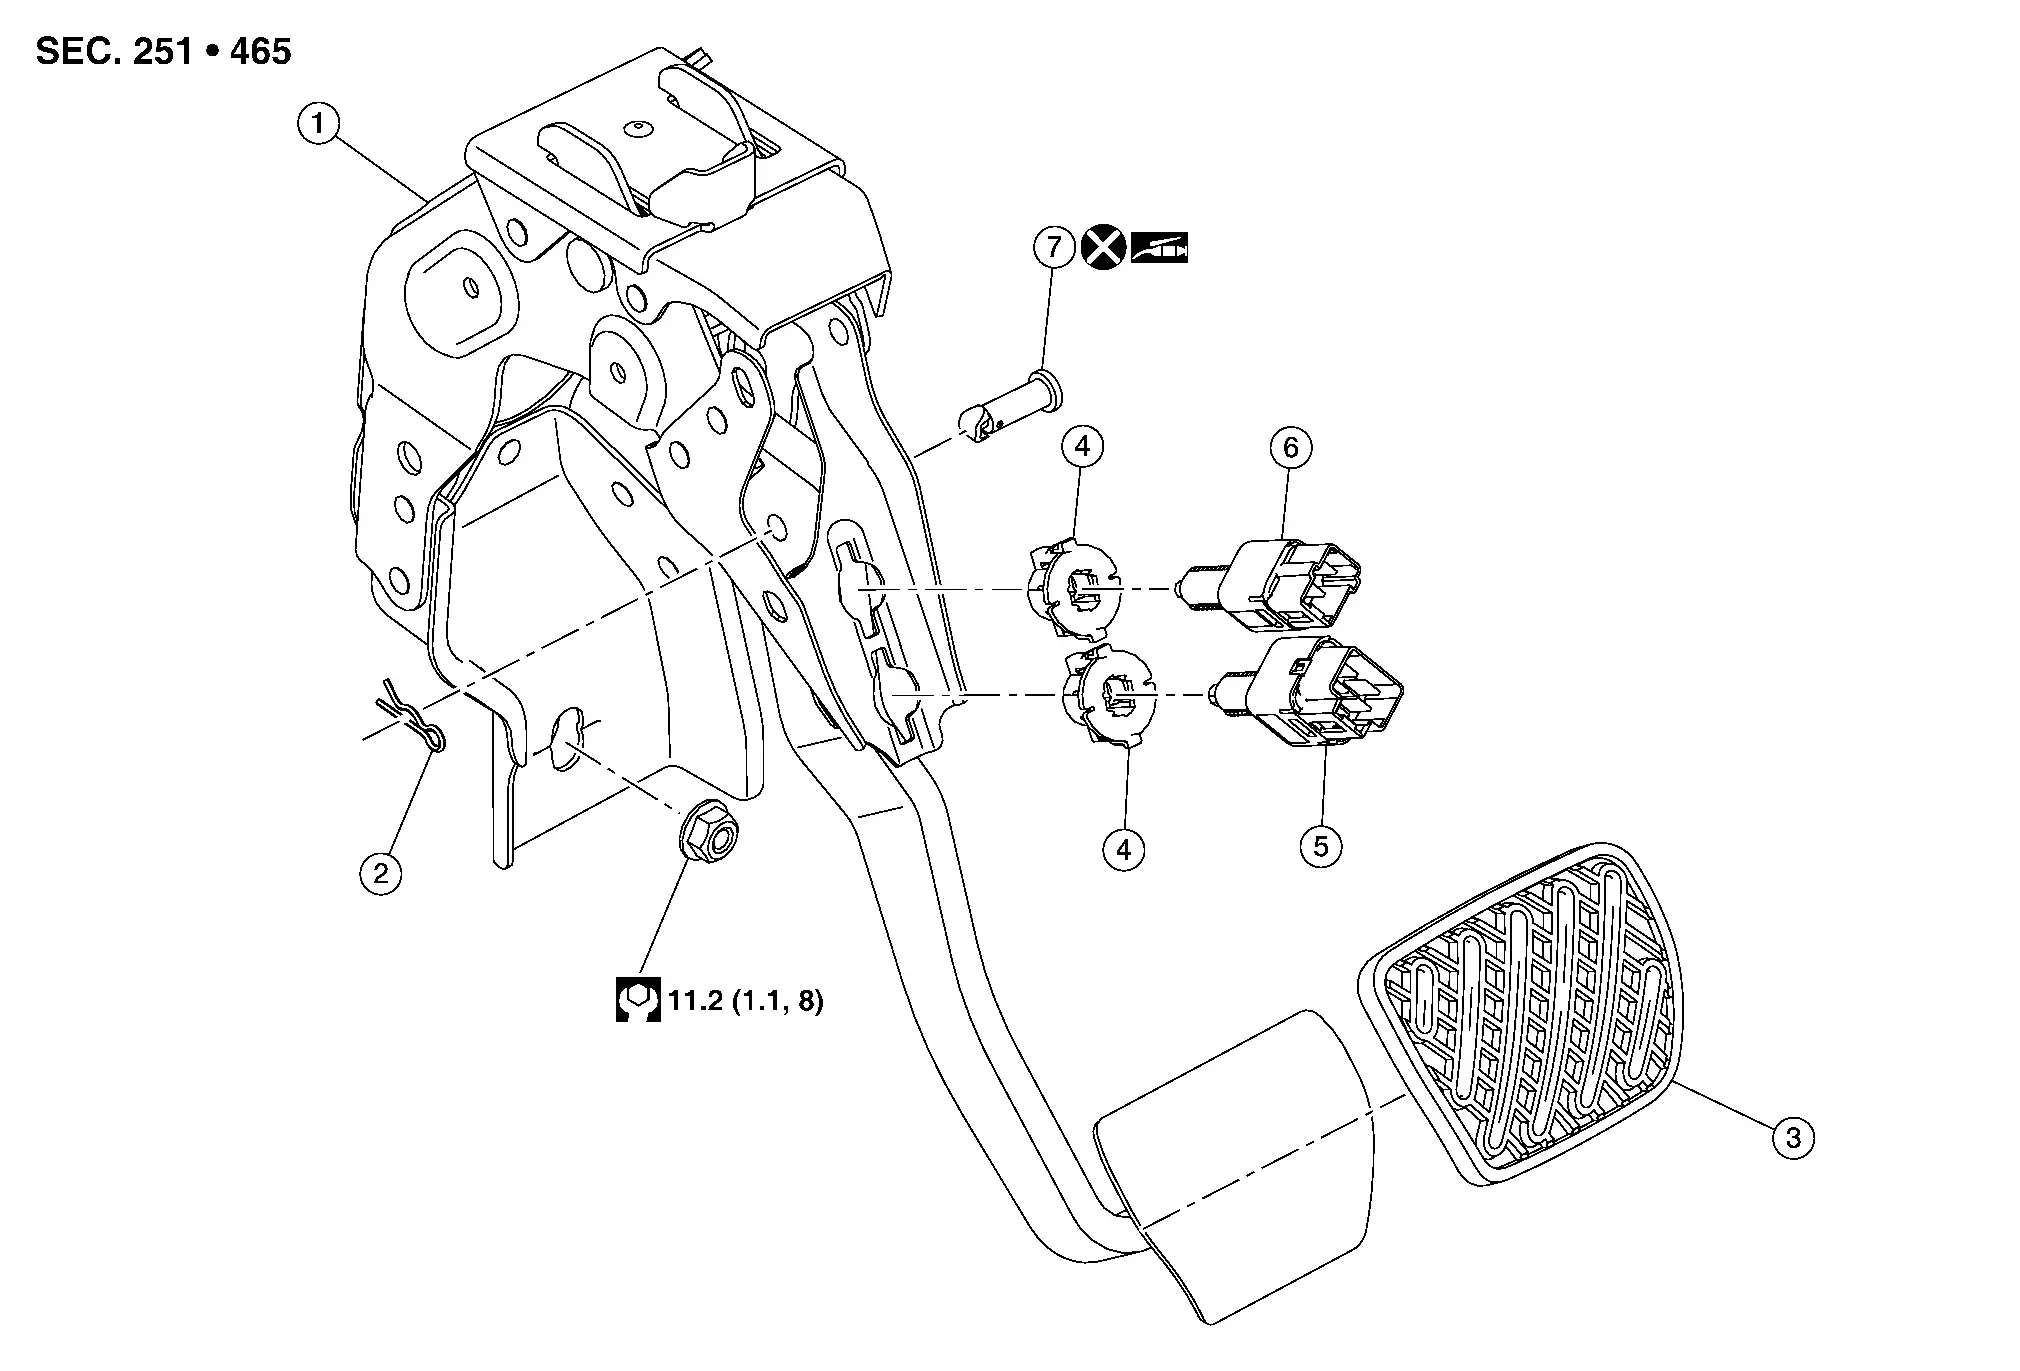
| 1. | Brake pedal assembly | 2. | Snap pin | 3. | Brake pedal pad |
| 4. | Clip | 5. | Stop lamp switch | 6. | Brake pedal position switch |
| 7. | Clevis pin |
Removal and Installation
REMOVAL
Disconnect the negative terminal from the battery. Refer to Battery Disconnect.
Remove the instrument lower panel LH. Refer to Removal and Installation.
Disconnect the harness connector from the stop lamp switch.
Disconnect the harness connector from the brake pedal position switch.
Using a suitable tool, separate the harness clips from the brake pedal assembly.
Remove the snap pin and the clevis pin from the brake pedal assembly and the brake booster input rod. Refer to Exploded View.
Remove the nut from the bottom of the brake pedal assembly.
Remove the nuts and the brake pedal assembly from the brake booster. Refer to Exploded View.
Remove the stop lamp switch, if necessary.
Remove the brake pedal position switch, if necessary.
INSPECTION AFTER REMOVAL
Check the following items and replace the brake pedal assembly if necessary.
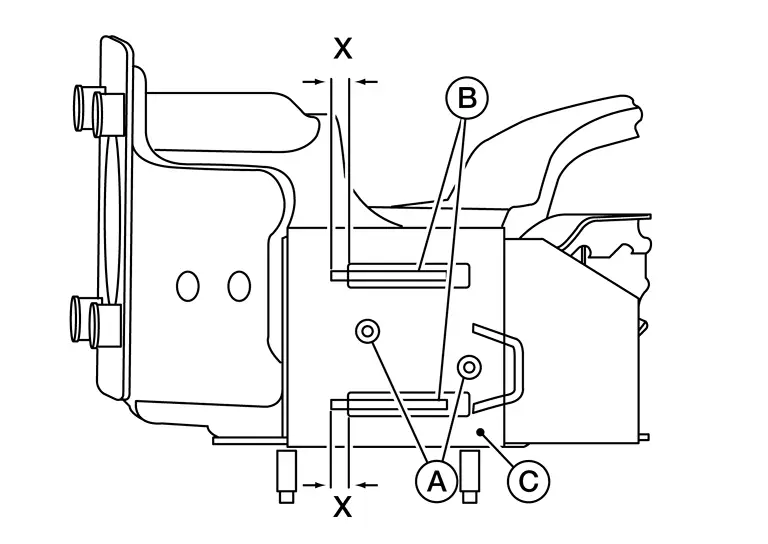
Check the brake pedal upper rivet (made of aluminum) (A) for deformation.
Check the brake pedal for damage and cracks on the welded parts.
Check the overlap distance (X) of sub-bracket (B) and slide plate (C).
Overlap distance (X) between sub-bracket (B) and slide plate (C) : Refer to Brake Pedal.
INSTALLATION
Installation is in the reverse order of removal.
Apply multi-purpose grease to the clevis pin.
Inspect the brake pedal height after installing the brake pedal to the Nissan Pathfinder vehicle. Refer to Inspection.
Brake Piping Nissan Pathfinder
Hydraulic Layout
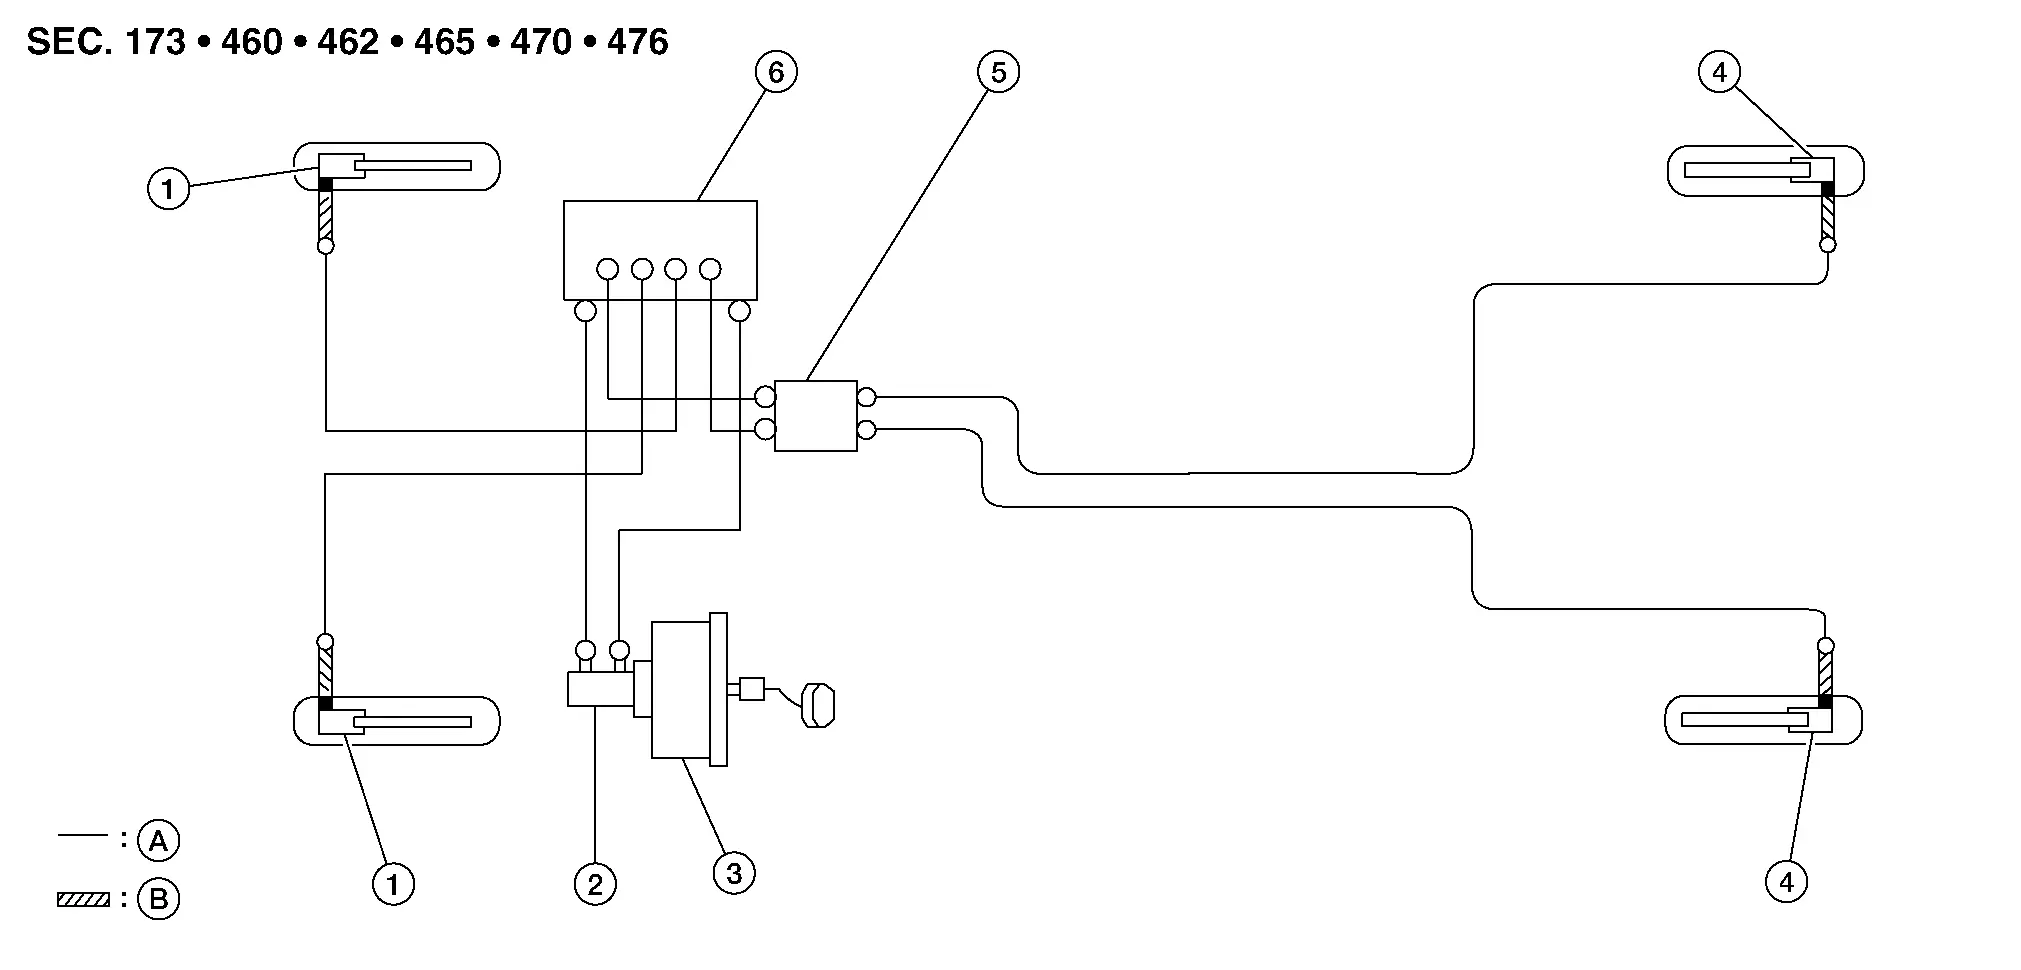
| 1. | Front disc brake | 2. | Master cylinder assembly | 3. | Brake booster |
| 4. | Rear disc brake | 5. | Connector | 6. | ABS actuator and electric unit (control unit) |
| A. | Brake tube | B. | Brake hose | ||
 : Flare nut |
|||||
 : Union bolt |
|||||
Front Brake Piping Nissan Pathfinder 2026
Exploded View
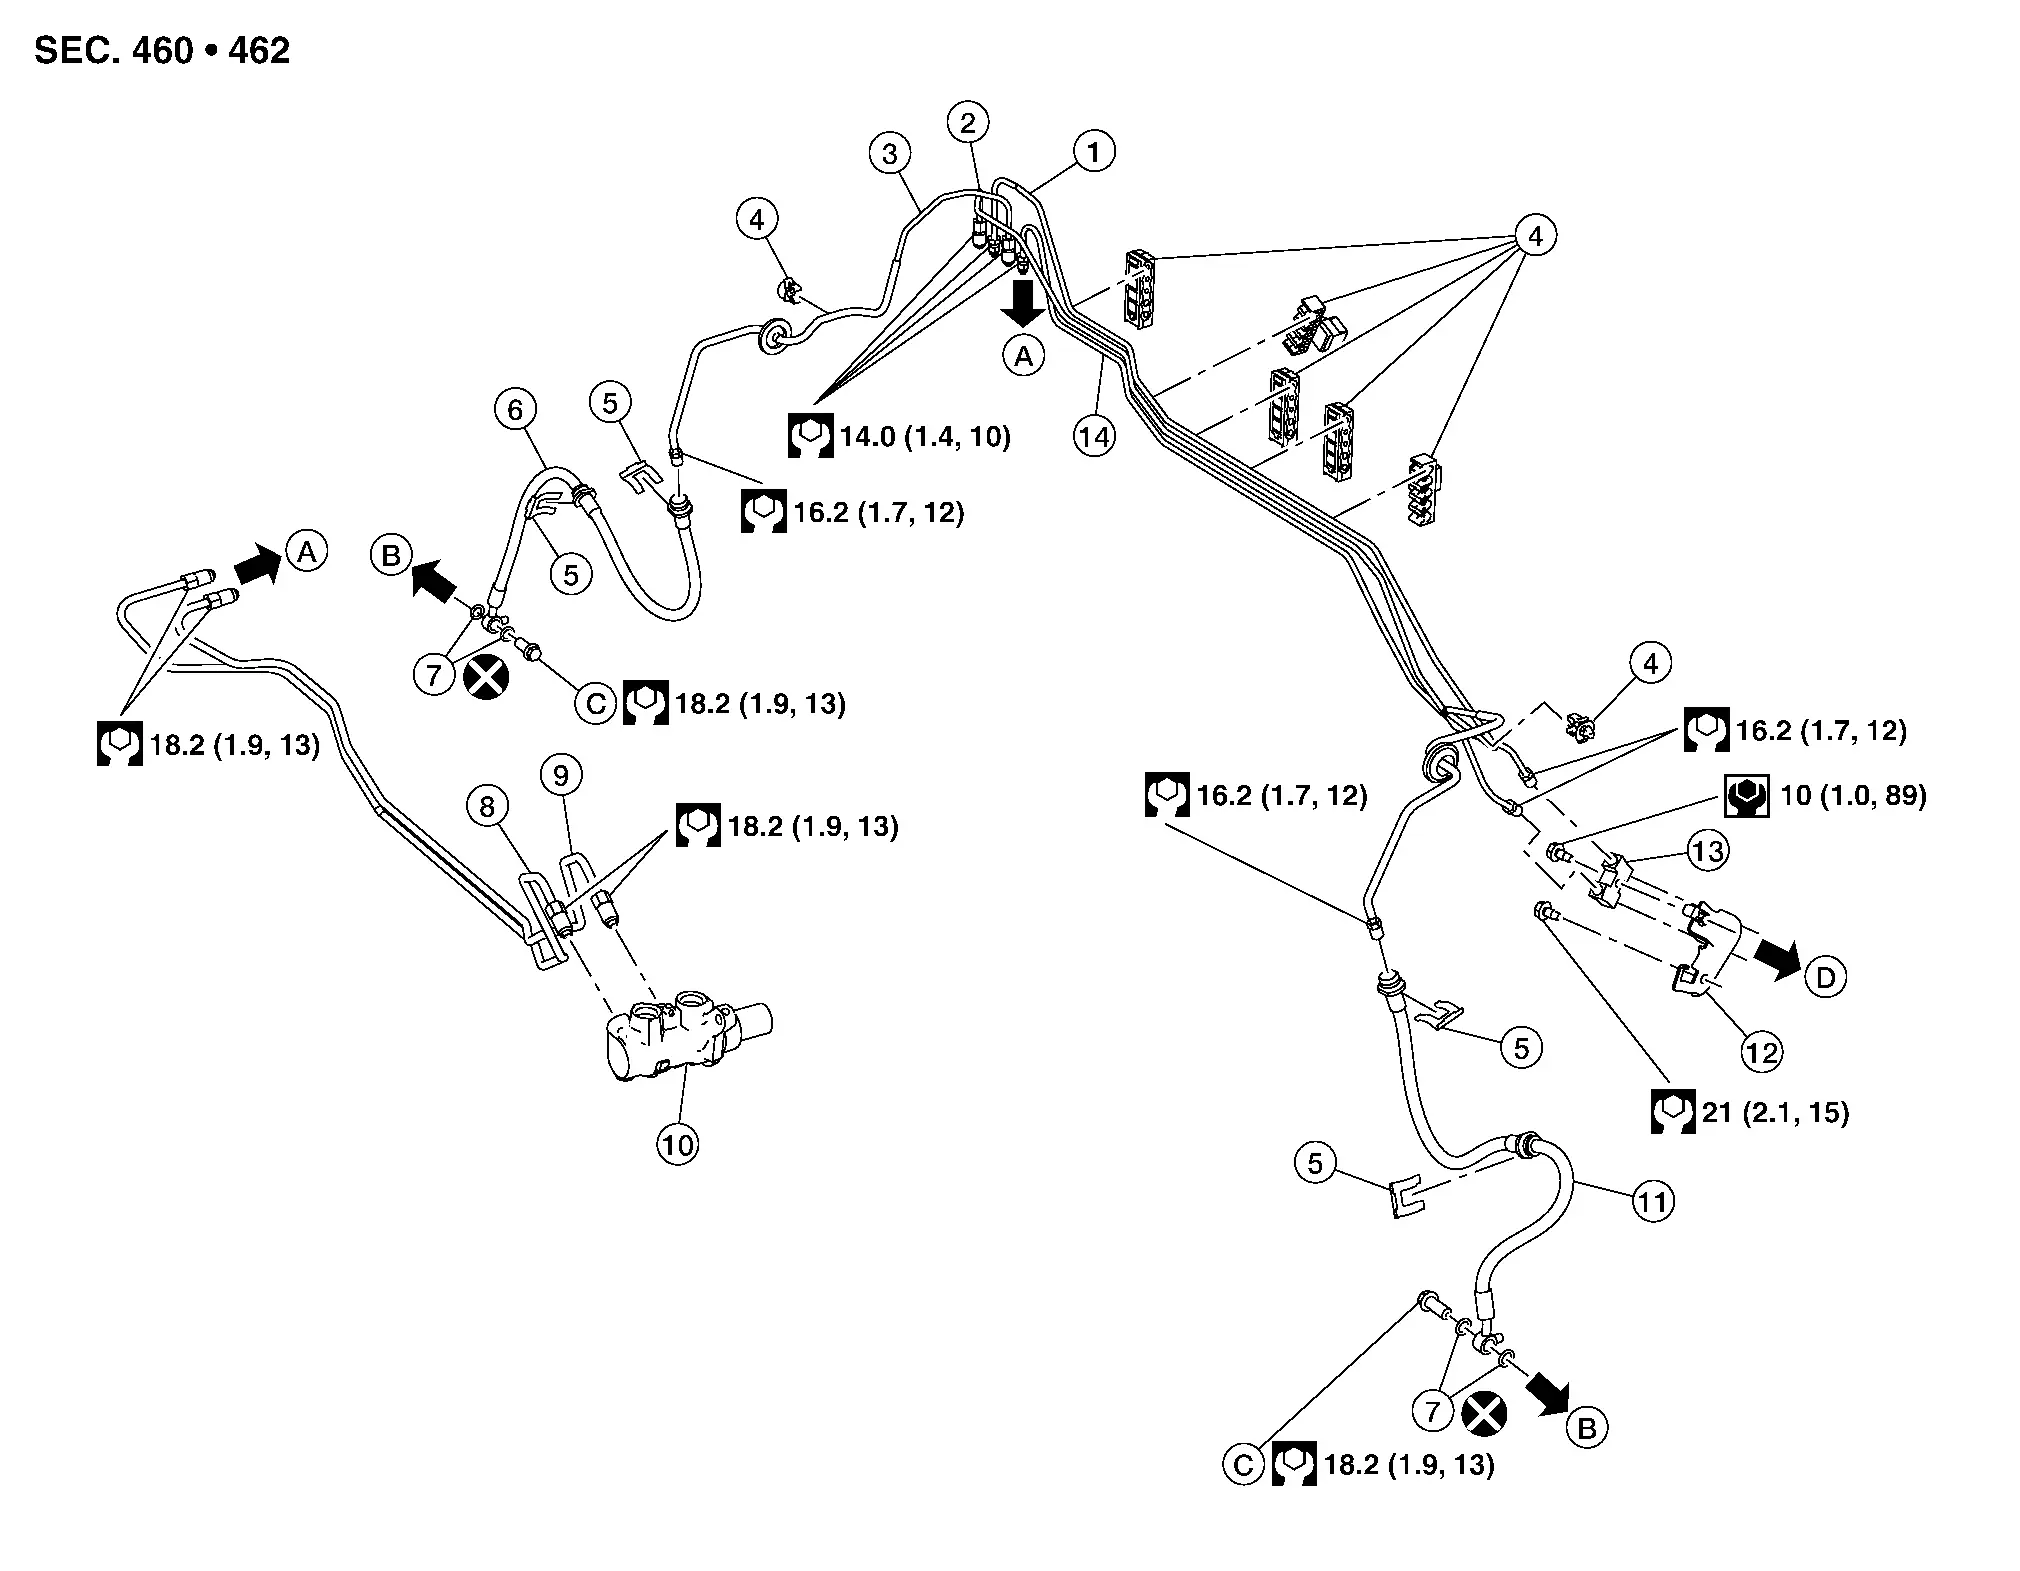
| 1. | Brake tube to front (LH) | 2. | Brake tube to connector to rear (RH) | 3. | Brake tube to front (RH) |
| 4. | Clamp | 5. | Lock plate | 6. | Brake hose (RH) |
| 7. | Copper sealing washer | 8. | Master cylinder secondary to ABS actuator brake tube | 9. | Master cylinder primary to ABS actuator brake tube |
| 10. | Master cylinder | 11. | Brake hose (LH) | 12. | Connector bracket |
| 13. | Connector | 14. | Brake tube to connector to rear (LH) | A. | To ABS actuator and electric unit (control unit). Refer to Exploded View. |
| B. | To front brake caliper assembly. Refer to Exploded View. | C. | Union bolt | D. | To rear brake tube. Refer to Exploded View. |
Removal and Installation
REMOVAL
Remove the reservoir tank cap. Refer to Exploded View.
Remove the front wheel and tire using power tool. Refer to Removal and Installation.
Loosen the flare nut using a flare nut wrench. Separate the brake tube from the brake hose. Refer to Exploded View.
Remove the union bolt (B) and the brake hose (1) from the brake caliper (3). Remove and discard the copper sealing washers (2).
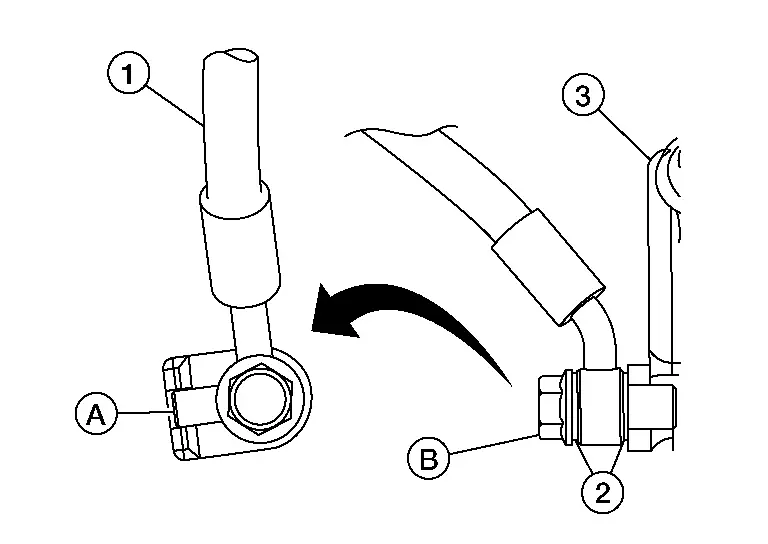
Remove the lock plates and remove the brake hose.
INSTALLATION
Assemble the union bolt (B) and the copper sealing washers (2) to the brake hose (1) and install it as an assembly to the brake caliper (3). Align the brake hose part (A) with the brake caliper assembly projections, and tighten the union bolt to the specified torque. Refer to Exploded View.
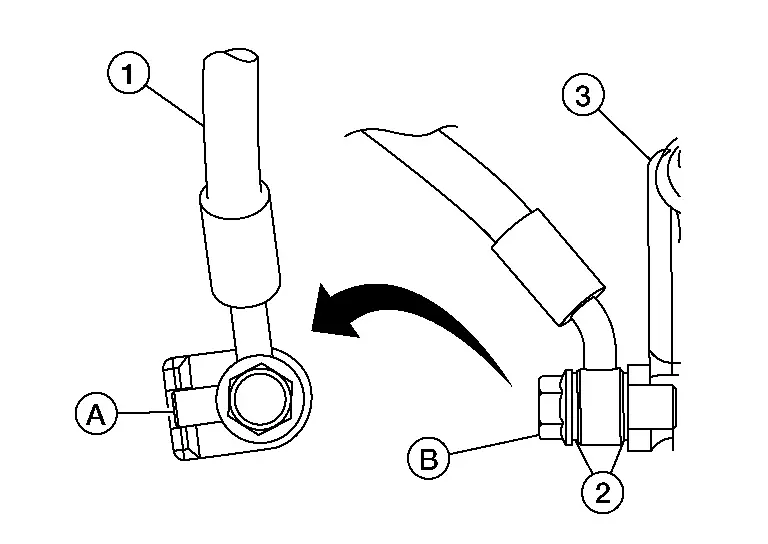
Install the brake tube to the brake hose, temporarily tighten the flare nut by hand until it does not rotate further, and attach the brake hose to the brackets with the lock plates.
Tighten the flare nut to the specified torque using a flare nut crowfoot and a torque wrench.
Refill with new brake fluid and bleed air from the brake system. Refer to Bleeding Brake System.
Install the front wheel and tire. Refer to Removal and Installation.
Perform the inspection after installation. Refer to Inspection.
Brake Master Cylinder Nissan Pathfinder Fifth generation
Exploded View

| 1. | Reservoir tank cap | 2. | Reservoir tank | 3. | Reservoir tank bracket |
| 4. | Hose clamp | 5. | Hose | 6. | Grommet |
| 7. | Master cylinder body | 8. | O-ring | 9. | Sub tank |
| A. | Screw | B. | To brake booster. Refer to Exploded View. |  |
PBC (Poly Butyl Cuprysil) grease or silicone-based grease |
 |
Brake fluid |
Removal and Installation
REMOVAL
Slide the connector position assurance to unlock the harness connector. Disconnect the harness connector from the brake fluid level switch.
Using a suitable tool, separate the harness clip from the reservoir tank.
Remove the nuts and separate the reservoir tank bracket from the cowl top extension. Refer to Exploded View.
Remove the air cleaner housing. Refer to Removal and Installation.
Loosen the brake tube flare nuts using a flare nut wrench. Separate the brake tubes from the master cylinder body. Refer to Exploded View.
Remove the nuts and the master cylinder assembly.
Remove the O-ring.
If necessary, disassemble the master cylinder assembly. Refer to Disassembly and Assembly.
INSTALLATION
Installation is in the reverse order of removal.
Apply PBC (Poly Butyl Cuprysil) grease or silicone grease to the O-ring.
Temporarily tighten the brake tube flare nut to the master cylinder by hand. Then tighten it to the specified torque using a flare nut crowfoot and a torque wrench. Refer to Exploded View.
After installation, bleed air from the brake system. Refer to Bleeding Brake System.
Perform the inspection after installation. Refer to Inspection.
Disassembly and Assembly
DISASSEMBLY
Remove the master cylinder assembly. Refer to Removal and Installation.
Remove the nuts and the reservoir tank bracket from the reservoir tank. Refer to Exploded View.
Remove the reservoir tank cap.
Loosen the hose clamp and remove the reservoir tank from the hose.
Loosen the hose clamp and remove the hose from the sub tank.
Secure the master cylinder body in a vise.
Remove the screw, the sub tank, and the grommets from the master cylinder body. Discard the grommets.
ASSEMBLY
Assembly is in the reverse order of disassembly.
Apply new brake fluid to the grommets.
Brake Booster Nissan Pathfinder SUV
Exploded View
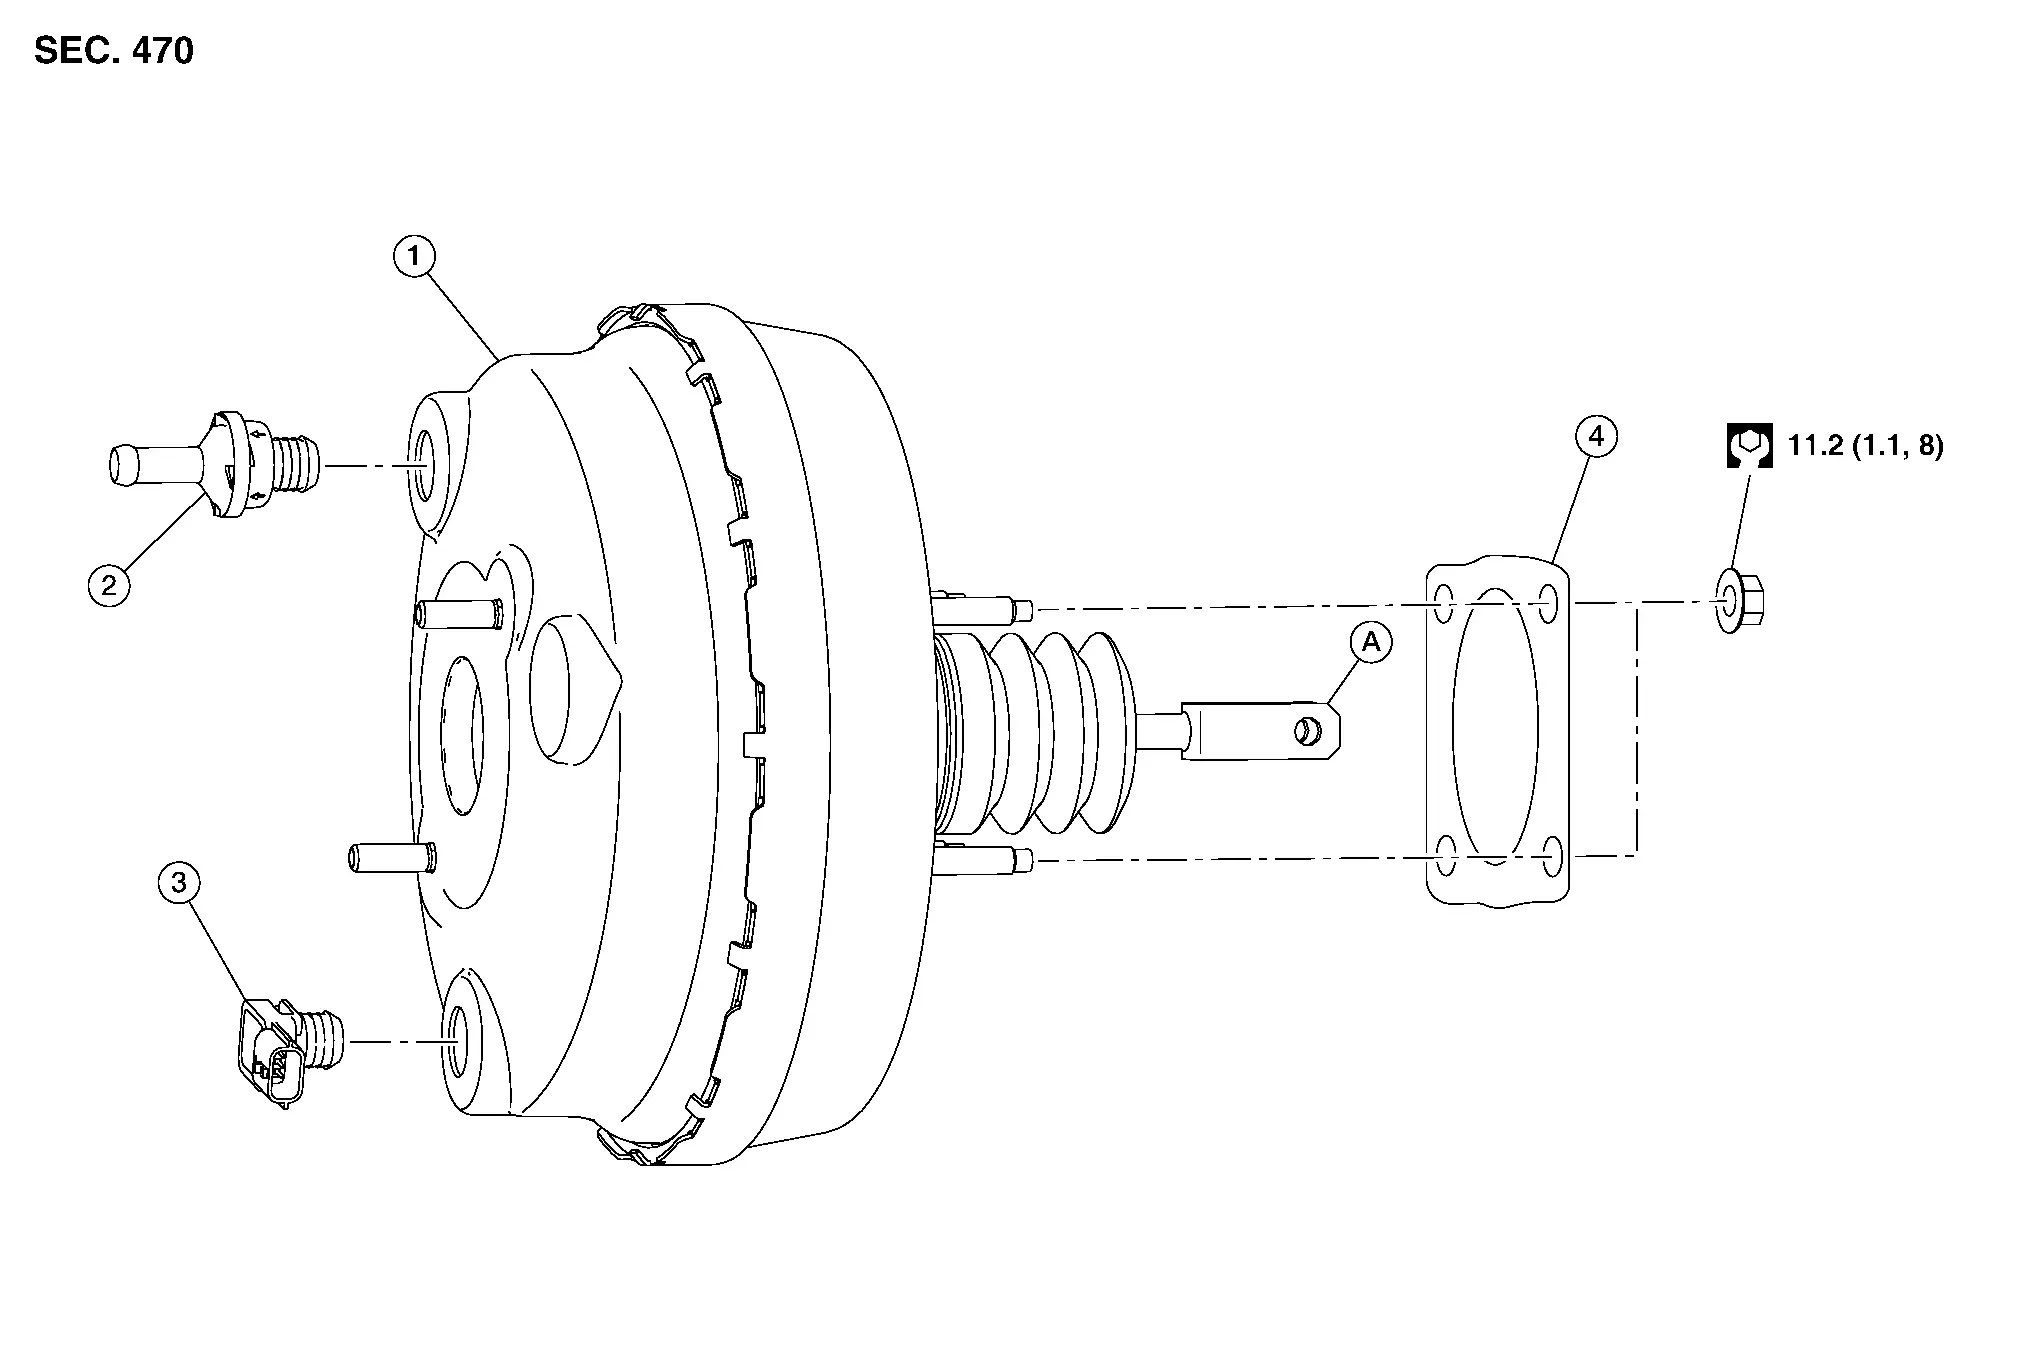
| 1. | Brake booster | 2. | Check valve | 3. | Vacuum sensor |
| 4. | Gasket | A. | Brake booster clevis |
Removal and installation
REMOVAL
Remove the air cleaner housing. Refer to Removal and Installation.
Disconnect the harness connector from the vacuum sensor.
If necessary, remove the vacuum sensor. Refer to Exploded View.
Remove the master cylinder assembly. Refer to Removal and Installation.
Loosen the hose clamp and separate the vacuum hose B from the check valve on the brake booster. Refer to Exploded View.
Remove the snap pin and the clevis pin from the brake booster clevis and the brake pedal assembly. Refer to Exploded View.
Remove the nuts from the brake booster on the brake pedal side.
Remove the brake booster and the gasket.
If necessary, remove the gasket.
If necessary, remove the check valve.
INSPECTION AFTER REMOVAL
Measure the input rod (A) length (B).
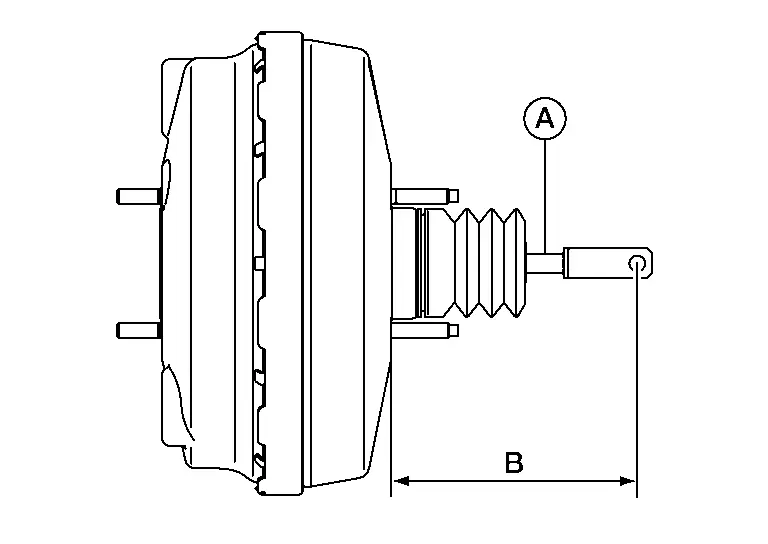
Input rod (A) length (B) : Refer to Brake Booster. If the input rod length is not the standard, replace the brake booster.
Make sure the vacuum sensor (2) angle (A) matches the specification for brake booster (1).
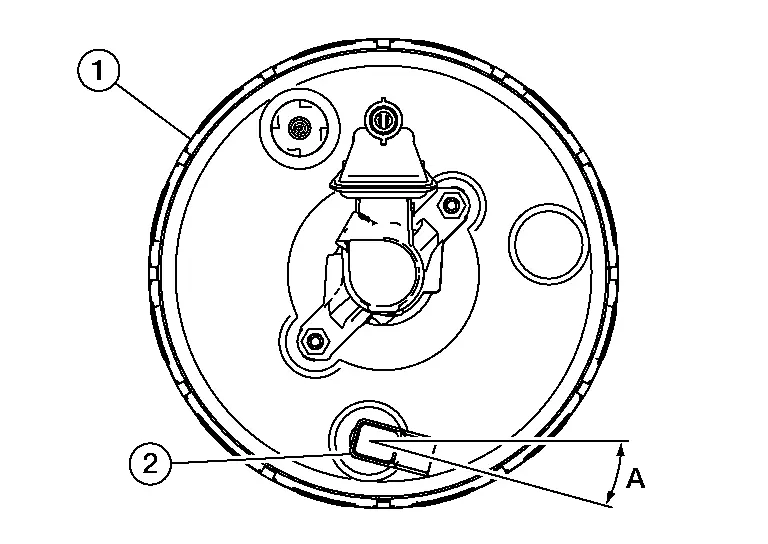
Vacuum sensor (2) angle (A) : Refer to Brake Booster.
INSTALLATION
Installation is in the reverse order of removal.
Apply multi-purpose grease to the clevis pin. Refer to Exploded View.
Bleed air from the hydraulic brake system. Refer to Bleeding Brake System.
Inspect the brake pedal. Refer to Inspection.
Inspect the brake booster. Refer to Inspection.
Vacuum Lines Nissan Pathfinder 5th Gen
Exploded View
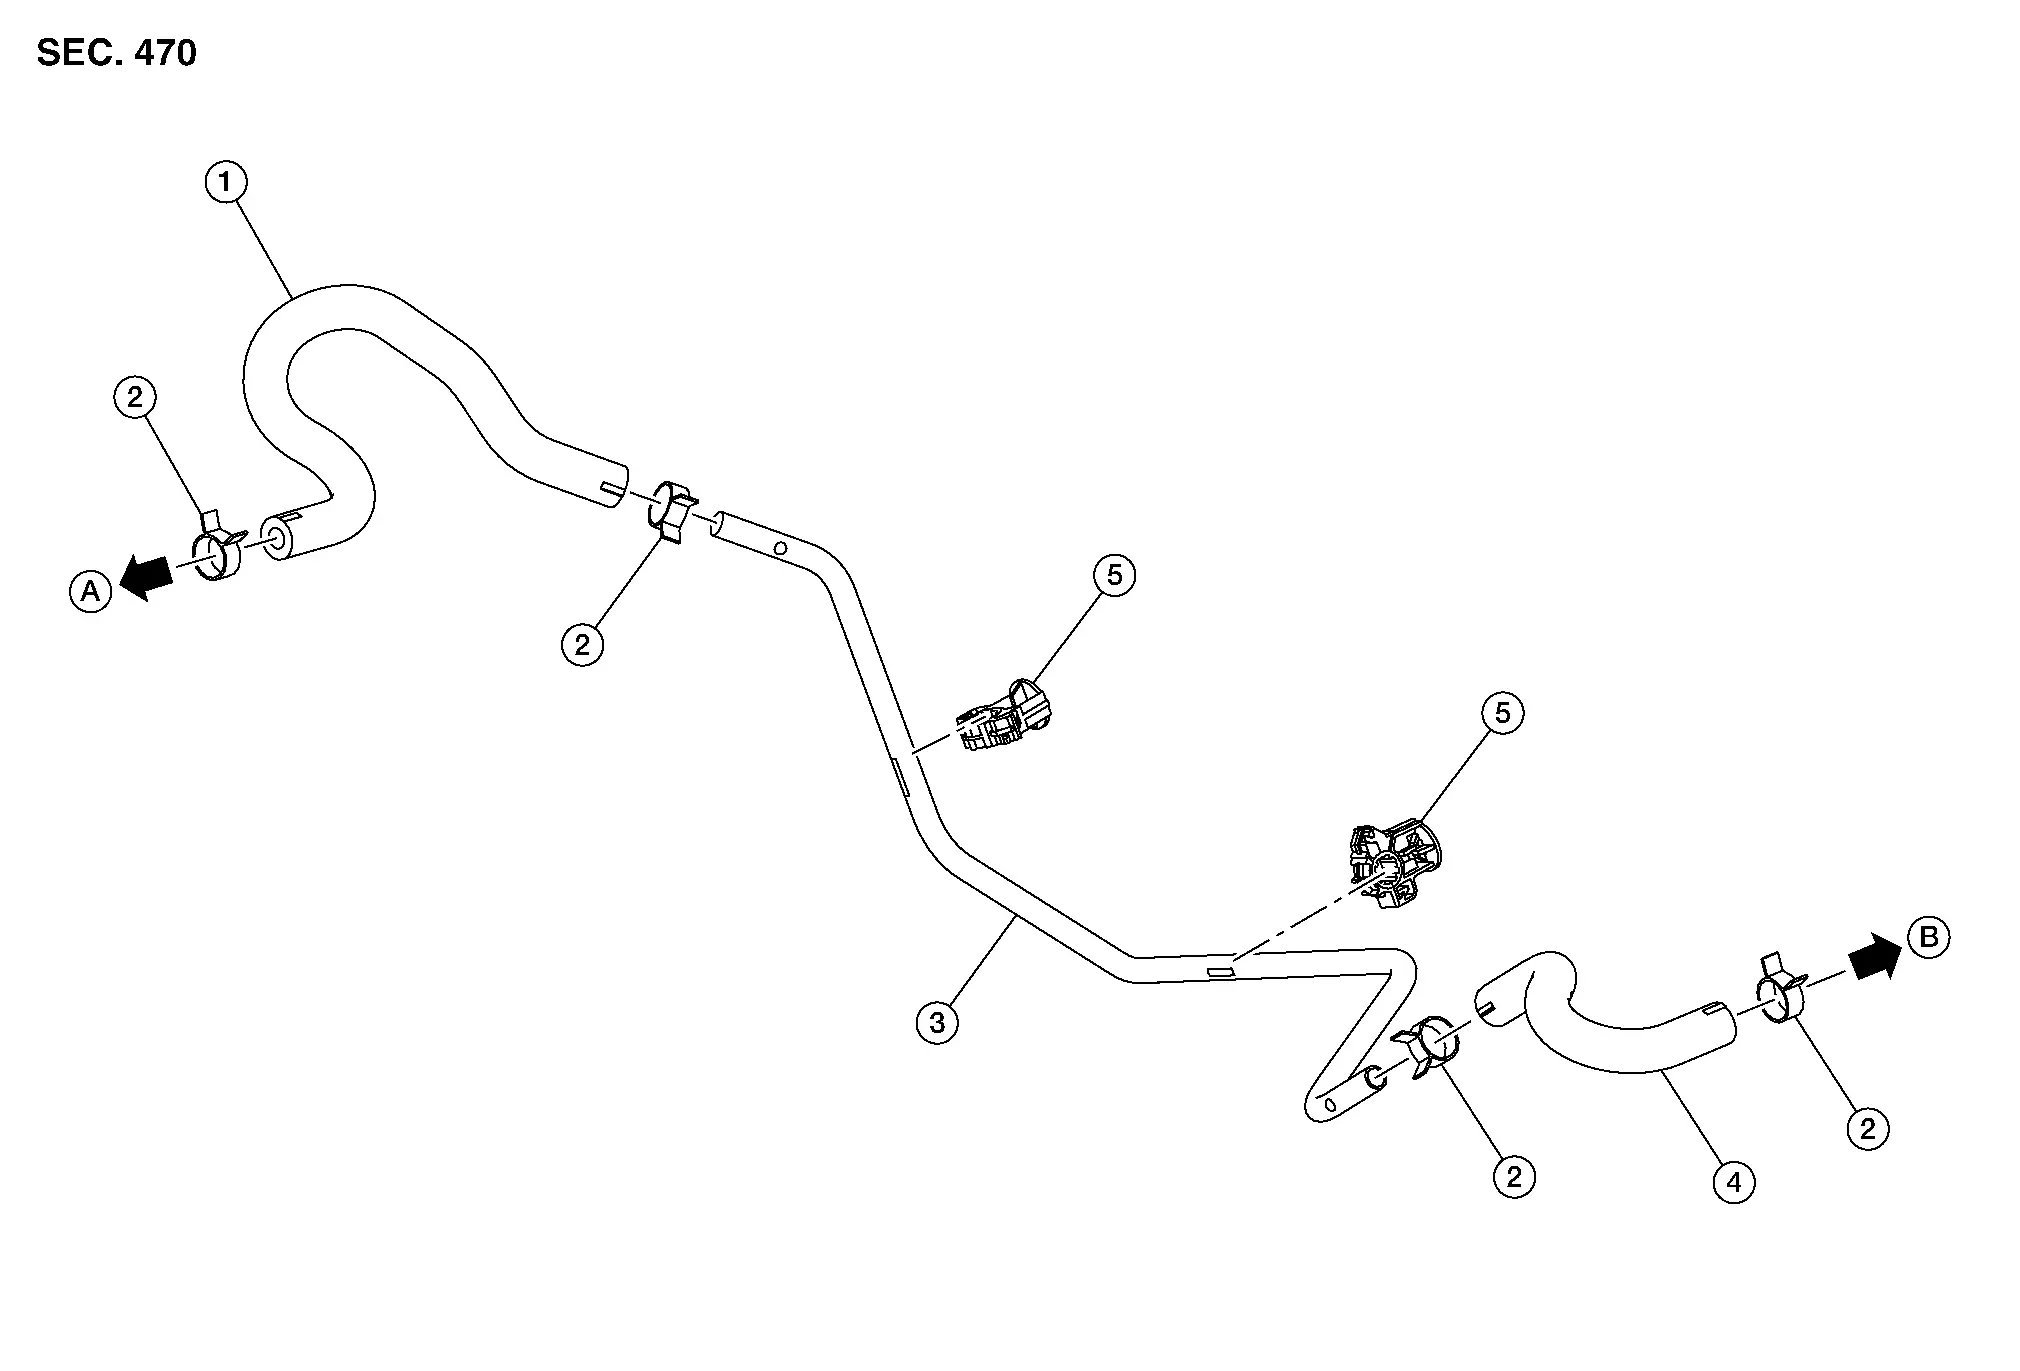
| 1. | Vacuum hose A | 2. | Hose clamp | 3. | Vacuum tube |
| 4. | Vacuum hose B | 5. | Tube clamp | A. | To intake manifold. Refer to Exploded View. |
| B. | To check valve. Refer to Exploded View. |
Removal and Installation
REMOVAL
Remove the cowl top extension. Refer to Removal and Installation.
Loosen the hose clamp and separate the vacuum hose B from the check valve on the brake booster. Refer to Exploded View.
Loosen the hose clamp and remove the vacuum hose B from the vacuum tube.
Loosen the hose clamp and separate the vacuum hose A from the vacuum tube.
Remove the vacuum tube from the tube clamps.
Loosen the hose clamp and remove the vacuum hose A from the intake manifold.
INSPECTION AFTER REMOVAL
Check for damage, deterioration, and foreign matter.
INSTALLATION
Installation is in the reverse order of removal.
Install the vacuum hoses and the vacuum tube in the correct position. Refer to Exploded View.
Install the vacuum hoses onto the vacuum tube to the specified length (A) or further as shown.

(A) : 24 mm (0.94 in) or more Install the hose clamp (1) onto the vacuum hose (2) to the specified length (A) from the hose end as shown.
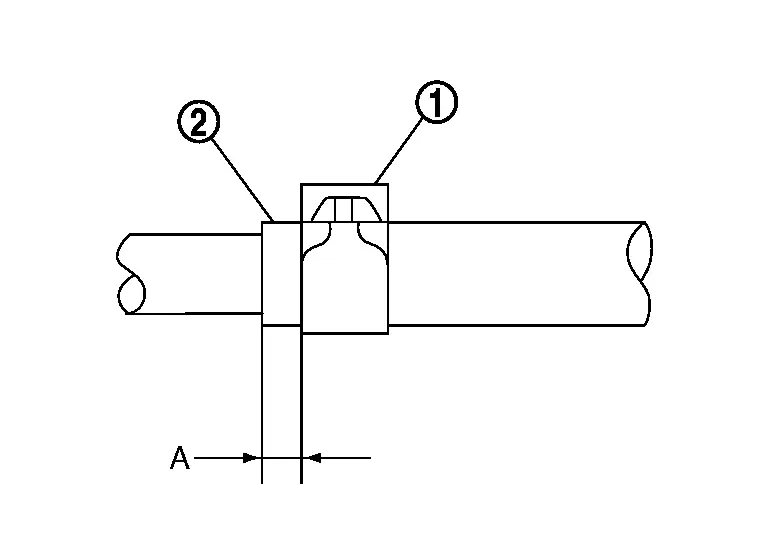
(A) : 4 – 8 mm (0.16 – 0.31 in)
Front Brake Pad Nissan Pathfinder 2026
Exploded View

| 1. | Inner shim | 2. | Inner pad | 3. | Pad retainer |
| 4. | Outer shim | 5. | Outer pad | A. | Wear indicator |
| B. | Pad spring | C. | Molykote® AS-880N grease |
Removal and Installation
REMOVAL
Observe the brake fluid level in the reservoir tank. Partially drain brake fluid if necessary. Refer to Draining.
Remove the front wheel and tire using power tool. Refer to Removal and Installation.
Secure the disc brake rotor using wheel nuts.
Remove the slide pin bolts. Refer to Exploded View.
Remove the brake caliper from the torque member. Leaving the brake hose attached, reposition the brake caliper aside using wire.
Remove the slide pins from the torque member.
Remove the brake pads, shims, and pad retainers from the torque member. Refer to Exploded View.
Remove the shims from the brake pads.
INSTALLATION
Install the pad retainers to the torque member. Refer to Exploded View.
Apply Niglube RX-2 grease to the slide pins. Refer to Exploded View.
Install the slide pins to the torque member.
Apply Molykote® AS-880N grease to the matching surfaces between the shims and the brake pads.
Install the shims to the brake pads.
Install the brake pads and the shims to the torque member.
Using a suitable tool, press the pistons into the brake caliper body.
Install the brake caliper to the torque member.
Install the slide pin bolts. Tighten the slide pin bolts to the specified torque. Refer to Exploded View.
Depress the brake pedal several times and perform the inspection after installation.
Install the front wheel and tire. Refer to Removal and Installation.
Check brake fluid level and refill as necessary. Refer to Inspection.
INSPECTION AFTER INSTALLATION
Check the drag of the front disc brake. If any drag is found, perform the following procedure:Remove the brake pads. Using a suitable tool, press the pistons into the brake caliper body.
Install the brake pads. Depress the brake pedal several times. Check the drag of the front disc brake again. If any drag is found, disassemble the brake caliper body. Refer to Disassembly and Assembly.Burnish contact surfaces after replacing brake pads or if a soft pedal occurs at very low mileage. Refer to Periodic Maintenance Operation.
Front Brake Caliper Assembly ➤ Nissan Pathfinder
Front Disc Brake Rotor Nissan Pathfinder 2026
Exploded View

| 1. | Wheel hub and bearing | 2. | Disc brake rotor |
Removal and Installation
REMOVAL
Observe the brake fluid level in the reservoir tank. Partially drain brake fluid if necessary. Refer to Draining.
Remove the front wheel and tire using a power tool. Refer to Removal and Installation.
Remove the brake pads, shims, and pad retainers from the torque member. Refer to Removal and Installation.
Remove the slide pins from the torque member. Refer to Exploded View.
Remove the bolts and the torque member.
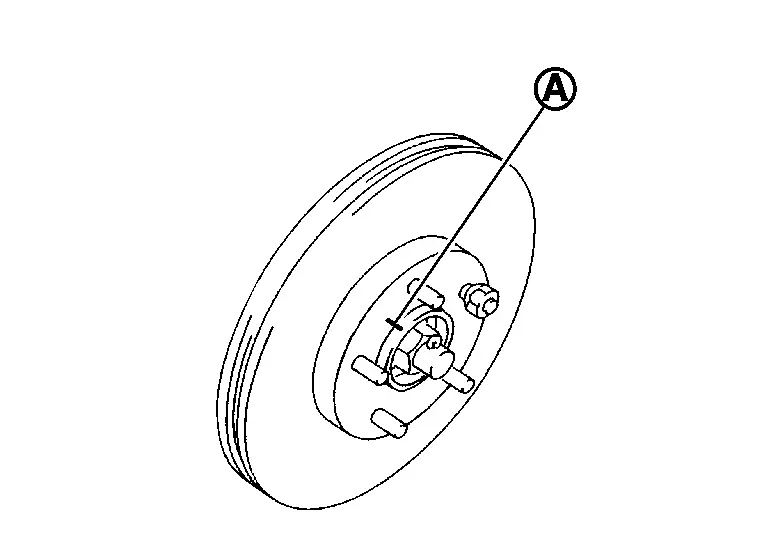
Place alignment marks (A) on the front disc brake rotor and the wheel hub, then remove the front disc brake rotor.
INSTALLATION
Installation is in the reverse order of removal.
Using a suitable tool, press the pistons into the brake caliper body.
Apply Niglube RX-2 grease to the slide pins. Refer to Exploded View.
Check brake fluid level and refill as necessary. Refer to Inspection.
INSPECTION AFTER INSTALLATION
Burnish contact surfaces after refinishing or replacing disc brake rotors or if a soft pedal occurs at very low mileage. Refer to Periodic Maintenance Operation.
Rear Brake Pad Nissan Pathfinder R53
Exploded View
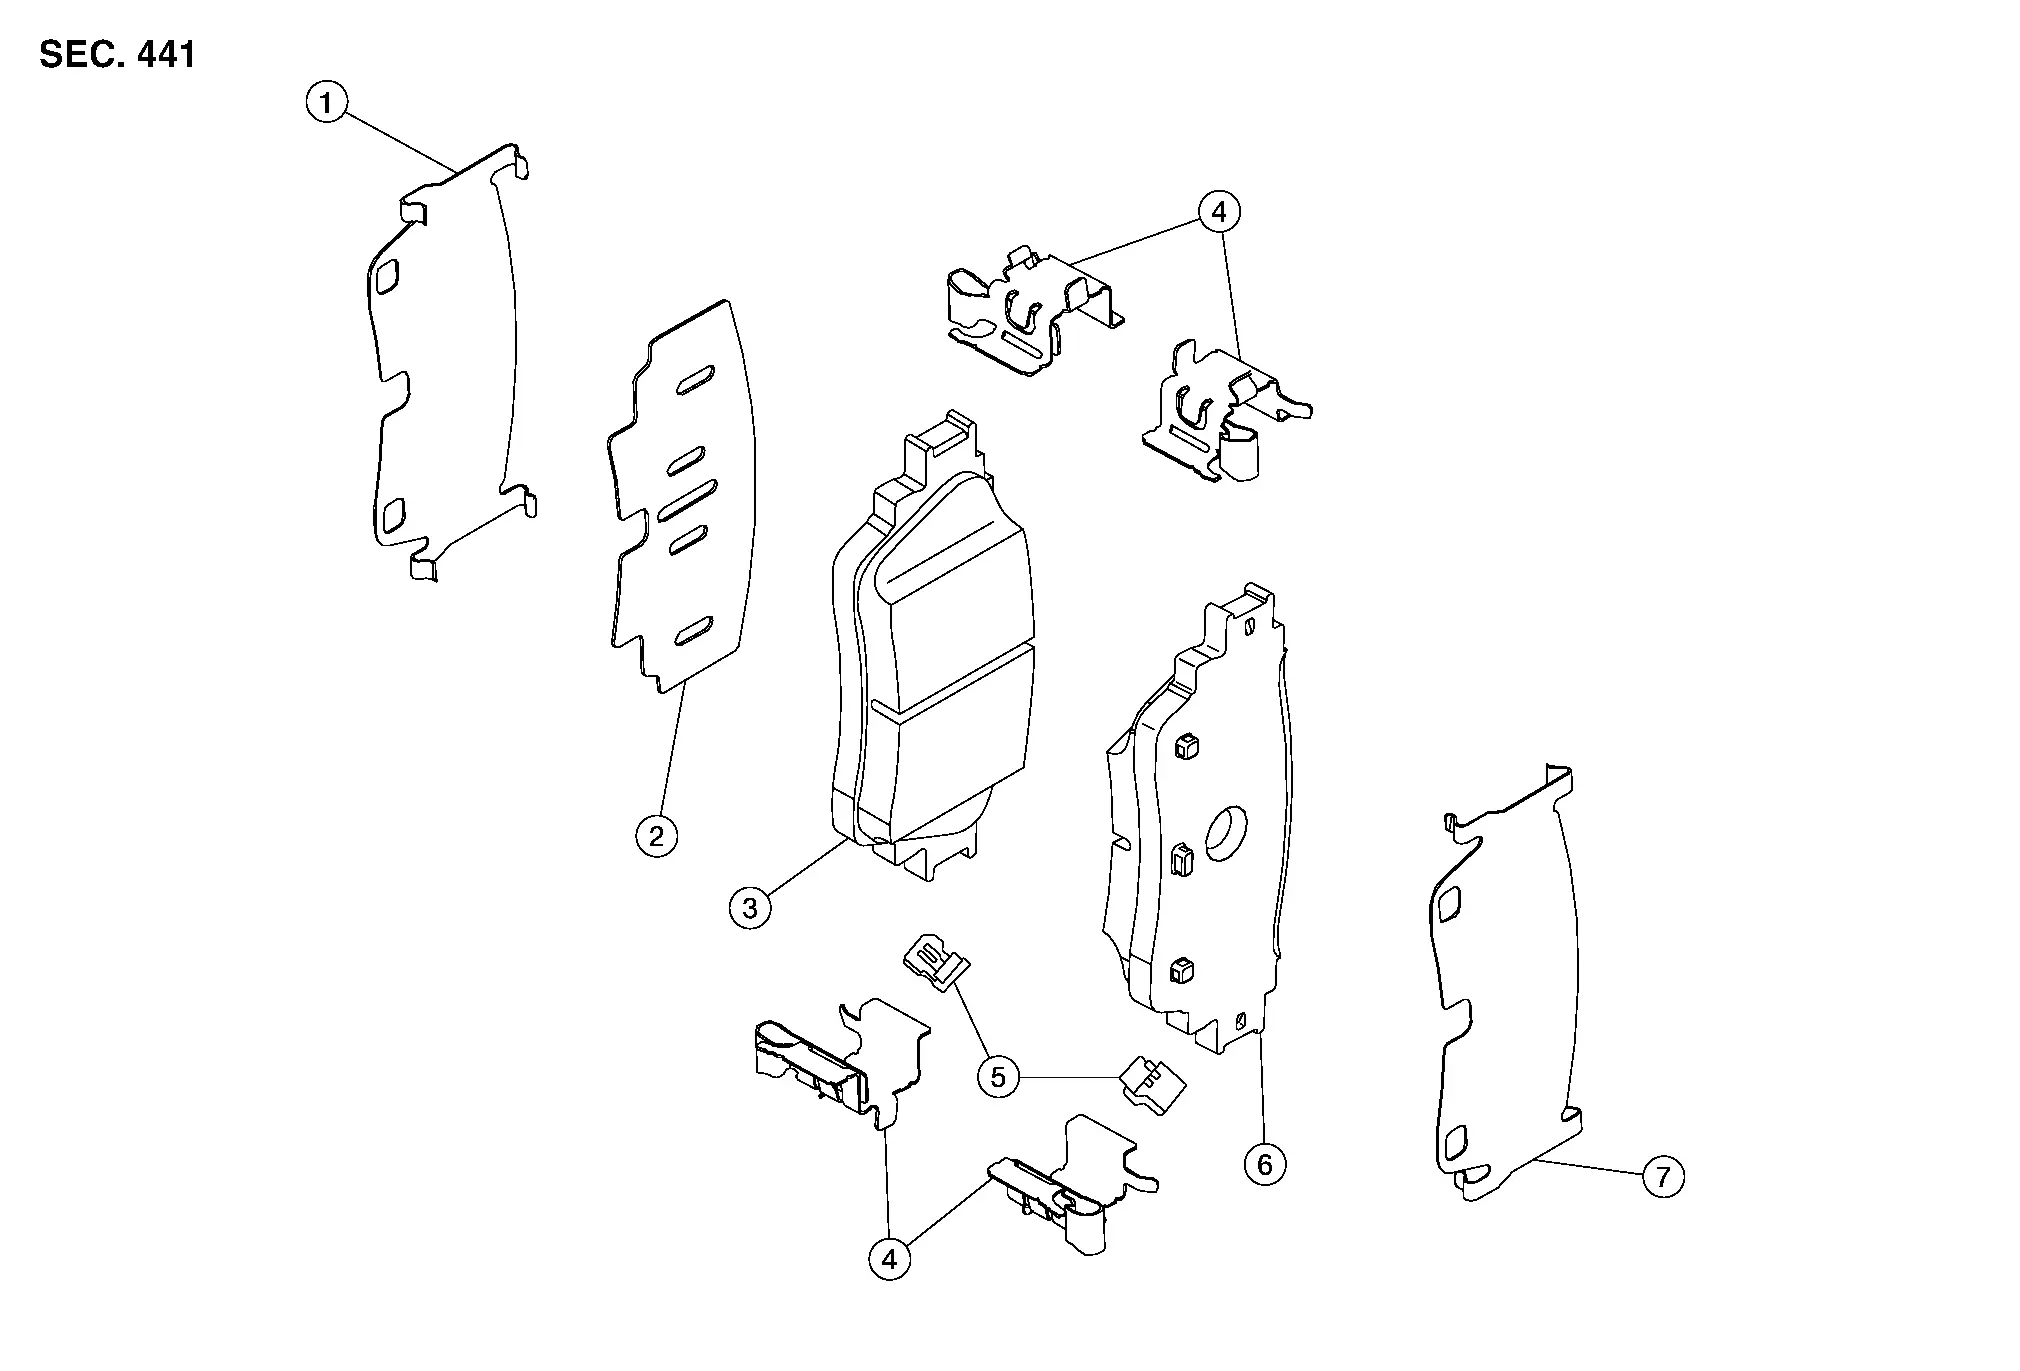
| 1. | Inner shim cover | 2. | Inner shim | 3. | Inner pad |
| 4. | Pad retainer | 5. | Wear indicator | 6. | Outer pad |
| 7. | Outer shim |
Removal and Installation
REMOVAL
Observe the brake fluid level in the reservoir tank. Partially drain brake fluid if necessary. Refer to Draining.
Remove the rear wheel and tire using a power tool. Refer to Removal and Installation.
Secure the disc brake rotor using wheel nuts.
Remove the slide pin bolts. Refer to Exploded View.
Remove the brake caliper from the torque member. Leaving the brake hose attached, reposition the brake caliper aside using wire.
Remove the slide pins from the torque member..
Remove the brake pads, shims, shim cover, wear indicators, and pad retainers from the torque member. Refer to Exploded View.
INSTALLATION
Apply rubber grease to the slide pins. Refer to Exploded View.
Install the slide pins to the torque member.
Install the pad retainers to the torque member. Refer to Exploded View.
Install the wear indicators to the brake pads.
Install the shims to the brake pads.
Install the shim cover to the inner brake pad.
Install the brake pads, shims, shim cover, and wear indicators to the torque member.
Install the brake caliper to the torque member.
Install the slide pin bolts. Refer to Exploded View.
Depress the brake pedal several times and verify that drag does not exist.
Install the rear wheel and tire. Refer to Removal and Installation.
Check brake fluid level and refill as necessary. Refer to Inspection.
INSPECTION AFTER INSTALLATION
Check the drag of the rear disc brake. If any drag is found, perform the following procedure:Remove the rear brake pads.
Install the brake pads. Depress the brake pedal several times. Check the drag of the rear disc brake again. If any drag is found, disassemble the brake caliper body. Refer to Disassembly and Assembly.Burnish contact surfaces after replacing the brake pads or if a soft pedal occurs at very low mileage. Refer to Periodic Maintenance Operation.
Rear Brake Caliper Assembly ➤ Nissan Pathfinder 2026
Rear Disc Brake Rotor Nissan Pathfinder 5th Gen
Exploded View
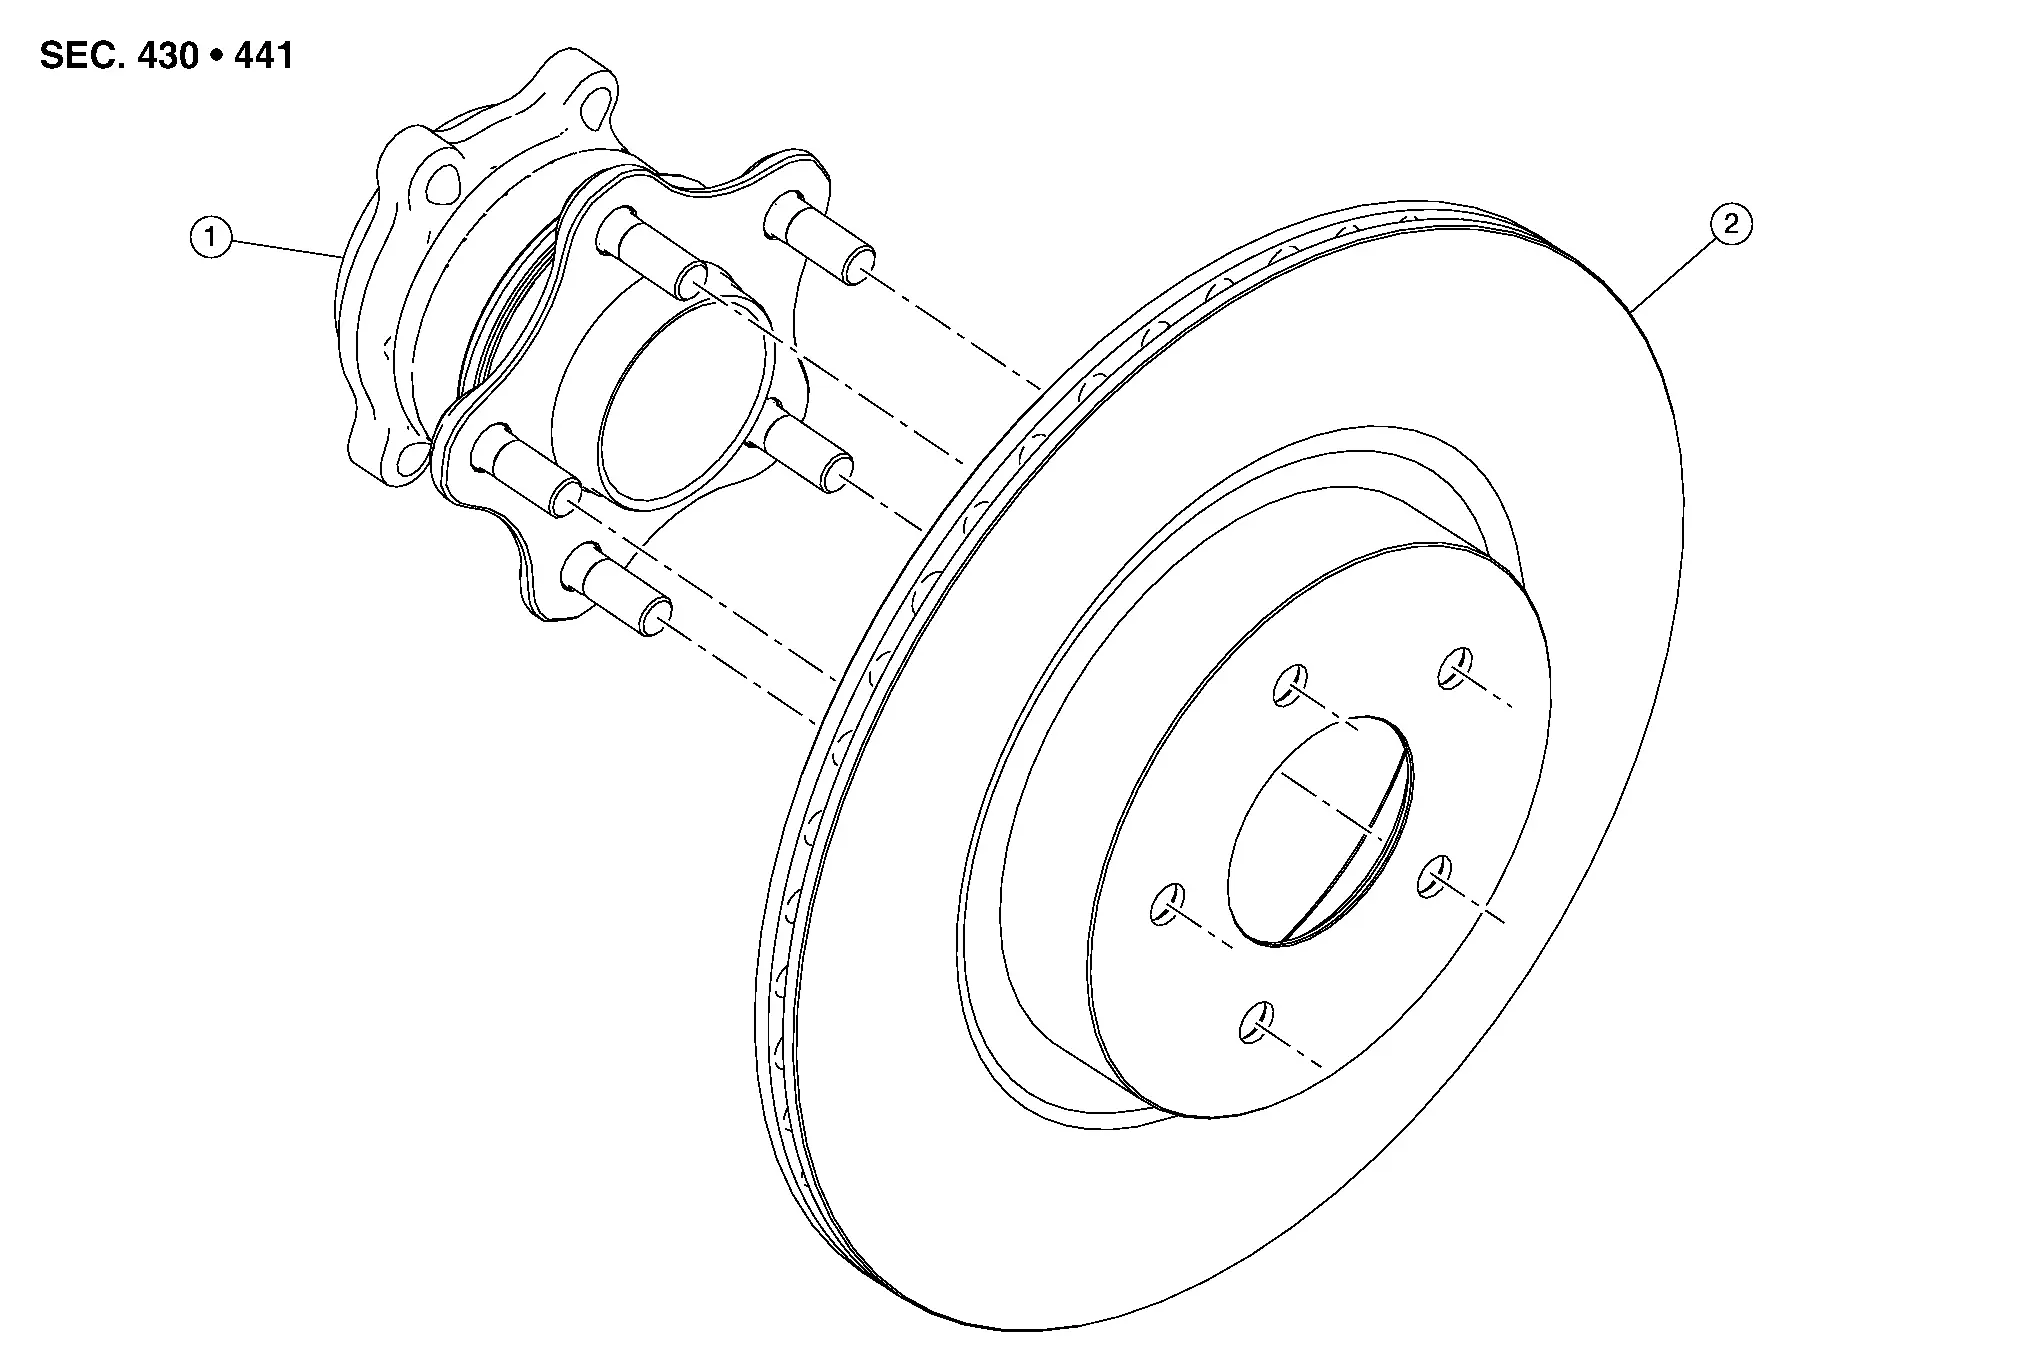
| 1. | Wheel hub and bearing | 2. | Disc brake rotor |
Removal and Installation
REMOVAL
Observe the brake fluid level in the reservoir tank. Partially drain brake fluid if necessary. Refer to Draining.
Remove the rear wheel and tire using a power tool. Refer to Removal and Installation.
Remove the brake pads, shims, shim cover, and wear indicators from the torque member. Refer to Removal and Installation.
Remove the bolts and the torque member. Refer to Exploded View.
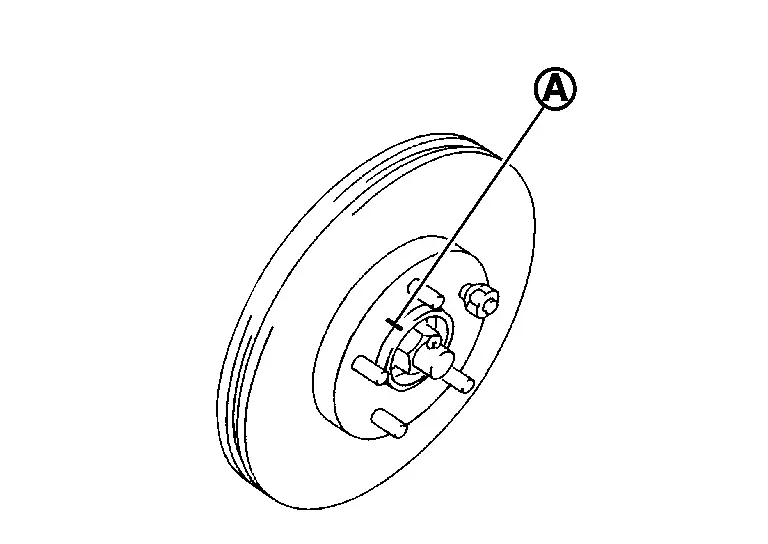
Place alignment marks (A) on the disc brake rotor and the wheel hub, then remove the disc brake rotor.
INSTALLATION
Installation is in the reverse order of removal.
Check the brake fluid level and refill as necessary. Refer to Inspection.
Perform the inspection after installation.
INSPECTION AFTER INSTALLATION
Burnish contact surfaces after refinishing or replacing disc brake rotors or if a soft pedal occurs at very low mileage. Refer to Periodic Maintenance Operation.