Air conditioner compressor, R744
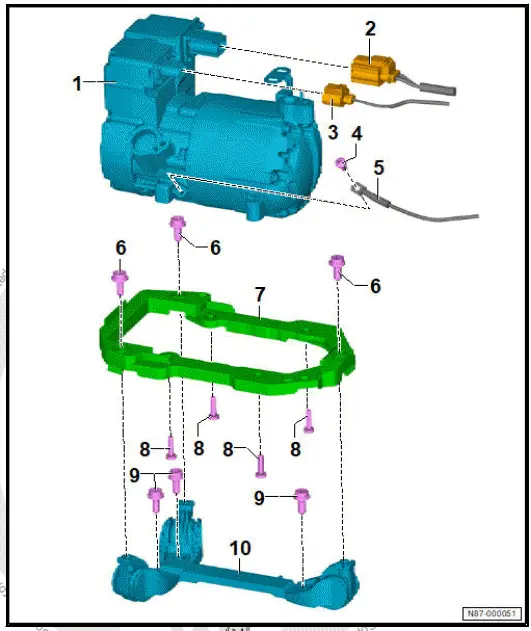
- Assembly overview - air conditioner compressor
- Detaching and attaching refrigerant lines at air conditioner compressor
- Removing and installing air conditioner compressor [VX81]
Assembly overview - air conditioner compressor
- Air conditioner compressor - VX81-
- ⇒ Rep. gr. 87 ; Removing and installing air conditioner compressor [VX81]
- Electrical connector for high-voltage system
- ⇒ Electric drive motor; Rep. gr. 93 ; High-voltage cables; Overview of fitting locations - high-voltage cables
- Electrical connector
- Bolt
- 8 N·m
- Potential equalisation line
- Electric drive motor; Rep. gr. 93 ; Potential equalisation lines; Overview of fitting locations - potential equalisation lines
- Bolt
- Qty. 3
- 20 N·m
- Retainer
- Rep. gr. 87 ; Detaching and attaching air conditioner compressor at bracket
- Bolt
- Qty. 4
- 8 N·m
- Bolt
- Qty. 3
- 20 N·m
- Retainer
- ⇒ Rep. gr. 87 ; Detaching and attaching air conditioner compressor at bracket
Detaching and attaching refrigerant lines at air conditioner compressor
Special tools and workshop equipment required
- engine bung set - VAS 6122-
Detaching
Seal open lines and connections immediately with clean plugs from engine bung set - VAS 6122- .
- Perform function "Opening electrically actuated valves in refrigerant circuit for extracting, evacuating and charging" with ⇒ Vehicle diagnostic tester ⇒ Rep. gr. 00 ; Starting diagnosis .
- ⇒ Air conditioners with refrigerant R744 - General information; Rep. gr. 87 ; Working with the air conditioner service station; Discharging refrigerant circuit .
- Remove vibration isolation strut ⇒ General body repairs, exterior; Rep. gr. 50 ; Lock carrier; Removing and installing vibration isolation strut .
- Release retaining tab -3-.
- Take out cover -2-.
- Take cover -1- out of guide.

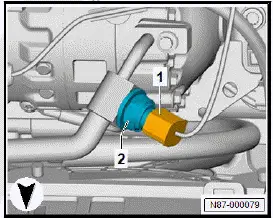
- Unplug electrical connector -1- on refrigerant pressure and temperature sender - G395- -2-.
CAUTION
Risk of frostbite from escaping pressurised refrigerant Risk of frostbite on skin and other parts of the body
- Put on protective gloves.
- Put on safety goggles.
- Extract/drain refrigerant and then immediately open up refrigerant circuit.
- Extract/drain refrigerant again if more than 10 minutes have passed since initial extraction and refrigerant circuit has not been opened up. Renewed evaporation has created pressure in the refrigerant circuit.
NOTICE
Danger of irreparable damage to refrigerant lines if the inside film is torn.
- Never bend refrigerant lines to a radius smaller than r = 100 mm.

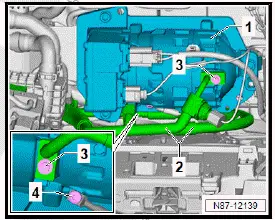
- Remove bolts -3- and detach refrigerant lines -2-.
Attaching
Installation is carried out in reverse order; note the following:
- Install seals and retaining elements, making sure they are free of oil.
- Connect refrigerant lines -2- and tighten bolts -3-.
- Perform function "Opening electrically actuated valves in refrigerant circuit for extracting, evacuating and charging" with ⇒ Vehicle diagnostic tester ⇒ Rep. gr. 00 ; Starting diagnosis .
- ⇒ Air conditioners with refrigerant R744 - General information; Rep. gr. 87 ; Working with the air conditioner service station; Charging refrigerant circuit
Tightening torques
- ⇒ Rep. gr. 87 ; Assembly overview - refrigerant lines
Removing and installing air conditioner compressor [VX81]
Special tools and workshop equipment required
- engine bung set - VAS 6122-
Removing
Immediately seal open lines and connections with clean plugs from engine bung set - VAS 6122- .
- Carry out function "Open electrically actuated valves to drain, evacuate or charge refrigerant circuit" using ⇒ Vehicle diagnostic tester ⇒ Rep. gr. 00 ; Access to diagnoses .
- ⇒ Air conditioning systems with refrigerant R744 - General notes; Rep. gr. 87 ; Working with air conditioner service station; Draining refrigerant circuit .
DANGER
High voltage can cause fatal injury.
Danger of severe or fatal injuries from electric shock or electric arcs.
- Have a high-voltage technician (HVT) or a high-voltage expert (HVE) de-energise the high-voltage system.
- ⇒ Rep. gr. 93 ; De-energise high-voltage system .
- Remove air intake box of heater and air conditioning unit ⇒ Rep. gr. 87 ; Removing and installing air intake unit of heater and air conditioning unit .
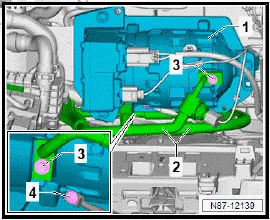
- Disconnect electrical connectors -3-, and unclip electrical wires ⇒ Electric drive motor; Rep. gr. 93 ; High-voltage cables; Disconnecting high-voltage connectors .
- Unclip cable holder -4-.
- Unscrew bolts -2-.

- Unscrew bolt -4-.
CAUTION
Risk of frostbite from escaping pressurised refrigerant Risk of frostbite on skin and other parts of the body
- Put on protective gloves.
- Put on safety goggles.
- Extract/drain refrigerant and then immediately open up refrigerant circuit.
- Extract/drain refrigerant again if more than 10 minutes have passed since initial extraction and refrigerant circuit has not been opened up. Renewed evaporation has created pressure in the refrigerant circuit.
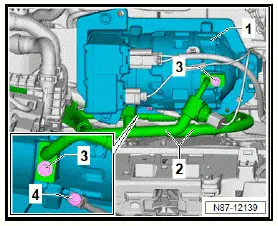
- Unscrew bolts -3-, and pull off refrigerant lines.
- Remove air conditioner compressor - VX81- -1-.
If air conditioner compressor needs to be disconnected from bracket:
- ⇒ Rep. gr. 87 ; Detaching/attaching air conditioner compressor from/to bracket .
Installing
Install in reverse order of removal, observing the following:
When renewing air conditioner compressor:
- Carry out adaption routine for refrigerant oil capacity, and clean refrigerant circuit, if necessary ⇒ General information - air conditioning systems with refrigerant R744; Rep.
gr. 87 ; Renewing components .
Continued
- Install seals and captive fasteners free of oil.
Check contact points of potential equalisation line, and clean them if necessary ⇒ Electrical system; Rep. gr. 97 ; Cleaning contact surfaces .
Important
Contact surfaces must be free of dirt, rust and grease.
- Connect potential equalisation line, and tighten bolt -4-.
- Carry out function "Open electrically actuated valves to drain, evacuate or charge refrigerant circuit" using ⇒ Vehicle diagnostic tester ⇒ Rep. gr. 00 ; Access to diagnoses .
- ⇒ Air conditioning systems with refrigerant R744 - General notes; Rep. gr. 87 ; Working with air conditioner service station; Charging refrigerant circuit .
WARNING
High voltage can cause fatal injury.
Danger of severe or fatal injuries from electric shock or electric arcs.
- Have a high-voltage technician (HVT) or a high-voltage expert (HVE) re-energise the high-voltage system.
- ⇒ Rep. gr. 93 ; Re-energising high-voltage system .
After renewal of air conditioner compressor:
- After charging refrigerant circuit and re-energising high-voltage system, carry out functions "Adapt air conditioning compressor" and "Compressor run-in" using ⇒ Vehicle diagnostic tester ⇒ Rep. gr. 00 ; Access to diagnoses .
Continued
Tightening torques
- ⇒ Rep. gr. 87 ; Assembly overview - air conditioner compressor
- ⇒ Rep. gr. 87 ; Assembly overview - refrigerant lines
Detaching/attaching air conditioner compressor [VX81] from/to bracket
Removing
- Remove air conditioner compressor - VX81- ⇒ Rep. gr. 87 ; Removing and installing air conditioner compressor [VX81] .
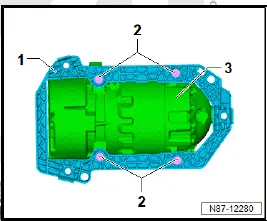
- Unscrew bolts -2-.
- Detach air conditioner compressor -3- from bracket -1-.
Installing
Install in the reverse sequence of removal, observing the following:
Tightening torques
- ⇒ Rep. gr. 87 ; Assembly overview - air conditioner compressor