Rear axle
In this manual: Rear axle
~9min read
- Overview of fitting locations - rear axle
- Removing and installing rear axle
- Lowering rear axle
- Securing vehicle to support arms of lifting platform
Overview of fitting locations - rear axle
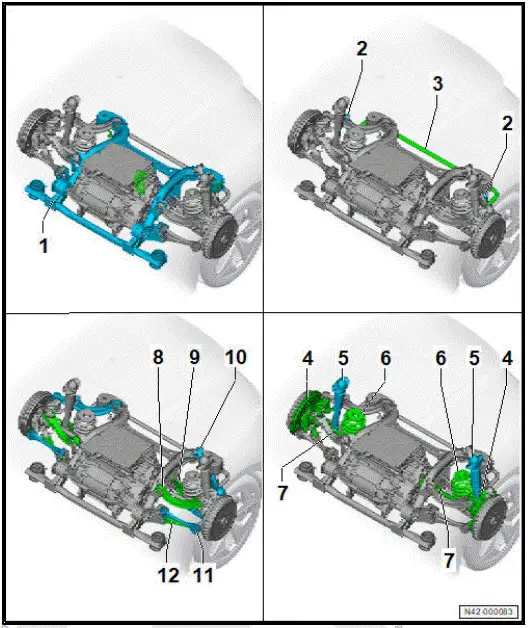
- Subframe
- ⇒ Rep. gr. 42 ; Assembly overview - subframe
- ⇒ Rep. gr. 42 ; Taking up weight of subframe using scissor-type assembly platform
- ⇒ Rep. gr. 42 ; Removing and installing rear axle
- Coupling rod
- ⇒ Rep. gr. 42 ; Assembly overview - antiroll bar
- ⇒ Rep. gr. 42 ; Removing and installing coupling rod
- Anti-roll bar
- ⇒ Rep. gr. 42 ; Assembly overview - antiroll bar
- ⇒ Rep. gr. 42 ; Removing and installing anti-roll bar
- Wheel bearing housing
- ⇒ Rep. gr. 42 ; Assembly overview - wheel bearing
- ⇒ Rep. gr. 42 ; Removing and installing wheel bearing housing
- Shock absorbers
- ⇒ Rep. gr. 42 ; Assembly overview - shock absorber
- ⇒ Rep. gr. 42 ; Removing and installing shock absorber
- Spring
- ⇒ Rep. gr. 42 ; Assembly overview - spring
- ⇒ Rep. gr. 42 ; Removing and installing spring
- Drive shaft
- ⇒ Rep. gr. 42 ; Assembly overview - drive shaft
- ⇒ Rep. gr. 42 ; Removing and installing drive shaft
- Upper link (front)
- ⇒ Rep. gr. 42 ; Assembly overview - suspension link
- ⇒ Rep. gr. 42 ; Removing and installing upper front suspension link
- Spring control arm
- ⇒ Rep. gr. 42 ; Assembly overview - spring control arm
- ⇒ Rep. gr. 42 ; Removing and installing spring control arm
- Upper rear suspension link
- ⇒ Rep. gr. 42 ; Assembly overview - suspension link
- ⇒ Rep. gr. 42 ; Removing and installing upper rear suspension link
- Track rod
- ⇒ Rep. gr. 42 ; Assembly overview - track rod
- ⇒ Rep. gr. 42 ; Removing and installing track rod
- Lower suspension link
- ⇒ Rep. gr. 42 ; Assembly overview - suspension link
- ⇒ Rep. gr. 42 ; Removing and installing lower suspension link
Removing and installing rear axle
Special tools and workshop equipment required
- scissor-type assembly platform - VAS 6131B-
- tensioning strap - T10038-
Removing
- Remove motor ⇒ Rep. gr. 10 ; Removing and installing rear motor; Removing rear motor .
- Remove springs ⇒ Rep. gr. 42 ; Removing and installing springs .
- Remove rear wheel housing liners ⇒ General body repairs, exterior; Rep. gr. 66 ; Wheel housing liner; Removing and installing rear wheel housing liner .
- Disconnect electrical connector -2- on left parking brake motor - V282- and on right parking brake motor - V283- -1-.
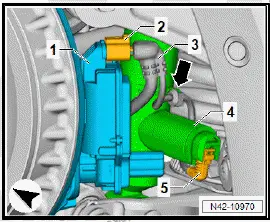
Vehicles with adaptive chassis control
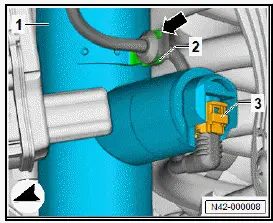
- Disconnect electrical connector -3- on rear left shock absorber damping adjustment valve - N338- and on rear right shock absorber damping adjustment valve - N339- .
- Pull electrical wire off retainer on shock absorber -2- on both sides of vehicle -arrow-.
All vehicles (continued)
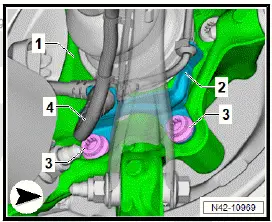
- Disconnect electrical wire -3- on rear left vehicle level sender - G76- -4-.
- Pull off electrical wire -2- on rear axle -1- -arrow-.
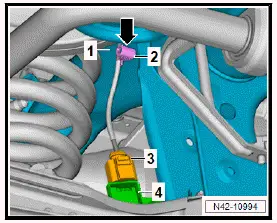
- Pull electrical wire -4- off retainer -2-.
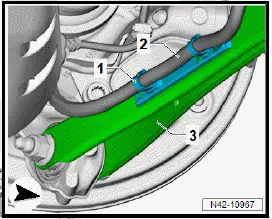
- Unclip retainer -1- for electrical wire -2- from lower suspension link -3-.
- To do this, press together locking lugs of retainer -1- at inside of lower suspension link -3-.
- Pull electrical wire -3- off retainer -4- on both sides of vehicle.
- Unclip electrical wire -3- from rear axle -1- on both sides of vehicle -2-.
- Disconnect electrical connector -2- on rear left speed sensor - G46- and on rear right speed sensor - G44- -3-.

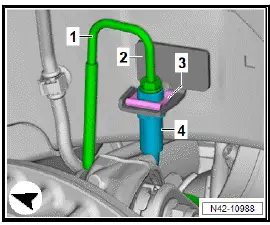
- Pull retaining clip -3- off brake hose -4- on both sides of vehicle.
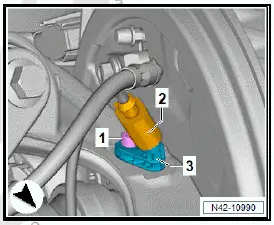
- Unscrew brake line -1- on both sides of vehicle.
- Pull brake hose -4- out of retainer -2- on both sides of vehicle.
- Unclip electrical wire -3- from retainer -1- on right side of vehicle -arrows-.
- Unclip electrical wire -6- from retainer -4- on left side of vehicle -arrow-.
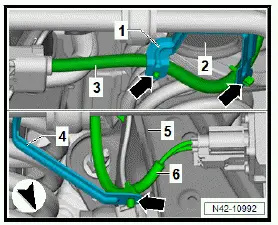
For greater clarity, the illustration shows the rear axle from above.
- Completely detach electrical wire -3- on rear axle -1-, and move it aside.
- Unclip brake lines -5- on rear axle -1- from retainers -arrows-.
- Pull cable guide -4- upwards off rear axle -1-.
- Secure electrical wire and brake lines to vehicle using suitable workshop materials.

- ⇒ Rep. gr. 42 ; Fix subframe in position .
- Unscrew bolts -3- for shock absorbers -4- and -5-.
- ⇒ Rep. gr. 42 ; Take up weight of subframe using scissortype assembly platform .
NOTICE
Risk of lines becoming damaged due to limited space.
- When lowering, ensure sufficient clearance to brake lines and electrical wiring.
- Lower subframe with attachments using scissor-type assembly platform - VAS 6131B- .
- Use a tensioning strap - T10038- to secure subframe to scissor-type assembly platform - VAS 6131B- .
- Lower subframe with attachments further using scissor-type assembly platform - VAS 6131B- .
Installing
Install in reverse order of removal, observing the following:
- Carry out required function/functions using ⇒ Vehicle diagnostic tester ⇒ Rep. gr. 00 ; Access to diagnoses .
- ⇒ Rep. gr. 44 ; When does wheel alignment have to be checked?
Tightening torques
- ⇒ Rep. gr. 42 ; Assembly overview - subframe
- ⇒ Rep. gr. 42 ; Assembly overview - shock absorber
Lowering rear axle
Lowering rear axle, front section
Special tools and workshop equipment required
- engine and gearbox jack - VAS 6931-
- gearbox support - T10337-
- Remove rear underbody cladding ⇒ General body repairs, exterior; Rep. gr. 66 ; Underbody cladding; Removing and installing rear underbody cladding .
- Unclip brake line -1- on right side of subframe -2- -arrow Aand -arrow B-.
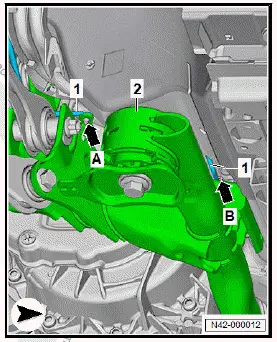
- Unclip brake line -1- on left side of subframe -2- -arrows-.
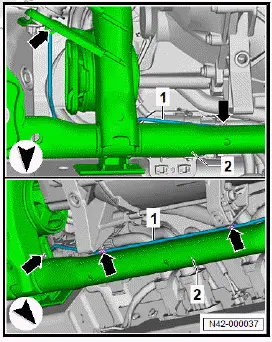
- Fit gearbox support - T10337- -A- onto engine and gearbox jack - VAS 6931- -B-.
- Position gearbox support - T10337- -A- on subframe -1-.
- Support subframe -1- with engine and gearbox jack - VAS 6931- -B-.
- Unscrew bolts -2- from subframe -1- on both sides of vehicle.
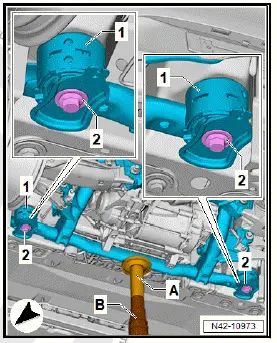
NOTICE
Risk of damage to electrical wires, hoses and connections!
- Do not lower subframe any further than specified.
- When lowering, make sure not to damage any components.
- Lower subframe -1- approx. 35 mm.
Installing
Install in reverse order of removal, observing the following:
Vehicles with intermediate plates on front mountings on subframe
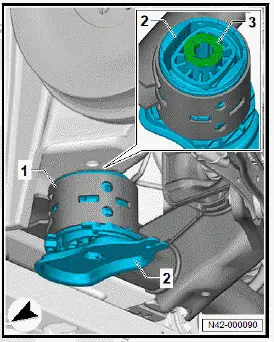
- Check if intermediate plate -1- is fitted between body and mounting.
Important
- There may be no intermediate plates -1- fitted on front subframe mounting -4- (fluted surface -3-).
- Renew intermediate plate -3-.
Important
- Intermediate plates -3- must be fitted on both sides of vehicle.
- Insert intermediate plates -3- with locking lugs into front subframe mounting -2-
All vehicles (continued)
Tightening torques
- ⇒ Rep. gr. 42 ; Assembly overview - subframe
Lowering rear axle, rear section
Special tools and workshop equipment required
- engine and gearbox jack - VAS 6931-
- gearbox support - T10337-
- Remove rear underbody cladding ⇒ General body repairs, exterior; Rep. gr. 66 ; Underbody cladding; Removing and installing rear underbody cladding .
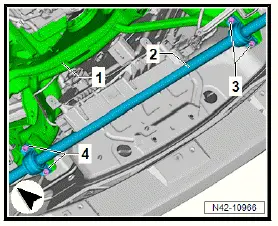
- Unscrew bolts -3- and -4- for anti-roll bar -2- on subframe -1-. Hold anti-roll bar when doing this.
- Detach anti-roll bar from subframe, and swing it downwards.
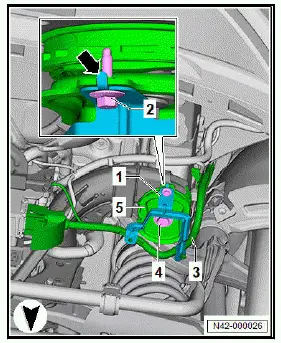
- Unscrew bolt -2- from subframe mounting on rear right -5-.
- Lay aside bracket -1- with electrical wire -3-.
- Unscrew bolt -2- from subframe mounting on rear left -5-.
- Lay aside bracket -1- with electrical wire -3-.

- Fit gearbox support - T10337- -A- onto engine and gearbox jack - VAS 6931- -B-.
- Position gearbox support - T10337- -A- on subframe -1-.
- Support subframe -1- with engine and gearbox jack - VAS 6931- -B-.
- Unscrew bolts -2-.
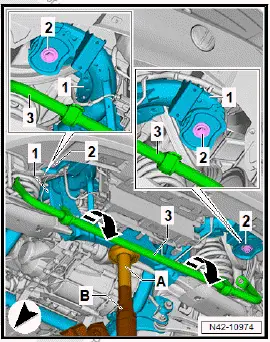
NOTICE
Risk of damage to electrical wires, hoses and connections!
- Do not lower subframe any further than specified.
- When lowering, make sure not to damage any components.
- Lower subframe -1- by 35 mm.
Installing
Install in reverse order of removal, observing the following:
Tightening torques
- ⇒ Rep. gr. 42 ; Assembly overview - subframe
Securing vehicle to support arms of lifting platform
Special tools and workshop equipment required
- tensioning strap - T10523-
Removal and installation are described for the left side of vehicle as an example.
Securing for work on suspension links:
- Remove rear centre underbody cladding ⇒ General body repairs, exterior; Rep. gr. 66 ; Underbody cladding; Removing and installing rear centre underbody cladding .
- Wrap tensioning strap - T10523- -A- support arms of lifting platform -B- on both sides of vehicle.
NOTICE
Risk of damage to lines.
- Make sure that no brake lines, electrical wires, hoses or connections are trapped or put under tension.
- Lay tensioning strap - T10523- -A- around rear axle -1-.
- Insert end of tensioning strap into ratchet of tensioning strap - T10523- -A-.
- Tension the tensioning strap - T10523- -A-.
All vehicles (continued)
Securing for work on rear axle and to remove rear axle:
- Join three tensioning straps - T10523- to each other.
NOTICE
Risk of damage to the vehicle if protective measures are insufficient.
- Cover paintwork and components using suitable workshop materials to protect them against damage.
- Make sure that no brake lines, electrical wires, hoses and connections are damaged when routing the tensioning straps.
- Position ratchets of tensioning strap so that they do not cause damage and can be actuated.
- Open rear doors on both sides of vehicle.
- Route tensioning strap - T10523- -1- through vehicle and around lifting platform.
- Wrap tensioning strap - T10523- -1- around support arms -2- of lifting platform on both sides of vehicle.
- Route tensioning strap - T10523- -1- beneath vehicle.
- Insert end of tensioning strap into ratchet of tensioning strap - T10523- -1-.
- Tension the tensioning strap - T10523- -1-.
Was this page helpful?