Packaging high-voltage batteries
- General information about packaging high-voltage batteries
- Packaging high-voltage batteries in genuine part crate
- Packing defective high-voltage batteries with "normal" status, module
General information about packaging high-voltage batteries
The procedure described here is based on the European agreement concerning the international carriage of dangerous goods by road (ADR). Country-specific legislation must be observed.
According to ADR regulations, the listed high-voltage batteries come under category UN 3480. For the latest packaging instructions and special regulations, see the hazardous materials table of the ADR.
The procedure is orientated around the classification status of the high-voltage battery.
For transporting high-voltage batteries with the status "WARNING", the currently applicable transport laws apply.
It is not permissible to transport high-voltage batteries with the status "DANGER".
Start situation:
Batteries that are new, in use or used but functional, e.g. warranty case due to low residual capacity.
Execution of classification:
HVT or HVE
Classification status:
- Technically OK
- "NORMAL" status
Assignment of packaging regulation:
P 903 / LP 903 transport in genuine part crate (protect battery against short circuit and slipping).
If the battery is to be disposed of or recycled, SV 377: P909 => e.g. genuine part crate labelled accordingly: LITHIUM BATTERIES FOR DISPOSAL or LITHIUM BATTERIES FOR RECYCLING
Start situation:
Batteries damaged/ defective but safe for transport, e.g.
defective cell controller, triggered pyrofuse without other defects.
Execution of classification:
HVE
Classification status:
- Technically not OK
- "NORMAL" status
Assignment of packaging regulation:
SV 376: P 908 / LP 904 applies, carton according to packaging group, inner packaging (individually in inner packaging) and outer packaging required (>30 kg= only one battery per outer packaging), foil around battery/ electrolyte leakage must be prevented, ventilation if necessary, e.g. inner packaging required (inc. non-flammable, non-conductive heat insulation). Protect battery against short circuit. Consignment label: DAMAGED/DEFECTIVE LITHIUM-ION BATTERIES or DAMAGED/DEFECTIVE LITHIUM METAL BATTERIES, reference in transport documents: TRANSPORT AS PER SPECIAL REGULATION 376
Start situation:
Batteries heavily damaged and transport critical SV 376 (e.g.
leaking electrolyte, relevant cell defects).
Execution of classification:
HVE, consultation with importer if necessary
Classification status:
- Technically not OK
- "WARNING" statu
Assignment of packaging regulation:
P 911 / LP 906 special transport container required (see overview).
Packaging approved by relevant authority. The applicable transport laws apply. Packaging according to packaging group I, consignment label: DAMAGED/ DEFECTIVE LITHIUM-ION BATTERIES or DAMAGED/DEFECTIVE LITHIUM METAL BATTERIES, reference in transport documents: TRANSPORT AS PER SPECIAL REGULATION 376
Start situation:
Battery reactive (heat development/ fire/ smoke, noise etc.).
Execution of classification:
Maintain distance , call fire service if necessary.
Classification status:
- Technically not OK
- "DANGER" status
Assignment of packaging regulation:
Do not consign
Packaging high-voltage batteries in genuine part crate
Special tools and workshop equipment required
- Anhaengevorrichtung - T10616-
- Holding strap - T40155A-
- Lift arm extension/workshop hoist - VAS 6101-
- Lifting ring - VAS 501 013-
- Scissor-type assembly platform VAS 6131B 208 - 230V - VAS 6131B-
- Shackle - VAS 691 009A-
- Workshop hoist - VAS 6100-
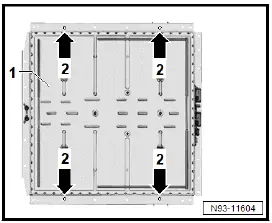
Mounting points 55 kWh and 62 kWh
Important
- The mounting points shown -arrows- must be used.
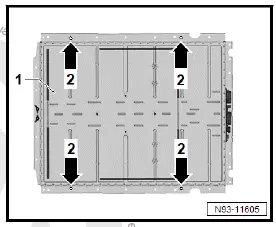
Mounting points 82 kWh
Important
- The mounting points shown -arrows- must be used.
All vehicles (continued)
Preparing for lifting (shown on 82 kWh)
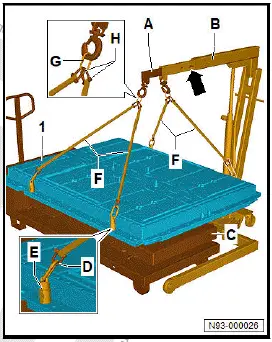
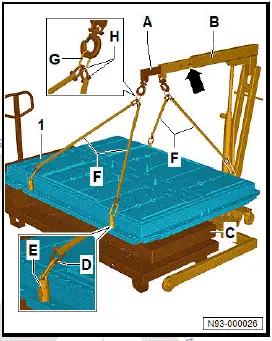
- Secure extension for lifting arm/workshop hoist - VAS 6101- -A- at position -arrow- to workshop hoist - VAS 6100- -B-.

Removing new high-voltage battery from genuine part crate
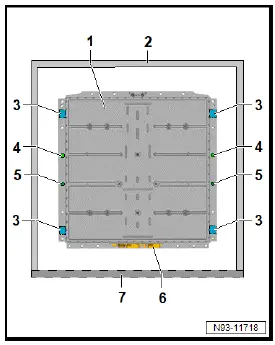
- Open genuine part crate -2-.
- Loosen bolts -4-.
- Remove nuts and washers.

- Position workshop hoist - VAS 6100- -B- centrally above high-voltage battery -1-.
- Secure retaining strap - T40155A- -F- with shackle - VAS 691 009A- -H- and ring - VAS 501 013- -G- to lift arm extension/ workshop hoist - VAS 6101- -A- and workshop hoist - VAS 6100- -B-.
- Secure retaining strap - T40155A- -F- with shackle - VAS 691 009A- -D- to mounting bracket - T10616- -E-.
CAUTION
Risk of injury caused by moving components.
Risk of hands being crushed.
- Never reach in between workshop hoist and high-voltage battery.
- Raise high-voltage battery.
- Place high-voltage battery on suitable surface.
- Detach shackle - VAS 691 009A- -D- from mounting bracket - T10616- -E-.
- Unscrew mounting bracket - T10616- -E-.
Removing high-voltage battery and placing in genuine part crate
- Assess condition of high-voltage battery in installed state ⇒ "3.1.2 Classification of high-voltage batteries with aid of ODIS".
- Remove high-voltage battery ⇒ Electric drive, rear-wheel drive EIP220 and all-wheel drive EIA200, EIP220; Rep.
gr. 93 ; High-voltage battery unit; Removing and installing high-voltage battery 1 [AX2], 82 kWh; Removing and installing high-voltage battery 1 [AX2] .
- Support high-voltage battery on scissor-type assembly platform - VAS 6131B- .
- Lower high-voltage battery -1- into genuine part crate -2-.
Important
- Connector housing -6- must point towards opening -7- of genuine part crate -2-.
- Locking pins -5- must be inserted in associated holes of high-voltage battery -1-.
- Insert locking pins -5- in associated holes of high-voltage battery -1-.
- Position high-voltage battery -1- at support points -3- in genuine part crate -2-.
- Detach shackle - VAS 691 009A- -D- from mounting bracket - T10616- -E-.
- Unscrew mounting bracket - T10616- -E-.
Securing high-voltage battery in genuine part crate
Detailed view
- Bolt
- Nut
- Small washer
- Large washer
- High-voltage battery
- Genuine part crate
- Small washer
- Nut
- Genuine part crate
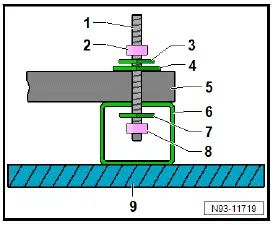
- Secure high-voltage battery -5-.
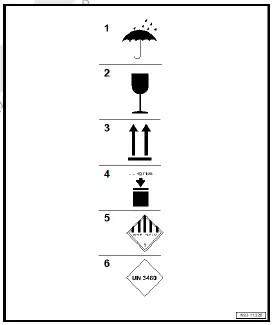
Sealing genuine part crate and preparing for transport
- Fit lid on genuine part crate.
- Attach tensioning straps.
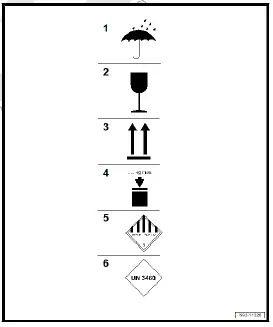
- Affix and check hazardous material label and consignment code.
- Fill in and insert transport documents.
- "Protect against water"
- "Attention! Fragile"
- "This side up"
- "Maximum stacking load"
- "Hazardous material label: Hazardous material category 9 "Various hazardous substances and items" packaging group 2"
- "Type label with UN number UN 3480 for lithium-ion batteries"
Placing new high-voltage battery on scissor-type assembly platform - VAS 6131B- and installing
- Support high-voltage battery.
- Place high-voltage battery on scissor-type assembly platform - VAS 6131B- .
- Install high-voltage battery ⇒ Electric drive, rear-wheel drive EIP220 and all-wheel drive EIA200, EIP220; Rep. gr. 93 ; High-voltage battery unit; Removing and installing high-voltage battery 1 [AX2], 82 kWh .
Tightening torques 
Packing defective high-voltage batteries with "normal" status, module
Special tools and workshop equipment required
- Lifting aid - 3033-
- Lifting aid - T10619-
- Workshop hoist - VAS 6100-
The description applies to defective high-voltage battery modules that are sufficiently stable for being transported.
- Classify high-voltage module ⇒ "3.1.2 Classification of highvoltage batteries with aid of ODIS"
All vehicles (continued)
Removing new module from packaging
Do not damage the packaging when opening and removing the stickers. Do not peel off the adhesive tape.
- Cut adhesive tape with a cutter knife and open packaging.
- Remove existing stickers or make them unrecognisable.
Continued
- Secure mounting bracket - T10619- to module.
- Secure lifting tackle - 3033- to workshop hoist - VAS 6100- .
- Position workshop hoist - VAS 6100- centrally above module.
- Secure lifting tackle - 3033- to mounting bracket - T10619- .
- Use workshop hoist - VAS 6100- to lift module out of cardboard box, and place module on suitable surface.
Preparing packaging
UN stickers must not be pasted over.
- Remove cardboard insert from packaging.
- Turn packaging over
- Use adhesive filament tape -2- to close packaging -1- with overlaps as shown in illustration.
Filament adhesive tape, refer to ⇒ Electronic parts catalogue (ETKA)
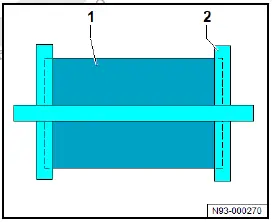
Packing defective module with "normal" status
- Use adhesive tape to protect all contacts of battery modules against being short-circuited.
Packing with hollow glass granulate or vermiculite
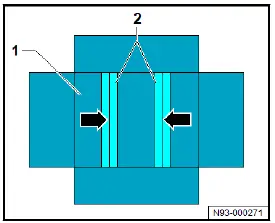
- Use filament adhesive tape -2- to close overlap -arrows- at bottom of packaging.
WARNING
Risk to health due to dust from expanded glass granules.
Risk of irreversible dust deposits in lungs, which could lead to respiratory problems.
- Wear a dust protection mask.
- Wear a face mask.
- Fill hollow glass granulate or vermiculite into packaging with an even layer thickness of 2 cm.
- Secure mounting bracket - T10619- to module.
- Use workshop hoist - VAS 6100- to lift module, and position it centrally above packaging.
- Pull plastic bag over module.
Plastic bag, refer to ⇒ Electronic parts catalogue (ETKA)
- Use workshop hoist - VAS 6100- to place module centrally and at an even distance from outer walls in packaging.
- Remove mounting bracket - T10619- from module.
- Fold plastic bag sideways, and seal it with adhesive tape so that no liquid can escape.
- Pour in hollow glass granulate or vermiculite so that gaps are filled and also entire packaging up to upper edge.
All vehicles (continued)
Packing with hollow glass granulate bag (if available on site)
- Place small hollow glass granulate bag in packaging and distribute contents evenly.
- Secure mounting bracket - T10619- to module.
- Use workshop hoist - VAS 6100- to lift module, and position it centrally above packaging.
- Pull plastic bag over module.
Plastic bag, refer to ⇒ Electronic parts catalogue (ETKA)
- Use workshop hoist - VAS 6100- to place module centrally and at an even distance from outer walls in packaging.
- Remove mounting bracket - T10619- from module.
- Fold plastic bag sideways, and seal it with adhesive tape so that no liquid can escape.
- Place large hollow glass granulate bag onto module.
- Distribute contents evenly so that a layer thickness of 2 cm is ensured above module and that cavities of packaging are filled.
All vehicles (continued)
- Put classification protocol in packaging.
- Use adhesive filament tape -2- to close packaging -1- with overlaps as shown in illustration.
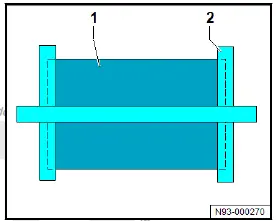
- Apply the warning notice for hazardous materials and information label to both ends of the packaging.
- "Dangerous goods class 9"
- "UN number 3480"
- "Attention! Damaged lithium-ion battery"
- "This side up"
- "Protect against water"
- "Attention! Fragile"
- "This side up"
- "Maximum stacking load"
- "Hazardous material label: Hazardous material category 9 "Various hazardous substances and items" packaging group 2"
- "Type label with UN number UN 3480 for lithium-ion batteries"