Front seat covers and padding
- Assembly overview seat pan cover and padding
- Assembly overview backrest cover and padding
- Assembly overview backrest heating element
- Removing and installing seat pan cover and padding
- Removing and installing backrest cover and padding
- Separating seat pan cover from seat pan padding
- Separating backrest cover from backrest padding
- Removing and installing seat heating element [ZX11]/[ZX13]
- Removing and installing backrest heating element [Z116]/[Z117]
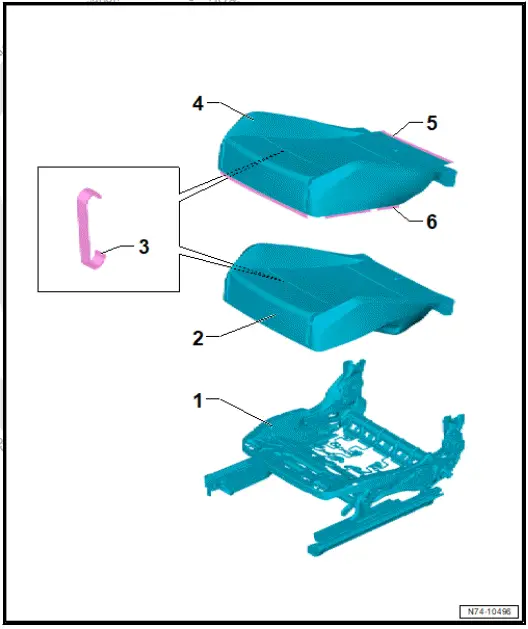
Assembly overview seat pan cover and padding
- Seat pan
- ⇒ Rep. gr. 72 ; Assembly overview - seat pan
- Padding
- ⇒ Rep. gr. 74 ; Removing and installing seat pan cover and padding
- ⇒ Rep. gr. 74 ; Separating seat pan cover from seat pan padding
- Upholstery clip
- Renew after removing
- Seat cover
- ⇒ Rep. gr. 74 ; Separating seat pan cover from seat pan padding
- ⇒ Rep. gr. 74 ; Removing and installing seat pan cover and padding
- Beading strip
- Sewn to seat cover
- Beading strip
- Sewn to seat cover
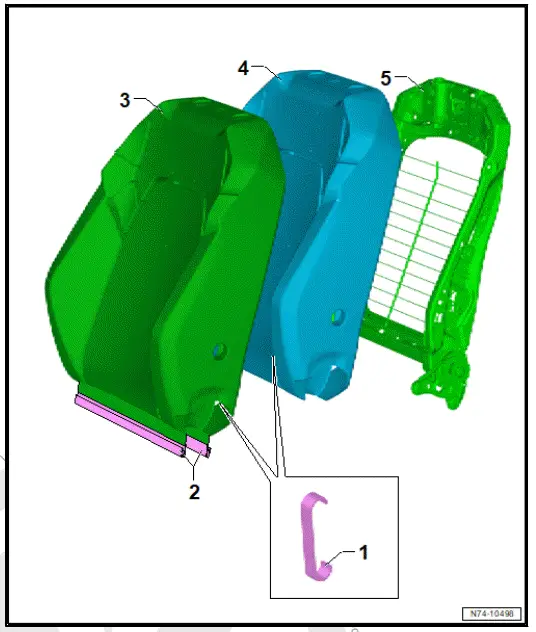
Assembly overview backrest cover and padding
The overview is shown for the left side of vehicle as an example.
- Upholstery clip
- Renew after removing
- Beading strip
- Sewn to backrest cover
- Backrest cover
- ⇒ Rep. gr. 74 ; Removing and installing backrest cover and padding
- ⇒ Rep. gr. 74 ; Separating backrest cover from backrest padding
- Backrest padding
- ⇒ Rep. gr. 74 ; Removing and installing backrest cover and padding
- ⇒ Rep. gr. 74 ; Separating backrest cover from backrest padding
- Backrest frame
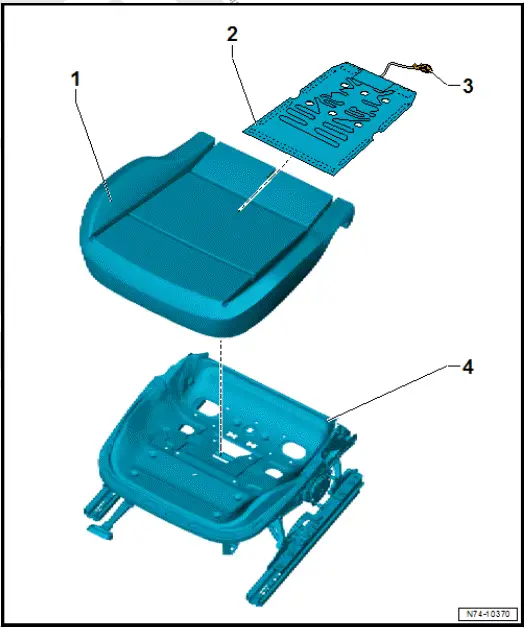
Assembly overview seat heating element
The overview is shown for the left side of vehicle as an example.
- Seat padding
- ⇒ Rep. gr. 74 ; Removing and installing seat pan cover and padding
- ⇒ Rep. gr. 74 ; Separating seat pan cover from seat pan padding
- Seat heating element
- With front left seat heating - ZX11- or front right seat heating - ZX13-
- ⇒ Rep. gr. 74 ; Removing and installing seat heating element [ZX11]/[ZX13]
- Electrical connector
- Seat pan
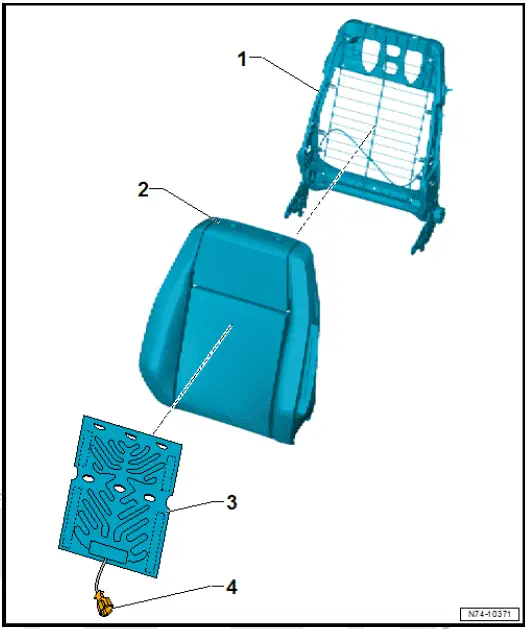
Assembly overview backrest heating element
The overview is shown for the left side of vehicle as an example.
- Backrest frame
- Backrest padding
- ⇒ Rep. gr. 74 ; Removing and installing backrest cover and padding
- ⇒ Rep. gr. 74 ; Separating backrest cover from backrest padding
- Backrest heating element
- With heated backrest for front left seat - Z116- or heated backrest for front right seat - Z117-
- ⇒ Rep. gr. 74 ; Removing and installing backrest heating element [Z116]/[Z117]
- Electrical connector
Removing and installing seat pan cover and padding
Special tools and workshop equipment required
- hook - 3438-
If the seat padding in a vehicle with seat heating is renewed, then the respective seat heating element must also be renewed.
Removal and installation are described for the left side of vehicle as an example.
Removing
- ⇒ Rep. gr. 72 ; Secure front seat to seat repair stand .
- Remove inner seat trim ⇒ Rep. gr. 72 ; Removing and installing inner seat trim .
- Remove outer seat trim ⇒ Rep. gr. 72 ; Removing and installing outer seat trim .
- Remove seat trim bracket ⇒ Rep. gr. 72 ; Removing and installing seat trim bracket .
- Remove front belt buckle ⇒ Rep. gr. 69 ; Removing and installing front belt buckle .
- Remove front backrest ⇒ Rep. gr. 72 ; Removing and installing front backrest .
Front passenger seat
- Remove front child seat anchor ⇒ Rep. gr. 69 ; Removing and installing front child seat anchor .
All vehicles (continued)
- Using hook - 3438- , open beading strip -1- and -2-.
- Detach cover and padding from seat pan.
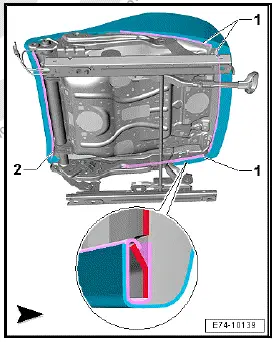
Front seat with seat heating element
- Disconnect electrical connector.
All vehicles (continued)
Installing
Install in reverse sequence of removal.
Removing and installing backrest cover and padding
Special tools and workshop equipment required
- hook - 3438-
If the backrest padding in a vehicle with backrest heating is renewed, the respective backrest heating element must also be renewed.
Removal and installation are described for left side of vehicle as an example.
Removing
Vehicles with Top-Sport seat
- Remove trim for backrest with integrated head restraint ⇒ General body repairs, interior; Rep. gr. 72 ; Front seats; Removing and installing trim for backrest with integrated head restraint .
All vehicles (continued)
- Remove front backrest ⇒ Rep. gr. 72 ; Removing and installing front backrest .
Vehicles with centre armrest on front seat
- Remove front centre armrest ⇒ General body repairs, interior; Rep. gr. 68 ; Front centre armrest; Removing and installing front centre armrest .
All vehicles (continued)
Vehicles with standard seat
- Remove head restraint ⇒ Rep. gr. 72 ; Removing and installing head restraint .
Using commercially available plastic wedge, unclip covers from head restraint guides.
All vehicles (continued)
- Open beading strips -2- using hook - 3438- .
- Fold up cover -1- at front and at rear.
- Remove cover -1- together with padding from backrest frame.
- Separate cover from padding ⇒ Rep. gr. 74 ; Separating backrest cover from backrest padding .

Vehicles with backrest heating element
- Disconnect electrical connector
All vehicles (continued)
Installing
Install in reverse order.
Separating seat pan cover from seat pan padding
Special tools and workshop equipment required
- upholstery clip pliers - V.A.G 1634B
Removal and installation are described for the left side of vehicle as an example.
Removing
- Remove seat pan cover and padding ⇒ Rep. gr. 74 ; Removing and installing seat pan cover and padding
- Pull retaining tab -3- of cover -1- in direction of -arrow- off padding -2-.

- Pull cover -1- off padding -2-.
- Using commercially available pliers -4-, open upholstery clips -3-.

Installing
Install in reverse order of removal, observing the following:
Vehicles without seat depth adjustment
- Secure upholstery clips in sequence -1- through -14- using upholstery clip pliers - V.A.G 1634B- .
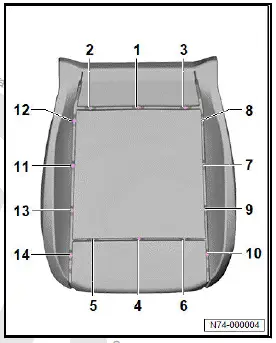
All vehicles (continued)
Vehicles with seat depth adjustment unit
- Secure upholstery clips in sequence -1- through -9- using upholstery clip pliers - V.A.G 1634B- .
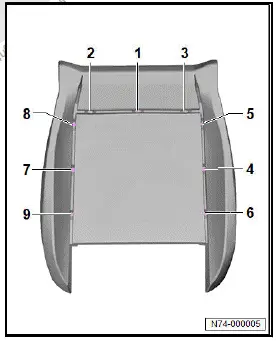
All vehicles (continued)
- Make sure that the cover is fitted without creases.
Separating backrest cover from backrest padding
Special tools and workshop equipment required
- upholstery clip pliers - V.A.G 1634BID
Removal and installation are described for left side of vehicle as an example.
Removing
- Remove backrest cover and padding ⇒ Rep. gr. 74 ; Removing and installing backrest cover and padding .
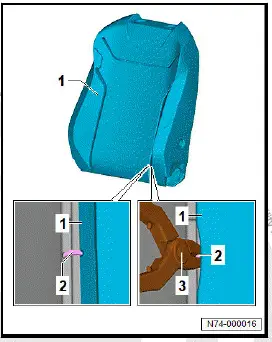
- Pull cover -1- upwards in order to gain access to upholstery clips -2-.
- Using commercially available pliers -3-, open upholstery clips -2-.
- Pull off cover -1- upwards.
Installing
Install in reverse order of removal, observing the following:
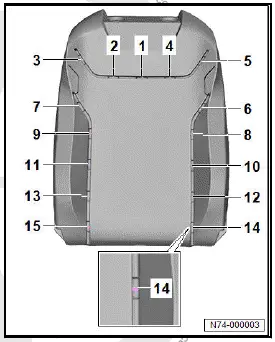
Vehicles with standard seat
- Secure upholstery clips in the order -1- to -15- using upholstery clip pliers - V.A.G 1634B- .
- Make sure that cover is fitted without creases.
All vehicles (continued)
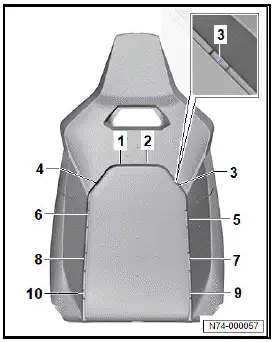
Vehicles with Top-Sport seat
- Secure upholstery clips in the order -1- to -10- using upholstery clip pliers - V.A.G 1634B- .
- Make sure that cover is fitted without creases.
Removing and installing seat heating element [ZX11]/[ZX13]
Front seat heating - ZX11- and front right seat heating - ZX13- are referred to hereafter as seat heater element.
Removing
- Separate seat pan cover from seat pan padding ⇒ Rep.
gr. 74 ; Separating seat pan cover from seat pan padding .
Important
- Commercially available hot air blower, setting: 220ºC
- Apply heat to defective seat heating element in area of bonded joint. While doing so, make sure to maintain distance of approx. 30 cm between hot air blower and padding.
- Grip seat heating element in area of adhesive strips, and carefully detach it while continuously applying hot air.
- When doing this, slowly and carefully pull off seat heating element at an angle of approx. 45º.
Note
Adhesive remains from the detective seat heating element can remain on the padding.
- Make sure that no larger pieces of the padding are torn out.
Small torn out fragments are permissible.
Installing
There are grooved recesses in the padding in which the wires run. The seat pan cover is attached to the wires by means of upholstery clips.
- Make sure that seat heating element is fully in contact with padding in grooved recesses.
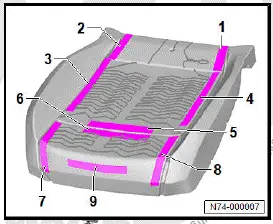
Vehicles without seat depth adjustment
Important
- If the bond requires repositioning, use a new seat heating element.
- Bond on seat heating element centrally and without creases in sequence -1- through -9-.
All vehicles (continued)
Vehicles with seat depth adjustment unit
Important
- If the bond requires repositioning, use a new seat heating element.
- Bond on seat heating element centrally and without creases in sequence -1- through -5-.

Removing and installing backrest heating element [Z116]/[Z117]
Heated backrest for front left seat - Z116- and heated backrest for front right seat - Z117- are referred to hereafter as backrest heater element.
Removing
- Separate backrest cover from backrest padding ⇒ Rep. gr. 74 ; Separating backrest cover from backrest padding .
Important
- Commercially available hot air blower, setting: 220ºC
- Apply heat to defective backrest heating element in area of bonded joint. While doing so, make sure to maintain distance of approx. 30 cm between hot air blower and padding.
- Grip backrest heating element in area of adhesive strips, and carefully detach it while continuously applying hot air.
- When doing this, slowly and carefully pull off backrest heating element at an angle of approx. 45º.
Note
Adhesive remains from the detective backrest heating element can remain on the padding.
- Make sure that no larger fragments of the padding are torn out. Small torn out fragments are permissible.
Installing
There are grooved recesses in the padding in which the wires run. The backrest cover is attached to the wires by means of upholstery clips.
- Make sure that backrest heater element is fully in contact with padding in grooved recesses.
Vehicles with standard seat
Important
- If the bond requires repositioning, use a new backrest heating element.
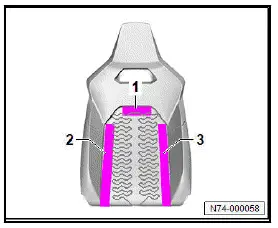
- Bond on backrest heating element centrally and without creases in sequence -1- through -3-.

All vehicles (continued)
Vehicles with Top-Sport seat
Important
- If the bond requires repositioning, use a new backrest heating element.
- Bond on backrest heating element centrally and without creases in sequence -1- through -3-.