Charging unit for high-voltage battery

In this manual: Charging unit for high-voltage battery
Basic information on body repairs — 1Explanation of symbols — 1Overview of materials used — 1Joining and separating techniques — 1Surface repair — 1Corrosion protection — 1Noise insulation — 1Plastic repair — 1General notes - windows — 1Self-adhesive components — 1Noises — 1Resistance spot welding — 1Solid rivet — 1Pop rivet — 1Incorrect riveting — 1Overview of riveting attachments — 1Making a flow-drill screw connection, pre-drilled hole in upper part — 1Distinction of types of plastic — 1Processing instructions - original products — 1Preparing plastic repair — 1Repairing deformations — 1Bonding plastic attachments — 1Welding plastic attachments — 1Glass repair- Introduction — 1Carrying out glass repair — 1General notes on the use of adhesives — 1Preparing old undamaged windows for installing — 1Preparing new windows for installation — 1Installation instructions for bonded windows — 1Bonding log — 1Preparing gas strut for disposal — 1Preparing rear lid drive unit VX69/rear lid drive unit 2 VX77 for disposal — 1Causes of water ingress — 1Locating water ingress — 1Interior equipment — 1Compartments/covers — 1Equipment — 1Centre console — 1Front centre armrest — 1Interior mirror — 1Passenger protection — 1Seat belts — 1Child seat anchors — 1Airbag system — 1Airbag control unit — 1Front airbag, driver side — 1Front passenger airbag — 1Side airbags — 1Curtain airbags — 1Airbag crash sensors — 1Seat belt verification — 1Seat occupied recognition — 1Trim, insulation — 1Front door trims — 1Rear door trims — 1Dash panel — 1Central tube for dash panel — 1Interior trims — 1Luggage compartment trims — 1Roof trims — 1Seat frames — 1Overview of seat variants — 1Front seats — 1Rear seats — 1Seat - padding, covers — 1Front seat covers and padding — 1Rear seat covers and padding — 1Technical data — 1Body - front — 1Lock carrier — 1Wings — 1Technical data — 1Air conditioning system — 1Overview of fitting locations - air conditioning system, R134a/R1234yf — 1Overview of fitting locations - air conditioning system, R744 — 1Refrigerant circuit, R134a/R1234yf — 1Refrigerant circuit, R744 — 1Valve unit of heat pump, R744 — 1Air conditioner compressor, R134a/R1234yf — 1Air conditioner compressor, R744 — 1Control motors, vehicles without air conditioner operating unit at rear — 1Control motors, vehicles with air conditioner operating unit at rear — 1Front heater and air conditioning unit, R134a/R1234yf — 1Front heater and air conditioning unit, R744 — 1Air duct — 1Coolant circuit, rear-wheel drive — 1Coolant circuit, all-wheel drive — 1Operating and display unit — 1Other controlling and regulating components — 1Air quality improvement system — 1Technical data — 1Brake test — 1Electrical components — 1Anti-lock brake system — 1Control unit and hydraulic unit — 1Separating control unit from and connecting to hydraulic unit — 1Connecting brake lines to hydraulic unit — 1Sensors — 1Brakes - mechanism — 1Front brake — 1Rear brake — 1Parking brake — 1Brake pedal — 1Brakes - hydraulics — 1Brake servo and brake master cylinder — 1Hydraulic system — 1Technical data — 1Fitting locations — 1Senders/sensors/control units — 1Adaptive cruise control — 1Reversing camera system — 1Front camera for driver assist systems — 1Overhead view camera — 1Electric drive systems- Safety information and repair notes — 1Classifying high-voltage batteries — 1Packaging high-voltage batteries — 1Packaging critical high-voltage batteries with "Warning" status — 1Bulkhead — 1Bonnet, rear lid — 1Bonnet — 1Rear lid — 1Charging flap unit — 1Front doors, door components, central locking — 1Door — 1Door components — 1Central locking — 1Rear doors, door components — 1Door — 1Door components — 1Sunroof — 1Sliding sunroof — 1Water drain hoses — 1Bumpers — 1Bumper, front — 1Bumper, rear — 1Glazing — 1Windscreen — 1Rear windscreen — 1Side windows — 1Door windows — 1Exterior equipment — 1Spoiler — 1Mouldings, trims, extensions — 1Underbody cladding — 1Roof moulding and roof railing — 1Exterior mirror — 1Wheel housing liner — 1Lettering and emblems — 1Towing bracket — 1Technical data — 1Vehicle identification data — 1Safety information — 1Body parts and materials — 1Technical data — 1Alignment jig — 1Body - front — 1Overview of fitting locations — 1Longitudinal member cross panel — 1Longitudinal member — 1Assembly overview - front right longitudinal member, part section — 1Battery tray — 1Front wheel housing — 1Body - centre — 1Overview of fitting locations — 1Roof — 1A-pillar — 1B-pillar — 1Side member — 1Body - rear — 1Rear cross member — 1Rear cross panel — 1Luggage compartment floor — 1Rear longitudinal member — 1Side panel — 1Rear wheel housing — 1Technical data — 1Controls, housing — 1Removing and installing gearbox — 1Gearbox housing, clutch housing — 1Final drive - differential — 1Technical data — 1Controls, housing — 1Gearbox housing, clutch housing — 1Gear oil — 1Final drive - differential — 1Explanation of symbols — 1Paintwork structure — 1Areas exposed to stone chipping — 1Seam seals, front body — 1Seam seals, bonnet, inner side — 1Seam seals, doors — 1Seam seals, underbody — 1Underseal — 1Cavity sealing — 1Technical data — 1Overview of fitting locations - components/control units in centre section of vehicle — 1Overview of fitting locations - components/control units in rear section of vehicle — 1Overview of fitting locations - components/control units in centre section of vehicle — 1Overview of fitting locations - components/control units in rear section of vehicle — 1Components/control units — 1Multifunction steering wheel — 1Technical data — 1Identification — 1Electrical components — 1Hazard classification of high-voltage system — 1Removing and installing engine — 1Removing and installing front motor — 1Removing and installing rear motor — 1Removing and installing rear motor — 1Front assembly mountings — 1Cooling — 1Cooling system/coolant — 1Coolant pump/coolant regulation — 1Radiator, radiator fan — 1Electric drive systems — 1High-voltage components, charging unit for high-voltage battery and voltage converter — 1High-voltage components, charging unit for high-voltage battery with integrated voltage converter — 1Warning stickers — 1High-voltage battery unit, edge of upper part of battery housing without wax — 1High-voltage battery components, edge of upper part of battery housing without wax — 1High-voltage battery unit, edge of upper part of battery housing with wax — 1High-voltage battery components, edge of upper part of battery housing with wax — 1Power and control electronics for electric drive — 1Electric drive motor — 1Electric drive motor — 1Motor control unit — 1De-energising high-voltage system — 1Potential equalisation lines — 1Charging socket, with charging cable — 1Charging socket, with separate charging cable — 1Charging unit for high-voltage battery — 1Charging unit for high-voltage battery, with integrated voltage converter — 1Vehicle noise/engine sound — 1Accelerator pedal — 1Voltage converter — 1High-voltage cables, all-wheel drive — 1High-voltage cables, rear-wheel drive — 1Technical data — 1Starter, current supply, CCS — 1Assembly overview - battery — 1Removing and installing battery [A] — 1Disconnecting and connecting battery — 1Removing and installing earth wire with battery monitor control unit [J367] — 1Gauges, instruments — 1Dash panel insert — 1Horn — 1Windscreen wash/wipe system — 1Windscreen wiper system — 1Windscreen washer system — 1Rear window wiper system ID4 — 1Rear window washer system — 1Lights, bulbs, switches - exterior — 1Headlights — 1Lights in exterior mirror — 1Tail lights — 1High-level brake light — 1Number plate light — 1Entry and start authorisation system — 1Steering column switch module — 1Towing bracket — 1Lights, bulbs, switches - interior — 1Lights — 1Controls — 1Anti-theft alarm system — 1Cigarette lighter, socket — 1Wiring — 1Relay carriers, fuse holders, electronics boxes — 1Control units — 1Technical data — 1Front suspension — 1Front axle — 1Subframe — 1Suspension strut, upper suspension link — 1Lower suspension link, swivel joint — 1Wheel bearing — 1Drive shaft — 1Anti-roll bar — 1Rear suspension — 1Rear axle — 1Subframe — 1Anti-roll bar — 1Suspension link, track rod — 1Suspension strut, shock absorber, spring — 1Wheel bearing assembly, trailing arm — 1Drive shaft — 1Self-levelling suspension — 1Electronic damping control — 1Vehicle level sender — 1Wheels, tyres, vehicle geometry — 1Wheel alignment — 1Wheels, tyres — 1Steering — 1Steering wheel — 1Steering column — 1Steering rack — 1
27steps
~162min
4/5difficulty
010203040502015N·mlb·ft
Tightening torque found on this page
Done 0 of 27
  • Assembly overview - charging unit for high-voltage battery, rear-wheel drive
  • Assembly overview - charging unit for high-voltage battery, all-wheel drive
  • Removing and installing charging unit 1 for high-voltage battery [AX4], rear-wheel drive
  • Removing and installing charging unit 1 for high-voltage battery [AX4], all-wheel drive

Assembly overview - charging unit for high-voltage battery, rear-wheel drive

Assembly overview - charging unit for high-voltage battery
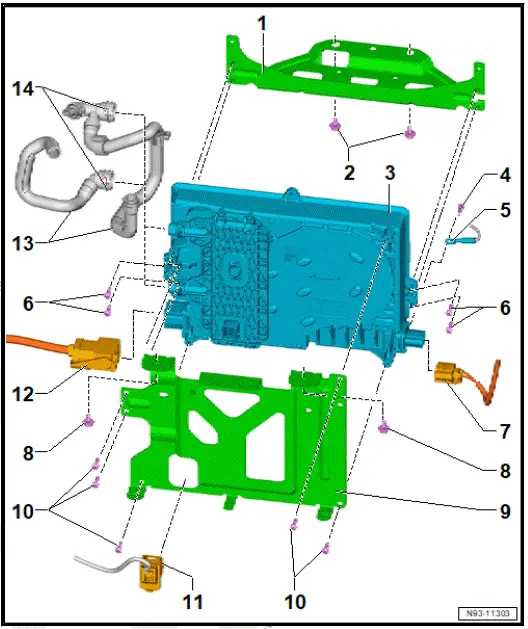
Volkswagen ID.4. Assembly overview - charging unit for high-voltage battery, rear-wheel drive
  1. Bracket for charging unit 1 for high-voltage battery - AX4-
  2. Bolt
  • Qty. 2
  • 20 N·m
  1. Charging unit 1 for highvoltage battery - AX4-
  • With control unit for high-voltage battery charger - J1050-
  • ⇒ Rep. gr. 93 ; Removing and installing charging unit 1 for highvoltage battery [AX4]
  1. Bolt
  • 8 N·m
  1. Potential equalisation line with additional external PE conductor
  2. Bolt
  • Qty. 4
  • 8 N·m
  1. High-voltage electrical connector
  2. Bolt
  • Qty. 2
  • 20 N·m
  1. Bracket for charging unit 1 for high-voltage battery - AX4-
  2. Bolt
  • Qty. 5
  • 8 N·m
  1. Electrical connector for electrical system
  2. High-voltage electrical connector
  3. Coolant hose
  4. Retaining clip for coolant hose

Assembly overview - charging unit for high-voltage battery, all-wheel drive

Assembly overview - charging unit for high-voltage battery
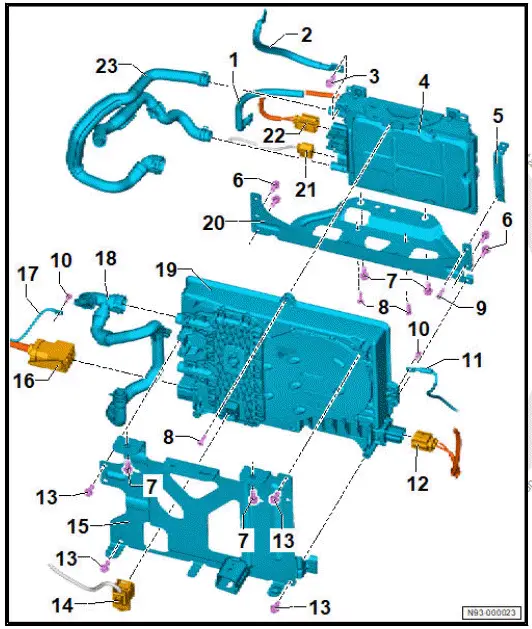
Volkswagen ID.4. Assembly overview - charging unit for high-voltage battery, all-wheel drive
  1. 12 V voltage supply
  • Positive terminal
  1. 12 V voltage supply
  • Negative terminal
  1. Bolt
  • 20 N·m
  1. Voltage converter - A19-
  • ⇒ Rep. gr. 93 ; Removing and installing voltage converter [A19]
  1. Bracket
  2. Bolt
  • Qty. 4
  • 8 N·m
  1. Bolt
  • Qty. 4
  • 20 N·m
  1. Bolt
  • Qty. 3
  • 8 N·m
  1. Bolt
  • 8 N·m
  1. Bolt
  • Qty. 2
  • 8 N·m
  1. Potential equalisation line
  2. High-voltage electrical connector
  3. Bolt
  • Qty. 4
  • 8 N·m
  1. Electrical connector for electrical system
  2. Bracket for charging unit 1 for high-voltage battery - AX4-
  3. High-voltage electrical connector
  4. Potential equalisation line
  5. Coolant hose
  6. Charging unit 1 for high-voltage battery - AX4-
  • With control unit for high-voltage battery charger - J1050-
  • ⇒ Rep. gr. 93 ; Removing and installing charging unit 1 for high-voltage battery [AX4]
  1. Bracket for voltage converter - A19-
  2. Electrical connector for electrical system
  3. High-voltage electrical connector
  4. Coolant hose

Removing and installing charging unit 1 for high-voltage battery [AX4], rear-wheel drive

Removing and installing charging unit 1 for high-voltage battery AX4

Special tools and workshop equipment required

  • drip tray - VAS 6208-
  • hose clamps up to 25 mm - 3094-

Charging unit 1 for high-voltage battery - AX4- is referred to hereafter as charging unit.

Removing

DANGER

High voltage can cause fatal injury.

Danger of severe or fatal injuries from electric shock or electric arcs.

  • Have a high-voltage technician (HVT) or a high-voltage expert (HVE) de-energise the high-voltage system.
  • ⇒ Rep. gr. 93 ; De-energise high-voltage system .

If the charging unit is renewed, perform the test plan for renewal of the control unit:

  • Carry out function "Renew control unit" using ⇒ Vehicle diagnostic tester ⇒ Rep. gr. 00 ; Access to diagnoses .

Continued

  • Disconnect battery ⇒ Electrical system; Rep. gr. 27 ; Battery; Disconnecting and connecting battery .
  • Remove rear underbody cladding ⇒ General body repairs, exterior; Rep. gr. 66 ; Underbody cladding; Removing and installing rear underbody cladding .
  • Remove rear centre underbody cladding ⇒ General body repairs, exterior; Rep. gr. 66 ; Underbody cladding; Removing and installing rear centre underbody cladding .
  • Remove skid plate ⇒ General body repairs, exterior; Rep. gr. 66 ; Underbody cladding; Removing and installing skid plate .
  • Place drip tray - VAS 6208- under rear section of vehicle.
  • Clamp off coolant hoses -2- and -4- using hose clamps up to 25 mm - 3094- .
  • Open clamp -3-, and pull coolant hose off power and control electronics for electric drive - JX1- .
  • Pull out retaining clip -arrow-, and pull coolant hose -4- off charge unit -1-.
Volkswagen ID.4. Removing and installing charging unit 1 for high-voltage battery [AX4], rear-wheel drive
  • Loosen anti-roll bar ⇒ Running gear, axles, steering; Rep. gr. 42 ; Anti-roll bar; Removing and installing anti-roll bar .
  • Disconnect electrical connector -1- from charging unit -2-.
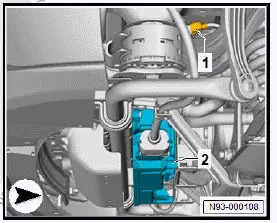
Volkswagen ID.4. Removing and installing charging unit 1 for high-voltage battery [AX4], rear-wheel drive
  • Disconnect electrical connector -2-, -3- and -4-.
Volkswagen ID.4. Removing and installing charging unit 1 for high-voltage battery [AX4], rear-wheel drive
  • Unscrew potential equalisation line.
  • Protect connector receiver and coolant connections to prevent the ingress of dirt.
  • Unscrew bolts -arrows-.
  • Remove charging unit -1- with bracket downwards.
  • Place charging unit -1- on a clean surface.
Volkswagen ID.4. Removing and installing charging unit 1 for high-voltage battery [AX4], rear-wheel drive
  • Unscrew bolts -arrows-.
  • Remove bracket -4- from charging unit -1-.
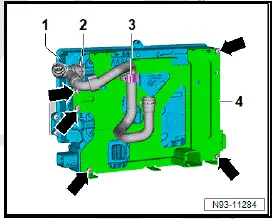
Volkswagen ID.4. Removing and installing charging unit 1 for high-voltage battery [AX4], rear-wheel drive
  • Unscrew bolts -arrows-.
  • Remove bracket -2- from charging unit -1-.
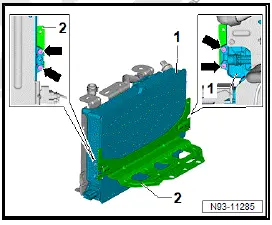
Volkswagen ID.4. Removing and installing charging unit 1 for high-voltage battery [AX4], rear-wheel drive

Installing

Install in reverse order of removal, observing the following:

  • ⇒ Rep. gr. 19 ; Cooling system/coolant; Filling cooling system

If the charging unit has been renewed, perform the test plan for renewal of the control unit:

  • Carry out function "Renew control unit" using ⇒ Vehicle diagnostic tester ⇒ Rep. gr. 00 ; Access to diagnoses .

Continued

WARNING

High voltage can cause fatal injury.

Danger of severe or fatal injuries from electric shock or electric arcs.

  • Have a high-voltage technician (HVT) or a high-voltage expert (HVE) re-energise the high-voltage system.
  • ⇒ Rep. gr. 93 ; Re-energise high-voltage system .

Tightening torques

  • ⇒ Rep. gr. 93 ; Assembly overview - charging unit for high-voltage battery

Removing and installing charging unit 1 for high-voltage battery [AX4], all-wheel drive

Removing and installing charging unit 1 for high-voltage battery AX4

Special tools and workshop equipment required

  • drip tray - VAS 6208-

The charging unit 1 for high-voltage battery - AX4- will henceforth be referred to as "charging unit".

Removing

DANGER

High voltage can cause fatal injury.

Danger of severe or fatal injuries from electric shock or electric arcs.

  • Have a high-voltage technician (HVT) or a high-voltage expert (HVE) de-energise the high-voltage system.
  • ⇒ Rep. gr. 93 ; De-energise high-voltage system .

If the charging unit is renewed, perform the test plan for renewal of the control unit:

  • Carry out function "Renew control unit" using ⇒ Vehicle diagnostic tester ⇒ Rep. gr. 00 ; Access to diagnoses .

Continued

  • Disconnect battery ⇒ Electrical system; Rep. gr. 27 ; Battery; Disconnecting and connecting battery .
  • ⇒ Rep. gr. 19 ; Drain coolant .
  • Remove rear underbody cladding ⇒ General body repairs, exterior; Rep. gr. 66 ; Underbody cladding; Removing and installing rear underbody cladding .
  • Remove rear centre underbody cladding ⇒ General body repairs, exterior; Rep. gr. 66 ; Underbody cladding; Removing and installing rear centre underbody cladding .
  • Remove skid plate ⇒ General body repairs, exterior; Rep. gr. 66 ; Underbody cladding; Removing and installing skid plate .
  • Loosen anti-roll bar ⇒ Running gear, axles, steering; Rep. gr. 42 ; Anti-roll bar; Removing and installing anti-roll bar .
  • Place drip tray - VAS 6208- under rear section of vehicle.
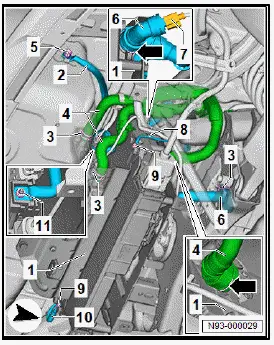
  • Open clamps -3-, and pull coolant hoses -4- off battery charger -1- and coolant hose -6- off rear motor.
  • Unscrew nut -5-.
  • Unscrew nut -11-.
  • Unscrew bolts -9-.
  • Disconnect electrical connector -7-.
Volkswagen ID.4. Removing and installing charging unit 1 for high-voltage battery [AX4], all-wheel drive
  • Disconnect electrical connector -1-, -2- and -4-.
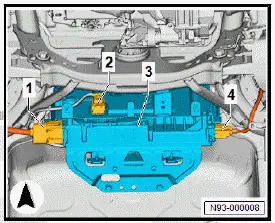
Volkswagen ID.4. Removing and installing charging unit 1 for high-voltage battery [AX4], all-wheel drive
  • Unscrew potential equalisation line.
  • Protect connector receiver and coolant connections to prevent the ingress of dirt.
  • Unscrew bolts -arrows-.
  • Remove charging unit -1- with bracket downwards.
  • Place charging unit -1- on a clean surface.
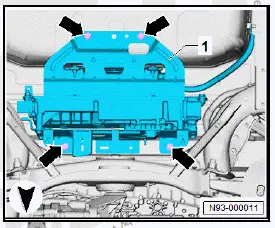
Volkswagen ID.4. Removing and installing charging unit 1 for high-voltage battery [AX4], all-wheel drive
  • Unscrew bolts -1-.
  • Detach bracket -2- with voltage converter - A19- .
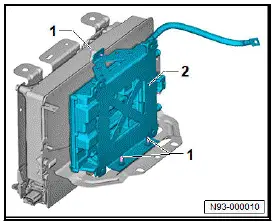
Volkswagen ID.4. Removing and installing charging unit 1 for high-voltage battery [AX4], all-wheel drive
  • Unscrew bolts -arrows-.
  • Remove bracket -4- from charging unit -1-.
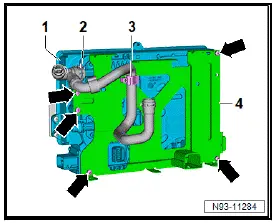
Volkswagen ID.4. Removing and installing charging unit 1 for high-voltage battery [AX4], all-wheel drive
  • Unscrew bolts -arrows-.
  • Remove bracket -2- from charging unit -1-.
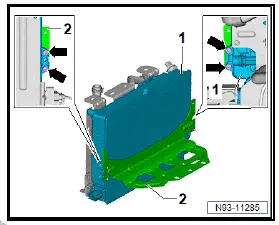
Volkswagen ID.4. Removing and installing charging unit 1 for high-voltage battery [AX4], all-wheel drive

Installing

Install in reverse order of removal, observing the following:

  • ⇒ Rep. gr. 19 ; Filling cooling system

If the charging unit has been renewed, perform the test plan for renewal of the control unit:

  • Carry out function "Renew control unit" using ⇒ Vehicle diagnostic tester ⇒ Rep. gr. 00 ; Access to diagnoses .

Continued

WARNING

High voltage can cause fatal injury.

Danger of severe or fatal injuries from electric shock or electric arcs.

  • Have a high-voltage technician (HVT) or a high-voltage expert (HVE) re-energise the high-voltage system.
  • ⇒ Rep. gr. 93 ; Re-energise high-voltage system .

Tightening torques

  • ⇒ Rep. gr. 93 ; Assembly overview - charging unit for high-voltage battery