Wheels, tyres
In this manual: Wheels, tyres
2steps
~12min
1/5difficulty
Done 0 of 2
- Assembly overview - wheel
- Removing and installing wheel
- Cleaning contact surfaces on rim
Assembly overview - wheel
Overview shows one aluminium wheel as an example

- Tyres
- ⇒ Rep. gr. 44 ; Removing and installing wheel
- ⇒ General information on wheels and tyres; Rep. gr. 44 ; Tyres
- ⇒ General information on wheels and tyres; Rep. gr. 44 ; Tyre damage and wear
- ⇒ General information on wheels and tyres; Rep. gr. 44 ; Vibration and reduced driving performance caused by wheels/tyres
- ⇒ General information on wheels and tyres; Rep. gr. 44 ; Fitting tyres
- Tyre pressure sensor
- Valve
- ⇒ General information on wheels and tyres; Rep. gr. 44 ; Fitting tyres; Removing and installing valve
- Carrier
- Depending on equipment/ version
- Bolt
- Depending on equipment/ version
- Trim element
- Depending on equipment/version
- Anti-theft wheel bolt
- Depending on equipment/version
- ⇒ Rep. gr. 44 ; Positioning anti-theft wheel bolts - steel wheels
- 120 N·m
- Adapter for anti-theft wheel bolt
- ⇒ General information on wheels and tyres; Rep. gr. 44 ; Wheel bolts/wheel nuts; Master sets for anti-theft wheel bolts
- Wheel cap
- ⇒ General information on wheels and tyres; Rep. gr. 44 ; Fitting tyres; Removing and installing wheel caps for alloy wheels
- Wheel bolt
- Qty. 4 or 5
- ⇒ General information on wheels and tyres; Rep. gr. 44 ; Tyre bolts/wheel nuts; versions
- 120 N·m
- Adhesive balancing weights
- ⇒ General information on wheels and tyres; Rep. gr. 44 ; Fitting tyres; Balancing wheels
- Wheel rim
- ⇒ General information on wheels and tyres; Rep. gr. 44 ; Wheel rims
- ⇒ General information on wheels and tyres; Rep. gr. 44 ; Vibration and reduced driving performance caused by wheels/tyres; Check radial and axial run-out on wheel rim
Removing and installing wheel
Removing
Vehicles with wheel trim
- Remove wheel trim.
All vehicles (continued)
Models with wheel bolt cap
- Detach wheel bolt cap.
All vehicles (continued)
Models with anti-theft wheel bolt
- Detach anti-theft wheel bolt.
All vehicles (continued)
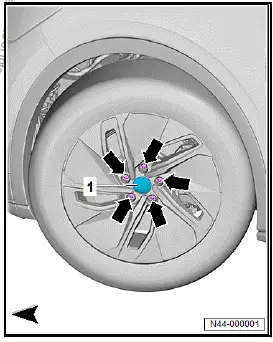
- Loosen wheel bolts -arrows-.
- Raise vehicle.
- Unscrew bolts -arrows-, and remove wheel.
Installing
Install in reverse order of removal, observing the following:
- ⇒ Rep. gr. 44 ; Clean contact surfaces of rim .
Vehicles with steel wheels
- ⇒ Rep. gr. 44 ; Positioning anti-theft wheel bolts for steel wheels .
All vehicles (continued)
Tightening torques
- ⇒ Rep. gr. 44 ; Assembly overview - wheel
Cleaning contact surfaces on rim
Important
- Wheel bolts and wheels may come loose due to corrosion, dirt and lubricant; affected parts and sections must be cleaned.
- Clean contact surfaces -arrows- on brake disc

- Clean contact surface -arrow- on centring seat of wheel hub.
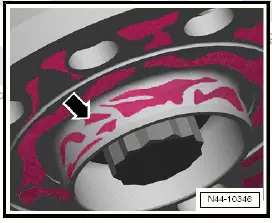
- Clean contact surface -arrow- on inside of rim and centring seat.
- Clean seats in holes for wheel bolts and threads of wheel bolts.
- Apply a thin coat of assembly paste to ends of wheel bolt threads ⇒ Electronic parts catalogue .
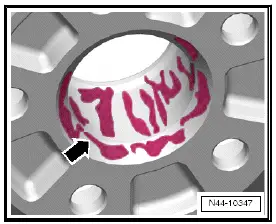
- Apply wax in vicinity of centring ring -arrow- using a brush.
Positioning anti-theft wheel bolts - steel wheels
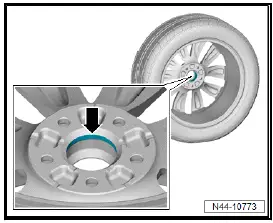
Steel wheels with four holes
Screw anti-theft wheel bolt -arrow- into hole farthest away from valve -1-.

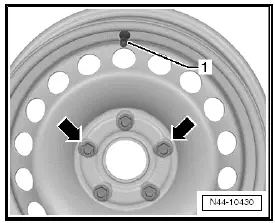
Steel wheels with five holes
Screw anti-theft wheel bolt into hole to right or left -arrows- of valve -1-.
Was this page helpful?