Air duct
- Assembly overview - air ducts and air distribution in passenger compartment
- Removing and installing driver side footwell vents, left-hand drive vehicles
- Removing and installing front passenger side footwell vents, right-hand drive vehicles
- Removing and installing air duct for centre dash panel vent
Assembly overview - air ducts and air distribution in passenger compartment
Overview shows a left-hand drive vehicle as an example
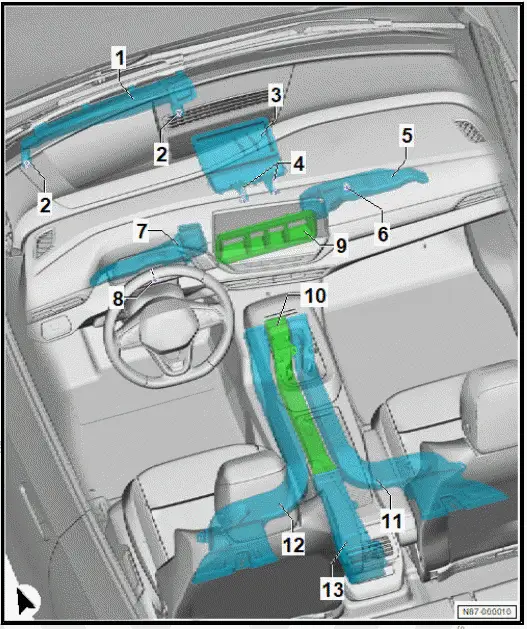
- Front air duct for dash panel
- Right-hand drive vehicle: mirror image
- ⇒ "13.11 Removing and installing front air duct for dash panel"
- Bolt
- Qty. 2
- 1,5 N·m
- Air duct for defroster vent
- ⇒ Rep. gr. 87 ; Removing and installing air duct for defroster vent
- Spreader rivet
- Qty. 2
- Footwell vent on front passenger side
- Right-hand drive vehicle: mirror image
- ⇒ Rep. gr. 87 ; Removing and installing footwell vent (front passenger side)
- Bolt
- 1,5 N·m
- Footwell vent on driver side
- Right-hand drive vehicle: mirror image
- ⇒ Rep. gr. 87 ; Removing and installing footwell vent (driver side)
- Bolt
- 1,5 N·m
- Air duct for centre dash panel vent
- ⇒ Rep. gr. 87 ; Removing and installing air duct for centre dash panel vent
- Air duct for rear vent in centre console
- Front
- ⇒ Rep. gr. 87 ; Removing and installing air duct for rear centre console vent
- Rear right footwell vent
- ⇒ Rep. gr. 87 ; Removing and installing rear footwell vent
- Rear left footwell vent
- ⇒ Rep. gr. 87 ; Removing and installing rear footwell vent
- Air duct for rear vent in centre console
- ⇒ Rep. gr. 87 ; Removing and installing air duct for rear centre console vent
Removing and installing driver side footwell vents, left-hand drive vehicles
Removing
- Remove footwell cover on driver side ⇒ General body repairs, interior; Rep. gr. 68 ; Compartments/covers; Removing and installing footwell cover on driver side .
- Disconnect electrical connector -2-.
- Unscrew bolt -3-.
- Detach footwell vent -1- in direction of -arrow-.

Installing
Install in reverse order of removal, observing the following:
Tightening torques
- ⇒ Rep. gr. 87 ; Assembly overview - air duct and air distribution in passenger compartment
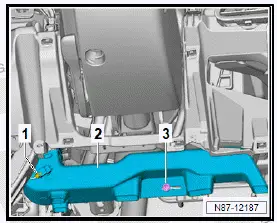
Removing and installing driver side footwell vents, right-hand drive vehicles
Removing
- Remove footwell cover on driver side ⇒ General body repairs, interior; Rep. gr. 68 ; Compartments/covers; Removing and installing footwell cover on driver side .
- Disconnect electrical connector -1-.
- Unscrew bolt -3-.
- Remove footwell vent -2-.
Installing
Install in reverse order of removal, observing the following:
Tightening torques
- ⇒ Rep. gr. 87 ; Assembly overview - air duct and air distribution in passenger compartment
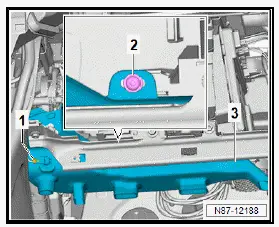
Removing and installing front passenger side footwell vents, left-hand drive vehicles
Removing
- Remove glove compartment ⇒ General body repairs, interior; Rep. gr. 68 ; Compartments/covers; Removing and installing glove compartment cover; Removing and installing glove compartment cover .
- Disconnect electrical connector -1-.
- Unscrew bolt -2-.
- Remove footwell vent -3-, observing the following:
Installing
Install in reverse order of removal, observing the following:
Tightening torques
- ⇒ Rep. gr. 87 ; Assembly overview - air ducts and air distribution in passenger compartment
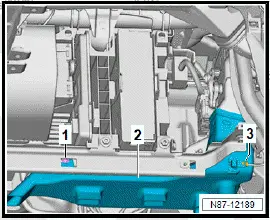
Removing and installing front passenger side footwell vents, right-hand drive vehicles
Removing
- Remove glove compartment ⇒ General body repairs, interior; Rep. gr. 68 ; Compartments/covers; Removing and installing glove compartment cover; Removing and installing glove compartment cover .
- Disconnect electrical connector -3-.
- Unscrew bolt -1-.
- Remove footwell vent -2-.
Installing
Install in reverse order of removal, observing the following:
Tightening torques
- ⇒ Rep. gr. 87 ; Assembly overview - air ducts and air distribution in passenger compartment
Removing and installing rear footwell vent
Removing
- Remove floor covering ⇒ General body repairs, interior; Rep. gr. 70 ; Interior trim; Removing and installing floor covering .
- Remove centre console bracket ⇒ General body repairs, interior; Rep. gr. 68 ; Centre console; Removing and installing centre console bracket .
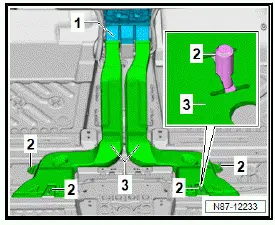
- Detach footwell vent -3- from pins -2-.
- Raise footwell vent -3-, and remove it from heater and air conditioning unit -1-.
Installing
Install in reverse order.
Removing and installing fresh air intake
Removing
- Remove bulkhead ⇒ General body repairs, exterior; Rep.
gr. 50 ; Bulkhead; Removing and installing bulkhead .
Removing and installing air duct for defroster vent
Removing
- Remove dash panel ⇒ General body repairs, interior; Rep.
gr. 70 ; Dash panel; Removing and installing dash panel .
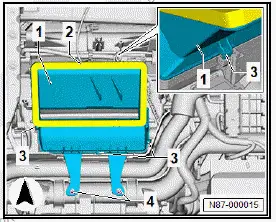
- Release spreader rivets -4-.
- Unhook air duct for defroster vent -1- from fasteners -3-, and remove it upwards.
Installing
Install in reverse order of removal.
Removing and installing air duct for centre dash panel vent
Removing
- Remove dash panel ⇒ General body repairs, interior; Rep.
gr. 70 ; Dash panel; Removing and installing dash panel
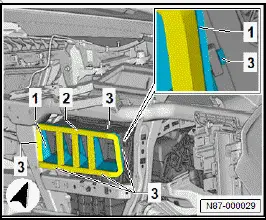
- Disengage fasteners -3- and detach air duct for centre dash panel vent -1-.
Installing
Installation is carried out in reverse sequence
Removing and installing air duct for rear centre console vent
Removing
- Remove brackets (front and rear) for centre console ⇒ General body repairs, interior; Rep. gr. 68 ; Centre console; Removing and installing brackets for centre console .
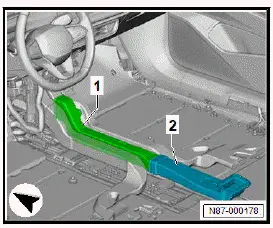
- Detach air duct -1- and -2-.
Installing
Installation is carried out in reverse sequence.
Removing and installing front air duct for dash panel
Removal and installation are described for a left-hand drive vehicle as an example.
Removing
- Remove dash panel ⇒ General body repairs, interior; Rep.
gr. 70 ; Dash panel; Removing and installing dash panel .
- Unscrew bolts -2-
- Remove front air duct for dash panel -1-.

Installing
Install in reverse order of removal, observing the following:
Tightening torques
- ⇒ Rep. gr. 87 ; Assembly overview - air duct and air distribution in passenger compartment