Central locking

In this manual: Central locking
Basic information on body repairs — 1Explanation of symbols — 1Overview of materials used — 1Joining and separating techniques — 1Surface repair — 1Corrosion protection — 1Noise insulation — 1Plastic repair — 1General notes - windows — 1Self-adhesive components — 1Noises — 1Resistance spot welding — 1Solid rivet — 1Pop rivet — 1Incorrect riveting — 1Overview of riveting attachments — 1Making a flow-drill screw connection, pre-drilled hole in upper part — 1Distinction of types of plastic — 1Processing instructions - original products — 1Preparing plastic repair — 1Repairing deformations — 1Bonding plastic attachments — 1Welding plastic attachments — 1Glass repair- Introduction — 1Carrying out glass repair — 1General notes on the use of adhesives — 1Preparing old undamaged windows for installing — 1Preparing new windows for installation — 1Installation instructions for bonded windows — 1Bonding log — 1Preparing gas strut for disposal — 1Preparing rear lid drive unit VX69/rear lid drive unit 2 VX77 for disposal — 1Causes of water ingress — 1Locating water ingress — 1Interior equipment — 1Compartments/covers — 1Equipment — 1Centre console — 1Front centre armrest — 1Interior mirror — 1Passenger protection — 1Seat belts — 1Child seat anchors — 1Airbag system — 1Airbag control unit — 1Front airbag, driver side — 1Front passenger airbag — 1Side airbags — 1Curtain airbags — 1Airbag crash sensors — 1Seat belt verification — 1Seat occupied recognition — 1Trim, insulation — 1Front door trims — 1Rear door trims — 1Dash panel — 1Central tube for dash panel — 1Interior trims — 1Luggage compartment trims — 1Roof trims — 1Seat frames — 1Overview of seat variants — 1Front seats — 1Rear seats — 1Seat - padding, covers — 1Front seat covers and padding — 1Rear seat covers and padding — 1Technical data — 1Body - front — 1Lock carrier — 1Wings — 1Technical data — 1Air conditioning system — 1Overview of fitting locations - air conditioning system, R134a/R1234yf — 1Overview of fitting locations - air conditioning system, R744 — 1Refrigerant circuit, R134a/R1234yf — 1Refrigerant circuit, R744 — 1Valve unit of heat pump, R744 — 1Air conditioner compressor, R134a/R1234yf — 1Air conditioner compressor, R744 — 1Control motors, vehicles without air conditioner operating unit at rear — 1Control motors, vehicles with air conditioner operating unit at rear — 1Front heater and air conditioning unit, R134a/R1234yf — 1Front heater and air conditioning unit, R744 — 1Air duct — 1Coolant circuit, rear-wheel drive — 1Coolant circuit, all-wheel drive — 1Operating and display unit — 1Other controlling and regulating components — 1Air quality improvement system — 1Technical data — 1Brake test — 1Electrical components — 1Anti-lock brake system — 1Control unit and hydraulic unit — 1Separating control unit from and connecting to hydraulic unit — 1Connecting brake lines to hydraulic unit — 1Sensors — 1Brakes - mechanism — 1Front brake — 1Rear brake — 1Parking brake — 1Brake pedal — 1Brakes - hydraulics — 1Brake servo and brake master cylinder — 1Hydraulic system — 1Technical data — 1Fitting locations — 1Senders/sensors/control units — 1Adaptive cruise control — 1Reversing camera system — 1Front camera for driver assist systems — 1Overhead view camera — 1Electric drive systems- Safety information and repair notes — 1Classifying high-voltage batteries — 1Packaging high-voltage batteries — 1Packaging critical high-voltage batteries with "Warning" status — 1Bulkhead — 1Bonnet, rear lid — 1Bonnet — 1Rear lid — 1Charging flap unit — 1Front doors, door components, central locking — 1Door — 1Door components — 1Central locking — 1Rear doors, door components — 1Door — 1Door components — 1Sunroof — 1Sliding sunroof — 1Water drain hoses — 1Bumpers — 1Bumper, front — 1Bumper, rear — 1Glazing — 1Windscreen — 1Rear windscreen — 1Side windows — 1Door windows — 1Exterior equipment — 1Spoiler — 1Mouldings, trims, extensions — 1Underbody cladding — 1Roof moulding and roof railing — 1Exterior mirror — 1Wheel housing liner — 1Lettering and emblems — 1Towing bracket — 1Technical data — 1Vehicle identification data — 1Safety information — 1Body parts and materials — 1Technical data — 1Alignment jig — 1Body - front — 1Overview of fitting locations — 1Longitudinal member cross panel — 1Longitudinal member — 1Assembly overview - front right longitudinal member, part section — 1Battery tray — 1Front wheel housing — 1Body - centre — 1Overview of fitting locations — 1Roof — 1A-pillar — 1B-pillar — 1Side member — 1Body - rear — 1Rear cross member — 1Rear cross panel — 1Luggage compartment floor — 1Rear longitudinal member — 1Side panel — 1Rear wheel housing — 1Technical data — 1Controls, housing — 1Removing and installing gearbox — 1Gearbox housing, clutch housing — 1Final drive - differential — 1Technical data — 1Controls, housing — 1Gearbox housing, clutch housing — 1Gear oil — 1Final drive - differential — 1Explanation of symbols — 1Paintwork structure — 1Areas exposed to stone chipping — 1Seam seals, front body — 1Seam seals, bonnet, inner side — 1Seam seals, doors — 1Seam seals, underbody — 1Underseal — 1Cavity sealing — 1Technical data — 1Overview of fitting locations - components/control units in centre section of vehicle — 1Overview of fitting locations - components/control units in rear section of vehicle — 1Overview of fitting locations - components/control units in centre section of vehicle — 1Overview of fitting locations - components/control units in rear section of vehicle — 1Components/control units — 1Multifunction steering wheel — 1Technical data — 1Identification — 1Electrical components — 1Hazard classification of high-voltage system — 1Removing and installing engine — 1Removing and installing front motor — 1Removing and installing rear motor — 1Removing and installing rear motor — 1Front assembly mountings — 1Cooling — 1Cooling system/coolant — 1Coolant pump/coolant regulation — 1Radiator, radiator fan — 1Electric drive systems — 1High-voltage components, charging unit for high-voltage battery and voltage converter — 1High-voltage components, charging unit for high-voltage battery with integrated voltage converter — 1Warning stickers — 1High-voltage battery unit, edge of upper part of battery housing without wax — 1High-voltage battery components, edge of upper part of battery housing without wax — 1High-voltage battery unit, edge of upper part of battery housing with wax — 1High-voltage battery components, edge of upper part of battery housing with wax — 1Power and control electronics for electric drive — 1Electric drive motor — 1Electric drive motor — 1Motor control unit — 1De-energising high-voltage system — 1Potential equalisation lines — 1Charging socket, with charging cable — 1Charging socket, with separate charging cable — 1Charging unit for high-voltage battery — 1Charging unit for high-voltage battery, with integrated voltage converter — 1Vehicle noise/engine sound — 1Accelerator pedal — 1Voltage converter — 1High-voltage cables, all-wheel drive — 1High-voltage cables, rear-wheel drive — 1Technical data — 1Starter, current supply, CCS — 1Assembly overview - battery — 1Removing and installing battery [A] — 1Disconnecting and connecting battery — 1Removing and installing earth wire with battery monitor control unit [J367] — 1Gauges, instruments — 1Dash panel insert — 1Horn — 1Windscreen wash/wipe system — 1Windscreen wiper system — 1Windscreen washer system — 1Rear window wiper system ID4 — 1Rear window washer system — 1Lights, bulbs, switches - exterior — 1Headlights — 1Lights in exterior mirror — 1Tail lights — 1High-level brake light — 1Number plate light — 1Entry and start authorisation system — 1Steering column switch module — 1Towing bracket — 1Lights, bulbs, switches - interior — 1Lights — 1Controls — 1Anti-theft alarm system — 1Cigarette lighter, socket — 1Wiring — 1Relay carriers, fuse holders, electronics boxes — 1Control units — 1Technical data — 1Front suspension — 1Front axle — 1Subframe — 1Suspension strut, upper suspension link — 1Lower suspension link, swivel joint — 1Wheel bearing — 1Drive shaft — 1Anti-roll bar — 1Rear suspension — 1Rear axle — 1Subframe — 1Anti-roll bar — 1Suspension link, track rod — 1Suspension strut, shock absorber, spring — 1Wheel bearing assembly, trailing arm — 1Drive shaft — 1Self-levelling suspension — 1Electronic damping control — 1Vehicle level sender — 1Wheels, tyres, vehicle geometry — 1Wheel alignment — 1Wheels, tyres — 1Steering — 1Steering wheel — 1Steering column — 1Steering rack — 1
~7min read
  • Overview of fitting locations - central locking system
  • Removing and installing door control unit [J386]/[J387]
  • Removing and installing rear door control unit [J926]/[J927]

Overview of fitting locations - central locking system

Overview shows a left-hand drive vehicle as an example
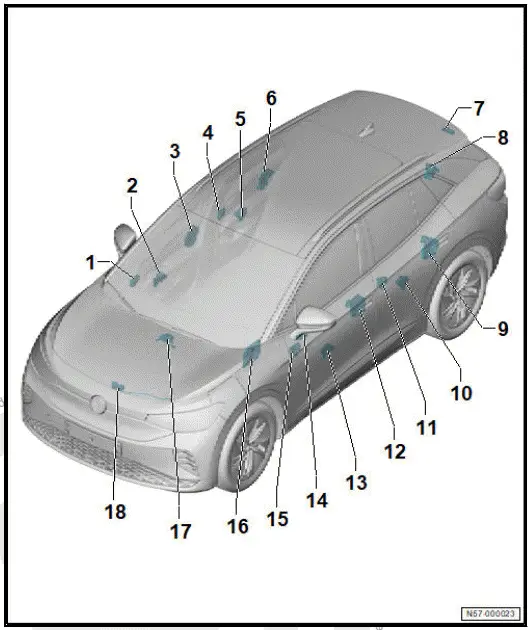
Volkswagen ID.4.  Overview of fitting locations - central locking system
  1. Front passenger door control unit - J387-
  • ⇒ Rep. gr. 57 ; Removing and installing door control unit [J386]/ [J387]
  1. Front passenger side window regulator motor - V148-
  • ⇒ Rep. gr. 57 ; Assembly overview - assembly carrier
  • ⇒ Rep. gr. 57 ; Removing and installing window regulator motor [V147]/[V148]
  1. Front passenger door lock unit - VX22-
  • With front passenger door contact switch - F3-
  • With front passenger side central locking lock unit - F221-
  • With front passenger door central locking actuator for SAFELOCK function - F244-
  • With front passenger door central locking motor - V57-
  • With front passenger door central locking SAFELOCK function motor - V162-
  • ⇒ Rep. gr. 57 ; Assembly overview - door handle and door lock
  • ⇒ Rep. gr. 57 ; Removing and installing lock unit [VX21]/[VX22]
  1. Rear passenger side door control unit - J927-
  • ⇒ Rep. gr. 57 ; Removing and installing rear door control unit [J926]/[J927]
  1. Rear passenger side window regulator motor - V472-
  • ⇒ Rep. gr. 58 ; Assembly overview - assembly carrier
  • ⇒ Rep. gr. 58 ; Removing and installing rear window regulator motor [V471]/[V472]
  1. Rear door lock unit, passenger side - VX84-
  • With rear door contact switch, passenger side - F506-
  • With rear passenger side central locking lock unit - F436-
  • With rear central locking actuator, passenger side - F510-
  • With rear central locking motor, passenger side - V540-
  • With rear central locking SAFELOCK function motor, passenger side - V538-
  • ⇒ Rep. gr. 58 ; Assembly overview - door handle and door lock
  • ⇒ Rep. gr. 58 ; Removing and installing rear door lock unit [VX83]/[VX84]
  1. Rear lid handle
  • With rear lid handle release button - E234-
  • Depending on equipment/version, with reversing camera - R189- or rear overhead view camera - R246-
  • Rep. gr. 55 ; Assembly overview - rear lid
  • ⇒ Rep. gr. 55 ; Removing and installing rear lid handle
  1. Rear lid lock unit - VX25-
  • ⇒ Rep. gr. 55 ; Assembly overview - rear lid
  • ⇒ Rep. gr. 55 ; Assembly overview - electrically operated rear lid
  1. Rear door lock unit, driver side - VX83-
  • With rear door contact switch, driver side - F505-
  • With rear driver side central locking lock unit - F435-
  • With rear central locking actuator, driver side - F509-
  • With rear central locking motor, driver side - V539-
  • With rear central locking SAFELOCK function motor, driver side - V537-
  • ⇒ Rep. gr. 58 ; Assembly overview - door handle and door lock
  • ⇒ Rep. gr. 58 ; Removing and installing rear door lock unit [VX83]/[VX84]
  1. Rear driver side window regulator motor - V471-
  • ⇒ Rep. gr. 58 ; Assembly overview - assembly carrier
  • ⇒ Rep. gr. 58 ; Removing and installing rear window regulator motor [V471]/[V472]
  1. Rear driver side door control unit - J926-
  • ⇒ Rep. gr. 57 ; Removing and installing rear door control unit [J926]/[J927]
  1. Driver door lock unit - VX21-
  • With driver door contact switch - F2-
  • With driver side central locking lock unit - F220-
  • With driver side contact switch in lock cylinder - F241-
  • With driver door central locking actuator for SAFELOCK function - F243-
  • With driver door central locking motor - V56-
  • With driver door central locking SAFELOCK function motor - V161- ⇒ Rep. gr. 58 ; Assembly overview - door handle and door lock
  • ⇒ Rep. gr. 57 ; Removing and installing lock unit [VX21]/[VX22]
  1. Driver side window regulator motor - V147-
  • ⇒ Rep. gr. 57 ; Assembly overview - assembly carrier
  • ⇒ Rep. gr. 57 ; Removing and installing window regulator motor [V147]/[V148]
  1. Operating unit for window regulator in driver door - EX36-
  • ⇒ Electrical system; Rep. gr. 96 ; Controls; Overview of fitting locations - controls in front doors
  • ⇒ Electrical system; Rep. gr. 96 ; Controls; Removing and installing operating unit for window regulator in driver door [EX36]
  1. Driver door control unit - J386-
  • ⇒ Rep. gr. 57 ; Removing and installing door control unit [J386]/[J387]
  1. Onboard supply control unit - J519-
  • ⇒ Electrical system; Rep. gr. 97 ; Control units; Assembly overview - onboard supply control unit
  • ⇒ Electrical system; Rep. gr. 97 ; Control units; Removing and installing onboard supply control unit [J519]
  1. Alarm horn - H12-
  • ⇒ Electrical system; Rep. gr. 96 ; Anti-theft alarm system; Assembly overview - interior monitoring
  • ⇒ Electrical system; Rep. gr. 96 ; Anti-theft alarm system; Removing and installing alarm horn [H12]
  1. Bonnet lock
  • With bonnet contact switch - F266-
  • ⇒ Rep. gr. 55 ; Assembly overview - bonnet
  • ⇒ Rep. gr. 55 ; Removing and installing bonnet lock

Removing and installing door control unit [J386]/[J387]

The driver door control unit - J386- and front passenger door control unit - J387- will henceforth be referred to as "door control unit".

Removal and installation are described for the left side of vehicle as an example.

Removing

If the door control unit is renewed, perform the test plan for the renewal of the control unit:

  • Carry out function "Renew control unit" using ⇒ Vehicle diagnostic tester ⇒ Rep. gr. 00 ; Access to diagnoses .

Continued

  • Remove front door trim ⇒ General body repairs interior; Rep. gr. 70 ; Front door trims; Removing and installing front door trim .
  • Disconnect electrical connectors -2-.
  • Disengage hook -3- in direction of -arrow A-.
  • Push door control unit -1- in direction of -arrow B-, and remove it.
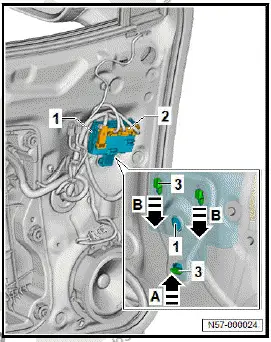
Volkswagen ID.4. Removing and installing door control unit [J386]/[J387]

Installing

Install in reverse order of removal, observing the following:

If the control unit has been renewed, conclude the test plan for the renewal of the control unit:

  • Carry out function "Renew control unit" using ⇒ Vehicle diagnostic tester ⇒ Rep. gr. 00 ; Access to diagnoses .

Removing and installing rear door control unit [J926]/[J927]

The rear driver side door control unit - J926- and rear passenger side door control unit - J927- will henceforth be referred to as "door control unit".

Removal and installation are described for the left side of vehicle as an example.

Removing

  • Carry out function "Renew control unit" using ⇒ Vehicle diagnostic tester ⇒ Rep. gr. 00 ; Access to diagnoses .
  • Remove rear door trim ⇒ General body repairs; interior; Rep. gr. 70 ; Rear door trims; Removing and installing rear door trim .
  • Disconnect electrical connectors -2-.
  • Disengage hook -3- in direction of -arrow A-.
  • Push door control unit -1- in direction of -arrow B-, and remove it.
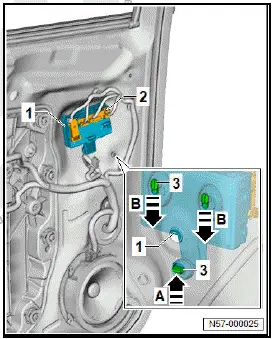
Volkswagen ID.4. Removing and installing rear door control unit [J926]/[J927]

Installing

Install in reverse order of removal, observing the following:

  • Carry out function "Renew control unit" using ⇒ Vehicle diagnostic tester ⇒ Rep. gr. 00 ; Access to diagnoses .

Removing and installing ignition key battery

See the ⇒ owner's manual for information about removal and installation of the battery in the ignition key.

Removing and installing actuator for high-voltage charging flap lock [F496]

Removing

  • Remove charging flap unit ⇒ Rep. gr. 55 ; Removing and installing charging flap unit .
  • Unscrew bolts -2-.
  • Remove actuator for high-voltage charging flap lock 1 - F496- -1- from charging flap unit.
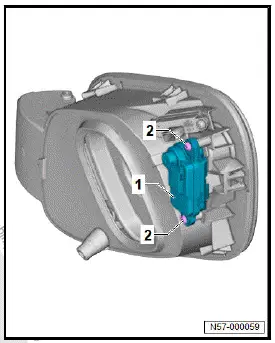
Volkswagen ID.4. Removing and installing actuator for high-voltage charging flap lock [F496]

Installing

Install in reverse order of removal, observing the following:

Tightening torques

  • ⇒ Rep. gr. 55 ; Assembly overview - charging flap unit