Preparing new windows for installation
Note
The application area for the adhesive bead is not precoated or primed.
For bonding surface area, see marking on new window or removed window.
- Clean edge of window -1- and bonding surface marked on new window all around with cleaning solution and lint-free cleaning cloth.
Important
- Adhere to flash-off time of 10 minutes.
- Bonding surface must be dry.
Important
- Processing temperature of primer is between 15 ºC (59 ºF) and 25 ºC (77 ºF).
- Shake primer -3- for at least 2 minutes to make sure that all components are mixed in the correct ratio.
- Apply uninterrupted, thin film of primer -3- evenly in one pass onto bonding surface using applicator -2-.
For drying time, refer to processing instructions on manufacturer's label.
Important
- Drying time of respective primer must be observed.
- Drying time of primer D 181 220 A1 is 30 minutes.
- Drying time of primer D 009 200 02 is 15 minutes.
- A continuous primer area must be visible.

If primer drying time of 8 hours is exceeded
Important
- Primer may be reapplied once and within 96 hours after the first primer application.
- Primed bonding surfaces must be protected within this period against external influences and dirt.
- Observe processing temperature of primer, and shake primer bottle before opening it.
- Apply full thin film of primer evenly in one pass using applicator.
Preparing body flange for installing
Special tools and workshop equipment required
- scraper set - VAS 861 005-
NOTICE
Risk of damage to the primer layer and the paintwork when cutting back the window adhesive
- Only cut back the window adhesive as far as specified.
- Do not treat cut-back adhesive beads with activator, primer or cleaning solution.
- Keep bonding surface free of dirt and grease
Important
- Do not remove remaining material
- Use a suitable scraper -1- from scraper set - VAS 861 005- to cut back remaining material -2- on body flange -3- to 1 to 2 mm shortly before bonding flange back in.
Note
Remaining material is the adhesion base for newly applied window adhesive.
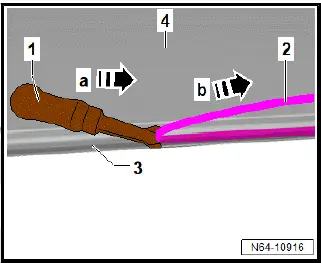
If bonding is performed later than 2 hours after cutting back, the remaining material of the adhesive bead must be activated with an activator:
- Shake activator to make sure that all components are mixed in the correct ratio.
Important
Processing temperature of activator is between 15ºC and 25ºC.
NOTICE
Risk of damage to paintwork caused by activator
- Apply activator precisely onto adhesive bead that has been cut back, and do not spill any activator
- Use applicator to apply full thin film of activator evenly in one pass onto adhesive bead that has been cut back.
For drying time, refer to processing instructions on manufacturer's label.
Important
- Adhere to drying time of 10 minutes
- Adhesive bond must be made no later than 2 hours after activating
Continued
Vehicles with steel-panel body flange: If the body flange has been repaired or partially renewed, clean and prime corresponding area after painting:
- Clean body flange all around with cleaning solution and lintfree cleaning cloth.
Important
- Adhere to flash-off time of 10 minutes
- Observe processing temperature for primer and shake primer bottle before opening ⇒ Rep. gr. 52 ; Preparing new windows for installation .
- Apply full thin film of primer evenly in one pass to paint using applicator.
Important
- A continuous primer area must be visible
- Observe drying time of primer ⇒ Rep. gr. 52 ; Preparing new windows for installation
All vehicles (continued)
If drying time of primer is exceeded by 8 hours:
Important
- Primer may be reapplied once and within 96 hours after the first primer application
- Primed bonding surfaces must be protected within this period against external influences and soiling
- Observe processing temperature for primer and shake primer bottle before opening ⇒ Rep. gr. 52 ; Preparing new windows for installation .
- Apply full thin film of primer evenly in one pass to paint using applicator.
Continued
Vehicles with steel-panel body flange: If laser weld seam on body flange is not covered by the existing adhesive bead:
Continued
- Clean laser weld seam on body flange with cleaning solution and lint-free cleaning cloth.
Important
- Adhere to flash-off time of 10 minutes
- Observe processing temperature for primer and shake primer bottle before opening ⇒ Rep. gr. 52 ; Preparing new windows for installation .
- Apply full thin film of primer evenly in one pass using applicator.
Important
- A continuous primer area must be visible
- Observe drying time of primer ⇒ Rep. gr. 52 ; Preparing new windows for installation .
NOTICE
Risk of leaks and corrosion due to improper sealing
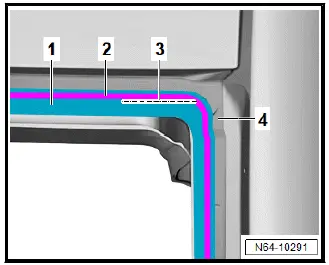
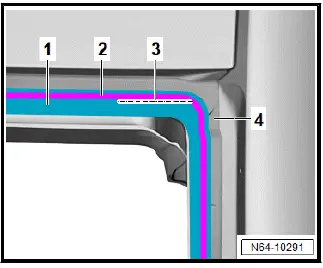
- Seal exposed laser weld seams with window adhesive before bonding the windows.
- Apply primer -1- to laser weld seam -3-.
Important
- Observe relevant information for adhesive ⇒ Rep. gr. 52 ; Use of adhesives
- Seal laser weld seam -3- using 2-component window adhesive.
All vehicles (continued)
Touching up paint damage
- If the paintwork structure is damaged, it must be restored according to specifications in the Paintwork manual ⇒ Paintwork structure .
Cleaning off excess adhesive
NOTICE
Windows may come loose when cleaning work is performed in the vehicle interior.
- When cleaning the vehicle interior, do not push newly installed windows outwards
- Clean painted surface roughly with lint-free cleaning cloth.
- Remove residual soiling using cleaning solution.
- Clean plastic trim: Allow window adhesive to cure for approx.
1 hour and then peel off.
- Clean plastic trim: Allow window adhesive to cure for approx.
1 hour and then peel off.