Drive shaft
- Assembly overview - drive shaft
- Removing and installing drive shaft
- Loosening and tightening threaded connections of drive shaft
- Removing and installing constant velocity joint
- Tensioning clamp for boot
Assembly overview - drive shaft
Overview shown for left side of vehicle as an example
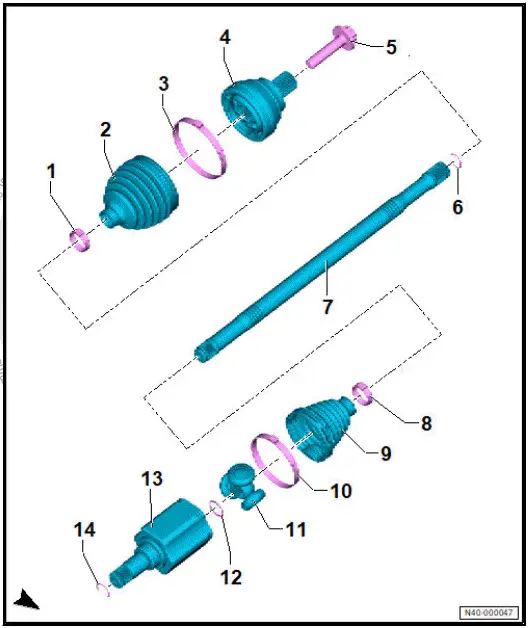
- Clamp
- Renew after removing
- ⇒ Rep. gr. 40 ; Tensioning clamp for boot
- Boot
- Clamp
- Renew after removing
- ⇒ Rep. gr. 40 ; Tensioning clamp for boot
- Outer constant velocity joint
- ⇒ Rep. gr. 40 ; Removing and installing constant velocity joint
- Bolt
- Renew after removing
- ⇒ Rep. gr. 40 ; Loosening and tightening threaded connections of drive shaft
- M16 × 1.5 × 70
- 200 N·m +90º
- Retaining ring
- Renew after removing
- Drive shaft
- Depending on equipment/ version
- Allocation ⇒ Electronic parts catalogue (ETKA)
- Clamp
- Renew after removing
- ⇒ Rep. gr. 40 ; Tensioning clamp for boot
- Boot
- Clamp
- Renew after removing
- ⇒ Rep. gr. 40 ; Tensioning clamp for boot
- Triple roller spider with rollers
- ⇒ Rep. gr. 40 ; Removing and installing inner triple roller joint, drive shaft removed
- Retaining ring
- Renew after removing
- Joint body
- ⇒ Rep. gr. 40 ; Removing and installing inner triple roller joint, drive shaft removed
- Retaining ring
- Renew after removing
Removing and installing drive shaft
Special tools and workshop equipment required
- ball joint puller - 3287A
- pressure tool - T10520A-
- thrust piece - T10520/5-
Removing
Front left vehicle level sender - G78- and front right vehicle level sender - G289- will henceforth be referred to as "vehicle level sender".
Removal and installation are described for the left side of vehicle as an example.
- Loosen threaded connection of drive shaft ⇒ Rep. gr. 42 ; Loosening and tightening threaded connections of drive shaft .
- Remove wheel ⇒ Rep. gr. 44 ; Removing and installing wheel .
- Remove front underbody cladding ⇒ General body repairs, exterior; Rep. gr. 66 ; Underbody cladding; Removing and installing front underbody cladding .
Vehicles with front vehicle level sender
- Remove vehicle level sender from suspension link ⇒ Rep.
gr. 43 ; Removing and installing front vehicle level sender [G78]/[G289] .
All vehicles (continued)
- Unscrew nut of coupling rod from suspension strut ⇒ Rep.
gr. 40 ; Removing and installing coupling rod .
- Pull coupling rod -1- off suspension strut -2-.
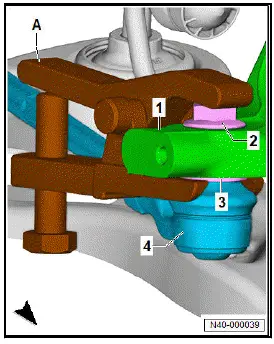
- Loosen nut -2- on track rod ball joint -4-; do not unscrew it completely. Counter-hold on pin using a suitable tool.
Important
- To protect threads, nut -2- must remain screwed onto pin a few turns.
NOTICE
Risk of damage to wheel bearing housing! Loosened bushes on wheel bearing housing due to incorrect placement of ball joint puller.
- Ball joint puller must be supported on bush and not on wheel bearing housing.
- Use ball joint puller - 3287A- -A- to press track rod ball joint -4- off wheel bearing housing -1-.
- Unscrew nut -2-.
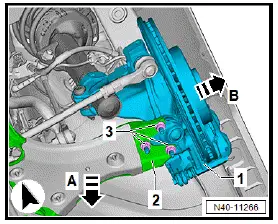
- Detach lower suspension link -2- from swivel joint -1-.
- Unscrew nuts -3-.
- Pull suspension link -2- in direction of -arrow A- off swivel joint.
- Pull wheel bearing housing -1- outwards in direction of -arrow B-.
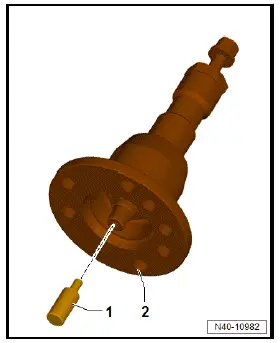
- Insert thrust piece - T10520/5- -1- into pressure tool - T10520A- -2-.
- Use 3 wheel bolts -arrows- to secure pressure tool - T10520A- -A- to wheel bearing unit -2-.
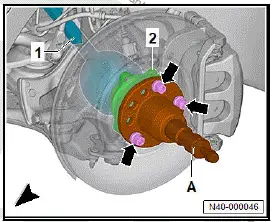
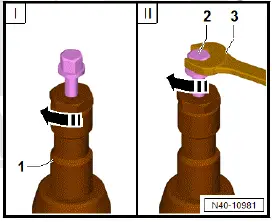
- Press out drive shaft using pressure tool - T10520A- .
- Tighten knurled nut -1- hand-tight.
- Using spanner -3-, turn only bolt -2-, not the pressure tool itself.
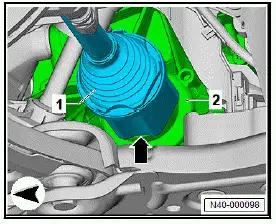
- Pull wheel bearing housing outwards
- Using assembly lever, push drive shaft -1- out of gearbox -2- -arrow-.
- Pull drive shaft -1- out of gearbox -2-, and remove it.
Installing
Install in reverse order of removal, observing the following:
- Renew gearbox seal ⇒ 1-speed front gearbox, 0MJ; Rep.
gr. 39 ; Seals; Renewing left seal .
- Mask off jaws of water pump pliers -A- with adhesive tape to prevent damage to splines of drive shaft -2-.

Important
- Use commercially available water pump pliers -A-.
- Position ends of new retaining ring -4- at ends of old retaining ring -1-.
- Apply water pump pliers -A-, and press old retaining ring -1- out of drive shaft groove -2-.
Important
- New retaining ring -4- is pressed into drive shaft groove -2- at the same time.
- Make sure that retaining ring -4- is seated correctly.
- Position drive shaft in straight line, and push it in until it can be heard to engage.
Important
- Hold drive shaft by inner joint when inserting.
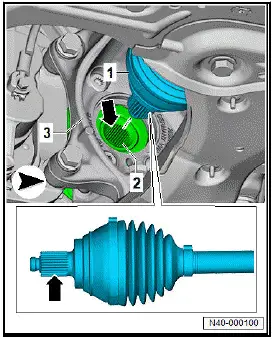
- Clean inner side of wheel hub -2- and drive shaft splines -1- -arrow-.
Important
- Cleaned areas must be free of oil and grease.
Vehicles with front vehicle level sender
- Carry out required function/functions using ⇒ Vehicle diagnostic tester ⇒ Rep. gr. 00 ; Access to diagnoses .
All vehicles (continued)
Tightening torques
- ⇒ Rep. gr. 40 ; Assembly overview - drive shaft
- ⇒ Rep. gr. 40 ; Assembly overview - suspension link, swivel joint
Loosening and tightening threaded connections of drive shaft
Special tools and workshop equipment required
- socket - T10125-
- socket - T10361A
Removal and installation are described for left side of vehicle as an example.
Removing
Vehicles with cap for wheel hub
- Remove wheel ⇒ Rep. gr. 44 ; Removing and installing wheel .
- Remove cap for wheel hub.
- Remove wheel ⇒ Rep. gr. 44 ; Removing and installing wheel .
All vehicles (continued)
NOTICE
Risk of damage to wheel bearings from the vehicle's own weight when threaded connections are loosened on wheel end.
- When threaded connections of wheel bearings have been loosened, the wheel bearings must not be subjected to load.
- Loosen the bolt no more than 90º when the vehicle is standing on its wheels.
- Vehicles without bolted wheel bearings must not be moved while standing on their wheels. If a vehicle nevertheless must be moved, observe the following: install outer joint, and tighten it to 120 N·m.
Important
- The aid of an additional mechanic is required for the subsequent work steps.
- Press brake pedal.
Vehicles on which drive shaft is secured with bolt
- Use socket - T10361A- to loosen bolt -1- max. 90º with vehicle standing on its wheels.

All vehicles (continued)
Vehicles on which drive shaft is secured with nut
- Use socket - T10125- to loosen nut -1- max. 90º with vehicle standing on its wheels.
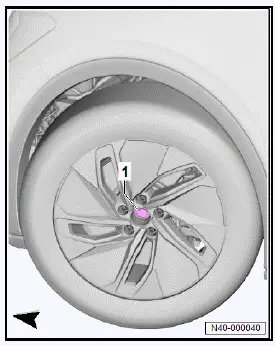
All vehicles (continued)
- Raise vehicle.
- Unscrew bolt or nut -1-.
- Remove wheel ⇒ Rep. gr. 44 ; Removing and installing wheel .
Installing
Install in reverse order of removal, observing the following:
Important
- The aid of an additional mechanic is required for the subsequent work steps.
NOTICE
Risk of damage to wheel bearings from vehicle's own weight when threaded connections of wheel bearings are loosened on wheel end.
- When threaded connections of wheel bearings are pretightened, the wheels must not be in contact with the ground.
- Press brake pedal.
- Tighten bolt or nut -1- to specified torque.
- Lower vehicle onto its wheels.
- Tighten bolt or nut -1- to further turning angle.
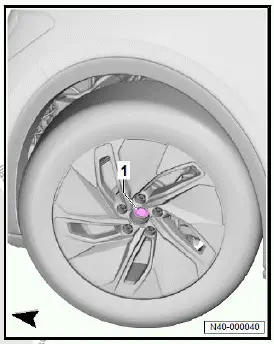
Tightening torques
- ⇒ Rep. gr. 40 ; Assembly overview - wheel bearing
Removing and installing constant velocity joint
Removing and installing outer constant velocity joint, drive shaft removed
Special tools and workshop equipment required
- multi-purpose tool - VW771-
- puller - T10382-
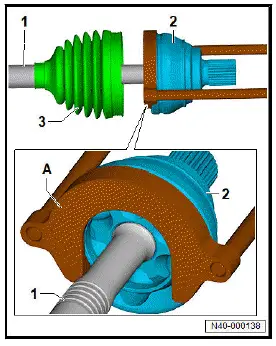
- Remove drive shaft ⇒ Rep. gr. 42 ; Removing and installing drive shaft .
- Clamp drive shaft -1- in vice -A- using jaw protectors -B-.
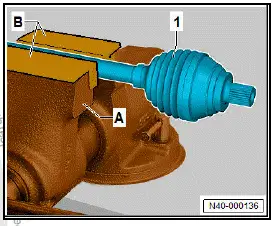
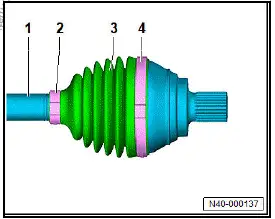
- Open clamps -2- and -4- for boot -3-.
- Push back boot -3- on drive shaft -1-.
- Remove grease, and clean drive shaft -1-.
- Set up puller - T10382- -A- in such a way that smooth side of puller plate faces spindles.
- Assemble puller - T10382- -A- and multi-purpose tool - VW771- .
- Pull off constant velocity joint from drive shaft using puller - T10382- -A- and multi-purpose tool - VW771- .
Installing
Install in reverse order of removal, observing the following:
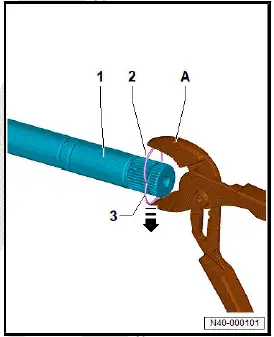
- Clean constant velocity joint and drive shaft -1-.
- Mask off jaws of commercially available water pump pliers -A- with adhesive tape to prevent damage to splines of drive shaft -1-.
- Position ends of new retaining ring -2- at ends of old retaining ring -3-.
- Apply water pump pliers -A-, and press old retaining ring -3- out of drive shaft groove -1-.
Important
- New retaining ring -2- is pressed into drive shaft groove -1- at the same time.
- Make sure that retaining ring -2- is seated correctly.
- Slide on clamp with smaller diameter.
- Push boot onto drive shaft.
- Slide on clamp with larger diameter.
- Knock constant velocity joint onto drive shaft using plastic hammer until retaining ring engages.
- Press in half of total amount of grease from repair kit at rear of constant velocity joint.
- Press remaining amount of grease from repair kit into boot.
- Push boot with clamp onto constant velocity joint.
- ⇒ Rep. gr. 40 ; Tensioning clamp for boot .
Removing and installing outer constant velocity joint, drive shaft installed
Special tools and workshop equipment required
- Press-out tool - T10520A-
- hook - VAS 281 007-
- thrust bolt - T10640-
Removal and installation are described for the left side of vehicle as an example.
Removing
- Loosen threaded connection of drive shaft ⇒ Rep. gr. 40 ; Loosening and tightening threaded connections of drive shaft .
- Remove wheel ⇒ Rep. gr. 44 ; Removing and installing wheel .
- Remove suspension link from swivel joint ⇒ Rep. gr. 40 ; Removing and installing swivel joint .
- Remove coupling rod from anti-roll bar ⇒ Rep. gr. 40 ; Removing and installing coupling rod .
- Pull outer joint of drive shaft -1- out of wheel hub.

If outer joint of drive shaft cannot be pulled out of wheel hub:
- Use Press-out tool - T10520A- to press out drive shaft ⇒ Rep. gr. 40 ; Removing and installing drive shaft .
Continued
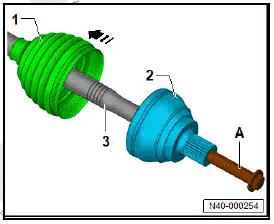
- Use hook - VAS 281 007- -A- to secure drive shaft -1- to body.
- Open clamps -2- and -4-.

- Push boot -1- in direction of -arrow- off drive shaft -3-.
- Remove any grease.
- Clean drive shaft -1-.
- Screw in thrust bolt - T10640- -A- until outer joint -2- is pressed off drive shaft -3-.
Installing
Install in reverse order of removal, observing the following:
- Clean constant velocity joint and drive shaft -1-.
- Use commercially available water pump pliers -A-.
- Mask off jaws of water pump pliers -A- with commercially available adhesive tape to prevent damage to splines of drive shaft -1-.
- Position ends of new retaining ring -2- at ends of installed retaining ring -3-.
- Fit water pump pliers -A-, and press new retaining ring -2- into groove.

Note
Old retaining ring -3- is pressed out in direction of -arrow- in the process.
- Make sure that retaining ring -2- is properly seated.
- Slide on clamp with smaller diameter.
- Push boot onto drive shaft.
- Slide on clamp with larger diameter.
- Knock constant velocity joint onto drive shaft using a commercially available plastic hammer until retaining ring engages.
- Press in half of total amount of grease from repair kit at rear of constant velocity joint.
- Press remaining amount of grease from repair kit into boot.
- Push boot with clamp onto constant velocity joint.
- ⇒ Rep. gr. 42 ; Tensioning clamp for boot .
Tightening torques
- ⇒ Rep. gr. 40 ; Assembly overview - drive shaft
Removing and installing inner triple roller joint, drive shaft removed
Special tools and workshop equipment required
- assembly tool - T10065/1-
- assembly tool - T10065/4-
- press tool - VW409-
- retaining clip pliers - VAS 5503A-
- thrust plate - VW401-
- tube - VW416BID
Removing
- Clamp drive shaft -1- in vice -A- using jaw protectors -B-.
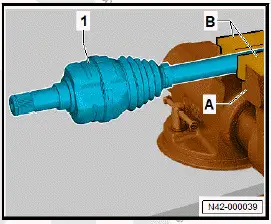
- Open clamps -2- and -4- for boot -3-.
- Push back boot -3- on drive shaft -5-.
- Pull joint body -1- off drive shaft.
- Remove grease, and clean drive shaft -5-.
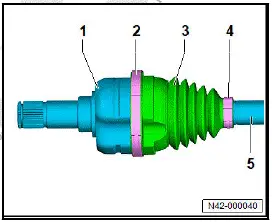
- Remove retaining ring -3- using retaining clip pliers - VAS 5503A- -C-.

- Insert thrust plate - VW401- -C- and thrust plate - VW401- -D- into workshop press.
- Fit assembly tool - T10065/4- -B- to drive shaft -2-.
- Push assembly tool - T10065/1- -A- with opening over drive shaft -2-.
- Insert drive shaft -2- with assembly tool - T10065/4- -B- into assembly tool - T10065/1- -A-.
- Insert drive shaft -2- with assembly tool - T10065/4- -Band assembly tool - T10065/1- -A- between thrust plate - VW401- -C- and thrust plate - VW401- -D-.
- Push thrust plate - VW401- -C- and thrust plate - VW401- -D- together.
- Fit drive shaft with assembly tool - T10065/4- -B- and assembly tool - T10065/1- -A- onto thrust plate - VW401- -Cand thrust plate - VW401- -D-.
- Make sure that triple roller spider -1- is properly seated on assembly tool - T10065/4- -B-.
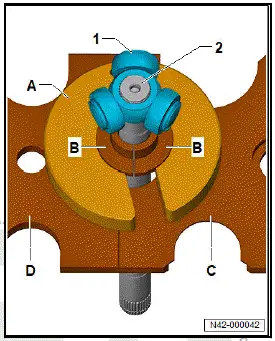
- Mount press tool - VW409- -E- on drive shaft -2-.
- Press triple roller spider -1- off drive shaft -2-.
- Pull boot off drive shaft -2-.
- Clean drive shaft -2-, joint body and groove for seal.

Installing
Install in reverse order of removal, observing the following:
- Push small clamp for boot onto drive shaft.
- Push boot onto drive shaft.
- Clamp drive shaft -1- in vice -A- using jaw protectors -B-.
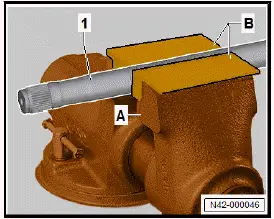
- Clean triple roller spider -1-.
- Fit triple roller spider -1- onto drive shaft -2-. Before fitting, make sure that chamfer -arrow- on triple roller spider -1- points towards drive shaft -2-.

- Drive triple roller spider -1- onto drive shaft -2- using tube - VW416B- -C-.
- Drive on triple roller spider -1- as far as stop.
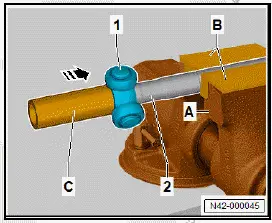
- Install new retaining ring -3- using retaining clip pliers - VAS 5503A- -C-.
- Make sure it is seated correctly.

- Press half of total amount of grease from repair kit into triple roller joint.
- Slide on clamp with larger diameter.
- Slide joint body over rollers and hold it there.
- Press remaining amount of grease from repair kit into back of triple roller joint.
- Push boot with clamp onto joint body.
- ⇒ Rep. gr. 40 ; Tensioning clamp for boot .
Tensioning clamp for boot
Special tools and workshop equipment required
- clamp tensioner - V.A.G 1682A
NOTICE
Risk of damage caused by insufficiently tensioned clamps.
- Due to the rigid material of the boot and, consequently, the use of a stainless steel clamp, only the specified clamp tensioner may be used for tensioning.
- Make sure that clamp tensioner spindle moves smoothly.
Lubricate with suitable lubricant.
- If spindle is tight, force required to tighten clamp will not be attained even if specified tightening torque is applied.
Clean the spindle threads
The procedure of tensioning the boot clamp is described for the outer joint as an example.
Important
- Boot -3- must be seated properly on joint -2-.
- Boot -3- must be seated properly on drive shaft.
- Bring clamp tensioner - V.A.G 1682A- -A- into position.
Important
- Jaws of clamp tensioner - V.A.G 1682A- -A- must be in corners of boot clamp -1-.
- Tighten boot clamp -1- by turning spindle with commercially available toque wrench -B- and clamp tensioner - V.A.G 1682A- .
- Keep clamp tensioner - V.A.G 1682A- -A- straight.
- ⇒ Rep. gr. 40 ; Assembly overview - drive shaft