High-voltage battery components, edge of upper part of battery housing without wax
- Overview of fitting locations - battery modules, 48, 55 kWh
- Overview of fitting locations - battery modules, 62 kWh
- Overview of fitting locations - battery modules, 82 kWh
- Overview of fitting locations - battery connectors
- Assembly overview - high-voltage battery, removed, 82 kWh
- Assembly overview - switching unit for high-voltage battery, 48, 55, 62 kWh
- Assembly overview - switching unit for high-voltage battery, 82 kWh
- Assembly overview - high-voltage battery, connecting element, 48, 55, 62 kWh
- Assembly overview - high-voltage battery, connecting element, 82 kWh
- Removing battery module
- Installing battery module
- Removing and installing battery modules control unit
- Removing and installing connecting element, 48, 55 kWh
- Removing and installing connecting element, 62 kWh
- Removing and installing connecting element, 82 kWh
Overview of fitting locations - battery modules, 48, 55 kWh
Overview of fitting locations - battery modules
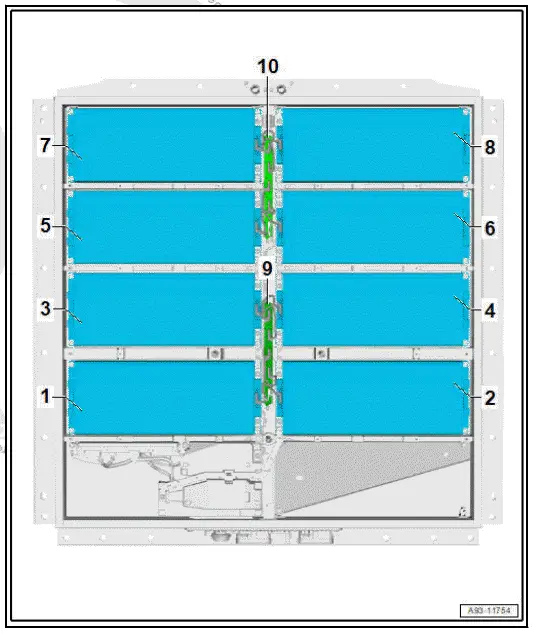
- Battery module 1 - J991-
- ⇒ Rep. gr. 93 ; Removing battery module
- ⇒ Rep. gr. 93 ; Installing battery module
- Battery module 2 - J992-
- ⇒ Rep. gr. 93 ; Removing battery module
- ⇒ Rep. gr. 93 ; Installing battery module
- Battery module 3 - J993-
- ⇒ Rep. gr. 93 ; Removing battery module
- ⇒ Rep. gr. 93 ; Installing battery module
- Battery module 4 - J994-
- ⇒ Rep. gr. 93 ; Removing battery module
- ⇒ Rep. gr. 93 ; Installing battery module
- Battery module 5 - J995-
- ⇒ Rep. gr. 93 ; Removing battery module
- ⇒ Rep. gr. 93 ; Installing battery module
- Battery module 6 - J996-
- ⇒ Rep. gr. 93 ; Removing battery module
- ⇒ Rep. gr. 93 ; Installing battery module
- Battery module 7 - J997-
- ⇒ Rep. gr. 93 ; Removing battery module
- ⇒ Rep. gr. 93 ; Installing battery module
- Battery module 8 - J998-
- ⇒ Rep. gr. 93 ; Removing battery module
- ⇒ Rep. gr. 93 ; Installing battery module
- Battery modules control unit - J1208-
- ⇒ Rep. gr. 93 ; Removing and installing battery modules control unit
- Battery modules control unit 5 - J1212-
- ⇒ Rep. gr. 93 ; Removing and installing battery modules control unit
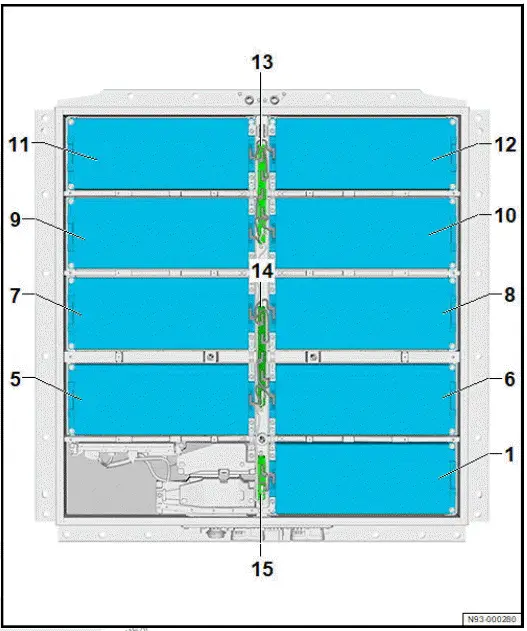
Overview of fitting locations - battery modules, 62 kWh
Overview of fitting locations - battery modules
- Battery module 1 - J991-
- ⇒ Rep. gr. 93 ; Removing battery module
- ⇒ Rep. gr. 93 ; Installing battery module
- Not fitted
- Not fitted
- Not fitted
- Battery module 5 - J995-
- ⇒ Rep. gr. 93 ; Removing battery module
- ⇒ Rep. gr. 93 ; Installing battery module
- Battery module 6 - J996-
- ⇒ Rep. gr. 93 ; Removing battery module
- ⇒ Rep. gr. 93 ; Installing battery module
- Battery module 7 - J997-
- ⇒ Rep. gr. 93 ; Removing battery module
- ⇒ Rep. gr. 93 ; Installing battery module
- Battery module 8 - J998-
- ⇒ Rep. gr. 93 ; Removing battery module
- ⇒ Rep. gr. 93 ; Installing battery module
- Battery module 9 - J999-
- ⇒ Rep. gr. 93 ; Removing battery module
- ⇒ Rep. gr. 93 ; Installing battery module
- Battery module 10 - J1000-
- ⇒ Rep. gr. 93 ; Removing battery module
- ⇒ Rep. gr. 93 ; Installing battery module
- Battery module 11 - J1001-
- ⇒ Rep. gr. 93 ; Removing battery module
- ⇒ Rep. gr. 93 ; Installing battery module
- Battery module 12 - J1002-
- ⇒ Rep. gr. 93 ; Removing battery module
- ⇒ Rep. gr. 93 ; Installing battery module
- Battery modules control unit 9 - J1216-
- ⇒ Rep. gr. 93 ; Removing and installing battery modules control unit
- Battery modules control unit 5 - J1212-
- ⇒ Rep. gr. 93 ; Removing and installing battery modules control unit
- Battery modules control unit - J1208-
- ⇒ Rep. gr. 93 ; Removing and installing battery modules control unit
Overview of fitting locations - battery modules, 82 kWh
Overview of fitting locations - battery modules
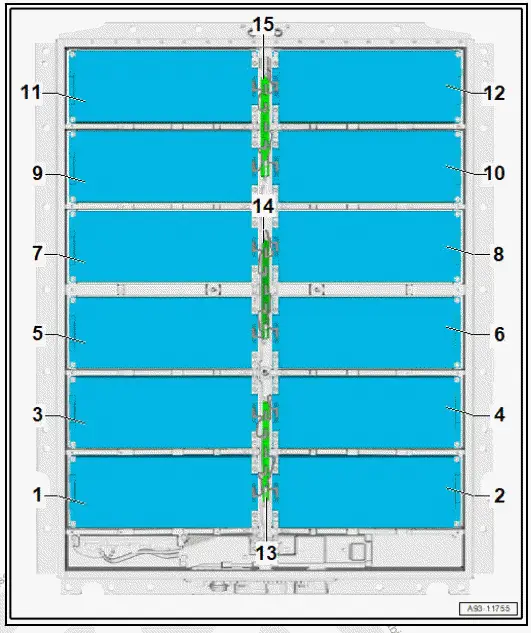
- Battery module 1 - J991-
- ⇒ Rep. gr. 93 ; Removing battery module
- ⇒ Rep. gr. 93 ; Installing battery module
- Battery module 2 - J992-
- ⇒ Rep. gr. 93 ; Installing battery module
- ⇒ Rep. gr. 93 ; Removing battery module
- Battery module 3 - J993-
- ⇒ Rep. gr. 93 ; Installing battery module
- ⇒ Rep. gr. 93 ; Removing battery module
- Battery module 4 - J994-
- ⇒ Rep. gr. 93 ; Installing battery module
- ⇒ Rep. gr. 93 ; Removing battery module
- Battery module 5 - J995-
- ⇒ Rep. gr. 93 ; Installing battery module
- ⇒ Rep. gr. 93 ; Removing battery module
- Battery module 6 - J996-
- ⇒ Rep. gr. 93 ; Installing battery module
- ⇒ Rep. gr. 93 ; Removing battery module
- Battery module 7 - J997-
- ⇒ Rep. gr. 93 ; Installing battery module
- ⇒ Rep. gr. 93 ; Removing battery module
- Battery module 8 - J998-
- ⇒ Rep. gr. 93 ; Installing battery module
- ⇒ Rep. gr. 93 ; Removing battery module
- Battery module 9 - J999-
- ⇒ Rep. gr. 93 ; Installing battery module
- ⇒ Rep. gr. 93 ; Removing battery module
- Battery module 10 - J1000-
- ⇒ Rep. gr. 93 ; Installing battery module
- ⇒ Rep. gr. 93 ; Removing battery module
- Battery module 11 - J1001-
- ⇒ Rep. gr. 93 ; Installing battery module
- ⇒ Rep. gr. 93 ; Removing battery module
- Battery module 12 - J1002-
- ⇒ Rep. gr. 93 ; Installing battery module
- ⇒ Rep. gr. 93 ; Removing battery module
- Battery modules control unit - J1208-
- ⇒ Rep. gr. 93 ; Removing and installing battery modules control unit
- Battery modules control unit 5 - J1212-
- ⇒ Rep. gr. 93 ; Removing and installing battery modules control unit
- Battery modules control unit 9 - J1216-
- ⇒ Rep. gr. 93 ; Removing and installing battery modules control unit
Overview of fitting locations - battery connectors
Overview shows high-voltage battery, 82 kWh as an example
- Battery module 1 - J991-
- Battery module 2 - J992-
- Battery module 3 - J993-
- Battery module 4 - J994-
- Battery module 5 - J995-
- Battery module 6 - J996-
- Battery module 7 - J997-
- Battery module 8 - J998-
- Battery module 9 - J999-
- Battery module 10 - J1000-
- Battery module 11 - J1001-
- Battery module 12 - J1002-

Assembly overview - high-voltage battery, removed, 48, 55, 62 kWh
Assembly overview - high-voltage battery (removed)
- Upper part of battery housing
- ⇒ Rep. gr. 93 ; Opening high-voltage battery 1 AX2
- ⇒ Rep. gr. 93 ; Checking whether upper part of battery housing can be reused
- ⇒ Rep. gr. 93 ; Closing high-voltage battery 1 AX2
- Bolt
- Qty. 14
- Renew after removing
- M5×18
- Small fastener
- Qty. 2
- Renew after removing
- Large fastener
- Qty. 2
- Renew after removing
- Spacer
- Qty. 8
- Bolt
- Qty. 72
- Renew after removing
- Separating film
- Renew after removal of high-voltage battery 1 - AX2-
- Qty. 14
- Lower part of battery housing
- Bolt
- Qty. 16
- Renew after removing
- M5×25
- 4,5 N·m
- Pressure relief valve
- Renew after removing
- Potential equalisation
- Nut
- M6×10
- 8 N·m
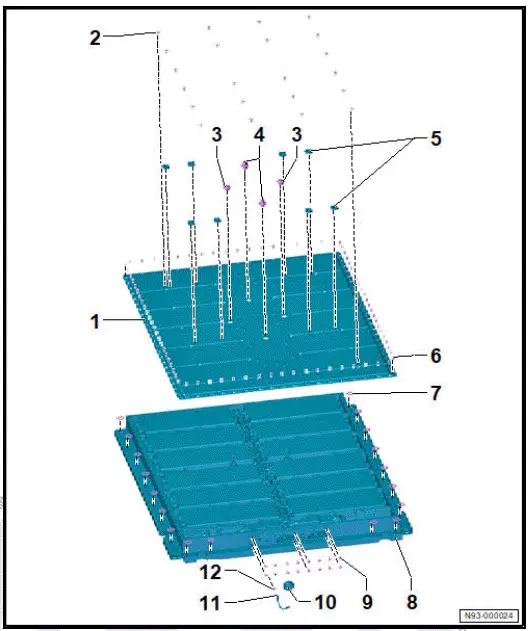
Upper part of battery housing - specified torque and tightening sequence 1 
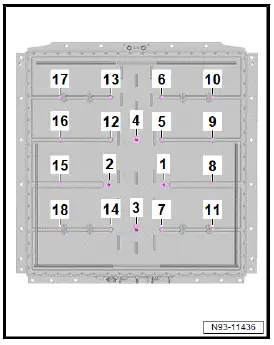
Upper part of battery housing - specified torque and tightening sequence 2 for production condition and repair bolt stage 2
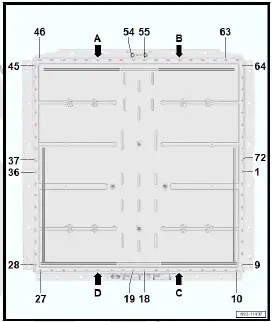
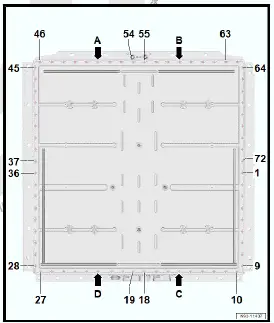
Upper part of battery housing - specified torque and tightening sequence 2 for repair bolt stage 1
Assembly overview - high-voltage battery, removed, 82 kWh
Assembly overview - high-voltage battery (removed)
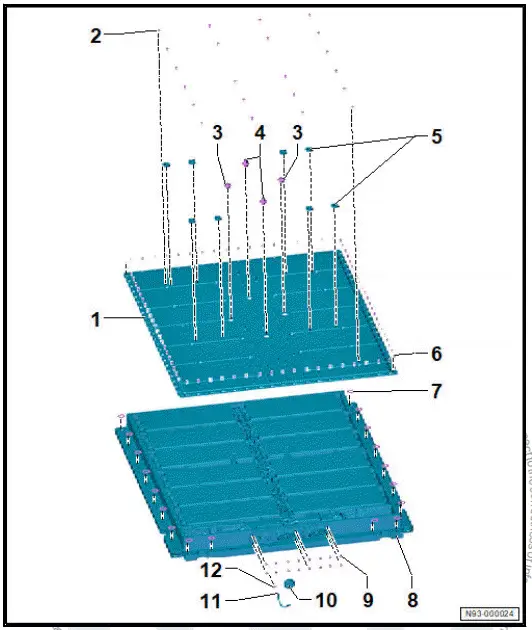
- Upper part of battery housing
- ⇒ Rep. gr. 93 ; Opening high-voltage battery 1 AX2
- ⇒ Rep. gr. 93 ; Checking whether upper part of battery housing can be reused
- ⇒ Rep. gr. 93 ; Closing high-voltage battery 1 AX2 2 - Bolt
- Qty. 22
- Renew after removing
- M5×18
- Small fastener
- Qty. 2
- Renew after removing
- Large fastener
- Qty. 2
- Renew after removing
- Spacer
- Qty. 8
- Bolt
- Qty. 82
- Renew after removing
- Separating film
- Renew after removal of high-voltage battery 1 - AX2-
- Qty. 22
- Lower part of battery housing
- Bolt
- Qty. 16
- Renew after removing
- M5×25
- 4,5 N·m
- Pressure relief valve
- Renew after removing
- Potential equalisation line
- Nut
- M6×10
- 8 N·m
Upper part of battery housing - specified torque and tightening sequence 1 
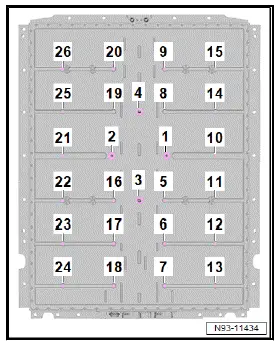
Upper part of battery housing - specified torque and tightening sequence 2 for production condition and repair bolt stage 2 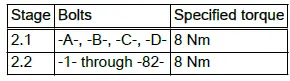
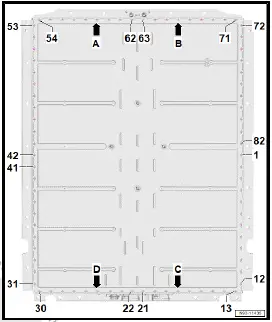
Upper part of battery housing - specified torque and tightening sequence 2 for repair bolt stage 1

Assembly overview - battery modules
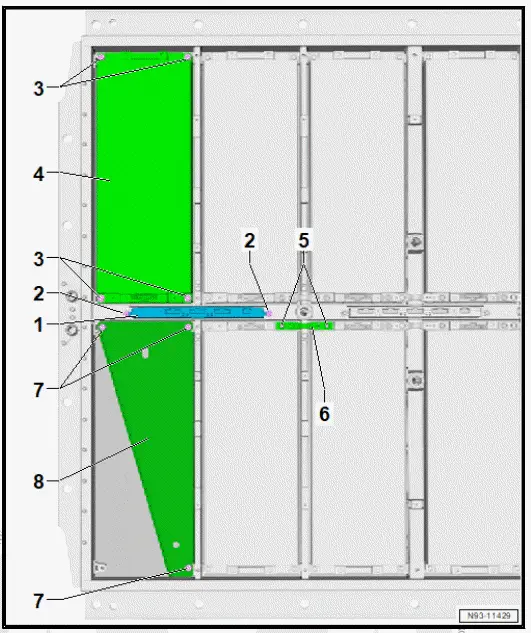
- Battery modules control unit
- ⇒ Rep. gr. 93 ; Removing and installing battery modules control unit
- Bolt
- Qty. 2
- M5 x 25
- 4,5 N·m
- Bolt
- Qty. 4
- Renew after removing
- M8 x 72
- 16 N·m + 180º
- Battery module
- ⇒ Rep. gr. 93 ; Removing battery module
- ⇒ Rep. gr. 93 ; Installing battery module
- Bolt
- Qty. 2
- M6 x 20
- 8 N·m
- High-voltage connector
- Bolt
- Qty. 3
- M8 x 25
- 20 N·m
- Reinforcement for highvoltage battery body aperture
- Depending on equipment/version
Assembly overview - switching unit for high-voltage battery, 48, 55, 62 kWh
Assembly overview - switching unit for high-voltage battery
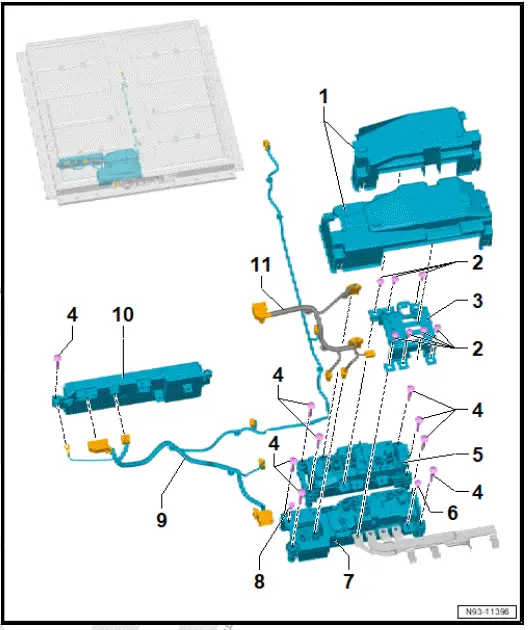
- Cover
- 2x
- Bolt
- 7x
- Renew after removing
- M6 x 20
- 8 N·m
- Bridge
- Bolt
- 9x
- M6 x 52
- 8 N·m
- Switching unit for highvoltage battery, positive terminal - SX8-
- ⇒ Rep. gr. 93 ; Removing and installing switching unit for highvoltage battery, positive terminal SX8
- Bolt
- Renew after removing
- M6 x 20
- 8 N·m
- Switching unit for highvoltage battery, negative terminal - SX7-
- With high-voltage battery isolation igniter - N563-
- ⇒ Rep. gr. 93 ; Removing and installing switching unit for high-voltage battery, negative terminal SX7
- Bolt
- M6 x 20
- 8 N·m
- Electrical wire
- Battery regulation control unit - J840-
- ⇒ Rep. gr. 93 ; Removing and installing battery regulation control unit J840
- Electrical wire
Assembly overview - switching unit for high-voltage battery, 82 kWh
Assembly overview - switching unit for high-voltage battery
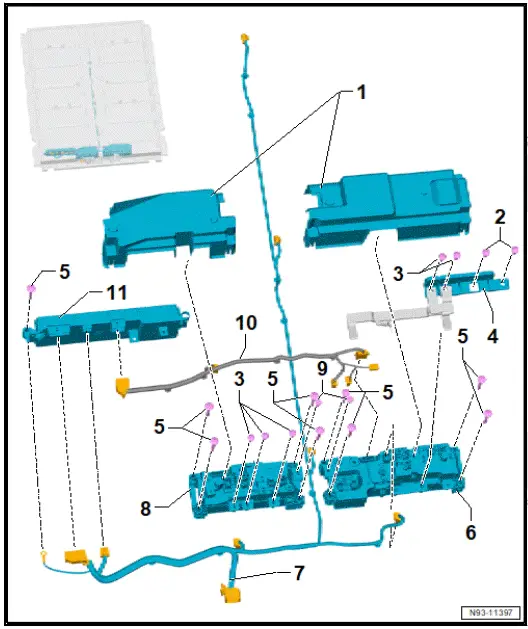
- Cover
- 2x
- Bolt
- 2x
- Renew after removing
- M6 x 20
- 8 N·m
- Bolt
- 5x
- Renew after removing
- M6 x 20
- 8 N·m
- Bridge
- Bolt
- 9x
- M6 x 52
- 8 N·m
- Switching unit for highvoltage battery, negative terminal - SX7-
- With high-voltage battery isolation igniter - N563-
- ⇒ Rep. gr. 93 ; Removing and installing switching unit for highvoltage battery, negative terminal SX7
- Electrical wire
- Switching unit for highvoltage battery, positive terminal - SX8-
- ⇒ Rep. gr. 93 ; Removing and installing switching unit for high-voltage battery, positive terminal SX8
- Bolt for high-voltage connecting bracket
- M6 x 20
- 8 N·m
- Electrical wire
- Battery regulation control unit - J840-
- ⇒ Rep. gr. 93 ; Removing and installing battery regulation control unit J840
Assembly overview - high-voltage battery, connecting element, 48, 55, 62 kWh
Assembly overview - high-voltage battery, connector strip

- Connector strip
- ⇒ Rep. gr. 93 ; Removing and installing connector strip
- Bolt
- Qty. 5
- Renew after removing
- Specified torque and tightening sequence
- M6×20
- Bolt
- Qty. 16
- Renew after removing
- Specified torque and tightening sequence
- M5×25
Connector strip - specified torque and tightening sequence
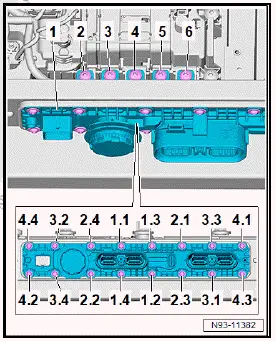
Assembly overview - high-voltage battery, connecting element, 82 kWh
Assembly overview - high-voltage battery, connector strip
- Connector strip
- ⇒ Rep. gr. 93 ; Removing and installing connector strip
- Bolt
- Qty. 5
- Renew after removing
- Specified torque and tightening sequence
- M6×20
- Bolt
- Qty. 16
- Renew after removing
- Specified torque and tightening sequence
- M5×25

Connection strip - specified torque and tightening sequence 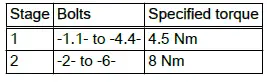

Removing battery module
Special tools and workshop equipment required
- Contact protection - T10608-
- High-voltage tool kit - VAS 6762-
- High-voltage tool kit - VAS 6883A-
- adapter - 10-222A/14-
- contact protection - T10628-
- hook - 10-222A/10-
- lifting tackle - 3033-
- lifting tackle - T10619-
- removal wedge set - VAS 895 015-
- shackle - 10-222A/12-
- support bracket - 10-222B-
- workshop hoist - VAS 6100-
DANGER
High voltage can cause fatal injury.
Danger of severe or fatal injuries from electric shock or electric arcs.
- Suitable personal protective equipment (PPE) must be worn for the following work.
- The following steps require a second suitably qualified person to be present to supervise.
- Outside the danger zone, the second person may assist the high-voltage expert where required to the extent of his/her qualification.
- The personal protective equipment (PPE) must be dry and undamaged.
Put on protective equipment ⇒ Electronic parts catalogue (ETKA) before performing the following work steps:
- Clothing approved for working with electric arcs (minimum protection class 2, at least 318 kJ)
- Helmet with visor approved for working with electric arcs (minimum protection class 2, at least 318 kJ)
- Gloves approved for working with electric arcs with nitrile glove liners (minimum protection class 2, at least 318 kJ), minimum insulating effect up to 500 V
- Safety shoes with ESD protection
- ⇒ Rep. gr. 93 ; Open high-voltage battery 1 AX2 .
- ⇒ Rep. gr. 93 ; Interrupt electrical circuit .
- ⇒ Rep. gr. 93 ; Charging and discharging battery modules
- Mark installation position of electrical connectors and highvoltage connecting brackets.
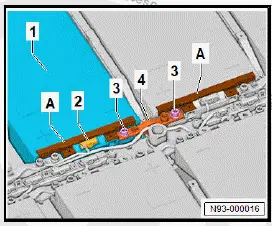
- Unplug electrical connector -2-.
- Fit contact protection - T10628- -A- on battery module -1-.
- Remove bolts -3-.
- Remove high-voltage connecting bracket -4-.
- Fit contact protection - T10608- on open high-voltage connection at battery module.
Important
- Contact protection - T10608- -B- must be fitted.
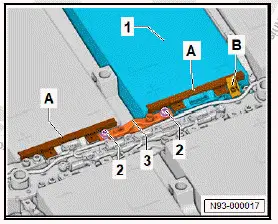
- Fit contact protection - T10628- -A-.
- Remove bolts -2-.
- Remove high-voltage connecting bracket -3-.
- Fit contact protection - T10608- on open high-voltage connection at battery module.
Important
- Contact protection - T10608- -2- must be fitted on open highvoltage connections.

- Remove bolts -3-.
NOTICE
Mechanical forces on connector housing of battery modules control unit Risk of damage to battery modules control unit
- Unplug electrical connector of battery modules control unit in vicinity of battery module that is to be removed.
- Prepare support bracket - 10-222B- -1- and adapter - 10-222A/14- -2- and position over centre of battery module.
- Connect battery module to lifting tackle - T10619- -3-, shackle - 10-222A/12- -4- and hook - 10-222A/10- -5-.
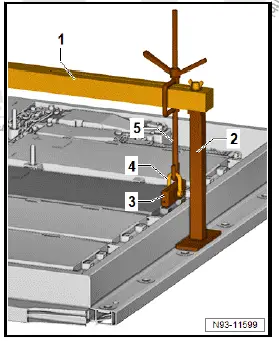
- Lift battery module off lower part of battery housing at outside in direction of -arrow- until battery module is released.
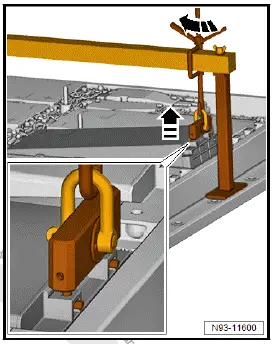
- Remove support bracket - 10-222B- -1- and adapter - 10-222A/14- -2-.
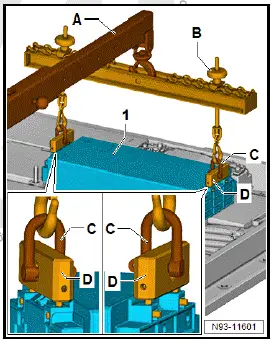
- Attach lifting tackle - 3033- -B- to workshop hoist - VAS 6100- -A-.
- Lift battery module -1- using workshop hoist - VAS 6100- -A-, lifting tackle - T10619- -D-, shackle - 10-222A/12- -Cand lifting tackle - 3033- -B-.
- Set battery module down on a clean surface.
Important
- After the module has been lifted, the 2-component thermal grease must be renewed.
NOTICE
Risk of leaks in high-voltage battery 1 - AX2- .
- Do not remove 2-component thermal grease from sealant on inner edge of lower part of battery housing. If 2-component thermal grease is touching sealant, leave approx.
3 mm of 2-component thermal grease on sealant.
- Carefully remove 2-component thermal grease residue from lower part of battery housing using a suitable scraper from removal wedge set - VAS 895 015- .
If reusing battery module
- Remove 2-component thermal grease from battery module, making sure no residue is left.
Installing battery module
Special tools and workshop equipment required
- High-voltage tool kit - VAS 6762-
- High-voltage tool kit - VAS 6883A-
- Torque wrench - VAS 6883/1A-
- accidental contact protection - T10608-
- accidental contact protection insert - T10628-
- cartridge opener - VAS 221 005-
- double cartridge gun - VAS 5237-
- lifting bracket - T10619-
- lifting tackle - 3033-
- reversible ratchet - VAS 6762/29-
- shackle - 10-222A/12-
- template - T10606-
- workshop hoist - VAS 6100-
DANGER
High voltage can cause fatal injury.
Danger of severe or fatal injuries from electric shock or electric arcs.
- Suitable personal protective equipment (PPE) must be worn for the following work.
- The following steps require a second suitably qualified person to be present to supervise.
- Outside the danger zone, the second person may assist the high-voltage expert where required to the extent of his/her qualification.
- The personal protective equipment (PPE) must be dry and undamaged.
Put on the required protective equipment for the subsequent work steps ⇒ Electronic parts catalogue (ETKA) :
- Arc flash resistant clothing (at least APC 2, at least 318 kJ)
- Helmet with arc flash resistant visor (at least APC 2, at least 318 kJ)
- Arc flash resistant gloves with nitrile glove liners (at least APC 2, at least 318 kJ), insulating up to at least 500 V
- Safety shoes with ESD protection
Installing
- On removed battery module, check if separating film of lower part of battery housing -2- is present and undamaged.
- Only affix separating film -2- on inner edges of lower part of battery housing -1-.

Important
- Removed battery modules must be inserted in lower part of battery housing with 2-pack thermal grease ⇒ Electronic parts catalogue (ETKA) .
- Before installing, adhere to cleaning solution flash-off time of 10 minutes.
- Bonding surfaces are dry.
- Clean surfaces onto which 2-pack thermal compound is to be applied using cleaning solution ⇒ Electronic parts catalogue (ETKA) .
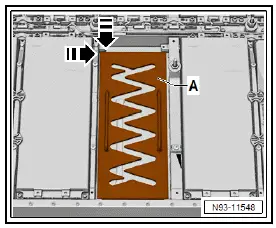
- Insert template - T10606- -A- into lower part of battery housing.
Push in direction of -arrows- up to position shown.
NOTICE
2-pack thermal grease application insufficient.
Thermal conductivity impaired.
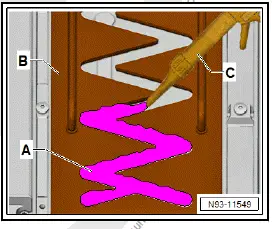
- Apply 2-pack thermal grease in one pass and without bubbles.
Important
- Use cartridge opener - VAS 221 005- to open cartridge.
- Fill 2-pack thermal grease -A- using double cartridge gun - VAS 5237- -C- up to edge of template - T10606- -B-.
- Remove template - T10606- -B- from lower part of battery housing.
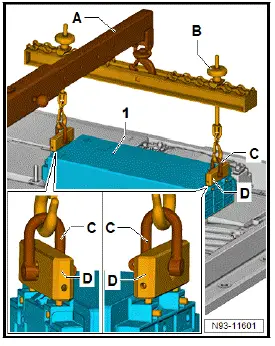
- Attach lifting tackle - 3033- -B- to workshop hoist - VAS 6100- -A-.
- Position battery module -1- with workshop hoist - VAS 6100- -A-, lifting bracket - T10619- -D-, shackle - 10-222A/12- -Cand lifting tackle - 3033- -B- above lower part of battery housing.
- Screw in bolts of battery module by hand to continue guiding battery module.
- Lower battery module -1- into lower part of battery housing up to 3 cm before end position. Screw in bolts 3 to 4 turns of thread.
- Lower battery module -1- to final position.
Important
- Torque must be monitored by a 2nd person.
- Tighten bolts of battery module in diagonal sequence using torque wrench - VAS 6883/1A- .
- Tighten bolts of battery module to turning further angle in diagonal sequence using reversible ratchet - VAS 6762/29- .
Installing
Important
- Torque must be monitored by a 2nd person.
- Remove accidental contact protection - T10608- from battery module -1-.
- Fit accidental contact protection insert - T10628- -A-.
- Install battery connector -4-.
- Tighten bolts -3-.
- Test battery connector against housing for short circuit.
- Connect electrical connector -2-.
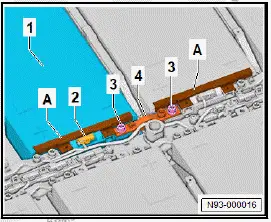
Important
- Torque must be monitored by a 2nd person.
- Remove accidental contact protection - T10608- -B- from battery module -1-.
- Fit accidental contact protection insert - T10628- -A-.
- Install battery connector -3-.
- Tighten bolts -2-.
- Test battery connector against housing for short circuit.
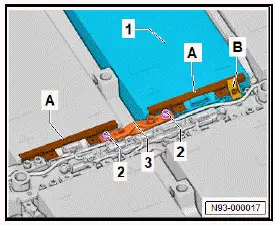
Tightening torques
- ⇒ Rep. gr. 93 ; Assembly overview - high-voltage battery, battery modules
Removing and installing battery modules control unit
Special tools and workshop equipment required
- High-voltage tool kit - VAS 6762-
- Torque wrench, insulated - VAS 691 001-
DANGER
High voltage can cause fatal injury.
Danger of severe or fatal injuries from electric shock or electric arcs.
- Suitable personal protective equipment (PPE) must be worn for the following work.
- The following steps require a second suitably qualified person to be present to supervise.
- Outside the danger zone, the second person may assist the high-voltage expert where required to the extent of his/her qualification.
- The personal protective equipment (PPE) must be dry and undamaged.
Put on protective equipment ⇒ Electronic parts catalogue (ETKA) before performing the following work steps:
- Clothing approved for working with electric arcs (minimum protection class 2, at least 318 kJ)
- Helmet with visor approved for working with electric arcs (minimum protection class 2, at least 318 kJ)
- Gloves approved for working with electric arcs with nitrile glove liners (minimum protection class 2, at least 318 kJ), minimum insulating effect up to 500 V
- Safety shoes with ESD protection
Battery modules control unit - J1208- is referred to as battery modules control unit below.
Battery modules control unit 5 - J1212- is referred to as battery modules control unit below.
Battery modules control unit 9 - J1216- is referred to as battery modules control unit below.
Removing
- ⇒ Rep. gr. 93 ; Open high-voltage battery 1 AX2 .
- ⇒ Rep. gr. 93 ; Interrupt electrical circuit .
NOTICE
Risk of damage to high-voltage battery 1 - AX2- if components are interchanged.
- Mark installation position of electrical connectors, cable routing and installation position of battery modules control unit.
- Unplug electrical connectors -3- and -4- and move electrical wire to one side.
- Remove bolts -2-.
- Remove battery modules control unit -1-.
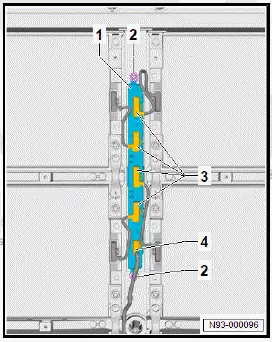
Installing
Installation is carried out in reverse order; note the following:
- Perform "Controller configuration" function with ⇒ Vehicle diagnostic tester ⇒ Rep. gr. 00 ; Starting diagnosis .
Tightening torques
- Rep. gr. 93 ; Assembly overview - high-voltage battery, battery modules
Removing and installing connecting element, 48, 55 kWh
Removing and installing connector strip
Special tools and workshop equipment required
- High-voltage tool kit - VAS 6762-
- High-voltage tool kit - VAS 6883A-
- Torque wrench - VAS 6883/1A-
- contact protection - T10608-
- contact protection - T10628-
DANGER
High voltage can cause fatal injury.
Danger of severe or fatal injuries from electric shock or electric arcs.
- Suitable personal protective equipment (PPE) must be worn for the following work.
- The following steps require a second suitably qualified person to be present to supervise.
- Outside the danger zone, the second person may assist the high-voltage expert where required to the extent of his/her qualification.
- The personal protective equipment (PPE) must be dry and undamaged.
- Put on protective equipment ⇒ Electronic parts catalogue (ETKA) before performing the following work steps:
- Clothing approved for working with electric arcs (minimum protection class 2, at least 318 kJ)
- Helmet with visor approved for working with electric arcs (minimum protection class 2, at least 318 kJ)
- Gloves approved for working with electric arcs with nitrile glove liners (minimum protection class 2, at least 318 kJ), minimum insulating effect up to 500 V
- Safety shoes with ESD protection
Switching unit for high-voltage battery, negative terminal - SX7- is referred to below as switching unit, negative terminal.
Removing
- ⇒ Rep. gr. 93 ; Open high-voltage battery 1 AX2 .
- ⇒ Rep. gr. 93 ; Interrupt electrical circuit .
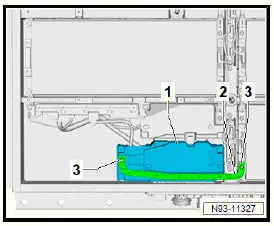
- Fit contact protection - T10628- on battery module 2 - J992- .
- Unscrew bolts -2- from high-voltage connecting brackets -1- on switching unit, negative terminal -3- and battery module 2 - J992- .
- Remove high-voltage connecting bracket -1-.
- Fit contact protection - T10608- on open high-voltage connection at battery module 2 - J992- .
- Detach cap for switching unit, negative terminal -3-.
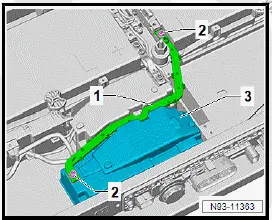
- Remove bolts -2-.
- Remove bolts -3-.
- Remove connector strip -1-.
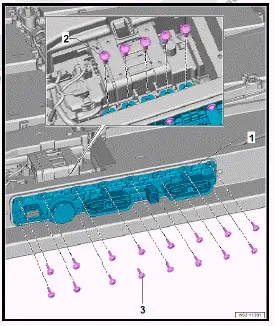
Installing
Installation is carried out in reverse order; note the following:
Important
- Have a second person check all torques.
- Check that seal is not damaged.
- Clean sealing surface with cleaning solution ⇒ Electronic parts catalogue (ETKA) .
- Apply sealant ⇒ Electronic parts catalogue (ETKA) all around outside of connector strip next to existing seal.
- Ensure lower part of battery housing makes contact with seal.
- Install high-voltage connecting bracket and check it for short circuit to lower part of battery housing.
Tightening torques
- ⇒ Rep. gr. 93 ; Assembly overview - switching unit for high-voltage battery
- ⇒ Rep. gr. 93 ; Assembly overview - high-voltage battery, connector strip
Removing and installing connecting element, 62 kWh
Removing and installing connector strip
Special tools and workshop equipment required
- igh-voltage tool kit - VAS 6762-
- High-voltage tool kit - VAS 6883A-
- Torque wrench - VAS 6883/1A-
- accidental contact protection - T10608-
- accidental contact protection insert - T10628-
DANGER
High voltage can cause fatal injury.
Danger of severe or fatal injuries from electric shock or electric arcs.
- Suitable personal protective equipment (PPE) must be worn for the following work.
- The following steps require a second suitably qualified person to be present to supervise.
- Outside the danger zone, the second person may assist the high-voltage expert where required to the extent of his/her qualification.
- The personal protective equipment (PPE) must be dry and undamaged.
Put on the required protective equipment for the subsequent work steps ⇒ Electronic parts catalogue (ETKA) :
- Arc flash resistant clothing (at least APC 2, at least 318 kJ)
- Helmet with arc flash resistant visor (at least APC 2, at least 318 kJ)
- Arc flash resistant gloves with nitrile glove liners (at least APC 2, at least 318 kJ), insulating up to at least 500 V
- Safety shoes with ESD protection
Switching unit for high-voltage battery, negative terminal - SX7- is referred to hereafter as switching unit, negative terminal.
Removing
- ⇒ Rep. gr. 93 ; Open high-voltage battery 1 [AX2] .
- ⇒ Rep. gr. 93 ; Open electrical circuit .
- Fit accidental contact protection insert - T10628- onto battery module 1 - J991- .
- Unscrew bolts -3- from high-voltage connector -2- on switching unit, negative terminal -1- and battery module 1 - J991- .
- Remove high-voltage connector -2-.
- Fit accidental contact protection - T10608- onto exposed high-voltage connection on battery module 1 - J991- .
- Detach cap for switching unit, negative terminal -1-.
- Unscrew bolts -2-.
- Unscrew bolts -3-.
- Remove connector strip -1-.
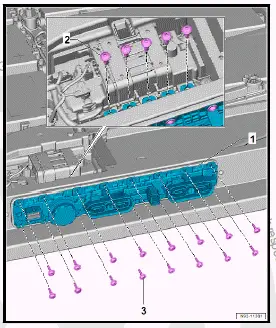
Installing
Install in reverse order of removal, observing the following:
Important
- Have an additional person observe all torque settings.
- Make sure not to damage seal.
- Clean sealing surface with cleaning solution ⇒ Electronic parts catalogue (ETKA) .
- Apply sealant ⇒ Electronic parts catalogue (ETKA) all around on outer side of connector strip, next to existing seal.
- Make sure that seal makes contact with lower part of battery housing.
- Install high-voltage connector and check for short circuit to lower part of battery housing.
Tightening torques
- ⇒ Rep. gr. 93 ; Assembly overview - switching unit for high-voltage battery
- ⇒ Rep. gr. 93 ; Assembly overview - high-voltage battery, connector strip
Removing and installing connecting element, 82 kWh
Removing and installing connector strip
Special tools and workshop equipment required
- High-voltage tool kit - VAS 6762-
- High-voltage tool kit - VAS 6883A-
- Torque wrench - VAS 6883/1A-
- contact protection - T10608-
- contact protection - T10628-
DANGER
High voltage can cause fatal injury.
Danger of severe or fatal injuries from electric shock or electric arcs.
- Suitable personal protective equipment (PPE) must be worn for the following work.
- The following steps require a second suitably qualified person to be present to supervise.
- Outside the danger zone, the second person may assist the high-voltage expert where required to the extent of his/her qualification.
- The personal protective equipment (PPE) must be dry and undamaged.
Put on protective equipment ⇒ Electronic parts catalogue (ETKA) before performing the following work steps:
- Clothing approved for working with electric arcs (minimum protection class 2, at least 318 kJ)
- Helmet with visor approved for working with electric arcs (minimum protection class 2, at least 318 kJ)
- Gloves approved for working with electric arcs with nitrile glove liners (minimum protection class 2, at least 318 kJ), minimum insulating effect up to 500 V
- Safety shoes with ESD protection
Switching unit for high-voltage battery, negative terminal - SX7- is referred to below as switching unit, negative terminal.
Switching unit for high-voltage battery, positive terminal - SX8- is referred to below as switching unit, positive terminal.
Removing
- ⇒ Rep. gr. 93 ; Open high-voltage battery 1 AX2 .
- ⇒ Rep. gr. 93 ; Interrupt electrical circuit .
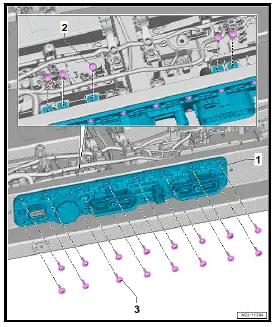
- Fit contact protection - T10628- on battery module 1 - J991- and battery module 2 - J992- .
- Unscrew bolts -2- from high-voltage connecting brackets -1- on switching unit, negative terminal -3-, switching unit, positive terminal -3-, battery module 1 - J991- and battery module 2 - J992- .
- Remove high-voltage connecting bracket -1-.
- Fit contact protection - T10608- on open high-voltage connection on battery module 1 - J991- and battery module 2 - J992- .
- Detach caps for switching unit, negative terminal -3- and switching unit, positive terminal -3-.
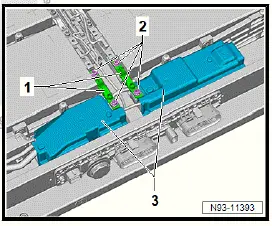
- Remove bolts -2-.
- Remove bolts -3-.
- Remove connector strip -1-.
Installing
Installation is carried out in reverse order; note the following:
Important
- Have a second person check all torques.
- Check that seal is not damaged.
- Clean sealing surface with cleaning solution ⇒ Electronic parts catalogue (ETKA) .
- Apply sealant ⇒ Electronic parts catalogue (ETKA) all around outside of connector strip next to existing seal.
- Ensure lower part of battery housing makes contact with seal.
- Install high-voltage connecting bracket and check it for short circuit to lower part of battery housing.
Tightening torques
- ⇒ Rep. gr. 93 ; Assembly overview - switching unit for high-voltage battery
- ⇒ Rep. gr. 93 ; Assembly overview - high-voltage battery, connector strip
Removing and installing switching unit for high-voltage battery, negative terminal SX7
Installing
- Battery regulation control unit - J840- , switching unit for high-voltage battery, negative terminal - SX7- and switching unit for high-voltage battery, positive terminal - SX8- must be renewed together ⇒ Rep. gr. 93 ; Removing and installing battery regulation control unit [J840] .
Removing and installing switching unit for high-voltage battery, positive terminal SX8
Installing
- Battery regulation control unit - J840- , switching unit for high-voltage battery, negative terminal - SX7- and switching unit for high-voltage battery, positive terminal - SX8- must be renewed together ⇒ Rep. gr. 93 ; Removing and installing battery regulation control unit [J840] .