Wings
- Assembly overview wing
- Removing and installing wing
- Removing and installing end plate
- Removing and installing wing bracket
- Removing and installing bracket for deformation element
Assembly overview wing
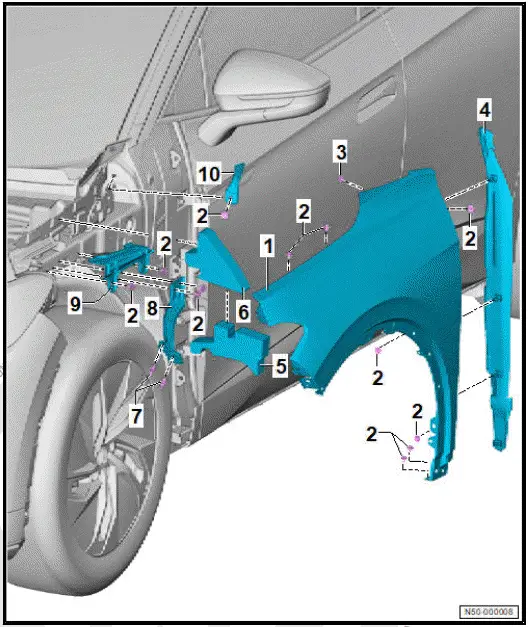
The overview is shown for the left side of vehicle as an example.
- Wings
- ⇒ Rep. gr. 50 ; Removing and installing wing
- Bolt
- Qty. 12
- 8 N·m
- Bolt
- 6 N·m
- End plate
- ⇒ Rep. gr. 50 ; Removing and installing end plate
- Insulation for wing, lower section
- Insulation for wing, upper section
- Centre hex stud
- Qty. 2
- 8 N·m
- Wing bracket
- ⇒ Rep. gr. 50 ; Removing and installing wing bracket
- Bracket for deformation element
- ⇒ Rep. gr. 50 ; Removing and installing bracket for deformation element
- Wing bracket
- ⇒ Rep. gr. 50 ; Removing and installing wing bracket
Removing and installing wing
Special tools and workshop equipment required
- setting gauge - 3371-
Removal and installation are described for left side of vehicle as an example.
Removing
- Remove seal for plenum chamber cover ⇒ Rep. gr. 50 ; Removing and installing plenum chamber cover .
- Remove plenum chamber cover at side ⇒ Rep. gr. 50 ; Removing and installing plenum chamber cover .
- Remove headlight ⇒ Electrical system; Rep. gr. 94 ; Headlights; Removing and installing headlights .
- Remove A-pillar trim ⇒ Rep. gr. 66 ; Removing and installing A-pillar trim .
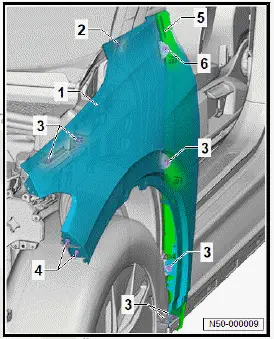
- Unscrew bolt -2-.
- Unscrew centre hex studs -4-.
- Pull off end plate -5- in area of bolt -6-. Unscrew bolt -6- when doing so.
- Remove wing -1-.
Installing
Install in reverse order of removal, observing the following:
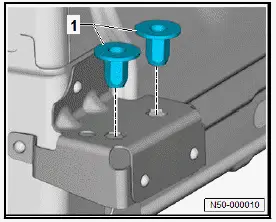
If A-pillar has been renewed:
- Insert pop rivet nuts -1- ⇒ Electronic parts catalogue (ETKA) .
All vehicles (continued)
- Wax threaded connection for side member -1- ⇒ Rep. gr. 00 ; General information, paint; Technical data; Corrosion protection of body parts, attachments and welded parts .
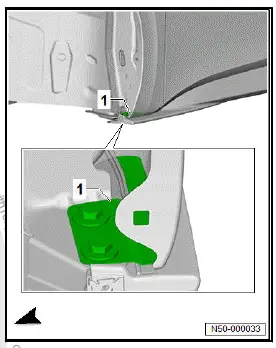
- Align wing free of stress.
- Verify gaps using setting gauge - 3371- . Observe ⇒ Rep. gr. 00 ; Gaps - front and ⇒ Rep. gr. 00 ; Gaps - centre when doing this.
Tightening torques
- ⇒ Rep. gr. 50 ; Assembly overview - wing
Removing and installing end plate
Removal and installation are described for the left vehicle side as an example.
Removing
- Remove door ⇒ Rep. gr. 57 ; Removing and installing door .
- Remove front wheel housing liner ⇒ Rep. gr. 66 ; Removing and installing front wheel housing liner .
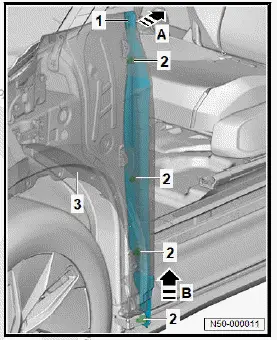
- Release locking devices -2-.
- Slight pull end plate -1- at top in direction of -arrow A- off wing -3-, and pull it out in direction of -arrow B-.
Installing
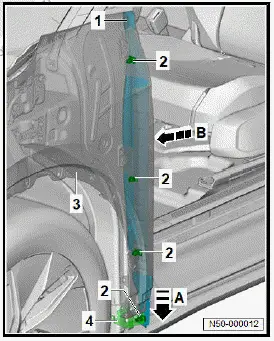
- Insert end plate -1- in direction of -arrow a- at wing -3-.
- Push end plate -1- in direction of -arrow B- against wing -3- until locking devices -2- engage.
Important
- The lower locking device -2- must engage in wing bracket -4-.
Continue installation in reverse order of removal.
Removing and installing wing bracket
Special tools and workshop equipment required
- setting gauge - 3371-
Removal and installation are described for left side of vehicle as an example.
The design of the wing panel brace differs depending on the model.
Removing
- Remove wing ⇒ Rep. gr. 50 ; Removing and installing wing .
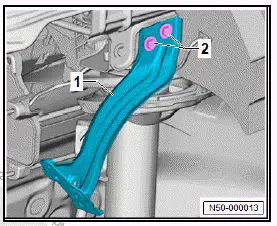
- Unscrew bolts -2-.
- Remove wing bracket -1-.
Installing
Install in reverse order of removal, observing the following:
- Align wing free of stress.
- Check gaps with setting gauge - 3371- , observing ⇒ Rep. gr. 00 ; front gaps and ⇒ Rep. gr. 00 ; centre gaps while doing so.
Tightening torques
- ⇒ Rep. gr. 50 ; Assembly overview - wing
Removing and installing wing bracket
Special tools and workshop equipment required
- setting gauge - 3371-
Removal and installation are described for left side of vehicle as an example.
The design of the wing bracket differs depending on the model.
Removing
- Remove wing ⇒ Rep. gr. 50 ; Removing and installing wing .
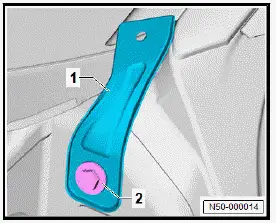
- Unscrew bolt -2-.
- Remove for wing bracket -1-.
Installing
Install in reverse order of removal, observing the following:
- Align wing free of stress.
- Verify gaps using setting gauge - 3371- . Observe ⇒ Rep. gr. 00 ; Gaps - front and ⇒ Rep. gr. 00 ; Gaps - centre when doing this.
Tightening torques
- ⇒ Rep. gr. 50 ; Assembly overview - wing
Removing and installing bracket for deformation element
Special tools and workshop equipment required
- setting gauge - 3371-
Removal and installation are described for left side of vehicle as an example.
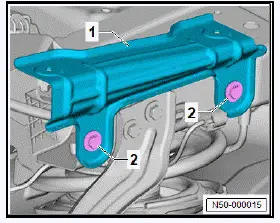
The design of the deformation element bracket differs depending on the model.
Removing
- Remove wing ⇒ Rep. gr. 50 ; Removing and installing wing .
- Unscrew bolts -2-.
- Remove bracket for deformation element -1-.
Installing
Install in reverse order of removal, observing the following:
- Align wing free of stress.
- Verify gaps using setting gauge - 3371- . Observe ⇒ Rep.gr. 00 ; Gaps - front and ⇒ Rep. gr. 00 ; Gaps - centre when doing this.
Tightening torques
- ⇒ Rep. gr. 50 ; Assembly overview - wing