Charger/pd Module (on-Board Charger)
- P0d22-00 Battery Charger Output Current
- P0d4e-00 Batt Chg Hv Batt Output Voltage Sensor
- P0d67-00 Battery Charger Control Module
- P1c50-4b Can Controller
- P1c63-97 Ac Connector Error
- P1c64-17 Ac Over Voltage Error
- P1c64-38 Ac Over Voltage Error
- U1d40-87 Communication Error
P0d22-00 Battery Charger Output Current Nissan Ariya SUV
DTC Description
DTC DETECTION LOGIC
| DTC | CONSULT screen terms | DTC detecting condition | ||
|---|---|---|---|---|
| P0D22 | 00 | Battery charger output current | Diagnosis condition | During normal charge |
| Signal | — | |||
| Threshold | When the normal charge end command value from the VCM is not complied with | |||
| Detection time | 300 ms | |||
POSSIBLE CAUSE
On-board charger
FAIL-SAFE
Normal charge is stopped
Confirmation Procedure
PRECONDITIONING
Erase “self-diagnostic result” in “CHARGER/POWER DELIVERY MODULE” and “EV/HEV” using CONSULT.
Turn the power switch OFF with the driver's side door open, get out of the Nissan Ariya vehicle, close the driver's side door and wait for at least 4 minutes.
Check that 12 V battery voltage is 11 V or more.
GO TO 2
PERFORM DTC CONFIRMATION PROCEDURE
 With CONSULT
Change the power supply environment (Charging device) and perform normal charge for at least 120 seconds.
Stop normal charge and disconnect the charge connector.
Set the Nissan Ariya vehicle to READY and wait at least 1 second.
Check “self-diagnostic result” in “CHARGER/POWER DELIVERY MODULE” using CONSULT.
Is DTC detected?
YES>>Refer to DTC Diagnosis Procedure.
NO-1>>To check malfunction symptom before repair: Refer to Intermittent Incident.
NO-2>>Confirmation after repair: INSPECTION END
DTC Diagnosis Procedure
PERFORM DTC CONFIRMATION PROCEDURE AGAIN
With CONSULT
Perform DTC confirmation procedure again. Refer to Confirmation Procedure.
Is DTC P0D22-00 detected again?
YES>>Perform trouble diagnosis for CAN communication circuit. Refer to Trouble Diagnosis Flow Chart.
NO>>INSPECTION END
P0d4e-00 Batt Chg Hv Batt Output Voltage Sensor Nissan Ariya 2023
DTC Description
DTC DETECTION LOGIC
| DTC | CONSULT screen terms | DTC detecting condition | ||
|---|---|---|---|---|
| P0D4E | 00 | Battery charger high voltage battery output voltage sensor | Diagnosis condition | During normal charge |
| Signal | DC voltage signal | |||
| Threshold | When the measured value of the DC voltage is sticking to the sensor lower limit value | |||
| Detection time | Max 100 seconds | |||
POSSIBLE CAUSE
On-board charger
High voltage parts (Such as DC/DC converter, Li-ion battery and high voltage relay)
FAIL-SAFE
Normal charge is stopped
Confirmation Procedure
PRECONDITIONING
Erase “self-diagnostic result” in “CHARGER/POWER DELIVERY MODULE”, “EV/HEV”, “HIGH VOLTAGE BATTERY” and “HIGH VOLTAGE BATTERY 2” using CONSULT.
Turn the power switch OFF with the driver's side door open, get out of the Nissan Ariya vehicle, close the driver's side door and wait for at least 4 minutes.
Check that 12 V battery voltage is 11 V or more.
GO TO 2
PERFORM DTC CONFIRMATION PROCEDURE
With CONSULT
Perform normal charge for at least 120 seconds.
Check “self-diagnostic result” in “CHARGER/POWER DELIVERY MODULE” using CONSULT.
Is DTC detected?
YES>>Refer to DTC Diagnosis Procedure.
NO-1>>To check malfunction symptom before repair: Refer to Intermittent Incident.
NO-2>>Confirmation after repair: INSPECTION END
DTC Diagnosis Procedure
PERFORM SELF-DIAGNOSIS OF VCM
With CONSULT
Power switch ON.
Check “self-diagnostic result” in “EV/HEV” using CONSULT.
Is DTC detected?
YES>>Perform the trouble diagnosis for the detected DTC.
NO>>GO TO 2.
PERFORM SELF-DIAGNOSIS OF LBC
With CONSULT
Power switch ON.
Check “self-diagnostic result” in “HIGH VOLTAGE BATTERY” and “HIGH VOLTAGE BATTERY 2” using CONSULT.
Is DTC detected?
YES>>Perform the trouble diagnosis for the detected DTC.
NO>>GO TO 3.
PERFORM DTC CONFIRMATION PROCEDURE AGAIN
With CONSULT
Perform DTC confirmation procedure again. Refer to Confirmation Procedure.
Is DTC P0D4E-00 detected again?
YES>>Replace On-board charger. Refer to ON-BOARD CHARGER : Disassembly & Assembly.
NO>>INSPECTION END
P0d67-00 Battery Charger Control Module Nissan Ariya SUV
DTC Description
DTC DETECTION LOGIC
| DTC | CONSULT screen terms | DTC detecting condition | ||
|---|---|---|---|---|
| P0D67 | 00 | Battery charger control module | Diagnosis condition | READY, power switch ON or AUTO ACC |
| Signal | 12 V battery voltage signal | |||
| Threshold | When a 12 V battery voltage error is detected | |||
| Detection time | Max 100 seconds | |||
POSSIBLE CAUSE
On-board charger
12 V battery
FAIL-SAFE
Normal charge is stopped
Confirmation Procedure
PRECONDITIONING
Erase “self-diagnostic result” in “CHARGER/POWER DELIVERY MODULE” and “EV/HEV” using CONSULT.
Turn the power switch OFF with the driver's side door open, get out of the Nissan Ariya vehicle, close the driver's side door and wait for at least 4 minutes.
Check that 12 V battery voltage is 11 V or more.
GO TO 2
PERFORM DTC CONFIRMATION PROCEDURE
With CONSULT
Set the Nissan Ariya vehicle to READY and wait for at least 120 seconds.
Check “self-diagnostic result” in “CHARGER/POWER DELIVERY MODULE” using CONSULT.
Is DTC detected?
YES>>Refer to DTC Diagnosis Procedure.
NO-1>>To check malfunction symptom before repair: Refer to Intermittent Incident.
NO-2>>Confirmation after repair: INSPECTION END
DTC Diagnosis Procedure
CHECK 12V BATTERY CIRCUIT SELF-DIAGNOSIS
With CONSULT
Check if a DTC related to 12V battery voltage error has been detected at another ECU.
Is a 12V battery voltage error DTC detected?
YES>>Perform the trouble diagnosis for the detected DTC.
NO>>GO TO 2.
CHECK 12V BATTERY
Check 12V battery. Refer to Work Flow.
Is the inspection result normal?
YES>>GO TO 3.
NO>>Replace 12V battery.Refer to 12V BATTERY : Removal & Installation.
CHECK 12V BATTERY CIRCUIT
Power switch OFF.
Disconnect On-board charger harness connector.
Check voltage between On-board charger and ground.
+ − Voltage On-board charger Connector Terminal E30 1 Ground 12V battery power supply voltage Also check harness for short to ground.
Is the inspection result normal?
YES>>GO TO 4.
NO>>Repair or replace error-detected parts.
PERFORM DTC CONFIRMATION PROCEDURE AGAIN
With CONSULT
Perform DTC confirmation procedure again. Refer to Confirmation Procedure.
Is DTC P0D67-00 detected again?
YES>>Replace On-board charger. Refer to ON-BOARD CHARGER : Disassembly & Assembly.
NO>>INSPECTION END
P1c50-4b Can Controller Nissan Ariya 2026
DTC Description
DTC DETECTION LOGIC
| DTC | CONSULT screen terms | DTC detecting condition | ||
|---|---|---|---|---|
| P1C50 | 4B | CAN controller | Diagnosis condition | During normal charge |
| Signal | — | |||
| Threshold | When the On-board charger internal temperature is detected to be high | |||
| Detection time | 2 seconds | |||
POSSIBLE CAUSE
On-board charger
High voltage cooling system
FAIL-SAFE
Normal charge is paused
Confirmation Procedure
PRECONDITIONING
Erase “self-diagnostic result” in “CHARGER/POWER DELIVERY MODULE” and “EV/HEV” using CONSULT.
Turn the power switch OFF with the driver's side door open, get out of the Nissan Ariya vehicle, close the driver's side door and wait for at least 4 minutes.
Check that 12 V battery voltage is 11 V or more.
GO TO 2
PERFORM DTC CONFIRMATION PROCEDURE
With CONSULT
Erase “self-diagnostic result” in “CHARGER/POWER DELIVERY MODULE” using CONSULT.
Perform normal charge for at least 120 seconds.
Set the Nissan Ariya vehicle to READY and wait for at least 2 seconds.
Check “self-diagnostic result” in “CHARGER/POWER DELIVERY MODULE” using CONSULT.
Is DTC detected?
YES>>Refer to DTC Diagnosis Procedure.
NO-1>>To check malfunction symptom before repair: Refer to Intermittent Incident.
NO-2>>Confirmation after repair: INSPECTION END
DTC Diagnosis Procedure
CHECK DTC RELATED TO HIGH VOLTAGE COOLING SYSTEM
Check “self-diagnostic result” in “EV/HEV” using CONSULT.
Is DTC detected?
YES>>Inspect items of detected DTC. Refer to DTC Index.
NO>>GO TO 2.
HIGH VOLTAGE COOLING SYSTEM INSPECTION
Inspect high voltage cooling system for coolant amount and leakage. Refer to COOLANT : Inspection.
Is the inspection result normal?
YES>>GO TO 3.
NO>>Repair or replace error-detected parts.
CHECK ON-BOARD CHARGER OPERATION
With CONSULT
Perform normal charge when the battery charging status (SOC) is of a low status and wait for at least 1 hour.
Power switch ON.
Check “self-diagnostic result” in “CHARGER/POWER DELIVERY MODULE” using CONSULT.
Is DTC P1C50-4B detected again?
YES>>Replace On-board charger. Refer to ON-BOARD CHARGER : Disassembly & Assembly.
NO>>Perform inspection for the other high power parts.
P1c63-97 Ac Connector Error Nissan Ariya 1st generation
DTC Description
DTC DETECTION LOGIC
| DTC | CONSULT screen terms | DTC detecting condition | ||
|---|---|---|---|---|
| P1C63 | 97 | AC connector error | Diagnosis condition | READY, power switch ON or AUTO ACC |
| Signal | — | |||
| Threshold | When an AC connector engagement error is detected | |||
| Detection time | 300 ms | |||
POSSIBLE CAUSE
On-board charger
Charge port harness connector
FAIL-SAFE
Normal charge is stopped
Confirmation Procedure
PRECONDITIONING
Erase “self-diagnostic result” in “CHARGER/POWER DELIVERY MODULE” using CONSULT.
Turn the power switch OFF with the driver's side door open, get out of the Nissan Ariya vehicle, close the driver's side door and wait for at least 4 minutes.
Check that 12V battery voltage is 11 V or more.
GO TO 2
PERFORM DTC CONFIRMATION PROCEDURE
With CONSULT
Set the Nissan Ariya vehicle to READY and wait at least 10 seconds.
Check “self-diagnostic result” in “CHARGER/POWER DELIVERY MODULE” using CONSULT.
Is DTC detected?
YES>>Refer to DTC Diagnosis Procedure.
NO-1>>To check malfunction symptom before repair: Refer to Intermittent Incident.
NO-2>>Confirmation after repair: INSPECTION END
DTC Diagnosis Procedure
PRECONDITIONING
>>GO TO 2
CHECK HIGH VOLTAGE HARNESS CONNECTOR INSTALLATION CONDITION
Check On-board charger high voltage harness connector installation condition visually and tactually.
Is the inspection result normal?
YES>>GO TO 3
NO>>Repair or replace error-detected parts.
CHECK HIGH VOLTAGE HARNESS CONNECTOR
Disconnect On-board charger high voltage harness connector
 .
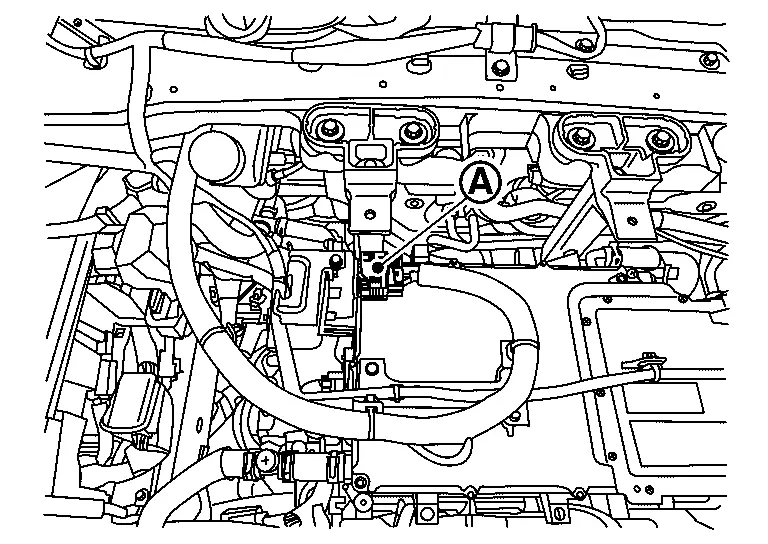
Check On-board charger high voltage harness connector and connetcor on the On-board charger side visually and tactually for abnormalities.
Is the inspection result normal?
YES>>GO TO 4
NO>>Replace error-detected parts.
PERFORM DTC CONFIRMATION PROCEDURE AGAIN
With CONSULT
Securely reconnect the high voltage harness.
Perform DTC confirmation procedure again. Refer to Confirmation Procedure.
Is DTC P1C63-97 detected again?
YES>>Replace On-board charger. Refer to ON-BOARD CHARGER : Disassembly & Assembly.
NO>>INSPECTION END
P1c64-17 Ac Over Voltage Error Nissan Ariya
DTC Description
DTC DETECTION LOGIC
Never use an extension cable or similar item during charging.
Be sure to use an independent specification current or higher charging station or socket. Refer to Handling Precaution.
| DTC | CONSULT screen terms | DTC detecting condition | ||
|---|---|---|---|---|
| P1C64 | 17 | AC over voltage error | Diagnosis condition | During normal charge |
| Signal | — | |||
| Threshold | When an AC voltage is too large error is detected | |||
| Detection time | 2 seconds | |||
POSSIBLE CAUSE
On-board charger
Commercial power supply
EVSE (Charging device)
FAIL-SAFE
Normal charge is stopped
Confirmation Procedure
PRECONDITIONING
Erase “self-diagnostic result” in “CHARGER/POWER DELIVERY MODULE” and “EV/HEV” using CONSULT.
Turn the power switch OFF with the driver's side door open, get out of the Nissan Ariya vehicle, close the driver's side door and wait for at least 4 minutes.
Check that 12 V battery voltage is 11 V or more.
GO TO 2
PERFORM DTC CONFIRMATION PROCEDURE
With CONSULT
Erase “self-diagnostic result” in “CHARGER/POWER DELIVERY MODULE” using CONSULT.
Change the power supply environment (Charging device) and perform normal charge for at least 120 seconds.
Check “self-diagnostic result” in “CHARGER/POWER DELIVERY MODULE” using CONSULT.
Is DTC detected?
YES>>Refer to DTC Diagnosis Procedure.
NO-1>>To check malfunction symptom before repair: Refer to Intermittent Incident.
NO-2>>Confirmation after repair: INSPECTION END
DTC Diagnosis Procedure
PERFORM SELF-DIAGNOSIS OF VCM
With CONSULT
Power switch ON.
Check “self-diagnostic result” in “EV/HEV” using CONSULT.
Is DTC detected?
YES>>Perform the trouble diagnosis for the detected DTC.
NO>>GO TO 2
PERFORM DTC CONFIRMATION PROCEDURE AGAIN
With CONSULT
Perform DTC confirmation procedure again with a different EVSE than the EVSE that was used when performing the DTC confirmation procedure the previous time. Refer to Confirmation Procedure.
Is DTC P1C64-17 detected again?
YES>>Replace On-board charger. Refer to ON-BOARD CHARGER : Disassembly & Assembly.
NO>>Perform EVSE inspection. Refer to Symptom Table.
P1c64-38 Ac Over Voltage Error Nissan Ariya 1st generation
DTC Description
DTC DETECTION LOGIC
| DTC | CONSULT screen terms | DTC detecting condition | ||
|---|---|---|---|---|
| P1C64 | 38 | AC over voltage error | Diagnosis condition | During normal charge |
| Signal | — | |||
| Threshold | When an AC frequency error is detected | |||
| Detection time | Max 100 seconds | |||
POSSIBLE CAUSE
On-board charger
Commercial power supply
FAIL-SAFE
Normal charge is stopped
Confirmation Procedure
PRECONDITIONING
Erase “self-diagnostic result” in “CHARGER/POWER DELIVERY MODULE” using CONSULT.
Turn the power switch OFF with the driver's side door open, get out of the Nissan Ariya vehicle, close the driver's side door and wait for at least 4 minutes.
Check that 12 V battery voltage is 11 V or more.
GO TO 2
PERFORM DTC CONFIRMATION PROCEDURE
With CONSULT
Change the power supply environment (Charging device) and perform normal charge for at least 120 seconds.
Power switch ON and wait for at least 2 seconds.
Check “self-diagnostic result” in “CHARGER/POWER DELIVERY MODULE” using CONSULT.
Is DTC detected?
YES>>Refer to DTC Diagnosis Procedure.
NO-1>>To check malfunction symptom before repair: Refer to Intermittent Incident.
NO-2>>Confirmation after repair: INSPECTION END
DTC Diagnosis Procedure
PERFORM DTC CONFIRMATION PROCEDURE AGAIN
With CONSULT
Perform DTC confirmation procedure again. Refer to Confirmation Procedure.
Is DTC P1C64-38 detected again?
YES>>Replace On-board charger. Refer to ON-BOARD CHARGER : Disassembly & Assembly.
NO>>INSPECTION END
U1d40-87 Communication Error Nissan Ariya SUV
DTC Description
DTC DETECTION LOGIC
| DTC | CONSULT screen terms | DTC detecting condition | ||
|---|---|---|---|---|
| U1D40 | 87 | Communication error | Diagnosis condition | During key OFF and normal charge |
| Signal | — | |||
| Threshold | When a CAN bus error is detected | |||
| Detection time | Max 9 seconds | |||
POSSIBLE CAUSE
Harness and connector (CAN communication line is open or shorted)
FAIL-SAFE
Normal charge is stopped
Confirmation Procedure
PRECONDITIONING
Erase “self-diagnostic result” in “CHARGER/POWER DELIVERY MODULE”, “EV/HEV”, “HIGH VOLTAGE BATTERY” and “HIGH VOLTAGE BATTERY 2” using CONSULT.
Turn the power switch OFF with the driver's side door open, get out of the Nissan Ariya vehicle, close the driver's side door and wait for at least 4 minutes.
Check that 12 V battery voltage is 11 V or more.
GO TO 2.
PERFORM DTC CONFIRMATION PROCEDURE
With CONSULT
Set the Nissan Ariya vehicle to key OFF status and perform normal charge for at least 120 seconds.
Power switch ON.
Check “self-diagnostic result” in “CHARGER/POWER DELIVERY MODULE” using CONSULT.
Is DTC detected?
YES>>Refer to DTC Diagnosis Procedure.
NO-1>>To check malfunction symptom before repair: Refer to Intermittent Incident.
NO-2>>Confirmation after repair: INSPECTION END
DTC Diagnosis Procedure
PERFORM DTC CONFIRMATION PROCEDURE AGAIN
With CONSULT
Perform DTC confirmation procedure again. Refer to Confirmation Procedure.
Is DTC U1D40-87 detected again?
YES>>Perform trouble diagnosis for CAN communication circuit. Refer to Trouble Diagnosis Flow Chart.
NO>>INSPECTION END