Removal and Installation
- Driver Air Bag Module
- Spiral Cable
- Passenger Air Bag Module
- Driver Knee Air Bag Module
- Front Side Air Bag Module
- Curtain Air Bag Module
- Crash Zone Sensor
- Satellite Sensor
- Seat Belt Pre-Tensioner
- Lap Pretensioner
- Occupant Detection System Control Unit
- Occupant Detection System Sensor
- Indicator Unit
- Diagnosis Sensor Unit
Driver Air Bag Module Nissan Ariya first Gen
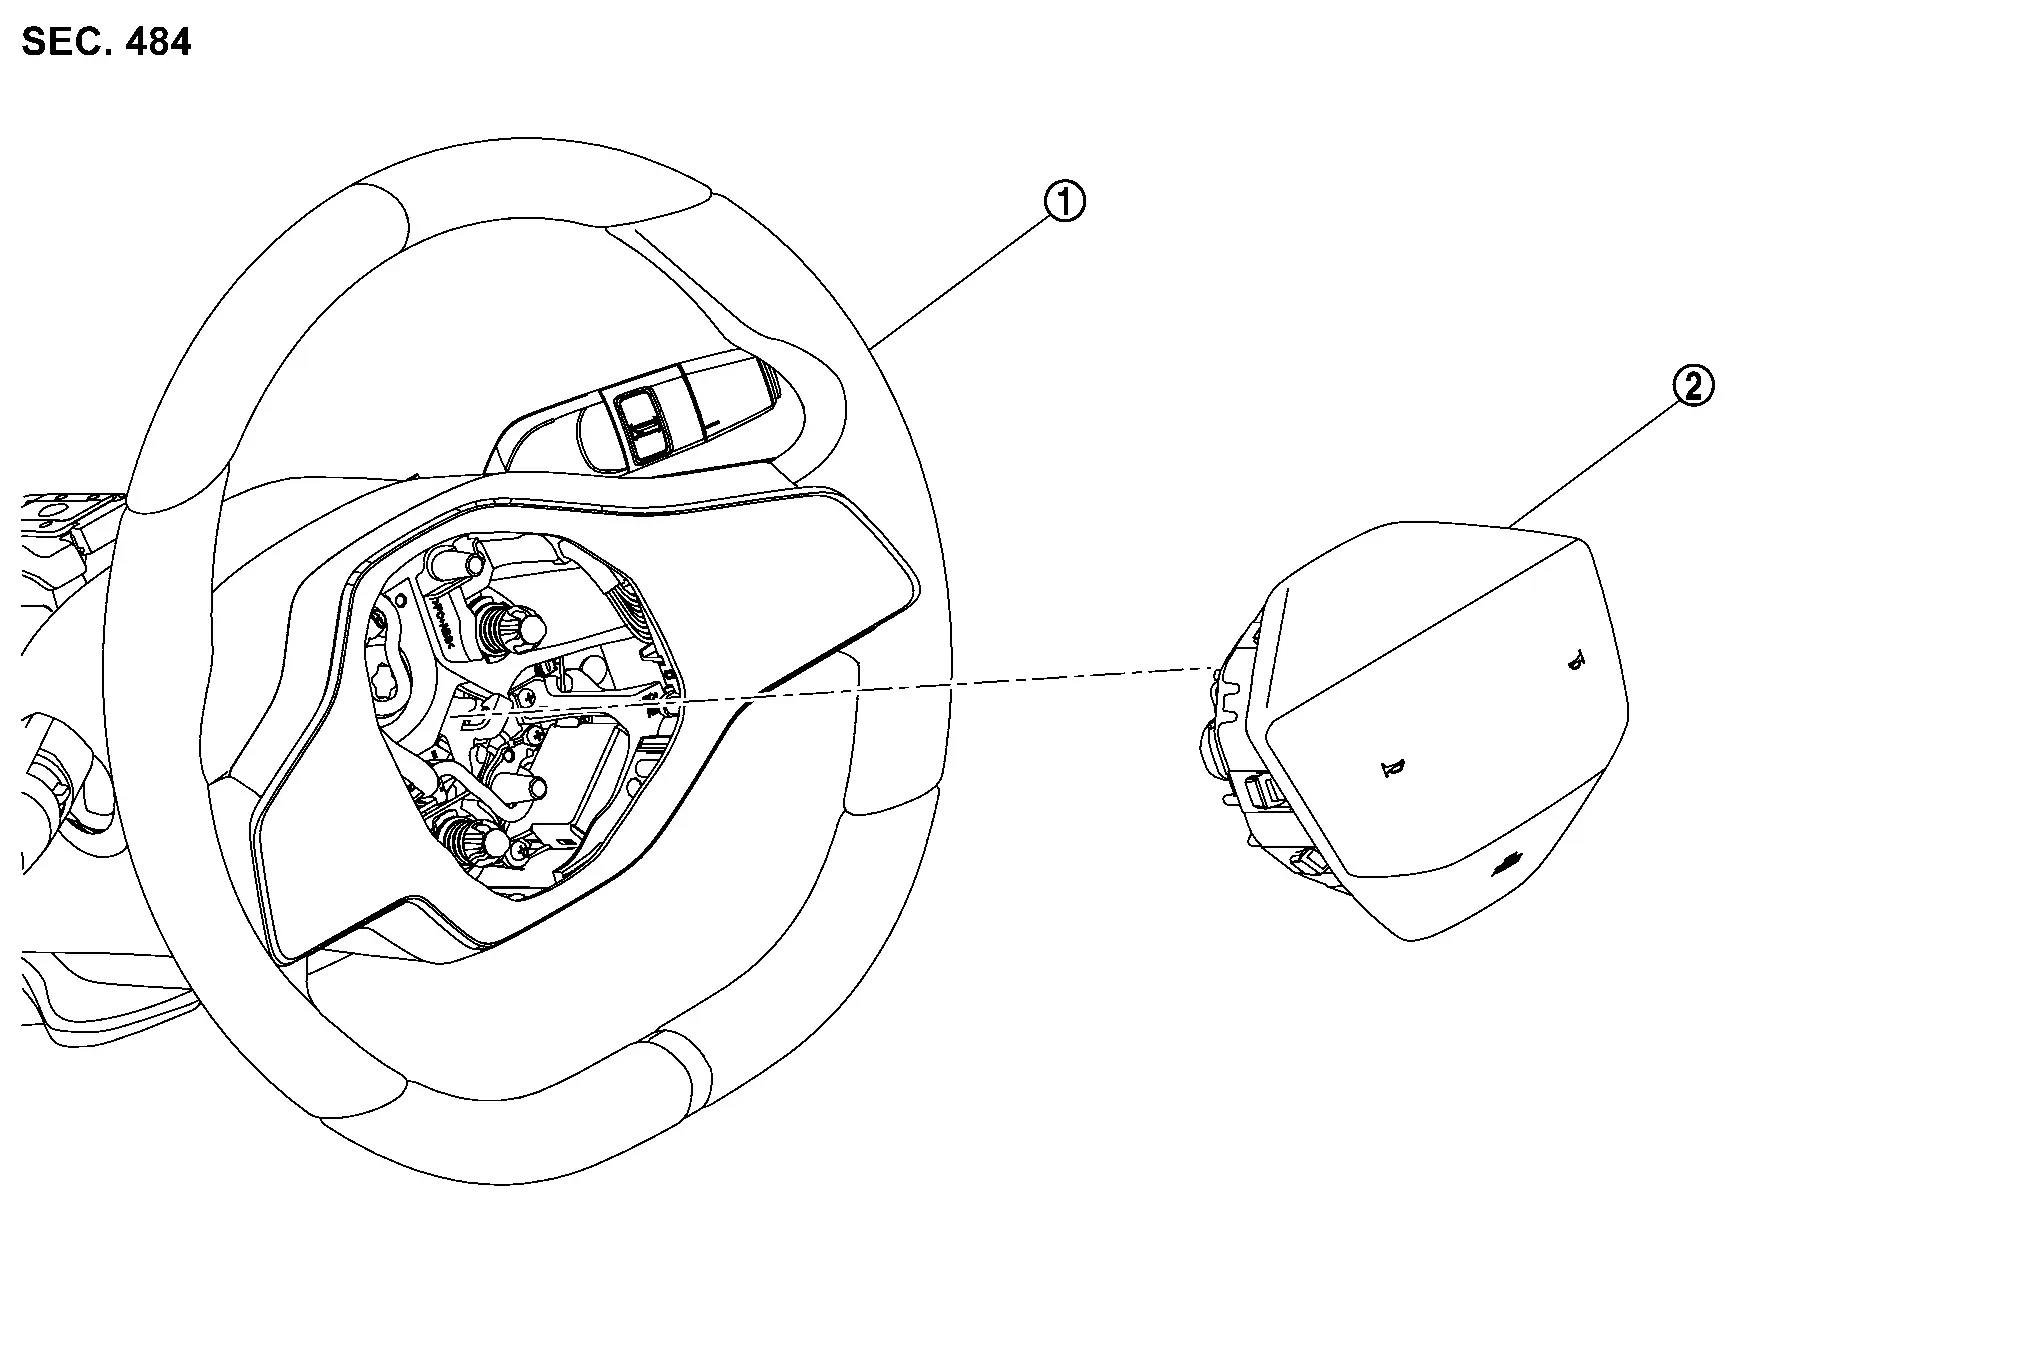
Exploded View
 |
Steering wheel |  |
Driver air bag module |
Removal & Installation
Before servicing, power switch OFF, disconnect 12V battery negative terminal and wait for 3 minutes or more (discharges electricity held in the additional power supply circuit of the air bag diagnosis sensor unit). Refer to Precautions for Removing Battery Terminal.
Always work from the side of air bag module. Never work in front of it.
Never use the air tools or electric tools for servicing.
REMOVAL
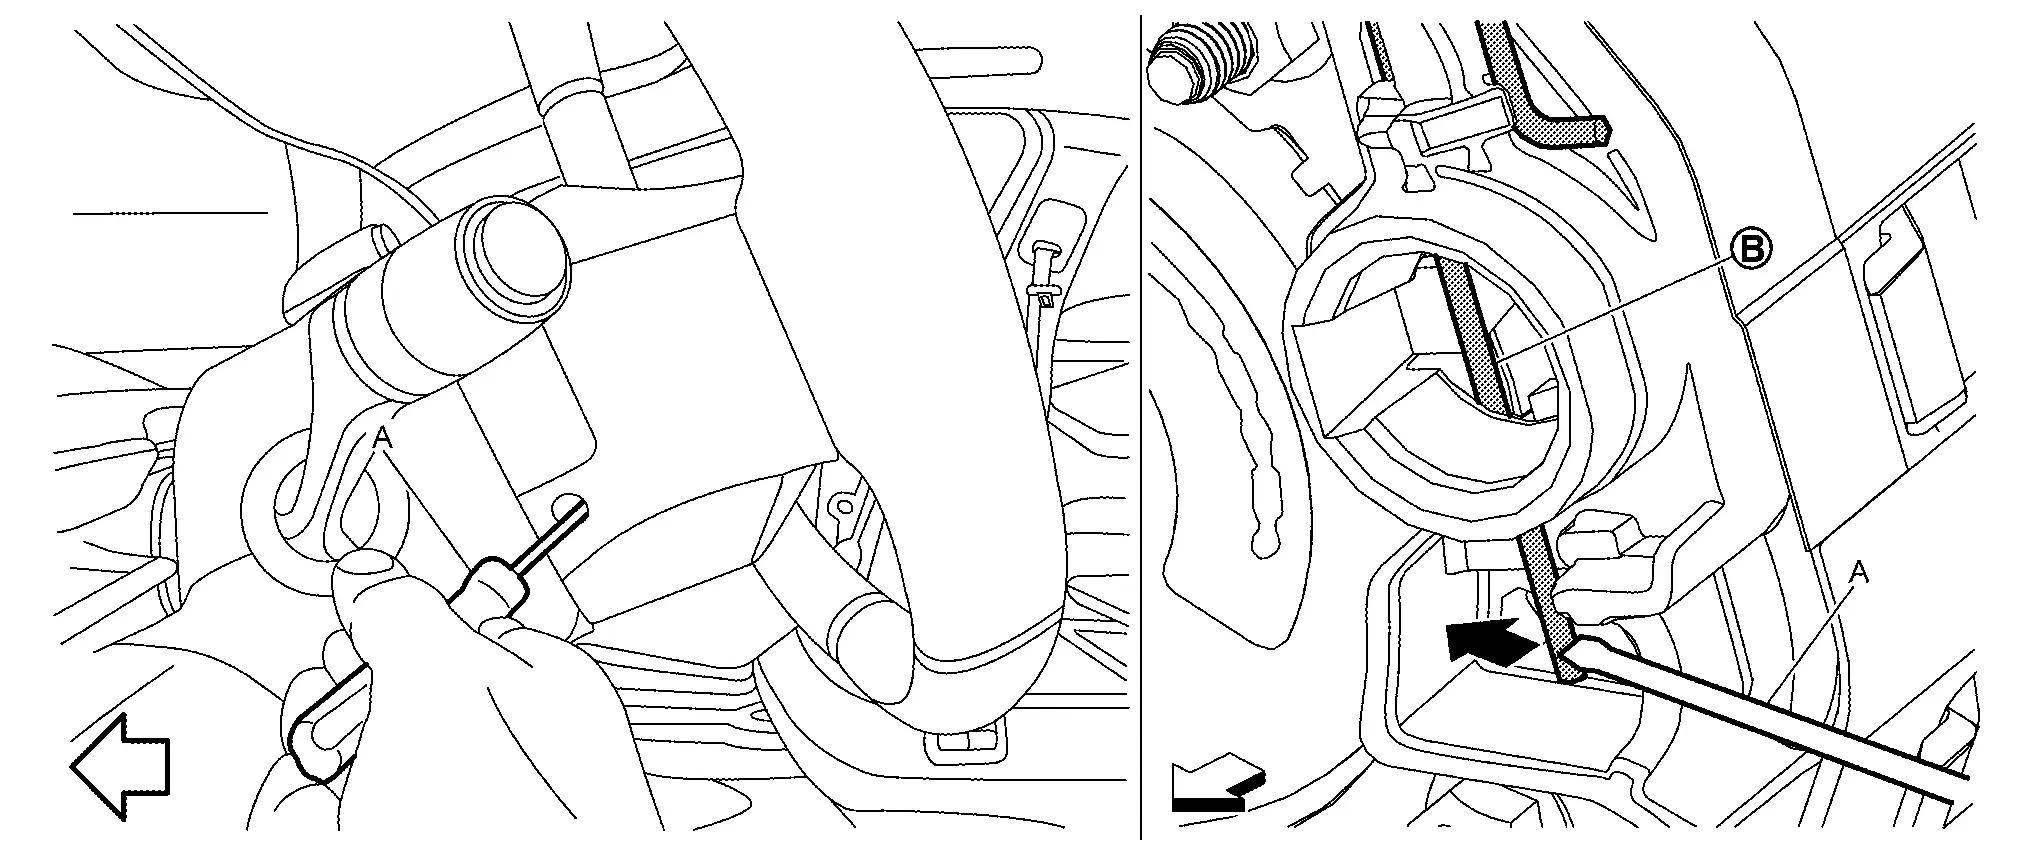
From the holes on left, right and lower of steering wheel, check the position of torsion spring  secure the driver air bag module.

 |
: Nissan Ariya Vehicle front |
Insert remover tool (A) into a hole of the steering wheel, and then press and disengage torsion spring  .
|
: Nissan Ariya Vehicle front |
Remove remaining springs in numerical order from 1 to 2.
Disconnect driver air bag module harness connectors and horn switch harness terminal .

Remove driver air bag module.
INSTALLATION
Note the following items, and install in the reverse order of removal.
Spiral Cable Nissan Ariya first Gen
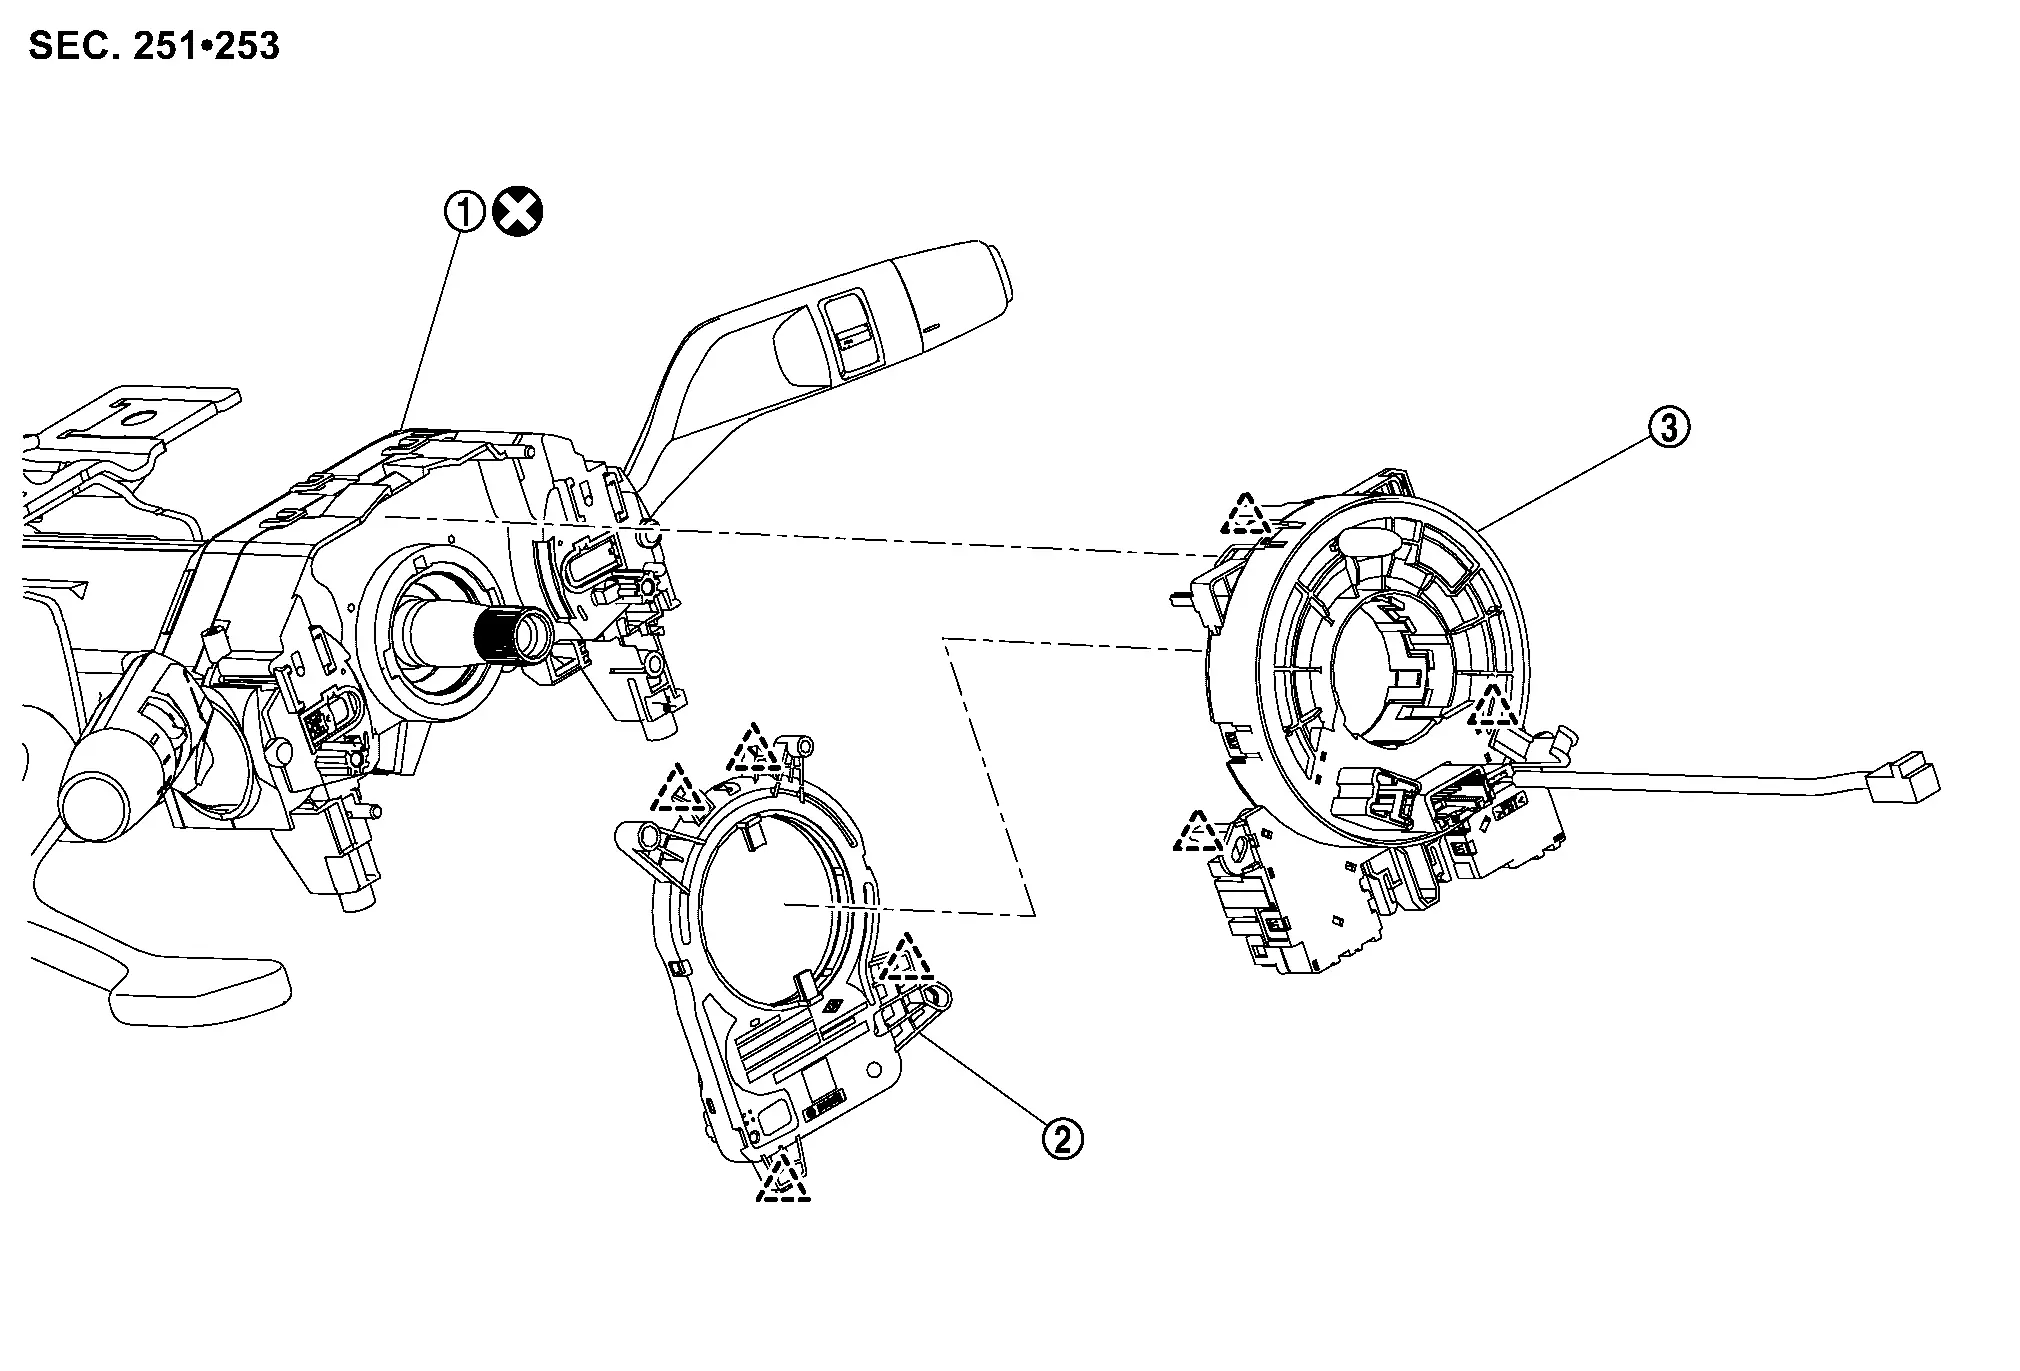
Exploded View
|
Combination switch | |
Steering angle sensor |  |
Spiral cable |
 |
: Pawl | ||||
 |
: Always replace after every disassembly. | ||||
Removal & Installation
REMOVAL
Remove driver air bag module. Refer to Removal & Installation.
Remove steering wheel. Refer to STEERING WHEEL : Removal & Installation.
Remove steering column cover. Refer to Removal & Installation.
Disconnect spiral cable body side harness connectors .
Left side
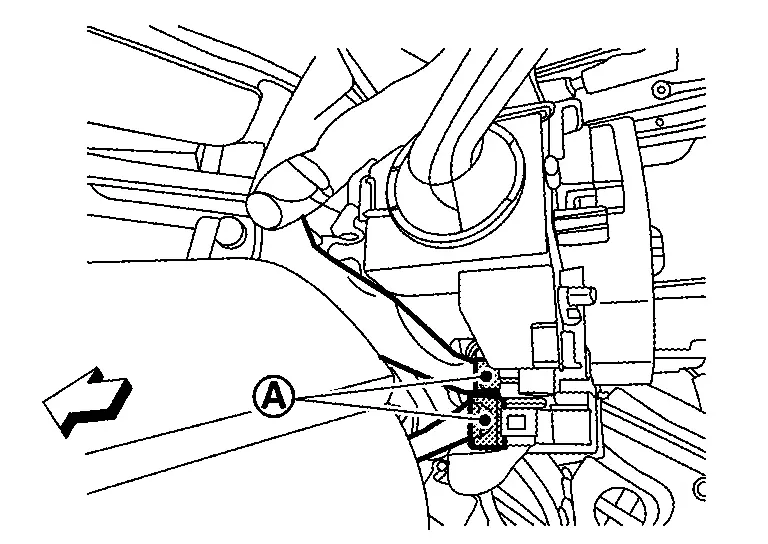
: Nissan Ariya Vehicle front Right side (with steering heater models)
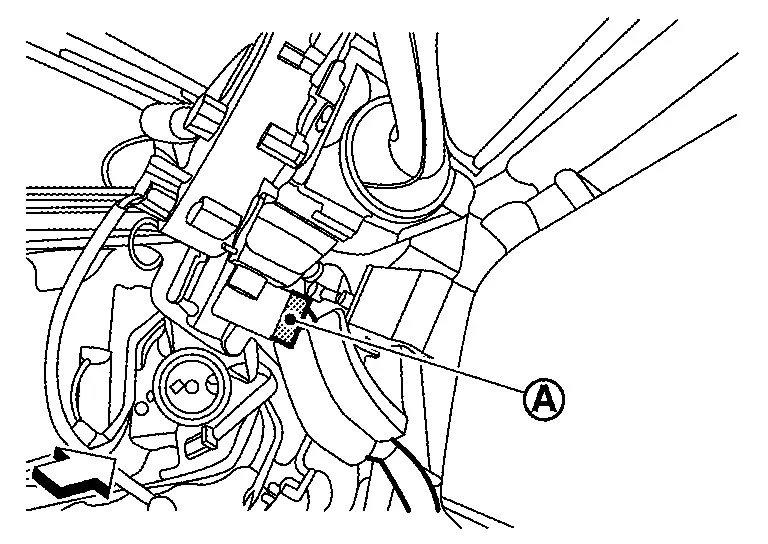
: Nissan Ariya Vehicle front
Disconnect steering angle sensor body side harness connector .
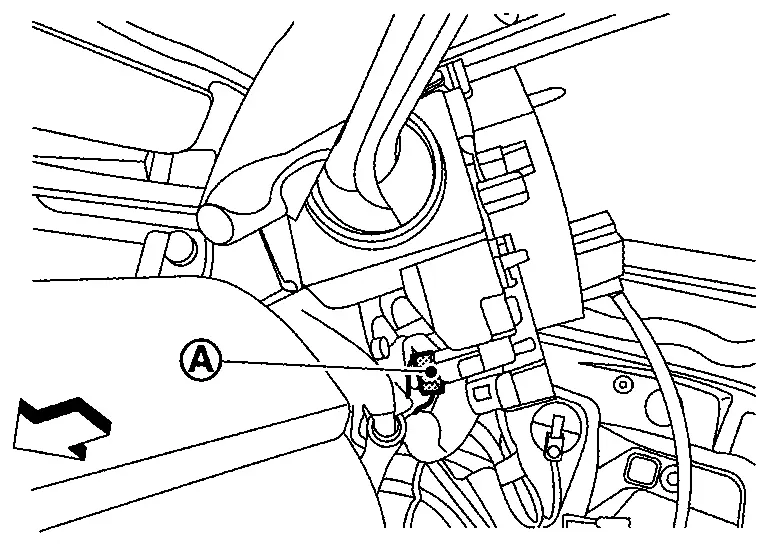
|
: Nissan Ariya Vehicle front |
Disengage spiral cable fixing pawls, and then remove spiral cable with steering angle sensor.

|
: Pawl |
Remove steering angle sensor. Refer to STEERING ANGLE SENSOR : Removal & Installation.
INSTALLATION
Note the following items, and then install in the reverse order of removal.
Set the neutral position.Carefully turn spiral cable clockwise to the end position.
Turn counterclockwise (about 2 and a half turns) and stop turning where the part of clear window appear yellow mark. 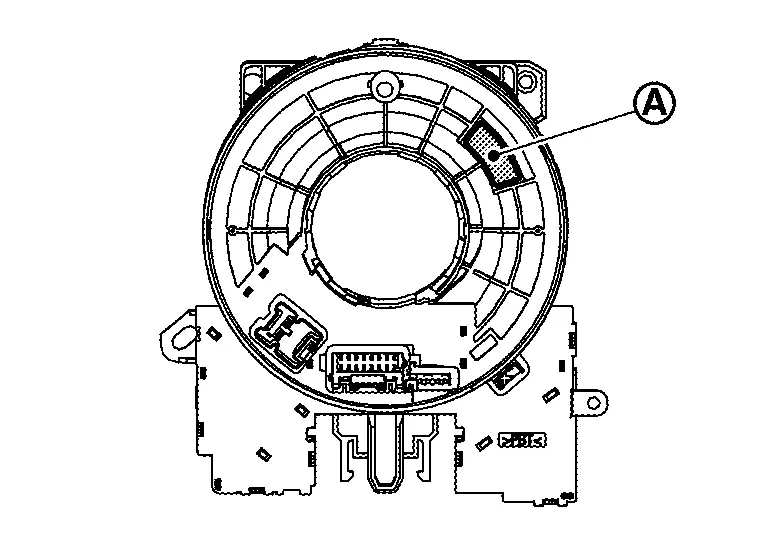
Install steering angle sensor to spiral cable. Refer to STEERING ANGLE SENSOR : Removal & Installation.
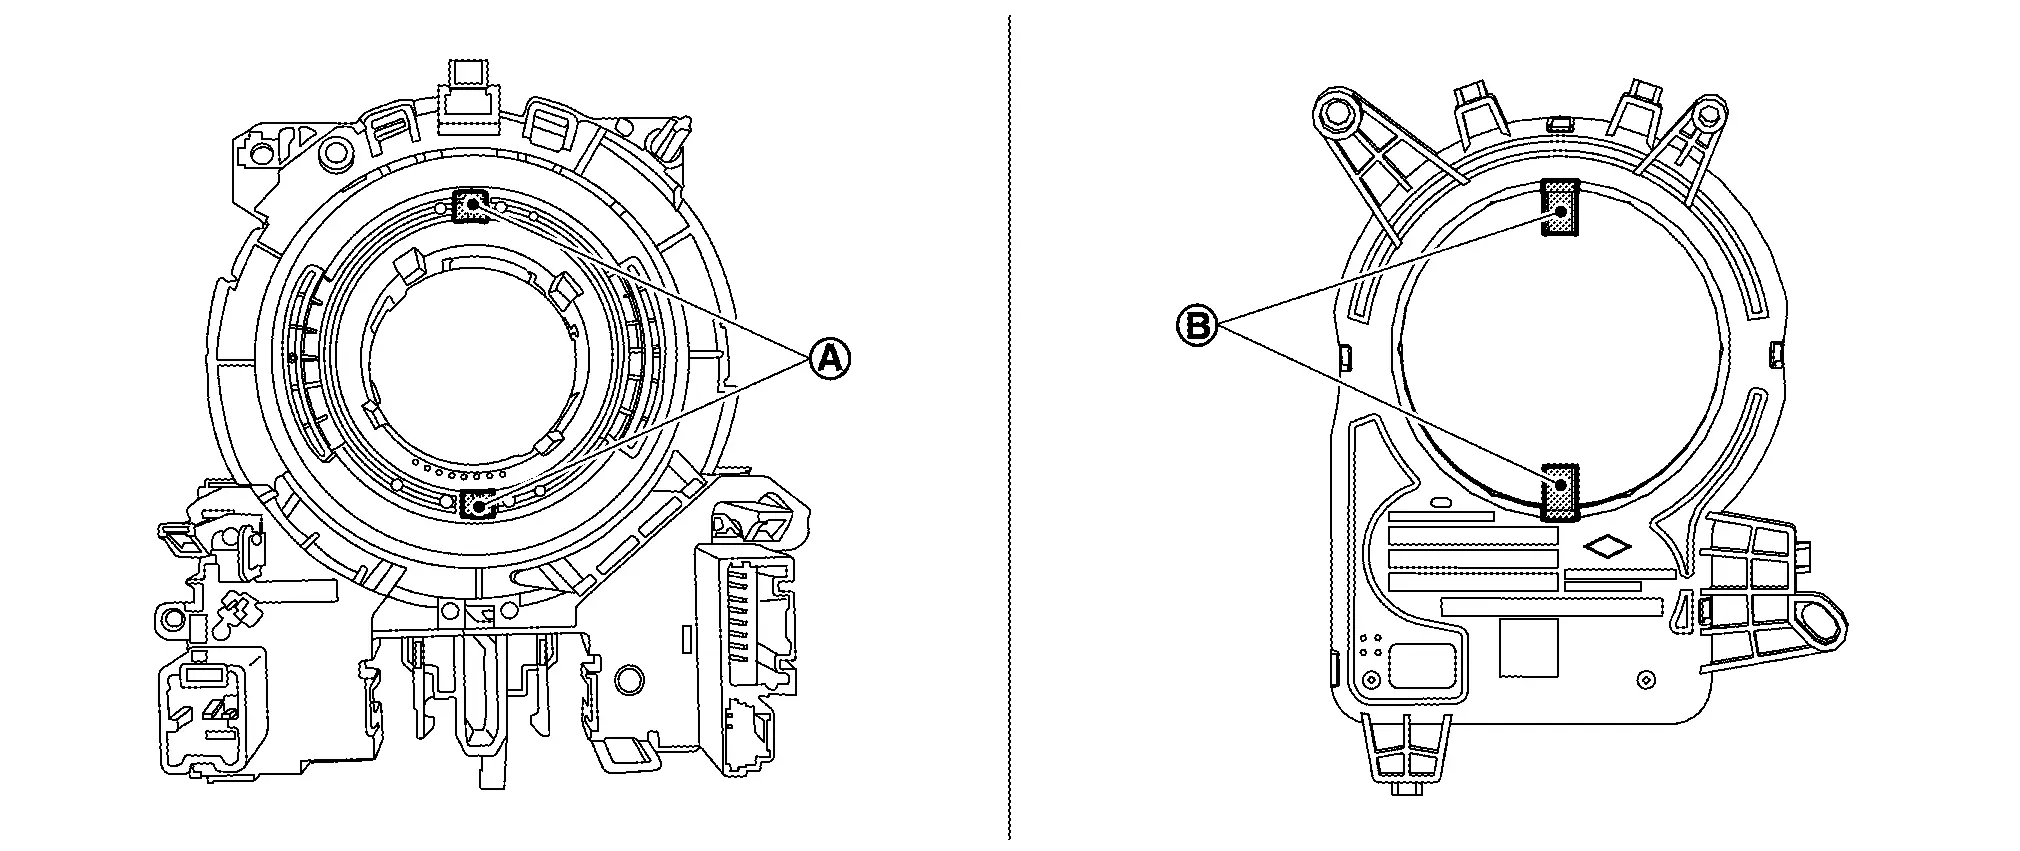
Install spiral cable into combination switch by fixing pawls.
Remove lock pin of combination switch according to numerical order 1→2 indicated by arrows as shown in figure.
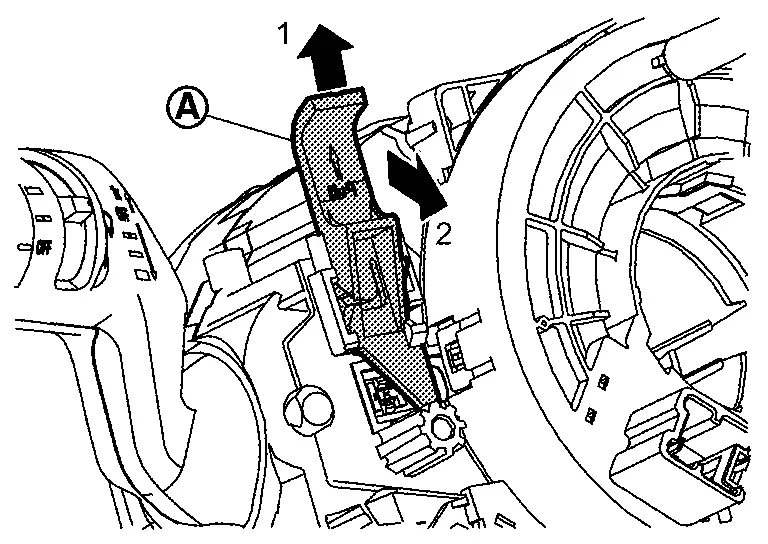
Connect body harness to spiral cable and steering angle sensor.
Install steering column cover. Refer to Removal & Installation.
Install steering wheel. Refer to STEERING WHEEL : Removal & Installation.
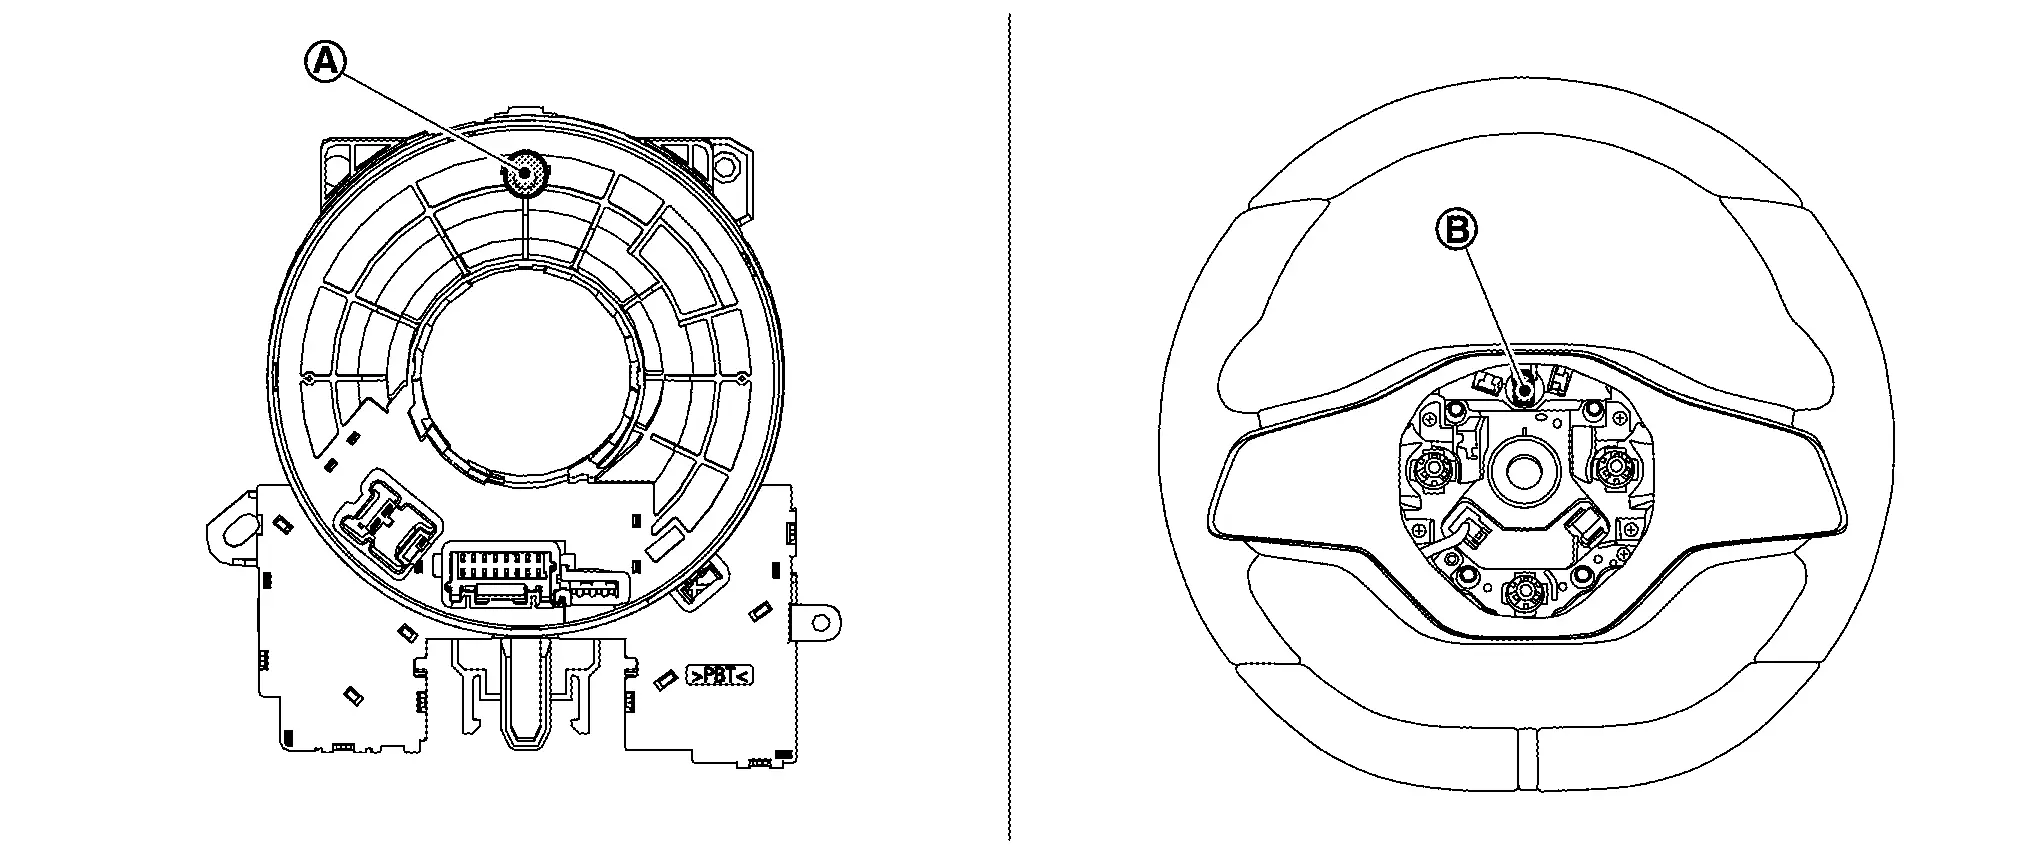
Install driver air bag module. Refer to Removal & Installation.
Passenger Air Bag Module Nissan Ariya
Exploded View

|
Instrument upper garnish | |
Steering member | |
Passenger air bag module |
|
: Always replace after every disassembly. | ||||
 |
: N·m (kg-m, ft-lb) | ||||
 ,  : Indicates that the part is connected at points with same symbol in actual Nissan Ariya vehicle. |
|||||
Removal & Installation
Before servicing, power switch OFF, disconnect 12V battery negative terminal and wait for 3 minutes or more (discharges electricity held in the additional power supply circuit of the air bag diagnosis sensor unit). Refer to Precautions for Removing Battery Terminal.
Always work from the side of air bag module. Never work in front of it.
Never use air tools or electric tools for servicing.
REMOVAL
Remove instrument upper garnish. Refer to Removal & Installation.
Remove passenger air bag module fixing screws .

Remove passenger air bag module.Disengage fixing hooks of passenger air bag while pulling instrument upper garnish according to numerical order 1→2 indicated by arrows as shown in figure.
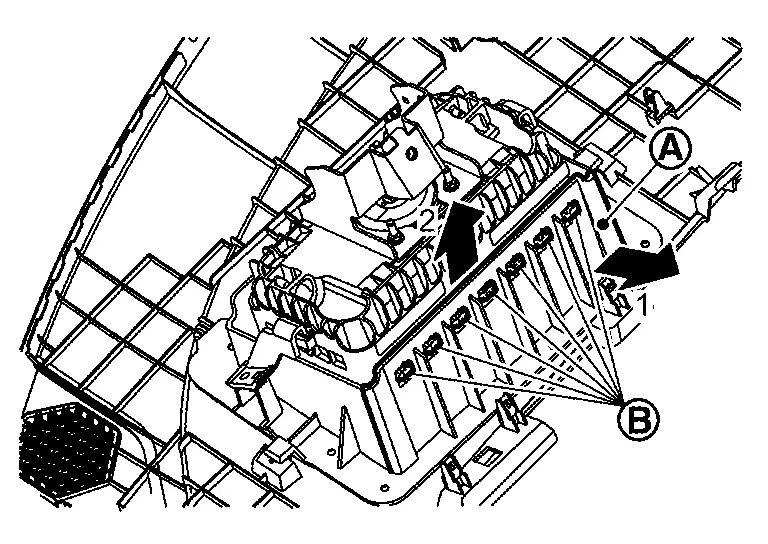
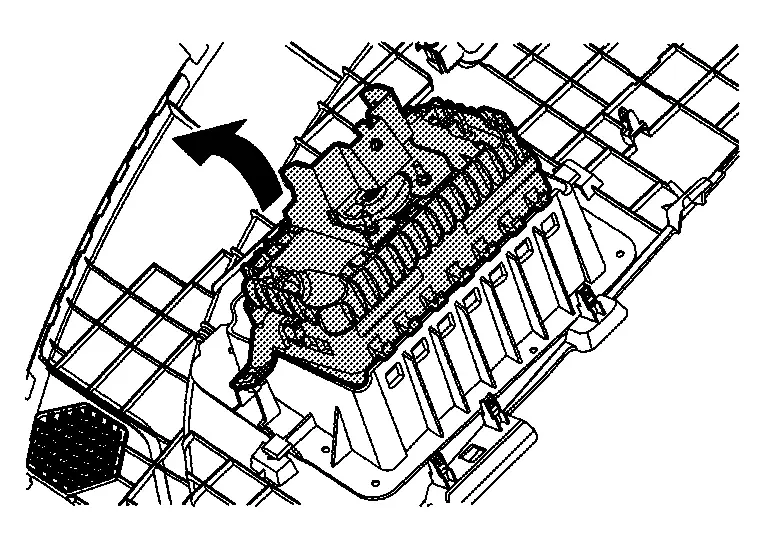
INSTALLATION
Note the following items, and then install in the reverse order of removal.
Driver Knee Air Bag Module Nissan Ariya 1st generation
Exploded View

|
Steering member | |
Driver knee air bag module | ||
|
: Always replace after every disassembly. | ||||
 |
: N·m (kg-m, in-lb) | ||||
Removal and Installation
Before servicing, ignition switch OFF, disconnect battery negative terminal and wait for 3 minutes or more (discharges electricity held in the additional power supply circuit of the air bag diagnosis sensor unit). Refer to Precautions for Removing Battery Terminal.
Always work from the side of air bag module. Never work in front of it.
REMOVAL
Remove instrument lower panel. Refer to Removal & Installation.
Remove driver knee air bag module mounting bolts .
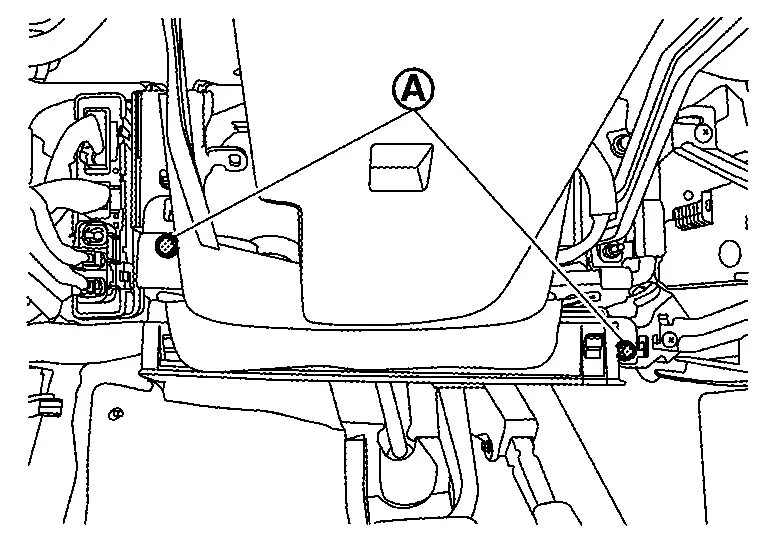
Move driver knee air bag module from steering member, and then disconnect driver knee air bag module harness connector .
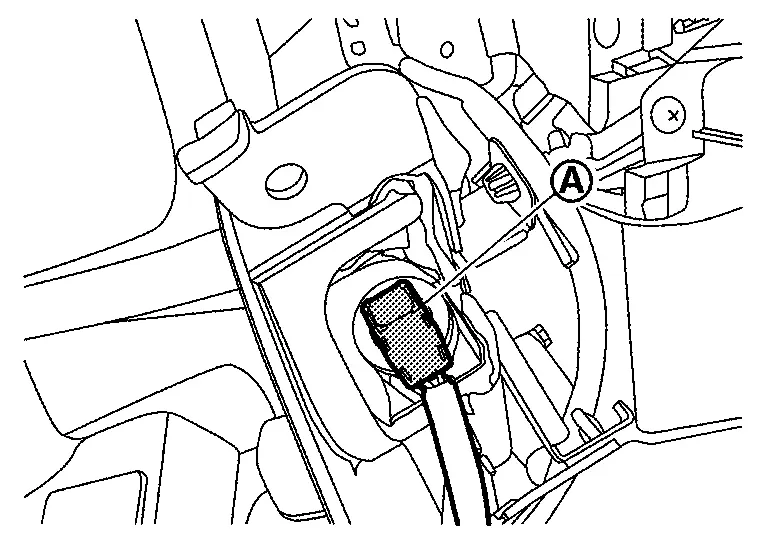
Disengage harness connector fixing clips, and then remove driver knee air bag module.
INSTALLATION
Note the following items, and then install in the reverse order of removal.
Front Side Air Bag Module Nissan Ariya 2023
Exploded View
Front side air bag module is built in to seatback assembly.
For exploded view of seatback assembly, refer to Exploded View.
Removal & Installation
For removal and installation of seatback assembly, refer to Disassembly & Assembly.
Curtain Air Bag Module Nissan Ariya 1st generation
Exploded View
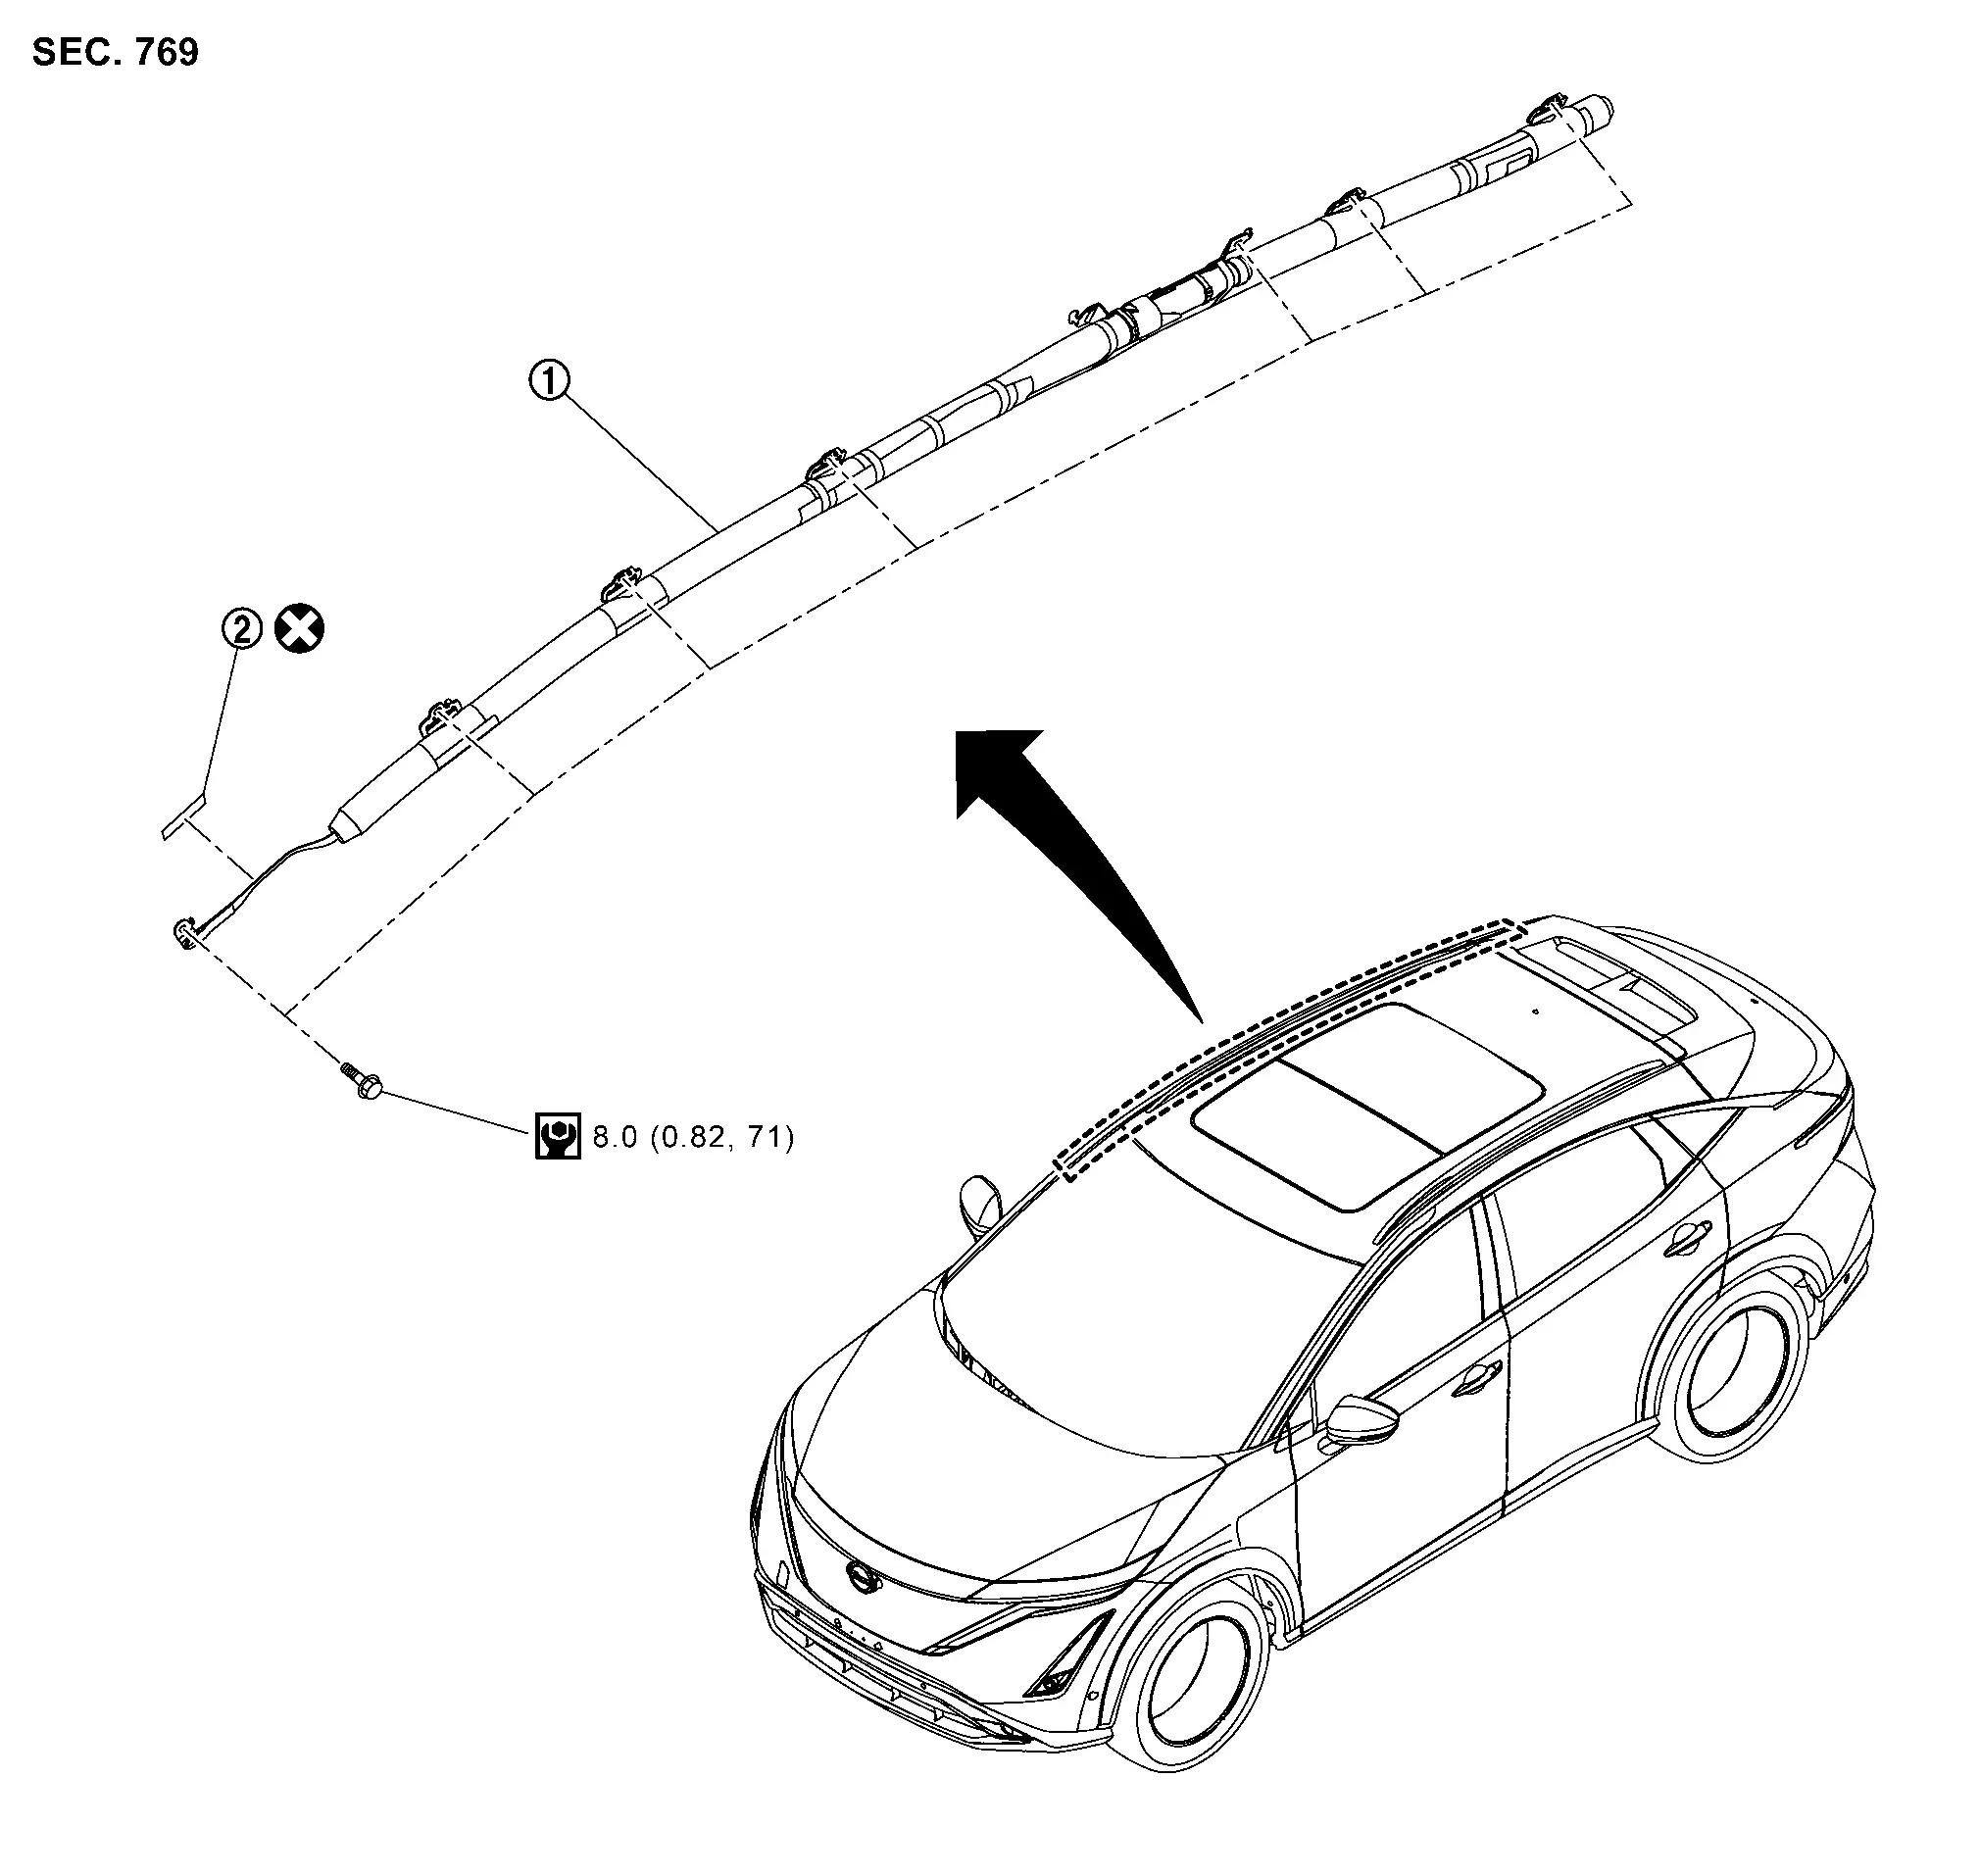
|
Curtain airbag module | |
Double-sided tape [t: 0.16 mm (0.006 in)] |
||
|
: Always replace after every disassembly. | ||||
|
: N·m (kg-m, in-lb) | ||||
Removal & Installation
Before servicing, power switch OFF, disconnect 12V battery negative terminal and wait for 3 minutes or more (discharges electricity held in the additional power supply circuit of the air bag diagnosis sensor unit). Refer to Precautions for Removing Battery Terminal.
Always work from the side of air bag module. Never work in front of it.
Never use air tools or electric tools for servicing.
REMOVAL
Remove headlining assembly. Refer to Removal & Installation.
Disconnect curtain air bag module harness connector .
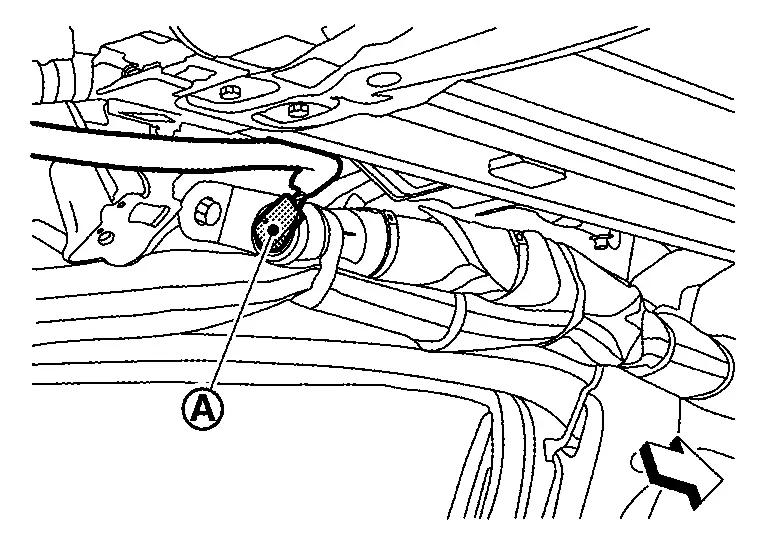
|
: Nissan Ariya Vehicle front |
Remove curtain air bag module front side mounting bolt, and then peel off double-sided tape from Nissan Ariya vehicle.
Remove curtain air bag module mounting bolts.
Remove bracket part of curtain air bag module from Nissan Ariya vehicle, and then remove curtain air bag module.
INSTALLATION
Note the following items, and then install in the reverse order of removal.
Crash Zone Sensor Nissan Ariya first Gen
Exploded View

|
Crash zone sensor | |
Radiator core support | |
Bracket |
|
: Nissan Ariya Vehicle front | ||||
|
: Always replace after every disassembly. | ||||
|
: N·m (kg-m, in-lb) | ||||
|
: N·m (kg-m, ft-lb) | ||||
Removal & Installation
Before servicing, power switch OFF, disconnect 12V battery negative terminal and wait for 3 minutes or more (discharges electricity held in the additional power supply circuit of the air bag diagnosis sensor unit). Refer to Precautions for Removing Battery Terminal.
Never use air tools or electric tools for servicing.
REMOVAL
Fully open hood.
Remove bracket mounting bolts.
Disconnect crash zone sensor harness connector.
Remove crash zone sensor mounting nut, and then remove crash zone sensor from bracket.
INSTALLATION
Note the following items, and then install in the reverse order of removal.
Satellite Sensor Nissan Ariya 2023
Exploded View
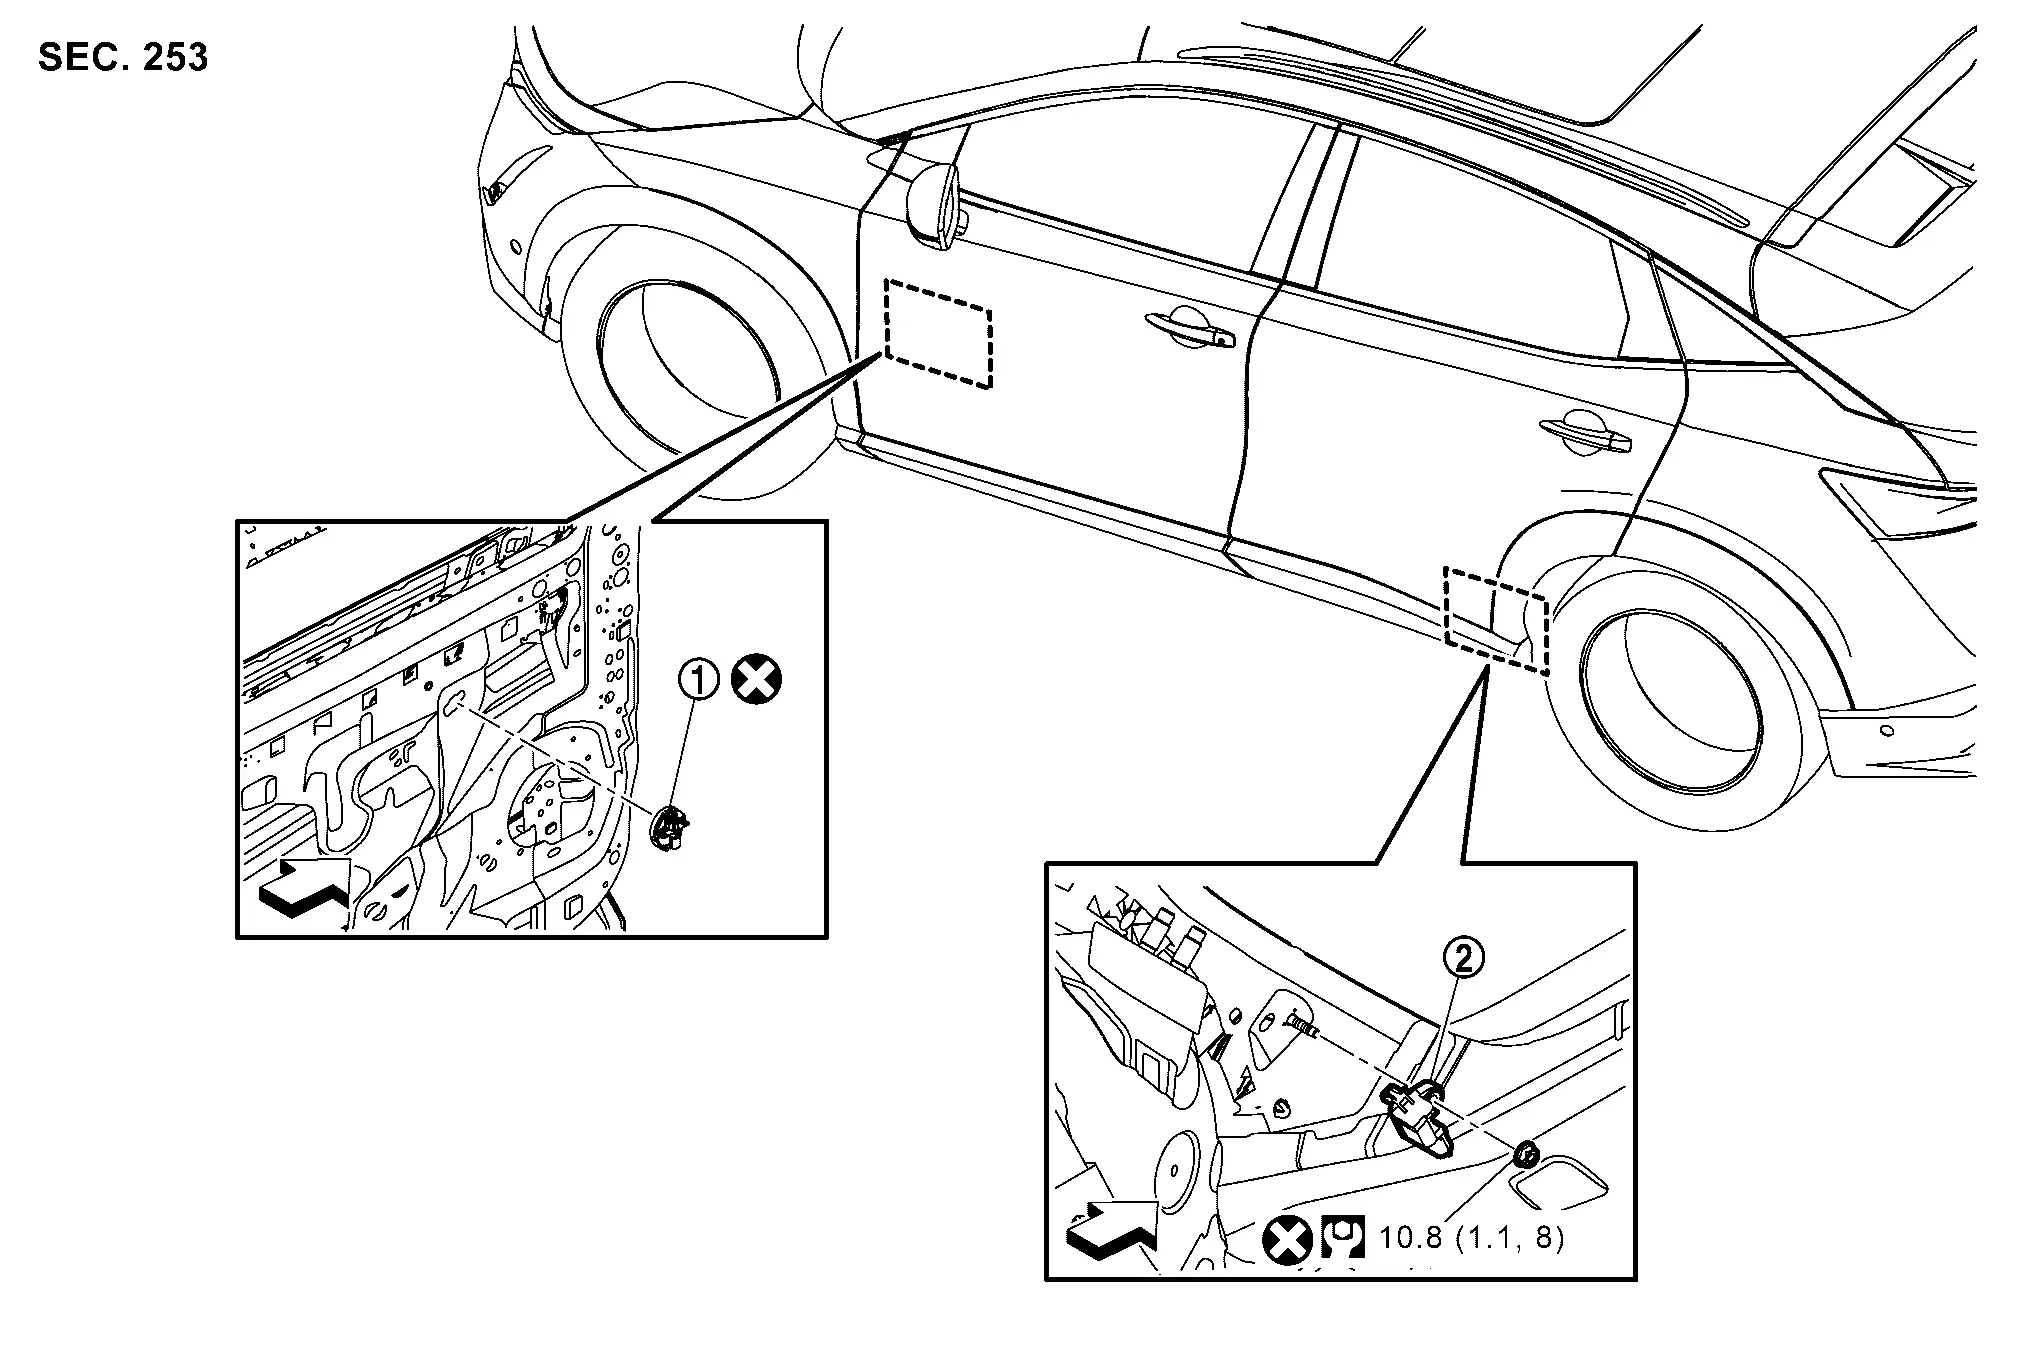
|
Front door satellite sensor | |
C-pillar satellite sensor | ||
|
: Nissan Ariya Vehicle front | ||||
|
: Always replace after every disassembly. | ||||
|
: N·m (kg-m, ft-lb) | ||||
Removal & Installation
Before servicing, power switch OFF, disconnect 12V battery negative terminal and wait for 3 minutes or more (discharges electricity held in the additional power supply circuit of the air bag diagnosis sensor unit). Refer to Precautions for Removing Battery Terminal.
Never use air tools or electric tools for servicing.
REMOVAL
Front Door Satellite Sensor
Remove front door finisher. Refer to Removal & Installation.
Remove front door sealing screen. Refer to Removal & Installation.
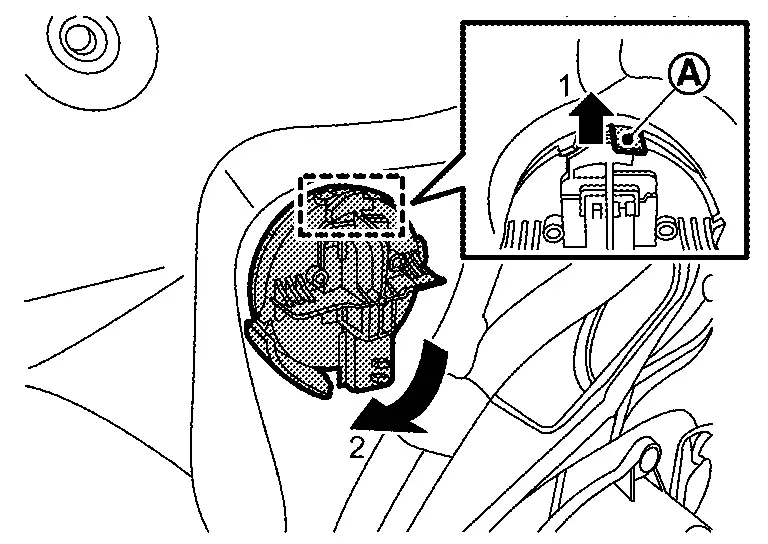
Disconnect front door satellite sensor harness connector.
Disengage front door satellite sensor lock pin according numerical order 1→2 indicated arrows as shown in figure, and then remove front door satellite sensor.
C-pillar Satellite Sensor
Remove luggage side lower finisher. Refer to Removal & Installation.
Disconnect C-pillar satellite sensor harness connector.
Remove C-pillar satellite sensor mounting nut, and then remove C-pillar satellite sensor.
INSTALLATION
Note the following items, and then install in the reverse order of removal.
Front Door Satellite Sensor
Note the following items, and then install in the reverse order of removal.
C-pillar Satellite Sensor
Note the following items, and then install in the reverse order of removal.
Seat Belt Pre-Tensioner Nissan Ariya
Exploded View
For exploded view of seat belt pre-tensioner, refer to the following.
Front: Refer to Exploded View.
Rear: Refer to Exploded View.
Removal & Installation
For removal and installation procedure of seat belt pre-tensioner, refer to the following.
Front: Refer to Removal & Installation.
Rear: Refer to Removal & Installation.
Lap Pretensioner Nissan Ariya 2026
Exploded View
For exploded view of lap pre-tensioner. Refer to Exploded View.
Removal & Installation
For removal and installation procedure. Refer to Removal & Installation.
Occupant Detection System Control Unit Nissan Ariya 2026
Exploded View
For exploded view of occupant detection system control unit. Refer to Exploded View.
Removal and Installation
For removal and installation of occupant detection system control unit. Refer to Disassembly & Assembly.
Occupant Detection System Sensor Nissan Ariya
Exploded View
Occupant detection system sensor is built in to seat cushion frame of passenger seat.
For exploded view of seat cushion frame of passenger seat. Refer to Exploded View.
Removal and Installation
For removal and installation of seat cushion frame of passenger seat. Refer to Disassembly & Assembly.
Indicator Unit Nissan Ariya first Gen
Exploded View
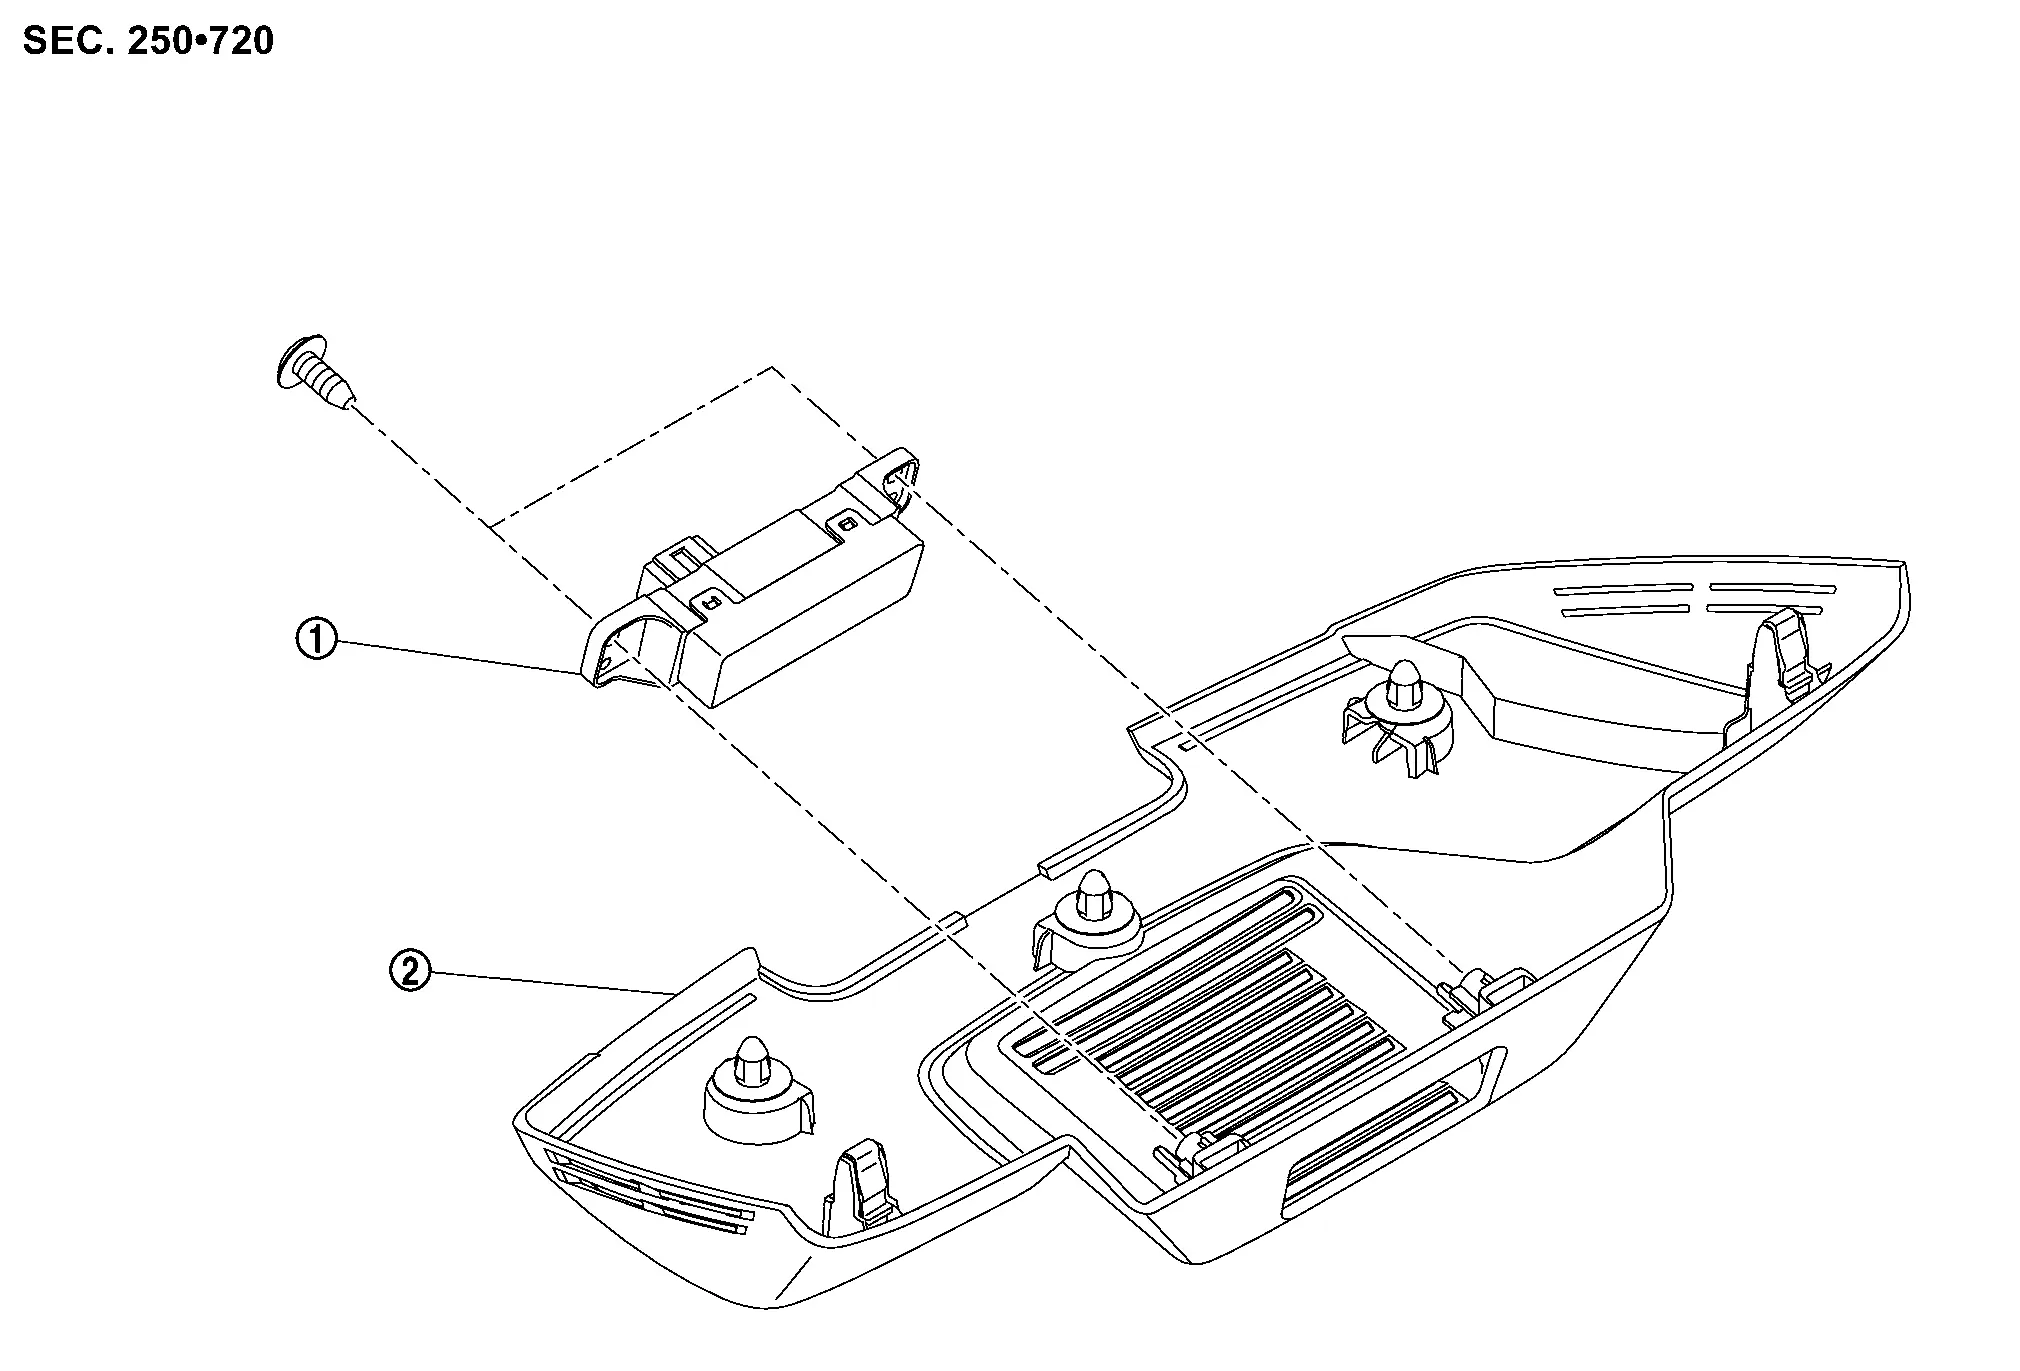
|
Indicator unit | |
Front camera unit cover |
Removal & Installation
REMOVAL
Remove front camera unit cover. Refer to Removal and Installation (without propilot assist) or Removal and Installation (with propilot assist).
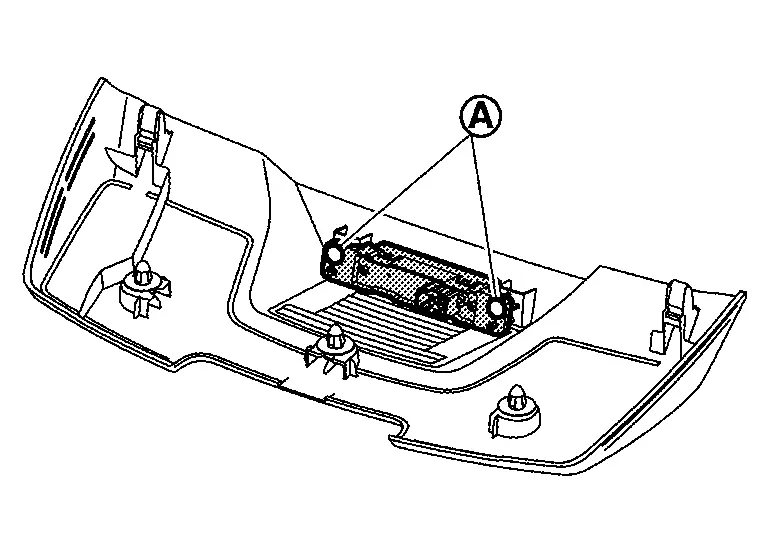
Remove indicator unit fixing screws , and then remove indicator unit.
INSTALLATION
Install in the reverse order of removal.
Diagnosis Sensor Unit Nissan Ariya
Exploded View
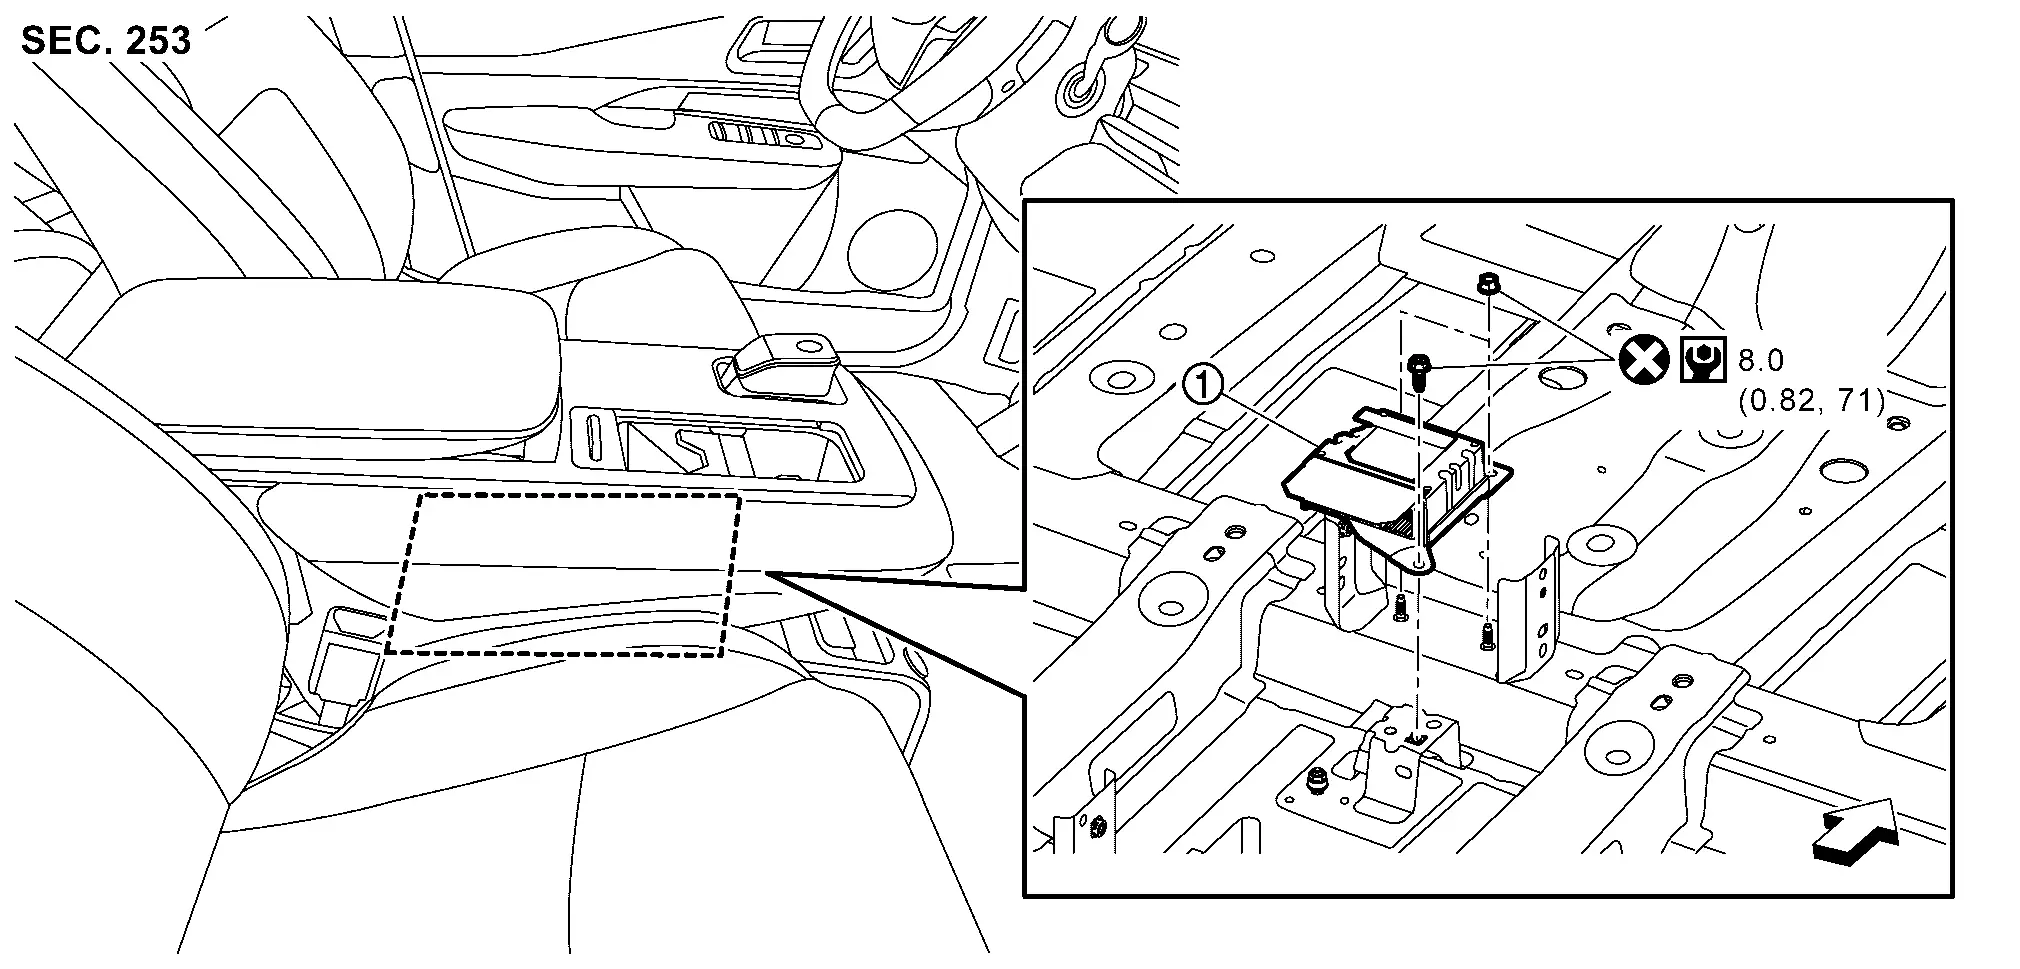
|
Diagnosis sensor unit | ||||
|
: Nissan Ariya Vehicle front | ||||
|
: Always replace after every disassembly. | ||||
|
: N·m (kg-m, in-lb) | ||||
Removal & Installation
Before servicing, power switch OFF, disconnect 12V battery negative terminal and wait for 3 minutes or more (discharges electricity held in the additional power supply circuit of the air bag diagnosis sensor unit). Refer to Precautions for Removing Battery Terminal.
Before disconnecting the air bag sensor unit harness connector, be sure to disconnect each harness connector of the air bag modules, seat belt pre-tensioners and lap pre-tensioner to prevent air bag deployment by static electricity and seat belt pre-tensioner operation.
Never use air tools or electric tools for servicing.
When replacing the air bag diagnosis sensor unit, always check with the parts department for the latest parts information. Installing an incorrect air bag diagnosis sensor unit may or may not cause the air bag warning lamp to illuminate and may cause incorrect deployment of the supplemental air bags and seat belt pre-tensioners in a collision resulting in serious personal injury or death.
REMOVAL
Disconnect connector of all air bag modules, seat belt pre-tensioners and lap pre-tensioner.
Driver air bag module: Refer to Removal & Installation.
Passenger air bag module: Refer to Removal & Installation.
Driver knee air bag module: Refer to Removal and Installation.
Passenger knee air bag module: Refer to Removal and Installation.
Front side air bag module: Refer to Removal & Installation.
Front center air bag module (with front center air bag module models): Refer to Removal & Installation.
Rear side air bag module: Refer to Removal and Installation.
Curtain air bag module: Refer to Removal & Installation.
Pre-tensioner seat belt: Refer to Removal & Installation.
Lap pre-tensioner: Refer to Removal & Installation.
Remove center console assembly. Refer to Removal & Installation.
Remove front floor duct. Refer to Removal & Installation.
Remove rear ventilator duct. Refer to Removal & Installation.
Disconnect diagnosis sensor unit harness connectors.
Remove diagnosis sensor unit mounting bolt and nuts, and then remove diagnosis sensor unit.
INSTALLATION
Note the following items, and then install in the reverse order of removal.