Tpms

In this manual: Tpms
How to Use This Manual — 1Precautions — 1Preparation — 1Vehicle Information — 1Basic Inspection — 1Preparation. Commercial Service Tools Or/and Repair Part — 1Description — 1Component Parts — 1System — 1Diagnosis System (vcm) — 1Ecu Diagnosis Information. Vcm — 1Ev Control System — 1Ev/hev (vcm) — 1Component Parts /circuit Diagnosis — 1Ev Control System — 1Periodic Maintenance. Ev System Warning Lamp — 1Removal and Installation. Vcm — 1Traction Motor System :: Front Traction Motor — 1Preparation — 1Description — 4Basic Inspection — 2Dtc Diagnosis — 2Component Parts /circuit Diagnosis — 1Traction Motor System :: Rear Traction Motor — 1Description — 4Basic Inspection — 2Dtc Diagnosis — 2Component Parts /circuit Diagnosis — 1Removal and Installation — 1Ev Battery System :: 66kwh Li-Ion Battery — 1Description — 4Basic Inspection — 2Dtc Diagnosis — 2Component Parts /circuit Diagnosis — 1Removal and Installation — 1Disassembly and Assembly — 2Service Data — 1Ev Battery System :: 91kwh Li-Ion Battery — 1Description — 4Basic Inspection — 2Dtc Diagnosis — 2Component Parts /circuit Diagnosis — 1Removal and Installation — 1Disassembly and Assembly — 1Service Data — 2Preparation. Vehicle Charging System — 1Vehicle Charging System :: Description — 1Component Parts — 2System — 1Diagnosis System (on-Board Charger) — 1Diagnosis System (dc/dc Converter) — 1Ecu Diagnosis Information — 1Vehicle Charging System — 1Charger/pd Module (on-Board Charger) — 1Cplc (cplc) — 1Dcdc (dc/dc Converter) — 1Component Parts/circuit Diagnosis — 1Symptom Diagnosis — 1Evse Inspection — 1Periodic Maintenance — 1Removal and Installation — 1Disassembly and Assembly — 1Preparation. High Voltage Cooling System — 1Description — 1Symptom Diagnosis. Overheating Cause Analysis — 1Periodic Maintenance — 1Coolant — 1Removal and Installation — 1Radiator — 1Service Data — 1Removal and Installation. Accelerator Control System — 1Reduction Gear: Re1f62a — 1Removal and Installation — 1Transaxle & Transmission :: Electric Shift — 1Description — 3Basic Inspection — 2Dtc Diagnosis — 2Component Parts /circuit Diagnosis — 1Removal and Installation — 1Rear Final Drive: Rn1r62a — 1Removal and Installation — 1Preparation. Front Axle System — 1Symptom Diagnosis. Noise, Vibration and Harshness (nvh) Troubleshooting — 1Periodic Maintenance — 1Removal and Installation — 1Service Data. Front Drive Shaft — 12wd — 14wd — 1Periodic Maintenance — 1Removal and Installation — 1Preparation. Front Suspension System — 1Symptom Diagnosis. Noise, Vibration and Harshness (nvh) Troubleshooting — 1Periodic Maintenance — 1Removal and Installation — 1Service Data — 1Symptom Diagnosis. Noise, Vibration and Harshness (nvh) Troubleshooting — 1Periodic Maintenance — 1Removal and Installation — 1Service Data — 1Preparation. Road Wheels & Tires System — 1Description — 1System — 1Ecu Diagnosis Information. Bcm (body Control Module) — 1Tpms — 1Dtc/circuit Diagnosis — 1Symptom Diagnosis — 1Periodic Maintenance. Road Wheels & Tires — 1Removal and Installation — 1Service Data — 1Preparation. Brake System — 1System Description — 1Component Parts — 1Ecu Diagnosis Information. Electrically-Driven Intelligent Brake Unit — 1Basic Inspection — 1Dtc/circuit Diagnosis — 1Symptom Diagnosis — 1Periodic Maintenance — 1Removal and Installation — 1Service Data — 1Preparation. Parking Brake System — 1System Description — 1Component Parts — 1System — 1Ecu Diagnosis Information. Abs Actuator and Electric Unit (control Unit) — 1Basic Inspection. Diagnosis and Repair Work Flow — 1Component Parts /circuit Diagnosis — 1Symptom Diagnosis — 1Removal and Installation — 1Brake Control System :: With Vdc — 1System Description — 3Basic Inspection — 2Dtc/circuit Diagnosis — 1Symptom Diagnosis — 2Removal and Installation — 1Brake Control System :: Automatic Brake Hold — 1System Description — 3Component Parts /circuit Diagnosis — 1Removal and Installation — 1Brake Control System :: E-Step — 1System Description — 3Removal and Installation — 1System Description — 1Ecu Diagnosis Information — 1Basic Inspection — 1Symptom Diagnosis — 1Rear Automatic Braking — 1System Description — 1Basic Inspection — 1Preparation. Steering System — 1System Description — 1Component Parts — 1Basic Inspection — 1Dtc/circuit Diagnosis — 1Symptom Diagnosis — 1Periodic Maintenance. Steering Wheel — 1Removal and Installation — 1Service Data — 1System Description — 1Component Parts — 1Steering Control System — 1Ecu Diagnosis Information. Power Steering Control Module — 1Dtc/circuit Diagnosis — 1Component Parts /circuit Diagnosis — 1Symptom Diagnosis — 1Removal and Installation. Power Steering Control Module — 1System Description — 1Removal and Installation — 1System Description — 1System — 1Basic Inspection. Diagnosis and Repair Work Flow — 1Dtc/circuit Diagnosis — 1Symptom Diagnosis — 1Component Parts — 1Basic Inspection — 1Removal and Installation — 1System Description — 1System — 1Ecu Diagnosis Information. Air Bag Diagnosis Sensor Unit — 1Basic Inspection — 1Dtc/circuit Diagnosis — 1Symptom Diagnosis — 1System Description. Description. Ventilation System — 1Removal and Installation — 1Preparation. Preparation — 1System Description — 1Basic Inspection — 1Symptom Diagnosis — 1Removal and Installation — 1Electric Compressor — 1Cooler Pipe and Hose — 1A/c Unit Assembly Cover — 1A/c Unit Assembly — 1Heater & Air Conditioning Control System :: Automatic Air Conditioning — 1System Description — 1Ecu Diagnosis Information — 1Basic Inspection — 2Dtc Diagnosis — 1Symptom Diagnosis — 1Removal and Installation — 2Preparation. Preparation — 1Symptom Diagnosis. Squeak and Rattle Trouble Diagnoses — 1Removal and Installation — 1Preparation. Instrument Panel — 1Component Parts — 1System — 1Ecu Diagnosis Information. Flexible Center Storage Control Module — 1Basic Inspection. Diagnosis and Repair Work Flow — 1Dtc/circuit Diagnosis — 1Symptom Diagnosis — 1Removal and Installation — 1Preparation. Preparation — 1Component Parts — 1System — 1Ecu Diagnosis Information. Driver Lumbar Support Control Module — 1Basic Inspection. Diagnosis and Repair Work Flow — 1Dtc/circuit Diagnosis — 1Symptom Diagnosis — 1Removal and Installation — 1System Description — 1System — 1Ecu Diagnosis Information — 1Basic Inspection — 1Dtc/circuit Diagnosis — 1Symptom Diagnosis — 1Manual Function Does Not Operate — 1Memory Function Does Not Operate — 1Removal and Installation — 1Preparation. Preparation — 1System Description — 1System (intelligent Key System) — 1Diagnosis System (bcm) — 1Ecu Diagnosis Information — 1Basic Inspection — 1Dtc/circuit Diagnosis — 1U2141-87 Can Comm Circuit — 1Power Supply and Ground Circuit — 1Symptom Diagnosis — 1Automatic Back Door Operation Does Not Operate — 1Back Door Does Not Open — 1Door Does Not Lock/unlock with Door Lock and Unlock Switch — 1Removal and Installation — 1Hood — 1Radiator Core Support — 1Charge Port Lid — 1Front Fender — 1Front Door — 1Rear Door — 1Back Door — 1Hood Lock — 1Front Door Lock — 1Rear Door Lock — 1Back Door Lock — 1Outside Key Antenna — 1System Description — 1System — 1Ecu Diagnosis Information. Inverter (front), Inverter (rear), Bcm, Intelligent Key Unit — 1Basic Inspection — 1Dtc/circuit Diagnosis — 1Symptom Diagnosis — 1Preparation — 1Symptom Diagnosis. Squeak and Rattle Trouble Diagnoses — 1Removal and Installation — 1System Description — 1Ecu Diagnosis Information — 1Basic Inspection — 1Dtc/circuit Diagnosis — 1Power Supply and Ground Circuit — 1Symptom Diagnosis — 1Front Passenger Side Power Window Does Not Operate — 1Rear Lh Side Power Window Does Not Operate — 1Rear Rh Side Power Window Does Not Operate — 1Removal and Installation. Power Window Main Switch — 1Preparation. Preparation — 1System Description — 1Ecu Diagnosis Information — 1Basic Inspection — 1Dtc/circuit Diagnosis — 1Power Supply and Ground Circuit — 1Sunroof Switch Assembly — 1Symptom Diagnosis — 1Auto Operation Does Not Operate — 1Removal and Installation — 1Preparation — 1Description — 1Symptom Diagnosis. Squeak and Rattle Trouble Diagnoses — 1Removal and Installation — 1Service Information — 6Repair Information — 1Precaution — 1Preparation — 1Removal and Installation — 1Service Data — 1Preparation. Preparation — 1Component Parts — 1System — 1Ecu Diagnosis Information — 1Wiring Diagram. Door Mirror — 1Basic Inspection. Diagnosis and Repair Work Flow — 1Dtc/circuit Diagnosis — 1Power Supply and Ground Circuit — 1Symptom Diagnosis — 1Removal and Installation — 1Exterior Lighting System :: Led Headlamp — 1System Description — 3Basic Inspection — 1Dtc/circuit Diagnosis — 1Symptom Diagnosis — 1Periodic Maintenance — 1Removal and Installation — 1System Description — 1System — 1Diagnosis System (bcm) — 1Ecu Diagnosis Information. Bcm, Intelligent Key Unit — 1Basic Inspection. Diagnosis and Repair Work Flow — 1Dtc/circuit Diagnosis — 1Symptom Diagnosis. Interior Lighting System Symptom — 1Removal and Installation — 1Service Data. Bulb Specifications — 1System Description — 1System — 1Ecu Diagnosis Information. Bcm, Ipdm E/r — 1Basic Inspection. Diagnosis and Repair Work Flow — 1Dtc/circuit Diagnosis — 1Symptom Diagnosis — 1Removal and Installation — 1System Description — 1Ecu Diagnosis Information. Bcm — 1Basic Inspection. Diagnosis and Repair Work Flow — 1Dtc/circuit Diagnosis — 1Symptom Diagnosis — 1Removal and Installation — 1Preparation. Preparation — 1Removal and Installation. Horn — 1Preparation. Commercial Service Tools Or/and Repair Part — 1System Description — 1Component Parts — 1Ecu Diagnosis Information. Approaching Vehicle Sound for Pedestrians (vsp) Control Unit — 1Approaching Vehicle Sound for Pedestrians (vsp) — 1Vsp [approaching Vehicle Sound for Pedestrians (vsp) Control Unit] — 1Approaching Vehicle Sound for Pedestrians (vsp) System — 1Removal and Installation — 1Removal and Installation — 1Wireless Charger — 1System Description — 1Basic Inspection — 1Dtc/circuit Diagnosis — 1Removal and Installation — 1Component Parts — 1System — 1Diagnosis System (bcm) — 1Ecu Diagnosis Information. Bcm — 1Basic Inspection — 1Dtc/circuit Diagnosis — 1Symptom Diagnosis — 1Removal and Installation — 1Can Fundamental — 1Description — 1Trouble Diagnosis — 1Can (controller Area Network) — 1Description — 1
20steps
~120min
5/5difficulty
Done 0 of 20
  • Diagnosis and Repair Work Flow
  • Additional Service When Replacing Bcm
  • Tire Pressure Sensor Id Registration

Diagnosis and Repair Work Flow Nissan Ariya first Gen

Work Flow

OVERALL SEQUENCE

DETAILED FLOW

INTERVIEW FROM THE CUSTOMER

Clarify customer complaints before inspection. To do so, reproduce the symptom before hand and fully understand it. Then interview the customer thoroughly. Check the symptoms by driving Nissan Ariya vehicle with the customer, if necessary.

>>

GO TO 2.

CHECK TIRE PRESSURE WARNING LAMP FUNCTION

Check that tire pressure warning lamp in combination meter.

Tire pressure warning lamp turn ON?

YES>>

GO TO 3.

NO>>

GO TO 6.

CHECK TIRE PRESSURE

Check the tire pressure of all wheels. Refer to Tire Air Pressure.

Is the inspection standard value?

YES>>

GO TO 6.

NO>>

GO TO 4.

ADJUST TIRE PRESSURE

  1. Check and adjust the tire pressure for all wheels specified to the value. Refer to Tire Air Pressure.

  2. Drive the Nissan Ariya vehicle at 40 km/h or more reaches 10 minuets in total.

Tire pressure warning lamp turn OFF?

YES>>

GO TO 5.

NO>>

GO TO 6.

CHECK AIR LEAK

Using soapsuds etc., check air leak.

Is air leak detected?

YES>>

Repair or replace error-detected parts. Replace the valve. Perform tire pressure sensor ID registration. Refer to Description.

NO>>

INSPECTION END

PERFORM SELF-DIAGNOSIS

With CONSULT

Perform “Self Diagnostic Result” for “AIR PRESSURE MONITOR” of “BCM”.

Is DTC detected?

YES>>

Record or print self-diagnosis results and freeze frame data (FFD). GO TO 8.

NO>>

GO TO 7.

CONFIRM THE SYMPTOM

Perform symptom diagnosis. Refer to Symptom Table.

>>

Repair or replace error-detected parts. GO TO 10.

PERFORM CONFIRMATION PROCEDURE

With CONSULT

Perform Confirmation Procedure for the detected DTC, and then check that DTC is detected again.

Is DTC detected?

YES>>

GO TO 9.

NO>>

Check harness and connectors based on the information obtained by interview. Refer to Intermittent Incident.

DIAGNOSIS PROCEDURE

Perform DTC Diagnosis Procedure.

>>

Repair or replace error-detected parts. GO TO 10 .

FINAL CHECK

Recheck the symptom and check that the symptom is not reproduced on the same conditions.

Is the symptom reproduced?

YES>>

GO TO 2.

NO>>

INSTPECTION END

Additional Service When Replacing Bcm Nissan Ariya first Gen

Work Procedure

ADDITIONAL SERVICE WHEN REPLACING BCM

Perform additional service when replacing BCM. Refer to Description.

>>

GO TO 2.

PERFORM TIRE PRESSURE SENSOR ID REGISTRATION

Perform tire pressure sensor ID registration. Refer to Description.

>>

WORK END

Tire Pressure Sensor Id Registration Nissan Ariya 1st generation

Description

This procedure must be performed.

  • After replacement of a tire pressure sensor or BCM.

  • After replacement of tire or road wheel.

  • After performing tire rotation.

Work Procedure

TPMS REGISTRATION WITH TIRE PRESSURE SENSOR ACTIVATION TOOL (J-45295-A)

With CONSULT

  1. Turn the ignition switch ON.

  2. Select “WORK SUPPORT” in AIR PRESSURE MONITOR. Then, select “ID REGIST.”

  3. Touch “Start” on “ID REGIST” screen.

  4. Hold the tire pressure sensor activation tool (J-45295-A) (A) against the side of the left front tire, near the valve.
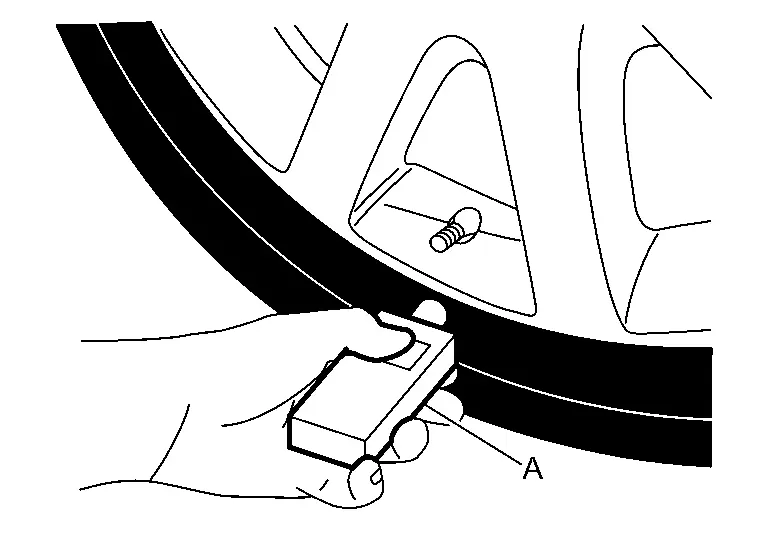
  5. With the tool held at a 0 to 15 degree angle to the tire, press and hold the tire pressure sensor activation tool button until the indicator lamp turns OFF (approximately 5 seconds).

  6. Repeat steps 4 and 5 for the remaining tires in this order: right front, right rear and left rear.

  7. When ID registration is complete, check the following pattern at each wheel.

    SequenceID registration positionTurn signal lampCONSULT
    1 Front LH 2 blinks

    “Yet (red)”

    ↓

    “Done (green)”
    2 Front RH
    3 Rear RH
    4 Rear LH
  8. After the ID registration procedure for all wheels is complete, press “End” on the CONSULT to finish ID registration.

TPMS REGISTRATION WITH SIGNAL TECH II TOOL (J-50190)

With CONSULT

  1. Adjust the tire pressure for all tires to the recommended value. Refer to Tire Air Pressure.

  2. Turn the ignition switch ON.

  3. Using CONSULT, select “WORK SUPPORT” in AIR PRESSURE MONITOR. Then, select “ID REGIST.”

  4. Select “Start” on “ID REGIST” screen.

  5. Turn on the Signal Tech II tool (J-50190).

  6. Hold the Signal Tech II against the side of the left front tire, near the valve.

  7. With the tool held at a 0 to 15 degree angle to the tire, select “Activate Sensor” from the main menu, then press and release the “OK” button to activate the sensor. Once the sensor is activated, the Nissan Ariya vehicle parking lamps will flash and the sensor ID will appear on the CONSULT screen.

  8. Repeat steps 6 and 7 for the remaining tires in this order: right front, right rear and left rear.

  9. When ID registration is complete, check the following pattern at each wheel.

    SequenceID registration positionTurn signal lampCONSULT
    1 Front LH 2 blinks

    “Yet (red)”

    ↓

    “Done (green)”
    2 Front RH
    3 Rear RH
    4 Rear LH
  10. Once all sensors have been activated, select “End” on the CONSULT to finish ID registration.