Disassembly and Assembly
- Li-Ion Battery Heater. 2wd
- Battery Pack Upper Case
- Battery Pack Lower Case. 2wd
- Service Plug Bracket
- Li-Ion Battery Controller
- Busbar
- Battery Junction Box and Battery Harness
- Front Module Stack
- Rear Module Stack
Li-Ion Battery Heater. 2wd Nissan Ariya 1st generation
Exploded View
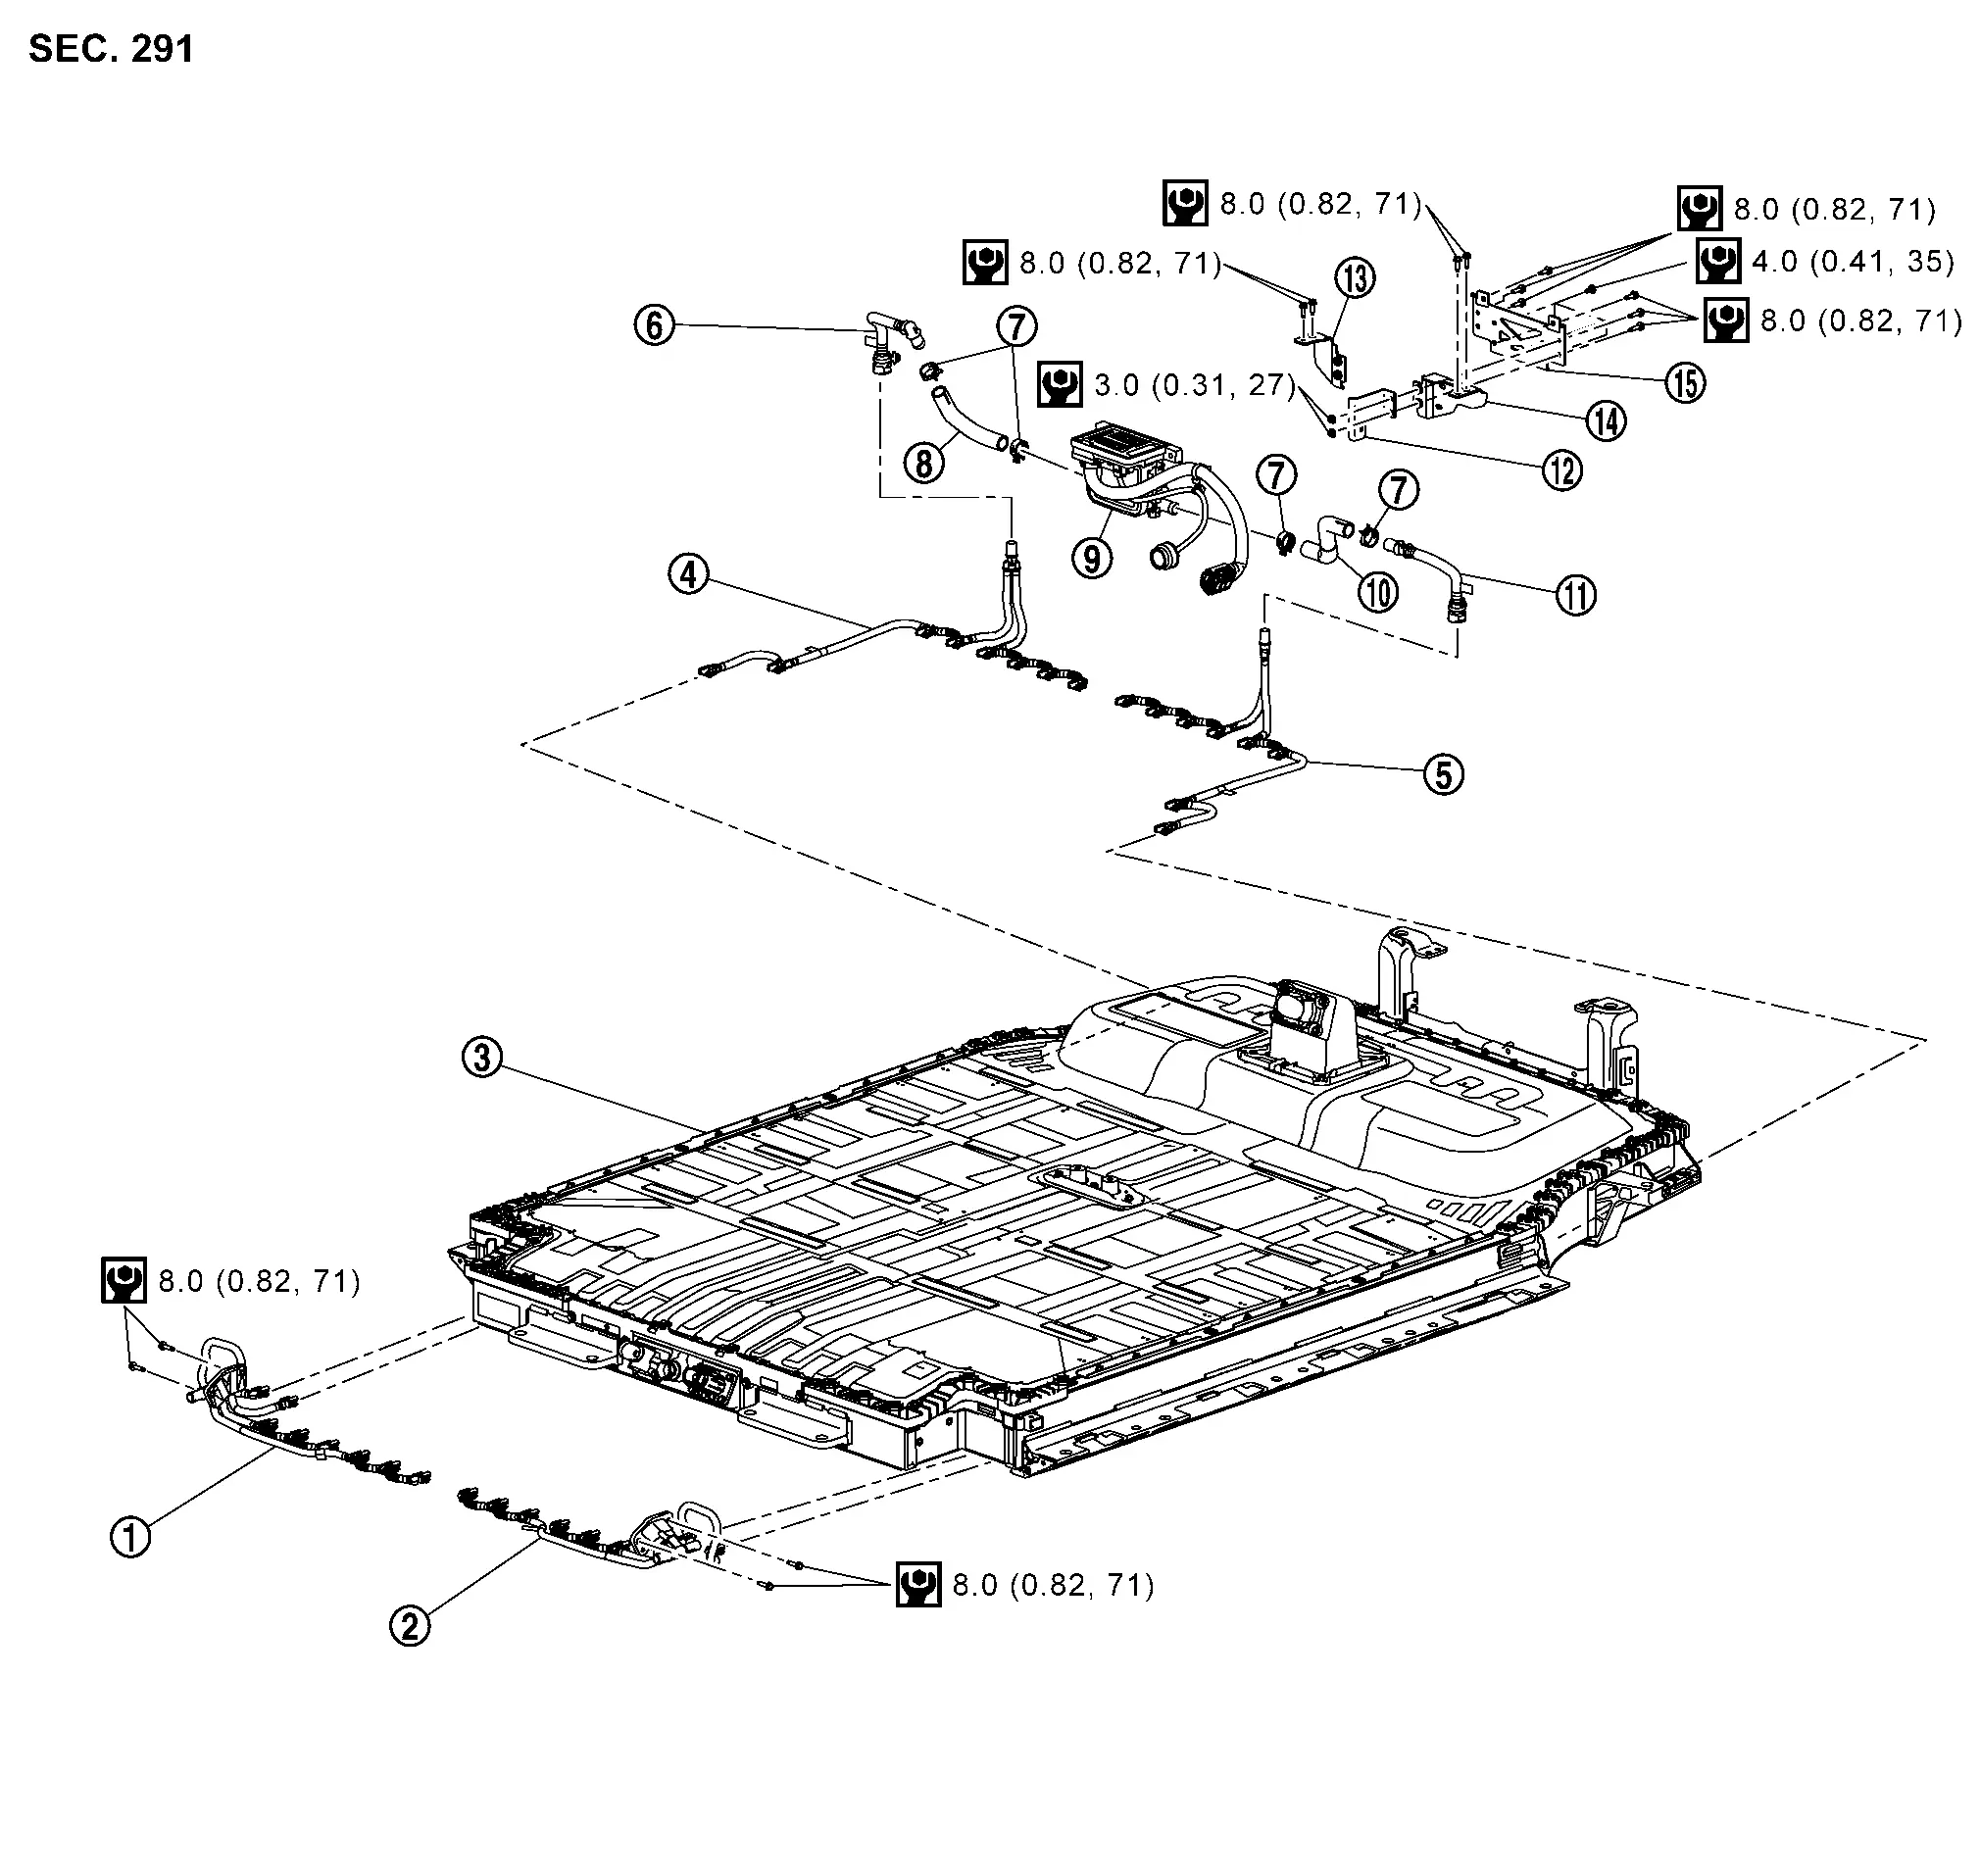
 |
Li-ion battery cooler tube (front right) |  |
Li-ion battery cooler tube (front left) |  |
Li-ion battery |
 |
Li-ion battery cooler tube (rear right) |  |
Li-ion battery cooler tube (rear left) |  |
Li-ion battery cooler tube (rear right) upper |
 |
Clamp |  |
Li-ion battery cooler hose (right) |  |
Battery heater |
 |
Li-ion battery cooler hose (left) |  |
Li-ion battery cooler tube (rear left) upper |  |
Battery heater bracket 1 |
 |
Battery heater bracket 3 |  |
Battery heater bracket 2 |  |
Battery heater bracket 4 |
 |
: N·m (kg-m, in-lb) | ||||
 |
: N·m (kg-m, ft-lb) |
Disassembly & Assembly
DANGER: Because hybrid vehicles and electric vehicles contain a high voltage battery, there is a risk of electric shock, electric leakage, or similar accidents if the Nissan Ariya vehicle is handled incorrectly. Be sure to follow the correct work procedures when performing inspection and maintenance.
DISASSEMBLY
LI-ION BATTERY COOLER TUBE (FRONT)
Remove Li-ion battery. Refer to Removal & Installation.
If necessary, remove Li-ion battery cooler tubes (front right and front left).
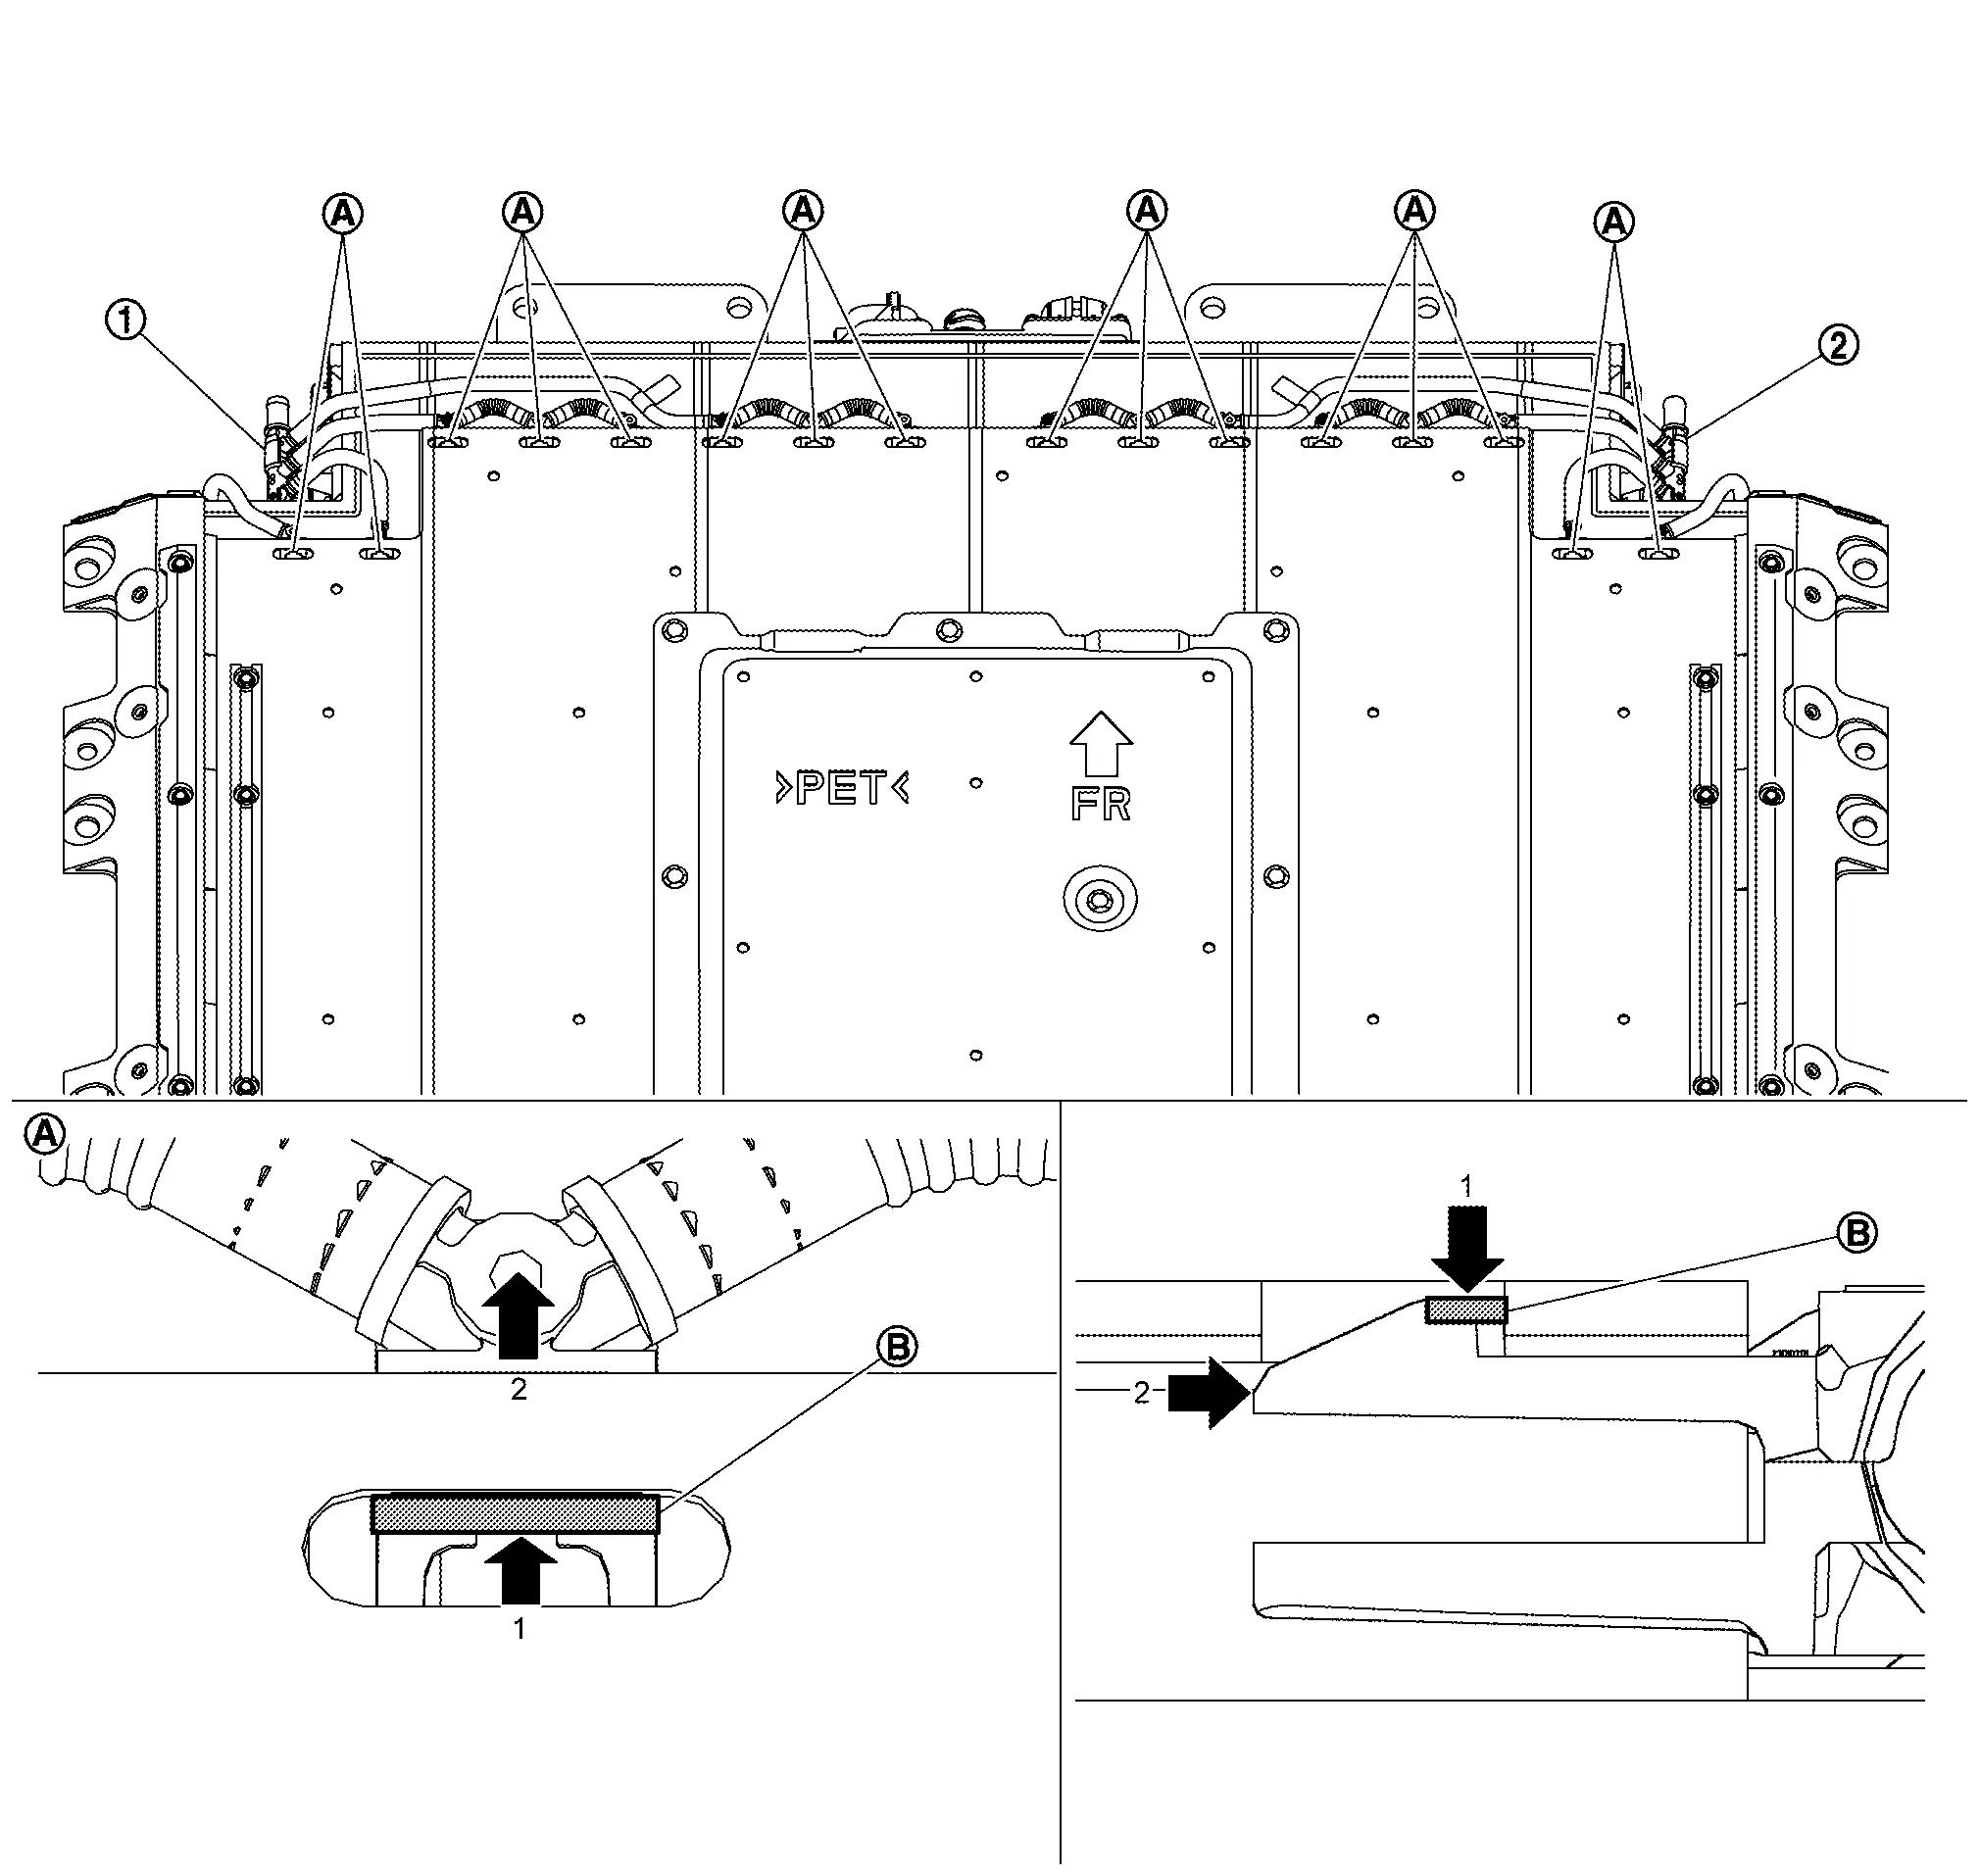
Push claws
 of connector on Li-ion battery cooler tubes (front right and front left)
 and remove from the Li-ion battery until all connectors are half-locked.
Remove mounting bolts of Li-ion battery cooler tubes (front right
and front left ).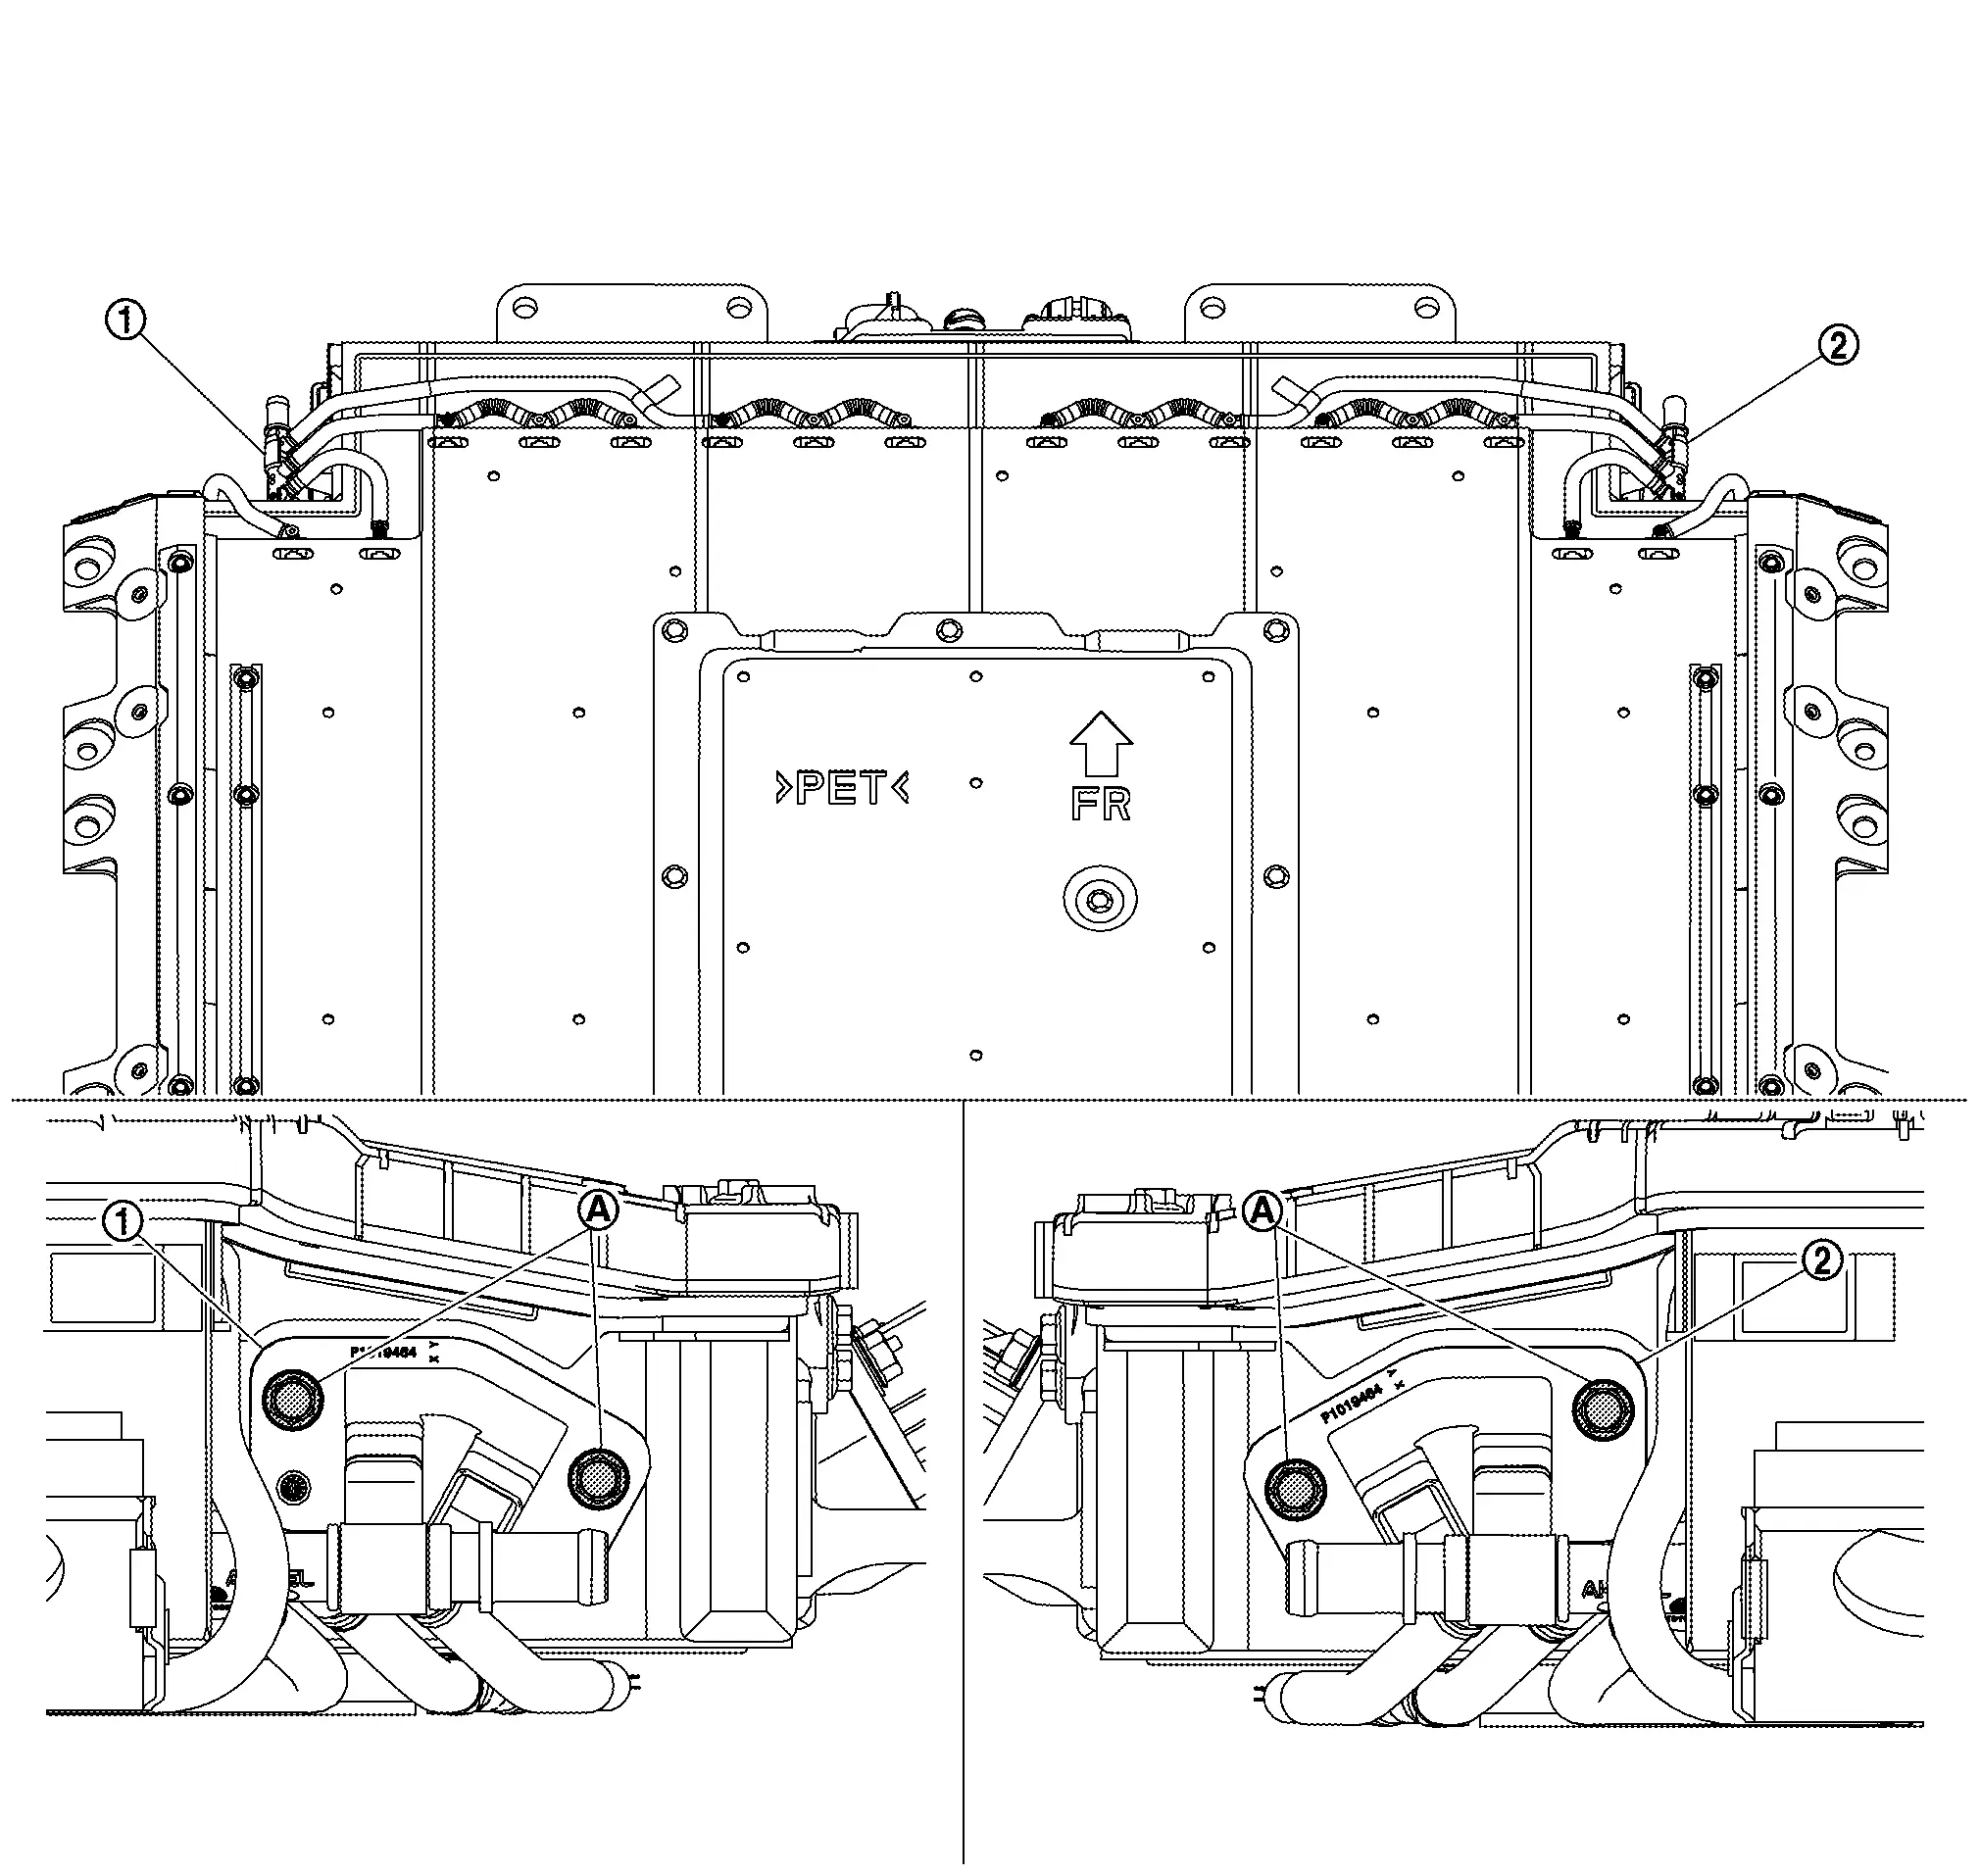
Remove Li-ion battery cooler tubes (front right and front left) from Li-ion battery.
LI-ION BATTERY COOLER TUBE (REAR)
Remove Li-ion battery. Refer to Removal & Installation.
If necessary, remove Li-ion battery cooler tubes (rear right and rear left).
Remove Li-ion battery cooler tubes (rear right and rear left) from Li-ion battery cooler tube (rear right and rear left) uppers, respectively.
Push claws
of connector on Li-ion battery cooler tubes (rear right and rear left) and remove from Li-ion battery until all connectors are half-locked.
Remove Li-ion battery cooler tubes (rear right and rear left) from Li-ion battery.
BATTERY HEATER
If necessary, remove Li-ion battery. Refer to Removal & Installation.
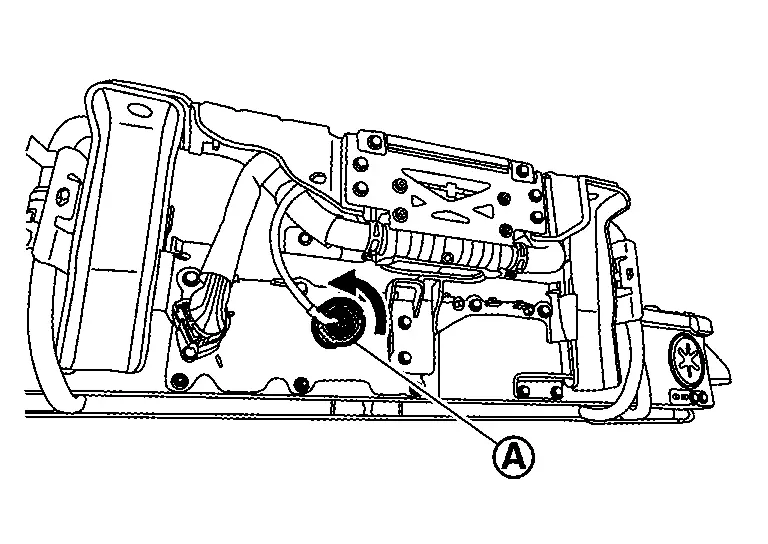
Remove high voltage harness connector .
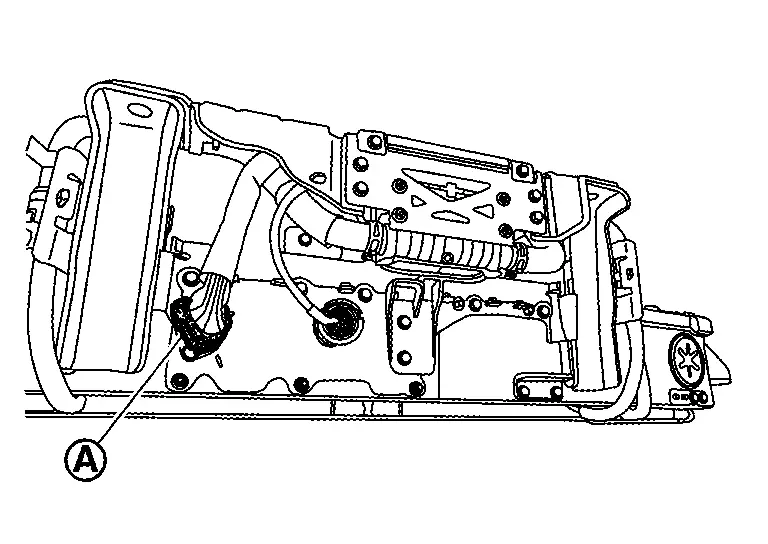
- There is the danger of electric shock caused by contact with the terminals. Be sure to wear insulated protective gear.


- Because there is the danger of electric shock, immediately insulate disconnected high voltage connectors and terminals with insulating tape.
Remove harness connector by turning in the direction of arrow.
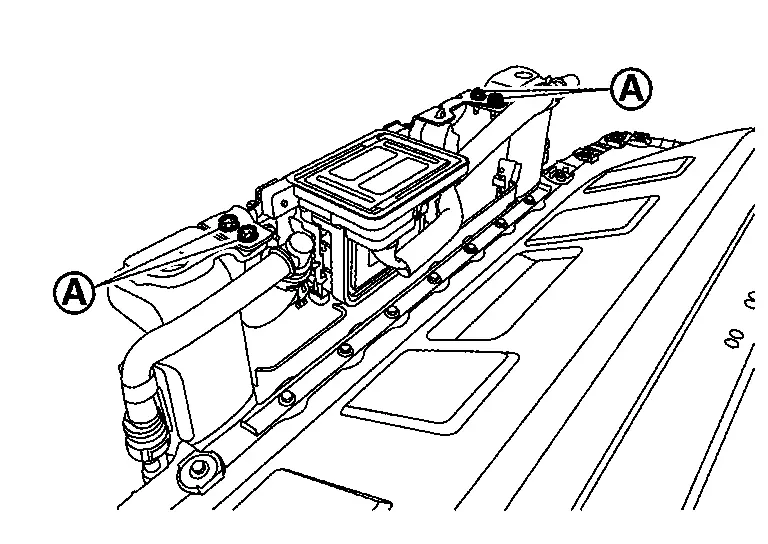
Remove battery heater bracket mounting bolts .
Remove battery heater sides only of Li-ion battery heater hose {left and right }
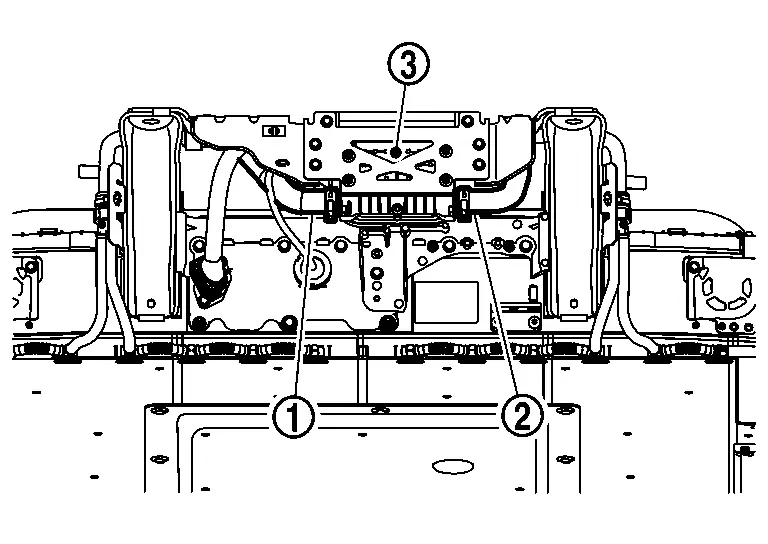
|
:battery heater bracket 4 |
Remove battery heater bracket 1 mounting nuts , and then remove battery heater bracket 1 from battery heater bracket 2 .
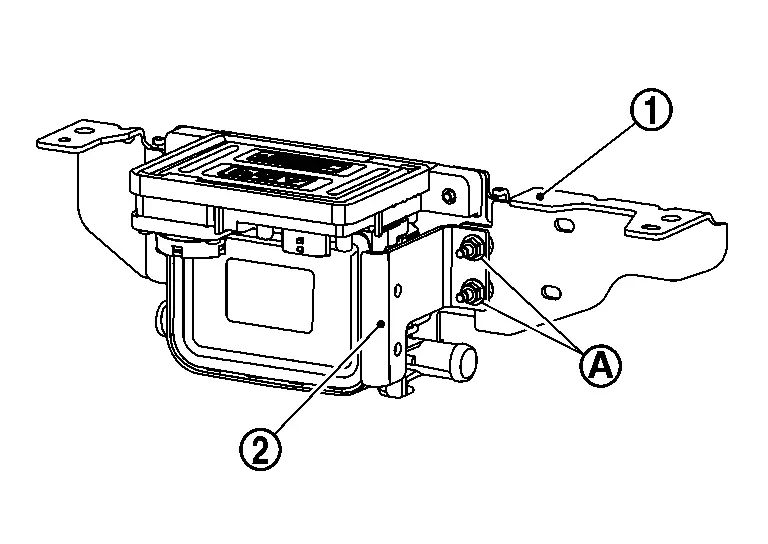
Remove harness clamp parts

Remove mounting bolts of battery heater brackets 2 and 3, and then remove battery heater brackets 2 and 3 from battery heater bracket 4 .
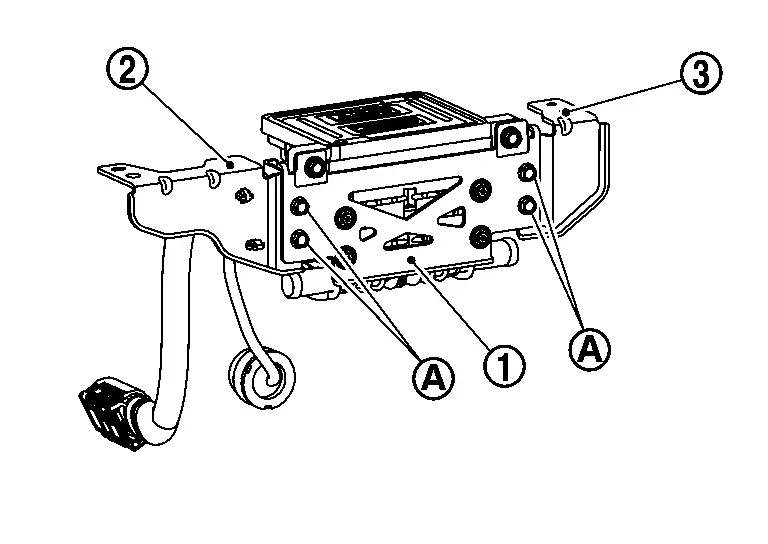
Remove mounting bolts of battery heater bracket 4, and then remove battery heater bracket 4 from battery heater .

If necessary, remove Li-ion battery cooler tubes {rear right upper and rear left upper } , and Li-ion battery cooler hoses {right and left }.
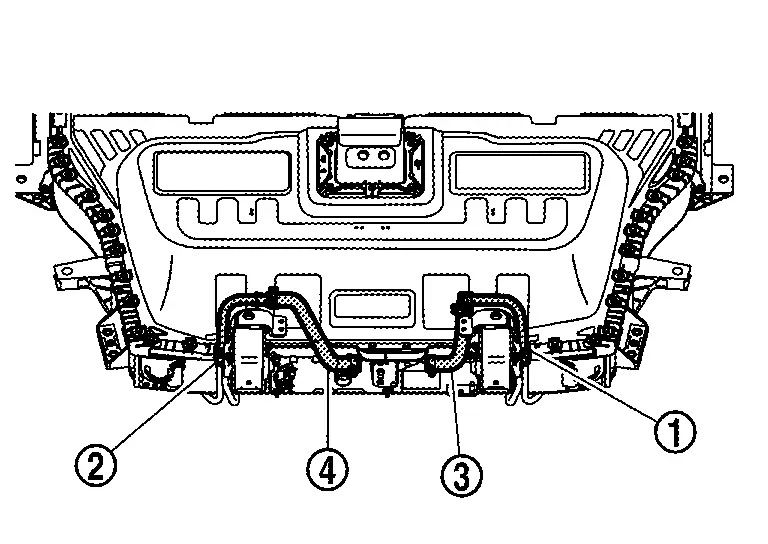
ASSEMBLY
Assemble in the reverse order of disassembly, and pay attention to the following caution.
Battery Pack Upper Case Nissan Ariya: FE0
Exploded View

|
Resin retainer | |
Resin retainer | |
Resin retainer |
|
Retainer | |
Resin retainer | |
Resin retainer |
|
Resin retainer | |
Retainer | |
Resin retainer |
|
Resin retainer | |
Resin retainer | |
Retainer |
|
Retainer | |
Service plug retainer | |
Battery pack upper case |
 |
Seal |  |
Battery pack lower case |  |
Service plug |
|
: Comply with the assembly procedure when tightening. Refer to Removal & Installation. | ||||
 |
: Nissan Ariya Vehicle front | ||||
 |
: Always replace after every disassembly. | ||||
|
: N·m (kg-m, in-lb) | ||||
 ,  ,  ,  ,  ,  ,  ,  : Indicates that the part is connected at points with same symbol in actual Nissan Ariya vehicle. |
|||||
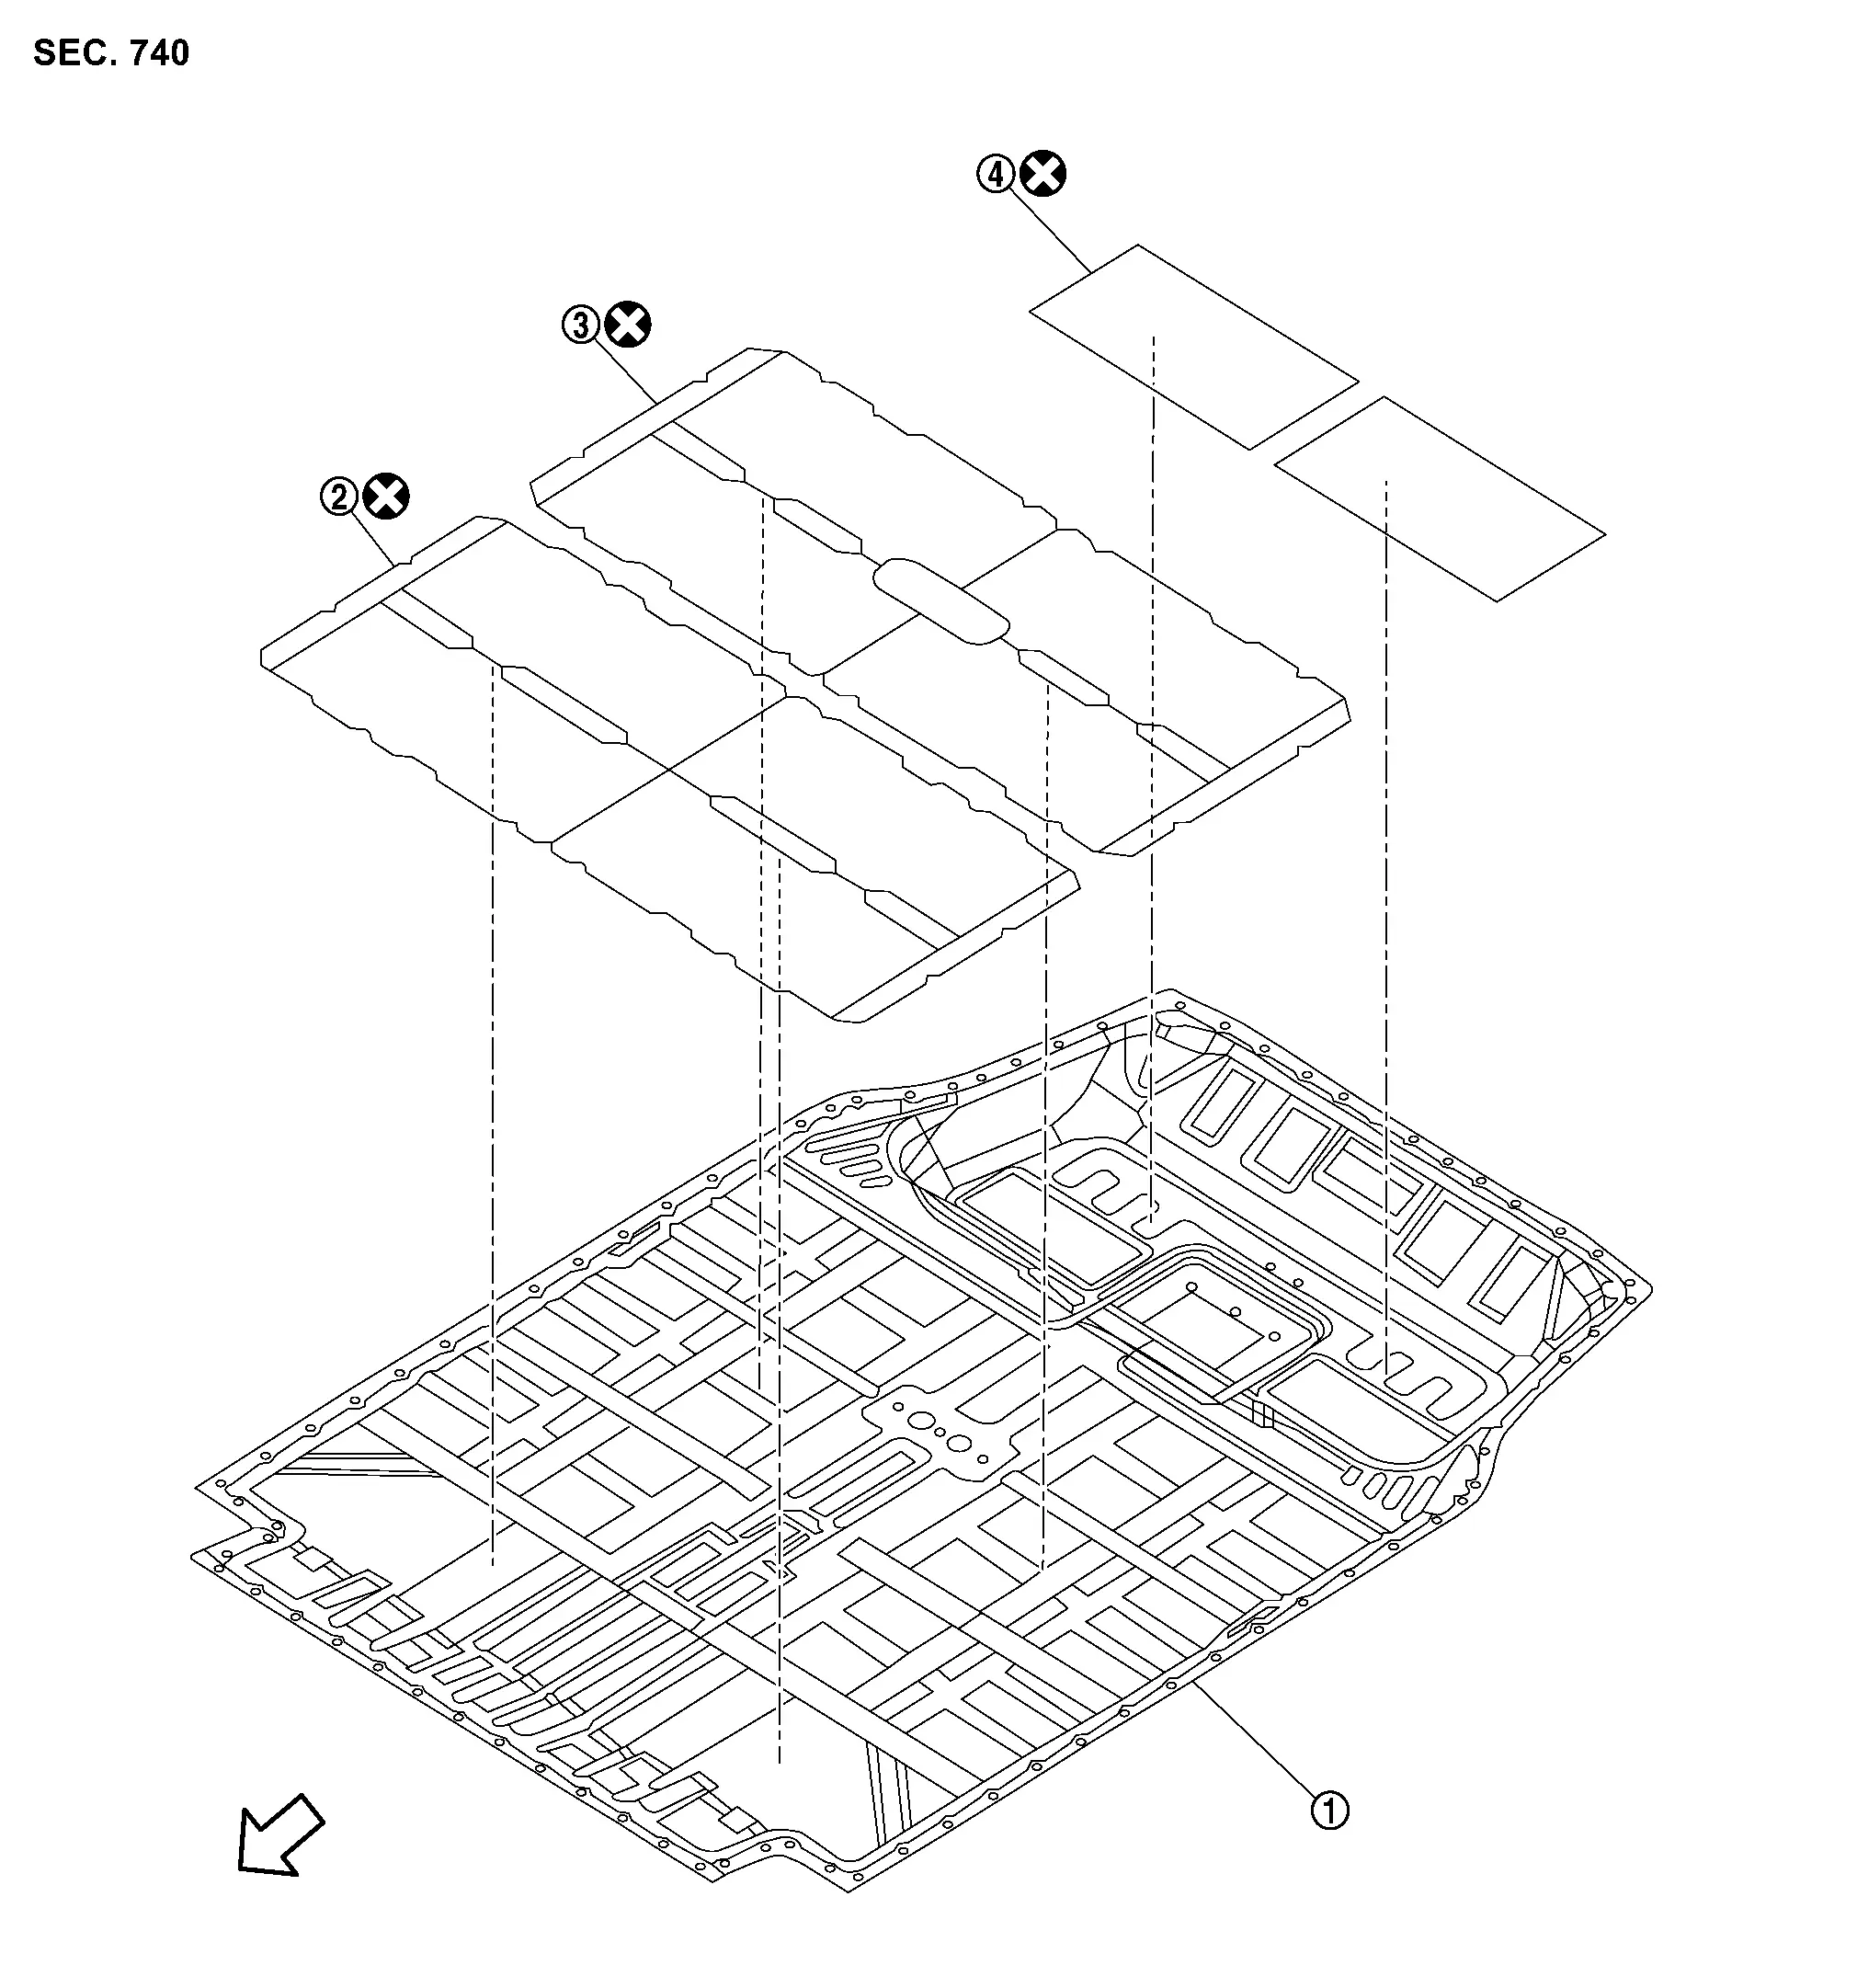
|
Battery pack upper case | |
Heat shield sheet | |
Heat shield sheet |
|
Heat shield sheet | ||||
|
: Nissan Ariya Vehicle front | ||||
|
: Always replace after every disassembly |
Removal & Installation
DANGER:Since hybrid vehicles and electric vehicles contain a high voltage battery, there is the risk of electric shock, electric leakage, or similar accidents if the high voltage component and Nissan Ariya vehicle are handled incorrectly. Be sure to follow the correct work procedures when performing inspection and maintenance.
ENVIRONMENT FOR LI-ION BATTERY DISASSEMBLY WORK
Must be an indoor environment.
The environment must utilize a shutter or other means to shut out the outside environment and prevent rain, snow, dust, or other substances from entering.
The environment must not cause the intrusion of sweat during work, or cause condensation to occur due to high temperature or humidity.
Metal powder, grease, and other foreign substances must not enter.
The indoor environment must also prevent metal powder, grease, and other foreign substances from entering due to maintenance performed on other Nissan Ariya vehicles and other sources during disassembly work.
During disassembly without internal work, temporarily close the battery pack upper case or cover it with an insulating cover.
The floor must be dry.
The floor must not be wet as a result of factors such as Nissan Ariya vehicle entry during rain or snow.
Work space
The work space must be approximately the size of one entire Nissan Ariya vehicle.
Take appropriate countermeasures so that persons other than the operator do not enter the work space, such as by placing signs indicating that disassembly work is in progress.
Standard fire fighting equipment
Always place a standard fire fighting equipment in the disassembly work area.
Depending on type of fire (Nissan Ariya vehicle or battery) use standard fire fighting equipment (water or extinguisher).
REMOVAL
Remove tightening bolts of battery heater bracket from battery pack lower case.

Remove left and right retainers.
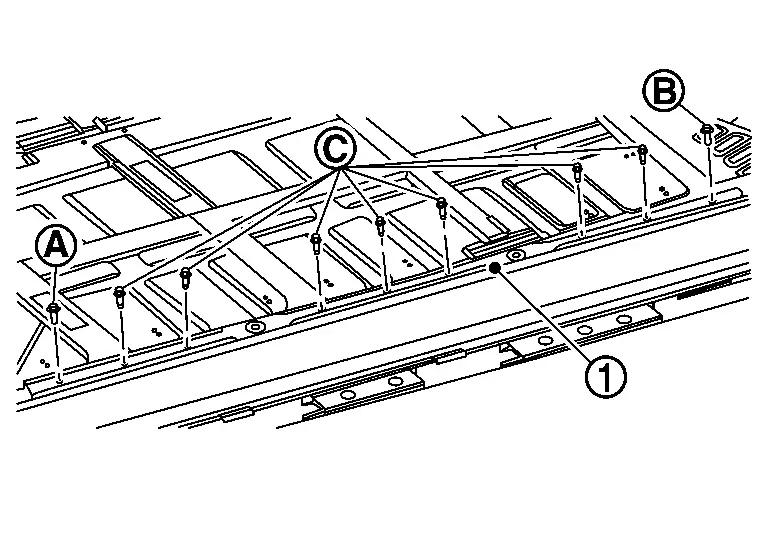
Remove left and right resin retainers in the order of 3→2→1

|
: Nissan Ariya Vehicle |
Remove retainer .
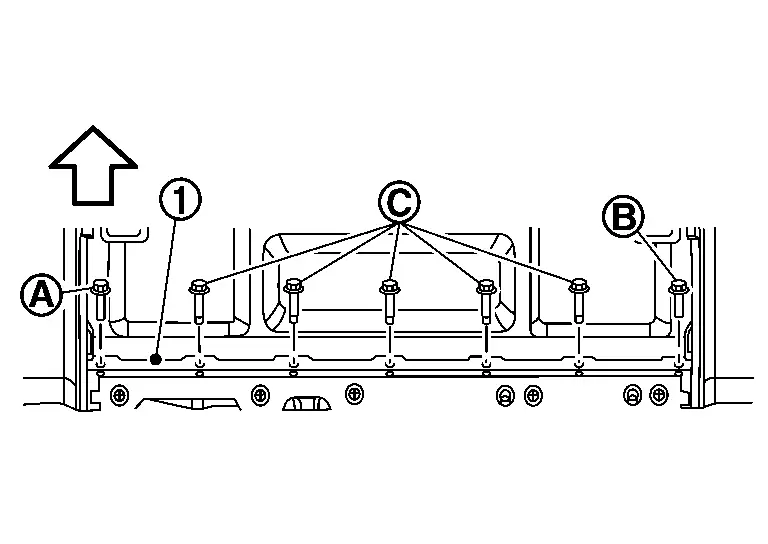
|
: Nissan Ariya Vehicle |
Remove resin retainers in the order of 3→2→1.
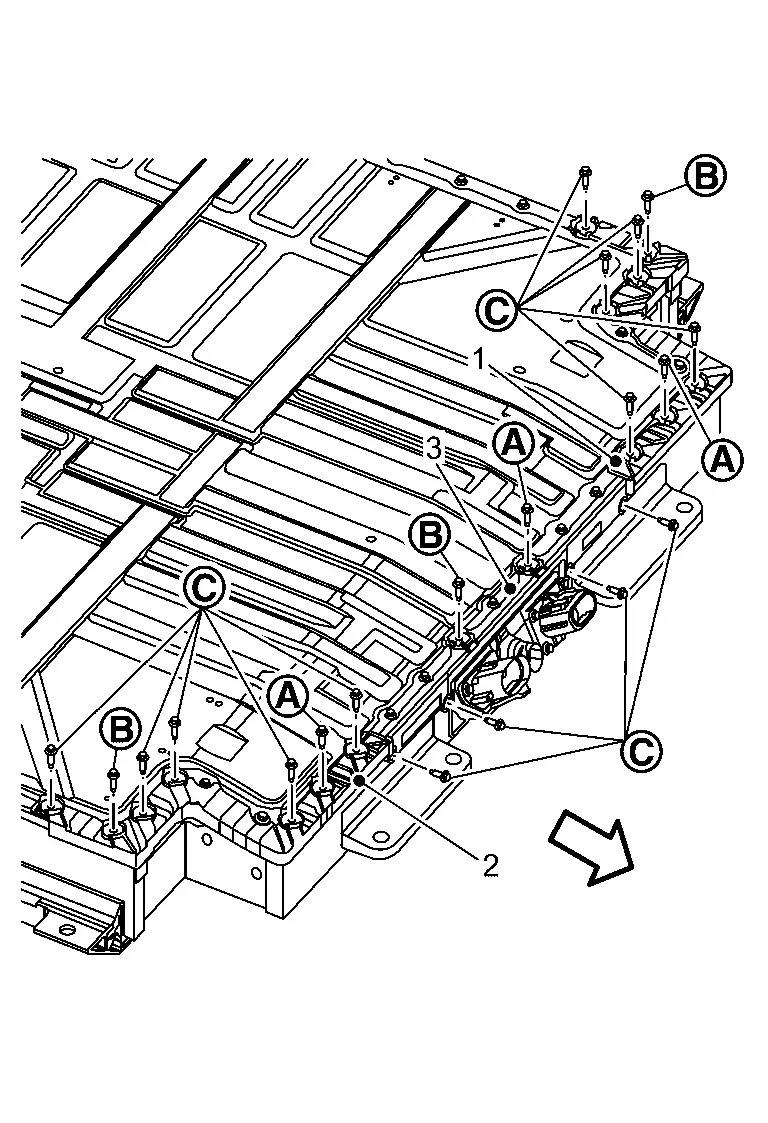
|
: Nissan Ariya Vehicle |
Remove retainer .
|
: Nissan Ariya Vehicle |
Remove service retainer .

|
: Nissan Ariya Vehicle |
Remove bolt .
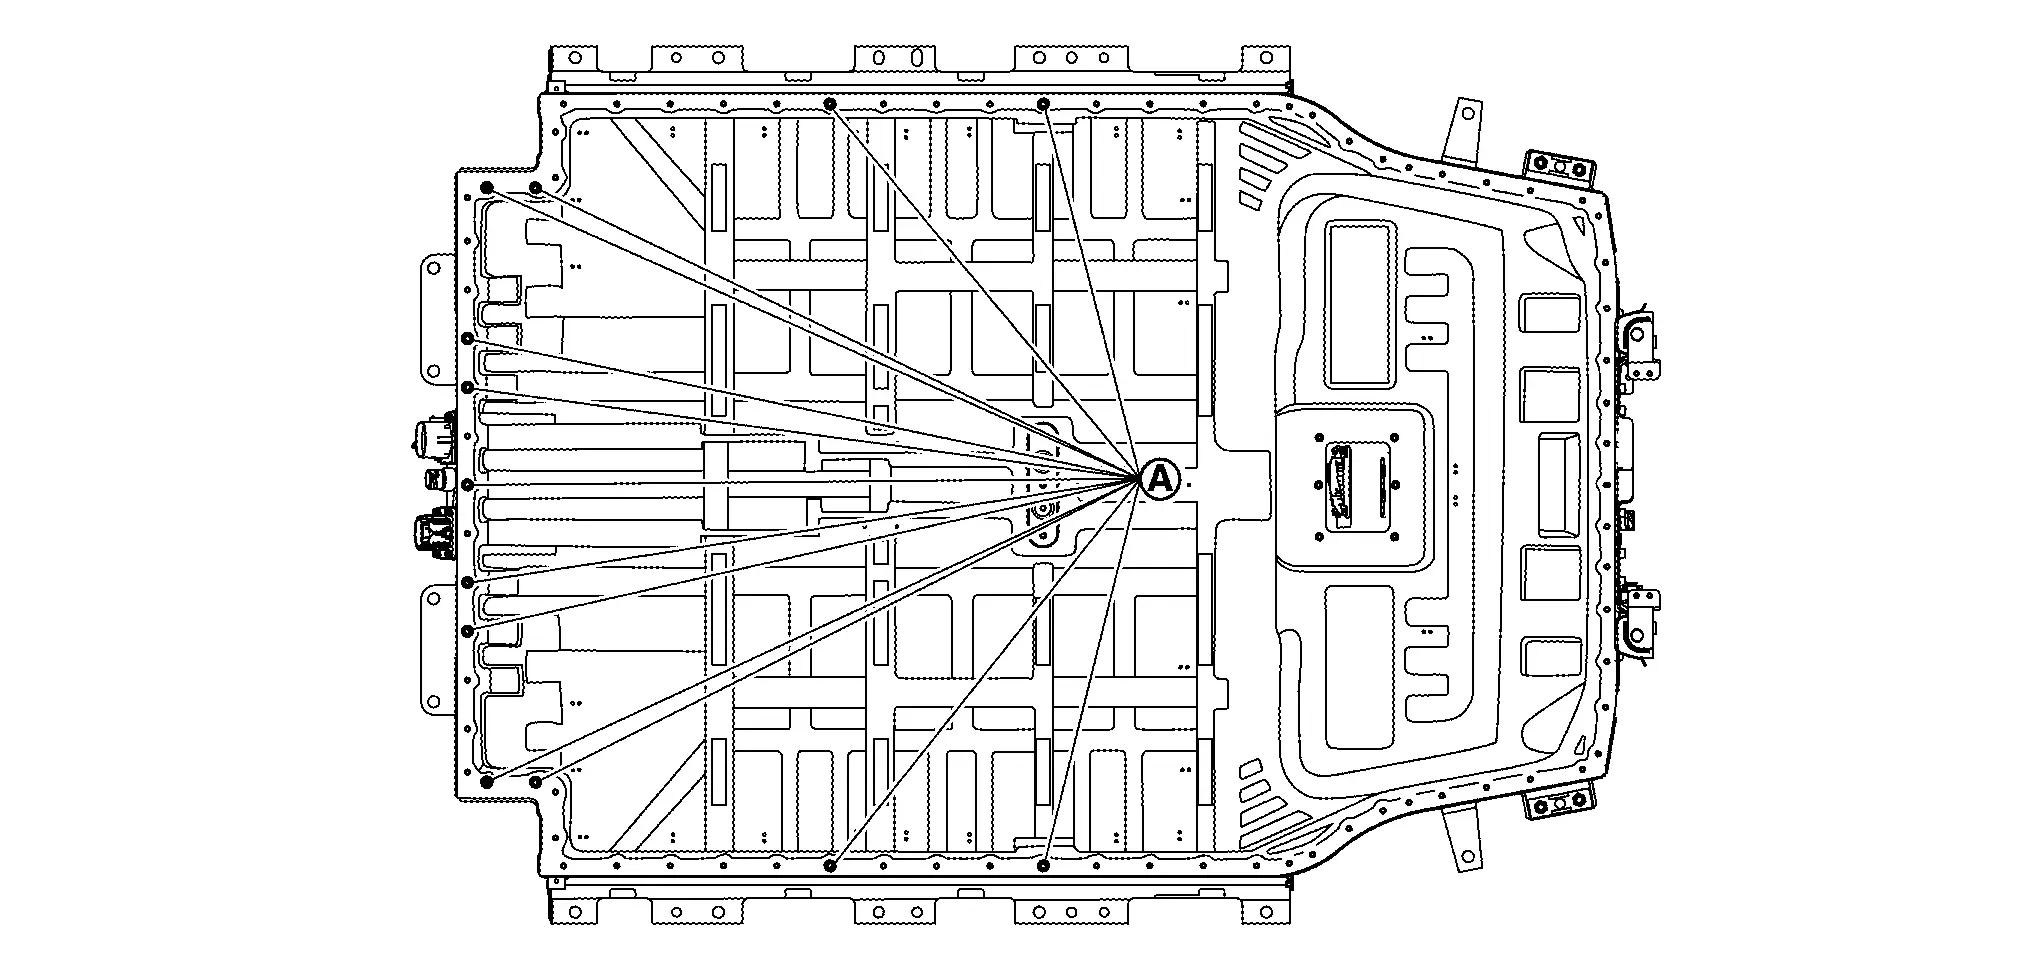
Hold both sides of the battery pack upper case to remove it.
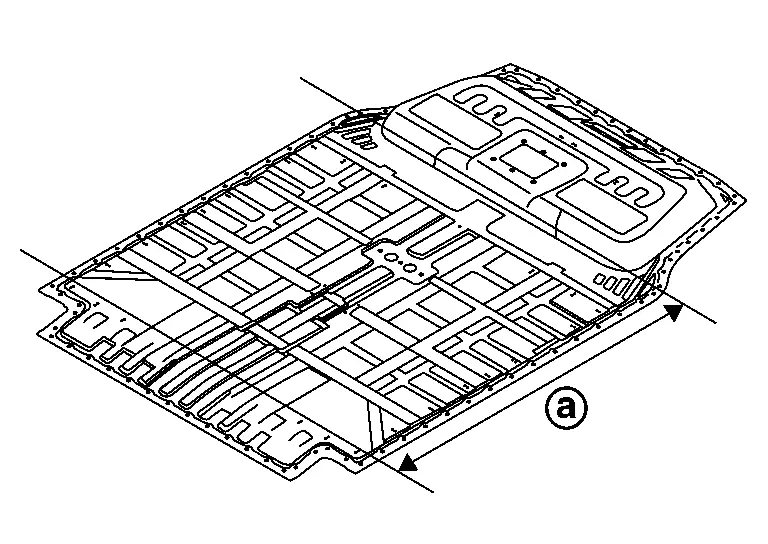
Remove seal from battery pack lower case.
INSTALLATION
Check that heat shield sheet is still stuck back of battery upper case.
When the sheet is peeled or battery pack upper case is replaced, stick new heat shield sheet according to the following procedure.
For the battery pack upper case, warm the surface where the heat shield sheet are stuck for at least 5 minutes so that the entire surface is at least 15 ℃ (59 °F).
Remove the release paper from the heat shield sheet, and then heat the side stuck to battery pack upper case for at least 1 minute so that its temperature is 15 ℃ (59 °F)or higher.
, , to the battery pack upper case as shown in the figure. 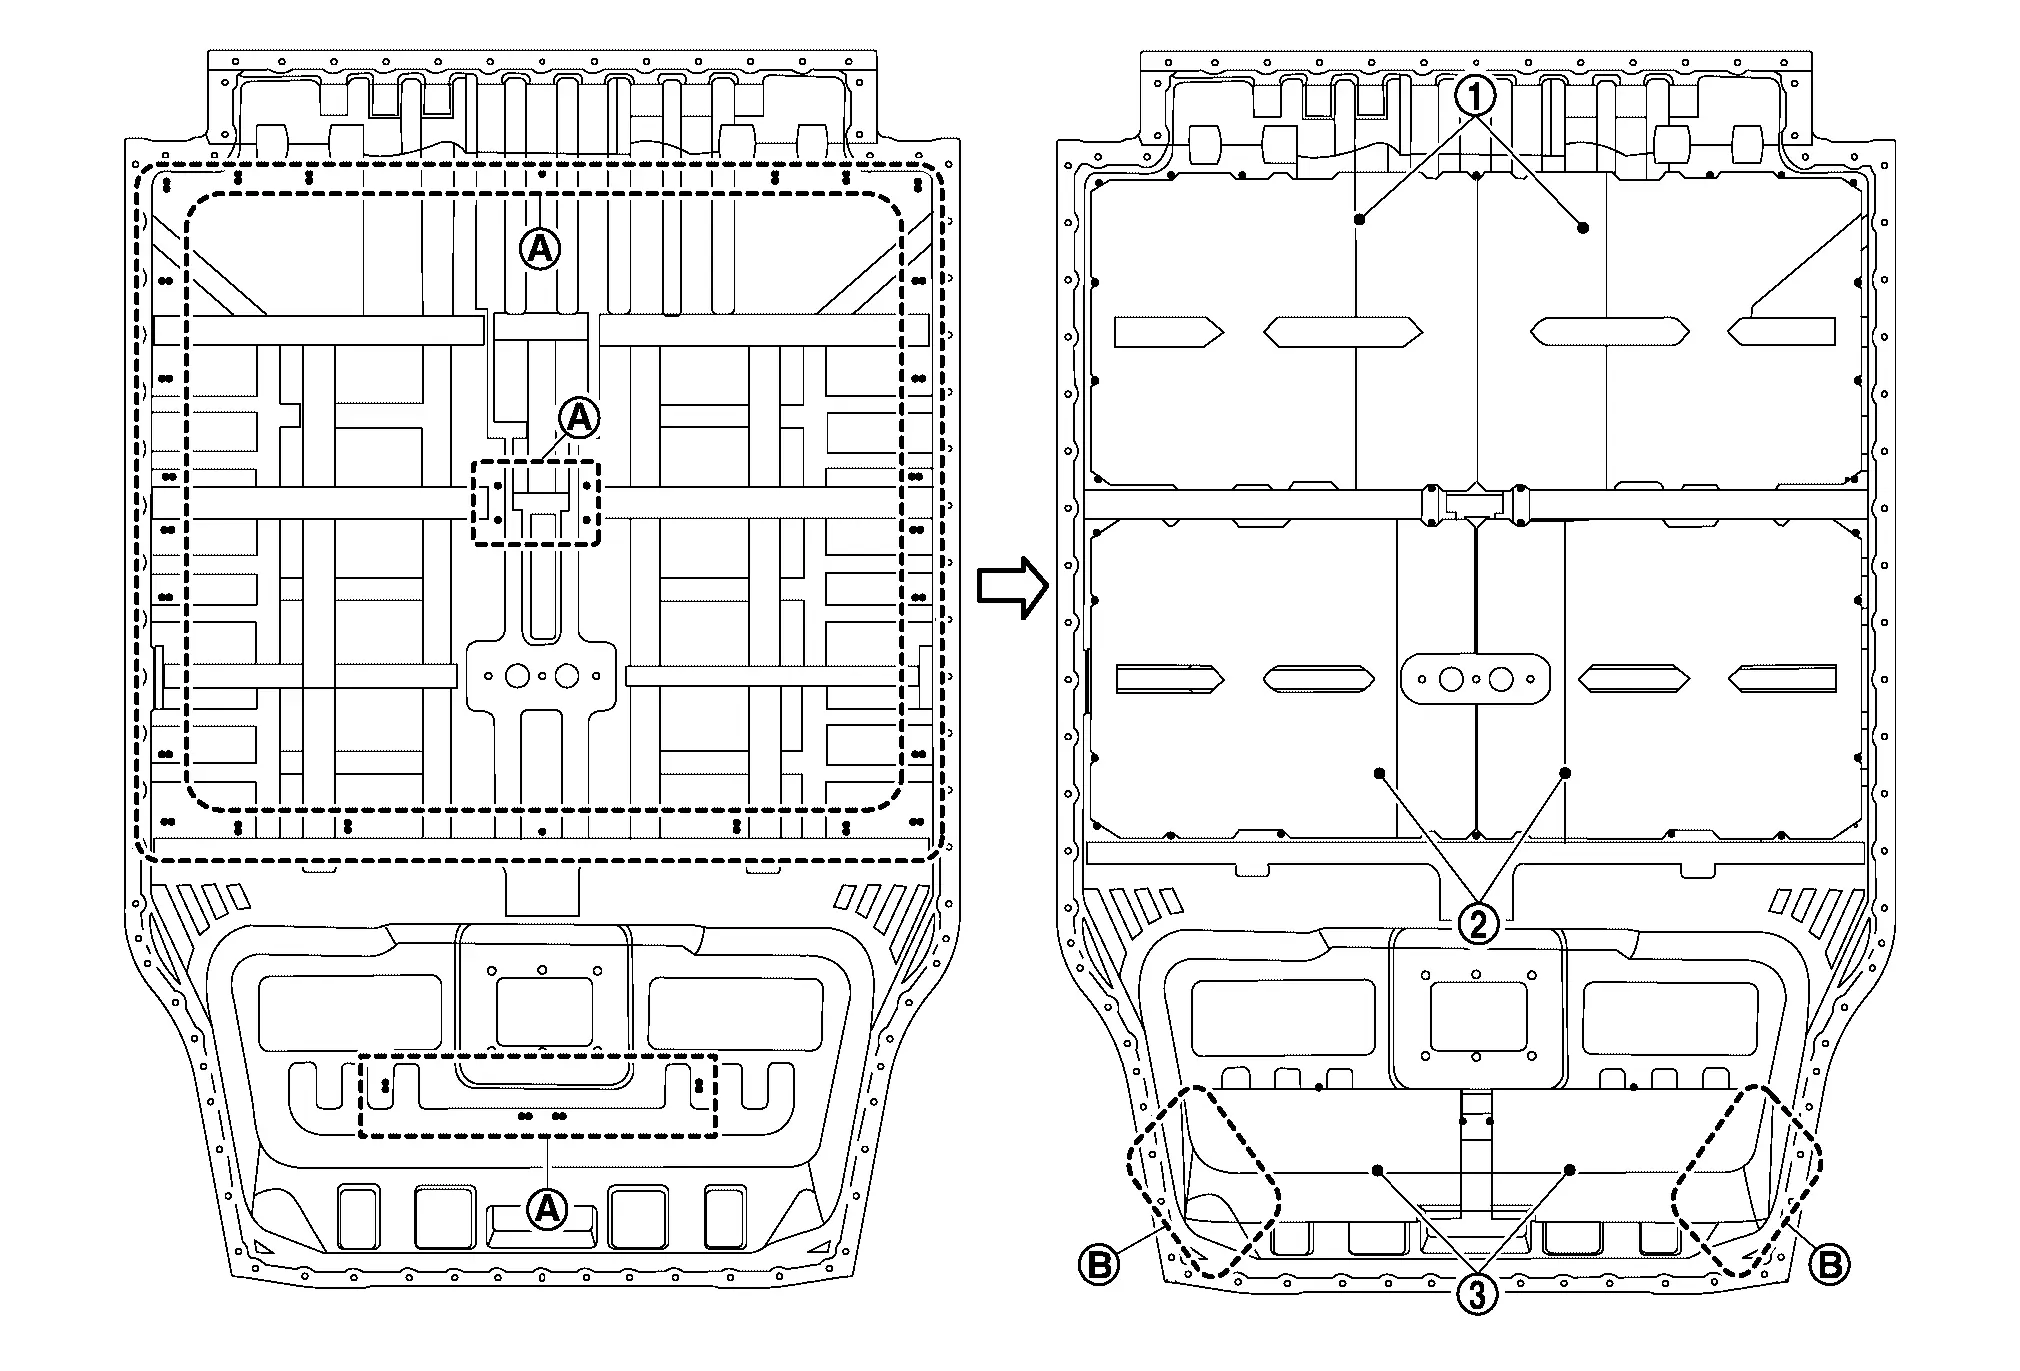
|
Position mark (Projection) |
Install seal to battery pack lower case.

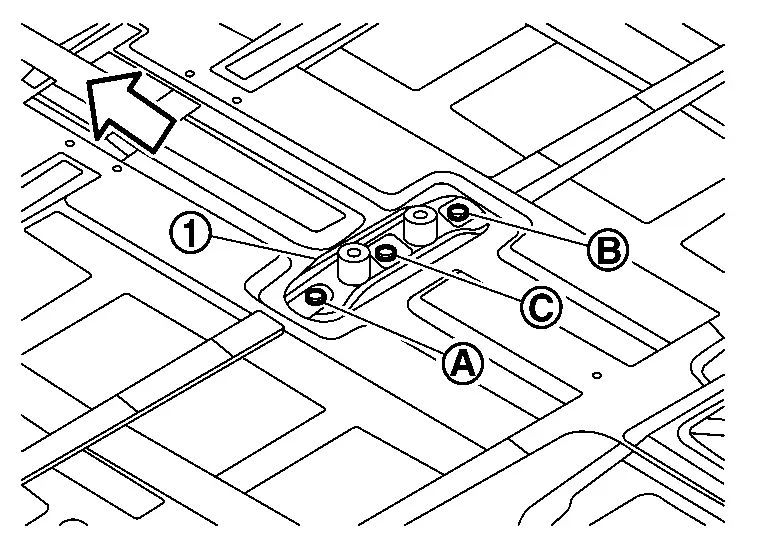
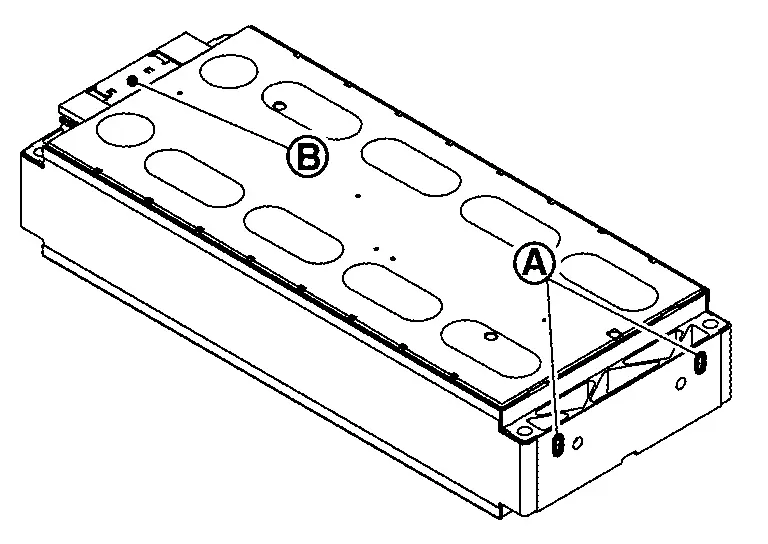
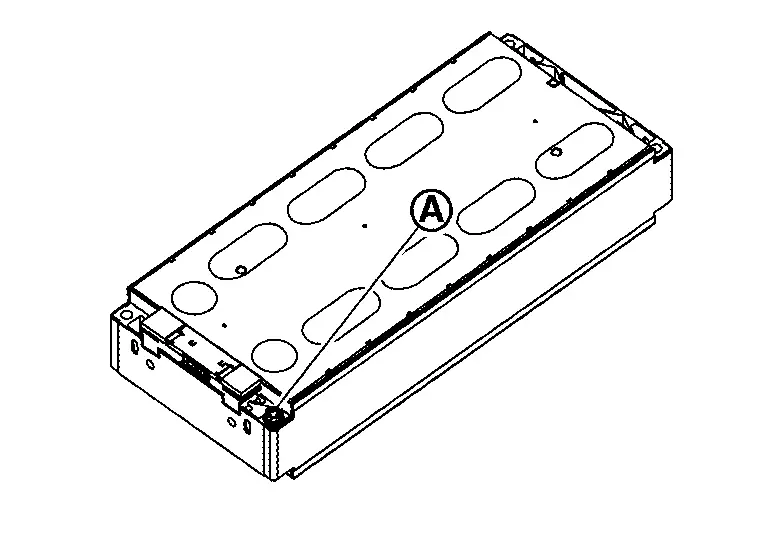
Install guide pin [SST: KV99119600 (J-53348)](A) to the center of battery pack lower case.
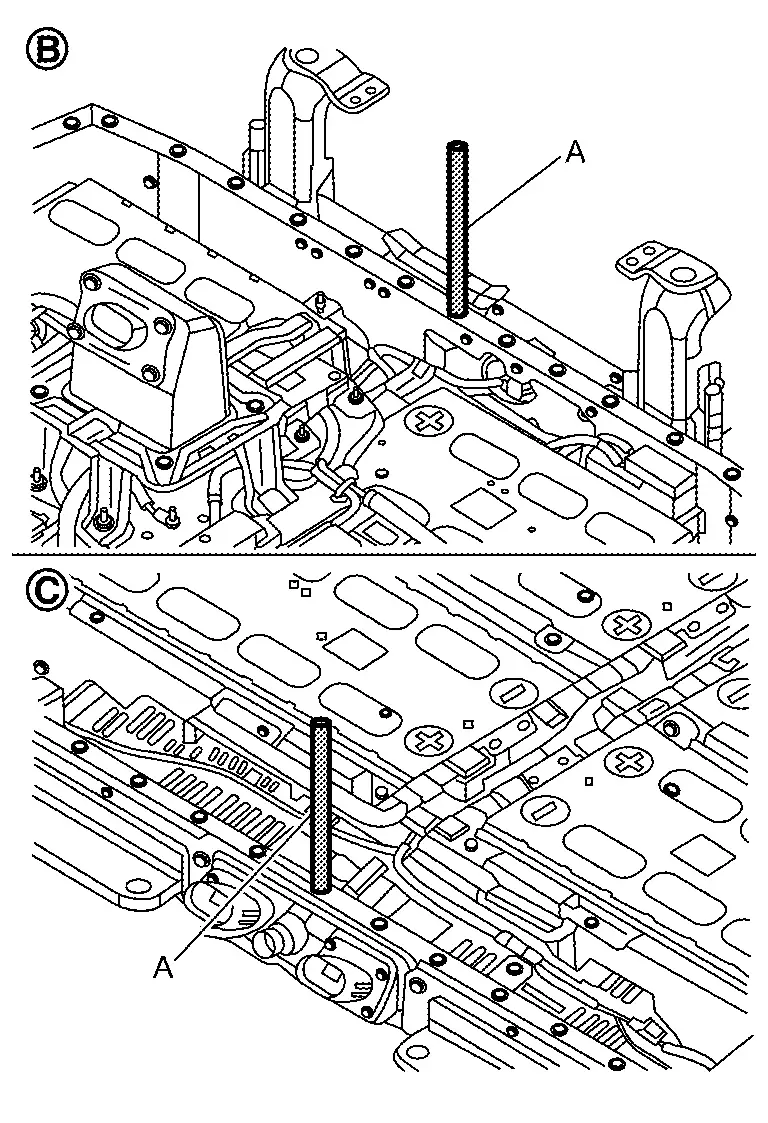
|
: Nissan Ariya Vehicle rear side |
 |
: Vehicle front side |
Hold both sides of battery pack upper case and install it.
Tighten bolts .

|
: Nissan Ariya Vehicle |
|
: 11.1 N.m (1.1 ㎏-m, 8 ft-lb) |
Install retainer.
|
: Nissan Ariya Vehicle |
|
: 8.0 N.m (0.82 ㎏-m, 71 in-lb) |
Install service retainer .
|
: Nissan Ariya Vehicle |
|
: 8.0 N.m (0.82 ㎏-m, 71 in-lb) |
Tighten bolt.

|
: Nissan Ariya Vehicle |
|
: 8.0 N.m (0.82 ㎏-m, 71 in-lb) |
Install resin retainers in the order of 1→2→3.
|
: Nissan Ariya Vehicle |
|
: 8.0 N.m (0.82 ㎏-m, 71 in-lb) |
Install retainer .
|
: Nissan Ariya Vehicle |
| , |
: 11.1 N.m (1.1 ㎏-m, 8 ft-lb) |
|
: 8.0 N.m (0.82 ㎏-m, 71 in-lb) |
Install left and right resin retainers in the order of 1→2→3.
|
: Nissan Ariya Vehicle |
|
: 8.0 N.m (0.82 ㎏-m, 71 in-lb) |
Install left and right retainers .
Install battery heater bracket to battery lower case. Refer to Exploded View.
Inspection
APPEARANCE CHECK
Check resin retainer for damage.
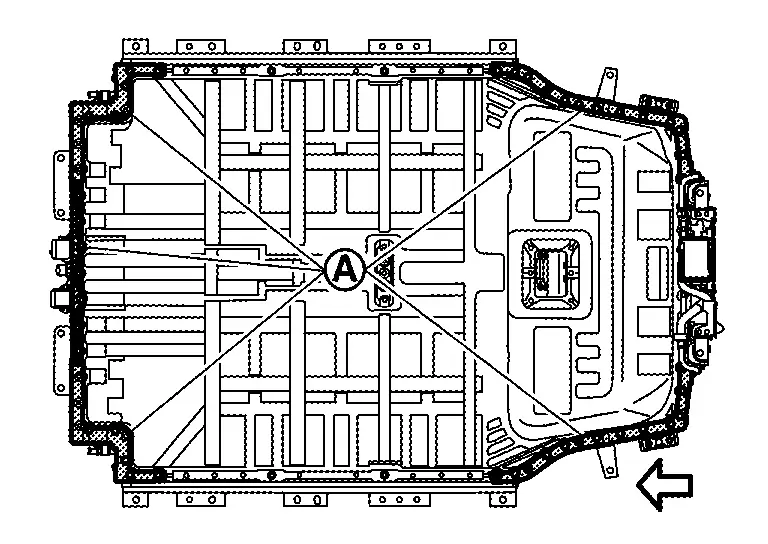
: Vehicle
AIR LEAK INSPECTION
Remove breather and install adapter (A) of air leak tester [SST: KV99112400 (J-53357)].
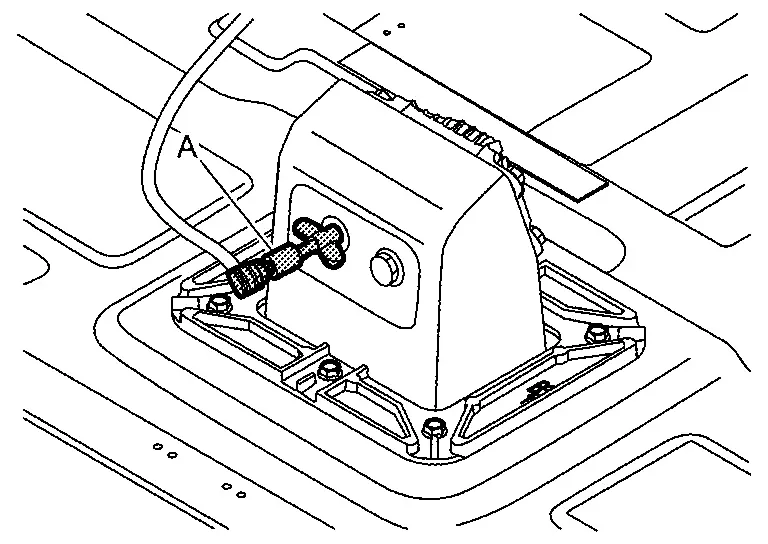
Install gauge (A) of air leak tester [SST: KV99111400 (-)].
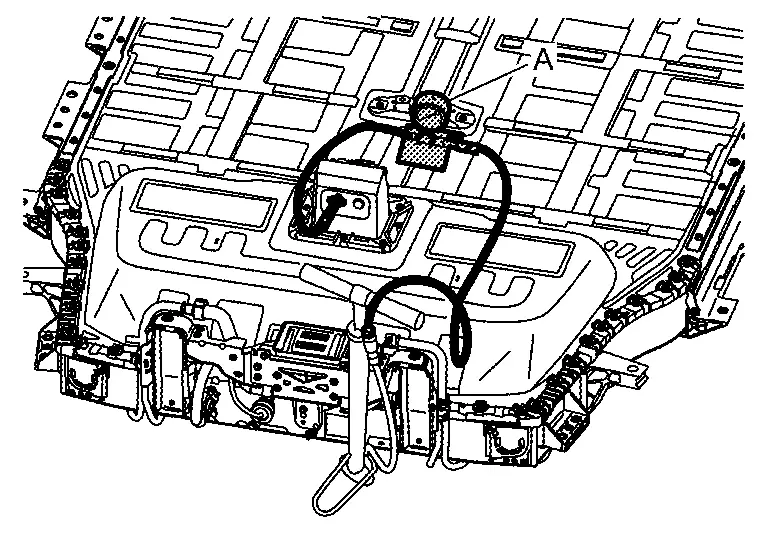
Install service plug. Refer to HOW TO DISCONNECT HIGH VOLTAGE : Precautions.DANGER:
To prevent electric shock, wear insulated protective gear.


Blocks high power connector and Nissan Ariya vehicle communications harness connector with vinyl tape or equivalent for preventing air leakage from connection area.
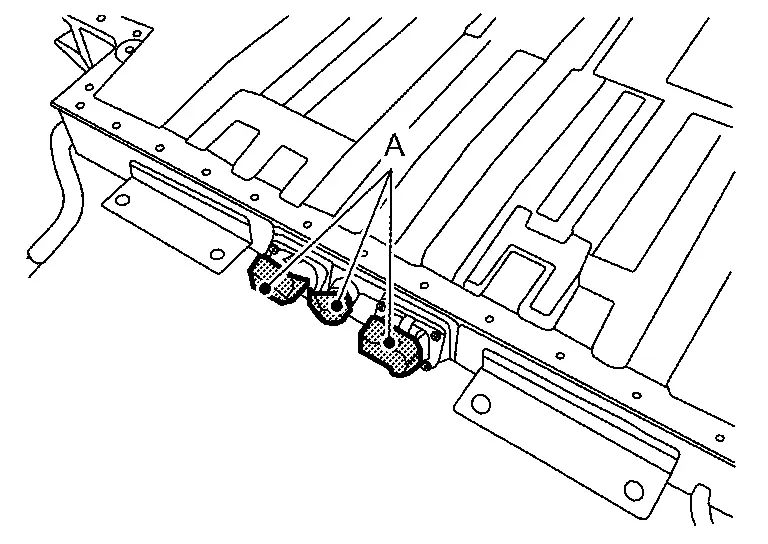
Use wide vinyl tape that is capable of covering all of the high power connector and Nissan Ariya vehicle communications harness connector with one strip.
Apply carefully so that no wrinkles in the tape occur.
Block breather with vinyl tape prevent air from leaking.

Apply carefully so that no wrinkles in the tape occur.
Perform battery case pressure test according to the following procedure.
of air leak tester. 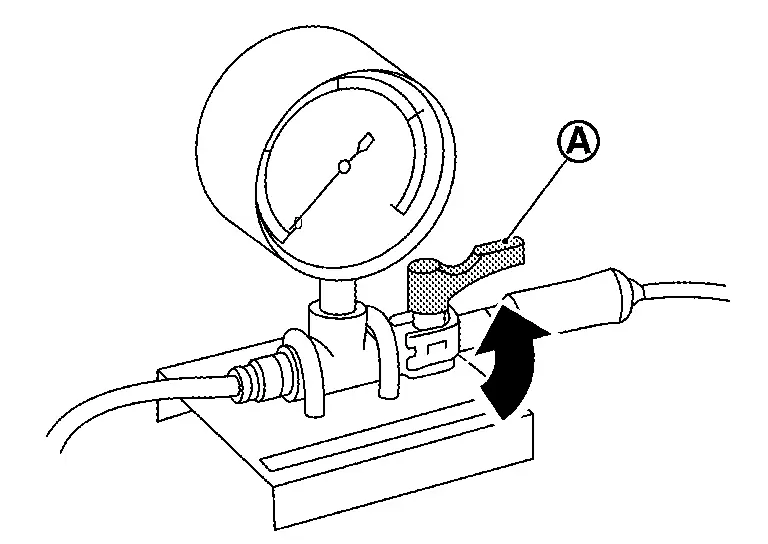
| Specified test pressure | : 1.6 kPa (0.016 bar, 0.0163 kg/cm2, 0.232 psi) |
| Repair limit | : 1.4 kPa (0.014 bar, 0.0142 kg/cm2, 0.203 psi) |
ELECTRIC EQUIPOTENTIAL TEST
After assembling Li-ion battery pack, remove the battery pack upper case ground bolt , then measure the resistance between the side of battery pack lower case and the seating surface of ground bolt (location of coating peeling) .
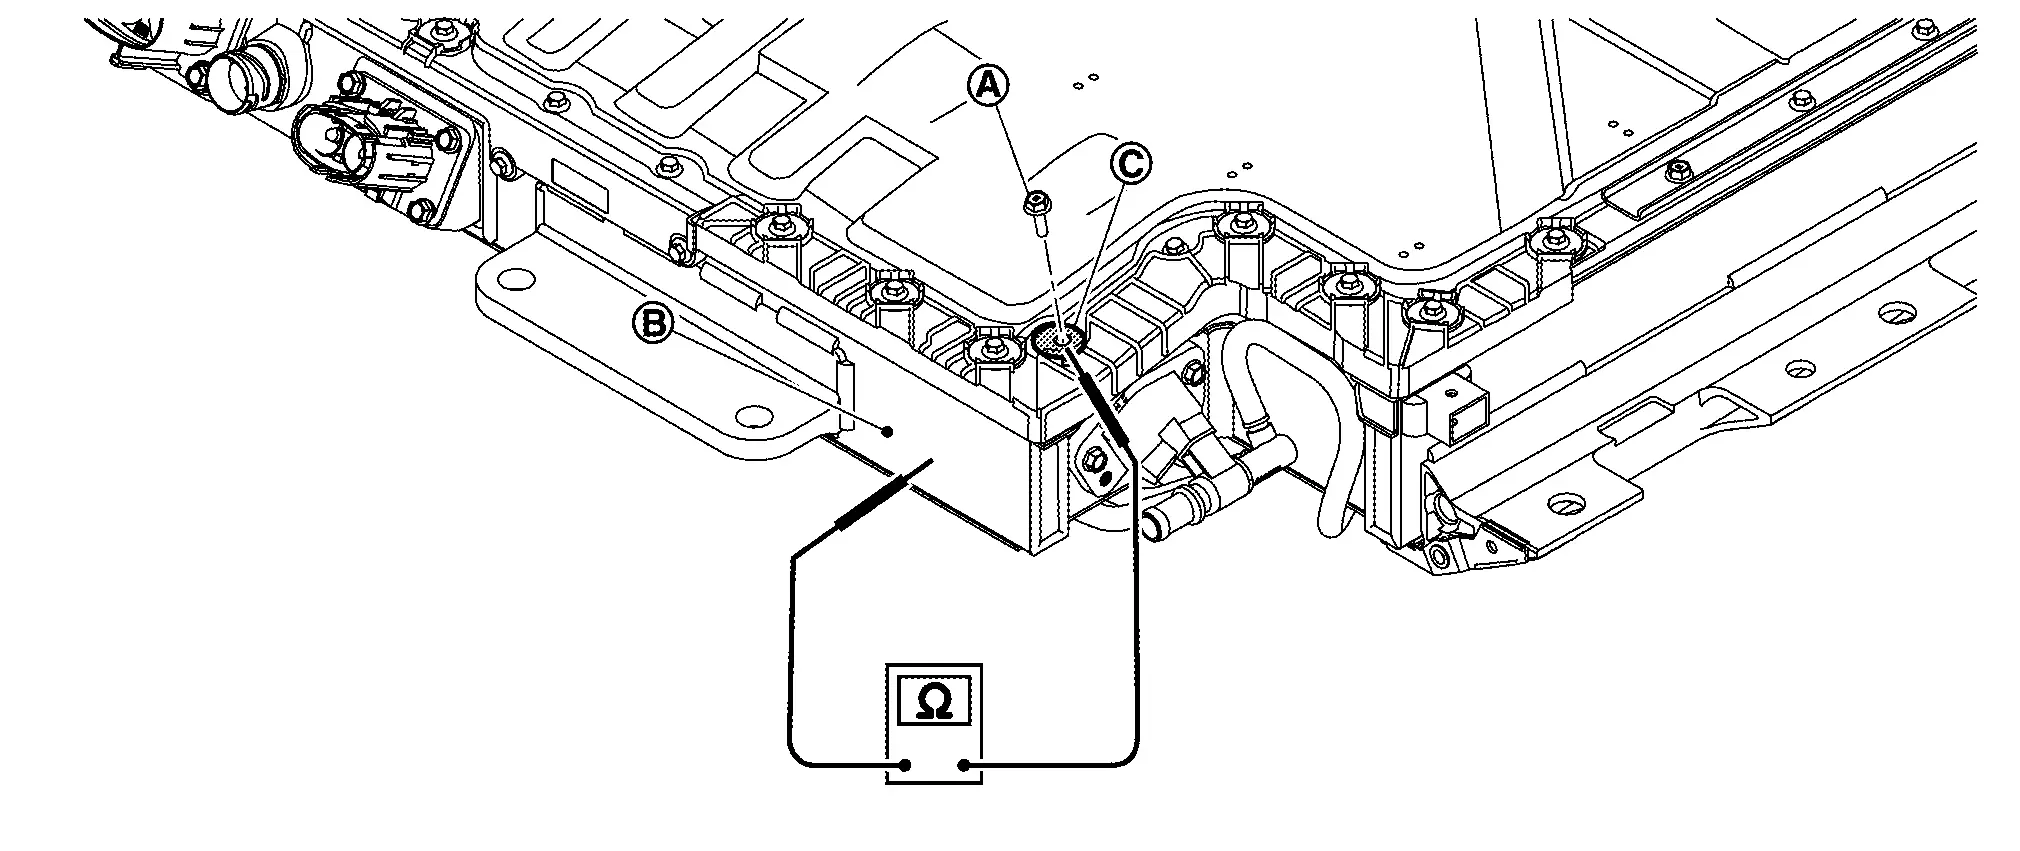
| Specified value | : Less than 0.1 Ω |
If the result deviates from the specified value, check the following and repair the malfunction parts.
Ground bolt connection condition
Corrosion on ground bolt mounting surface
Adhesion of paint, oil, dirt, or other substance on ground bolt mounting surface
After assembling Li-ion battery pack, remove the retainer ground bolt , then measure the resistance between the side of battery pack lower case and the seating surface of ground bolt (location of coating peeling) .
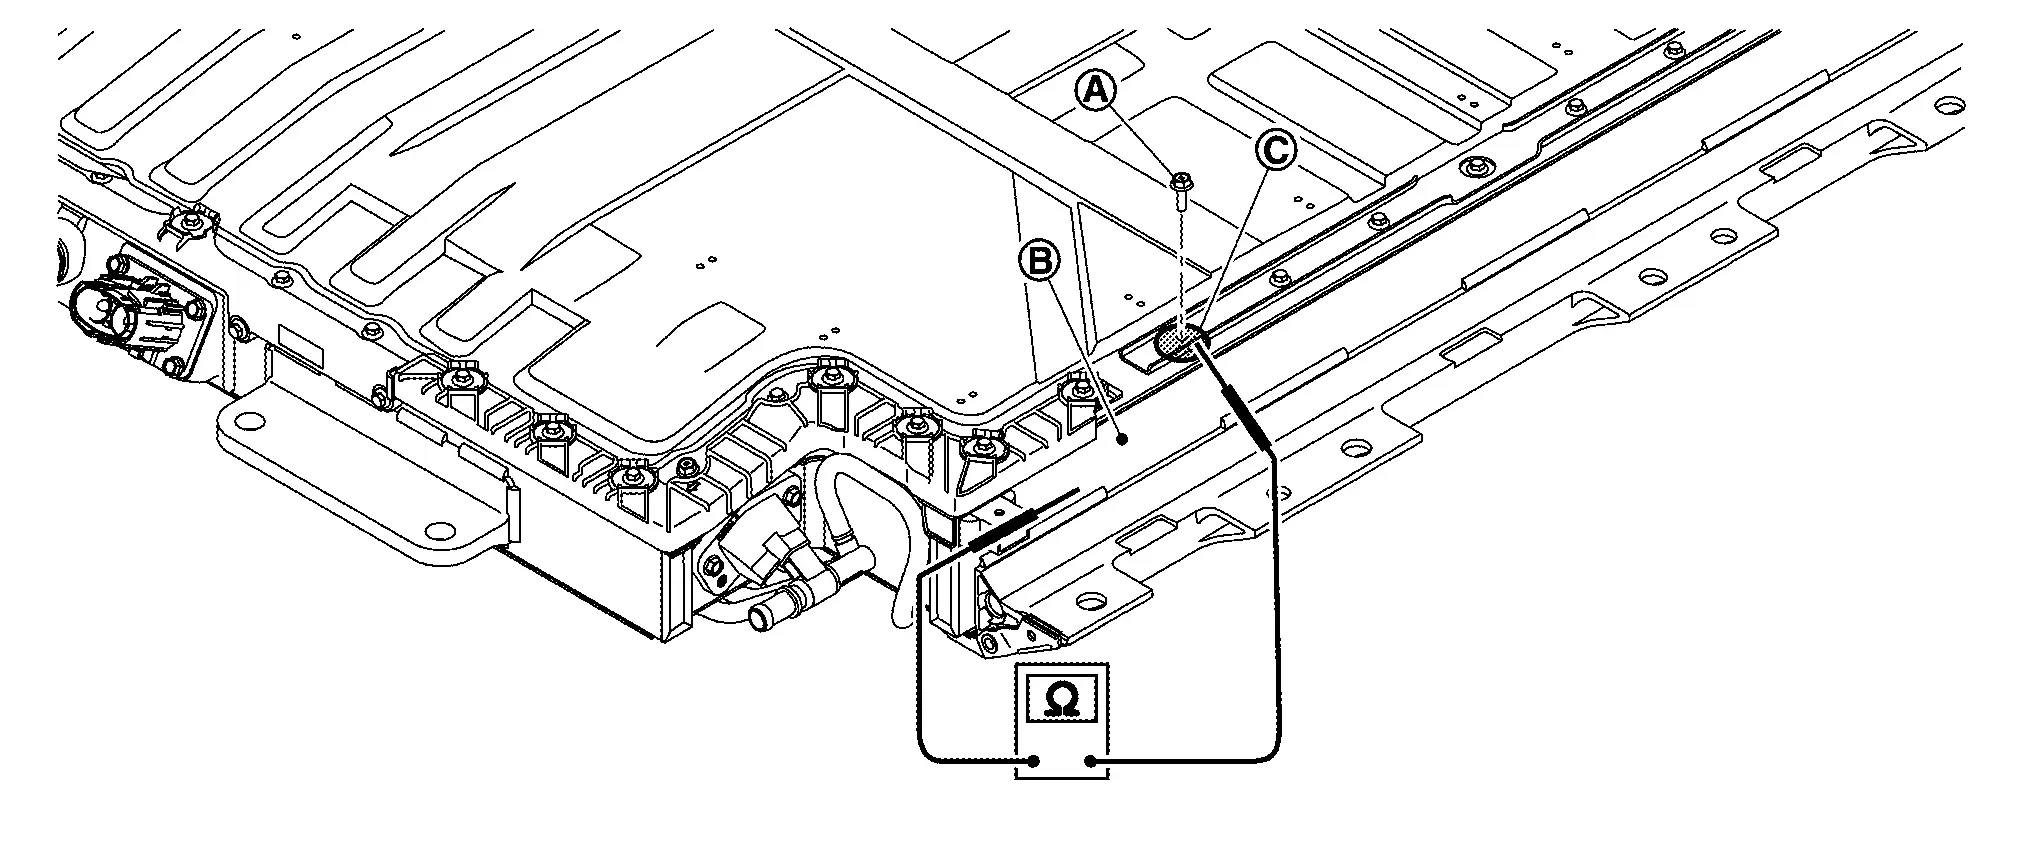
| Specified value | : Less than 0.1 Ω |
If the result deviates from the specified value, check the following and repair the malfunction parts.
Ground bolt connection condition
Corrosion on ground bolt mounting surface
Adhesion of paint, oil, dirt, or other substance on ground bolt mounting surface.
After assembling Li-ion battery pack, remove the rear retainer ground bolt , then measure the resistance between the side of battery pack lower case and the seating surface of ground bolt (location of coating peeling) .
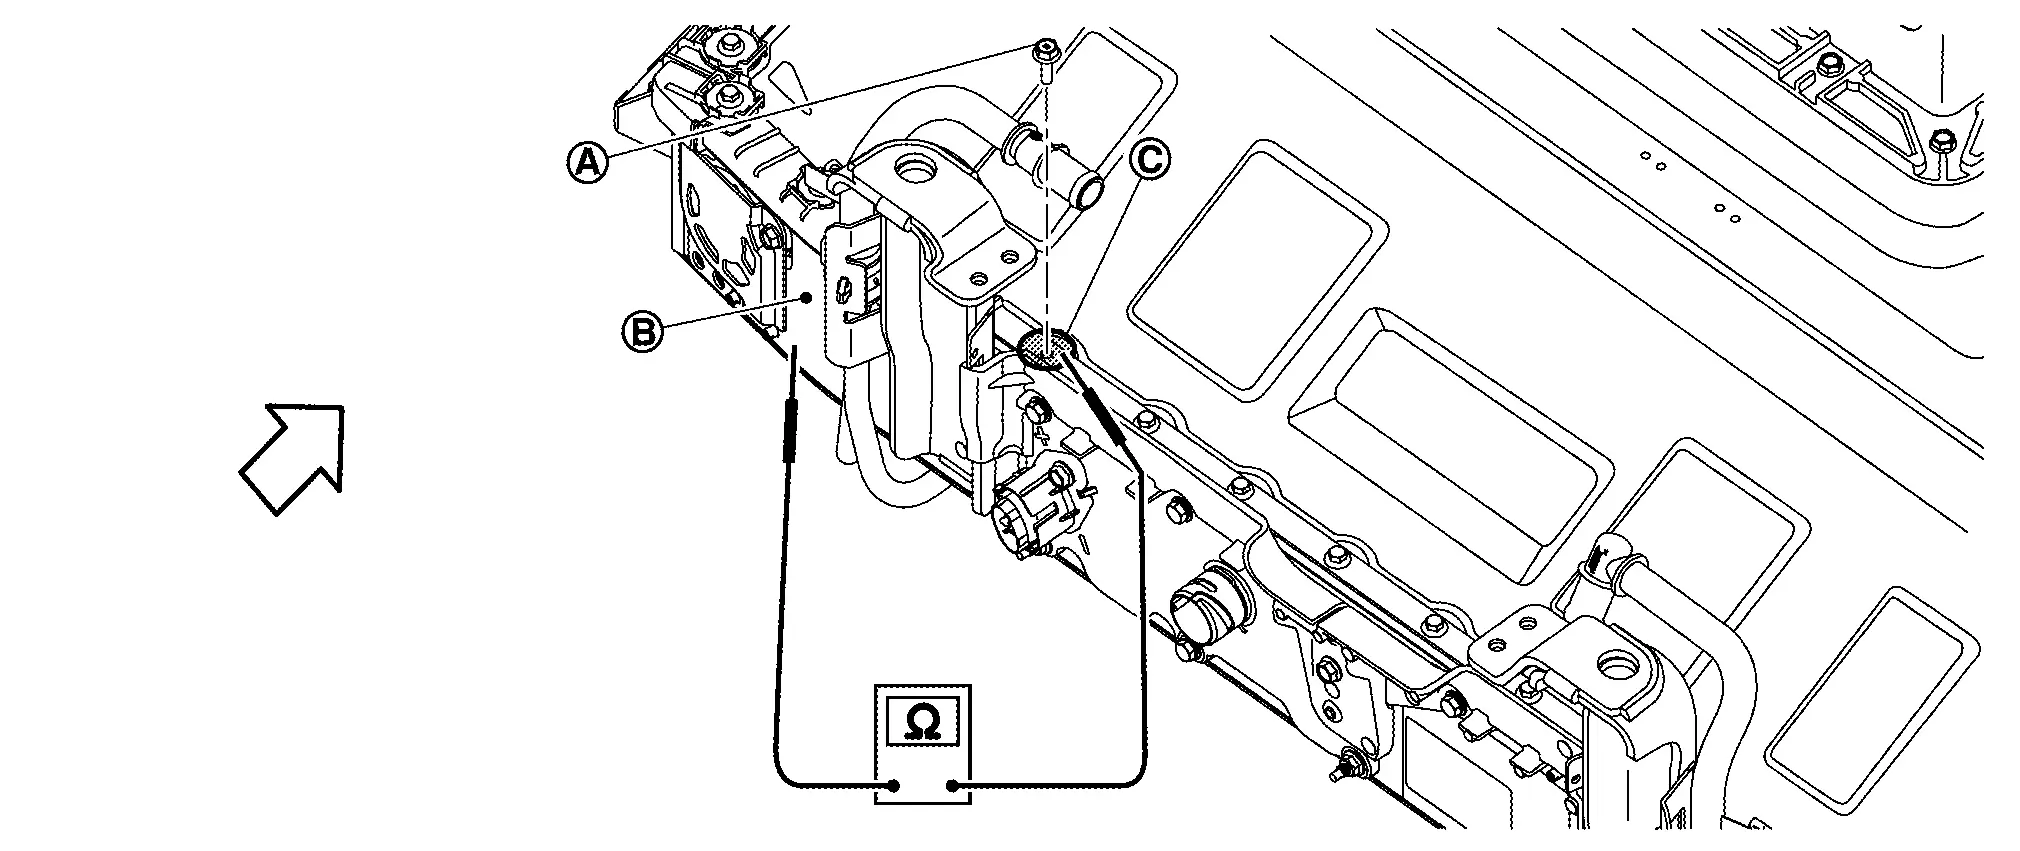
|
: Nissan Ariya Vehicle |
| Specified value | : Less than 0.1 Ω |
If the result deviates from the specified value, check the following and repair the malfunction parts.
Ground bolt connection condition
Corrosion on ground bolt mounting surface
Adhesion of paint, oil, dirt, or other substance on ground bolt mounting surface.
Battery Pack Lower Case. 2wd Nissan Ariya SUV
Exploded View
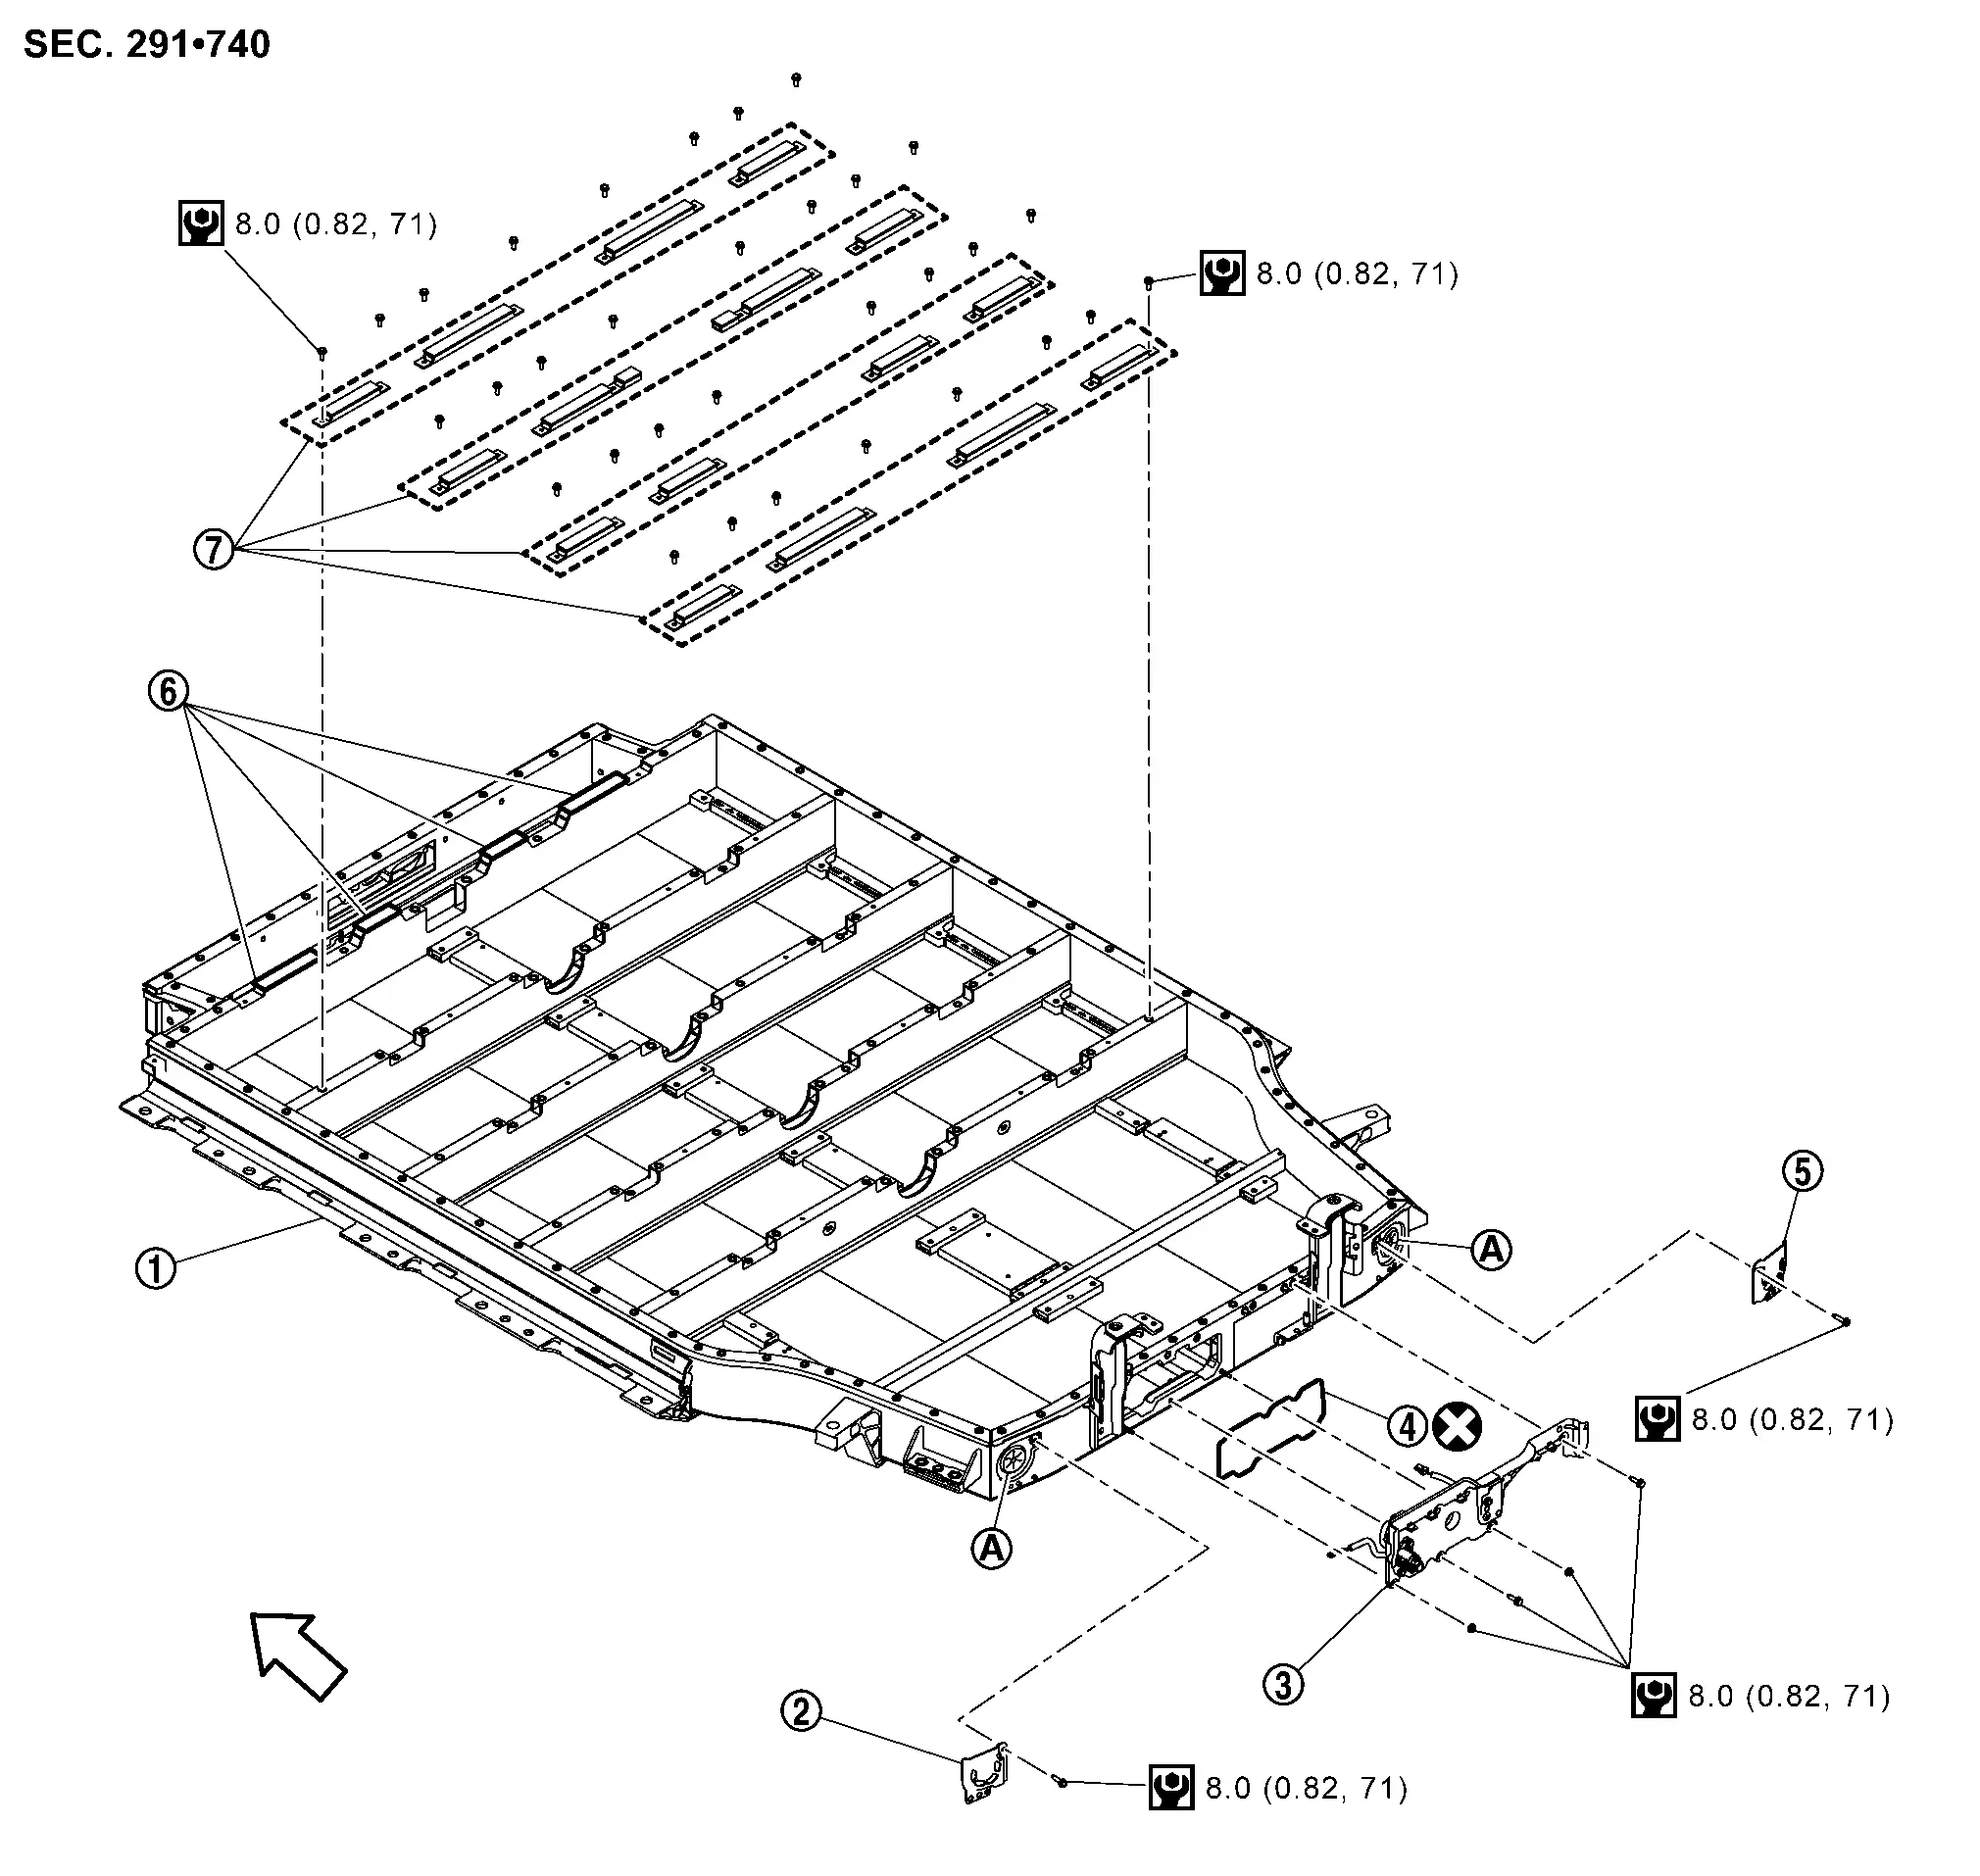
|
Battery pack lower case | |
Battery ventilation valve cover LH | |
Rear box |
|
Seal | |
Battery ventilation valve cover RH | |
Ept sealer |
|
Bracket with ept sealer | ||||
|
Battery ventilation valve | ||||
|
: Nissan Ariya Vehicle front | ||||
|
: Always replace after every disassembly. | ||||
|
: N·m (kg-m, in-lb) |
Disassembly & Assembly
DANGER:Because hybrid vehicles and electric vehicles contain a high voltage battery, there is a risk of electric shock, electric leakage, or similar accidents if the Nissan Ariya vehicle is handled incorrectly. Be sure to follow the correct work procedures when performing inspection and maintenance.
ENVIRONMENT FOR LI-ION BATTERY DISASSEMBLY WORK
Must be an indoor environment.
The environment must utilize a shutter or other means to shut out the outside environment and prevent rain, snow, dust, or other substances from entering.
The environment must not cause the intrusion of sweat during work, or cause condensation to occur due to high temperature or humidity.
Metal powder, grease, and other foreign substances must not enter.
The indoor environment must also prevent metal powder, grease, and other foreign substances from entering due to maintenance performed on other Nissan Ariya vehicles and other sources during disassembly work.
During disassembly without internal work, temporarily close the battery pack upper case or cover it with an insulating cover.
The floor must be dry.
The floor must not be wet as a result of factors such as Nissan Ariya vehicle entry during rain or snow.
Work space
The work space must be approximately the size of one entire Nissan Ariya vehicle.
Take appropriate countermeasures so that persons other than the operator do not enter the work space, such as by placing signs indicating that disassembly work is in progress.
Standard fire fighting equipment
Always place a standard fire fighting equipment in the disassembly work area.
Depending on type of fire (Nissan Ariya vehicle or battery) use standard fire fighting equipment (water or extinguisher).
REAR BOX
Disassembly
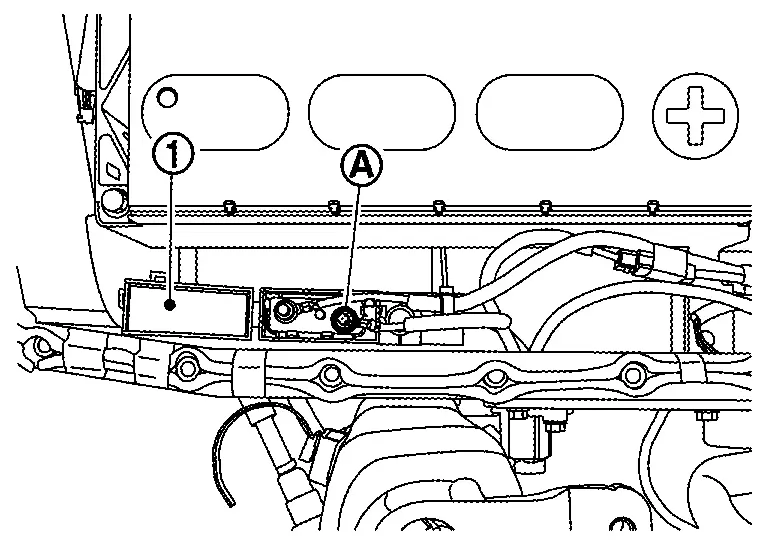
Open bus bar terminal block and remove nut .

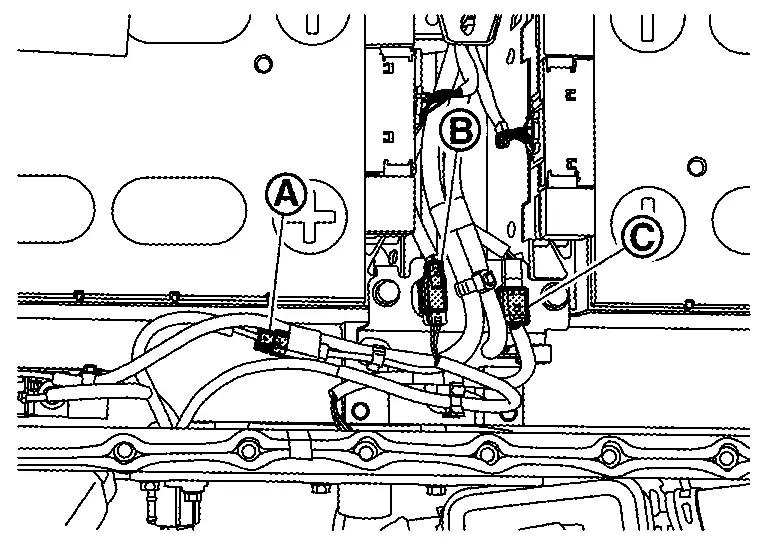
Remove connectors , and .
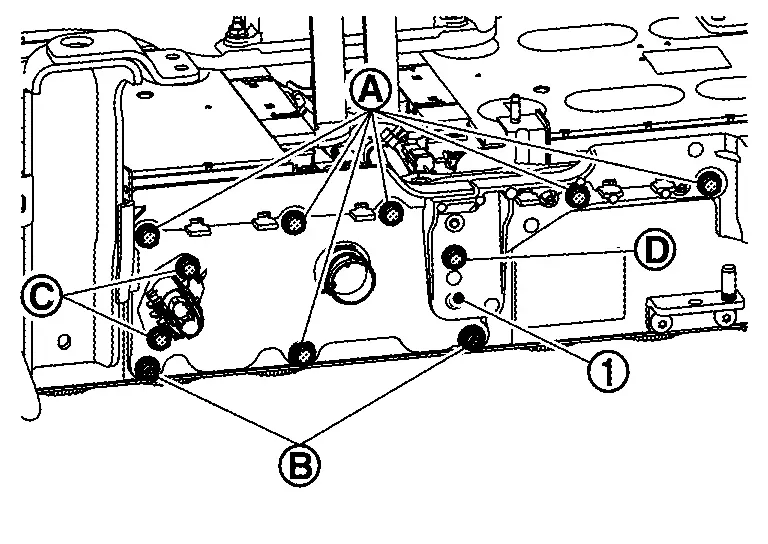
Remove bolts and nuts and the remove rear box .
If necessary, remove clip and the remove Nissan Ariya vehicle communication harness (Battery PTC).

Remove seal from rear box.
ASSEMBLY
Note the following items, and assemble in the reverse order of disassembly.
DANGER:- There is the danger of electric shock caused by contact with the terminals. Be sure to wear insulated protective gear and use insulated tools.
- Because there is a danger of electric shock and fire, never allow bus bar to contact a wrong terminal.
If bus bar contacts a wrong terminal, the circuit becomes energized and a short may occur.
Always keep the bus bar cover closed until immediately before the installation of bus bar.
BATTERY VENTILATION VALVE COVER
Disassembly
Remove right or left battery ventilation valve cover .

Assembly
Install the above right or left ventilation valve cover by aligning with projection of battery pack lower case.
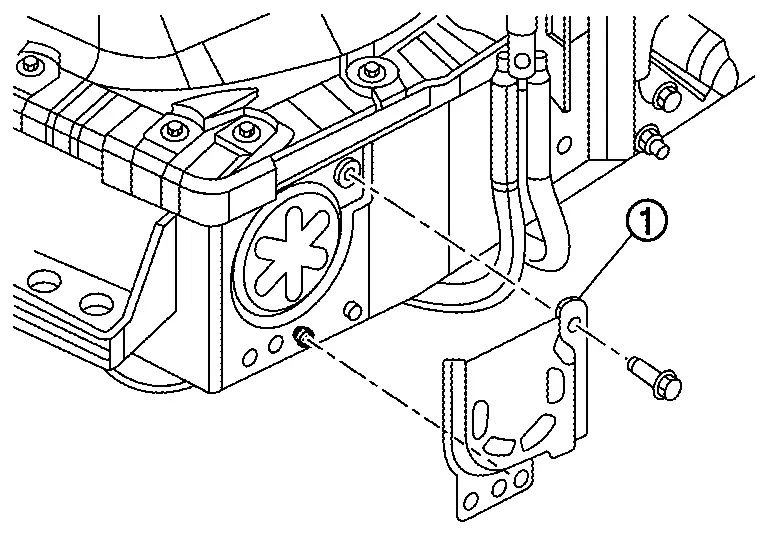
EPT SEALER REPLACEMENT
Check the figure because the procedure differs depending on the location.
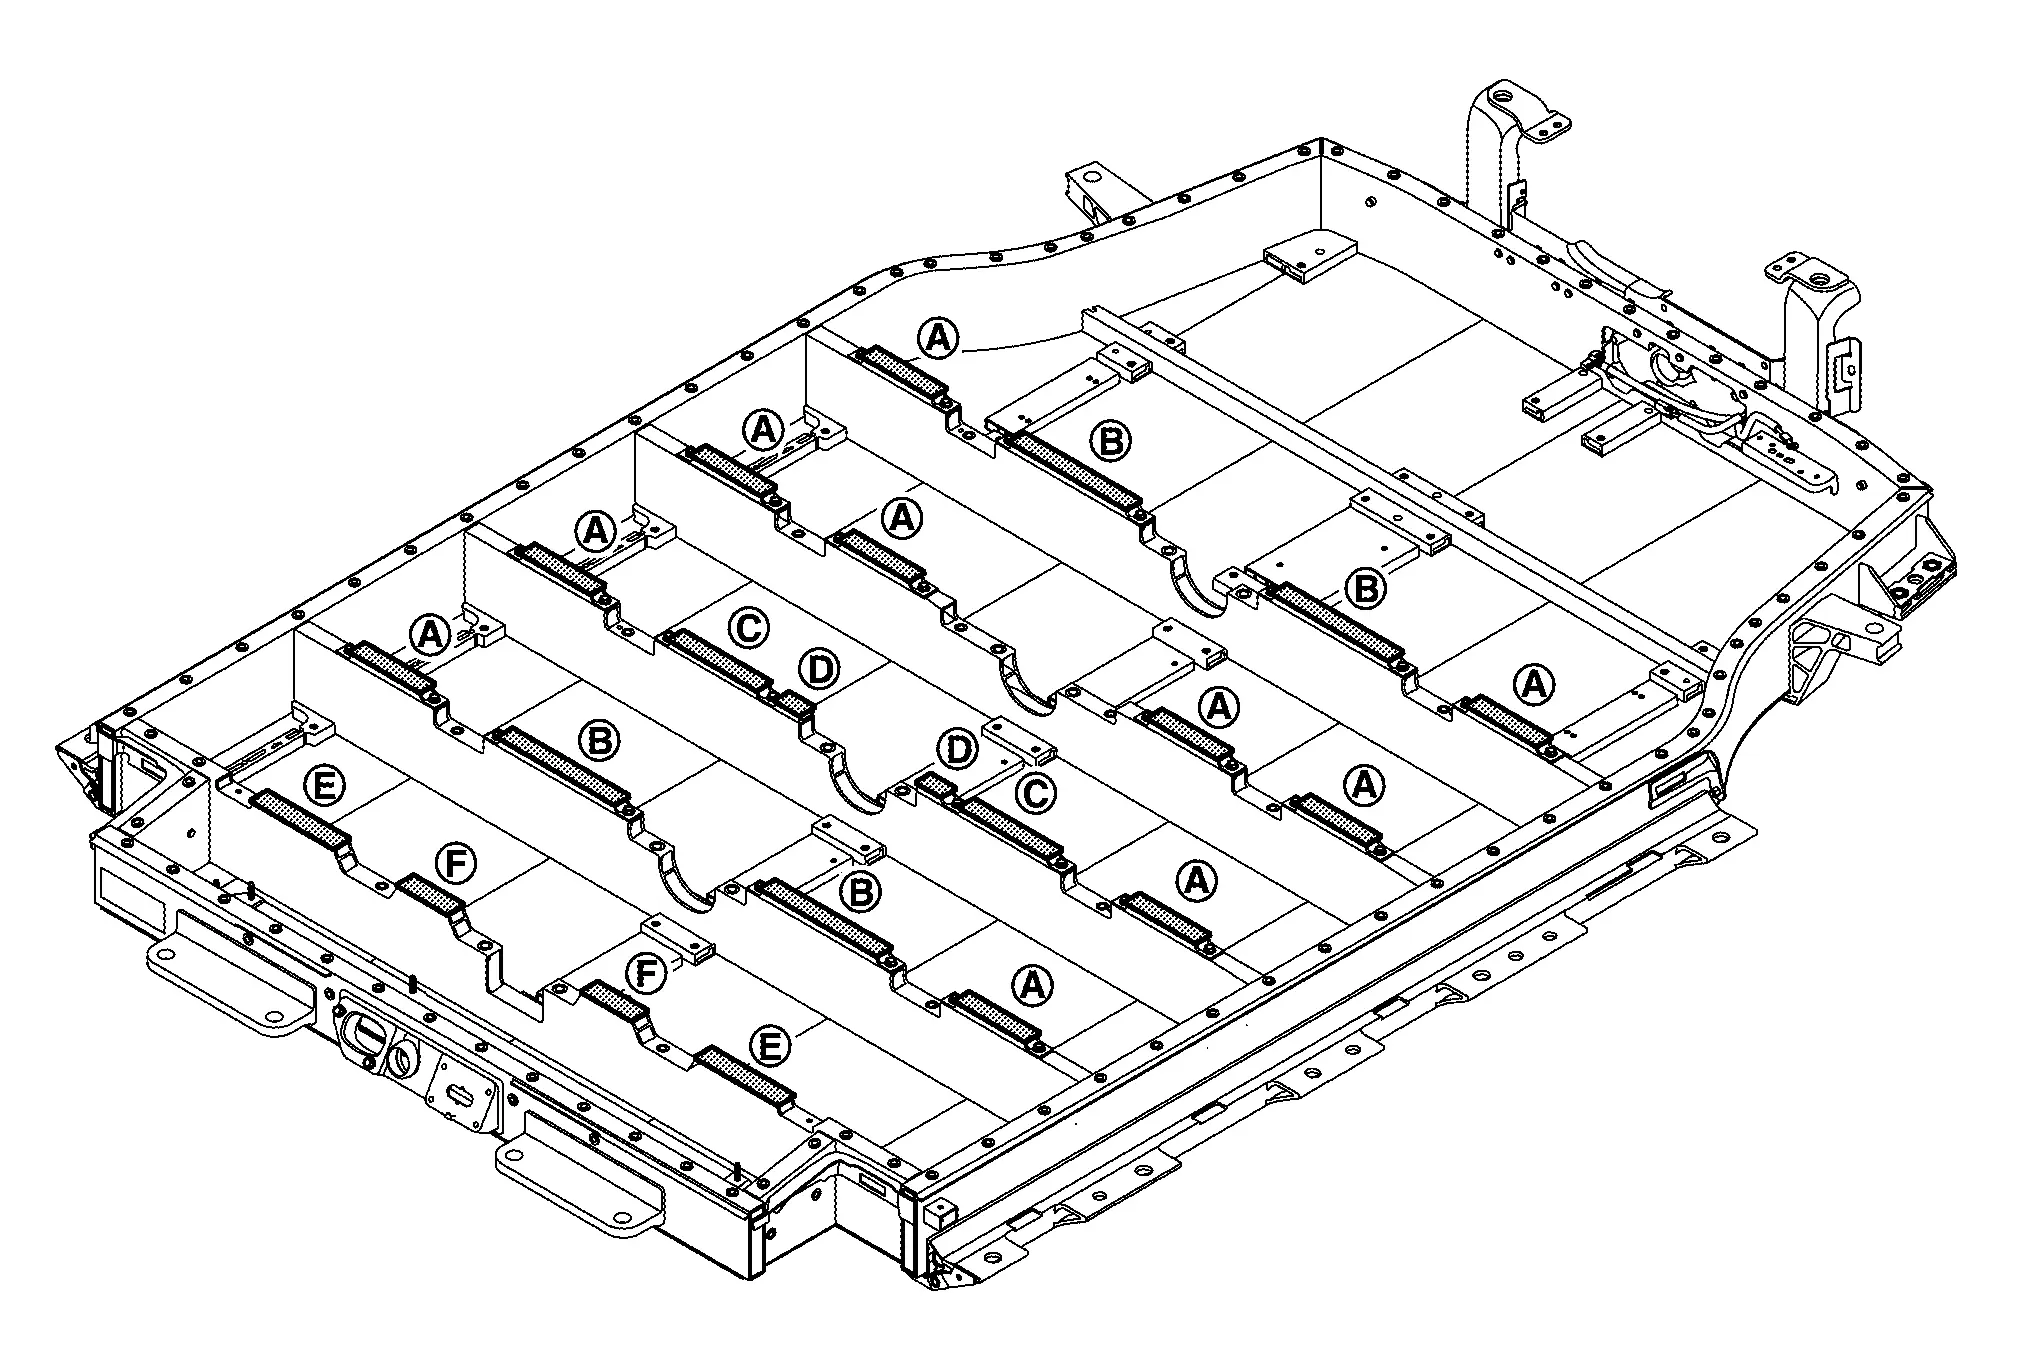
to  |
: Stick to bracket |
 and  |
: Stick to cross member of battery lower case. |
Perform parts from to according to the following procedure.Remove the bracket that requires replacement of EPT sealer.
|
: 111 mm (4.37 in) × 23 mm (0.91 in) |
|
: 184 mm (7.24 in) × 23 mm (0.91 in) |
|
: 139 mm (5.47 in) × 23 mm (0.91 in) |
|
: 39 mm (1.54 in) × 23 mm (0.91 in) |

|
: EPT sealer |
|
: Bracket |
 |
: 0.5 mm (0.020 in) |
Hold EPT seal firmly with the ball of fingers.
Perform parts from to according to the following procedure.
|
: 150 mm (5.91 in) × 26 mm (1.02 in) |
|
: 100 mm (3.94 in) × 26 mm (1.02 in) |
. 
|
: EPT sealer |
|
: 10 mm (0.39 in) |
Service Plug Bracket Nissan Ariya: FE0
Exploded View
REMOVAL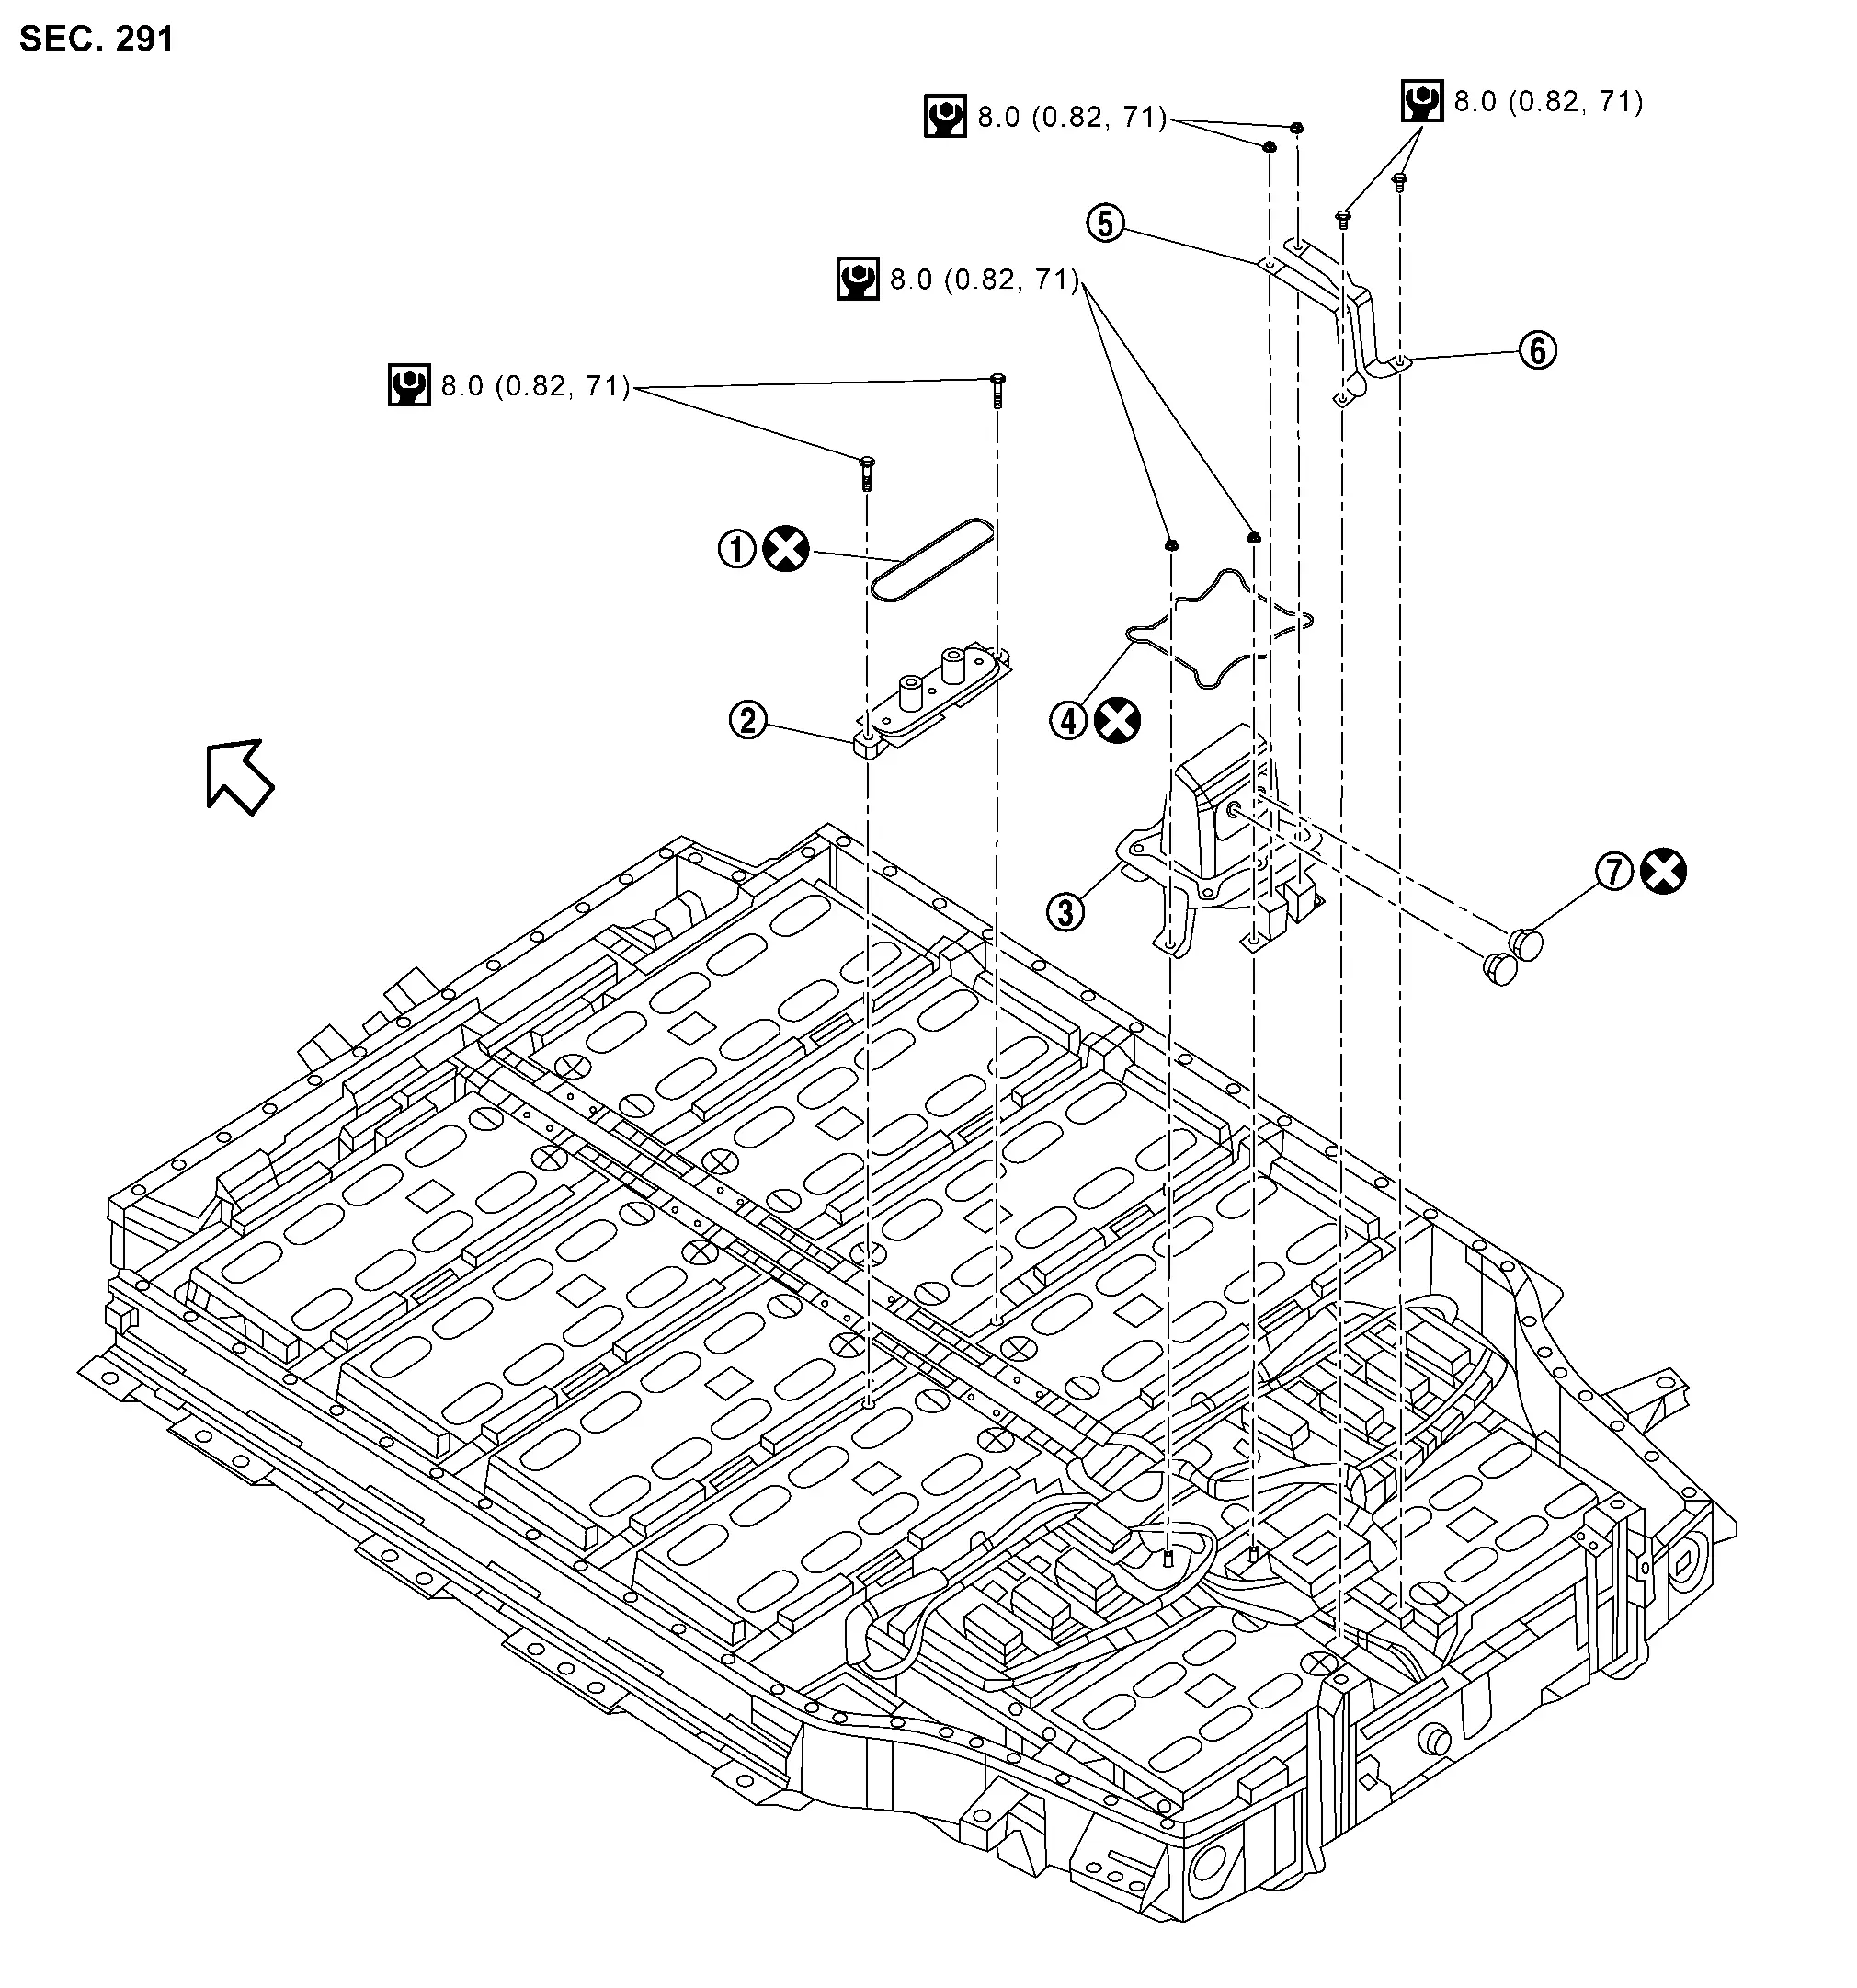
|
Seal | |
Bracket | |
Service plug bracket |
|
Seal | |
Busbar 8 | |
Busbar 13 |
|
Breather | ||||
|
: Nissan Ariya Vehicle front | ||||
|
: Always replace after every disassembly. | ||||
|
: N·m (kg-m, in-lb) |
DISASSEMBLY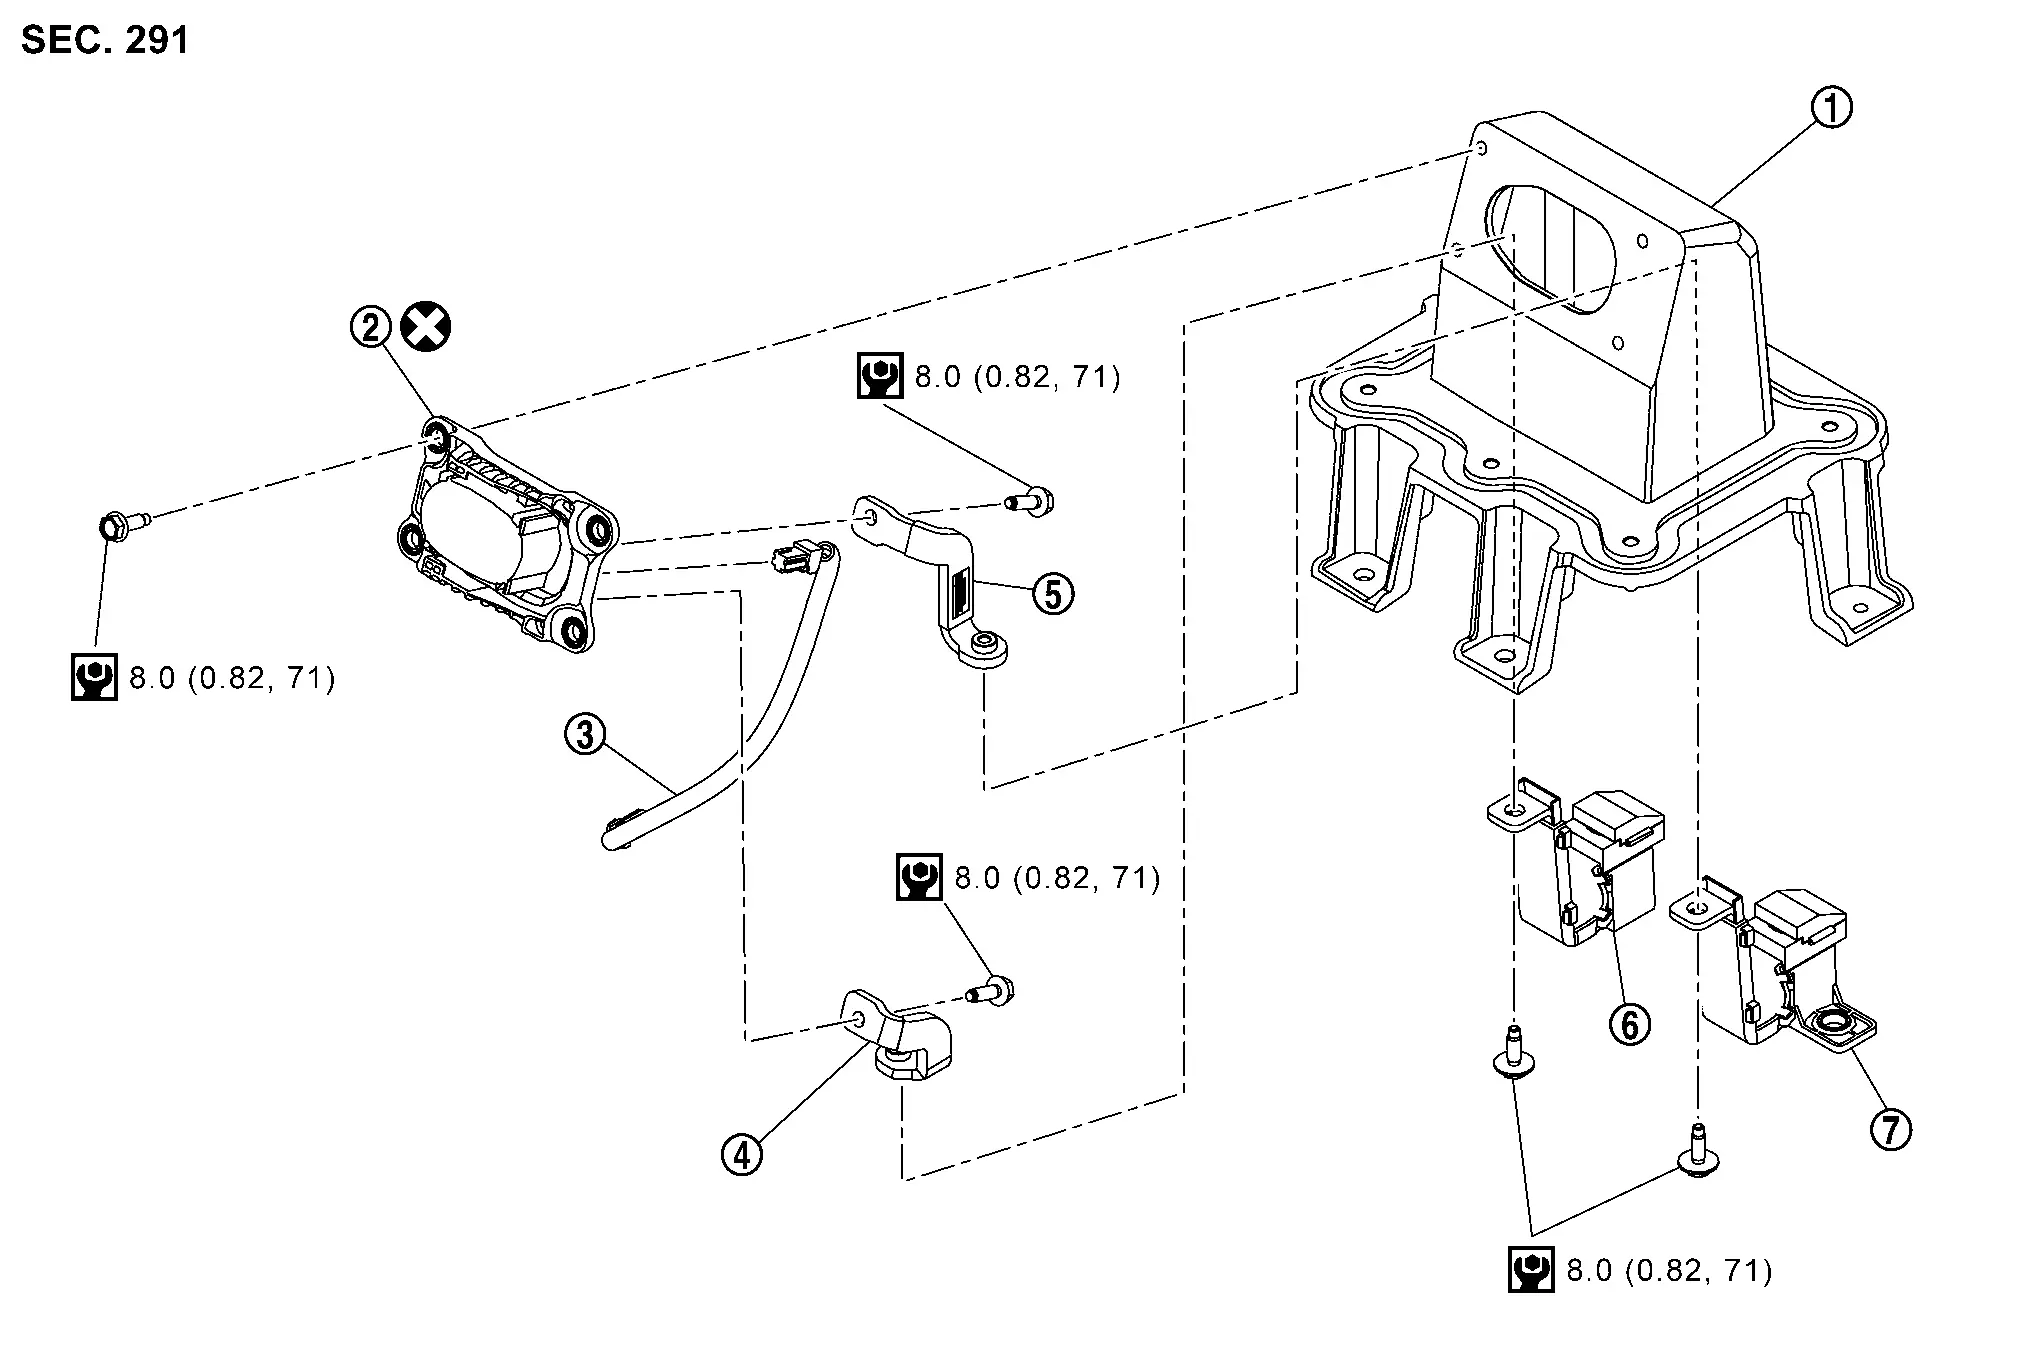
|
Service plug bracket | |
Service plug switch | |
Engagement detection switch (service plug) harness |
|
Busbar 11 | |
Busbar 10 | |
Busbar 12 |
|
Busbar 9 | ||||
|
: Always replace after every disassembly. | ||||
|
: N·m (kg-m, in-lb) |
Disassembly & Assembly
DANGER:Because hybrid vehicles and electric vehicles contain a high voltage battery, there is a risk of electric shock, electric leakage, or similar accidents if the Nissan Ariya vehicle is handled incorrectly. Be sure to follow the correct work procedures when performing inspection and maintenance.
ENVIRONMENT FOR LI-ION BATTERY DISASSEMBLY WORK
Must be an indoor environment.
The environment must utilize a shutter or other means to shut out the outside environment and prevent rain, snow, dust, or other substances from entering.
The environment must not cause the intrusion of sweat during work, or cause condensation to occur due to high temperature or humidity.
Metal powder, grease, and other foreign substances must not enter.
The indoor environment must also prevent metal powder, grease, and other foreign substances from entering due to maintenance performed on other Nissan Ariya vehicles and other sources during disassembly work.
During disassembly without internal work, temporarily close the battery pack upper case or cover it with an insulating cover.
The floor must be dry.
The floor must not be wet as a result of factors such as Nissan Ariya vehicle entry during rain or snow.
Work space
The work space must be approximately the size of one entire Nissan Ariya vehicle.
Take appropriate countermeasures so that persons other than the operator do not enter the work space, such as by placing signs indicating that disassembly work is in progress.
Standard fire fighting equipment
Always place a standard fire fighting equipment in the disassembly work area.
Depending on type of fire (Nissan Ariya vehicle or battery) use standard fire fighting equipment (water or extinguisher).
Disassembly
Remove busbar 8 and busbar 13 .

|
: Nut |
|
: Bolt |
Remove interlock detecting switch (Service plug) harness connector .
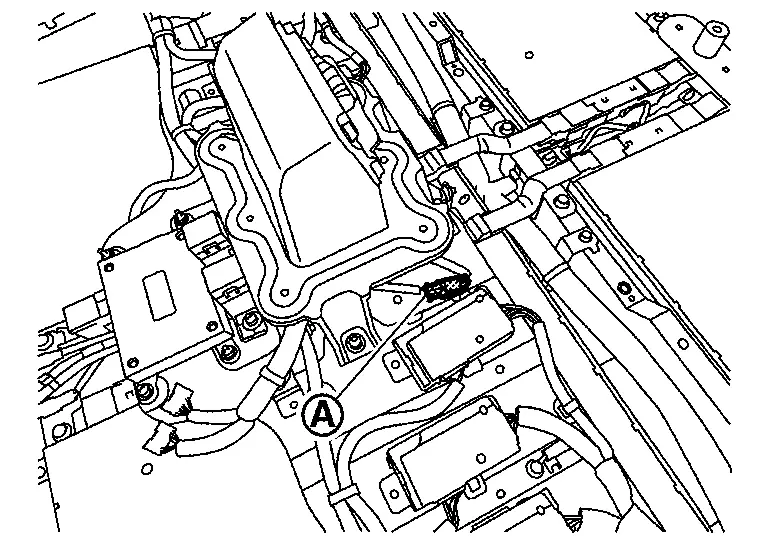
Remove nuts of busbar 9 and busbar 12 .

Remove service plug bracket .
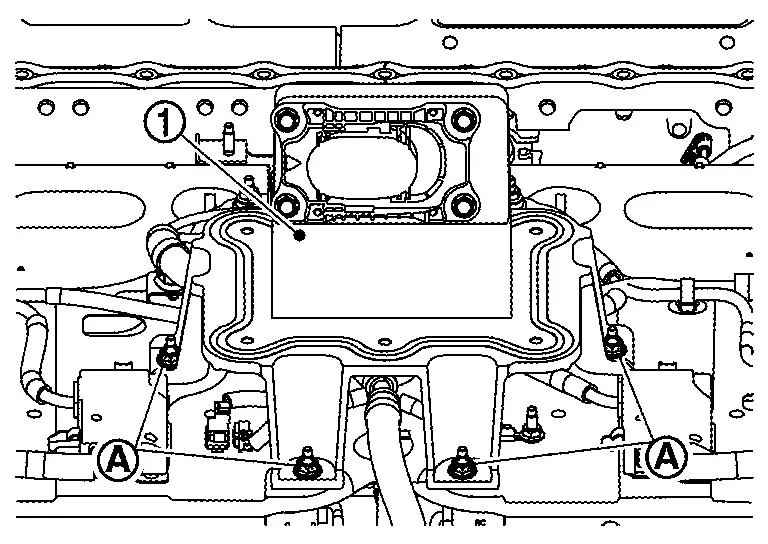
|
: Nuts |
Remove seal from service plug.
Remove busbar 9 and busbar 12 from service plug.

|
: Bolts |
Remove bolts .
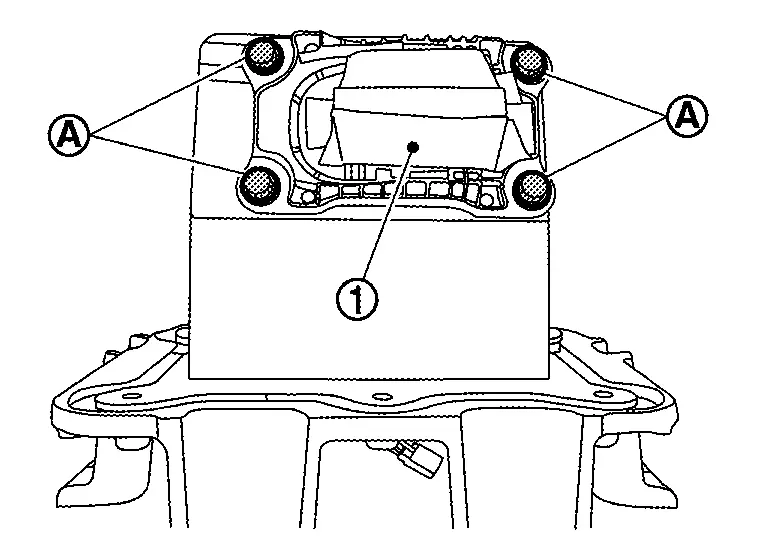
|
: Service plug |
Remove service plug from service plug bracket .

Remove interlock detecting switch (Service plug) harness , busbar 10 and busbar 11 from service plug .

|
: Bolts |
Assembly
Note the following items, and assemble in the reverse order of disassembly.
DANGER:- There is the danger of electric shock caused by contact with the terminals. Be sure to wear insulated protective gear and use insulated tools.
- Because there is a danger of electric shock and fire, never allow bus bar to contact a wrong terminal.
If bus bar contacts a wrong terminal, the circuit becomes energized and a short may occur.
Always keep the bus bar cover closed until immediately before the installation of bus bar.
Li-Ion Battery Controller Nissan Ariya SUV
Exploded View

|
Li-ion battery controller | |
Cell controller | |
Controller mounting plate |
|
: N·m (kg-m, in-lb) |
Removal & Installation
DANGER:Because hybrid vehicles and electric vehicles contain a high voltage battery, there is a risk of electric shock, electric leakage, or similar accidents if the Nissan Ariya vehicle is handled incorrectly. Be sure to follow the correct work procedures when performing inspection and maintenance.
ENVIRONMENT FOR LI-ION BATTERY DISASSEMBLY WORK
Must be an indoor environment.
The environment must utilize a shutter or other means to shut out the outside environment and prevent rain, snow, dust, or other substances from entering.
The environment must not cause the intrusion of sweat during work, or cause condensation to occur due to high temperature or humidity.
Metal powder, grease, and other foreign substances must not enter.
The indoor environment must also prevent metal powder, grease, and other foreign substances from entering due to maintenance performed on other Nissan Ariya vehicles and other sources during disassembly work.
During disassembly without internal work, temporarily close the battery pack upper case or cover it with an insulating cover.
The floor must be dry.
The floor must not be wet as a result of factors such as Nissan Ariya vehicle entry during rain or snow.
Work space
The work space must be approximately the size of one entire Nissan Ariya vehicle.
Take appropriate countermeasures so that persons other than the operator do not enter the work space, such as by placing signs indicating that disassembly work is in progress.
Standard fire fighting equipment
Always place a standard fire fighting equipment in the disassembly work area.
Depending on type of fire (Nissan Ariya vehicle or battery) use standard fire fighting equipment (water or extinguisher).
LI-ION BATTERY CONTROLLER
Disassembly
Remove battery pack upper case. Refer to Removal & Installation.
Remove busbar 8 and busbar 13 .
|
: Nuts |
|
: Bolts |
Remove harness connectors from Li-ion battery controller.
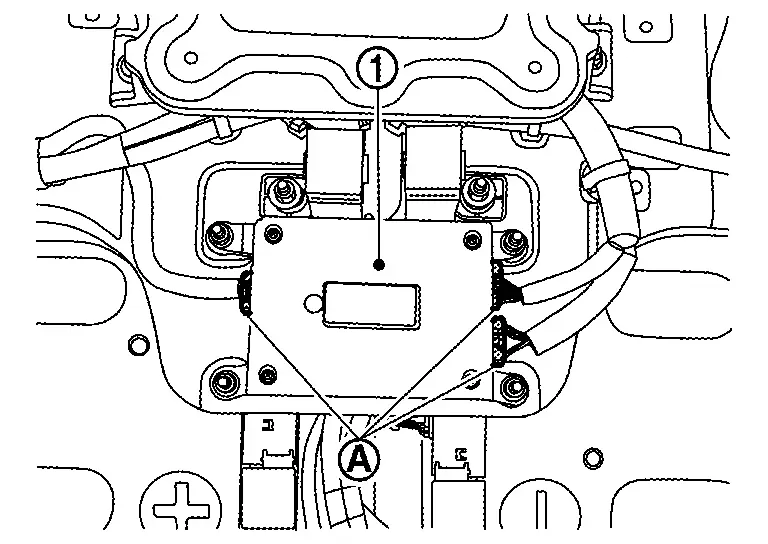
Remove Li-ion battery controller .
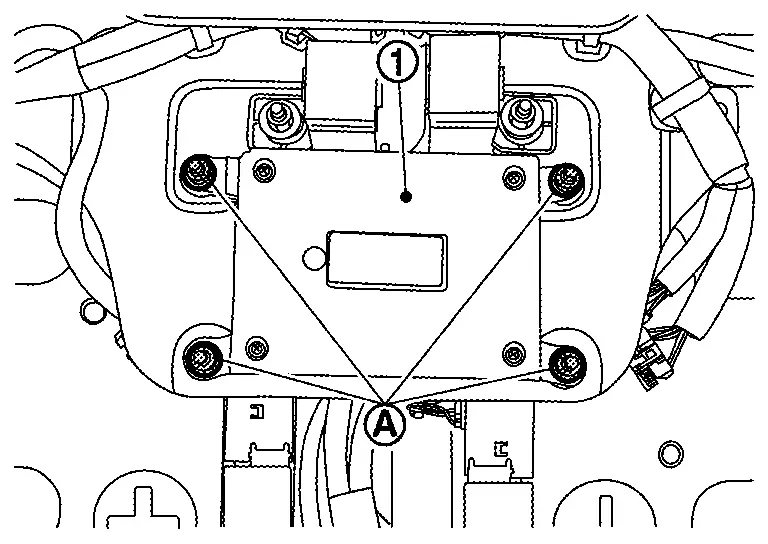
|
: Nuts |
Assembly
Note the following items, and assemble in the reverse order of disassembly.
DANGER:- There is the danger of electric shock caused by contact with the terminals. Be sure to wear insulated protective gear and use insulated tools.
- Because there is a danger of electric shock and fire, never allow bus bar to contact a wrong terminal.
If bus bar contacts a wrong terminal, the circuit becomes energized and a short may occur.
Always keep the bus bar cover closed until immediately before the installation of bus bar.
CELL CONTROLLER
DISASSEMBLY
Remove harness connector from cell controller .
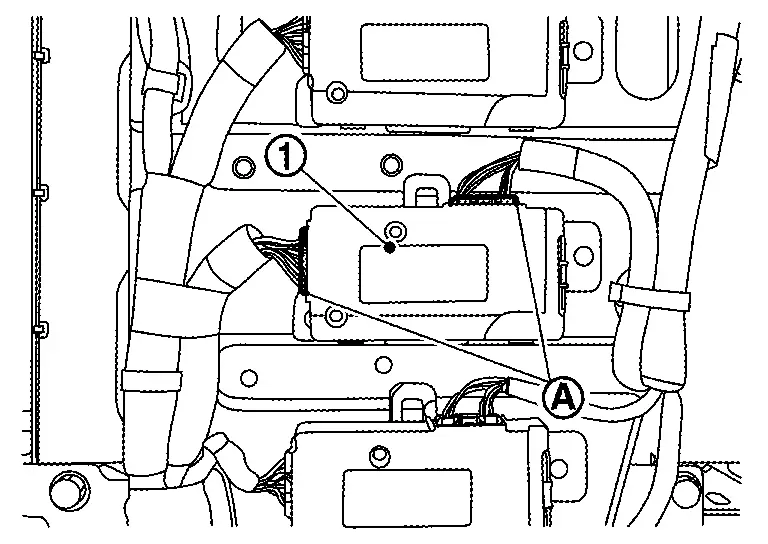
Remove cell controller by pressing part of controller mounting plate.
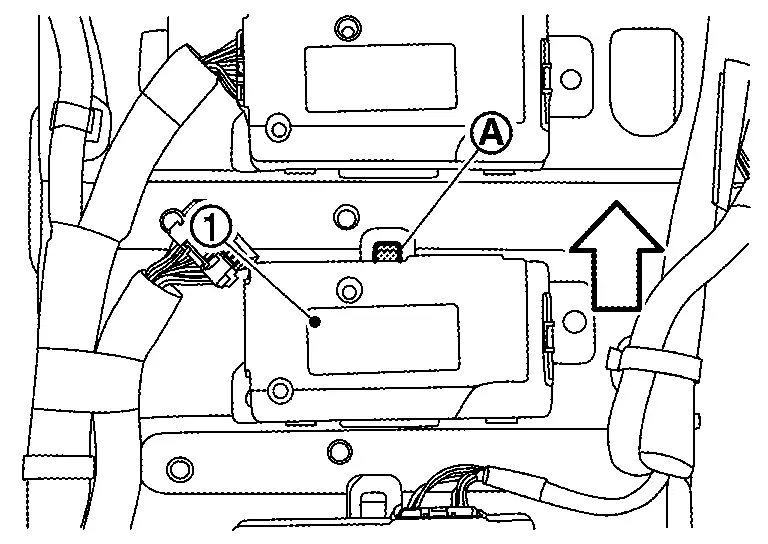
|
: Direction of removal |
Assembly
Note the following items, and assemble in the reverse order of disassembly.
DANGER:- There is the danger of electric shock caused by contact with the terminals. Be sure to wear insulated protective gear and use insulated tools.
There two types of cell controller harnesses for high voltage and low voltage. When inserting high voltage harness connector to low voltage system, it may cause fire or damage parts. Carefully avoid mistake when inserting connectors.
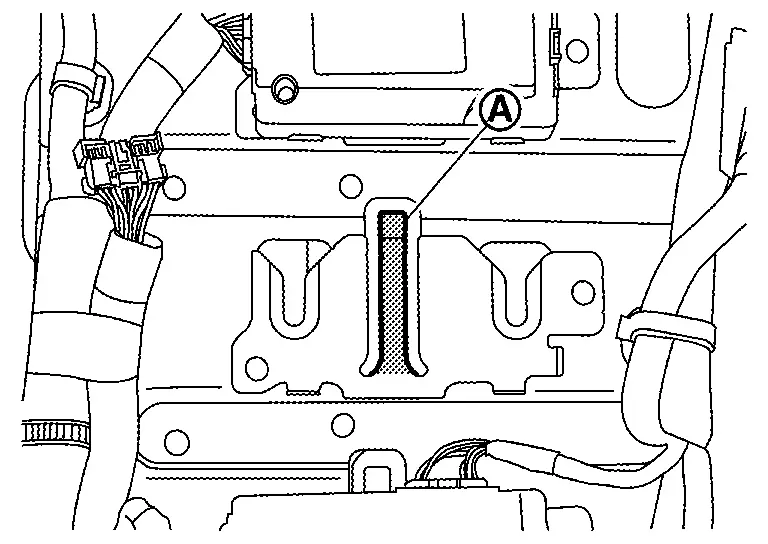
CONTROLLER MOUNTING PLATE
DISASSEMBLY
Remove service plug bracket. Refer to Disassembly & Assembly.
Remove harness connector and ground nut .
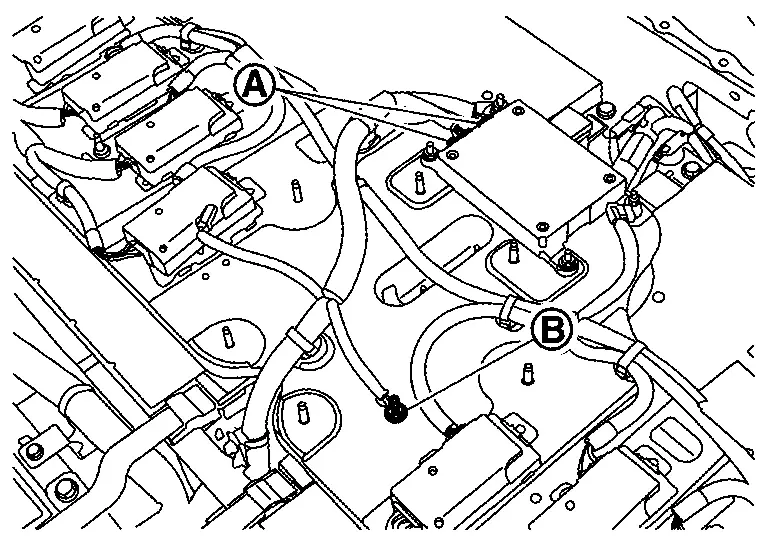
Remove high voltage harnesses.

|
: Harness connector |
|
: Ground nut |
|
: Clamp |
Remove controller mounting plate .
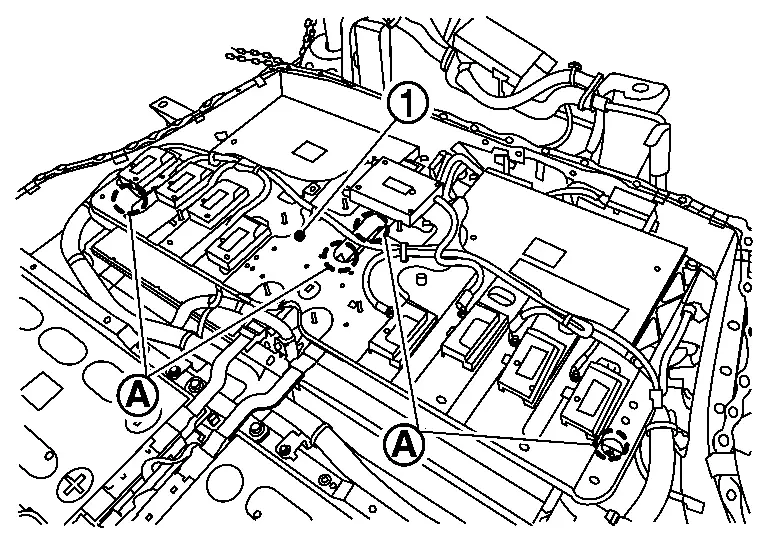
|
: Nut |
If necessary, remove Li-ion battery controller, cell controller and harnesses.
ASSEMBLY
Note the following items, and assemble in the reverse order of disassembly.
DANGER:- There is the danger of electric shock caused by contact with the terminals. Be sure to wear insulated protective gear and use insulated tools.
- Because there is a danger of electric shock and fire, never allow bus bar to contact a wrong terminal.
If bus bar contacts a wrong terminal, the circuit becomes energized and a short may occur.
Always keep the bus bar cover closed until immediately before the installation of bus bar.
Battery Junction Box and Battery Harness Nissan Ariya 1st generation
Exploded View
BATTERY JUNCTION BOX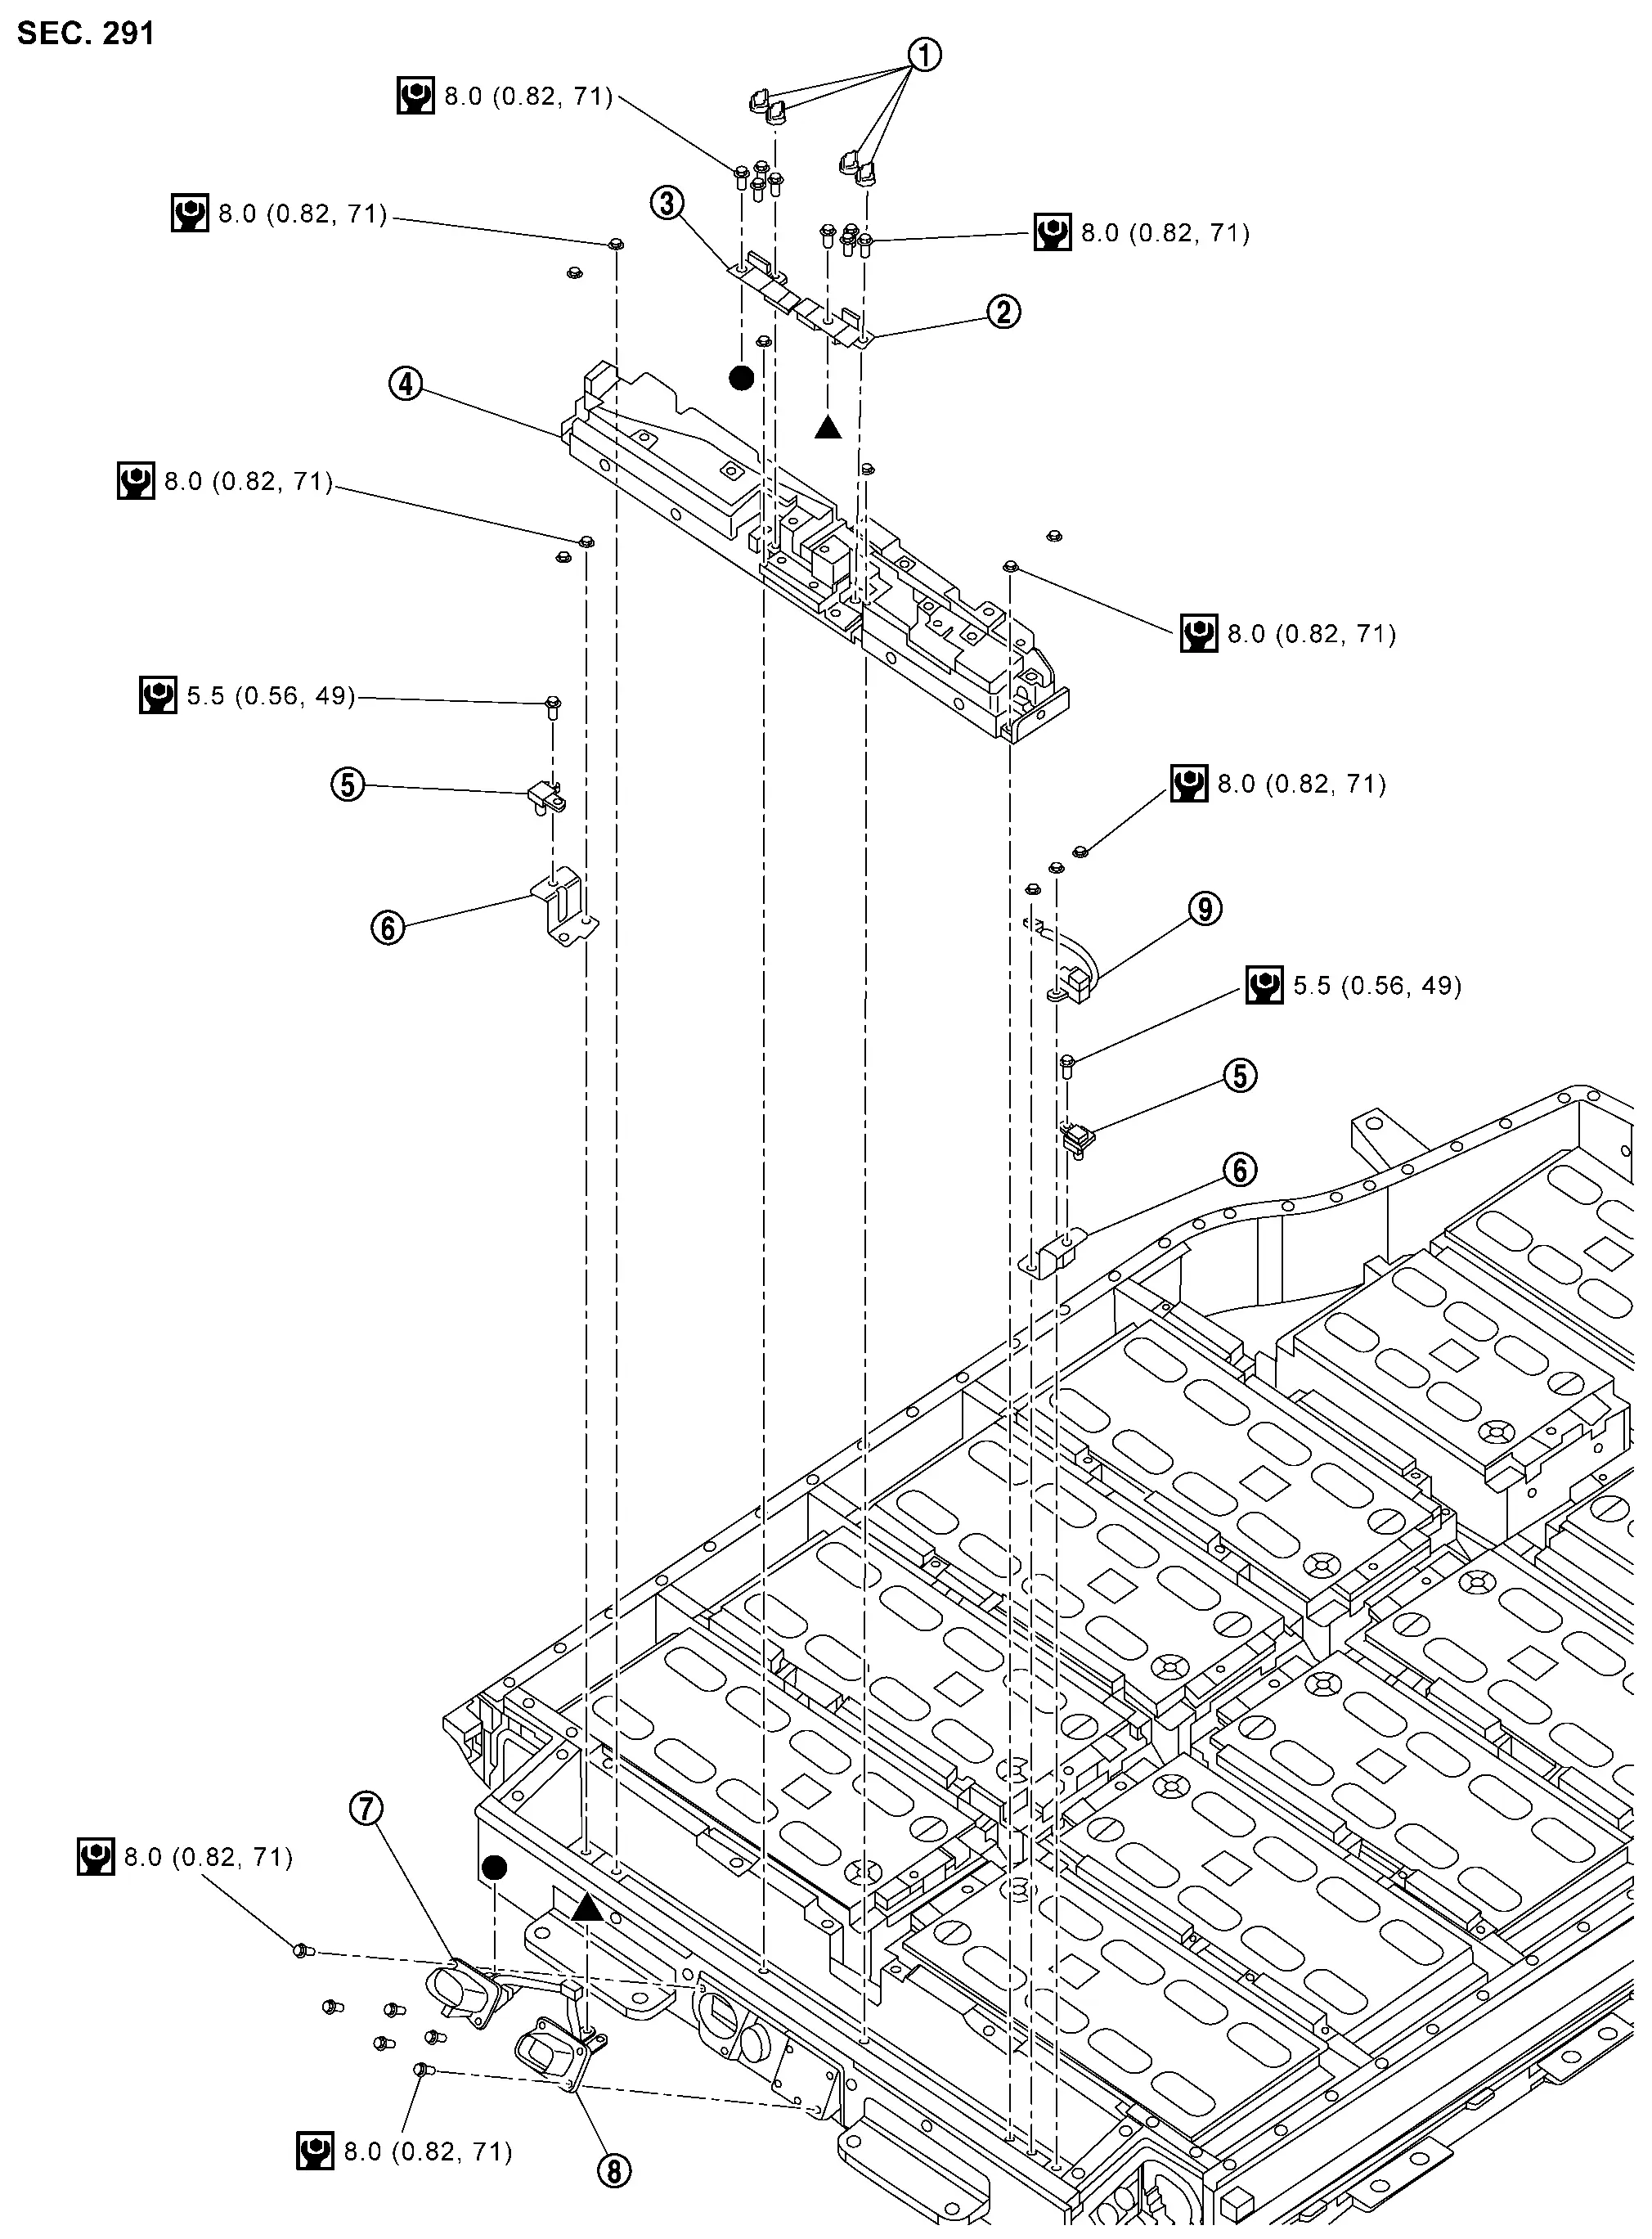
|
Nut cap | |
Busbar 1 | |
Busbar 20 |
|
Battery junction box | |
Battery pack pressure sensor | |
Bracket |
|
High-voltage harness connector | |
High-voltage harness connector | |
Battery pack water temperature sensor |
|
: N·m (kg-m, in-lb) | ||||
| ,: Indicates that the part is connected at points with same symbol in actual Nissan Ariya vehicle. |
|||||
BATTERY HARNESS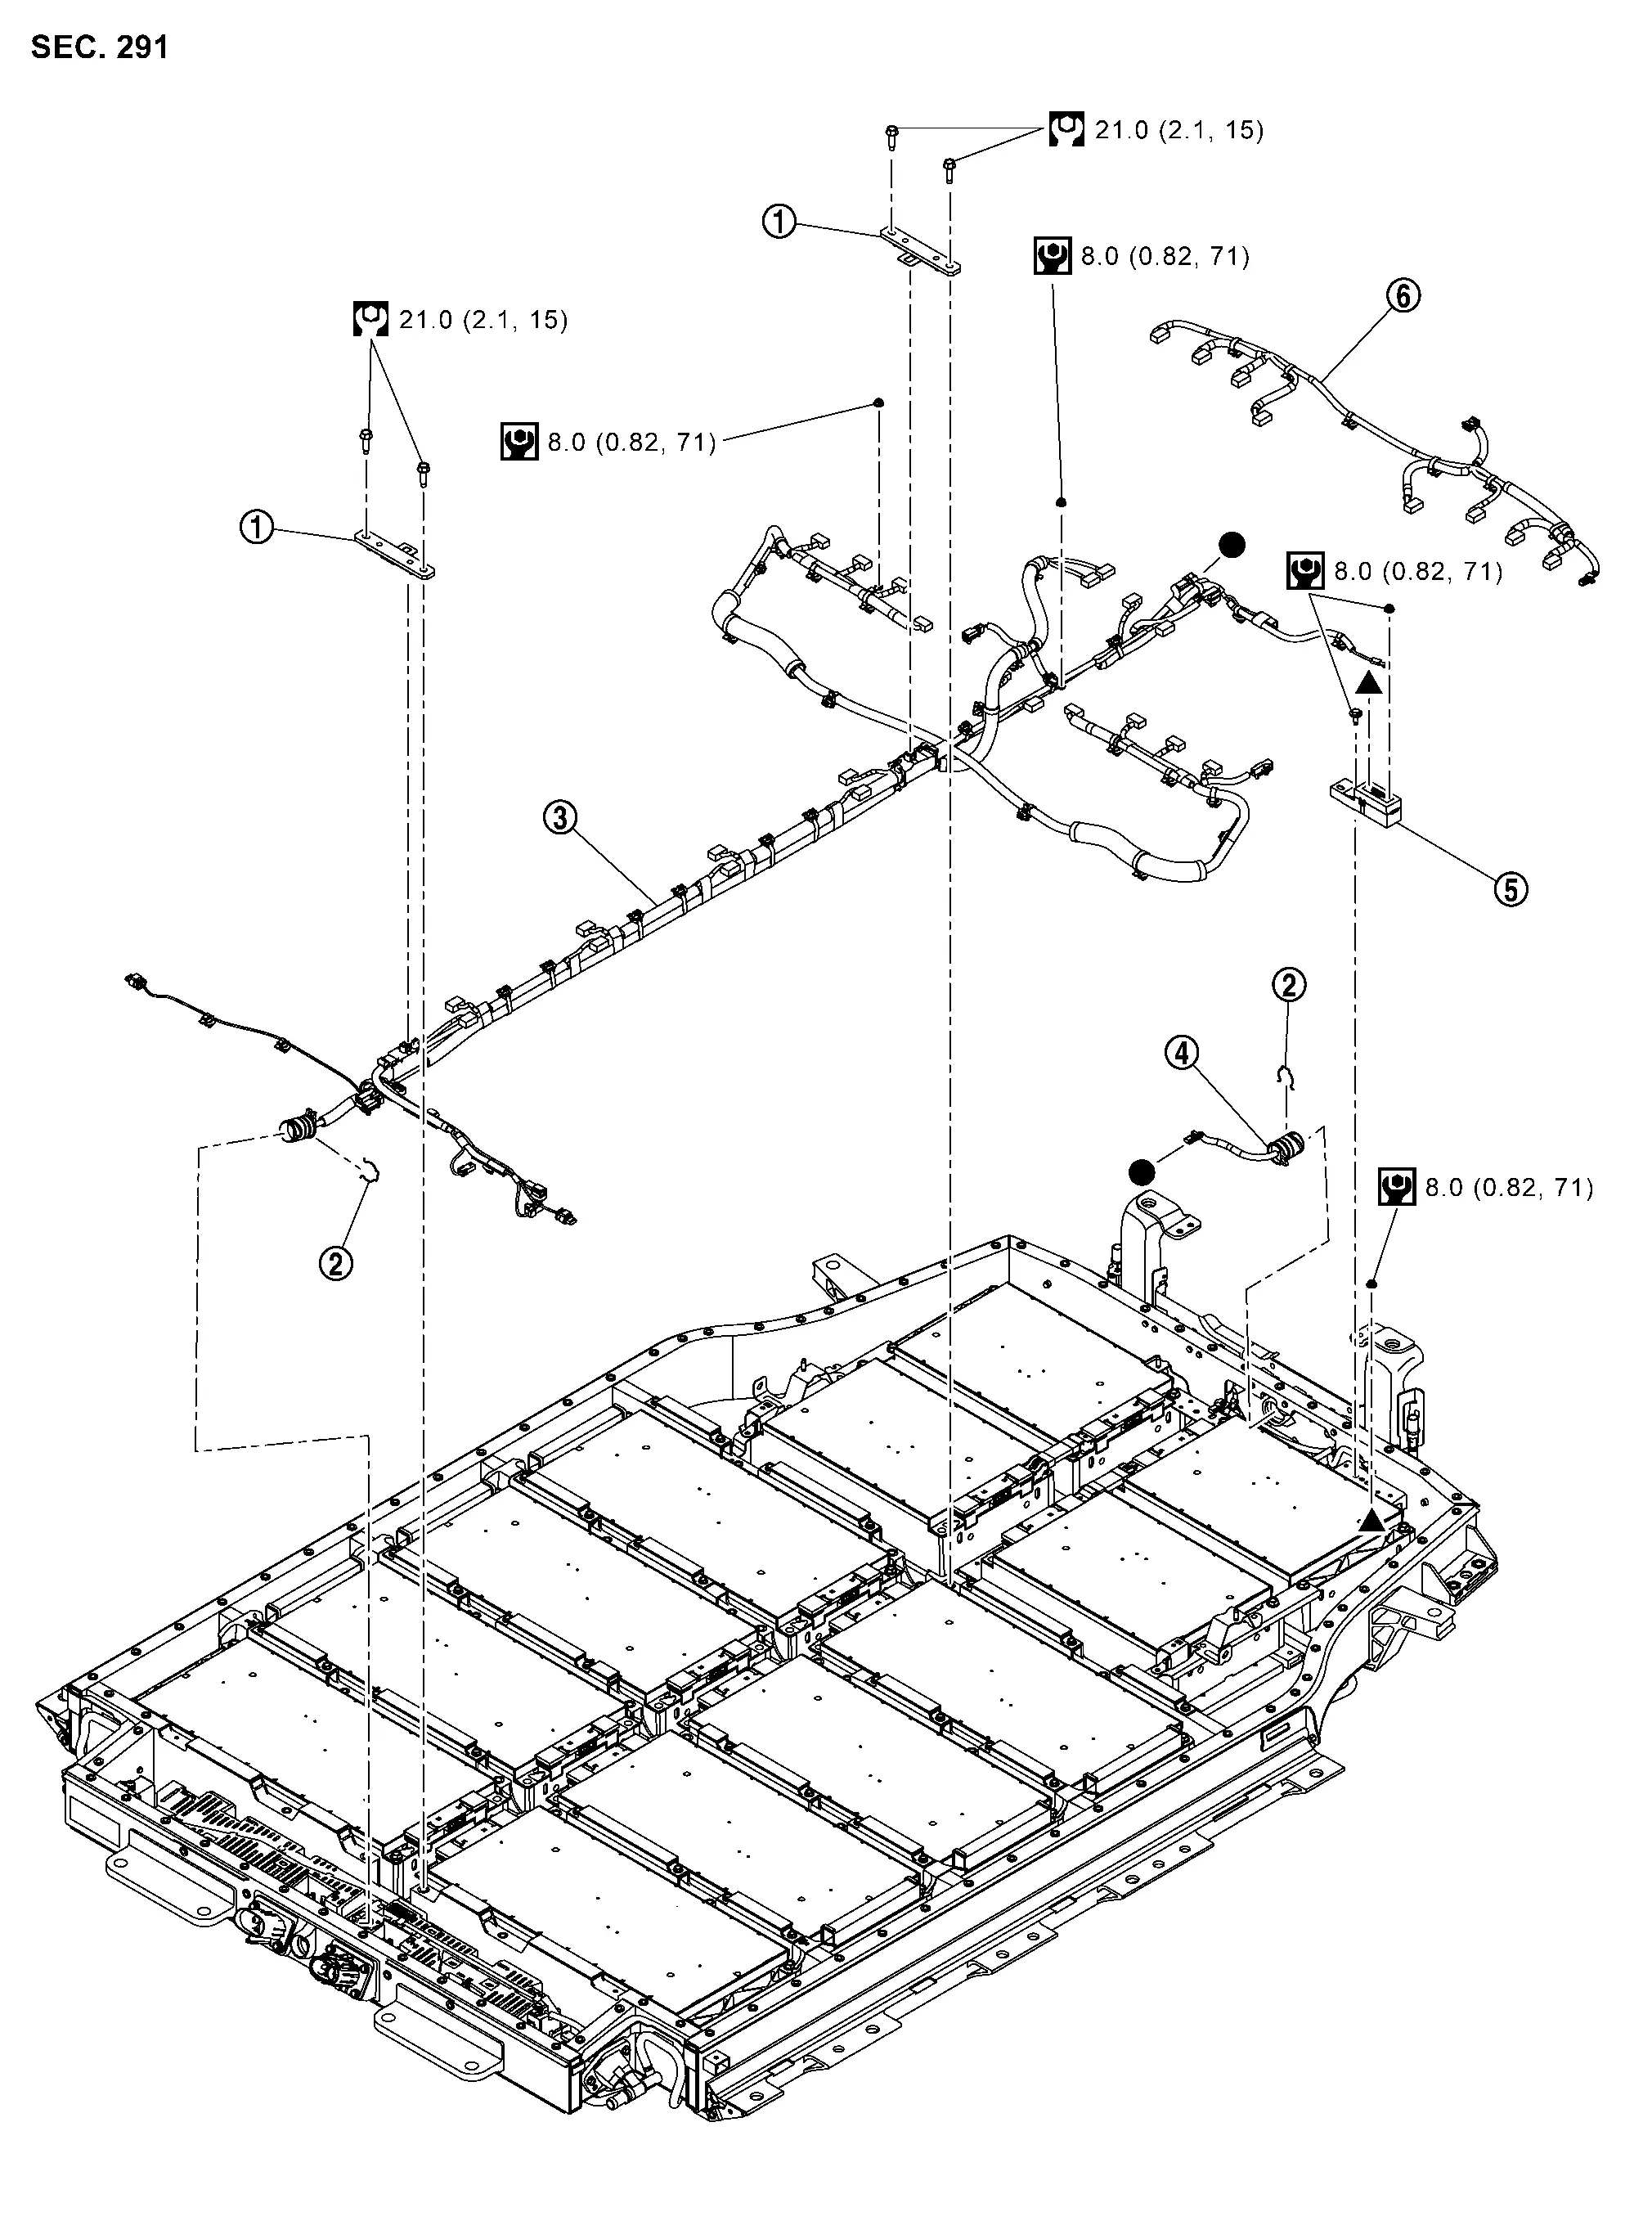
|
Bracket | |
Clip | |
Nissan Ariya Vehicle communication harness |
|
Vehicle communication harness (battery PTC) | |
Busbar terminal block | |
Cell voltage detection harness |
|
: N·m (kg-m, in-lb) | ||||
|
: N·m (kg-m, ft-lb) | ||||
| ,: Indicates that the part is connected at points with same symbol in actual Nissan Ariya vehicle. |
|||||
Disassembly & Assembly
DANGER:Because hybrid vehicles and electric vehicles contain a high voltage battery, there is a risk of electric shock, electric leakage, or similar accidents if the Nissan Ariya vehicle is handled incorrectly. Be sure to follow the correct work procedures when performing inspection and maintenance.
ENVIRONMENT FOR LI-ION BATTERY DISASSEMBLY WORK
Must be an indoor environment.
The environment must utilize a shutter or other means to shut out the outside environment and prevent rain, snow, dust, or other substances from entering.
The environment must not cause the intrusion of sweat during work, or cause condensation to occur due to high temperature or humidity.
Metal powder, grease, and other foreign substances must not enter.
The indoor environment must also prevent metal powder, grease, and other foreign substances from entering due to maintenance performed on other Nissan Ariya vehicles and other sources during disassembly work.
During disassembly without internal work, temporarily close the battery pack upper case or cover it with an insulating cover.
The floor must be dry.
The floor must not be wet as a result of factors such as Nissan Ariya vehicle entry during rain or snow.
Work space
The work space must be approximately the size of one entire Nissan Ariya vehicle.
Take appropriate countermeasures so that persons other than the operator do not enter the work space, such as by placing signs indicating that disassembly work is in progress.
Standard fire fighting equipment
Always place a standard fire fighting equipment in the disassembly work area.
Depending on type of fire (Nissan Ariya vehicle or battery) use standard fire fighting equipment (water or extinguisher).
VEHICLE COMMUNICATION HARNESS
DISASSEMBLY
Remove service plug bracket assembly. Refer to Disassembly & Assembly.
Remove controller mounting plate. Refer to Removal & Installation.
Remove busbar. Refer to Disassembly & Assembly.
Remove battery junction box.
Remove harness connector from module.
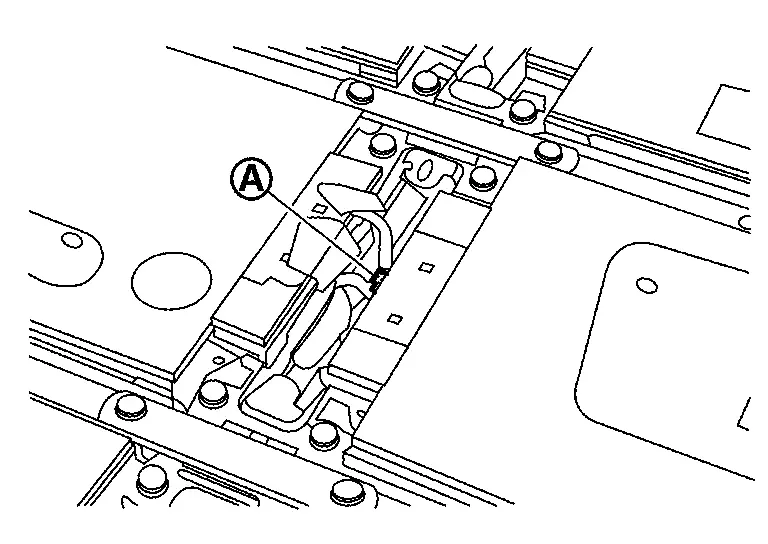
Remove bolts and then remove brackets.

Remove bolts .
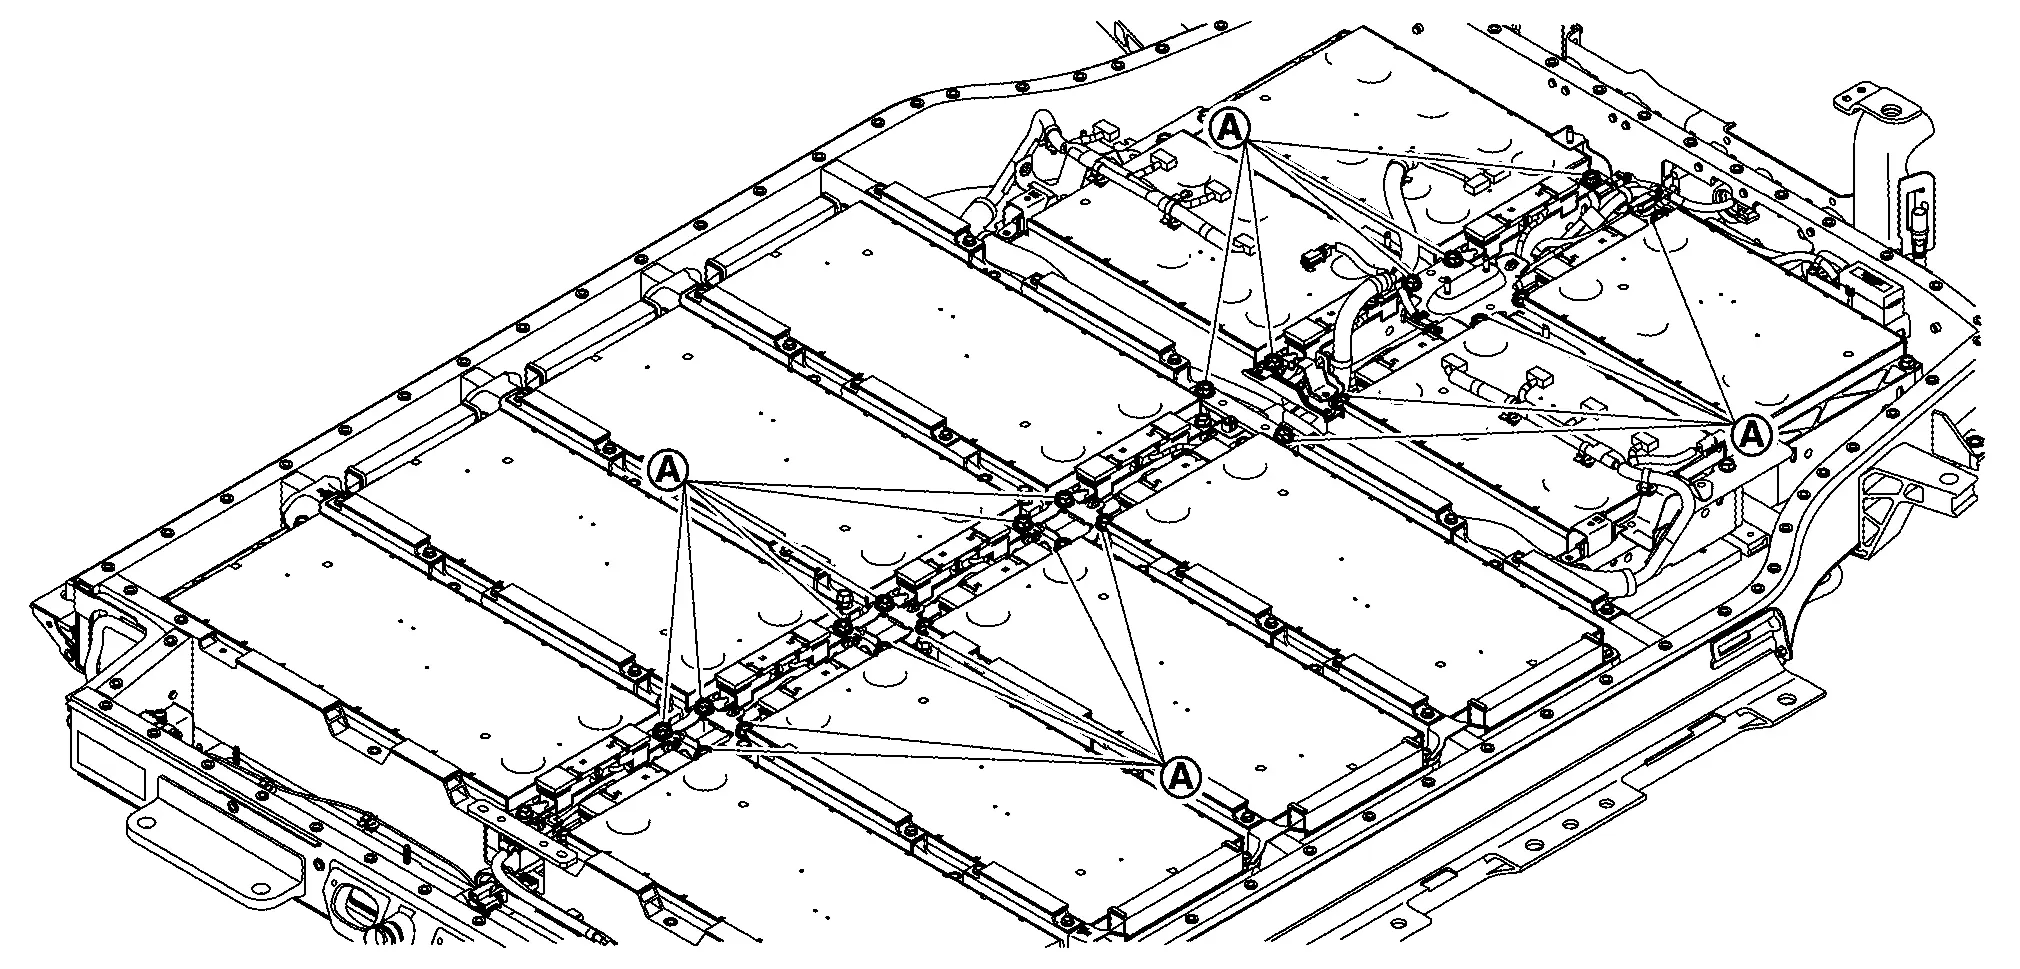
Open busbar terminal table and then remove nut .
Remove connectors , and .
Remove Nissan Ariya vehicle communication harness from battery pack lower case.
If necessary, Remove bracket from Nissan Ariya vehicle communication harness.
ASSEMBLY
Note the following items, and assemble in the reverse order of disassembly.
DANGER:- There is the danger of electric shock caused by contact with the terminals. Be sure to wear insulated protective gear and use insulated tools.
- Because there is a danger of electric shock and fire, never allow bus bar to contact a wrong terminal.
If bus bar contacts a wrong terminal, the circuit becomes energized and a short may occur.
Always keep the bus bar cover closed until immediately before the installation of bus bar.
HIGH-VOLTAGE HARNESS CONNECTOR
DISASSEMBLY
Remove interlock detecting harness connector .

Open cap and then remove bolt .
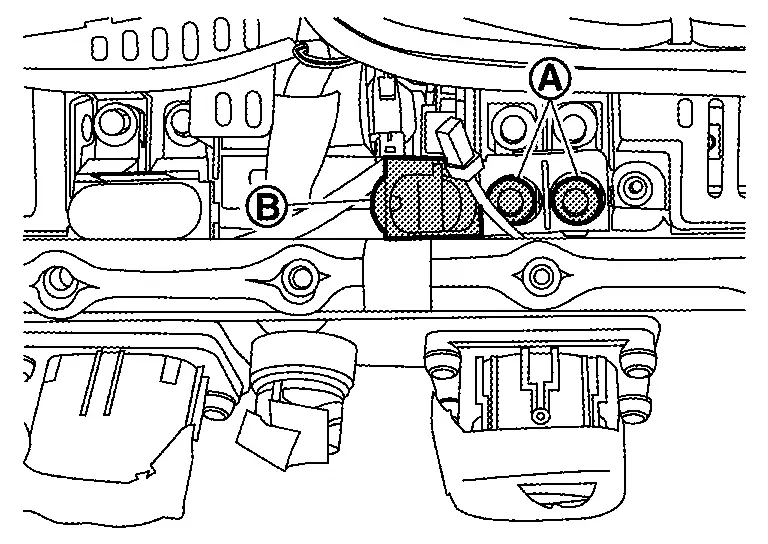
Remove bolts and then remove high-voltage harness connector .

Remove another high-voltage harness connector in the same way.
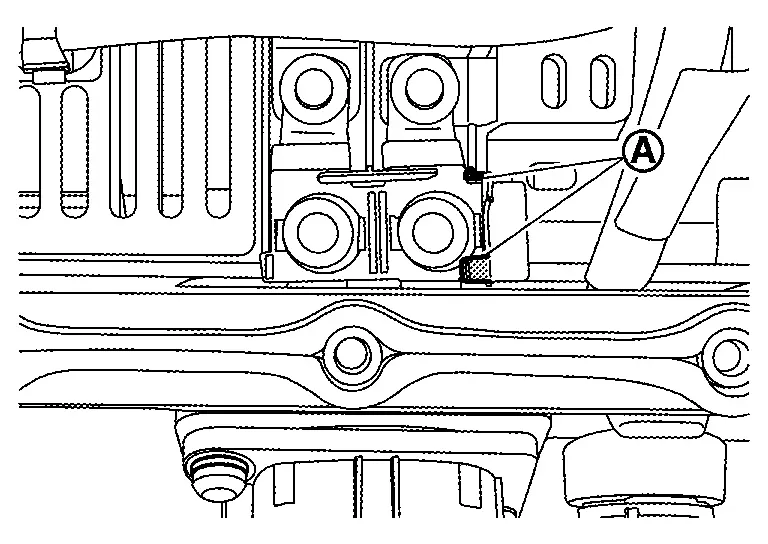
Assembly.
Note the following items, and assemble in the reverse order of disassembly.
DANGER:- There is the danger of electric shock caused by contact with the terminals. Be sure to wear insulated protective gear and use insulated tools.
- Because there is a danger of electric shock and fire, never allow bus bar to contact a wrong terminal.
If bus bar contacts a wrong terminal, the circuit becomes energized and a short may occur.
Always keep the bus bar cover closed until immediately before the installation of bus bar.
BUABAR 1 AND BUSBAR 20
DISASSEMBLY
Remove high-voltage harness connector.
Remove nut cap
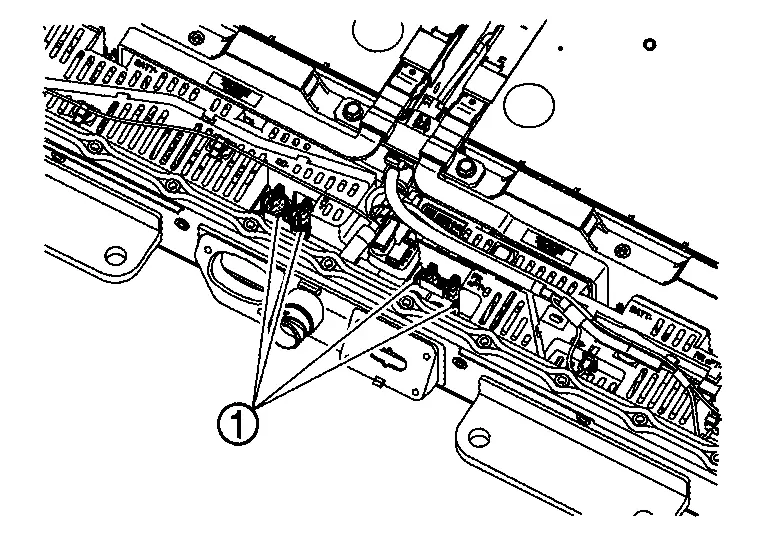
Remove bolt and then remove busbar 1 .
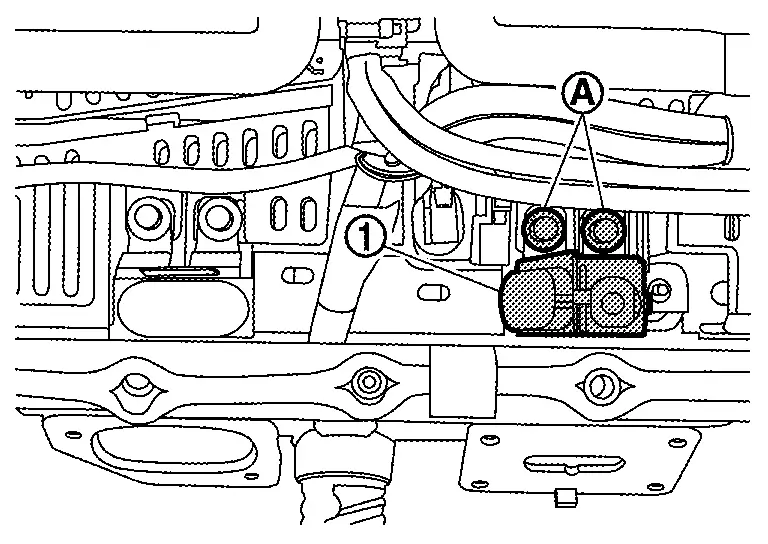
Remove busbar 20 in the same way.
Assembly.
Note the following items, and assemble in the reverse order of disassembly.
DANGER:- There is the danger of electric shock caused by contact with the terminals. Be sure to wear insulated protective gear and use insulated tools.
- Because there is a danger of electric shock and fire, never allow bus bar to contact a wrong terminal.
If bus bar contacts a wrong terminal, the circuit becomes energized and a short may occur.
Always keep the bus bar cover closed until immediately before the installation of bus bar.
BATTERY JUNCTION BOX
DISASSEMBLY
Remove high-voltage harness connector.
Remove busbar 1 and busbar 20.
Remove busbar 2 and busbar 19. Refer to Disassembly & Assembly.
Remove clip and then push Nissan Ariya vehicle communication harness connector in the battery pack lower case.
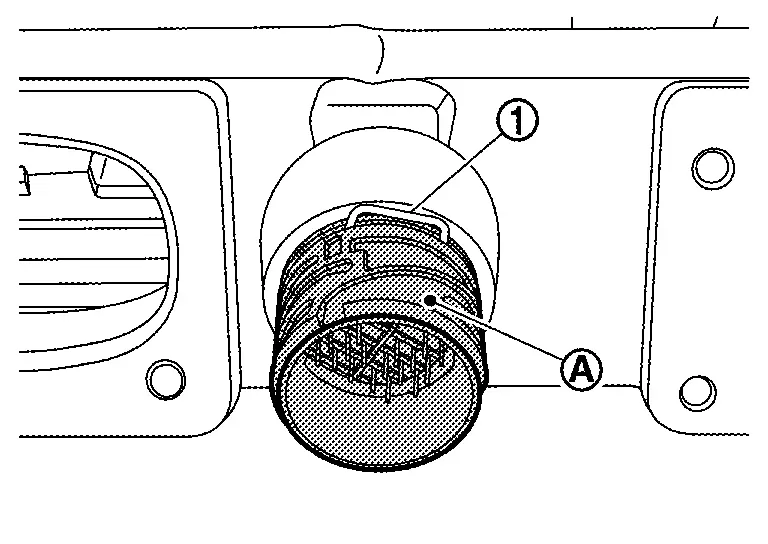
Remove bolts .

Remove harness connector of battery pack pressure sensor and harness connector of battery pack water temperature sensor.

Remove harness connector of battery pack pressure sensor.
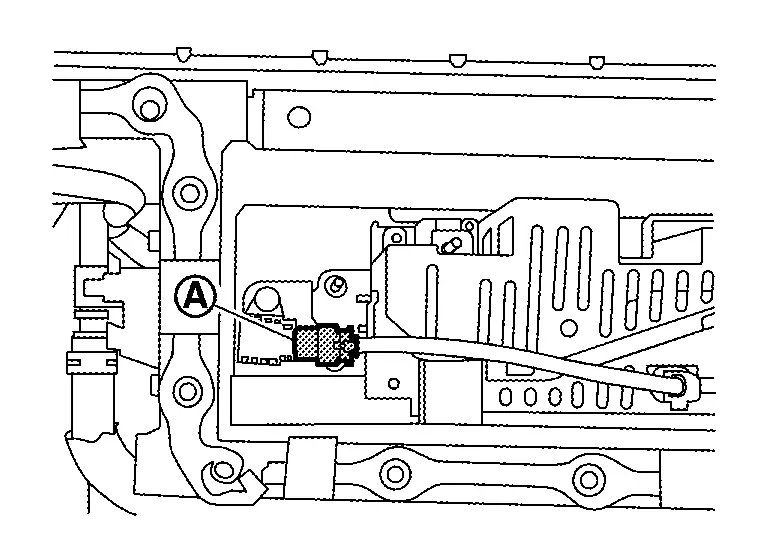
Remove connector harness of Nissan Ariya vehicle communication harness.
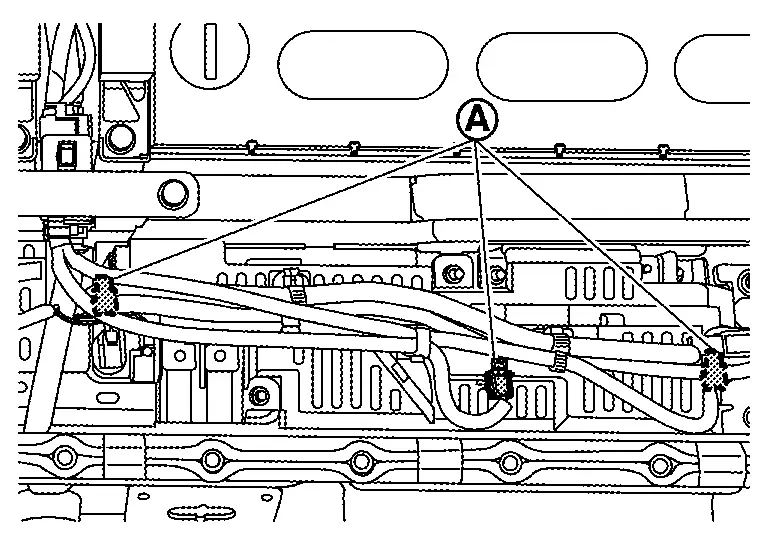
Remove nuts of battery junction box
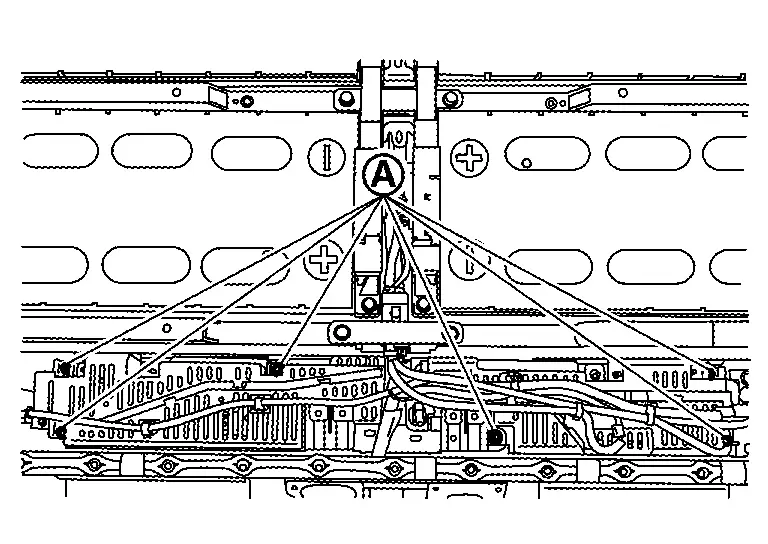
Lift battery junction box and release claws on upper cover of battery junction box.

Remove harness clips from battery junction box.
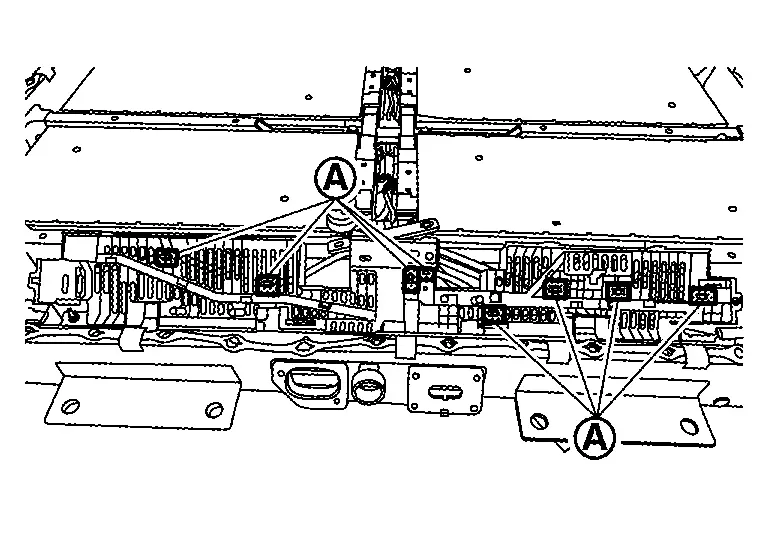
Assembly
Note the following items, and assemble in the reverse order of disassembly.
DANGER:- There is the danger of electric shock caused by contact with the terminals. Be sure to wear insulated protective gear and use insulated tools.
- Because there is a danger of electric shock and fire, never allow bus bar to contact a wrong terminal.
If bus bar contacts a wrong terminal, the circuit becomes energized and a short may occur.
Always keep the bus bar cover closed until immediately before the installation of bus bar.
Install upper cover to battery junction box .
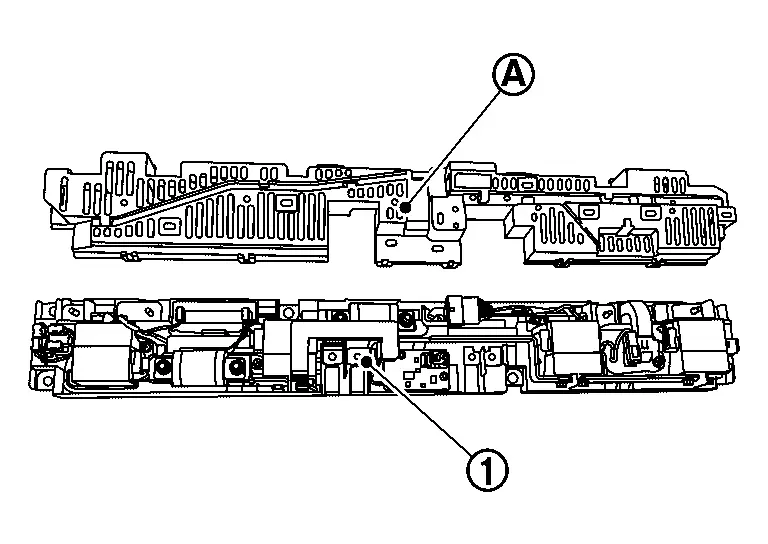
Install battery junction box to battery pack lower case.
BATTERY PACK PRESSURE SENSOR
DISASSEMBLY
Remove harness connector of battery pack pressure sensor.
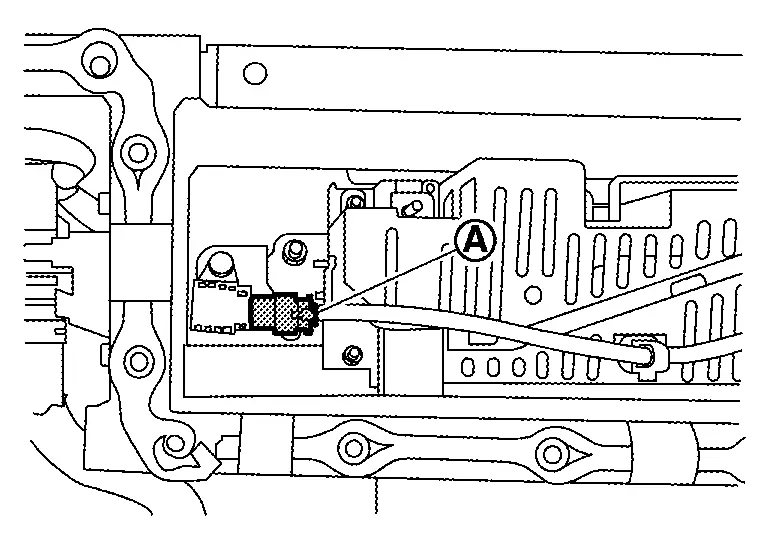
Remove bolt and then remove battery pack pressure sensor .
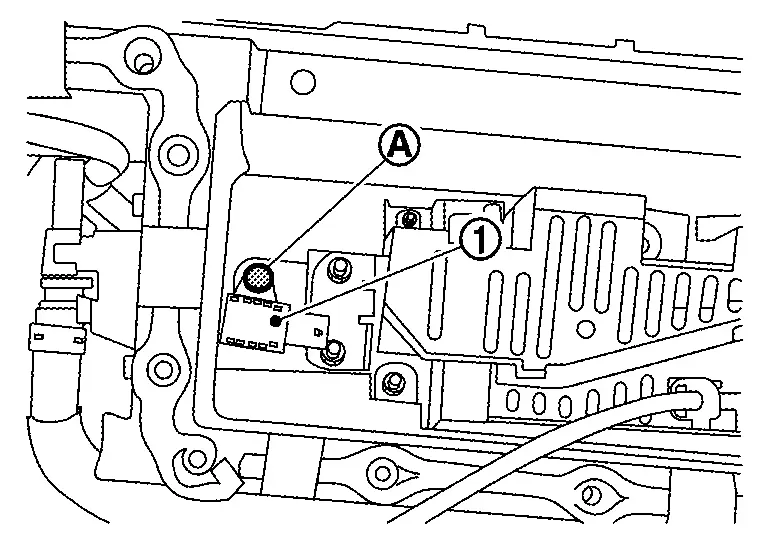
Remove left battery pack pressure sensor in the same way.
ASSEMBLY
Note the following items, and assemble in the reverse order of disassembly.
DANGER:- There is the danger of electric shock caused by contact with the terminals. Be sure to wear insulated protective gear and use insulated tools.
- Because there is a danger of electric shock and fire, never allow bus bar to contact a wrong terminal.
If bus bar contacts a wrong terminal, the circuit becomes energized and a short may occur.
Always keep the bus bar cover closed until immediately before the installation of bus bar.
BATTERY PACK WATER TEMPERATURE SENSOR
DISASSEMBLY
Disconnect harness connector of battery pack water temperature sensor and battery pack pressure sensor.
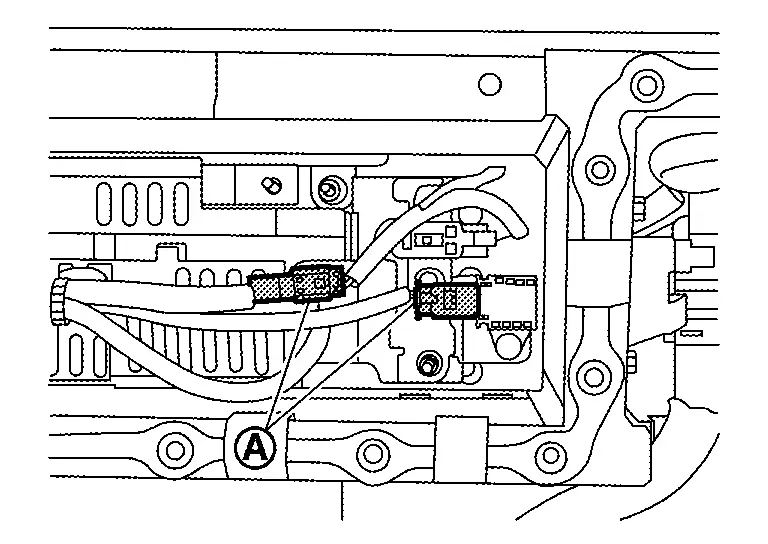
Remove nut and then remove battery pack pressure sensor .
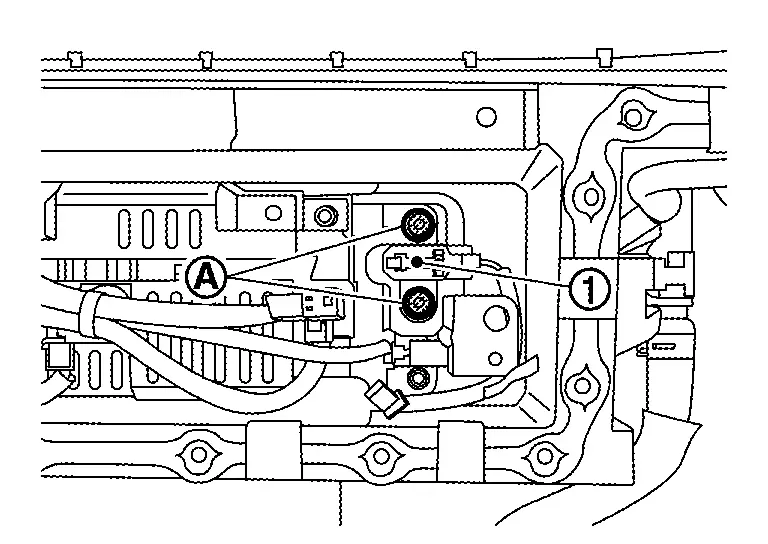
ASSEMBLY
Note the following items, and assemble in the reverse order of disassembly.
DANGER:- There is the danger of electric shock caused by contact with the terminals. Be sure to wear insulated protective gear and use insulated tools.
- Because there is a danger of electric shock and fire, never allow bus bar to contact a wrong terminal.
If bus bar contacts a wrong terminal, the circuit becomes energized and a short may occur.
Always keep the bus bar cover closed until immediately before the installation of bus bar.
Front Module Stack Nissan Ariya: FE0
Exploded View
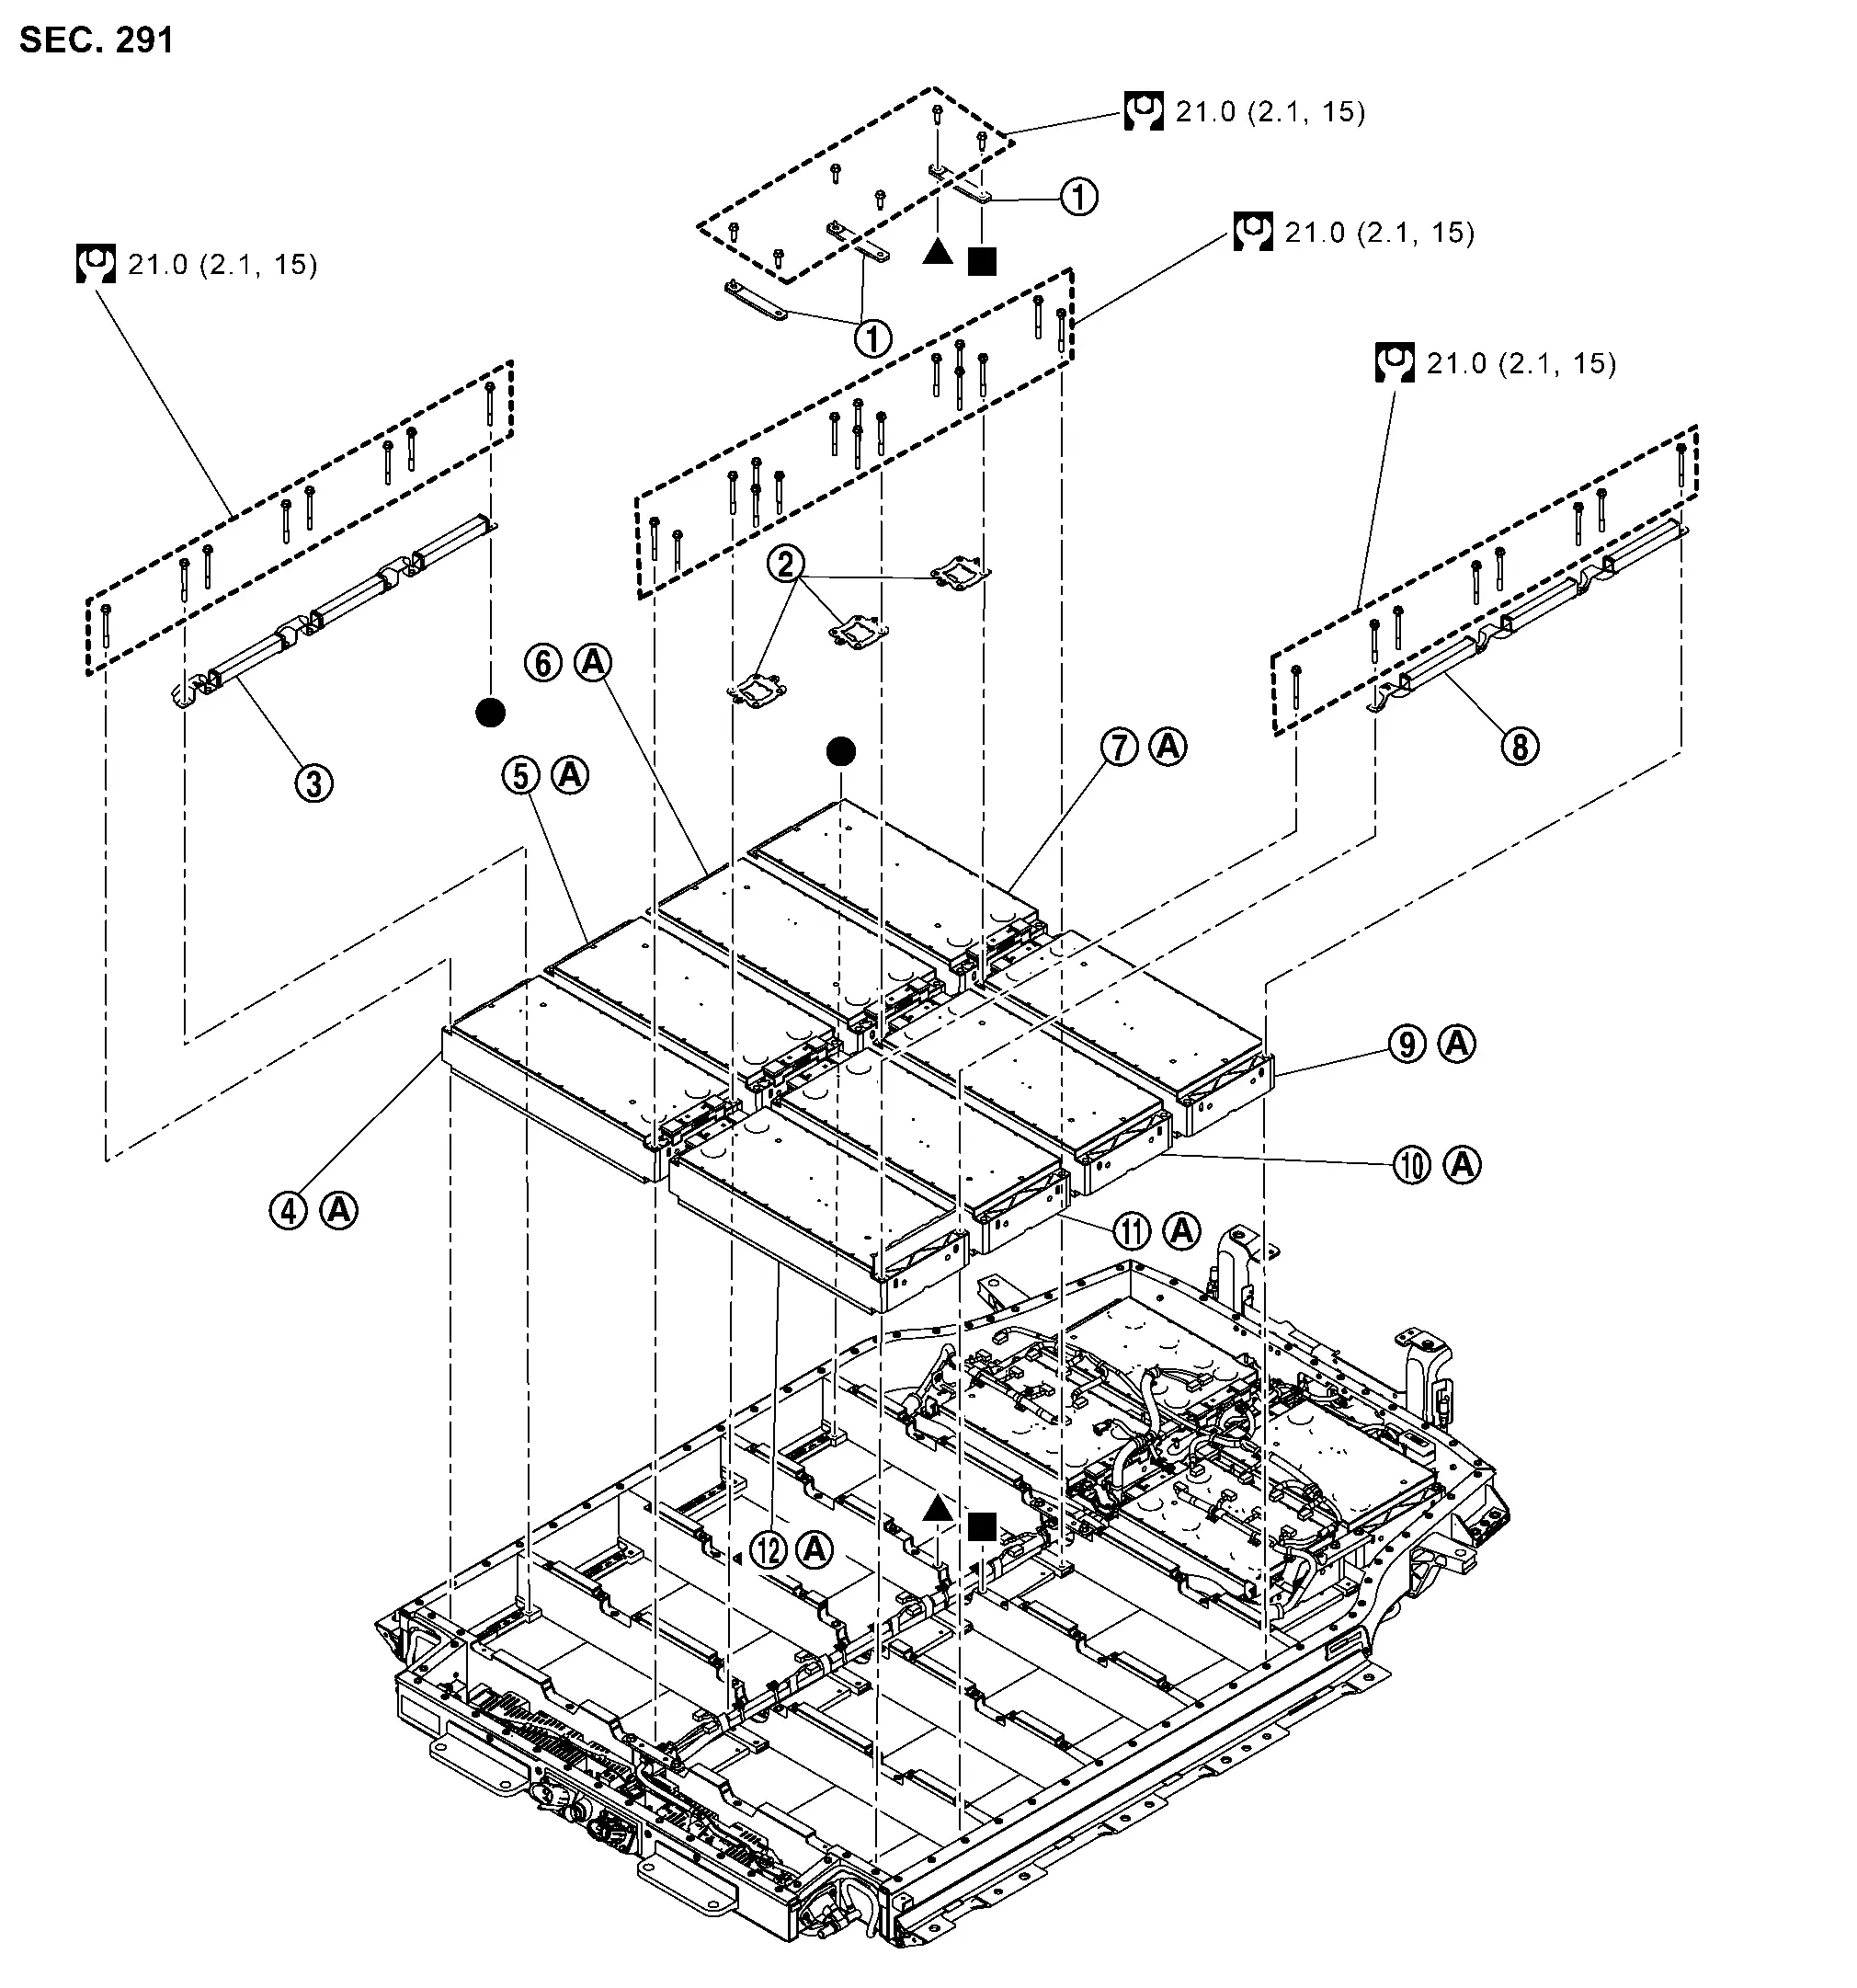
|
Bracket | |
Bracket | |
Bracket |
|
Module No.12(MD12) | |
Module No.11(MD11) | |
Module No.10(MD10) |
|
Module No.9(MD9) | |
Bracket | |
Module No.4(MD4) |
|
Module No.3(MD3) | |
Module No.2(MD2) | |
Module No.1(MD1) |
|
: Comply with the assembly procedure when installing. Refer to Disassembly & Assembly. | ||||
|
: N·m (kg-m, ft-lb) | ||||
| ,,: Indicates that the part is connected at points with same symbol in actual Nissan Ariya vehicle. |
|||||
Disassembly & Assembly
DANGER:Since hybrid vehicles and electric vehicles contain a high voltage battery, there is the risk of electric shock, electric leakage, or similar accidents if the high voltage component and Nissan Ariya vehicle are handled incorrectly. Be sure to follow the correct work procedures when performing inspection and maintenance.
ENVIRONMENT FOR LI-ION BATTERY DISASSEMBLY WORK
Must be an indoor environment.
The environment must utilize a shutter or other means to shut out the outside environment and prevent rain, snow, dust, or other substances from entering.
The environment must not cause the intrusion of sweat during work, or cause condensation to occur due to high temperature or humidity.
Metal powder, grease, and other foreign substances must not enter.
The indoor environment must also prevent metal powder, grease, and other foreign substances from entering due to maintenance performed on other Nissan Ariya vehicles and other sources during disassembly work.
During disassembly without internal work, temporarily close the battery pack upper case or cover it with an insulating cover.
The floor must be dry.
The floor must not be wet as a result of factors such as Nissan Ariya vehicle entry during rain or snow.
Work space
The work space must be approximately the size of one entire Nissan Ariya vehicle.
Take appropriate countermeasures so that persons other than the operator do not enter the work space, such as by placing signs indicating that disassembly work is in progress.
Standard fire fighting equipment
Always place a standard fire fighting equipment in the disassembly work area.
Depending on type of fire (Nissan Ariya vehicle or battery) use standard fire fighting equipment (water or extinguisher).
DISASSEMBLY
Remove service plug bracket assembly. [module No. 4 (MD4) and module No. 9 (MD9) only] Refer to Disassembly & Assembly.
Remove controller mounting plate. [module No. 4 (MD4) and module No. 9 (MD9) only] Refer to Removal & Installation.
Remove busbar. Refer to Disassembly & Assembly.
Remove harness connector from module.
Remove bolt and then remove bracket .
Remove bracket bolts that contact to the module to be removed.
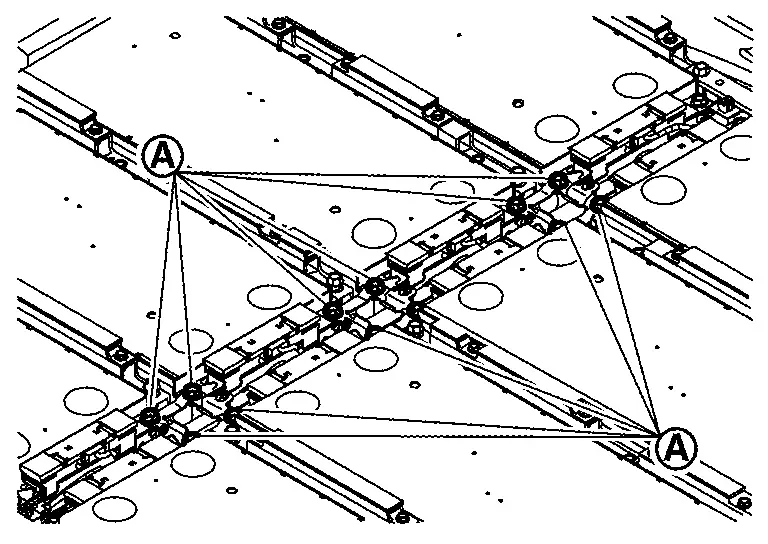
Remove bolt and then remove bracket .
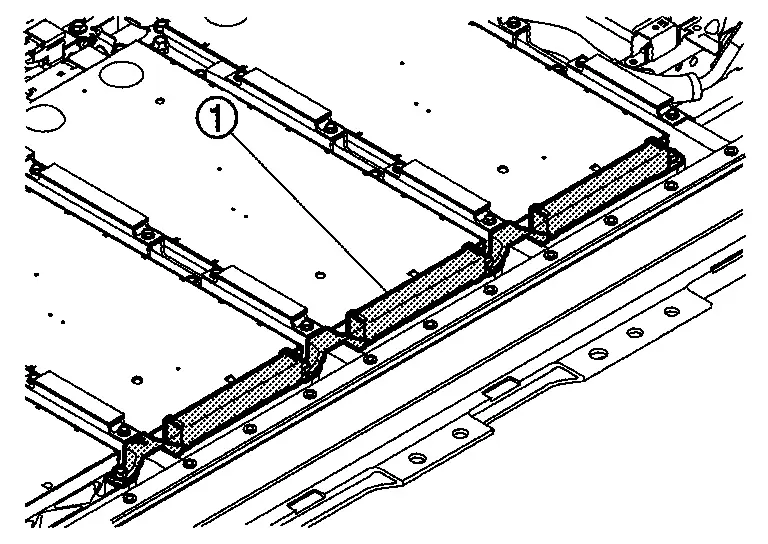
Remove bolt . [module No.1 (MD1) or module No.12 (MD12) only]
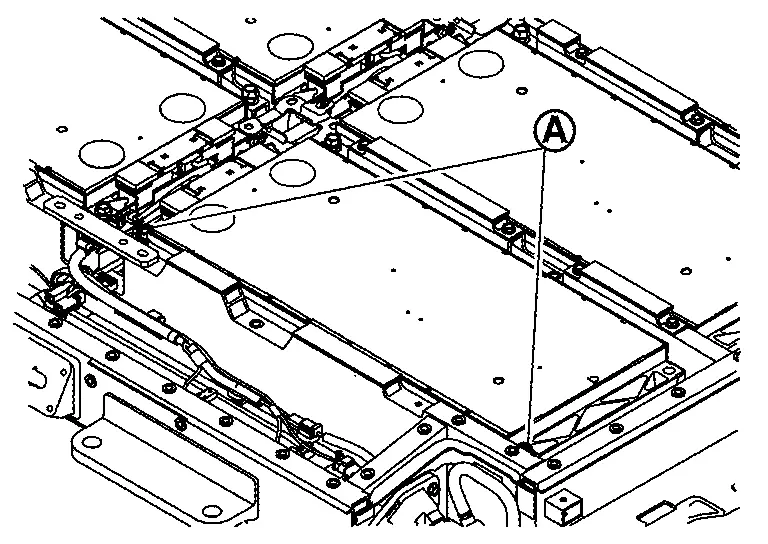
Remove bolt . [module No.4 (MD4) or module No.9 (MD9) only]
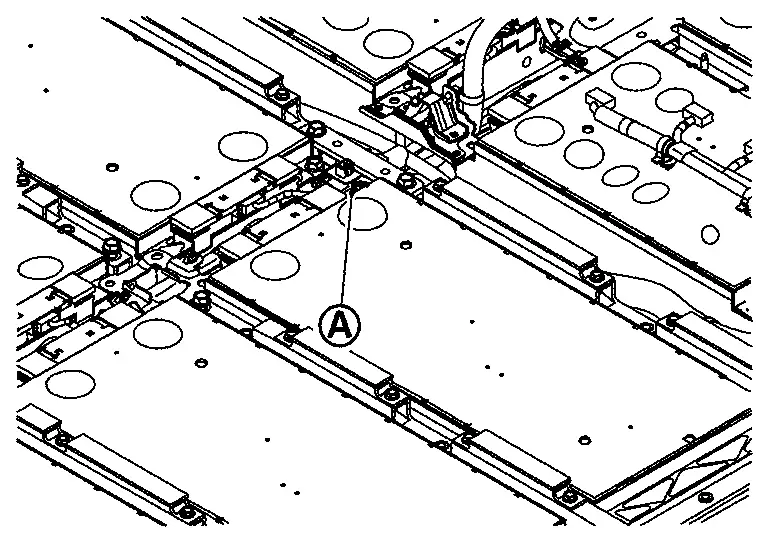
Hang carabiners (service part: 299A3 5MP0A) in the lifting holes and install belt slinger.
Install temporarily module mounting bolt to terminal side by screwing several rotations.
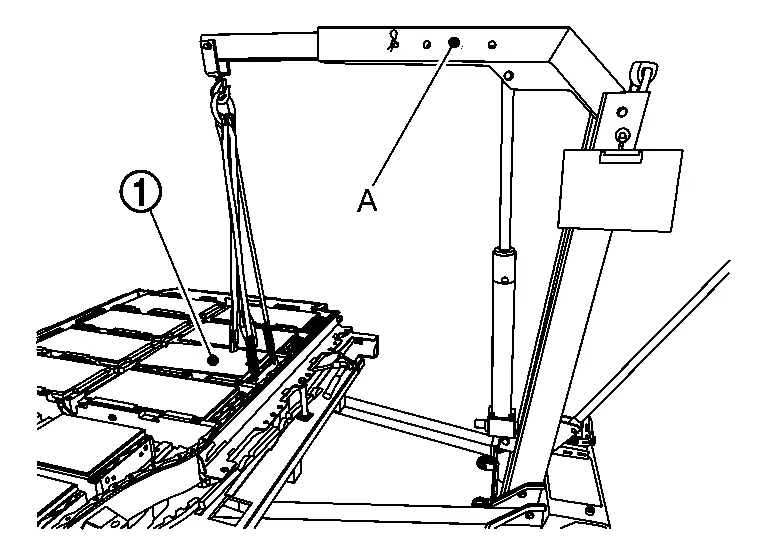
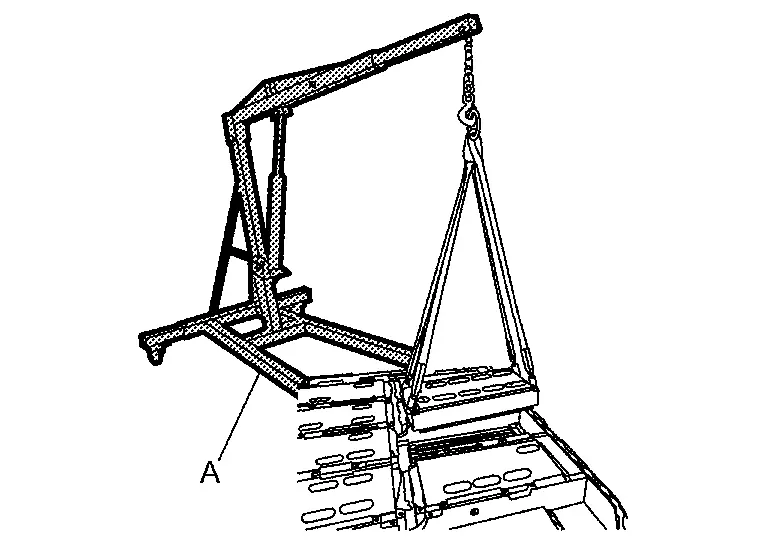
Lifting load is applied to the module using the mobile floor crane (A).
Drive resin scraper (service parts: 299A3 5MP0A) (A) in gap filler with a resin hammer and pry left and right to peel the adhesion of gap filler.
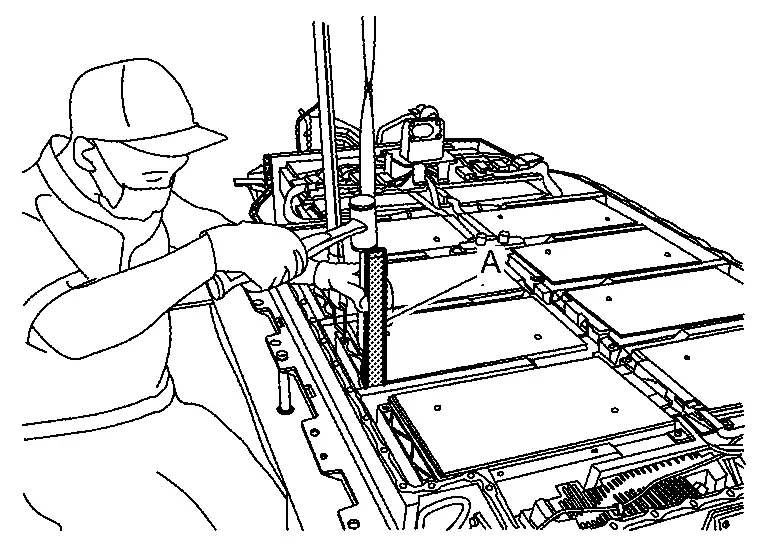
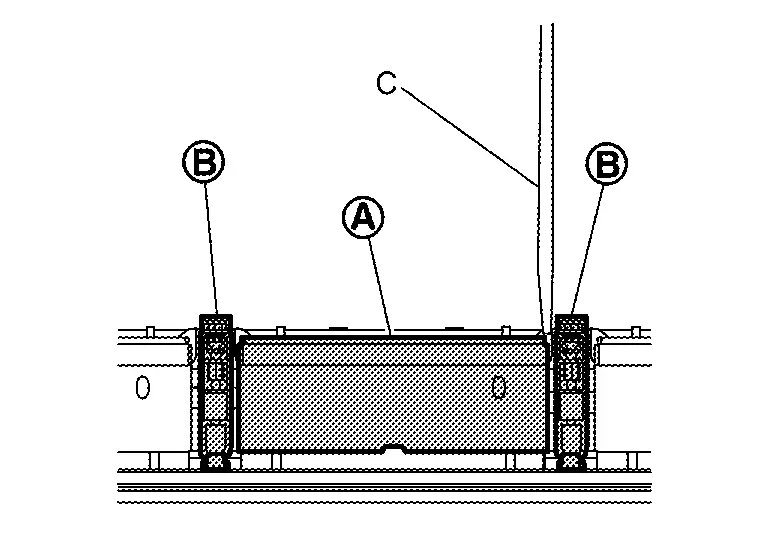
Never pry except module end plate
to prevent module from damaging, deforming and leaking liquid.Never remove 2 modules or more to prevent battery pack from weight unbalance except replacement work of battery pack lower case.
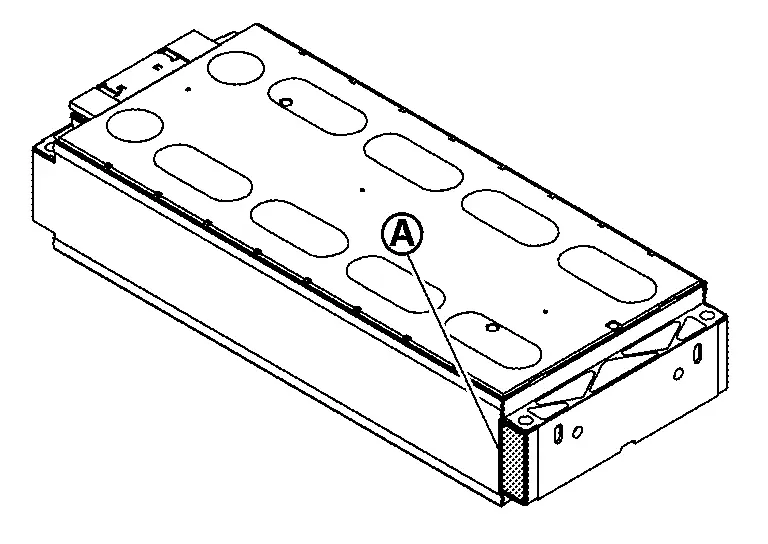
Remove module that was temporarily installed to terminal side.
Hang carabiners (service part: 299A3 5MP0A) in the lifting holes and install belt slinger.
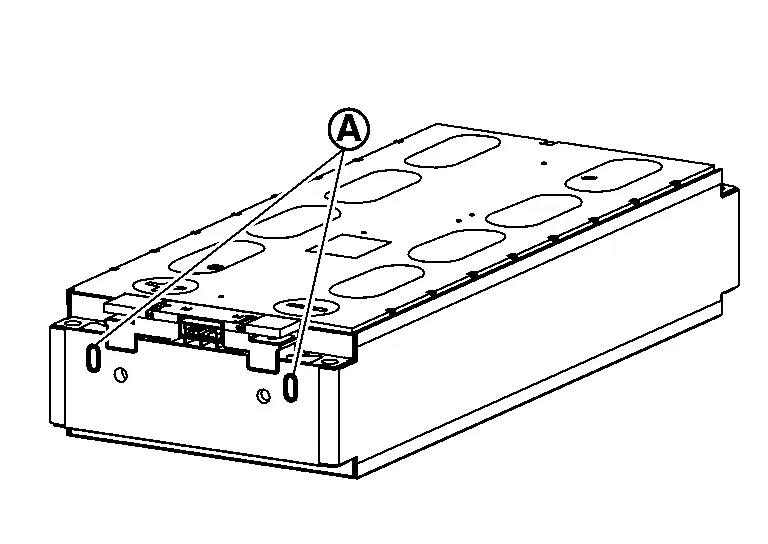
Remove module from battery lower case by lifting up 4 points of module with mobile floor crane.
Peel off gap filler from battery pack lower case.
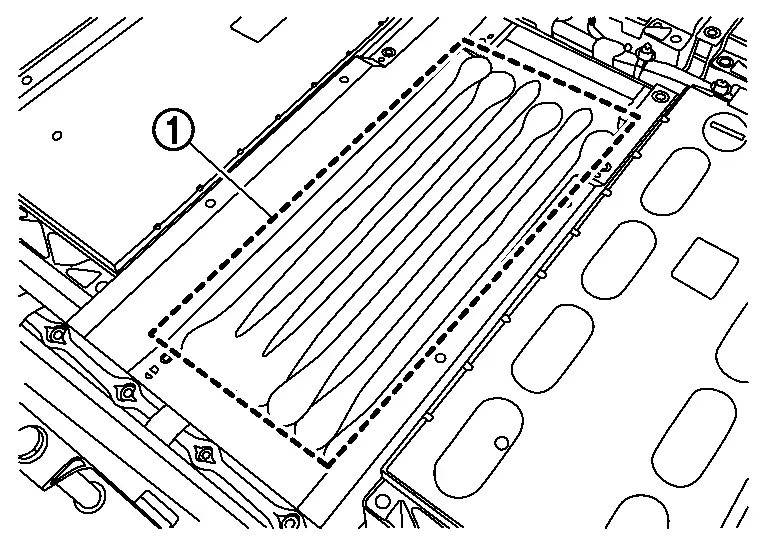
ASSEMBLY
Note the following items, and assemble in the reverse order of disassembly.
DANGER:- There is the danger of electric shock caused by contact with the terminals. Be sure to wear insulated protective gear and use insulated tools.
- Because there is a danger of electric shock and fire, never allow bus bar to contact a wrong terminal.
If bus bar contacts a wrong terminal, the circuit becomes energized and a short may occur.
Always keep the bus bar cover closed until immediately before the installation of bus bar.
Check battery pack lower case inside for foreign material or peeled gap filler
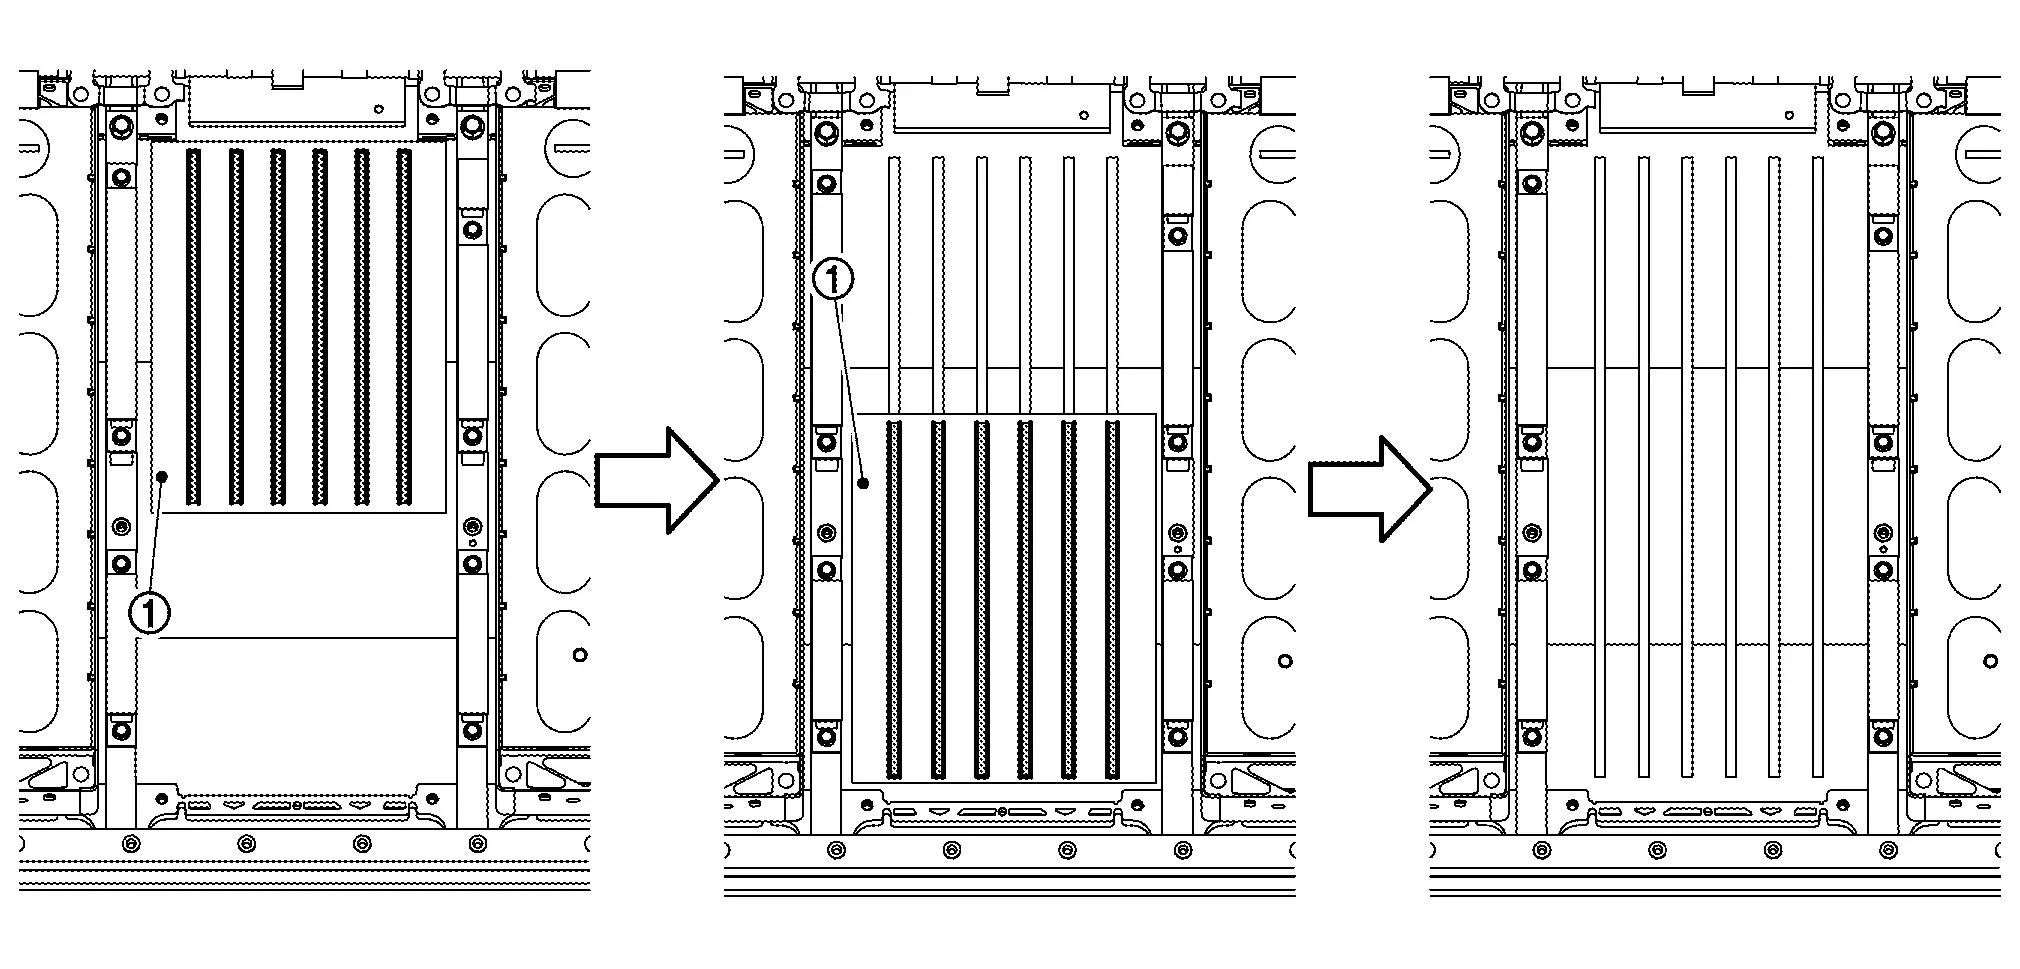
Set gabari sheet to battery pack lower case as shown in the figure and then write lines on battery pack lower case with oil-based pen.

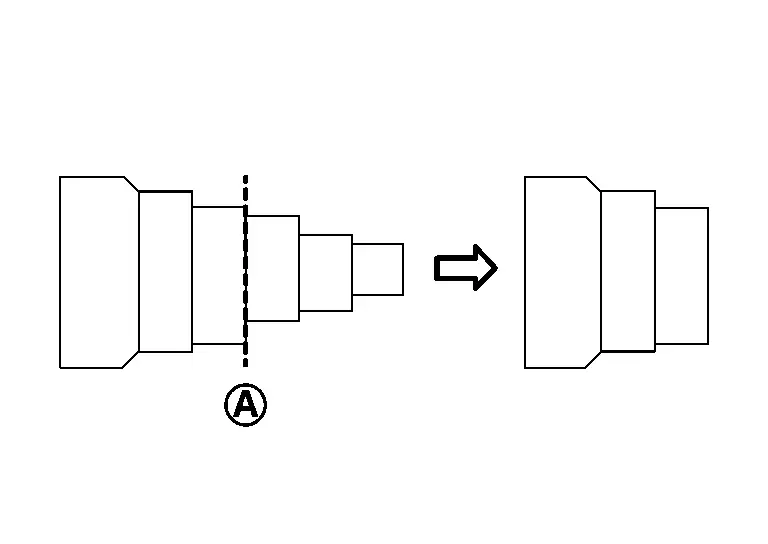
Cut the static mixer at the position shown in the figure.
After taking out cartridge from packing box, check the followings;
No evidence of liquid leakage in the packing box.
No liquid leakage from bottom of cartridge
.
Set static mixer to cartridge.
Set cartridge to the gap filler gun [SST: BP2000400Z (J-53350)].
Attach guideline label to cartridge as shown in the figure.

| Guideline label | :C-108ml |
Apply gap filler in accordance with lines written on the battery pack lower case.
Install locate pin [SST: KV99119700 (J-53349)] to battery pack lower case.
Install module in the reverse order of removal.
Rear Module Stack Nissan Ariya SUV
Exploded View
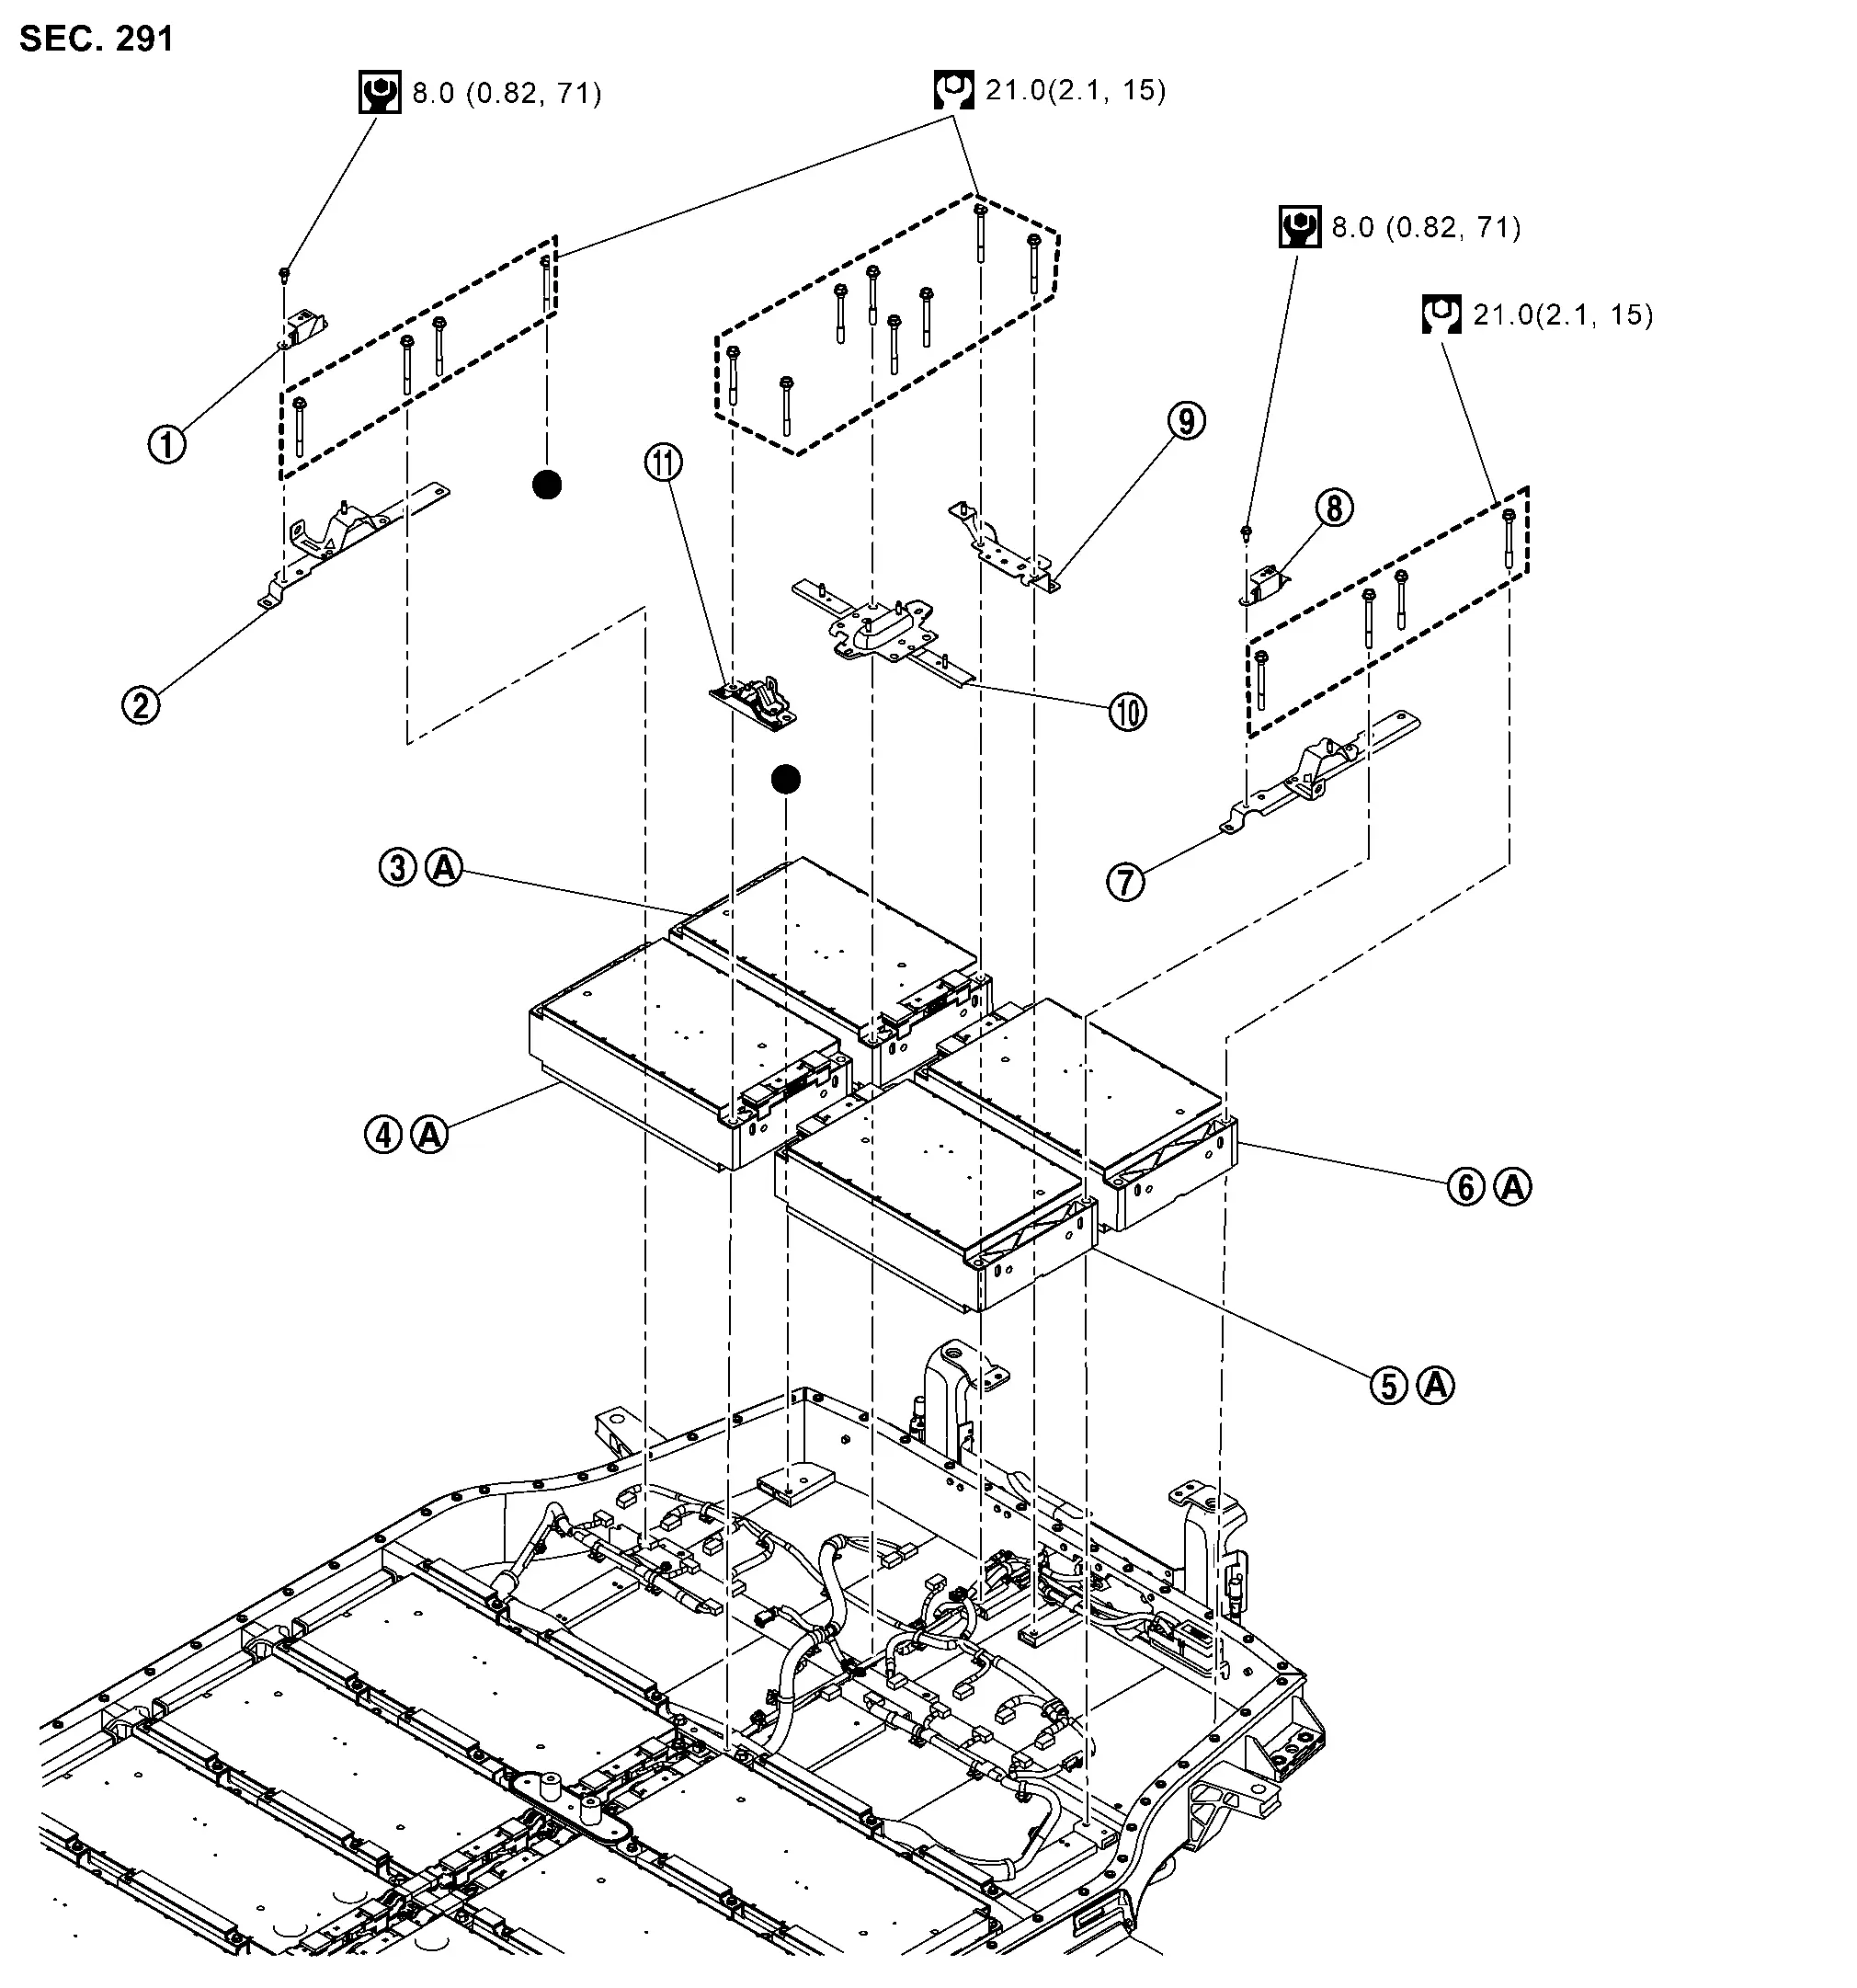
|
Bracket | |
Bracket | |
Module No.7(MD7) |
|
Module No.8(MD8) | |
Module No.5(MD5) | |
Module No.6(MD6) |
|
Bracket | |
Bracket | |
Bracket |
|
Bracket | |
Bracket | |
Retainer |
|
: Comply with the assembly procedure when installing. Refer to Disassembly & Assembly. | ||||
|
: N·m (kg-m, in-lb) | ||||
|
: N·m (kg-m, ft-lb) | ||||
| : Indicates that the part is connected at points with same symbol in actual Nissan Ariya vehicle. |
|||||
Disassembly & Assembly
DANGER:Since hybrid vehicles and electric vehicles contain a high voltage battery, there is the risk of electric shock, electric leakage, or similar accidents if the high voltage component and Nissan Ariya vehicle are handled incorrectly. Be sure to follow the correct work procedures when performing inspection and maintenance.
ENVIRONMENT FOR LI-ION BATTERY DISASSEMBLY WORK
Must be an indoor environment.
The environment must utilize a shutter or other means to shut out the outside environment and prevent rain, snow, dust, or other substances from entering.
The environment must not cause the intrusion of sweat during work, or cause condensation to occur due to high temperature or humidity.
Metal powder, grease, and other foreign substances must not enter.
The indoor environment must also prevent metal powder, grease, and other foreign substances from entering due to maintenance performed on other Nissan Ariya vehicles and other sources during disassembly work.
During disassembly without internal work, temporarily close the battery pack upper case or cover it with an insulating cover.
The floor must be dry.
The floor must not be wet as a result of factors such as Nissan Ariya vehicle entry during rain or snow.
Work space
The work space must be approximately the size of one entire Nissan Ariya vehicle.
Take appropriate countermeasures so that persons other than the operator do not enter the work space, such as by placing signs indicating that disassembly work is in progress.
Standard fire fighting equipment
Always place a standard fire fighting equipment in the disassembly work area.
Depending on type of fire (Nissan Ariya vehicle or battery) use standard fire fighting equipment (water or extinguisher).
DISASSEMBLY
Remove service plug bracket ASSY. Refer to Disassembly & Assembly.
Remove controller mounting plate. Refer to Removal & Installation.
Remove busbar. Refer to Disassembly & Assembly.
Remove harness connector from module.
Remove bracket bolts that contact to the module to be removed.
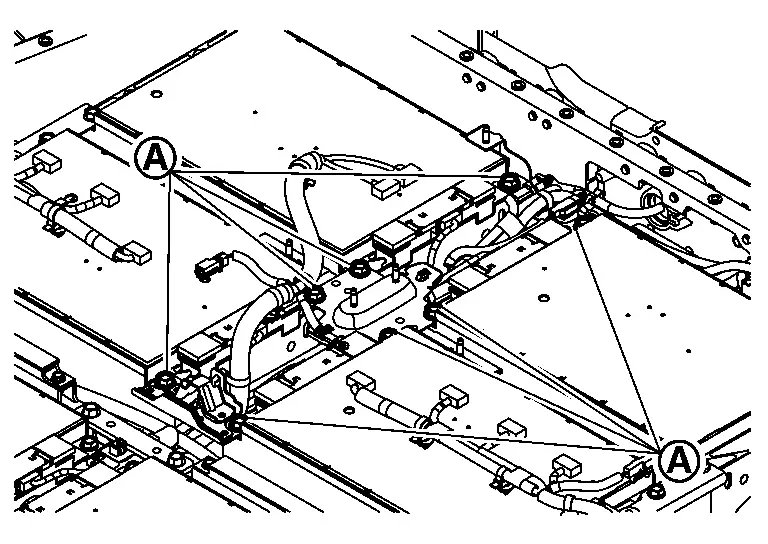
Remove bolt and then remove bracket .
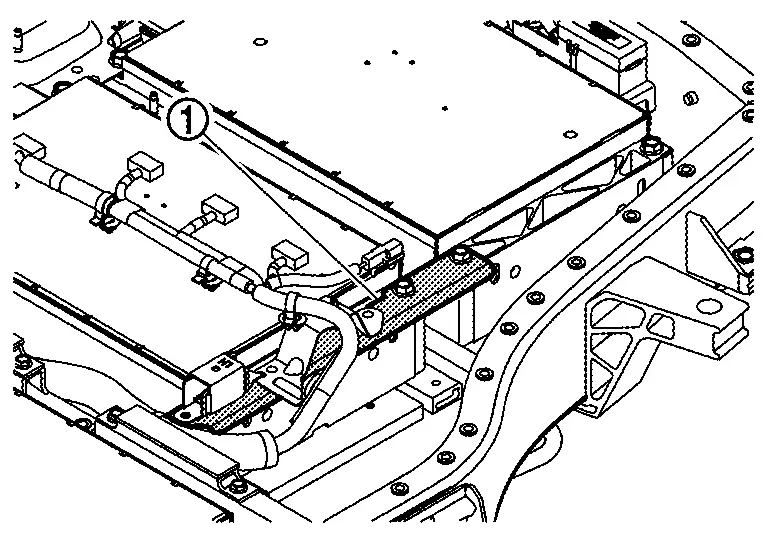
Remove bolt . [module No.6 (MD6) or module No.8 (MD8) only]
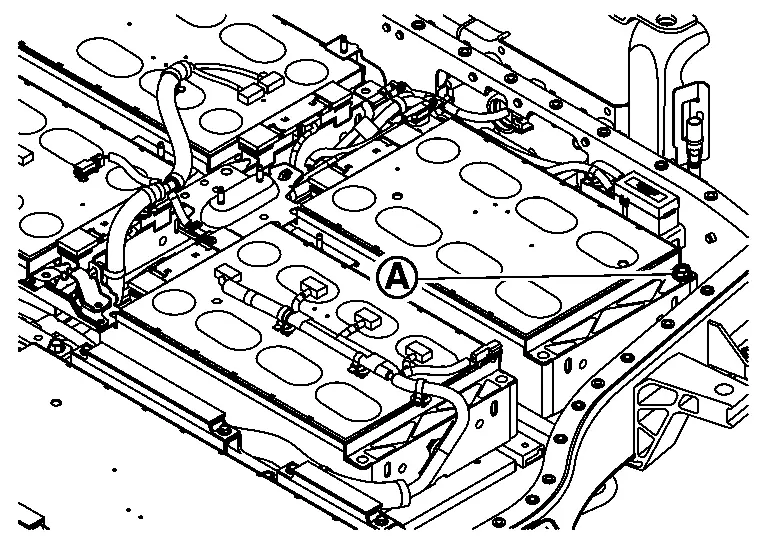
Tighten bolts temporarily.
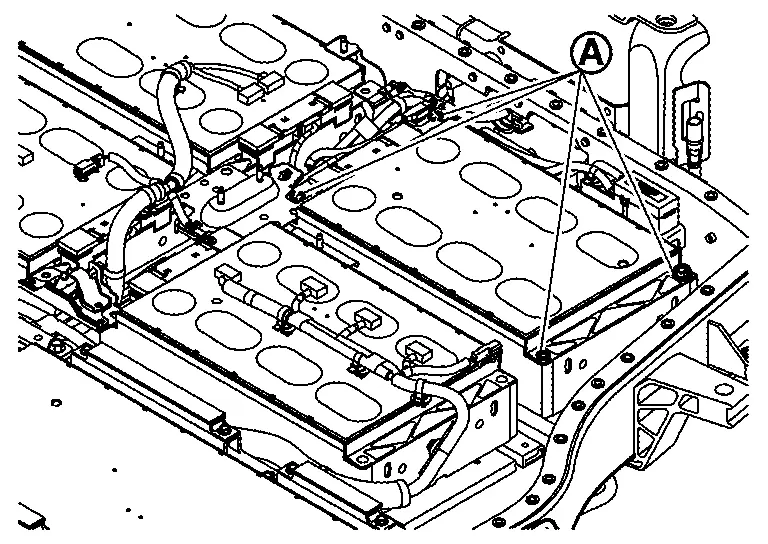
Hang carabiners (service part: 299A3 5MP0A) in the lifting holes and install belt slinger.
Install temporarily module mounting bolt to terminal side by screwing several rotations.
Lifting load is applied to the module using the mobile floor crane (engine crane) (A).
Pry resin scraper (service parts: 299A3 5MP0A) left and right to peel the adhesion of gap filler.
Remove module that was temporarily installed to terminal side.
Hang carabiners (service part: 299A3 5MP0A) in the lifting holes and install belt slinger.
Remove module from battery lower case by lifting up 4 points of module with mobile floor crane.
Peel off gap filler from battery pack lower case.
ASSEMBLY
Note the following items, and assemble in the reverse order of disassembly.
DANGER:- There is the danger of electric shock caused by contact with the terminals. Be sure to wear insulated protective gear and use insulated tools.
- Because there is a danger of electric shock and fire, never allow bus bar to contact a wrong terminal.
If bus bar contacts a wrong terminal, the circuit becomes energized and a short may occur.
Always keep the bus bar cover closed until immediately before the installation of bus bar.
Check battery pack lower case inside for foreign material or peeled gap filler
Set gabari sheet to battery pack lower case as shown in the figure and then write lines on battery pack lower case with oil-based pen.
Cut the static mixer at the position shown in the figure.
After taking out cartridge from packing box, check the followings;
No evidence of liquid leakage in the packing box.
No liquid leakage from bottom of cartridge
.
Set static mixer to cartridge.
Set cartridge to the gap filler gun [SST: BP2000400Z (J-53350)].
Attach guideline label to cartridge as shown in the figure.
| Guideline label | : A-78 ml |
Apply gap filler in accordance with lines written on the battery pack lower case.
Install locate pin [SST: KV99119700 (J-53349)]to battery pack lower case.
Install module in the reverse order of removal.