Dtc/circuit Diagnosis

In this manual: Dtc/circuit Diagnosis
How to Use This Manual — 1Precautions — 1Preparation — 1Vehicle Information — 1Basic Inspection — 1Preparation. Commercial Service Tools Or/and Repair Part — 1Description — 1Component Parts — 1System — 1Diagnosis System (vcm) — 1Ecu Diagnosis Information. Vcm — 1Ev Control System — 1Ev/hev (vcm) — 1Component Parts /circuit Diagnosis — 1Ev Control System — 1Periodic Maintenance. Ev System Warning Lamp — 1Removal and Installation. Vcm — 1Traction Motor System :: Front Traction Motor — 1Preparation — 1Description — 4Basic Inspection — 2Dtc Diagnosis — 2Component Parts /circuit Diagnosis — 1Traction Motor System :: Rear Traction Motor — 1Description — 4Basic Inspection — 2Dtc Diagnosis — 2Component Parts /circuit Diagnosis — 1Removal and Installation — 1Ev Battery System :: 66kwh Li-Ion Battery — 1Description — 4Basic Inspection — 2Dtc Diagnosis — 2Component Parts /circuit Diagnosis — 1Removal and Installation — 1Disassembly and Assembly — 2Service Data — 1Ev Battery System :: 91kwh Li-Ion Battery — 1Description — 4Basic Inspection — 2Dtc Diagnosis — 2Component Parts /circuit Diagnosis — 1Removal and Installation — 1Disassembly and Assembly — 1Service Data — 2Preparation. Vehicle Charging System — 1Vehicle Charging System :: Description — 1Component Parts — 2System — 1Diagnosis System (on-Board Charger) — 1Diagnosis System (dc/dc Converter) — 1Ecu Diagnosis Information — 1Vehicle Charging System — 1Charger/pd Module (on-Board Charger) — 1Cplc (cplc) — 1Dcdc (dc/dc Converter) — 1Component Parts/circuit Diagnosis — 1Symptom Diagnosis — 1Evse Inspection — 1Periodic Maintenance — 1Removal and Installation — 1Disassembly and Assembly — 1Preparation. High Voltage Cooling System — 1Description — 1Symptom Diagnosis. Overheating Cause Analysis — 1Periodic Maintenance — 1Coolant — 1Removal and Installation — 1Radiator — 1Service Data — 1Removal and Installation. Accelerator Control System — 1Reduction Gear: Re1f62a — 1Removal and Installation — 1Transaxle & Transmission :: Electric Shift — 1Description — 3Basic Inspection — 2Dtc Diagnosis — 2Component Parts /circuit Diagnosis — 1Removal and Installation — 1Rear Final Drive: Rn1r62a — 1Removal and Installation — 1Preparation. Front Axle System — 1Symptom Diagnosis. Noise, Vibration and Harshness (nvh) Troubleshooting — 1Periodic Maintenance — 1Removal and Installation — 1Service Data. Front Drive Shaft — 12wd — 14wd — 1Periodic Maintenance — 1Removal and Installation — 1Preparation. Front Suspension System — 1Symptom Diagnosis. Noise, Vibration and Harshness (nvh) Troubleshooting — 1Periodic Maintenance — 1Removal and Installation — 1Service Data — 1Symptom Diagnosis. Noise, Vibration and Harshness (nvh) Troubleshooting — 1Periodic Maintenance — 1Removal and Installation — 1Service Data — 1Preparation. Road Wheels & Tires System — 1Description — 1System — 1Ecu Diagnosis Information. Bcm (body Control Module) — 1Tpms — 1Dtc/circuit Diagnosis — 1Symptom Diagnosis — 1Periodic Maintenance. Road Wheels & Tires — 1Removal and Installation — 1Service Data — 1Preparation. Brake System — 1System Description — 1Component Parts — 1Ecu Diagnosis Information. Electrically-Driven Intelligent Brake Unit — 1Basic Inspection — 1Dtc/circuit Diagnosis — 1Symptom Diagnosis — 1Periodic Maintenance — 1Removal and Installation — 1Service Data — 1Preparation. Parking Brake System — 1System Description — 1Component Parts — 1System — 1Ecu Diagnosis Information. Abs Actuator and Electric Unit (control Unit) — 1Basic Inspection. Diagnosis and Repair Work Flow — 1Component Parts /circuit Diagnosis — 1Symptom Diagnosis — 1Removal and Installation — 1Brake Control System :: With Vdc — 1System Description — 3Basic Inspection — 2Dtc/circuit Diagnosis — 1Symptom Diagnosis — 2Removal and Installation — 1Brake Control System :: Automatic Brake Hold — 1System Description — 3Component Parts /circuit Diagnosis — 1Removal and Installation — 1Brake Control System :: E-Step — 1System Description — 3Removal and Installation — 1System Description — 1Ecu Diagnosis Information — 1Basic Inspection — 1Symptom Diagnosis — 1Rear Automatic Braking — 1System Description — 1Basic Inspection — 1Preparation. Steering System — 1System Description — 1Component Parts — 1Basic Inspection — 1Dtc/circuit Diagnosis — 1Symptom Diagnosis — 1Periodic Maintenance. Steering Wheel — 1Removal and Installation — 1Service Data — 1System Description — 1Component Parts — 1Steering Control System — 1Ecu Diagnosis Information. Power Steering Control Module — 1Dtc/circuit Diagnosis — 1Component Parts /circuit Diagnosis — 1Symptom Diagnosis — 1Removal and Installation. Power Steering Control Module — 1System Description — 1Removal and Installation — 1System Description — 1System — 1Basic Inspection. Diagnosis and Repair Work Flow — 1Dtc/circuit Diagnosis — 1Symptom Diagnosis — 1Component Parts — 1Basic Inspection — 1Removal and Installation — 1System Description — 1System — 1Ecu Diagnosis Information. Air Bag Diagnosis Sensor Unit — 1Basic Inspection — 1Dtc/circuit Diagnosis — 1Symptom Diagnosis — 1System Description. Description. Ventilation System — 1Removal and Installation — 1Preparation. Preparation — 1System Description — 1Basic Inspection — 1Symptom Diagnosis — 1Removal and Installation — 1Electric Compressor — 1Cooler Pipe and Hose — 1A/c Unit Assembly Cover — 1A/c Unit Assembly — 1Heater & Air Conditioning Control System :: Automatic Air Conditioning — 1System Description — 1Ecu Diagnosis Information — 1Basic Inspection — 2Dtc Diagnosis — 1Symptom Diagnosis — 1Removal and Installation — 2Preparation. Preparation — 1Symptom Diagnosis. Squeak and Rattle Trouble Diagnoses — 1Removal and Installation — 1Preparation. Instrument Panel — 1Component Parts — 1System — 1Ecu Diagnosis Information. Flexible Center Storage Control Module — 1Basic Inspection. Diagnosis and Repair Work Flow — 1Dtc/circuit Diagnosis — 1Symptom Diagnosis — 1Removal and Installation — 1Preparation. Preparation — 1Component Parts — 1System — 1Ecu Diagnosis Information. Driver Lumbar Support Control Module — 1Basic Inspection. Diagnosis and Repair Work Flow — 1Dtc/circuit Diagnosis — 1Symptom Diagnosis — 1Removal and Installation — 1System Description — 1System — 1Ecu Diagnosis Information — 1Basic Inspection — 1Dtc/circuit Diagnosis — 1Symptom Diagnosis — 1Manual Function Does Not Operate — 1Memory Function Does Not Operate — 1Removal and Installation — 1Preparation. Preparation — 1System Description — 1System (intelligent Key System) — 1Diagnosis System (bcm) — 1Ecu Diagnosis Information — 1Basic Inspection — 1Dtc/circuit Diagnosis — 1U2141-87 Can Comm Circuit — 1Power Supply and Ground Circuit — 1Symptom Diagnosis — 1Automatic Back Door Operation Does Not Operate — 1Back Door Does Not Open — 1Door Does Not Lock/unlock with Door Lock and Unlock Switch — 1Removal and Installation — 1Hood — 1Radiator Core Support — 1Charge Port Lid — 1Front Fender — 1Front Door — 1Rear Door — 1Back Door — 1Hood Lock — 1Front Door Lock — 1Rear Door Lock — 1Back Door Lock — 1Outside Key Antenna — 1System Description — 1System — 1Ecu Diagnosis Information. Inverter (front), Inverter (rear), Bcm, Intelligent Key Unit — 1Basic Inspection — 1Dtc/circuit Diagnosis — 1Symptom Diagnosis — 1Preparation — 1Symptom Diagnosis. Squeak and Rattle Trouble Diagnoses — 1Removal and Installation — 1System Description — 1Ecu Diagnosis Information — 1Basic Inspection — 1Dtc/circuit Diagnosis — 1Power Supply and Ground Circuit — 1Symptom Diagnosis — 1Front Passenger Side Power Window Does Not Operate — 1Rear Lh Side Power Window Does Not Operate — 1Rear Rh Side Power Window Does Not Operate — 1Removal and Installation. Power Window Main Switch — 1Preparation. Preparation — 1System Description — 1Ecu Diagnosis Information — 1Basic Inspection — 1Dtc/circuit Diagnosis — 1Power Supply and Ground Circuit — 1Sunroof Switch Assembly — 1Symptom Diagnosis — 1Auto Operation Does Not Operate — 1Removal and Installation — 1Preparation — 1Description — 1Symptom Diagnosis. Squeak and Rattle Trouble Diagnoses — 1Removal and Installation — 1Service Information — 6Repair Information — 1Precaution — 1Preparation — 1Removal and Installation — 1Service Data — 1Preparation. Preparation — 1Component Parts — 1System — 1Ecu Diagnosis Information — 1Wiring Diagram. Door Mirror — 1Basic Inspection. Diagnosis and Repair Work Flow — 1Dtc/circuit Diagnosis — 1Power Supply and Ground Circuit — 1Symptom Diagnosis — 1Removal and Installation — 1Exterior Lighting System :: Led Headlamp — 1System Description — 3Basic Inspection — 1Dtc/circuit Diagnosis — 1Symptom Diagnosis — 1Periodic Maintenance — 1Removal and Installation — 1System Description — 1System — 1Diagnosis System (bcm) — 1Ecu Diagnosis Information. Bcm, Intelligent Key Unit — 1Basic Inspection. Diagnosis and Repair Work Flow — 1Dtc/circuit Diagnosis — 1Symptom Diagnosis. Interior Lighting System Symptom — 1Removal and Installation — 1Service Data. Bulb Specifications — 1System Description — 1System — 1Ecu Diagnosis Information. Bcm, Ipdm E/r — 1Basic Inspection. Diagnosis and Repair Work Flow — 1Dtc/circuit Diagnosis — 1Symptom Diagnosis — 1Removal and Installation — 1System Description — 1Ecu Diagnosis Information. Bcm — 1Basic Inspection. Diagnosis and Repair Work Flow — 1Dtc/circuit Diagnosis — 1Symptom Diagnosis — 1Removal and Installation — 1Preparation. Preparation — 1Removal and Installation. Horn — 1Preparation. Commercial Service Tools Or/and Repair Part — 1System Description — 1Component Parts — 1Ecu Diagnosis Information. Approaching Vehicle Sound for Pedestrians (vsp) Control Unit — 1Approaching Vehicle Sound for Pedestrians (vsp) — 1Vsp [approaching Vehicle Sound for Pedestrians (vsp) Control Unit] — 1Approaching Vehicle Sound for Pedestrians (vsp) System — 1Removal and Installation — 1Removal and Installation — 1Wireless Charger — 1System Description — 1Basic Inspection — 1Dtc/circuit Diagnosis — 1Removal and Installation — 1Component Parts — 1System — 1Diagnosis System (bcm) — 1Ecu Diagnosis Information. Bcm — 1Basic Inspection — 1Dtc/circuit Diagnosis — 1Symptom Diagnosis — 1Removal and Installation — 1Can Fundamental — 1Description — 1Trouble Diagnosis — 1Can (controller Area Network) — 1Description — 1
257steps
~1542min
4/5difficulty
Done 0 of 257
  • B121a-11 Front Fog Lamp Lh Power Supply Circuit
  • B1c07-11 Aiming Motor Drive Signal
  • B20a2-87 Headlamp Rh Lin Communication
  • B20d4-11 Tail Lamp Power Supply Circuit
  • B20db-55 Height Sensor Initialize Not Done
  • B20e2-96 Led Headlamp Rh
  • B2c96-49 Light Sensor
  • Headlamp Levelizer Circuit
  • Tail Lamp Circuit
  • License Plate Lamp Circuit
  • Stop Lamp Circuit
  • Back-Up Lamp Circuit
  • Front Fog Lamp Circuit
  • Turn Signal Lamp Circuit
  • Hazard Switch
  • Headlamp Aiming Switch

B121a-11 Front Fog Lamp Lh Power Supply Circuit Nissan Ariya first Gen

DTC Description

DTC DETECTION LOGIC

DTC No.CONSULT screen itemsDTC detection condition
B121A-11 Front fog lamp LH power supply circuit Diagnosis condition When front fog lamp ON conditions are satisfied (smart FET inside IPDM E/R is ON)
Signal (terminal) Front fog lamp LH power supply circuit
Threshold Overcurrent is detected
Diagnosis delay time 1 second or less

POSSIBLE CAUSE

  • Harness or connector

  • Front fog lamp LH

    • LED

  • IPDM E/R

FAIL-SAFE

Shuts off the power supply to the front fog lamp LH power supply circuit until the front fog lamp ON conditions are no longer satisfied.

DTC CONFIRMATION PROCEDURE

PRECONDITIONING

With CONSULT

  1. Power switch ON.

  2. Select “Front fog lamp LH circuit malfunction” in “Data Monitor” mode of “IPDM E/R” using CONSULT.

  3. Check the monitor status.

    Monitor itemMonitor status
    Front fog lamp LH circuit malfunction 0
    1

What is the monitor status?

“0”>>

GO TO 2.

“1”>>

A short circuit is detected multiple times in the front fog lamp LH power supply circuit, and damage accumulates at the smart FET inside the IPDM E/R. For this reason, IPDM E/R does not turn ON the smart FET. Because the DTC cannot be reproduced in this state, perform Diagnosis Procedure and replace IPDM E/R after the malfunctioning part is repaired. Refer to Removal and Installation.

PERFORM DTC CONFIRMATION PROCEDURE

With CONSULT

  1. Power switch OFF.

  2. Power switch ON.

  3. Turn lighting switch 2ND, and front fog lamp switch ON.

  4. Select “Self Diagnostic Result” mode of “IPDM E/R” using CONSULT.

  5. Check DTC.

Is DTC detected?

YES>>

Refer to Diagnosis Procedure.

NO-1>>

To check malfunction symptom before repair: Refer to Intermittent Incident.

NO-2>>

Confirmation after repair: INSPECTION END

Diagnosis Procedure

CHECK FRONT FOG LAMP LH POWER SUPPLY CIRCUIT (SHORT TO GROUND)

  1. Power switch OFF.

  2. Turn lighting switch OFF or AUTO.

  3. Disconnect IPDM E/R connector and front fog lamp LH connector.

  4. Check continuity between IPDM E/R harness connector and ground.

    IPDM E/R—Continuity
    ConnectorTerminal
    E42 51 Ground Not existed

Is the inspection result normal?

YES>>

GO TO 2.

NO>>

Repair or replace harness.

CHECK FRONT FOG LAMP LH POWER SUPPLY

  1. Connect IPDM E/R connector.

  2. Power switch ON.

  3. Turn lighting switch 2ND.

  4. With operating the front fog lamp switch, check the voltage between front fog lamp LH harness connector and ground.

    +-ConditionVoltage
    Front fog lamp LH
    ConnectorTerminal
    E152 1 Ground Front fog lamp switch ON 6 – 16 V
    OFF 0 – 1 V

Is the inspection result normal?

YES>>

GO TO 3.

NO>>

Replace IPDM E/R. Refer to Removal and Installation.

CHECK FRONT FOG LAMP LH

Check front fog lamp LH. Refer to Component Inspection.

Is the inspection result normal?

YES>>

INSPECTION END

NO>>

Replace front fog lamp LH. Refer to Removal & Installation.

Component Inspection

CHECK FRONT FOG LAMP LH

  1. Power switch OFF.

  2. Disconnect front fog lamp LH connector.

  3. Check resistance of front fog lamp LH terminals.

    Front fog lamp LHResistance
    Terminal
    +–
    1 2 Except 0 Ω

Is the inspection result normal?

YES>>

INSPECTION END

NO>>

Replace front fog lamp LH. Refer to Removal & Installation.

B1c07-11 Aiming Motor Drive Signal Nissan Ariya SUV

DTC Description

DTC DETECTION LOGIC

DTC No.CONSULT screen itemsDTC detection condition
B1C07-11 Aiming motor drive signal Diagnosis condition When power switch is ON, headlamp (LO) ON conditions are satisfied
Signal (terminal) Aiming motor drive signal circuit
Threshold 1.25 V or less
Diagnosis delay time 2 seconds or less

POSSIBLE CAUSE

  • Harness or connector

  • Headlamp

    • Headlamp aiming motor

  • IPDM E/R

FAIL-SAFE

Right and left headlamp aiming motors stop at the position when DTC is detected.

DTC CONFIRMATION PROCEDURE

PERFORM DTC CONFIRMATION PROCEDURE

With CONSULT

  1. Power switch ON.

  2. Turn lighting switch 2ND and wait at least 2 seconds or more.

  3. Select “Self Diagnostic Result” mode of “IPDM E/R” using CONSULT.

  4. Check DTC.

Is DTC detected?

YES>>

Refer to Diagnosis Procedure.

NO-1>>

To check malfunction symptom before repair: Refer to Intermittent Incident.

NO-2>>

Confirmation after repair: INSPECTION END

Diagnosis Procedure

CHECK AIMING MOTOR DRIVE SIGNAL CIRCUIT (SHORT TO GROUND)

  1. Power switch OFF.

  2. Turn lighting switch OFF or AUTO.

  3. Disconnect the following connectors.

    • IPDM E/R

    • Headlamp aiming motor LH

    • Headlamp aiming motor RH

  4. Check continuity between IPDM E/R harness connector and ground.

    IPDM E/R—Continuity
    ConnectorTerminal
    E36 64 Ground Not existed

Is the inspection result normal?

YES>>

GO TO 2.

NO>>

Repair or replace harness.

PERFORM DTC CONFIRMATION PROCEDURE

With CONSULT

  1. Connect IPDM E/R connector and headlamp aiming motor connector.

  2. Power switch ON.

  3. Select “Self Diagnostic Result” mode of “IPDM E/R” using CONSULT.

  4. Touch “ERASE” to erase DTC memory of IPDM E/R.

  5. Power switch OFF.

  6. Perform DTC confirmation procedure. Refer to DTC Description.

Is DTC detected again?

YES>>

GO TO 3.

NO>>

INSPECTION END

REPLACE HEADLAMP AIMING MOTOR

With CONSULT

  1. Replace headlamp. Refer to Removal & Installation.

  2. Power switch ON.

  3. Select “Self Diagnostic Result” mode of “IPDM E/R” using CONSULT.

  4. Touch “ERASE” to erase DTC memory of IPDM E/R.

  5. Power switch OFF.

  6. Perform DTC confirmation procedure. Refer to DTC Description.

Is DTC detected again?

YES>>

Replace IPDM E/R. Refer to Removal and Installation.

NO>>

INSPECTION END

B20a2-87 Headlamp Rh Lin Communication Nissan Ariya

DTC Description

DTC DETECTION LOGIC

DTC No.CONSULT screen itemsDTC detection condition
B20A2-87 Headlamp RH LIN communication Diagnosis condition Power switch ON
Signal (terminal) Headlamp RH LIN communication
Threshold Detected headlamp RH LIN communication error
Diagnosis delay time 1 second or less

POSSIBLE CAUSE

  • Harness or connector

  • Headlamp RH

    • LED headlamp control module (LO)

    • Harness

  • IPDM E/R

FAIL-SAFE

—

DTC CONFIRMATION PROCEDURE

PERFORM DTC CONFIRMATION PROCEDURE

With CONSULT

  1. Power switch ON.

  2. Select “Self Diagnostic Result” mode of “IPDM E/R” using CONSULT.

  3. Check DTC.

Is DTC detected?

YES>>

Refer to Diagnosis Procedure.

NO-1>>

To check malfunction symptom before repair: Refer to Intermittent Incident.

NO-2>>

Confirmation after repair: INSPECTION END

Diagnosis Procedure

CHECK SELF-DIAGNOSIS RESULT

With CONSULT

  1. Power switch ON

  2. Select “Self Diagnostic Result” mode of “IPDM E/R” using CONSULT.

  3. Check if DTC "B20A2–87" is displayed with DTC "B20A4–87".

Is applicable DTC detected?

YES>>

GO TO 2.

NO>>

GO TO 3.

CHECK HEADLAMP RH LIN COMMUNICATION CIRCUIT 1

  1. Power switch OFF.

  2. Disconnect following connectors.

    • Front combination lamp RH

    • Front combination lamp LH

    • IPDM E/R

  3. Check continuity between front combination lamp RH harness connector and IPDM E/R harness connector.

    Front combination lamp RHIPDM E/RContinuity
    ConnectorTerminalConnectorTerminal
    E65 2 E40 44 Existed
  4. Check continuity between IPDM E/R harness connector and ground.

    IPDM E/R—Continuity
    ConnectorTerminal
    E40 44 Ground Not existed

Is the inspection result normal?

YES>>

Replace IPDM E/R. Refer to Removal and Installation.

NO>>

Repair or replace harness.

CHECK HEADLAMP RH FUSIBLE LINK

  1. Power switch OFF.

  2. Check that the following fusible link is not blown (open).

    UnitFusible link No.Capacity
    Front combination lamp RH U 15 A

Is the fusible link blown (open)?

YES>>

Replace the blown (open) fusible link after repairing the affected circuit if a fusible link is blown (open).

NO>>

GO TO 4.

CHECK HEADLAMP RH POWER SUPPLY

  1. Disconnect front combination lamp RH connector

  2. Check voltage between front combination lamp RH harness connector and ground.

    +-Voltage
    Front combination lamp RH
    ConnectorTerminal
    E65 1 Ground Battery voltage

Is the inspection result normal?

YES>>

GO TO 5.

NO>>

Repair or replace harness.

CHECK HEADLAMP RH GROUND CIRCUIT

Check continuity between front combination lamp RH harness connector and ground.

Front combination lamp RH—Continuity
ConnectorTerminal
E65 5 Ground Existed

Is the inspection result normal?

YES>>

GO TO 6.

NO>>

Repair or replace harness.

CHECK HEADLAMP RH CONTROL SIGNAL

  1. Power switch ON.

  2. Check voltage between front combination lamp RH harness connector and ground.

    +-Voltage
    Front combination lamp RH
    ConnectorTerminal
    E65 4 Ground 6 – 16 V

Is the inspection result normal?

YES>>

GO TO 8.

NO>>

GO TO 7.

CHECK HEADLAMP RH CONTROL SIGNAL CIRCUIT

  1. Power switch OFF.

  2. Disconnect IPDM E/R connector.

  3. Check continuity between front combination lamp RH harness connector and IPDM E/R harness connector.

    Front combination lamp RHIPDM E/RContinuity
    ConnectorTerminalConnectorTerminal
    E65 4 E36 62 Existed

Is the inspection result normal?

YES>>

Replace IPDM E/R. Refer to Removal and Installation.

NO>>

Repair or replace harness.

CHECK HEADLAMP RH LIN COMMUNICATION CIRCUIT 2

  1. Power switch OFF.

  2. Disconnect IPDM E/R connector.

  3. Check continuity between front combination lamp RH harness connector and IPDM E/R harness connector.

    Front combination lamp RHIPDM E/RContinuity
    ConnectorTerminalConnectorTerminal
    E65 2 E40 44 Existed

Is the inspection result normal?

YES>>

Replace headlamp RH. Refer to Removal & Installation.

NO>>

Repair or replace harness.

B20d4-11 Tail Lamp Power Supply Circuit Nissan Ariya: FE0

DTC Description

DTC DETECTION LOGIC

DTC No.CONSULT screen itemsDTC detection condition
B20D4-11 Tail lamp LH power supply circuit Diagnosis condition When license plate lamp, side marker lamp and tail lamp ON conditions are satisfied (smart FET inside IPDM E/R is ON)
Signal (terminal)

The following power supply circuit

  • Tail lamp

  • License plate lamp

  • Side marker lamp

Threshold Overcurrent is detected
Diagnosis delay time 1 second or less

POSSIBLE CAUSE

  • Harness or connector

  • Front combination lamp LH

    • LED (Front side marker lamp)

  • Front combination lamp RH

    • LED (Front side marker lamp)

  • Rear combination lamp (body side) LH

    • LED (Tail lamp)

    • LED (Rear side marker lamp)

    • Harness

  • Rear combination lamp (body side) RH

    • LED (Tail lamp)

    • LED (Rear side marker lamp)

    • Harness

  • Rear combination lamp (back door side) LH

    • LED (Tail lamp)

  • Rear combination lamp (back door side) RH

    • LED (Tail lamp)

  • License plate lamp LH

    • LED

  • License plate lamp RH

    • LED

  • IPDM E/R

FAIL-SAFE

Shuts off the power supply to the following power supply circuits until the license plate lamp, side marker lamp and tail lamp ON conditions are no longer satisfied.

  • Tail lamp

  • License plate lamp

  • Side marker lamp

DTC CONFIRMATION PROCEDURE

PRECONDITIONING

With CONSULT

  1. Power switch ON.

  2. Select “Tail lamp LH circuit malfunction” and “Tail lamp RH circuit malfunction” in “Data Monitor” mode of “IPDM E/R” using CONSULT.

  3. Check the monitor status.

    Monitor itemMonitor status
    Tail lamp LH circuit malfunction 0
    1
    Tail lamp RH circuit malfunction 0
    1

What is the monitor status?

“0”>>

GO TO 2.

“1”>>

A short circuit is detected multiple times in the tail lamp, side marker lamp or license plate lamp power supply circuit, and damage accumulates at the smart FET inside the IPDM E/R. For this reason, IPDM E/R does not turn ON the smart FET. Because the DTC cannot be reproduced in this state, perform Diagnosis Procedure and replace IPDM E/R after the malfunctioning part is repaired. Refer to Removal and Installation.

PERFORM DTC CONFIRMATION PROCEDURE

With CONSULT

  1. Power switch OFF.

  2. Power switch ON.

  3. Turn lighting switch 1ST.

  4. Select “Self Diagnostic Result” mode of “IPDM E/R” using CONSULT.

  5. Check DTC.

Is DTC detected?

YES>>

Refer to Diagnosis Procedure.

NO-1>>

To check malfunction symptom before repair: Refer to Intermittent Incident.

NO-2>>

Confirmation after repair: INSPECTION END

Diagnosis Procedure

CHECK TAIL LAMP POWER SUPPLY CIRCUIT (SHORT)

  1. Power switch OFF.

  2. Turn lighting switch AUTO.

  3. Disconnect the following connectors.

    • IPDM E/R

    • Front side marker lamp LH

    • Front side marker lamp RH

    • Rear combination lamp LH (body side)

    • Rear combination lamp RH (body side)

    • Rear combination lamp LH (back door side)

    • Rear combination lamp RH (back door side)

    • License plate lamp LH

    • License plate lamp RH

    • Connecting parts other than each exterior lamps. Refer to Wiring Diagram.

  4. Check continuity between IPDM E/R harness connector and ground.

    IPDM E/R—Continuity
    ConnectorTerminal
    E37 4 Ground Not existed
    17

Is the inspection result normal?

YES>>

GO TO 2.

NO>>

Repair or replace harness.

CHECK TAIL LAMP POWER SUPPLY

  1. Connect IPDM E/R connector.

  2. Power switch ON.

  3. With operating the lighting switch, check the voltage between rear combination lamp (body side) harness connector and ground.

    +-Test itemVoltage
    Rear combination lamp (body side)
    ConnectorTerminal
    RH B136 3 Ground Lighting switch 1ST 6 – 16 V
    OFF or AUTO* 0 – 1 V
    LH B135 1ST 6 – 16 V
    OFF or AUTO* 0 – 1 V

    *: Only when the illumination judgement by auto light function is OFF.

Is the inspection result normal?

YES>>

GO TO 3.

NO>>

Replace IPDM E/R. Refer to Removal and Installation.

CHECK TAIL LAMP/REAR SIDE MARKER LAMP

Check the tail lamp and rear side marker lamp. Refer to Component Inspection (Tail Lamp/Rear Side Marker Lamp).

Is the inspection result normal?

YES>>

GO TO 4.

NO>>

Repair or replace the malfunctioning part.

CHECK FRONT SIDE MARKER LAMP

Check the front side marker lamp. Refer to Component Inspection (Front Side Marker Lamp).

Is the inspection result normal?

YES>>

GO TO 5.

NO>>

Replace corresponding front combination lamp. Refer to Removal & Installation.

CHECK LICENSE PLATE LAMP

Check the license plate lamp. Refer to Component Inspection (License Plate Lamp).

Is the inspection result normal?

YES>>

INSPECTION END

NO>>

Replace corresponding license plate lamp. Refer to Removal & Installation.

Component Inspection (Tail Lamp/Rear Side Marker Lamp)

CHECK TAIL LAMP/REAR SIDE MARKER LAMP

  1. Power switch OFF.

  2. Disconnect each rear combination lamp connector.

  3. Check resistance of each rear combination lamp terminals.

    Body side
    Rear combination lamp (body side)Resistance
    Terminal
    +–
    3 1 Except 0 Ω
    Back door side
    Rear combination lamp (back door side)Resistance
    Terminal
    +–
    3 1 Except 0 Ω

Is the inspection result normal?

YES>>

INSPECTION END

NO-1>>

Body side: Replace corresponding rear combination lamp (body side). Refer to Removal & Installation.

NO-2>>

Back door side: Replace rear combination lamp (back door side). Refer to Removal & Installation.

Component Inspection (Front Side Marker Lamp)

CHECK FRONT SIDE MARKER LAMP

  1. Power switch OFF.

  2. Disconnect front side marker lamp connector.

  3. Check resistance of front side marker lamp terminals.

    Front side marker lampResistance
    Terminal
    +–
    1 2 Except 0 Ω

Is the inspection result normal?

YES>>

INSPECTION END

NO>>

Replace corresponding front combination lamp. Refer to Removal & Installation.

Component Inspection (License Plate Lamp)

CHECK LICENSE PLATE LAMP

  1. Power switch OFF.

  2. Disconnect license plate lamp connector.

  3. Check resistance of license plate lamp terminals.

    License plate lampResistance
    Terminal
    +–
    1 2 Except 0 Ω

Is the inspection result normal?

YES>>

INSPECTION END

NO>>

Replace corresponding license plate lamp. Refer to Removal & Installation.

B20db-55 Height Sensor Initialize Not Done Nissan Ariya 2026

DTC Description

DTC DETECTION LOGIC

DTC No.CONSULT screen itemsDTC detection condition
B20DB-55 Height sensor initialize not done Diagnosis condition Power switch ON
Signal (terminal) —
Threshold Nissan Ariya Vehicle specification is not written to IPDM E/R
Diagnosis delay time 1 second or less

POSSIBLE CAUSE

Configuration is not completed

FAIL-SAFE

Right and left headlamp aiming motors fix at the initial position.

DTC CONFIRMATION PROCEDURE

PERFORM DTC CONFIRMATION PROCEDURE

With CONSULT

  1. Power switch ON.

  2. Select “Self Diagnostic Result” mode of “IPDM E/R” using CONSULT.

  3. Check DTC.

Is DTC detected?

YES>>

Refer to Diagnosis Procedure.

NO-1>>

To check malfunction symptom before repair: Refer to Intermittent Incident.

NO-2>>

Confirmation after repair: INSPECTION END

Diagnosis Procedure

PERFORM CONFIGURATION

Perform configuration of IPDM E/R. Refer to Work Procedure.

>>

INSPECTION END

B20e2-96 Led Headlamp Rh Nissan Ariya 1st generation

DTC Description

DTC DETECTION LOGIC

DTC No.CONSULT screen itemsDTC detection condition
B20E2-96 LED headlamp RH Diagnosis condition Power switch ON
Signal (terminal) Headlamp warning signal (via LIN communication)
Threshold Detected a malfunction of headlamp RH (LO) circuit
Diagnosis delay time 1 second or less

POSSIBLE CAUSE

  • Headlamp RH

    • LED [Headlamp (LO)]

    • LED headlamp control module (LO)

FAIL-SAFE

  • Transmits the headlamp warning signal (CAN communication) to the combination meter. (When the power switch turns ON, the headlamp warning is displayed on the information display of the combination meter.)

  • Transmits the request signal (via LIN communication) to the both side LED headlamp control module (LO), and turns ON the headlamp (LO) and parking lamp.

DTC CONFIRMATION PROCEDURE

PERFORM DTC CONFIRMATION PROCEDURE

With CONSULT

  1. Power switch ON.

  2. Select “Self Diagnostic Result” mode of “IPDM E/R” using CONSULT.

  3. Check DTC.

Is DTC detected?

YES>>

Refer to Diagnosis Procedure.

NO-1>>

To check malfunction symptom before repair: Refer to Intermittent Incident.

NO-2>>

Confirmation after repair: INSPECTION END

Diagnosis Procedure

REPLACE HEADLAMP RH

Replace headlamp RH. Refer to Removal & Installation.

>>

INSPECTION END

B2c96-49 Light Sensor Nissan Ariya 1st generation

DTC Description

DTC DETECTION LOGIC

DTC No.CONSULT screen itemsDTC detection condition
B2C96-49 Light sensor Diagnosis condition When the Nissan Ariya vehicle READY and with lighting switch AUTO
Signal (terminal) Optical sensor signal
Threshold Less than 0.1 V, or more than 4.4 V
Diagnosis delay time 2 seconds or more

POSSIBLE CAUSE

  • Harness or connector

  • Optical sensor

  • BCM

FAIL-SAFE

Turns ON the headlamp (LO)

DTC CONFIRMATION PROCEDURE

PERFORM DTC CONFIRMATION PROCEDURE

With CONSULT

  1. Set the Nissan Ariya vehicle to READY.

  2. Turn lighting switch AUTO, and wait at least 2 seconds.

  3. Select “Self Diagnostic Result” mode of “BCM” using CONSULT.

  4. Check DTC.

Is DTC detected?

YES>>

Refer to Diagnosis Procedure.

NO-1>>

To check malfunction symptom before repair: Refer to Intermittent Incident.

NO-2>>

Confirmation after repair: INSPECTION END

Diagnosis Procedure

CHECK OPTICAL SENSOR POWER SUPPLY

  1. Power switch ON.

  2. Turn lighting switch AUTO.

  3. Check voltage between optical sensor harness connector and ground.

    +-Voltage
    Optical sensor
    ConnectorTerminal
    M3 1 Ground 4.65 – 5.5 V

Is the inspection result normal?

YES>>

GO TO 2.

NO>>

GO TO 4.

CHECK OPTICAL SENSOR GROUND

Check voltage between optical sensor harness connector and ground.

+-

Voltage

(Approx.)
Optical sensor
ConnectorTerminal
M3 3 Ground 0 V

Is the inspection result normal?

YES>>

GO TO 3.

NO>>

GO TO 6.

CHECK OPTICAL SENSOR SIGNAL

Check voltage between optical sensor harness connector and ground.

+-Voltage
Optical sensor
ConnectorTerminal
M3 2 Ground 0.1 – 4.4 V

Is the inspection result normal?

YES>>

GO TO 7.

NO>>

Replace optical sensor. Refer to Removal and Installation.

CHECK OPTICAL SENSOR POWER SUPPLY CIRCUIT (OPEN)

  1. Power switch OFF.

  2. Disconnect optical sensor connector and BCM connector.

  3. Check continuity between optical sensor harness connector and BCM harness connector.

    Optical sensorBCMContinuity
    ConnectorTerminalConnectorTerminal
    M3 1 M8 28 Existed

Is the inspection result normal?

YES>>

GO TO 5.

NO>>

Repair or replace harness.

CHECK OPTICAL SENSOR POWER SUPPLY CIRCUIT (SHORT)

Check continuity between optical sensor harness connector and ground.

Optical sensor—Continuity
ConnectorTerminal
M3 1 Ground Not existed

Is the inspection result normal?

YES>>

Replace BCM. Refer to Removal and Installation.

NO>>

Repair or replace harness.

CHECK OPTICAL SENSOR GROUND CIRCUIT

  1. Power switch OFF.

  2. Disconnect optical sensor connector and BCM connector.

  3. Check continuity between optical sensor harness connector and BCM harness connector.

    Optical sensorBCMContinuity
    ConnectorTerminalConnectorTerminal
    M3 3 M8 29 Existed

Is the inspection result normal?

YES>>

Replace BCM. Refer to Removal and Installation.

NO>>

Repair or replace harness.

CHECK OPTICAL SENSOR SIGNAL CIRCUIT (OPEN)

  1. Power switch OFF.

  2. Disconnect optical sensor connector and BCM connector.

  3. Check continuity between optical sensor harness connector and BCM harness connector.

    Optical sensorBCMContinuity
    ConnectorTerminalConnectorTerminal
    M3 2 M8 8 Existed

Is the inspection result normal?

YES>>

GO TO 8.

NO>>

Repair or replace harness.

CHECK OPTICAL SENSOR SIGNAL CIRCUIT (SHORT)

Check continuity between optical sensor harness connector and ground.

Optical sensor—Continuity
ConnectorTerminal
M3 2 Ground Not existed

Is the inspection result normal?

YES>>

Replace BCM. Refer to Removal and Installation.

NO>>

Repair or replace harness.

Headlamp Levelizer Circuit Nissan Ariya SUV

Component Function Check

CHECK HEADLAMP LEVELIZER OPERATION

With CONSULT

  1. Power switch ON.

  2. Turn lighting switch 2ND.

  3. Select “Levelizer output” in “Data Monitor” mode of “IPDM E/R” using CONSULT.

  4. With operating the headlamp aiming switch, check the monitor status.

    Monitor itemCondition

    Value

    (Approx.)
    Levelizer output Headlamp aiming switch 0 position 58.0%
    1 position Value decreases from the 0 position status of the headlamp aiming
    2 position Value decreases from the 1 position status of the headlamp aiming
    3 position Value decreases from the 2 position status of the headlamp aiming

Is the inspection result normal?

YES>>

Headlamp levelizer circuit is normal.

NO>>

Refer to Diagnosis Procedure.

Diagnosis Procedure

CHECK HEADLAMP AIMING MOTOR FUSE

  1. Power switch OFF.

  2. Check that the following fuse is not blown (open).

    UnitLocationFuse No.Capacity
    Headlamp aiming motor IPDM E/R 142 10 A

Is the fuse blown (open)?

YES>>

Replace the blown (open) fuse after repairing the affected circuit if a fuse is blown (open).

NO>>

GO TO 2.

CHECK HEADLAMP AIMING MOTOR POWER SUPPLY

  1. Power switch ON.

  2. Check voltage between headlamp aiming motor harness connector and ground.

    +-Voltage
    Headlamp aiming motor
    ConnectorTerminal
    RH E83 1 Ground 6 – 16 V
    LH E82

Is the inspection result normal?

YES>>

GO TO 4.

NO>>

GO TO 3.

CHECK HEADLAMP AIMING MOTOR POWER SUPPLY CIRCUIT

  1. Power switch OFF.

  2. Disconnect IPDM E/R connector and headlamp aiming motor connector.

  3. Check continuity between IPDM E/R harness connector and headlamp aiming motor harness connector.

    IPDM E/RHeadlamp aiming motorContinuity
    ConnectorTerminalConnectorTerminal
    RH E42 55 E83 1 Existed
    LH E82

Is the inspection result normal?

YES>>

Replace IPDM E/R. Refer to Removal and Installation.

NO>>

Repair or replace harness.

CHECK HEADLAMP AIMING MOTOR GROUND CIRCUIT

  1. Power switch OFF.

  2. Disconnect IPDM E/R connector and headlamp aiming motor connector.

  3. Check continuity between IPDM E/R harness connector and headlamp aiming motor harness connector.

    IPDM E/RHeadlamp aiming motorContinuity
    ConnectorTerminalConnectorTerminal
    RH E36 63 E83 3 Existed
    LH E82

Is the inspection result normal?

YES>>

Replace corresponding headlamp. Refer to Removal & Installation.

NO>>

Repair or replace harness.

Tail Lamp Circuit Nissan Ariya

Component Function Check

CHECK TAIL LAMP OPERATION

  1. Power switch ON.

  2. With operating the lighting switch, check that the tail lamp is turned ON.

    Lighting switch 1ST : Tail Lamp ON
    Lighting switch OFF or AUTO* : Tail lamp OFF

    *: Only illumination judgement by auto light function is OFF.

Is the inspection result normal?

YES>>

Tail lamp circuit is normal.

NO>>

Refer to Diagnosis Procedure.

Diagnosis Procedure

CHECK TAIL LAMP OUTPUT POWER SUPPLY

  1. Power switch ON.

  2. With operating the lighting switch, check voltage between IPDM E/R harness connector and ground.

    +-ConditionVoltage
    IPDM E/R
    ConnectorTerminal
    RH E37 17 Ground Lighting switch 1ST 6 – 16 V
    OFF or AUTO* 0 – 1 V
    LH 4 1ST 6 – 16 V
    OFF or AUTO* 0 – 1 V

    *: Only illumination judgement by auto light function is OFF.

Is the inspection result normal?

YES>>

GO TO 2.

NO>>

Replace IPDM E/R. Refer to Removal and Installation.

CHECK TAIL LAMP POWER SUPPLY CIRCUIT

  1. Power switch OFF.

  2. Turn lighting switch AUTO.

  3. Disconnect the following connectors.

    • IPDM E/R

    • Rear combination lamp LH (body side)

    • Rear combination lamp LH (back door side)

    • Rear combination lamp RH (body side)

    • Rear combination lamp RH (back door side)

  4. Check continuity between IPDM E/R harness connector and each rear combination lamp harness connector.

    Body side
    IPDM E/RRear combination lamp (body side)Continuity
    ConnectorTerminalConnectorTerminal
    RH E37 17 B136 3 Existed
    LH 4 B135
    Back door side
    IPDM E/RRear combination lamp (back door side)Continuity
    ConnectorTerminalConnectorTerminal
    RH E37 17 D132 3 Existed
    LH 4 D131

Is the inspection result normal?

YES>>

GO TO 3.

NO>>

Repair or replace harness.

CHECK TAIL LAMP GROUND CIRCUIT

Check continuity between each rear combination lamp harness connector and ground.

Body side
Rear combination lamp (body side)—Continuity
ConnectorTerminal
RH B136 1 Ground Existed
LH B135
Back door side
Rear combination lamp (back door side)—Continuity
ConnectorTerminalTerminal
RH D132 1 Ground Existed
LH D131

Is the inspection result normal?

YES -1>>

Body side: Replace corresponding rear combination lamp (body side). Refer to Removal & Installation.

YES -2>>

Back door side: Replace rear combination lamp (back door side). Refer to Removal & Installation.

NO>>

Repair or replace harness.

License Plate Lamp Circuit Nissan Ariya 1st generation

Component Function Check

CHECK TAIL LAMP LH OPERATION

Check that tail lamp LH is turned ON when lighting switch is turned 1ST.

Is the inspection result normal?

YES>>

GO TO 2.

NO>>

Check tail lamp circuit. Refer to Component Function Check.

CHECK LICENSE PLATE LAMP OPERATION

  1. Power switch ON.

  2. With operating the lighting switch, check that the license plate lamp is turned ON.

    Lighting switch 1ST : License plate lamp ON
    Lighting switch OFF or AUTO* : License plate lamp OFF

    *: Only illumination judgement by auto light function is OFF.

Is the inspection result normal?

YES>>

License plate lamp circuit is normal.

NO>>

Refer to Diagnosis Procedure.

Diagnosis Procedure

CHECK LICENSE PLATE LAMP POWER SUPPLY CIRCUIT

  1. Power switch OFF.

  2. Disconnect IPDM E/R connector and license plate lamp connector.

  3. Check continuity between IPDM E/R harness connector and license plate lamp harness connector.

    IPDM E/RLicense plate lampContinuity
    ConnectorTerminalConnectorTerminal
    RH E37 4 D130 1 Existed
    LH D129

Is the inspection result normal?

YES>>

GO TO 2.

NO>>

Repair or replace harness.

CHECK LICENSE PLATE LAMP GROUND CIRCUIT

Check continuity between license plate lamp harness connector and ground.

License plate lamp—Continuity
ConnectorTerminal
RH D130 2 Ground Existed
LH D129

Is the inspection result normal?

YES>>

Replace corresponding license plate lamp. Refer to Removal & Installation.

NO>>

Repair or replace harness.

Stop Lamp Circuit Nissan Ariya first Gen

Component Function Check

CHECK STOP LAMP OPERATION

  1. Power switch ON.

  2. With operating the brake pedal, check that the stop lamp and high-mounted stop lamp is turned ON.

    Depressed : Stop lamp and high-mounted stop lamp ON
    Fully released : Stop lamp and high-mounted stop lamp OFF

Is the inspection result normal?

YES>>

Stop lamp circuit is normal.

NO>>

Refer to Diagnosis Procedure.

Diagnosis Procedure

CHECK SYMPTOM

Check symptom (A or B)

Symptom
A All of stop lamp and high-mounted stop lamp are not turned ON/OFF
B Any of stop lamp and high-mounted stop lamp are not turned ON

Which symptom is detected?

A>>

GO TO 2.

B>>

GO TO 10.

CHECK FUSE

  1. Power switch OFF.

  2. Check that any of the following fuse is not blown (open).

    UnitLocationFuse No.Capacity
    • Battery power supply (stop lamp)

    • Battery power supply (stop lamp switch 2)

    Fuse block (J/B) 13 10 A
    Ignition power supply (stop lamp switch 1) 39 5 A

Is the fuse blown (open)?

YES>>

Replace the blown (open) fuse after repairing the affected circuit if a fuse is blown (open).

NO>>

GO TO 3.

CHECK BATTERY POWER SUPPLY (STOP LAMP)

  1. Disconnect BCM connector.

  2. Check voltage between BCM harness connector and ground.

    +-Voltage
    BCM
    ConnectorTerminal
    B14 139 Ground 9 – 16 V

Is the inspection result normal?

YES>>

GO TO 5.

NO>>

GO TO 4.

CHECK BATTERY POWER SUPPLY CIRCUIT (STOP LAMP)

  1. Disconnect fuse block (J/B) connector.

  2. Check voltage between BCM harness connector and fuse block (J/B) harness connector.

    BCMFuse block (J/B)Continuity
    ConnectorTerminalConnectorTerminal
    B14 139 B111 49 Existed

Is the inspection result normal?

YES>>

Replace fuse block (J/B).

NO>>

Repair or replace harness.

CHECK STOP LAMP SWITCH POWER SUPPLY

  1. Disconnect stop lamp switch connector.

  2. Power switch ON.

  3. Check voltage between stop lamp switch harness connector.

    +-Voltage
    Stop lamp switch
    ConnectorTerminal
    E115 1 Ground 9 – 16 V
    4
YES>>

GO TO 7.

NO>>

GO TO 6.

CHECK STOP LAMP SWITCH POWER SUPPLY CIRCUIT

  1. Power switch OFF.

  2. Disconnect fuse block (J/B) connector.

  3. Check voltage between stop lamp switch harness connector and fuse block (J/B) harness connector.

    Stop lamp switchFuse block (J/B)Continuity
    ConnectorTerminalConnectorTerminal
    E115 1 E58 60 Existed
    4 E57 71

Is the inspection result normal?

YES>>

Replace fuse block (J/B).

NO>>

Repair or replace harness.

CHECK STOP LAMP SWITCH SIGNAL

  1. Power switch OFF.

  2. Connect stop lamp switch connector.

  3. With operating the brake pedal, check voltage between BCM harness connector and ground.

    +-Condition

    Voltage

    (Approx.)
    BCM
    ConnectorTerminal
    M9 110 Ground Power switch ON Brake pedal is released 0 V
    OFF
    ON Brake pedal is depressed 9 – 16 V
    OFF
    111 ON Brake pedal is released 9 – 16 V
    OFF 0 V
    ON Brake pedal is depressed 0 V
    OFF

Is the inspection result normal?

YES>>

Replace BCM. Refer to Removal and Installation.

NO>>

GO TO 8.

CHECK STOP LAMP SWITCH

Check stop lamp switch. Refer to Component Inspection.

Is the inspection result normal?

YES>>

GO TO 9.

NO>>

Replace stop lamp switch. Refer to Exploded View.

CHECK STOP LAMP SWITCH AND BRAKE PEDAL POSITION SWITCH SIGNAL CIRCUIT (OPEN)

  1. Disconnect stop lamp switch connector.

  2. Check continuity between BCM harness connector and stop lamp switch harness connector.

    BCMStop lamp switchContinuity
    ConnectorTerminalStop lamp switchStop lamp switch
    M9 110 E115 2 Existed
    111 3

Is the inspection result normal?

YES>>

Check intermittent incident. Refer to Intermittent Incident.

NO>>

Repair or replace harness.

CHECK STOP LAMP / HIGH-MOUNTED STOP LAMP POWER SUPPLY

With CONSULT

  1. Power switch ON.

  2. Select “HEAD LAMP” of “BCM” using CONSULT.

  3. Select “Stop lamp 1” or “Stop lamp 2” in “Active Test” mode.

  4. With operating the test items, check voltage between BCM harness connector and ground.

    Stop lamp RH
    +-Test item

    Voltage

    (Approx.)
    BCM
    ConnectorTerminal
    B15 157 Ground Stop lamp 1 ON 9 – 16 V
    OFF 0 V
    Stop lamp LH and high-mounted stop lamp
    +-Test item

    Voltage

    (Approx.)
    BCM
    ConnectorTerminal
    B15 160 Ground Stop lamp 2 ON 9 – 16 V
    OFF 0 V

Is the inspection result normal?

YES>>

GO TO 12.

NO>>

GO TO 11.

CHECK STOP LAMP / HIGH-MOUNTED STOP LAMP POWER SUPPLY CIRCUIT (SHORT)

  1. Power switch OFF.

  2. Disconnect following connectors.

    • BCM

    • Rear combination lamp (body side)

    • High-mounted stop lamp

  3. Check continuity between BCM harness connector and ground.

    Stop lamp RH
    BCM—Continuity
    ConnectorTerminal
    B15 157 Ground Not existed
    Stop lamp LH and high-mounted stop lamp
    BCM—Continuity
    ConnectorTerminal
    B15 160 Ground Not existed

Is the inspection result normal?

YES>>

Replace BCM. Refer to Removal and Installation.

NO>>

Repair or replace harness.

CHECK STOP LAMP / HIGH-MOUNTED STOP LAMP POWER SUPPLY CIRCUIT (OPEN)

  1. Power switch OFF.

  2. Disconnect following connectors.

    • BCM

    • Rear combination lamp (body side)

    • High-mounted stop lamp

  3. Check continuity between BCM harness connector and each stop lamp harness connector.

    Stop lamp
    BCMRear combination lamp (body side)Continuity
    ConnectorTerminalConnectorTerminal
    RH B15 157 B136 2 Existed
    LH 160 B135
    High-mounted stop lamp
    BCMHigh-mounted stop lampContinuity
    ConnectorTerminalConnectorTerminal
    B15 160 D128 1 Existed

Is the inspection result normal?

YES>>

GO TO 13.

NO>>

Repair or replace harness.

CHECK STOP LAMP / HIGH-MOUNTED STOP LAMP GROUND CIRCUIT

Check continuity between each stop lamp harness connector and ground.

Stop lamp
Rear combination lamp (body side)—Continuity
ConnectorTerminal
RH B136 1 Ground Existed
LH B135
High-mounted stop lamp
High-mounted stop lamp—Continuity
ConnectorTerminal
D128 2 Ground Existed

Is the inspection result normal?

YES-1>>

Stop lamp: Replace corresponding rear combination lamp (body side). Refer to Removal & Installation.

YES-2>>

High-mounted stop lamp: Replace high-mounted stop lamp. Refer to Removal & Installation.

NO>>

Repair or replace harness.

Component Inspection

CHECK STOP LAMP SWITCH-1

  1. Power switch OFF.

  2. Disconnect stop lamp switch connector.

  3. Check continuity of stop lamp switch terminals.

    Stop lamp switchConditionContinuity
    Terminal
    +–
    1 2 Brake pedal Depressed Existed
    Fully released Not existed
    4 3 Depressed Not existed
    Fully released Existed

Is the inspection result normal?

YES>>

INSPECTION END

NO>>

GO TO 2.

CHECK STOP LAMP SWITCH-2

  1. Adjust stop lamp switch installation. Refer to Exploded View.

  2. Check continuity of stop lamp switch terminals.

    Stop lamp switchConditionContinuity
    Terminal
    +–
    1 2 Brake pedal Depressed Existed
    Fully released Not existed
    4 3 Depressed Not existed
    Fully released Existed

Is the inspection result normal?

YES>>

INSPECTION END

NO>>

Replace stop lamp switch. Refer to Exploded View.

Back-Up Lamp Circuit Nissan Ariya 2026

Component Function Check

CHECK BACK-UP LAMP OPERATION

  1. Set the Nissan Ariya vehicle to READY.

  2. With operating the selector lever, check that the back-up lamp is turned ON.

    Selector lever position: R range : Back-up lamp ON
    Selector lever position: Other than above : Back-up lamp OFF

Is the inspection result normal?

YES>>

Back-up lamp circuit is normal.

NO>>

Refer to Diagnosis Procedure.

Diagnosis Procedure

CHECK BACK-UP LAMP RELAY FUSE

  1. Power switch OFF.

  2. Check that the following fuse is not blown (open).

    UnitLocationFuse No.Capacity
    Back-up lamp relay IPDM E/R 142 10 A

Is the fuse blown (open)?

YES>>

Replace the blown (open) fuse after repairing the affected circuit if a fuse is blown (open).

NO>>

GO TO 2.

CHECK BACK-UP LAMP RELAY POWER SUPPLY

  1. Power switch ON.

  2. Check voltage between IPDM E/R harness connector and ground.

    +-Voltage
    IPDM E/R
    ConnectorTerminal
    E39 71 Ground 6 – 16 V

Is the inspection result normal?

YES>>

GO TO 3.

NO>>

Replace IPDM E/R. Refer to Removal and Installation.

CHECK BACK-UP LAMP RELAY POWER SUPPLY CIRCUIT

  1. Power switch OFF.

  2. Remove back-up lamp relay.

  3. Disconnect IPDM E/R connector.

  4. Check continuity between IPDM E/R harness connector and back-up lamp relay harness connector.

    IPDM E/RBack-up lamp relayContinuity
    ConnectorTerminalConnectorTerminal
    E39 71 M158 2 Existed
    5

Is the inspection result normal?

YES>>

GO TO 4.

NO>>

Repair or replace harness.

CHECK BACK-UP LAMP RELAY

Check back-up lamp relay. Refer to Component Inspection.

Is the inspection result normal?

YES>>

GO TO 5.

NO>>

Replace back-up lamp relay.

CHECK BACK-UP LAMP RELAY CONTROL SIGNAL

  1. Install back-up lamp relay.

  2. Connect IPDM E/R connector.

  3. Set the Nissan Ariya vehicle to READY.

  4. With operating the selector lever, check voltage between BCM harness connector and ground.

    +-Condition

    Voltage

    (Approx.)
    BCM
    ConnectorTerminal
    M9 119 Ground Selector lever position R range 0 V
    Except R range 9 – 16 V

Is the inspection result normal?

YES>>

GO TO 7.

NO-1>>

Fixed at 0 V: GO TO 6.

NO-2>>

Fixed at 9 – 16 V: Replace BCM. Refer to Removal and Installation.

CHECK BACK-UP LAMP RELAY CONTROL SIGNAL CIRCUIT

  1. Power switch OFF.

  2. Remove back-up lamp relay.

  3. Disconnect BCM harness connector.

  4. Check continuity between BCM harness connector and back-up lamp relay harness connector.

    BCMBack-up lamp relayContinuity
    ConnectorTerminalConnectorTerminal
    M9 119 M158 1 Existed

Is the inspection result normal?

YES>>

Replace BCM. Refer to Removal and Installation.

NO>>

Repair or replace harness.

CHECK BACK-UP LAMP POWER SUPPLY CIRCUIT 1

  1. Power switch OFF.

  2. Remove back-up lamp relay.

  3. Disconnect rear combination lamp (back door side) connector.

  4. Check continuity between back-up lamp relay harness connector and rear combination lamp (back door side) harness connector.

    Back-up lamp relayRear combination lamp (back door side)Continuity
    ConnectorTerminalConnectorTerminal
    RH M158 3 D132 2 Existed
    LH D131

Is the inspection result normal?

YES>>

GO TO 8.

NO>>

Repair or replace harness.

CHECK BACK-UP LAMP GROUND CIRCUIT

Check continuity between rear combination lamp (back door side) harness connector and ground.

Rear combination lamp (back door side)—Continuity
ConnectorTerminal
RH D132 1 Ground Existed
LH D131

Is the inspection result normal?

YES>>

Replace rear combination lamp (back door side). Refer to Removal & Installation.

NO>>

Repair or replace harness.

Component Inspection

CHECK BACK-UP LAMP RELAY

  1. Power switch OFF.

  2. Remove back-up lamp relay.

  3. Apply battery voltage to back-up lamp relay between terminals and .

  4. Check continuity of back-up lamp relay terminals.

    Back-up lamp relayConditionContinuity
    Terminal
    +–
    12 V direct current supply between terminals and . Apply Existed
    Not apply Not existed

Is the inspection result normal?

YES>>

INSPECTION END

NO>>

Replace back-up lamp relay.

Front Fog Lamp Circuit Nissan Ariya first Gen

Component Function Check

CHECK FRONT FOG LAMP OPERATION

  1. Power switch ON.

  2. Turn lighting switch 2ND.

  3. With operating the front fog lamp switch, check that the front fog lamp is turned ON.

    Front fog lamp switch ON : Front fog lamp ON
    Front fog lamp switch OFF : Front fog lamp OFF

Is the inspection result normal?

YES>>

Front fog lamp circuit is normal.

NO>>

Refer to Diagnosis Procedure.

Diagnosis Procedure

CHECK FRONT FOG LAMP POWER SUPPLY

  1. Power switch ON.

  2. Turn lighting switch 2ND.

  3. With operating the front fog lamp switch, check voltage between IPDM E/R harness connector and ground.

    +-ConditionVoltage
    IPDM E/R
    ConnectorTerminal
    RH E36 57 Ground Front fog lamp switch ON 6 – 16 V
    OFF 0 – 1 V
    LH E42 51 ON 6 – 16 V
    OFF 0 – 1 V

Is the inspection result normal?

YES>>

GO TO 2.

NO>>

Replace IPDM E/R. Refer to Removal and Installation.

CHECK FRONT FOG LAMP POWER SUPPLY CIRCUIT

  1. Power switch OFF.

  2. Turn lighting switch AUTO.

  3. Disconnect IPDM E/R connector and front fog lamp connector.

  4. Check continuity between IPDM E/R harness connector and front fog lamp harness connector.

    IPDM E/RFront fog lampContinuity
    ConnectorTerminalConnectorTerminal
    RH E36 57 E154 1 Existed
    LH E42 51 E152

Is the inspection result normal?

YES>>

GO TO 3.

NO>>

Repair or replace harness.

CHECK FRONT FOG LAMP GROUND CIRCUIT

Check continuity between front fog lamp harness connector and ground.

Front fog lamp—Continuity
ConnectorTerminal
RH E154 2 Ground Existed
LH E152

Is the inspection result normal?

YES>>

Replace corresponding front fog lamp. Refer to Removal & Installation.

NO>>

Repair or replace harness.

Turn Signal Lamp Circuit Nissan Ariya

Component Function Check

CHECK TURN SIGNAL LAMP OPERATION

With CONSULT

  1. Power switch ON.

  2. Select “FLASHER” of “BCM” using CONSULT.

  3. Select “Flasher” in “Active Test” mode.

  4. With operating the test items, check that the turn signal lamp is blinks.

    RH : Turn signal lamps RH blink
    LH : Turn signal lamps LH blink
    LH/RH : Turn signal lamps RH and LH blinks

Is the inspection result normal?

YES>>

Turn signal lamp circuit is normal.

NO>>

Refer to Diagnosis Procedure.

Diagnosis Procedure

CHECK SYMPTOM

Check symptom (A or B)

Symptom
A All of turn signal lamp are not blinks
B Applicable side performs high flasher activation

Which symptom is detected?

A>>

GO TO 2.

B>>

GO TO 4.

CHECK FUSE

  1. Power switch OFF.

  2. Check that the following fuse is not blown (open).

    UnitLocationFuse No.Capacity
    BCM Fuse block (J/B) 57 10 A

Is the fuse blown (open)?

YES>>

Replace the blown (open) fuse after repairing the affected circuit if a fuse is blown (open).

NO>>

GO TO 3.

CHECK BCM POWER SUPPLY (TURN SIGNAL LAMP)

  1. Disconnect BCM connector.

  2. Check voltage between BCM harness connector and ground.

    +-Voltage
    BCM
    ConnectorTerminal
    B14 136 Ground 9 – 16 V

Is the inspection result normal?

YES>>

Replace BCM. Refer to Removal and Installation.

NO>>

Repair or replace harness.

CHECK TURN SIGNAL LAMP POWER SUPPLY

  1. Power switch OFF.

  2. Disconnect the following connectors.

    • Front combination lamp

    • Door mirror

    • Rear combination lamp (body side)

    • Rear combination lamp (back door side)

  3. Power switch ON.

  4. With operating the turn signal switch, check voltage between BCM harness connector and ground.

    Front turn signal lamp
    +-ConditionVoltage
    BCM
    ConnectorTerminal
    RH M9 116 Ground Turn signal switch Right
    6 .5 V
    Center 0 V
    LH 128 Left
    6 .5 V
    Center 0 V
    Side turn signal lamp
    +-ConditionVoltage
    BCM
    ConnectorTerminal
    RH M8 1 Ground Turn signal switch Right
    6 .5 V
    Center 0 V
    LH 21 Left
    6 .5 V
    Center 0 V
    Rear turn signal lamp
    +-ConditionVoltage
    BCM
    ConnectorTerminal
    RH B15 159 Ground Turn signal switch Right
    6 .5 V
    Center 0 V
    LH 151 Left
    6 .5 V
    Center 0 V

Is the inspection result normal?

YES>>

GO TO 6.

NO>>

GO TO 5.

CHECK TURN SIGNAL LAMP POWER SUPPLY CIRCUIT (SHORT)

  1. Power switch OFF.

  2. Disconnect BCM connector.

  3. Check continuity between BCM harness connector and ground.

    Front turn signal lamp
    BCM—Continuity
    ConnectorTerminal
    RH M9 116 Ground Not existed
    LH 128
    Side turn signal lamp
    BCM—Continuity
    ConnectorTerminal
    RH M8 1 Ground Not existed
    LH 21
    Rear turn signal lamp
    BCM—Continuity
    ConnectorTerminal
    RH B15 159 Ground Not existed
    LH 151

Is the inspection result normal?

YES>>

Replace BCM. Refer to Removal and Installation.

NO>>

Repair or replace harness.

CHECK TURN SIGNAL LAMP POWER SUPPLY CIRCUIT (OPEN)

  1. Power switch OFF.

  2. Disconnect BCM connector.

  3. Check continuity between BCM harness connector and each turn signal lamp harness connector.

    Front turn signal lamp
    BCMFront combination lampContinuity
    ConnectorTerminalConnectorTerminal
    RH M9 116 E65 3 Existed
    LH 128 E64
    Side turn signal lamp
    BCMDoor mirrorContinuity
    ConnectorTerminalConnectorTerminal
    RH M8 1 D24 12 Existed
    LH 21 D64
    Rear turn signal lamp (body side)
    BCMRear combination lamp (body side)Continuity
    ConnectorTerminalConnectorTerminal
    RH B15 159 B136 4 Existed
    LH 151 B135
    Rear turn signal lamp (back door side)
    BCMRear combination lamp (back door side)Continuity
    ConnectorTerminalConnectorTerminal
    RH B15 159 D132 4 Existed
    LH 151 D131

Is the inspection result normal?

YES>>

GO TO 7.

NO>>

Repair or replace harness.

CHECK TURN SIGNAL LAMP GROUND CIRCUIT

Check continuity between each turn signal lamp harness connector and ground.

Front turn signal lamp
Front combination lamp—Continuity
ConnectorTerminal
RH E65 6 Ground Existed
LH E64
Side turn signal lamp
Door mirror—Continuity
ConnectorTerminal
RH D24 11 Ground Existed
LH D64
Rear turn signal lamp (body side)
Rear combination lamp (body side)—Continuity
ConnectorTerminal
RH B136 1 Ground Existed
LH B135
Rear turn signal lamp (back door side)
Rear combination lamp (back door side)—Continuity
ConnectorTerminal
RH D132 1 Ground Existed
LH D131

Is the inspection result normal?

YES -1>>

Front turn signal lamp: Replace corresponding front combination lamp. Refer to Removal & Installation.

YES -2>>

Side turn signal lamp: Replace corresponding side turn signal lamp. Refer to Removal & Installation.

YES -3>>

Rear turn signal lamp: GO TO 8.

NO>>

Repair or replace harness.

CHECK REAR TURN SIGNAL LAMP DIAGNOSIS CIRCUIT

Check continuity between rear combination lamp (body side) harness connector and rear combination lamp (back door side) harness connector.

Rear combination lamp (body side)Rear combination lamp (back door side)Continuity
ConnectorTerminalConnectorTerminal
RH B136 5 D132 5 Existed
LH B135 D131

Is the inspection result normal?

YES>>

GO TO 9.

NO>>

Repair or replace harness.

CHECK REAR TURN SIGNAL LAMP DIAGNOSIS CIRCUIT SIGNAL 1

With CONSULT

  1. Power switch OFF.

  2. Connect following connectors.

    • BCM

    • Rear combination lamp (back door side)

  3. Power switch ON.

  4. Select “FLASHER” of “BCM” using CONSULT.

  5. Select “Flasher” in “Active Test” mode.

  6. With operating the test items, check voltage between rear combination lamp (body side) harness connector and ground.

    +-Test itemVoltage
    Rear combination lamp (body side)
    ConnectorTerminal
    RH B136 5 Ground Flasher RH Approx. 5 V
    LH 0 V
    LH B135 LH Approx. 5 V
    RH 0 V

Is the inspection result normal?

YES>>

GO TO 10.

NO>>

Replace corresponding rear combination lamp (body side). Refer to Removal & Installation.

CHECK REAR TURN SIGNAL LAMP DIAGNOSIS CIRCUIT SIGNAL 2

With CONSULT

  1. Power switch OFF.

  2. Disconnect rear combination lamp (body side) connector.

  3. Connect rear combination lamp (back door side) connector.

  4. Power switch ON.

  5. Select “FLASHER” of “BCM” using CONSULT.

  6. Select “Flasher” in “Active Test” mode.

  7. With operating the test items, check voltage between rear combination lamp (back door side) harness connector and ground.

    +-Test itemVoltage
    Rear combination lamp (back door side)
    ConnectorTerminal
    RH D132 5 Ground Flasher RH Approx. 5 V
    LH 0 V
    LH D131 LH Approx. 5 V
    RH 0 V

Is the inspection result normal?

YES>>

Check intermittent incident. Refer to Intermittent Incident.

NO>>

Replace rear combination lamp (back door side). Refer to Removal & Installation.

Hazard Switch Nissan Ariya SUV

Component Function Check

CHECK HAZARD SWITCH SIGNAL

With CONSULT

  1. Power switch ON.

  2. Select “FLASHER” of “BCM” using CONSULT.

  3. Select “Hazard switch” in “Data Monitor” mode.

  4. With operating the hazard switch, check the monitor status.

    Monitor itemConditionMonitor status
    Hazard switch Hazard switch ON On
    OFF Off

Is the inspection result normal?

YES>>

Hazard switch circuit is normal.

NO>>

Refer to Diagnosis Procedure.

Diagnosis Procedure

CHECK HAZARD SWITCH SIGNAL

  1. Power switch OFF.

  2. Disconnect multifunction switch connector.

  3. Check voltage between multifunction switch connector and ground.

    +-Voltage
    Multifunction switch
    ConnectorTerminal
    M115 8 Ground 9 – 16 V

Is the inspection result normal?

YES>>

GO TO 4.

NO>>

GO TO 2.

CHECK HAZARD SWITCH SIGNAL CIRCUIT (OPEN)

  1. Disconnect BCM connector.

  2. Check continuity between multifunction switch harness connector and BCM harness connector.

    Multifunction switchBCMContinuity
    ConnectorTerminalConnectorTerminal
    M115 8 M8 13 Existed

Is the inspection result normal?

YES>>

GO TO 3.

NO>>

Repair or replace harness.

CHECK HAZARD SWITCH SIGNAL CIRCUIT (SHORT)

Check continuity between multifunction switch harness connector and ground.

Multifunction switch—Continuity
ConnectorTerminal
M115 8 Ground Not existed

Is the inspection result normal?

YES>>

Replace BCM. Refer to Removal and Installation.

NO>>

Repair or replace harness.

CHECK HAZARD SWITCH GROUND CIRCUIT

Check continuity between multifunction switch switch harness connector and ground.

Multifunction switch—Continuity
ConnectorTerminal
M115 4 Ground Existed

Is the inspection result normal?

YES>>

GO TO 5.

NO>>

Repair or replace harness.

CHECK HAZARD SWITCH

Check hazard switch. Refer to Component Inspection.

Is the inspection result normal?

YES>>

INSPECTION END

NO>>

Replace multifunction switch (hazard switch). Refer to Removal & Installation.

Component Inspection

CHECK HAZARD SWITCH

  1. Power switch OFF.

  2. Disconnect multifunction switch connector.

  3. Check continuity of multifunction switch terminals.

    Multifunction switchConditionContinuity
    Terminal
    +–
    8 4 Hazard switch ON Existed
    OFF Not existed

Is the inspection result normal?

YES>>

INSPECTION END

NO>>

Replace multifunction switch (hazard switch). Refer to Removal & Installation.

Headlamp Aiming Switch Nissan Ariya first Gen

Component Function Check

CHECK HEADLAMP AIMING SWITCH

With CONSULT

  1. Power switch ON.

  2. Turn lighting switch 2ND.

  3. Select "Rear height sensor" in "Data Monitor" mode of "IPDM E/R" using CONSULT.

  4. With operating the headlamp aiming switch, check the monitor status.

    Monitor itemCondition

    Voltage

    (Approx.)
    Rear height sensor Headlamp aiming switch 0 position 3.49 V
    1 position Voltage decreases from the 0 position status of the headlamp aiming switch
    2 position Voltage decreases from the 1 position status of the headlamp aiming switch
    3 position Voltage decreases from the 2 position status of the headlamp aiming switch

Is the inspection result normal?

YES>>

Headlamp aiming switch circuit is normal.

NO>>

Refer to Diagnosis Procedure.

Diagnosis Procedure

CHECK HEADLAMP AIMING SWITCH GROUND CIRCUIT

  1. Power switch OFF.

  2. Disconnect IPDM E/R connector and headlamp aiming switch connector.

  3. Check continuity between IPDM E/R harness connector and headlamp aiming switch harness connector.

    IPDM E/RHeadlamp aiming switchContinuity
    ConnectorTerminalConnectorTerminal
    E40 32 M141 2 Existed

Is the inspection result normal?

YES>>

GO TO 2.

NO>>

Repair or replace harness.

CHECK HEADLAMP AIMING SWITCH

Check headlamp aiming switch. Refer to Component Inspection.

Is the inspection result normal?

YES>>

Replace IPDM E/R. Refer to Removal and Installation.

NO>>

Replace headlamp aiming switch. Refer to Removal & Installation.

Component Inspection

CHECK HEADLAMP AIMING SWITCH

  1. Power switch OFF.

  2. Remove headlamp aiming switch.

  3. Check resistance among each headlamp aiming switch terminals.

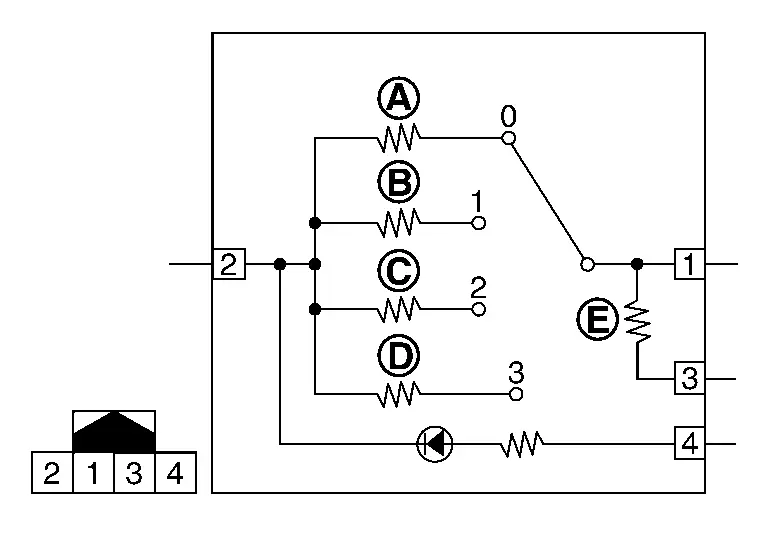
    Headlamp aiming switch Condition Resistance
    Terminal
    1 2 Switch position 0 : 910 Ω
    1 : 560 Ω
    2 : 390 Ω
    3 : 300 Ω
    3 — : 390 Ω

Is the inspection result normal?

YES>>

Headlamp aiming switch is normal.

NO>>

Replace headlamp aiming switch. Refer to Removal & Installation.