Dtc/circuit Diagnosis
- B2c40-04 Power Window Main Switch
- B2c40-95 Power Window Main Switch
- B2c41-04 Front Power Window Motor Lh
- Power Supply and Ground Circuit
- Power Window Main Switch
- Front Power Window Switch (passenger Side)
- Lin Communication Circuit
B2c40-04 Power Window Main Switch Nissan Ariya
DTC Description
DTC DETECTION LOGIC
| DTC No. | CONSULT screen terms | DTC detection condition | ||
|---|---|---|---|---|
| B2C40-04 | Power window main switch | 1 | Diagnosis condition | Power switch OFF (auto ACC status) or ON. |
| Signal (terminal) | — | |||
| Threshold | CPU in power window main switch detect internal malfunction. | |||
| Diagnosis delay time | 1 seconds or less | |||
| 2 | Diagnosis condition | Power switch OFF (auto ACC status) or ON. | ||
| Signal (terminal) | — | |||
| Threshold | When power window lock switch has been pressed for 30 seconds or more | |||
| Diagnosis condition | 30 seconds or more | |||
POSSIBLE CAUSE
Power window main switch
FAIL SAFE
When power window lock switch is held down for 30 seconds or more, power window lock status continues.
Power switch OFF (Auto ACC OFF status), and then power switch ON again to cancel the power window lock status.
DTC CONFIRMATION PROCEDURE
PERFORM DTC CONFIRMATION PROCEDURE
 With CONSULT
Power switch OFF and wait at least 1 minute with the front door (driver side) open.
Power switch ON.
Select “Self Diagnostic Result” mode of “BCM” using CONSULT and erase DTC.
Power switch OFF and wait at least 1 minute with the front door (driver side) open.
Power switch ON and wait at least 30 seconds.
Select “Self Diagnostic Result” mode of “BCM” using CONSULT.
Check DTC.
Is DTC detected?
YES-1>>CRNT: Refer to Diagnosis Procedure.
YES-2>>PAST: GO TO 2.
NO-1>>To check malfunction symptom before repair: Refer to Intermittent Incident.
NO-2>>Confirmation after repair: INSPECTION END
CHECK OPERATION
Check that power window main switch operate properly.
Is the inspection result normal?
YES>>INSPECTION END
NO>>Refer to Diagnosis Procedure.
Diagnosis Procedure
REPLACE POWER WINDOW MAIN SWITCH
Replace power window main switch. Refer to Removal and Installation.
>>INSPECTION END
B2c40-95 Power Window Main Switch Nissan Ariya first Gen
DTC Description
DTC DETECTION LOGIC
| DTC No. | CONSULT screen terms | DTC detection condition | |
|---|---|---|---|
| B2C40-95 | Power window main switch | Diagnosis condition | Power switch OFF (auto ACC status) or ON. |
| Signal (terminal) | LIN communication signal | ||
| Threshold | BCM cannot LIN communication with power window main switch. | ||
| Diagnosis delay time | 2 seconds or less | ||
POSSIBLE CAUSE
LIN communication line
Power window main switch
BCM
FAIL SAFE
—
DTC CONFIRMATION PROCEDURE
CHECK DTC PRIORITY
When DTC "B2C40-95" is displayed together with DTC "B2C40-04", perform the diagnosis of DTC "B2C40-04" first.
Is applicable DTC detected?
YES>>Refer to DTC Description.
NO>>GO TO 2.
CHECK SELF-DIAG RESULT
With CONSULT
Power switch ON.
Perform “Self Diagnostic Result” mode of “BCM” using CONSULT.
Is DTC detected?
YES-1>>CRNT: Refer to Diagnosis Procedure.
YES-2>>PAST: GO TO 3.
NO-1>>To check malfunction symptom before repair: Refer to Intermittent Incident.
NO-2>>Confirmation after repair: INSPECTION END
CHECK OPERATION
Check that power window main switch operate properly.
Is the inspection result normal?
YES>>INSPECTION END
NO>>Refer to Diagnosis Procedure.
Diagnosis Procedure
CHECK DTC PRIORITY
When DTC "B2C40-95" is displayed together with DTC "B2C40-04", perform the diagnosis of DTC "B2C40-04" first.
Is applicable DTC detected?
YES>>Refer to DTC Description.
NO>>GO TO 2.
CHECK POWER WINDOW MAIN SWITCH POWER SUPPLY AND GROUND CIRCUIT
Check power window main switch power supply and ground circuit. Refer to Diagnosis Procedure.
Is the inspection result normal?
YES>>GO TO 3.
NO>>Repair or replace the malfunctioning parts.
CHECK LIN COMMUNICATION CIRCUIT
Check LIN communication circuit. Refer to Diagnosis Procedure.
Is the inspection result normal?
YES>>Replace power window main switch. Refer to Removal and Installation.
NO>>Repair or replace the malfunctioning parts.
B2c41-04 Front Power Window Motor Lh Nissan Ariya SUV
DTC Description
DTC DETECTION LOGIC
| DTC No. | CONSULT screen terms | DTC detection condition | |
|---|---|---|---|
| B2C41-04 | Power window motor FL | Diagnosis condition | When power switch ON or power window timer operates. |
| Signal (terminal) | — | ||
| Threshold | CPU in front power window motor (driver side) detect internal malfunction. | ||
| Diagnosis delay time | 10 seconds | ||
POSSIBLE CAUSE
Front power window motor (driver side)
FAIL SAFE
Front power window motor (driver side) operation is stop or inching.
DTC CONFIRMATION PROCEDURE
PERFORM DTC CONFIRMATION PROCEDURE
Power switch ON.
Keep pulling the power window switch AUTO UP for 5 seconds or more.
Keep pressing the power window switch AUTO DOWN for 5 seconds or more.
Select “Self Diagnostic Result” mode of “BCM” using CONSULT.
Check DTC.
Is DTC detected?
YES>>Refer to Diagnosis Procedure.
NO-1>>To check malfunction symptom before repair: Refer to Intermittent Incident.
NO-2>>Confirmation after repair: INSPECTION END
Diagnosis Procedure
REPLACE FRONT POWER WINDOW MOTOR (DRIVER SIDE)
Replace front power window motor (driver side).
Refer to Disassembly & Assembly.Perform DTC confirmation procedure. Refer to DTC Description.
Is DTC detected?
YES>>Check intermittent incident. Refer to Intermittent Incident.
NO>>INSPECTION END
Power Window Main Switch Nissan Ariya 2026
Component Function Check
CHECK POWER WINDOW MAIN SWITCH FUNCTION
Check front power window motor (driver side) operation using power window main switch.
Is the inspection result normal?
YES>>INSPECTION END
NO>>Refer to Diagnosis Procedure.
Diagnosis Procedure
CHECK POWER WINDOW MAIN SWITCH CIRCUIT
Power switch OFF, and then wait for 1 minute with driver door open.
Disconnect front power window motor (driver side) connector and power window main switch connector.
Check continuity between front power window motor (driver side) harness connector and ground.
Front power window motor (driver side) — Continuity Connector Terminal D49 1 Ground Not existed
Is the inspection result normal?
YES>>INSPECTION END
NO>>Repair or replace harness.
Front Power Window Switch (passenger Side) Nissan Ariya: FE0
Component Function Check
CHECK FUNCTION
Check front power window motor (passenger side) operation with front power window switch (passenger side).
Is the inspection result normal?
YES>>INSPECTION END
NO>>Refer to Diagnosis Procedure.
Diagnosis Procedure
CHECK FRONT POWER WINDOW SWITCH (PASSENGER SIDE) SIGNAL
Power switch OFF.
Disconnect front power window switch (passenger side) connector.
Power switch ON.
Check voltage between front power window switch (passenger side) harness connector and ground.
| (+) | (-) | Voltage | |
|---|---|---|---|
| Front power window switch (passenger side) | |||
| Connector | Terminal | ||
| D21 | 4 | Ground | 10 – 16 V |
| 3 | |||
Is the inspection result normal?
YES>>GO TO 3.
NO>>GO TO 2.
CHECK FRONT POWER WINDOW SWITCH (PASSENGER SIDE) CIRCUIT
Power switch OFF, and then wait for 1 minutes with driver door open.
Disconnect front power window motor (passenger side) connector.
Check continuity between front power window switch (passenger side) harness connector and front power window motor (passenger side) harness connector.
Front power window switch (passenger side) Front power window motor (passenger side) Continuity Connector Terminal Connector Terminal D21 4 D1 1 Existed 3 2 Check continuity between front power window switch (passenger side) harness connector and ground.
Front power window switch (passenger side) — Continuity Connector Terminal D21 4 Ground Not existed 3
Is the inspection result normal?
YES>>Replace power window motor (passenger side). Refer to Disassembly & Assembly.
NO>>Repair or replace harness.
CHECK FRONT POWER WINDOW SWITCH (PASSENGER SIDE)
Check front power window switch (passenger side). Refer to Component Inspection.
Is the inspection result normal?
YES>>Replace power window motor (passenger side). Refer to Disassembly & Assembly.
NO>>Replace front power window switch (passenger side). Refer to Removal and Installation.
Component Inspection
CHECK FRONT POWER WINDOW SWITCH (PASSENGER SIDE)
Power switch OFF.
Disconnect front power window switch (passenger side) connector.
Check front power window switch (passenger side) terminals under the following conditions.
| Front power window switch (passenger side) | Condition | Continuity | |
|---|---|---|---|
| Terminal | |||
| 5 | 4 | AUTO UP | Existed |
| UP | Not existed | ||
| NEUTRAL | |||
| DOWN | Existed | ||
| AUTO DOWN | |||
| 3 | AUTO UP | Existed | |
| UP | |||
| NEUTRAL | Not existed | ||
| DOWN | |||
| AUTO DOWN | Existed | ||
Is the inspection result normal?
YES>>INSPECTION END
NO>>Replace front power window switch (passenger side). Refer to Removal and Installation.
Lin Communication Circuit Nissan Ariya 2023
Diagnosis Procedure
CHECK BCM OUTPUT SIGNAL
Power switch ON.
Check signal between BCM harness connector and ground using an oscilloscope.
(+) (−) Signal BCM Connector Terminal M8 24 Ground 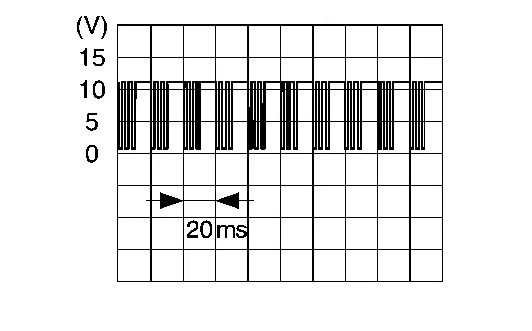
Is the inspection result normal?
YES>>GO TO 3.
NO>>GO TO 2.
CHECK LIN COMMUNICATION CIRCUIT
Power switch OFF, and then wait for 1 minutes with driver door open.
Disconnect following connectors.
BCM
Power window main switch
Front power window motor (driver side)
Front power window motor (passenger side)
Rear power window motor RH
Rear power window motor LH
Sunroof motor assembly
Sunshade motor assembly
Passenger door mirror control module
Connecting parts other than power window.
Check continuity between BCM harness connector and ground.
BCM — Continuity Connector Terminal M8 24 Ground Not existed
Is the inspection result normal?
YES>>Replace BCM. Refer to Removal and Installation.
NO>>Repair or replace harness.
CHECK LIN COMMUNICATION SIGNAL
Power switch OFF, and then wait for 1 minutes with driver door open.
Disconnect following connectors.
Power window main switch
Front power window motor (driver side)
Front power window motor (passenger side)
Rear power window motor RH
Rear power window motor LH
Sunroof motor assembly
Sunshade motor assembly
Passenger door mirror control module
Power switch ON.
Check signal between power window main switch harness connector, all power window motor harness connector and ground using an oscilloscope.
(+) (−) Signal Connector Terminal Power window main switch D63 4 Ground Front power window motor (driver side) D49 6 Front power window motor (passenger side) D1 Rear power window motor RH D85 Rear power window motor LH D105
Is the inspection result normal?
YES>>INSPECTION END
NO-1>>Power window main switch: GO TO 4.
NO-2>>Front power window motor (driver side): GO TO 5.
NO-3>>Front power window motor (passenger side): GO TO 6.
NO-4>>Rear power window motor RH: GO TO 7.
NO-5>>Rear power window motor LH: GO TO 8.
CHECK LIN COMMUNICATION CIRCUIT (POWER WINDOW MAIN SWITCH)
Power switch OFF.
Disconnect BCM connector.
Check continuity between BCM harness connector and power window main switch harness connector.
BCM Power window main switch Continuity Connector Terminal Connector Terminal M8 24 D63 4 Existed
Is the inspection result normal?
YES>>INSPECTION END
NO>>Repair or replace harness.
CHECK LIN COMMUNICATION CIRCUIT [FRONT POWER WINDOW MOTOR (DRIVER SIDE)]
Power switch OFF.
Disconnect BCM connector.
Check continuity between BCM harness connector and front power window motor (driver side) harness connector.
BCM Front power window motor (driver side) Continuity Connector Terminal Connector Terminal M8 24 D49 6 Existed
Is the inspection result normal?
YES>>INSPECTION END
NO>>Repair or replace harness.
CHECK LIN COMMUNICATION CIRCUIT [FRONT POWER WINDOW MOTOR (PASSENGER SIDE)]
Power switch OFF.
Disconnect BCM connector.
Check continuity between BCM harness connector and front power window motor (passenger side) harness connector.
BCM Front power window motor (passenger side) Continuity Connector Terminal Connector Terminal M8 24 D1 6 Existed
Is the inspection result normal?
YES>>INSPECTION END
NO>>Repair or replace harness.
CHECK LIN COMMUNICATION CIRCUIT (REAR POWER WINDOW MOTOR RH)
Power switch OFF.
Disconnect BCM connector.
Check continuity between BCM harness connector and rear power window motor RH harness connector.
BCM Rear power window motor RH Continuity Connector Terminal Connector Terminal M8 24 D85 6 Existed
Is the inspection result normal?
YES>>INSPECTION END
NO>>Repair or replace harness.
CHECK LIN COMMUNICATION CIRCUIT (REAR POWER WINDOW MOTOR LH)
Power switch OFF.
Disconnect BCM connector.
Check continuity between BCM harness connector and rear power window motor LH harness connector.
BCM Rear power window motor LH Continuity Connector Terminal Connector Terminal M8 24 D105 6 Existed
Is the inspection result normal?
YES>>INSPECTION END
NO>>Repair or replace harness.