Removal and Installation
- Steering Wheel
- Steering Column
- Steering Gear and Linkage
- Heated Steering Wheel Switch
Steering Wheel Nissan Ariya 2026
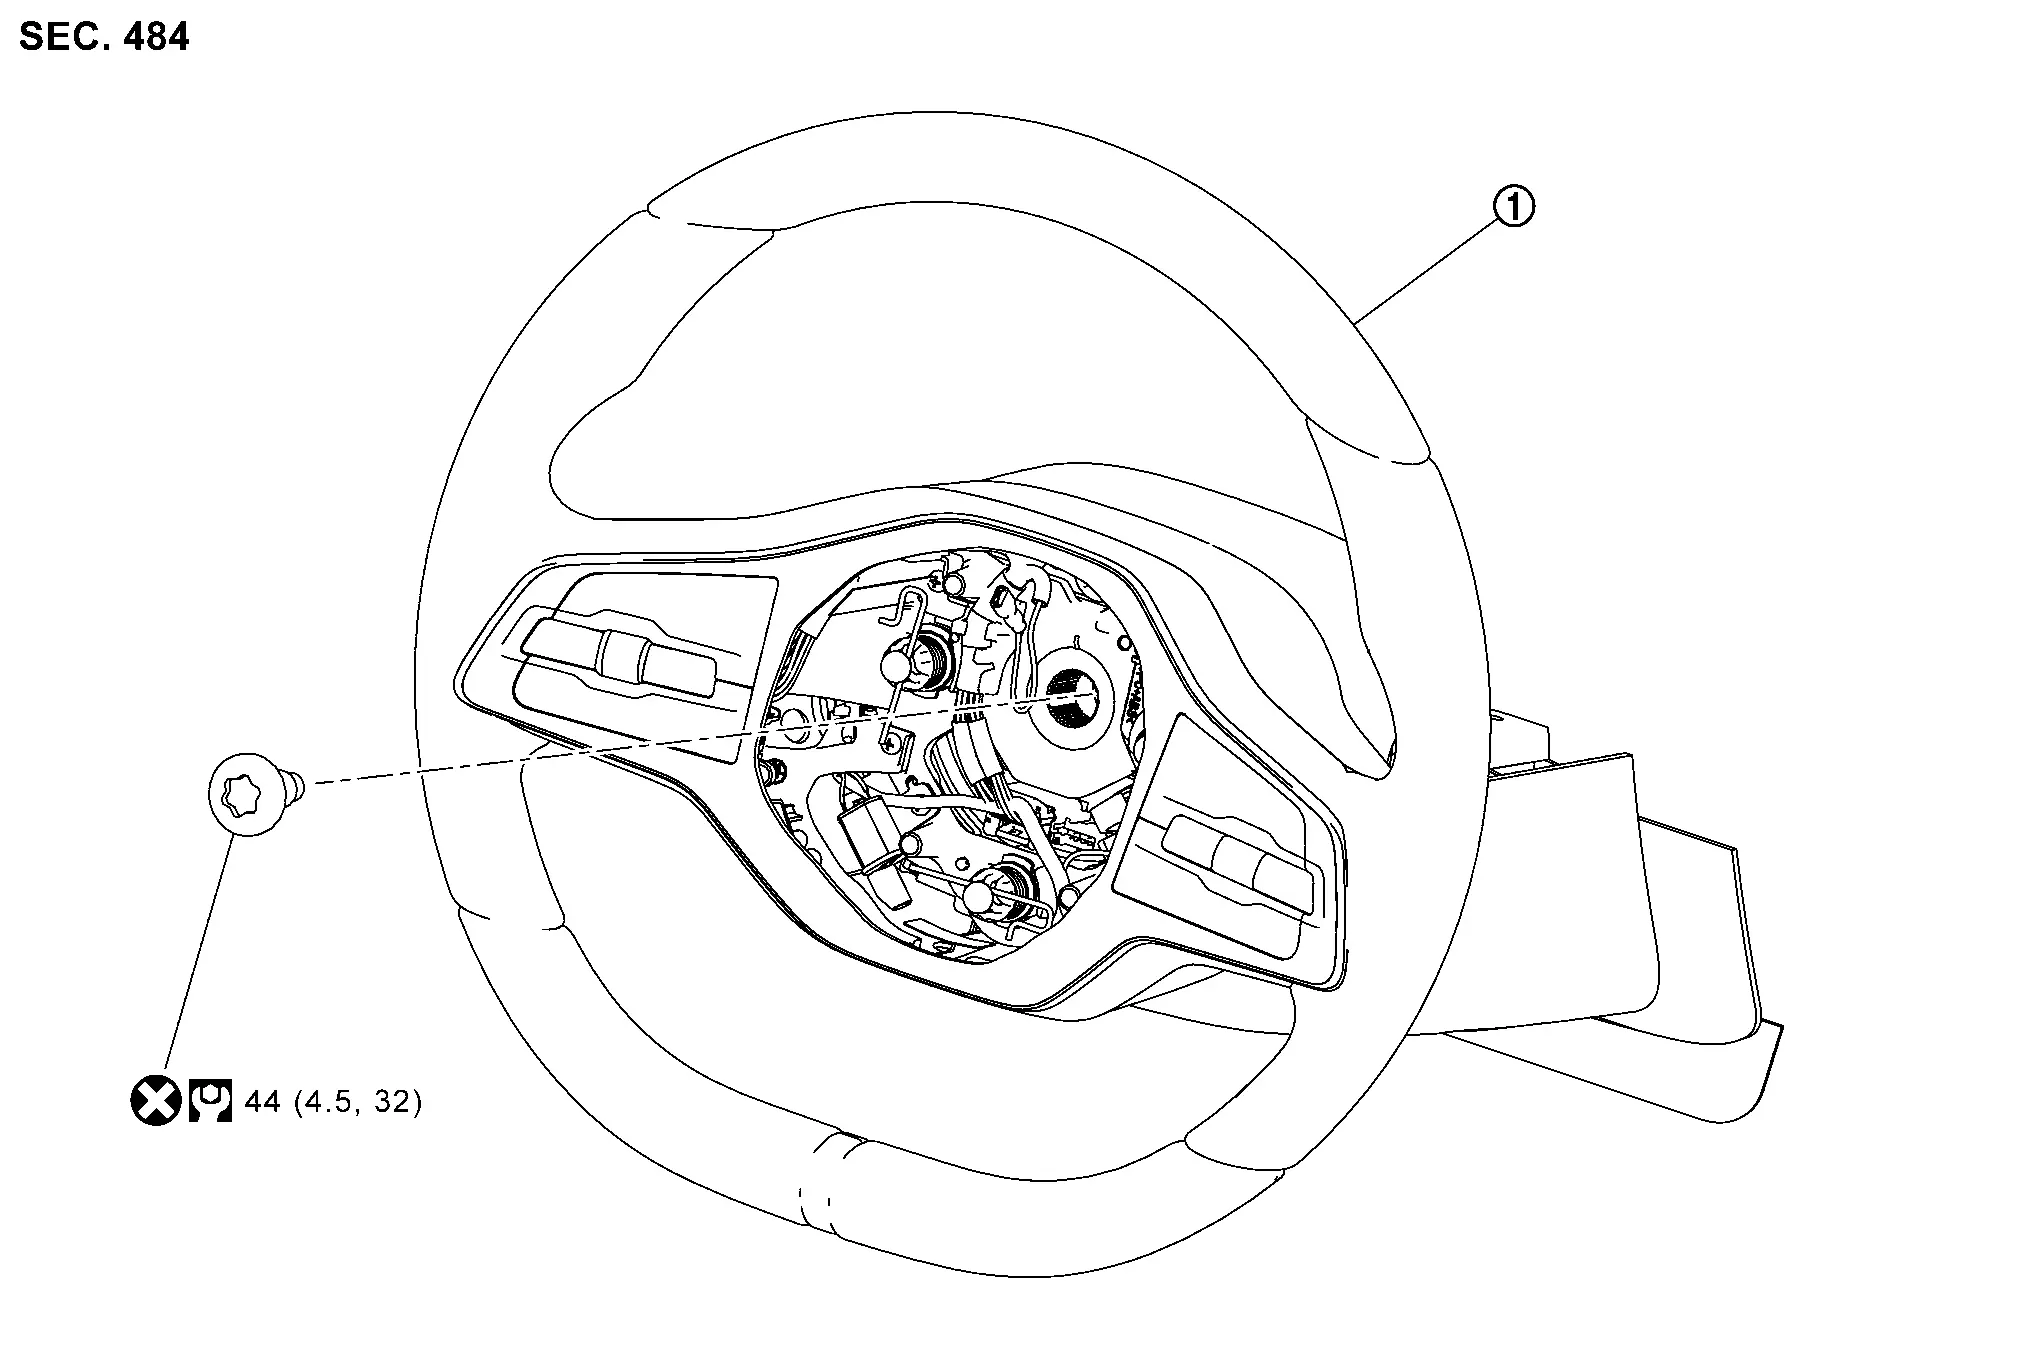
STEERING WHEEL : Exploded View
 |
Steering wheel | ||||
 |
: N·m (kg-m, ft-lb) | ||||
 |
: Always replace after every disassembly. | ||||
STEERING WHEEL : Removal & Installation
REMOVAL
Set vehicle to the straight-ahead position.
Remove driver air bag module. Refer to Removal & Installation.
Remove steering wheel lock nut after steering is locked.
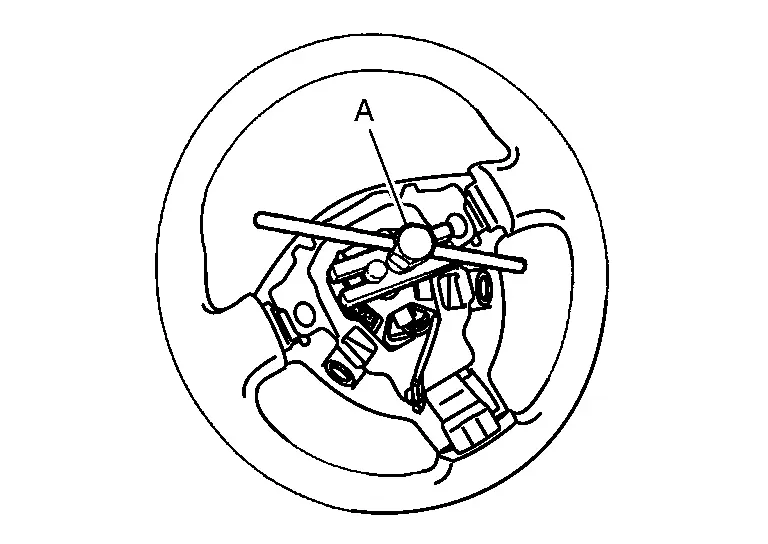
Remove steering wheel with the steering wheel puller (commercial service tool) (A).
INSTALLATION
Note the following, and install in the reverse order of removal.
Steering Column Nissan Ariya 2026
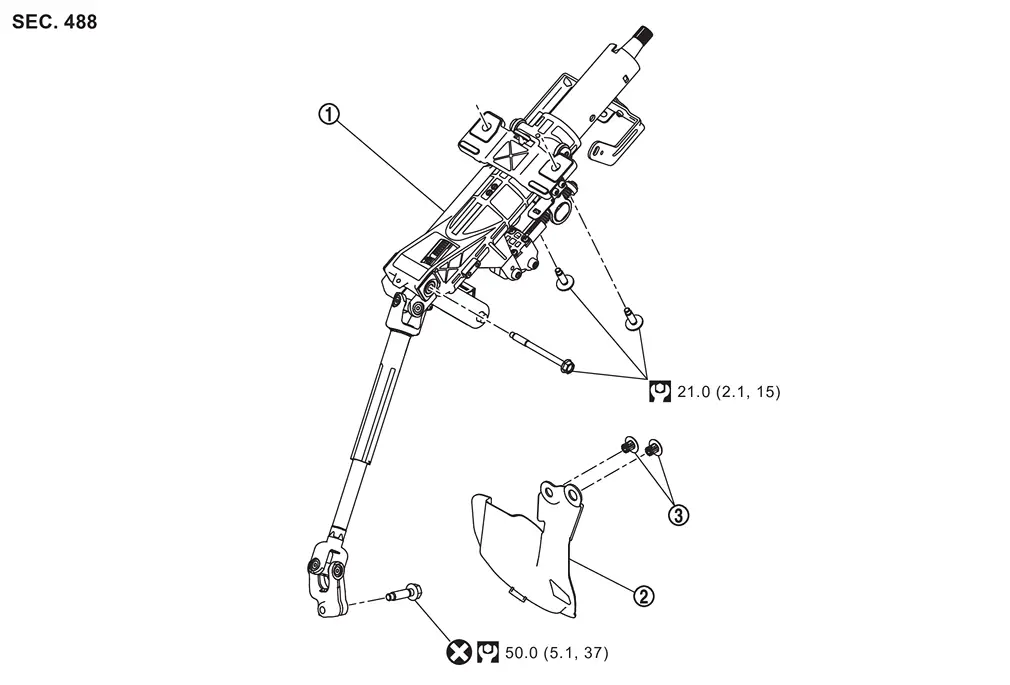
STEERING COLUMN : Exploded View
|
Steering column assembly |  |
Steering shaft lower cover |  |
Clip |
|
: N·m (kg-m, ft-lb) | ||||
|
: Always replace after every disassembly. | ||||
STEERING COLUMN : Removal & Installation
REMOVAL
Disconnect 12V battery negative terminal. Refer to PRECAUTIONS FOR REMOVING BATTERY TERMINAL : Precautions
Set Nissan Ariya vehicle to the straight ahead position.
Adjust the tilt / telescoping to the following position.
Electric type: Unlock the tilt/telescope adjustment lever then place the tilt to the lowest level and telescope in to the longest position. Then, lock the adjustment lever.
Manual type: Unlock the tilt/telescope adjustment lever then place the tilt to the highest level and telescope in to the center position. Then, lock the adjustment lever.
Remove the instrument lower panel. Refer to Removal & Installation.
Remove the steering wheel. Refer to STEERING WHEEL : Removal & Installation
Remove steering column covers. Refer to Removal & Installation.
Remove spiral cable. Refer to Removal & Installation.
Remove the combination switch. Refer to Removal and Installation.
Remove harness clip from steering column assembly.
Remove harness cover mounting bolt  , and then move the harness to a place where work is not hindered.
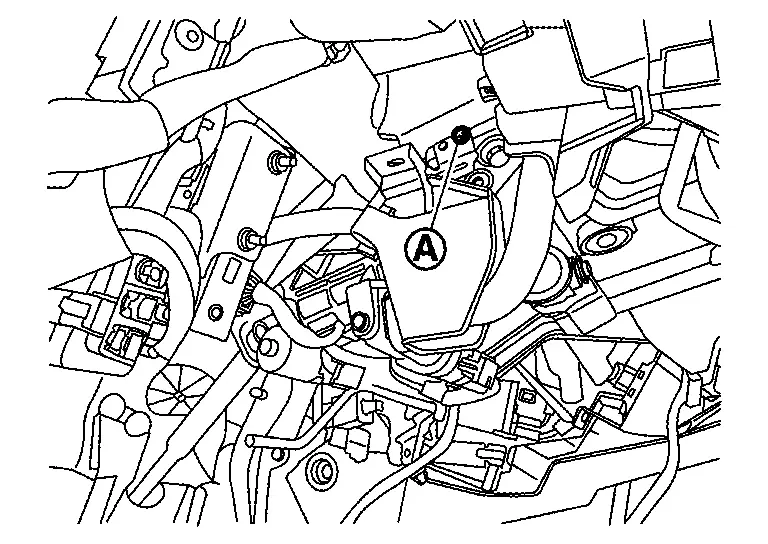
Disconnect harness connector .

Remove clips and then remove steering shaft lower cover .
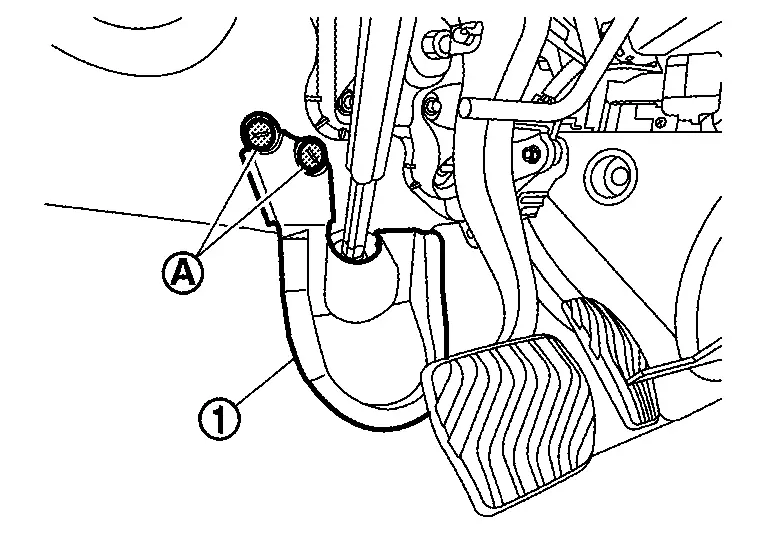
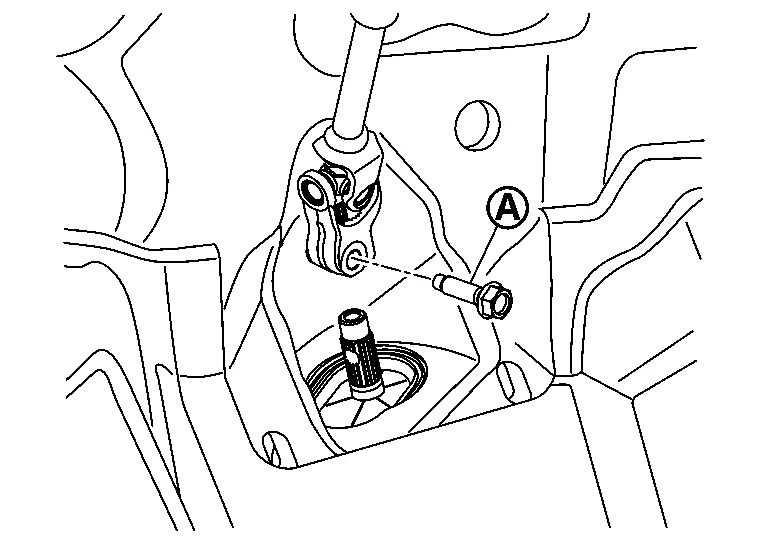
Remove lower shaft mounting bolt.
Remove steering column assembly mounting bolts in the order  to .
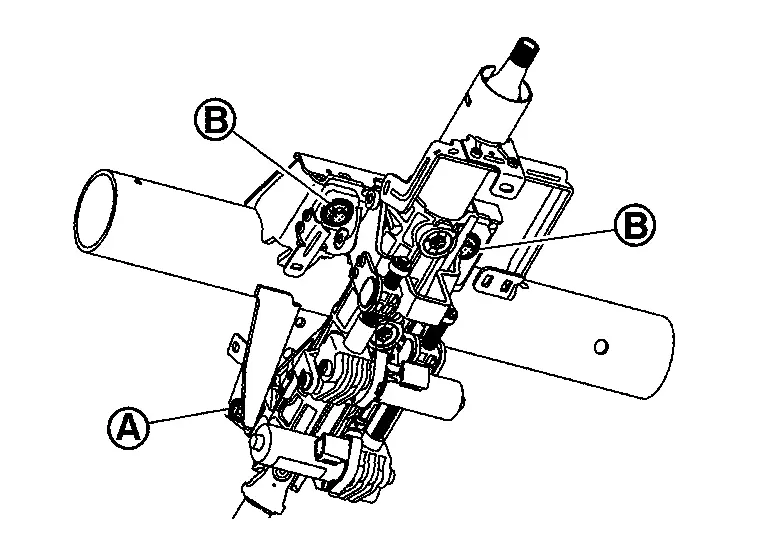
Remove steering column assembly.
Perform inspection after removal. Refer to STEERING COLUMN : Inspection
INSTALLATION
Insert bolt
through the steering column hole.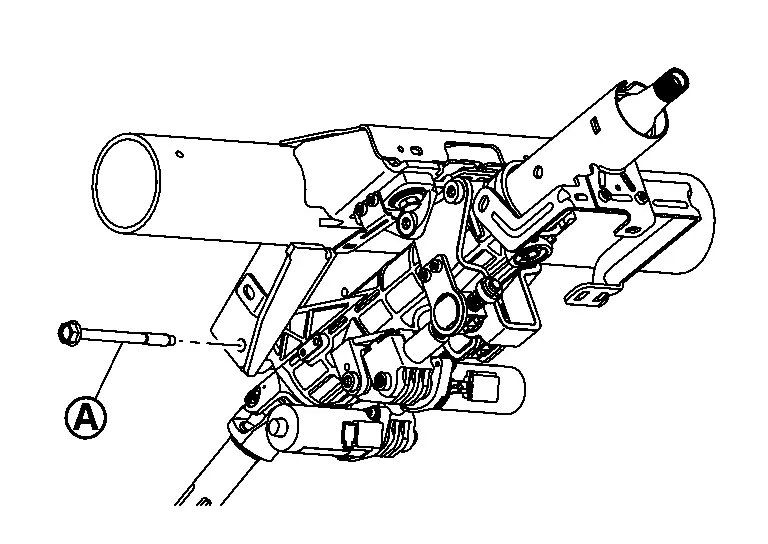
Tentatively tighten bolt.
Insert bolt
through the steering column hole.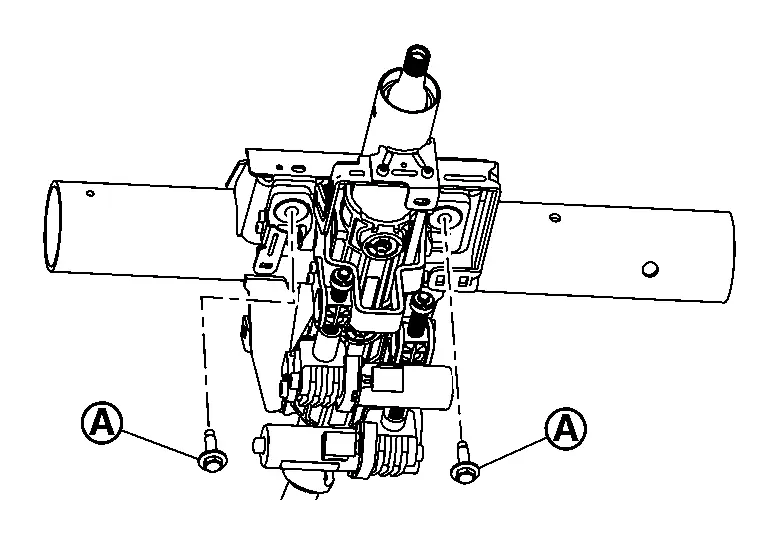
Tentatively tighten bolt.
Tighten bolt
to the specified torque.Tighten bolt
to the specified torque.After aligning the blocking phase of pinion, the yoke
shall be inserted to the pinion shaft until yoke lower surface  is in contact with pinion shaft surface
 .
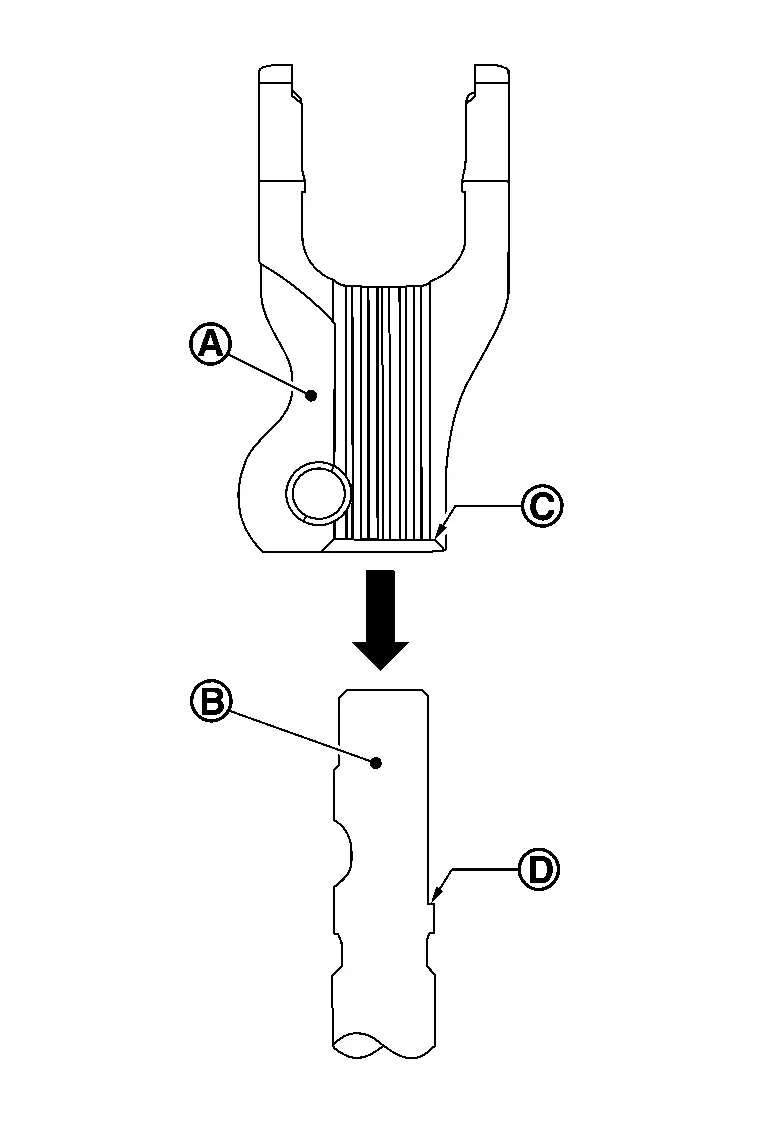
Insert bolt
.
Tighten bolt to the specified torque.
Unlock the tilt and telescope adjustment lever, move steering column up down smoothly without any catching or noise.
Perform alignment resetting the front wheel toe with steering wheel on center. Refer to WHEEL ALIGNMENT : Inspection
Reset steering angle sensor. Refer to Work Procedure.
STEERING COLUMN : Inspection
INSPECTION AFTER REMOVAL
Check the following items and replace, if necessary.
Check each part of steering column assembly for damage or other malfunctions. Replace if there are any abnormal conditions.
Measure steering column rotating torque using a preload gauge (commercial service tool) (A). Replace steering column assembly if the rotating torque is outside the standard.
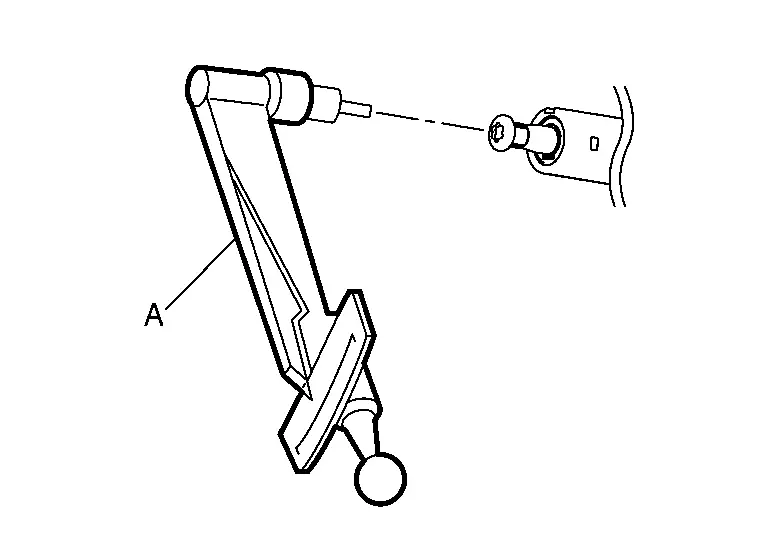
Rotating torque : Refer to STEERING COLUMN : Service Data. With the column telescope set to the shortest position, measure the length “L” shown in the figure, if Nissan Ariya vehicle has been involved in a minor collision. Replace steering column assembly (with motor, reduction gear, sensor) if “L” is less than the minimum length.
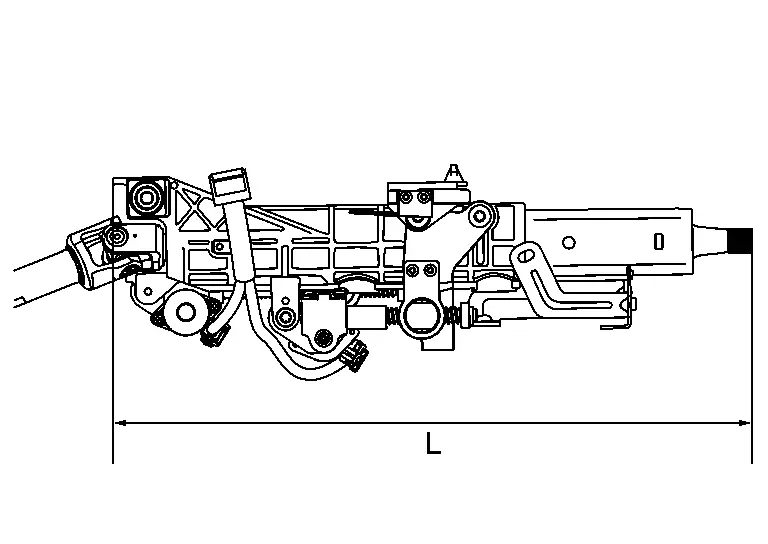
Steering column length minimum (telescope in) L : Refer to STEERING COLUMN : Service Data.
INSPECTION AFTER INSTALLATION
Check the following items and replace, if necessary.
Check each part of steering column assembly for damage or other malfunctions. Replace if there are any abnormal conditions.
Check tilt and telescopic mechanism operating range “T”, “L” as shown in the figure.

Tilt operating range (T) : Refer to STEERING COLUMN : Service Data. Telescopic operating range (L) : Refer to STEERING COLUMN : Service Data. Unlock the tilt and telescope adjustment lever, move steering column up and down smoothly without any catching or noise.
After installation, turn steering wheel to make sure it moves smoothly while turning to the left and right stops.
Make sure the number of turns is the same from the straight-forward position to left and right stops.
Make sure that the steering wheel is in a neutral position when driving straight ahead.
Rotate steering wheel to check for decentered condition, binding, noise, or excessive steering effort.
Check the steering wheel play, neutral position steering wheel, steering wheel turning torque, and front wheel turning angle.
Steering wheel play: Refer to STEERING WHEEL : Periodic Maintenance Operation.
Neutral position steering wheel, steering wheel turning torque, and front wheel turning angle: Refer to STEERING WHEEL : Periodic Maintenance Operation
Adjust neutral position of steering angle sensor. Refer to Work Procedure.
If the steering column has been replaced or removed / installed, perform the following operations.
ADJUSTMENT OF STEERING ANGLE SENSOR NEUTRAL POSITION: Refer to Work Procedure.
RES RESET: Refer to Work Procedure.
If equipped with ProPILOT Assist, perform steering torque calibration after replacing or removing and installing the steering column. Refer to How to check.
Steering Gear and Linkage Nissan Ariya: FE0
STEERING GEAR AND LINKAGE : Exploded View
REMOVAL

|
Steering gear assembly | |
Front suspension member | ||
 |
: Nissan Ariya Vehicle front | ||||
|
: N·m (kg-m, ft-lb) | ||||
|
: Always replace after every disassembly. | ||||
DISASSEMBLY
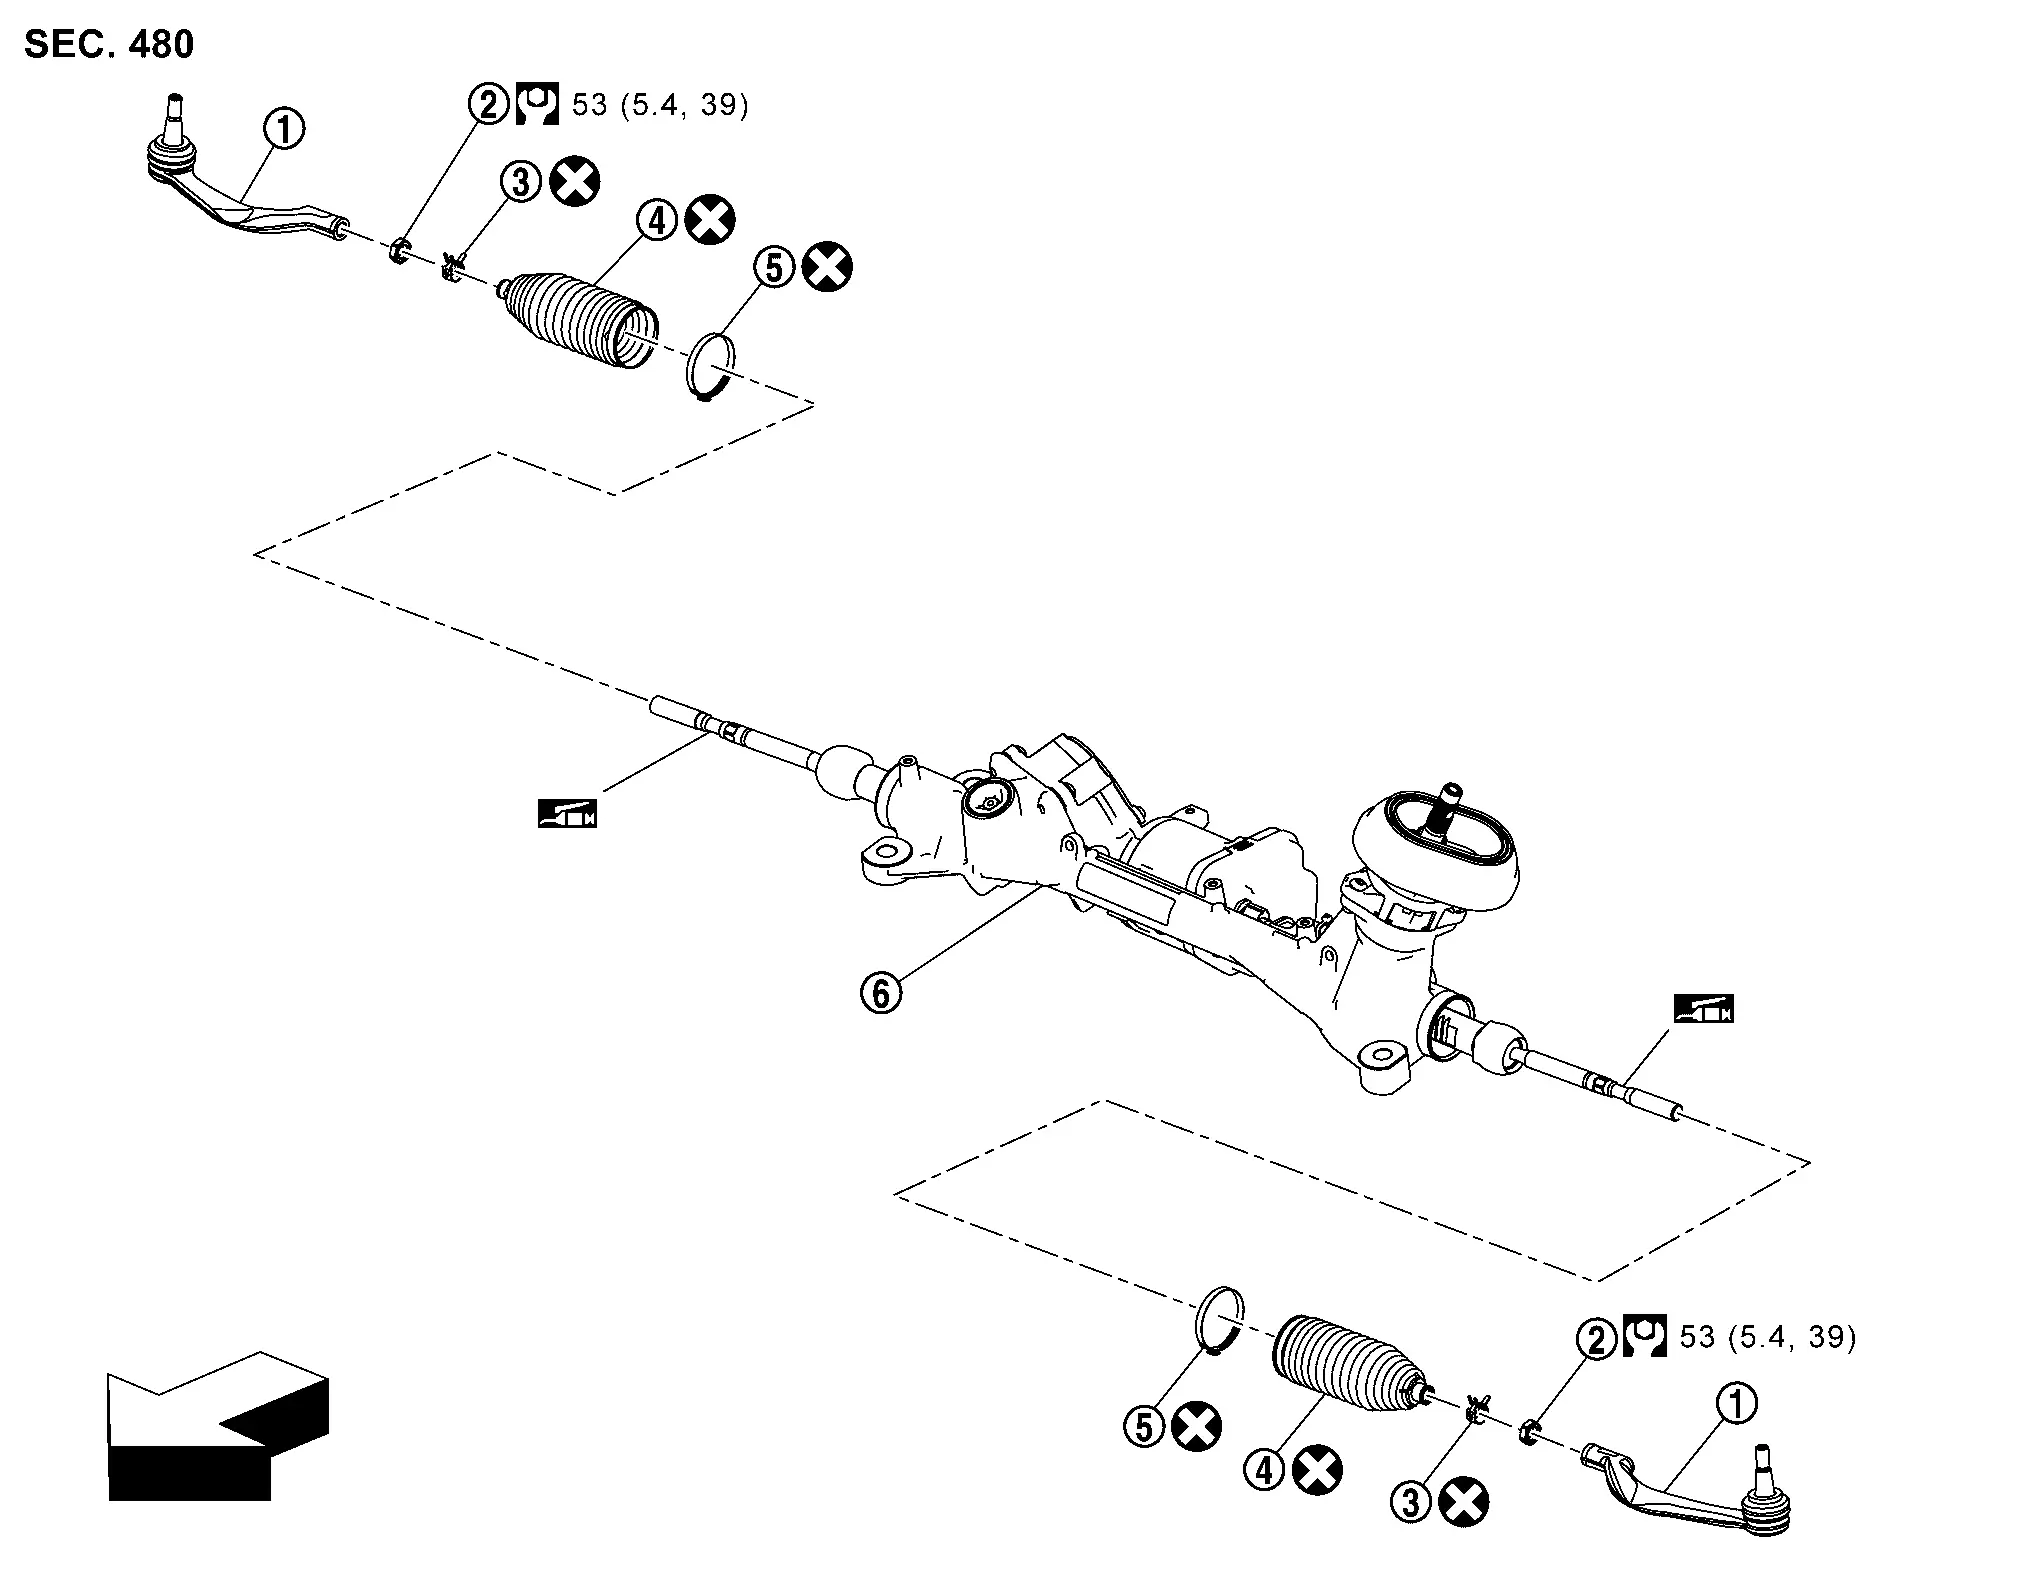
|
Outer socket | |
Outer socket lock nut | |
Boot clamp (small diameter) |
 |
Boot |  |
Boot clamp (large diameter) |  |
Gear housing assembly |
|
: Nissan Ariya Vehicle front | ||||
|
: N·m (kg-m, ft-lb) | ||||
 |
: Apply Dow corning 111 or equivalent. | ||||
|
: Always replace after every disassembly. | ||||
STEERING GEAR AND LINKAGE : Removal & Installation
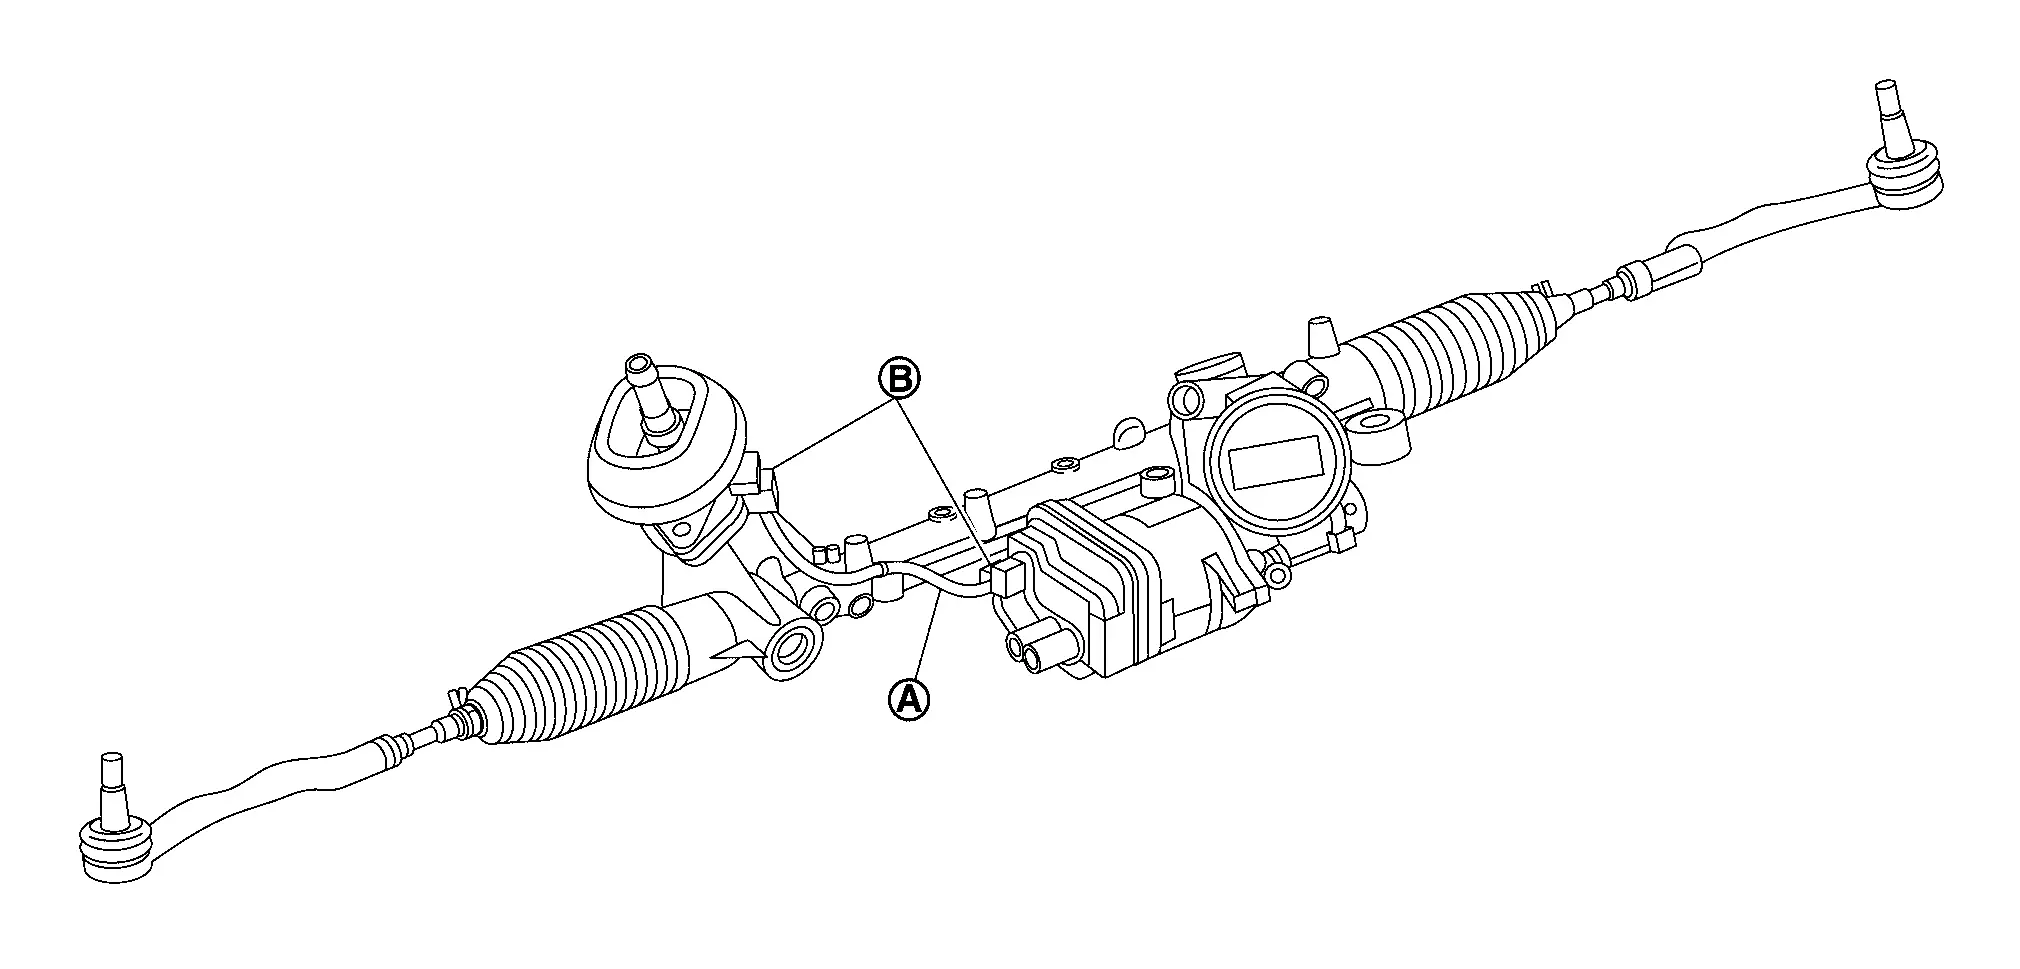
REMOVAL
Set vehicle to the straight-ahead position.
Remove front suspension member. Refer to FRONT SUSPENSION MEMBER : Removal & Installation
Remove front traction motor, front traction motor inverter and reduction gear from front suspension member.
Remove rear motor mounting. Refer to FRONT TRACTION MOTOR : Removal & Installation.
Remove steering gear assembly from front suspension member.
INSTALLATION
Note the following, and install in the reverse order of removal.
Before installation, check that the tilt position is at the middle level.
Clean mounting surface on the body side of fire wall seal when installing steering gear assembly.
Perform final tightening of nuts and bolts on each part under unladen conditions with tires on level ground when removing steering gear assembly. Check wheel alignment.
Rotate steering wheel to check for decentered condition, binding, noise or excessive steering effort.
Perform inspection after installation. Refer to STEERING GEAR AND LINKAGE : Inspection.
If equipped with ProPILOT Assist, perform steering torque calibration after replacing or removing and installing the steering gear assembly. Refer to How to check.
STEERING GEAR AND LINKAGE : Disassembly & Assembly
DISASSEMBLY
Loosen inner socket lock nut .

Remove boot clamps, and then remove boot from inner socket and housing.
Remove fire wall seal.
Perform inspection after disassembly. Refer to STEERING GEAR AND LINKAGE : Inspection.
ASSEMBLY
Apply recommended grease to part of inner socket, and install boot to inner socket and gear housing.
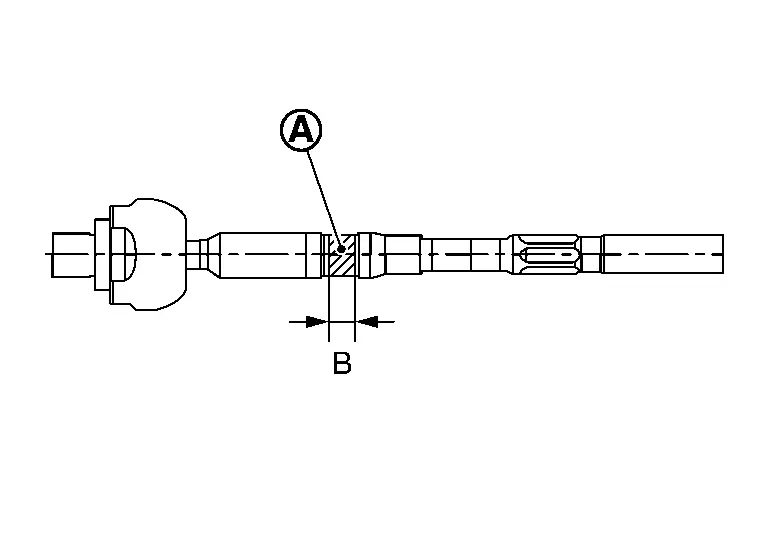
Use Dow corning 111 (manufactured by TOURE·DAUKONINGU) or equivalent.
| Grease application position (Reference) | |
| B | : 10 mm (0.39 in) |
Install boot clamp (large diameter) to boot using boot band crimping tool (SST: KV40107300) (A).
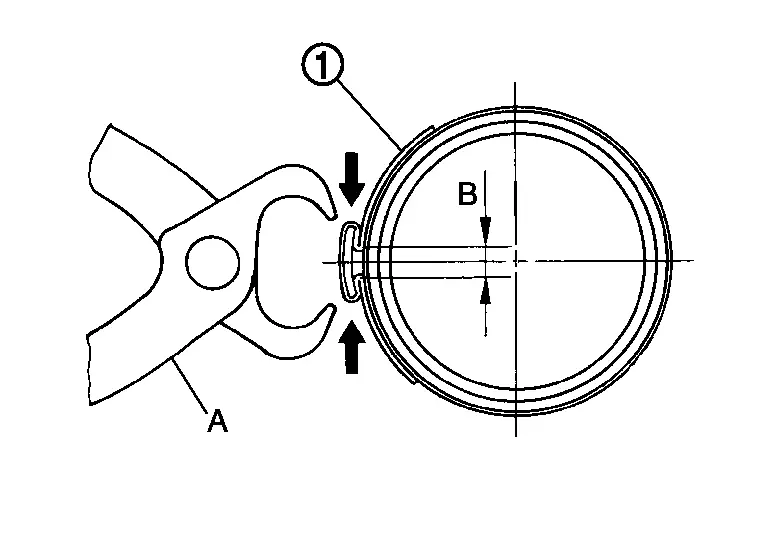
Install boot clamp (small diameter) to boot.
Adjust outer socket and then tighten lock nut to the specified torque. Check length again after tightening lock nut.
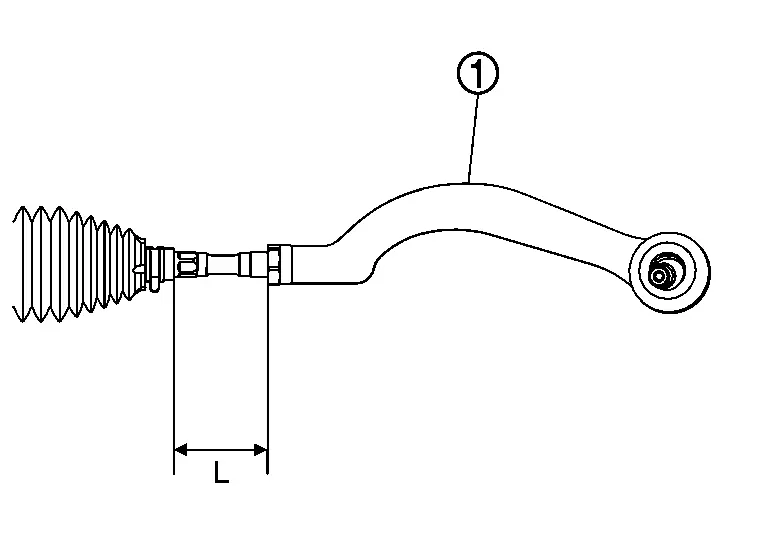
|
: Outer socket |
| Inner socket length (L) | : Refer to STEERING GEAR AND LINKAGE : Service Data |
STEERING GEAR AND LINKAGE : Inspection
INSPECTION AFTER DISASSEMBLY
Boot
Check boot for cracks, and replace it if a malfunction is detected.
Gear Housing Assembly
Check gear housing assembly for damage and scratches. Replace if there are any abnormal conditions.
Outer Socket and Inner Socket
Check the following items and replace the component if it does not meet the standard.
BALL JOINT SWINGING FORCE
Hook a pull gauge [SST: — (J-44372)] at the point shown in the figure and pull the pull gauge. Make sure that the pull gauge reads the specified value when ball stud and inner socket start to move. Replace outer socket and inner socket if they are outside the standard.
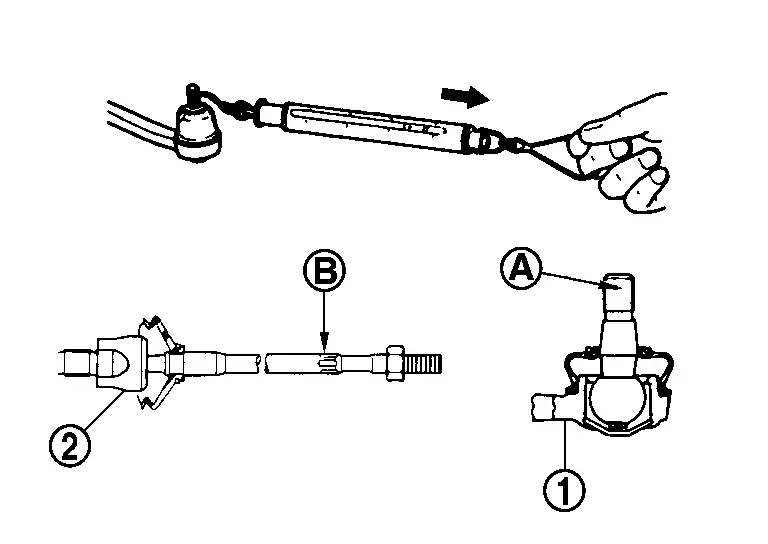
Measuring point of outer socket Ball stud upper side Measuring point of inner socket Point shown in the figureSwinging force Refer to STEERING GEAR AND LINKAGE : Service Data.
BALL JOINT ROTATING TORQUE
Make sure that the reading is within the following specified range using suitable tool (A). Replace outer socket if the reading is outside the specification.

Rotating torque Refer to STEERING GEAR AND LINKAGE : Service Data.
BALL JOINT AXIAL END PLAY
Apply an axial load of 490 N (50 kg, 110 lb) to ball stud. Using a dial gauge, measure amount of stud movement, and then make sure that the value is within the following specified range. Replace outer socket
and inner socket if the measured value is outside the standard.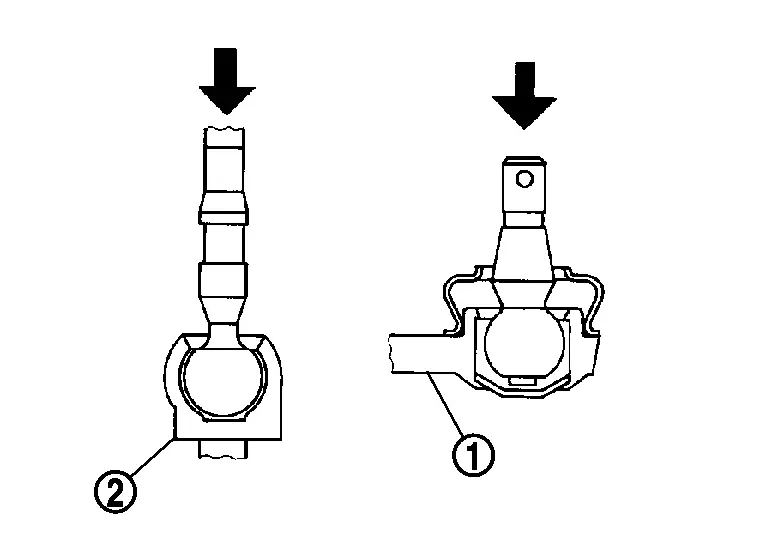
Axial end play Refer to STEERING GEAR AND LINKAGE : Service Data.
INSPECTION AFTER INSTALLATION
After installation, confirm that the power supply connector lock of steering control module is securely locked.
If the steering gear has been replaced, perform the following operations.
ADJUSTMENT OF STEERING ANGLE SENSOR NEUTRAL POSITION: Refer to Work Procedure.
RES RESET: Refer to Work Procedure
ADDITIONAL SERVICE WHEN REPLACING POWER STEERING CONTROL MODULE: Refer to Work Procedure.
Check the following items, and if there are any abnormalities, replace them.
Rotate the steering wheel and check for abnormal noise and excessive steering force, etc.
Check if steering wheel turns smoothly when it is turned several times fully to the end of the left and right.
Check the steering wheel play, neutral position steering wheel, steering wheel turning force, and front wheel turning angle.
Steering wheel play: Refer to STEERING WHEEL : Periodic Maintenance Operation.
Neutral position steering wheel, steering wheel turning force, and front wheel turning angle: Refer to Work Procedure
Heated Steering Wheel Switch Nissan Ariya 2023
HEATED STEERING WHEEL SWITCH : Removal & Installation
When replacing heated steering wheel switch, replace integreted interface display. Refer to Removal and Installation.