Traction Motor System :: Front Traction Motor
- Preparation
- Description
- Basic Inspection
- Ecu Diagnosis Information. Inverter (front)
- Dtc Diagnosis
- Component Parts /circuit Diagnosis
- Symptom Diagnosis. Electromagnetic Noise Is Audible
- Periodic Maintenance. Front Traction Motor Oil
- Removal and Installation. Inverter (front)
Ecu Diagnosis Information. Inverter (front) Nissan Ariya first Gen
Physical Values
TERMINAL LAYOUT

PHYSICAL VALUES
Terminal No. (Wire Color) | Item | Condition | Value (Approx.) | ||
|---|---|---|---|---|---|
| + | − | Signal name | Input/Output | ||
1 (BR) |
11 (GR) |
Motor oil temperature sensor | Input | — | Within ±50% of the temperature characteristics chart 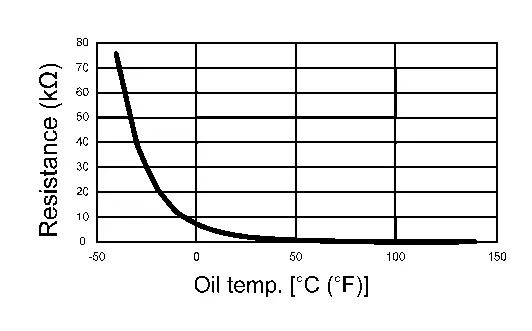 |
3 (BG) |
2 (V) |
Motor temperature sensor | Input | — | Within ±50% of the temperature characteristics chart 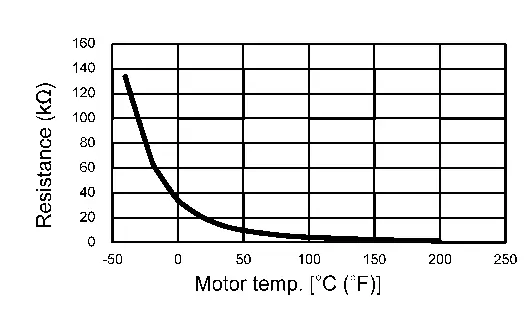 |
4 (B) |
Ground | Ground 2 | — | Always | 0 V |
13 (R) |
12 (L) |
Motor resolver signal (S1 - S3) | Input | — | 34.6 - 42.4 Ω |
14 (B) |
Ground | Ground 1 | — | Always | 0 V |
18 (SB) |
Ground | 12V battery power supply | Input | Always | 9 – 16 V |
22 (Y) |
21 (W) |
Motor resolver signal (S2 - S4) | Input | — | 37.6 - 46.0 Ω |
24 (G) |
23 (BR) |
Motor resolver signal (R1 - R2) | Output | — | 8.5 - 12.7 Ω |
25* (R) |
— | — | — | — | — |
26 (G) |
Ground | EV system CAN-L | Input/Output | — | — |
27 (L) |
Ground | EV system CAN-H | Input/Output | — | — |
28 (P) |
Ground | 12V battery power supply | Input | Always | 9 – 16 V |
29 (Y) |
19 (W) |
Motor oil pump communication signal | Input/Output | — | — |
30 (LG) |
Ground | Power switch ON signal | Input | Power switch: ON | 9 – 16 V |
| Power switch: OFF | 0 V | ||||
*: Not used for control.
Values On The Diagnosis Tool
| Monitor item | Condition | Value/Status |
|---|---|---|
| Motor speed 1 | READY state (Nissan Ariya vehicle is stopped) | Approx. 0 rpm |
| During driving | The value changes depending on the Nissan Ariya vehicle speed. | |
| Inverter input voltage (High voltage) | READY (stop the Nissan Ariya vehicle) and during driving | Approximately the same as the Li-ion battery voltage |
| Rotor current value 1 | READY state (Nissan Ariya vehicle is stopped) | Approx. 0 rpm |
| During driving | 0 - 17.5 A (The value changes depending on the Nissan Ariya vehicle speed.) | |
| Rotor current value 2 | READY state (Nissan Ariya vehicle is stopped) | Approx. 0 rpm |
| During driving | 0 - 17.5 A (The value changes depending on the Nissan Ariya vehicle speed.) | |
| Ignition signal | Power switch ON | Ignition power supply on |
| Inverter power module temperature | READY state (Nissan Ariya vehicle is stopped) | Same as the cooling water temperature once the temperature is saturated |
| During driving | The temperature changes depending on the Nissan Ariya vehicle running | |
| Resolver offset value | ― | ― |
| Rotor resistance value | ― | ― |
| Inverter initial diagnosis | READY state (Nissan Ariya vehicle is stopped) | Not diagnosed |
| Inverter high voltage circuit diagnosis result | READY state | OK |
| Inverter torque control function diagnosis result | READY state | OK |
| Inverter abnormality judgement 1 | READY state | OK |
| Inverter abnormality judgement 2 | READY state | OK |
| Rotor current diagnosis result | READY state | OK |
| Stator current diagnosis result | READY state | OK |
| Inverter over voltage malfunction (High voltage) | READY state | OK |
| Inverter control status 1 | READY state (Nissan Ariya vehicle is stopped) | Traction |
| During driving | Traction | |
| 12V battery voltage | Power switch ON | 9 – 16 V |
| Re-programming judgement result | ― | ― |
| Key available | ― | ― |
| Inverter temperature | READY state | The temperature changes depending on the Nissan Ariya vehicle running (including when stopped). |
| Inverter power module high arm IGBT status | READY state | OK |
| Inverter power module low arm IGBT status | READY state | OK |
| Li-ion battery abnormality state | READY state | OK |
| Li-ion battery voltage | Power switch ON | 269 – 402 V |
| Discharge request | READY state | Off |
| Torque request | READY state (Nissan Ariya vehicle is stopped) | Approx. 0 N·m |
| During driving | Changes depending on the Nissan Ariya vehicle acceleration or deceleration | |
| Inverter activation request | Power switch ON | Off |
| READY state | On | |
| Sleep/wake up request | Power switch ON | Wake up request |
| Ignition signal (CAN) | Power switch ON | Ignition power on |
| Communication diagnosis permission status | READY state | Permit |
| Coolant flow | READY state | Changes depending on the Nissan Ariya vehicle state. |
| ODO | Power switch ON | Approximately the same as the combination meter ODO |
| Safety maximum torque | During driving | Changes depending on the Nissan Ariya vehicle acceleration or deceleration |
| High voltage relay status | Power switch ON | Close |
| OTA status | Power switch ON (no OTA request) | No request |
| Drive prohibition signal | Power switch ON | OK |
| Safety minimum torque | During driving | Changes depending on the Nissan Ariya vehicle acceleration or deceleration |
| Oil pump status | Power switch ON | OK |
| Stator temperature | READY state (Nissan Ariya vehicle is stopped) | Same as the cooling water temperature once the temperature is saturated |
| During driving | The temperature changes depending on the Nissan Ariya vehicle running | |
| Rotor temperature | READY state (Nissan Ariya vehicle is stopped) | It is an estimated value and declines gradually when Nissan Ariya vehicle is stopped. |
| During driving | The temperature changes depending on the Nissan Ariya vehicle running | |
| Command oil pump speed | READY state (Nissan Ariya vehicle is stopped) | 500 - 3800 rpm (Changes depending on the front traction motor temperature and oil temperature.) |
| Oil pump speed | READY state (Nissan Ariya vehicle is stopped) | 500 - 3800 rpm (Changes depending on the front traction motor temperature and oil temperature.) |
| Motor speed 2 | READY state (Nissan Ariya vehicle is stopped) | Approx. 0 rpm |
| During driving | The value changes depending on the Nissan Ariya vehicle speed. | |
| Inverter high voltage | READY (stop the Nissan Ariya vehicle) and during driving | Approximately the same as the Li-ion battery voltage |
| Motor oil temperature | READY state (Nissan Ariya vehicle is stopped) | Same as the cooling water temperature once the temperature is saturated |
| During driving | The temperature changes depending on the Nissan Ariya vehicle running | |
| Inverter direct current value | READY state (Nissan Ariya vehicle is stopped) | Approx. 0.0 A |
| During driving | The temperature changes depending on the Nissan Ariya vehicle running | |
| Motor maximum power | READY state (Nissan Ariya vehicle is stopped) | Approx. 0.0 kw |
| During driving | The value changes depending on the Nissan Ariya vehicle speed. | |
| Motor power/regeneration status | READY state (Nissan Ariya vehicle is stopped) | Power mode |
| During driving (accelerator pedal ON) | Power mode | |
| During driving (accelerator pedal OFF) | Regeneration mode | |
| Inverter discharge status | Inverter (front) discharging | Discharging |
| Except above | Not discharged | |
| Inverter control status 2 | READY state | OK |
| Motor estimated torque | READY state (Nissan Ariya vehicle is stopped) | Approx. 0 N·m |
| During driving (accelerator pedal ON) | Changes depending on the Nissan Ariya vehicle speed. | |
| Motor regeneration maximum torque | READY state (Nissan Ariya vehicle is stopped) | Approx. 0 N·m |
| During driving (accelerator pedal OFF) | Changes depending on the Nissan Ariya vehicle speed. | |
| Motor power maximum torque | READY state (Nissan Ariya vehicle is stopped) | Approx. 0 N·m |
| During driving (accelerator pedal ON) | Changes depending on the Nissan Ariya vehicle speed. | |
| Inverter sleep permission | Power switch ON | Prohibit |
| Motor normalization temperature | Power switch ON | 0 - 100% (Changes depending on the front traction motor temperature.) |
| Inverter abnormality state | Power switch ON | OK |
| Inverter status (CAN) | READY state (Nissan Ariya vehicle is stopped) | Power on 2 |
| Inverter normalization temperature | Power switch ON | 0 - 100% [Changes depending on the inverter (front) temperature.] |
| Lamp lighting request 2 | EV system warning (EV system stopped)When displayed | Request present |
| Except above | No request | |
| Lamp lighting request 1 | EV system warning (EV system malfunction)When displayed | Request present |
| Except above | No request | |
| Inverter coolant temperature | READY state (Nissan Ariya vehicle is stopped) | Same as the cooling water temperature once the temperature is saturated |
| During driving | The temperature changes depending on the Nissan Ariya vehicle running | |
| U current sensor offset value | ― | ― |
| V current sensor offset value | ― | ― |
| W current sensor offset value | ― | ― |
| Rotor current sensor 1 offset value | ― | ― |
| Rotor current sensor 2 offset value | ― | ― |
Fail-safe
Refer to Fail-safe.
Protection Function
Refer to Protection Function.
DTC Inspection Priority Chart
If some DTCs are displayed at the same time, perform inspections one by one based on the priority as per the following list. For DTC, Refer to DTC Index.
| Priority | Detected items (DTC) |
|---|---|
| 1 | P0A8B-A2 14 Volt Power Module System Voltage |
| 2 | P030A-62 Ignition A Control Signal |
| P0A2A-11 Drive Motor A Temperature Sensor | |
| P0A2A-13 Drive Motor A Temperature Sensor | |
| P0A2A-4B Drive Motor A Temperature Sensor | |
| P0CBC-11 Drive Motor A Coolant Temperature Sensor | |
| P0CBC-13 Drive Motor A Coolant Temperature Sensor | |
| P0CBC-4B Drive Motor A Coolant Temperature Sensor | |
| P0CC1-04 Drive Motor A Coolant Pump Control | |
| P0CC1-81 Drive Motor A Coolant Pump Control | |
| P0CC1-87 Drive Motor A Coolant Pump Control | |
| P0D2D-17 Drive Motor A Inverter Voltage Sensor A | |
| P0DA8-00 Hybrid/EV Battery Voltage/Drive Motor A Inverter Voltage Correlation | |
| P161D-61 Immobilizer | |
| P161E-68 Immobilizer | |
| P161F-64 Immobilizer | |
| P0A78-48 Drive Motor A Inverter | |
| P0A78-62 Drive Motor A Inverter | |
| U2143-82 CAN communication error (VCM/HCM) | |
| U2143-83 CAN communication error (VCM/HCM) | |
| U2143-87 CAN communication error (VCM/HCM) | |
| U2144-82 CAN communication error (Li-ion battery) | |
| U2144-83 CAN communication error (Li-ion battery) | |
| U2144-87 CAN communication error (Li-ion battery) | |
| U2150-87 CAN communication error (AIRBAG) | |
| 3 | P0A00-11 Motor Electronics Coolant Temperature Sensor A |
| P0A00-13 Motor Electronics Coolant Temperature Sensor A | |
| P0A1B-01 Drive Motor A Control Module | |
| P0A1B-03 Drive Motor A Control Module | |
| P0A1B-04 Drive Motor A Control Module | |
| P0A1B-05 Drive Motor A Control Module | |
| P0A1B-44 Drive Motor A Control Module | |
| P0A3F-04 Drive Motor A Position Sensor | |
| P0A3F-1C Drive Motor A Position Sensor | |
| P0A51-01 Drive Motor A Current Sensor | |
| P0AED-11 Drive Motor Inverter Temperature Sensor A | |
| P0AED-13 Drive Motor Inverter Temperature Sensor A | |
| P0AED-1C Drive Motor Inverter Temperature Sensor A | |
| P0AED-4B Drive Motor Inverter Temperature Sensor A | |
| P0BE5-1C Drive Motor A Phase U Current Sensor | |
| P0BE9-1C Drive Motor A Phase V Current Sensor | |
| P0BED-1C Drive Motor A Phase W Current Sensor | |
| P0BFF-11 Drive Motor A Current | |
| P0BFF-12 Drive Motor A Current | |
| P0C0B-01 Drive Motor A Inverter Power Supply | |
| P0C0B-04 Drive Motor A Inverter Power Supply | |
| P0C0B-1C Drive Motor A Inverter Power Supply | |
| P0C0B-A2 Drive Motor A Inverter Power Supply | |
| P2E28-01 Drive Motor A Excitation Current Sensor | |
| P2E28-18 Drive Motor A Excitation Current Sensor | |
| P2E28-1D Drive Motor A Excitation Current Sensor | |
| P2E2B-11 Drive Motor A Excitation Current | |
| P2E2B-12 Drive Motor A Excitation Current | |
| P2E2B-1C Drive Motor A Excitation Current | |
| P3081-44 Resolver Offset Value Error | |
| P3082-44 Rotor Resistance Value Error | |
| P3083-44 Immobilizer | |
| 4 | P0BFF-18 Drive Motor A Current |
| P2D3B-92 Hybrid/EV Discharge System |
DTC Index
| DTC*1 | Items (CONSULT screen terms) | EV system warning lamp | Reference | |
|---|---|---|---|---|
| P030A | 62 | Ignition A Control Signal | — | DTC Description |
| P0A00 | 11 | Motor Electronics Coolant Temperature Sensor A | — | DTC Description |
| 13 | — | DTC Description | ||
| P0A1B | 01 | Drive Motor A Control Module | ON | DTC Description |
| 03 | ON | DTC Description | ||
| 04 | ON | DTC Description | ||
| 05 | ON | DTC Description | ||
| 44 | — | DTC Description | ||
| P0A2A | 11 | Drive Motor A Temperature Sensor | ON | DTC Description |
| 13 | ON | DTC Description | ||
| 4B | ON | DTC Description | ||
| P0A3F | 04 | Drive Motor A Position Sensor | ON | DTC Description |
| 1C | ON | DTC Description | ||
| P0A51 | 01 | Drive Motor A Current Sensor | ON | DTC Description |
| P0A78 | 48 | Drive Motor A Inverter | ON | DTC Description |
| 62 | ON | DTC Description | ||
| P0A8B | A2 | 14 Volt Power Module System Voltage | ON | DTC Description |
| P0AED | 11 | Drive Motor Inverter Temperature Sensor A | — | DTC Description |
| 13 | — | DTC Description | ||
| 1C | — | DTC Description | ||
| 4B | ON | DTC Description | ||
| P0BE5 | 1C | Drive Motor A Phase U Current Sensor | ON | DTC Description |
| P0BE9 | 1C | Drive Motor A Phase V Current Sensor | ON | DTC Description |
| P0BED | 1C | Drive Motor A Phase W Current Sensor | ON | DTC Description |
| P0BFF | 11 | Drive Motor A Current | ON | DTC Description |
| 12 | ON | DTC Description | ||
| 18 | ON | DTC Description | ||
| P0C0B | 01 | Drive Motor A Inverter Power Supply | ON | DTC Description |
| 04 | ON | DTC Description | ||
| 1C | ON | DTC Description | ||
| A2 | ON | DTC Description | ||
| P0CBC | 11 | Drive Motor A Coolant Temperature Sensor | ON | DTC Description |
| 13 | ON | DTC Description | ||
| 4B | ON | DTC Description | ||
| P0CC1 | 04 | Drive Motor A Coolant Pump Control | ON | DTC Description |
| 81 | ON | DTC Description | ||
| 87 | ON | DTC Description | ||
| P0D2D | 17 | Drive Motor A Inverter Voltage Sensor A | ON | DTC Description |
| P0DA8 | 00 | Hybrid/EV Battery Voltage/Drive Motor A Inverter Voltage Correlation | ON | DTC Description |
| P161D*2 | 61 | Immobilizer | — | — |
| P161E*2 | 68 | Immobilizer | — | — |
| P161F*2 | 64 | Immobilizer | — | — |
| P2D3B | 92 | Hybrid/EV Discharge System | ON | DTC Description |
| P2E28 | 01 | Drive Motor A Excitation Current Sensor | ON | DTC Description |
| 18 | ON | DTC Description | ||
| 1D | ON | DTC Description | ||
| P2E2B | 11 | Drive Motor A Excitation Current | ON | DTC Description |
| 12 | ON | DTC Description | ||
| 1C | ON | DTC Description | ||
| P3081 | 44 | Resolver Offset Value Error | ON | DTC Description |
| P3082 | 44 | Rotor Resistance Value Error | ON | DTC Description |
| P3083 | 44 | Immobilizer | — | DTC Description |
| U2143 | 82 | CAN communication error (VCM/HCM) | May turn ON | DTC Description |
| 83 | May turn ON | DTC Description | ||
| 87 | May turn ON | DTC Description | ||
| U2144 | 82 | CAN communication error (Li-ion battery) | May turn ON | DTC Description |
| 83 | May turn ON | DTC Description | ||
| 87 | May turn ON | DTC Description | ||
| U2150 | 87 | CAN communication error (AIRBAG) | — | DTC Description |
*1: These numbers are rescribed by SAE J2012/ISO 15031-6.
*2: These DTCs are the immobilizer-related DTCs.
Symptom Diagnosis. Electromagnetic Noise Is Audible Nissan Ariya SUV
Symptom Description
The electromagnetic noise of the front traction motor may become more noticeable when accelerating on a steep slope (large output torque).
This occurs when the IGBT switching frequency is lowered by the inverter (front) due to high temperature of the IGBT inside the inverter (front). This does not indicate a problem with the inverter (front) characteristics or control.
This phenomenon is one of the protective controls. Refer to Protection Function.
Periodic Maintenance. Front Traction Motor Oil Nissan Ariya: FE0
FRONT TRACTION MOTOR OIL : Inspection
Oil Leakage Inspection
Check that there is no oil leakage around the front traction motor.
If an abnormality is found, replace the front traction motor. Refer to FRONT TRACTION MOTOR : Removal & Installation.
Removal and Installation. Inverter (front) Nissan Ariya: FE0
INVERTER (FRONT) : Exploded View
INVERTER (FRONT) AND FRONT TRACTION MOTOR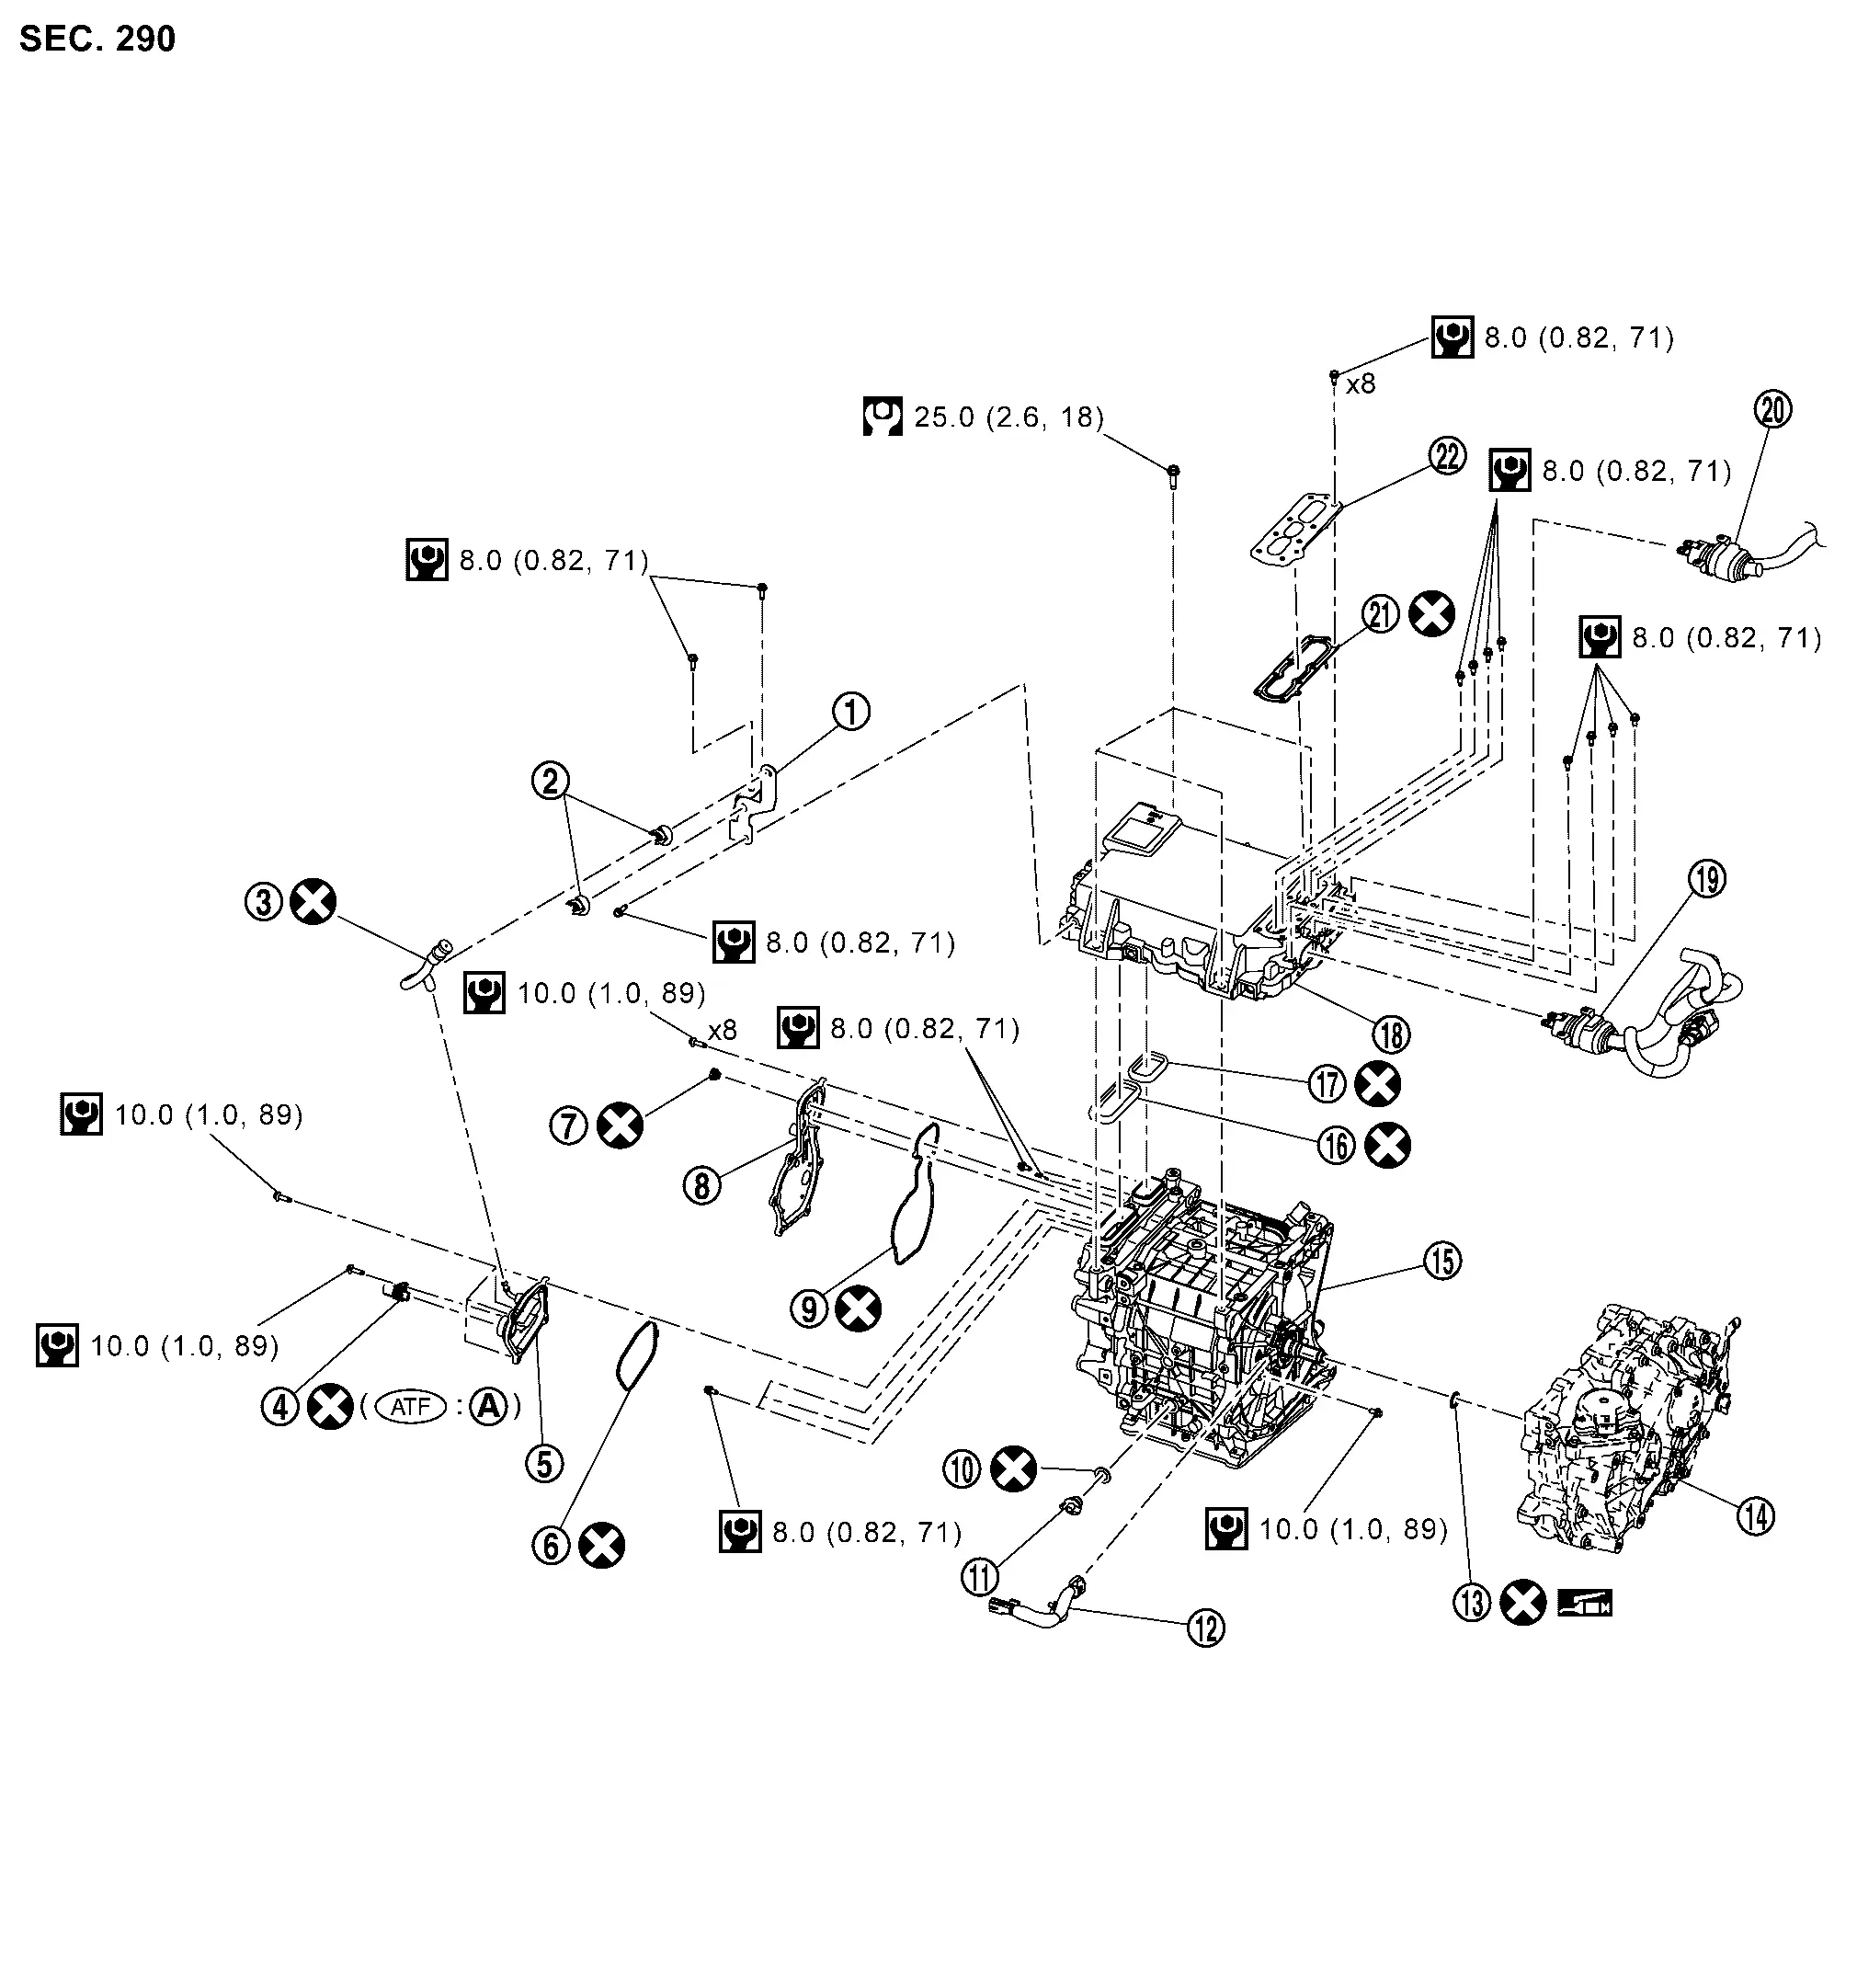
 |
Bracket |  |
Clip |  |
Air breather hose |
 |
Front traction motor stator temperature sensor joint connector |  |
3-phase bus bar cover |  |
Gasket |
 |
Breather |  |
Excitation cover |  |
Gasket |
 |
Gasket |  |
Plug |  |
Resolver harness |
 |
O-ring |  |
Reduction gear |  |
Front traction motor |
 |
Seal |  |
Seal |  |
Inverter (front) |
 |
High voltage harness |  |
High voltage harness |  |
Gasket |
 |
High voltage harness cover |  |
O-ring | ||
 |
: Always replace after every disassembly. | ||||
 |
: N·m (kg-m, in-lb) | ||||
 |
: N·m (kg-m, ft-lb) | ||||
 |
: Apply lithium-based grease including molybdenum disulphide. | ||||
 |
: Apply Genuine NISSAN Matic S ATF or equivalent. | ||||
FRONT TRACTION MOTOR MOUNTING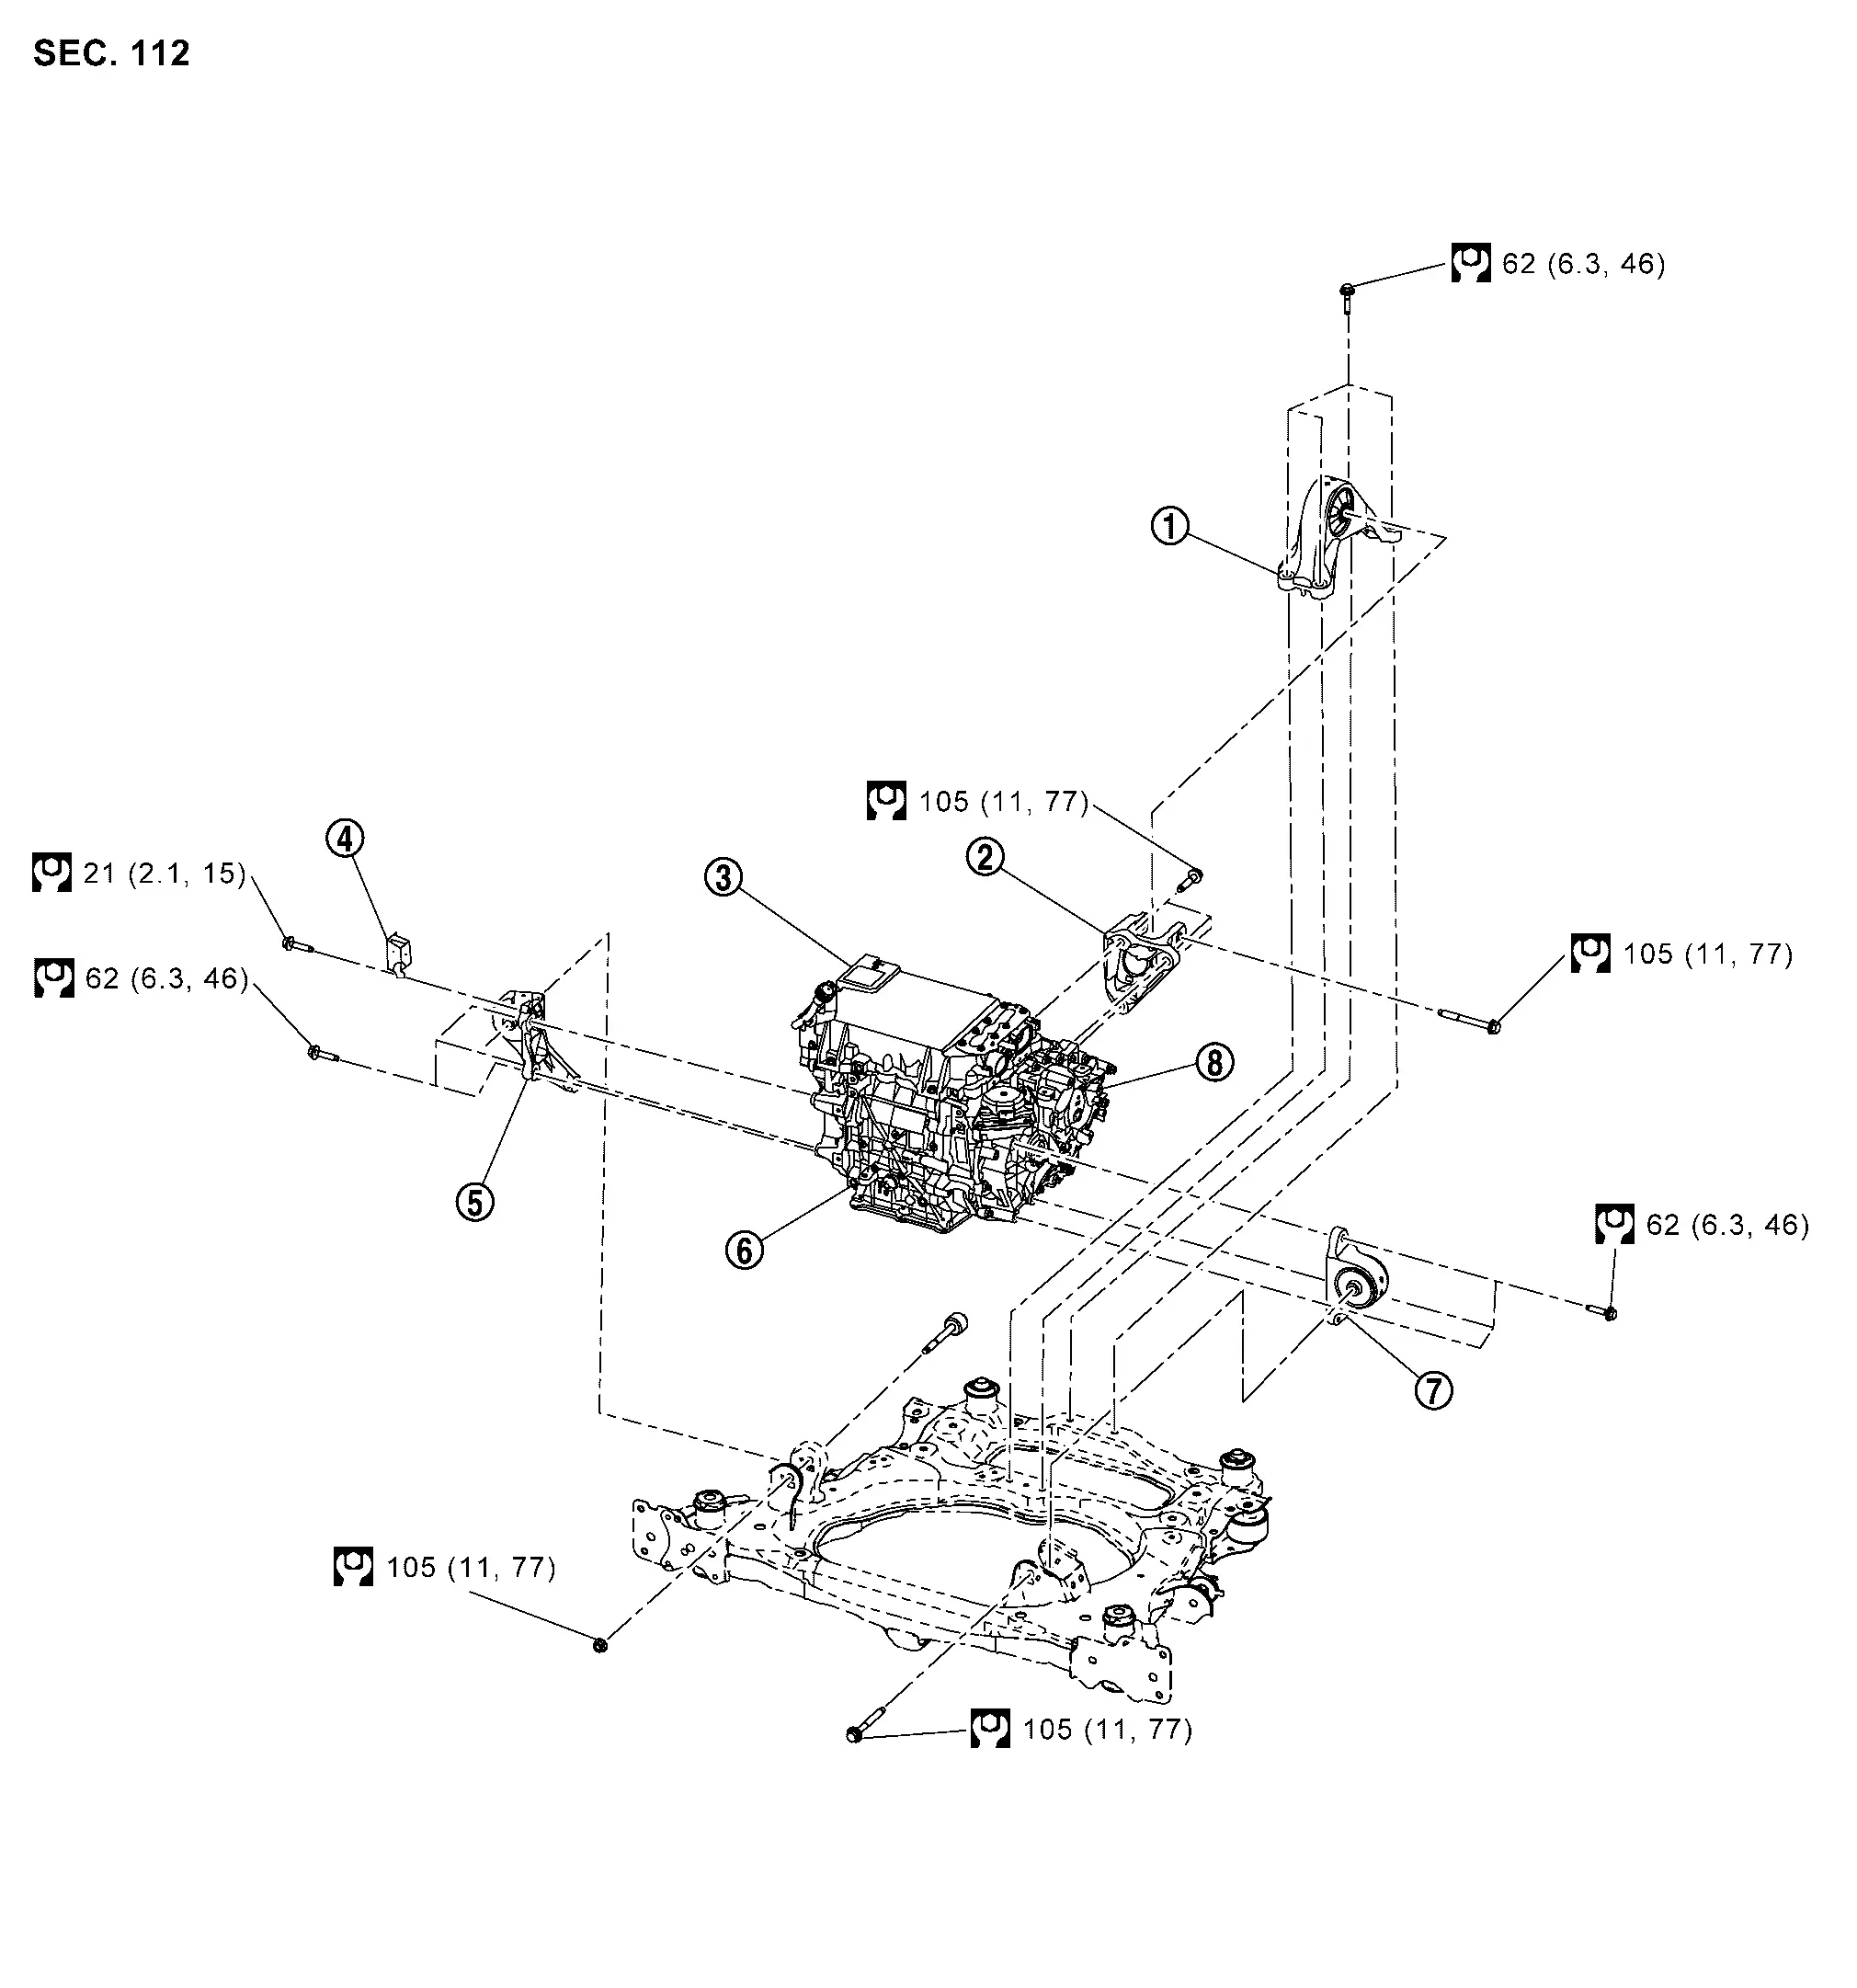
|
Motor mounting rear | |
Motor mounting bracket rear | |
Inverter (front) |
|
Bracket | |
Motor mounting RH | |
Front traction motor |
|
Motor mounting LH | |
Reduction gear | ||
|
: N·m (kg-m, ft-lb) |
INVERTER (FRONT) : Removal & Installation
DANGER: Since hybrid vehicles and electric vehicles contain a high voltage battery, there is the risk of electric shock, electric leakage, or similar accidents if the high voltage component and Nissan Ariya vehicle are handled incorrectly. Be sure to follow the correct work procedures when performing inspection and maintenance.
REMOVAL
Disconnect high voltage circuit. Refer to HOW TO DISCONNECT HIGH VOLTAGE : Precautions.
Check the voltage in the high voltage circuit. Refer to CHECK VOLTAGE IN HIGH VOLTAGE CIRCUIT : Precautions.
Remove inverter (front), front traction motor and reduction gear from vehicle together as suspension member assembly. Refer to FRONT SUSPENSION MEMBER : Removal & Installation.
Remove the electric compressor, low-pressure flexible hose, and high-pressure flexible hose together. Refer to Removal & Installation.
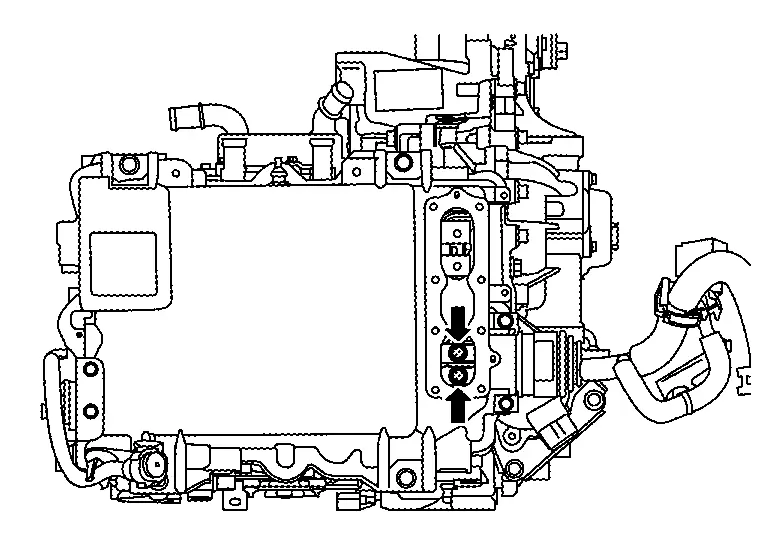
Remove high voltage harness terminal mounting bolts ( ).


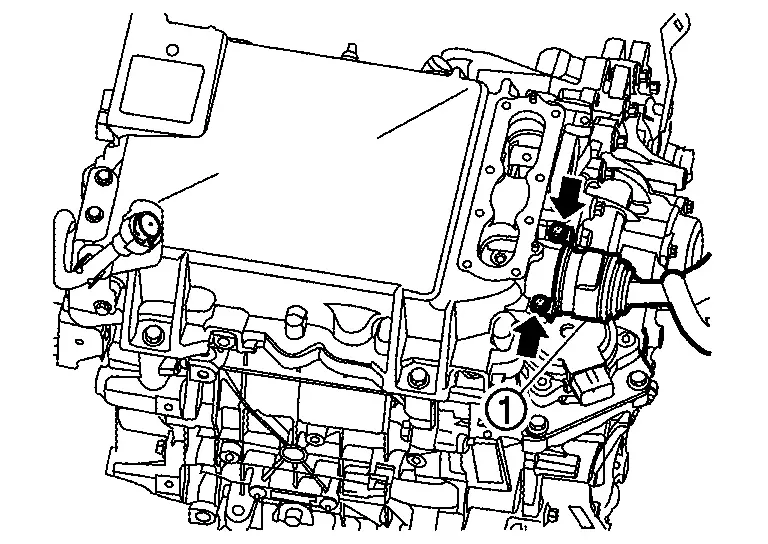
Remove high voltage harness mounting bolts (), and then disconnect high voltage harness .
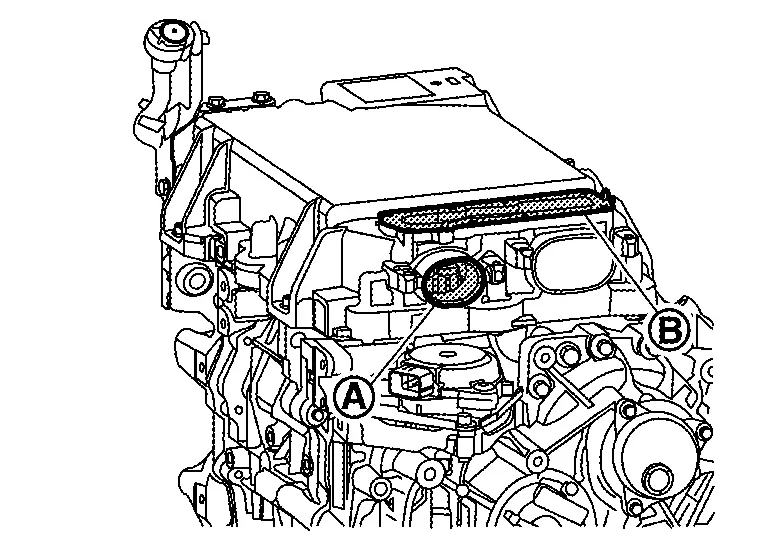
Remove harness bracket mounting bolt (), and then remove water hose and harness bracket .
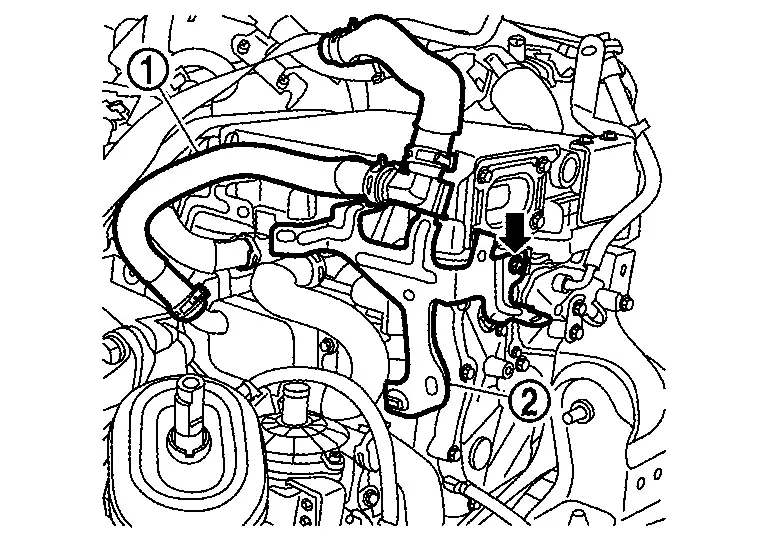
Remove harness bracket mounting bolt (), and then remove water hose and harness bracket .

Remove the water hose .
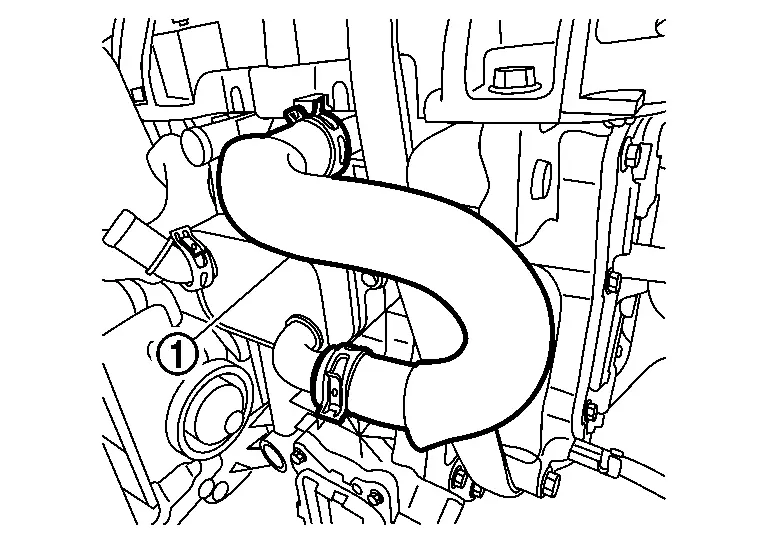
Remove the bracket mounting bolts ()and remove the breather hose and bracket .
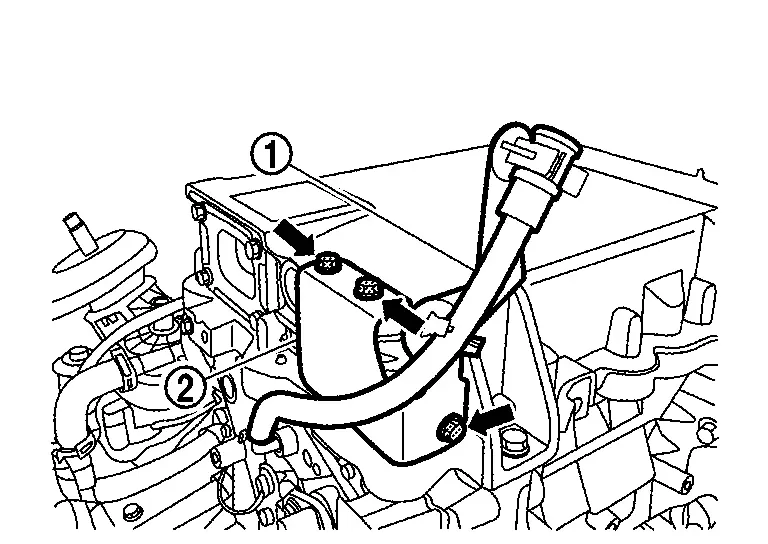
Attach sling belts to the inverter (front), front traction motor, and reduction gear, and prepare to separate them from the front suspension member assembly.
Remove joint bolt () of motor mounting bracket rear and motor mounting rear.

Remove joint bolt () of motor mounting bracket LH and motor mounting LH.
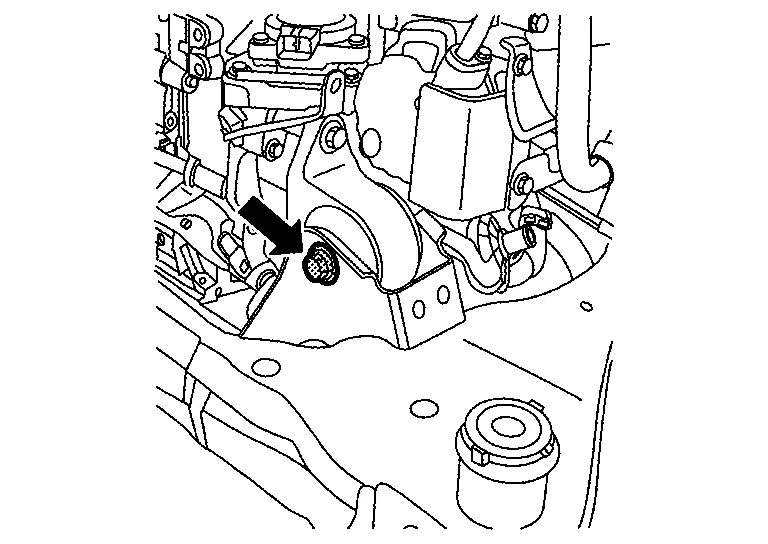
Remove joint bolt () of motor mounting bracket RH and motor mounting RH.
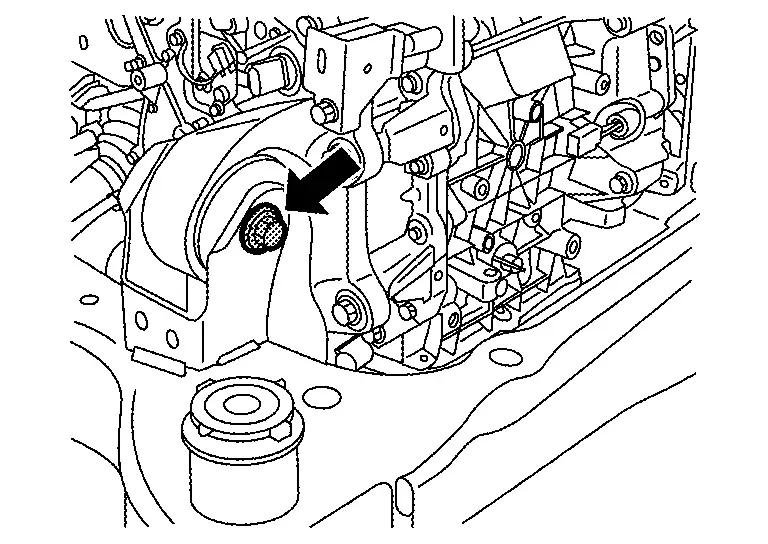
Remove the water hose from electric water pump for Li-ion battery, and then remove the electric water pump. Refer to ELECTRIC WATER PUMP : Removal & Installation.
Remove the water hose from electric water pump, and then remove the electric water pump. Refer to ELECTRIC WATER PUMP : Removal & Installation.
Use a hoist to lift up the inverter (front), front traction motor, and reduction gear, and separate them from the front suspension member assembly.
Slowly lower the inverter (front), front traction motor, and reduction gear onto sandbags or similar objects, then disconnect the sling belts from the hoist.
Remove motor mounting bolts (), and then remove motor mounting RH .
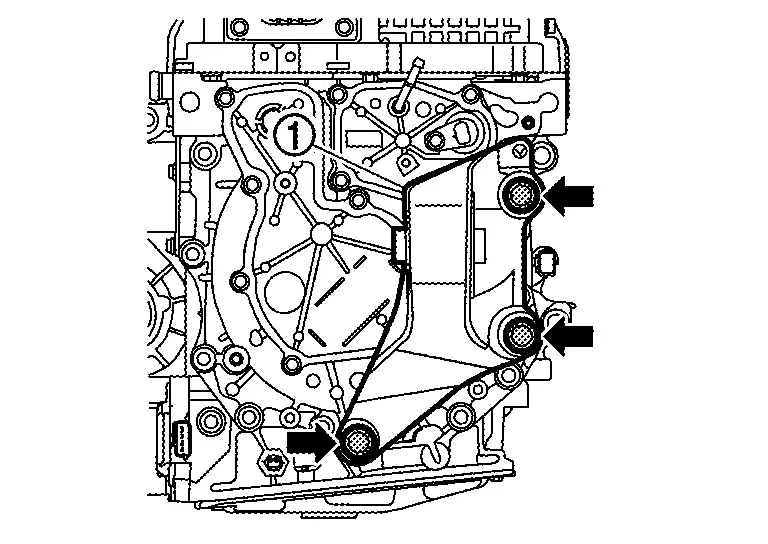
Remove harness bracket mounting bolt ( ), and then remove harness bracket .
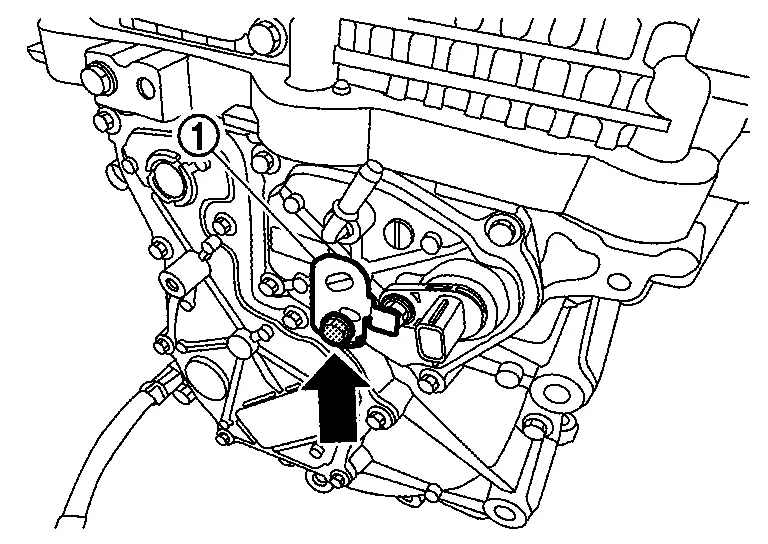
Remove three-phase bus bar cover mounting bolts (), and then remove three-phase bus bar cover .
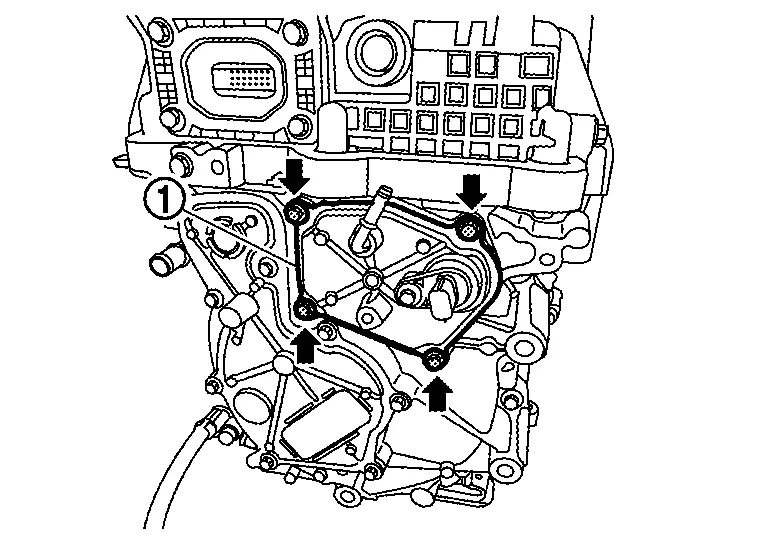
Disconnect the front traction motor stator temperature sensor harness connector .
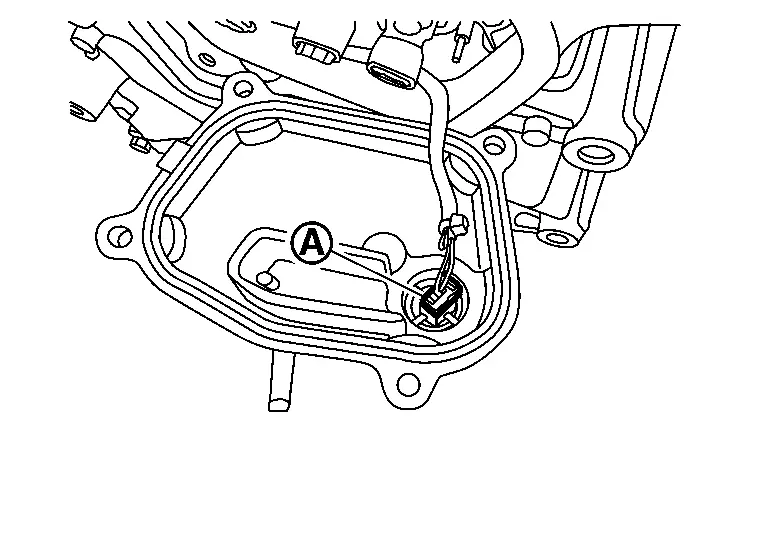
Remove the gasket .
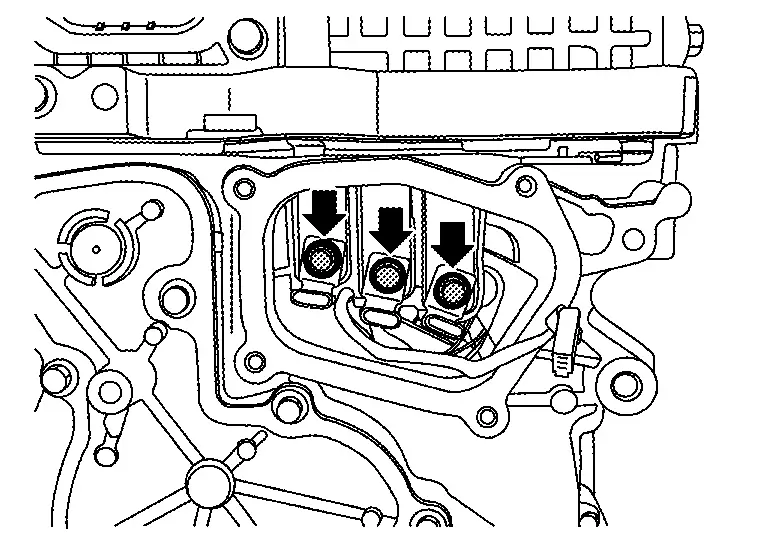
Remove three-phase bus bar terminal mounting bolts ().
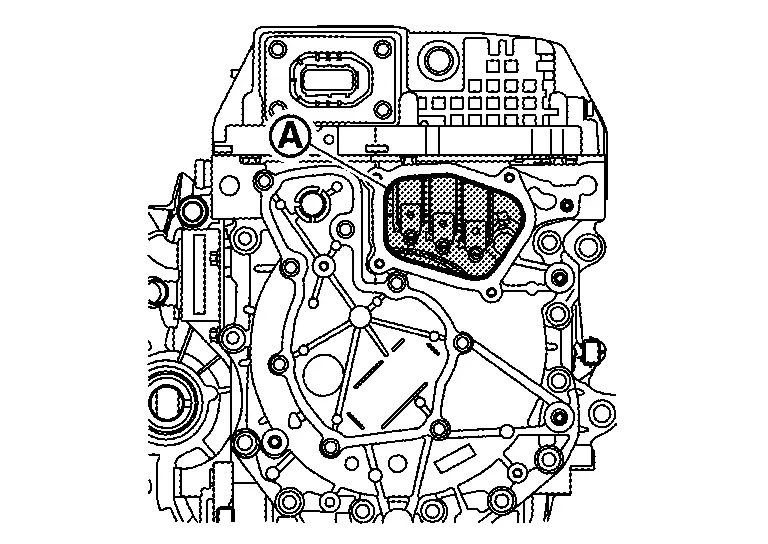
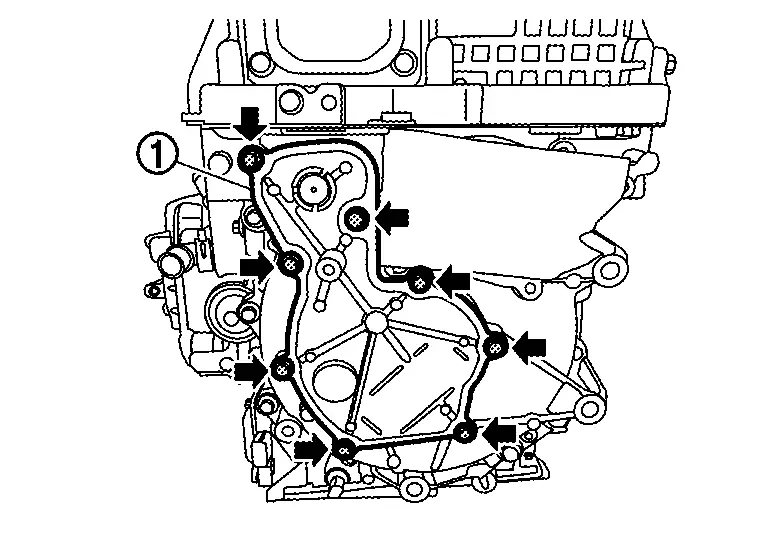
Remove excitation cover mounting bolts (), and then remove excitation cover .
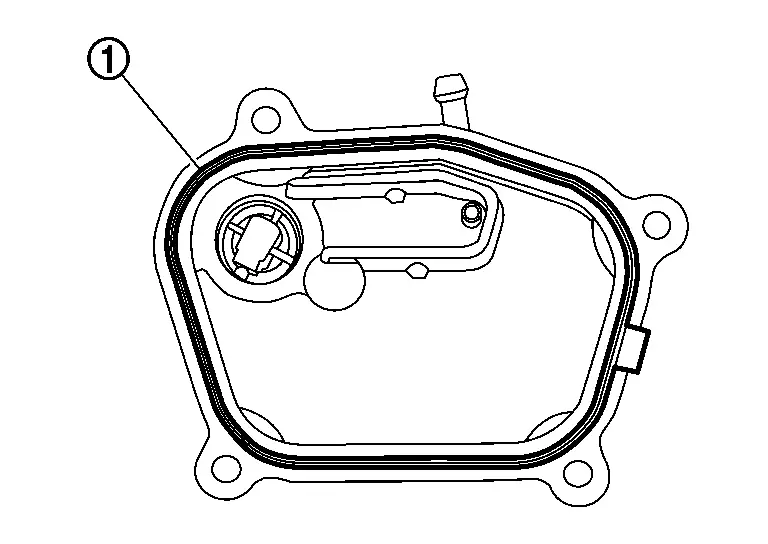
Remove the excitation cover gasket .
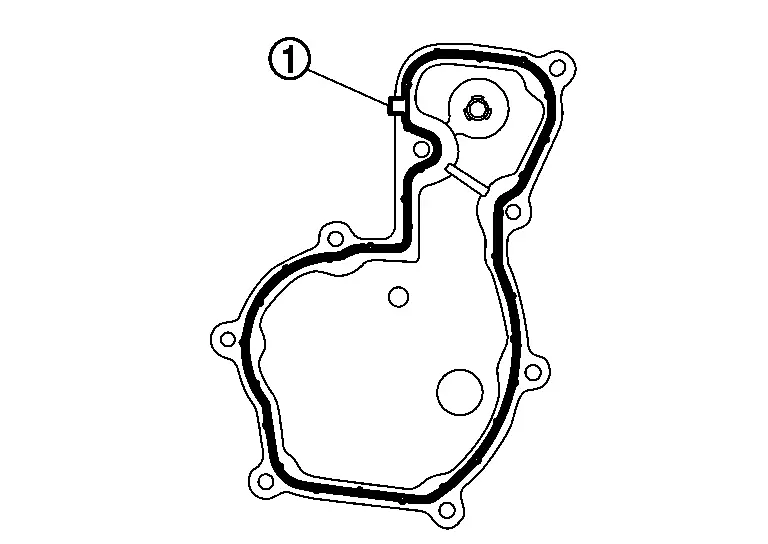
Remove excitation-phase bus bar terminal mounting bolts ().

Remove mounting bolts () of inverter (front).
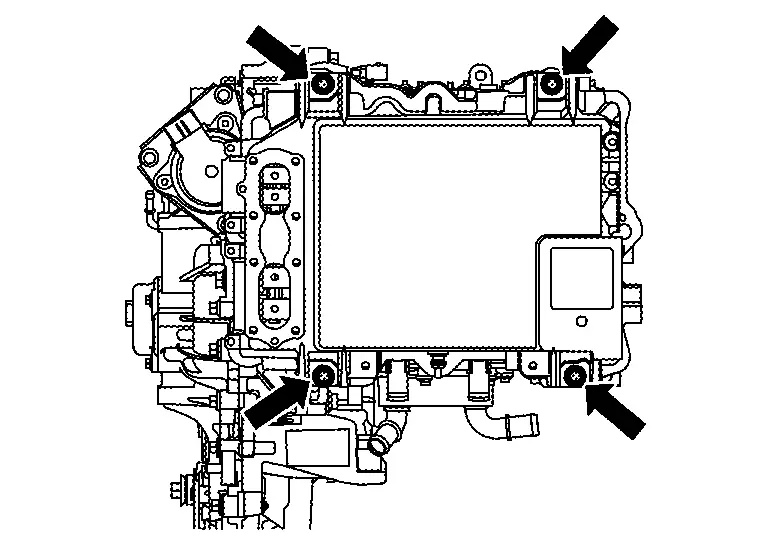
Remove the inverter (front).
Remove the seal on the excitation bus bar opening on the front traction motor side, and remove the seal on the three-phase bus bar opening.
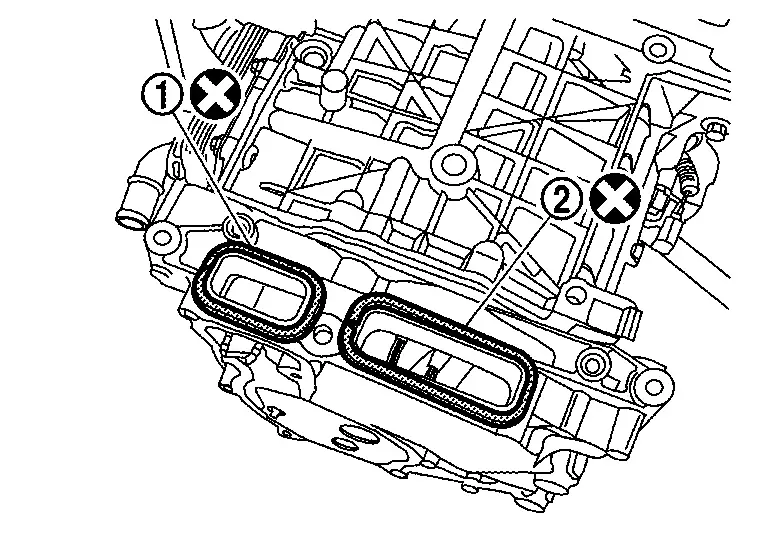
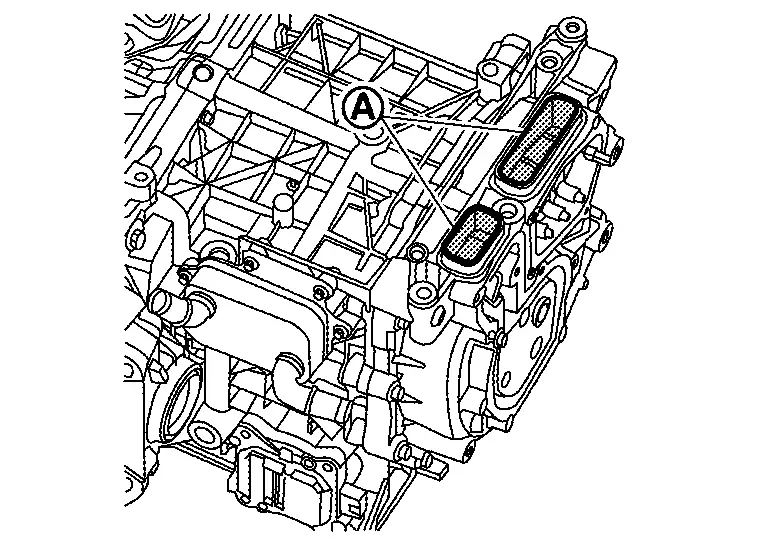
INSTALLATION
Note the following, and install in the reverse order of removal.
When the inverter (front) is installed, never bend three phase bus bar and excitation bus bar or give impact.
If the breather was removed from the excitation cover or replaced:
Check that the O-ring is securely installed before installing the breather.
After installing the breather, insert straight so that the distance the breather installation dimension from the edge of the case is A.
Step from edge of excitation cover to breather edge (A) : 0.55 mm (0.0217 in) 
When installing the excitation wiring harness onto the excitation bus bar, install the red harness terminal (Ex+)
onto the right side excitation bus bar, and the blue harness terminal (Ex-)  onto the left excitation bus bar.

When installing the excitation cover gasket
, check that the tab (A) is securely installed. The gasket is non-reusable part. Do not reuse it.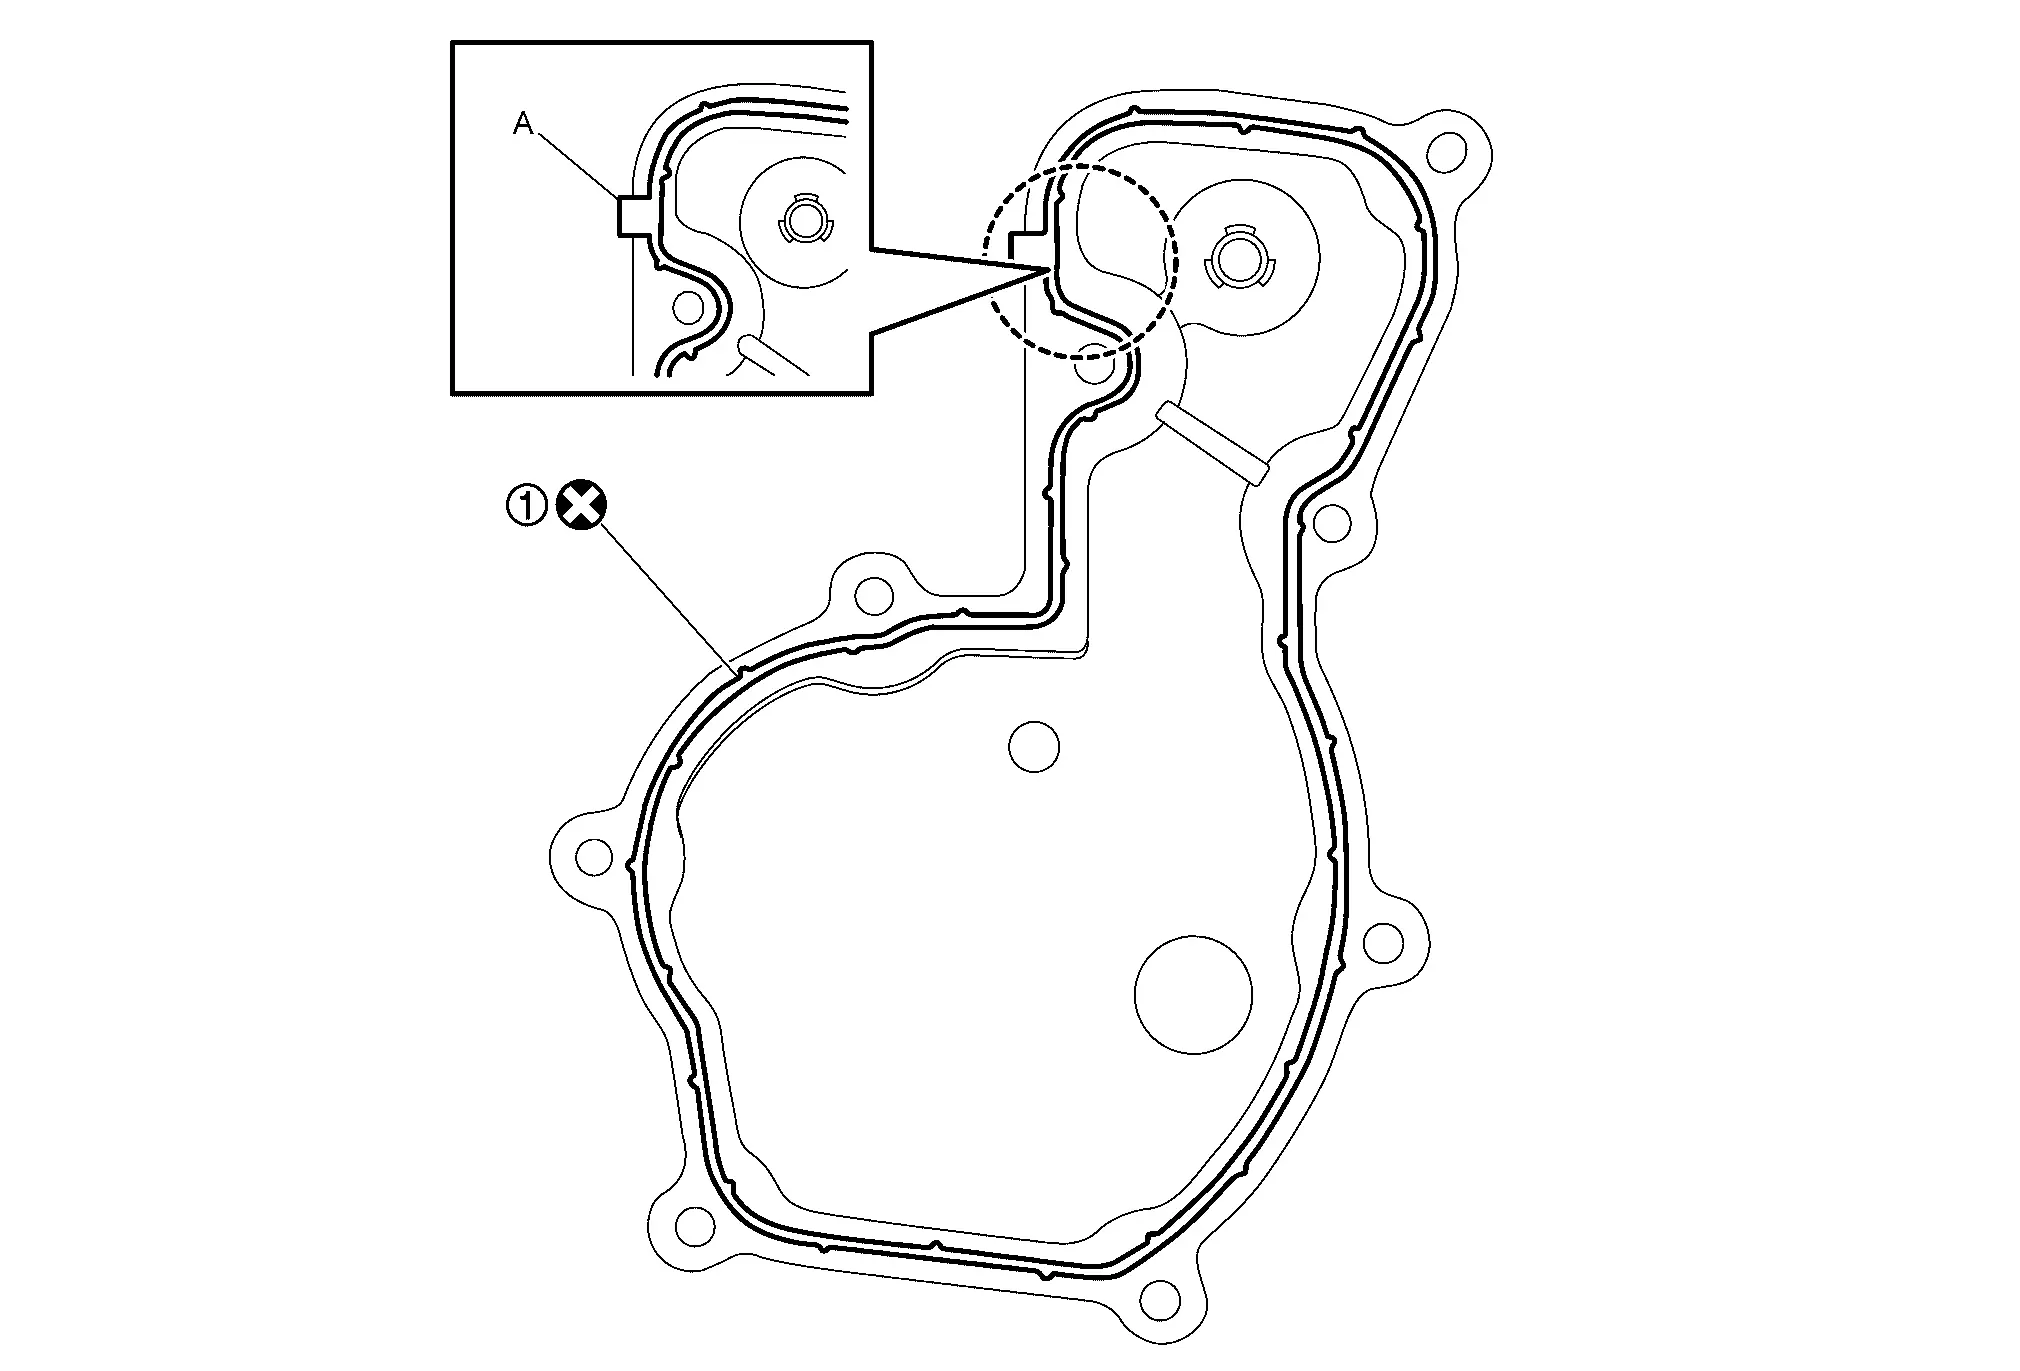
Follow the procedure below to install the excitation cover.
Tighten excitation cover mounting bolts to the temporarily tighten them in numerical order shown in the figure.
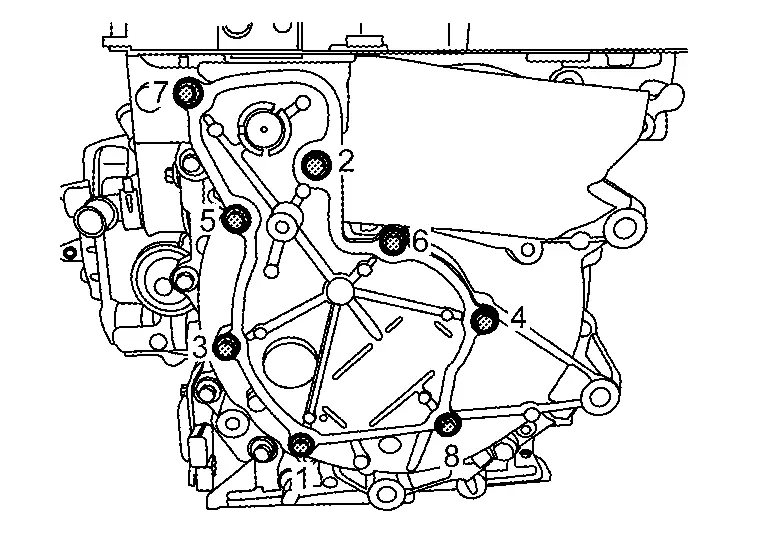
Tighten excitation cover mounting bolts to the specified torque in numerical order shown in the figure.
When installing the three-phase bus bar cover gasket
, check that the tab (A) is securely installed. The gasket is non-reusable part. Do not reuse it.
Follow the procedure below to install the three-phase bus bar cover.
If the terminals of three-phase harness have insulation tubes
, restore the insulation tube to the original position when installing the three-phase bus bar cover.
Partially tighten the three-phase bus bar cover mounting bolts in the order of 1→4 shown in the figure.
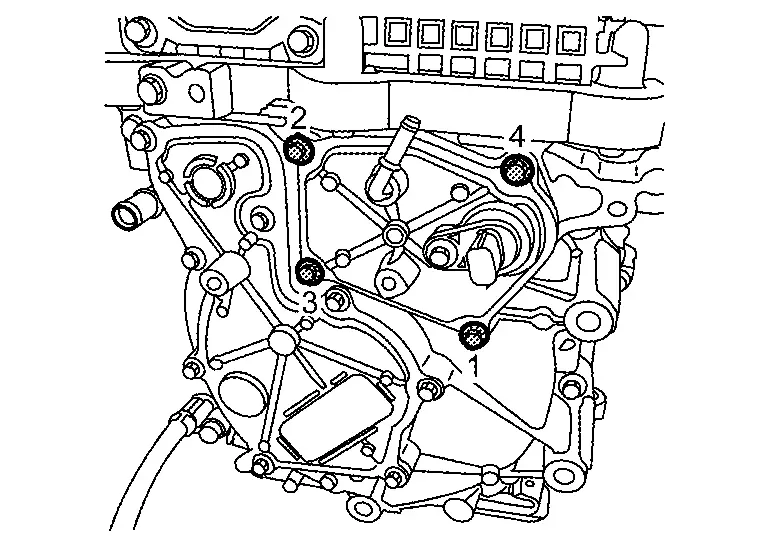
Fully tighten the three-phase bus bar cover mounting bolts in the order of 1→4 shown in the figure.
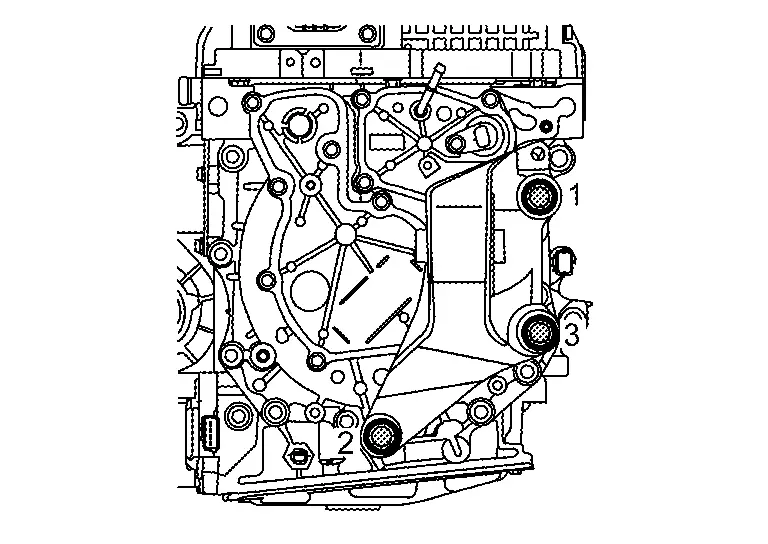
Partially tighten mounting bolt 1 in the figure for the motor mounting RH, then fully tighten in the order of 2→3, and finally fully tighten 1.
Installation Procedure when Installing the Suspension Member
Partially tighten the fastening bolts for the motor mounting bracket rear and motor mounting rear.
Partially tighten the fastening bolts of the motor mounting RH and motor mounting LH onto the suspension member.
Fully tighten the fastening bolts of the motor mounting bracket rear and motor mounting rear.
Fully tighten the fastening bolts of the motor mounting RH and motor mounting LH onto the suspension member.
When no external force is applied, check that there is no abnormal sagging or twisting of the mounts.
Checking After Suspension Member Installation
After installing the suspension member, check that each clearance is within the range of A and B.
If the clearance is outside the range, adjust so that it is within the range.
Dimension A : 11.0±1.0 mm (0.433±0.039 in) Dimension B : 10.0±1.0 mm (0.394±0.039 in) 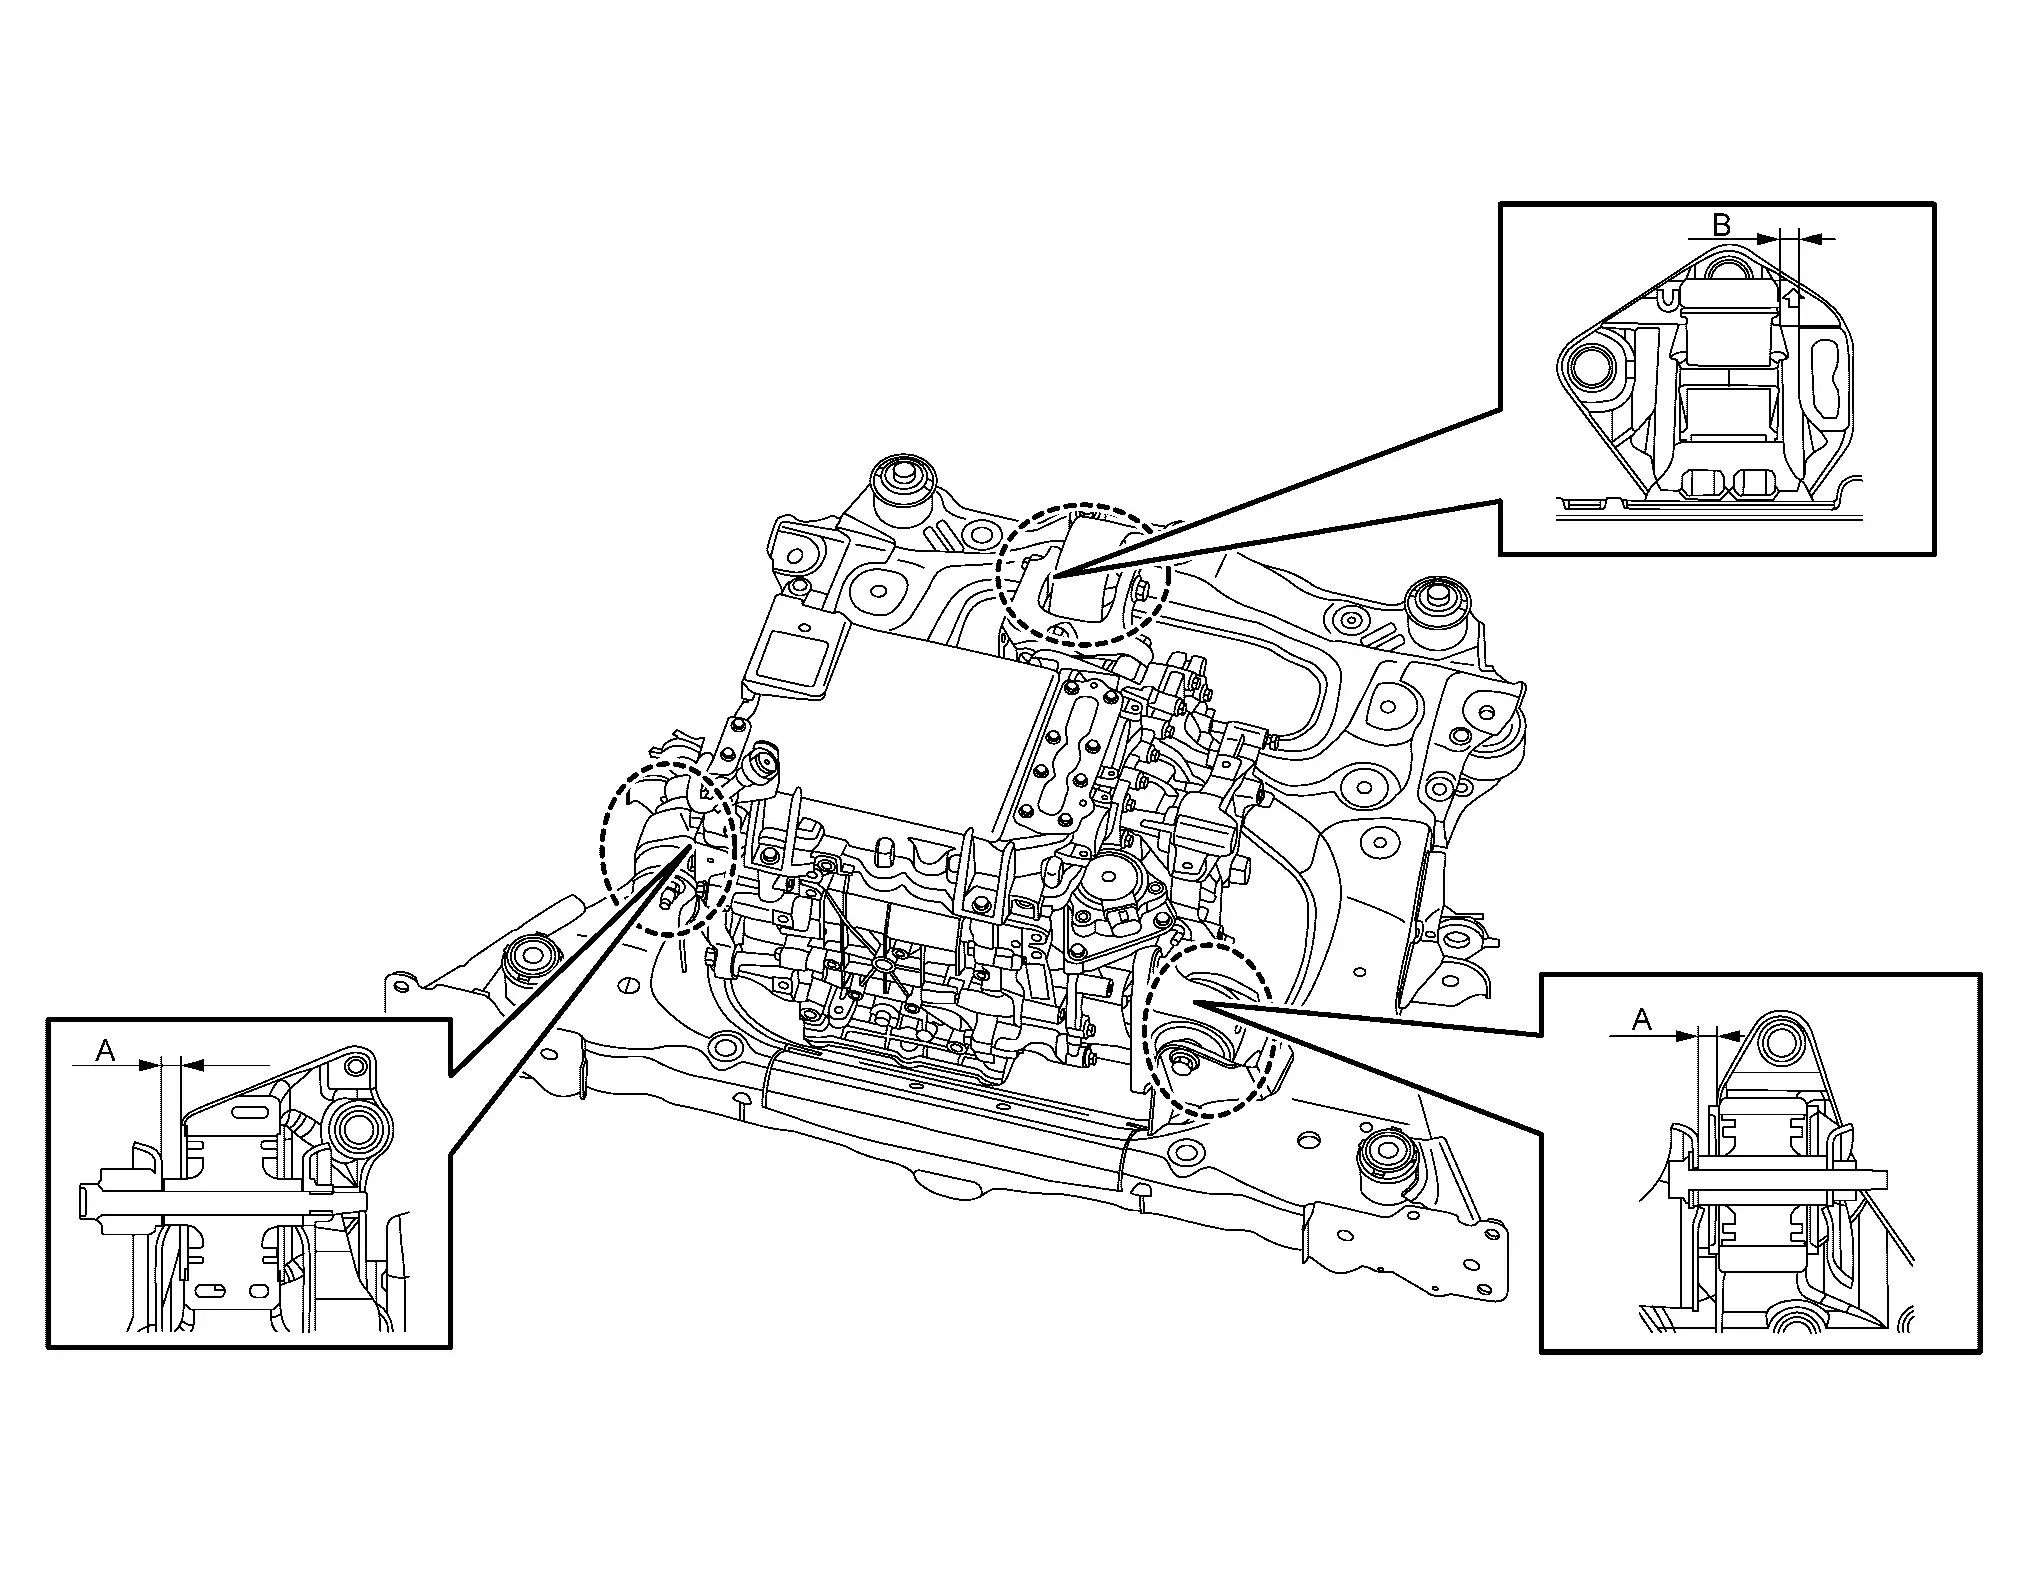
Partially tighten the bracket mounting bolts, then fully tighten them in the order of 1→2 shown in the figure.

INVERTER (FRONT) : Inspection
INSPECTION AFTER INSTALLATION
After installing the front traction motor, perform the following equipotential inspection.
Between inverter (front) and other high voltage system.
Between inverter (front) and body.
| Between front traction motor and ground to body | : less than 0.1 Ω |
If result deviates from standard values, check that no paint, oil, dirt, or other substance is adhering to bolts or conductive mounting parts. If any such substance is adhering, clean the surrounding area and remove the substance.
INVERTER (FRONT) : Adjustment
ADJUSTMENT AFTER INSTALLATION
When the inverter (front) is replaced, perform "ADDITIONAL SERVICE WHEN REPLACING INVERTER (FRONT)". Refer to Work Procedure.