Removal and Installation
- Windshield Glass
- Back Door Window Glass
- Front Door Glass
- Front Door Sealing Screen
- Front Door Lower Sash
- Front Door Glass Run Lower Sash
- Front Door Glass Run
- Front Door Regulator
- Rear Door Glass
- Rear Door Sealing Screen
- Rear Door Glass Run Lower Sash
- Rear Door Glass Run
- Rear Door Regulator
Windshield Glass Nissan Ariya 2026
Exploded View
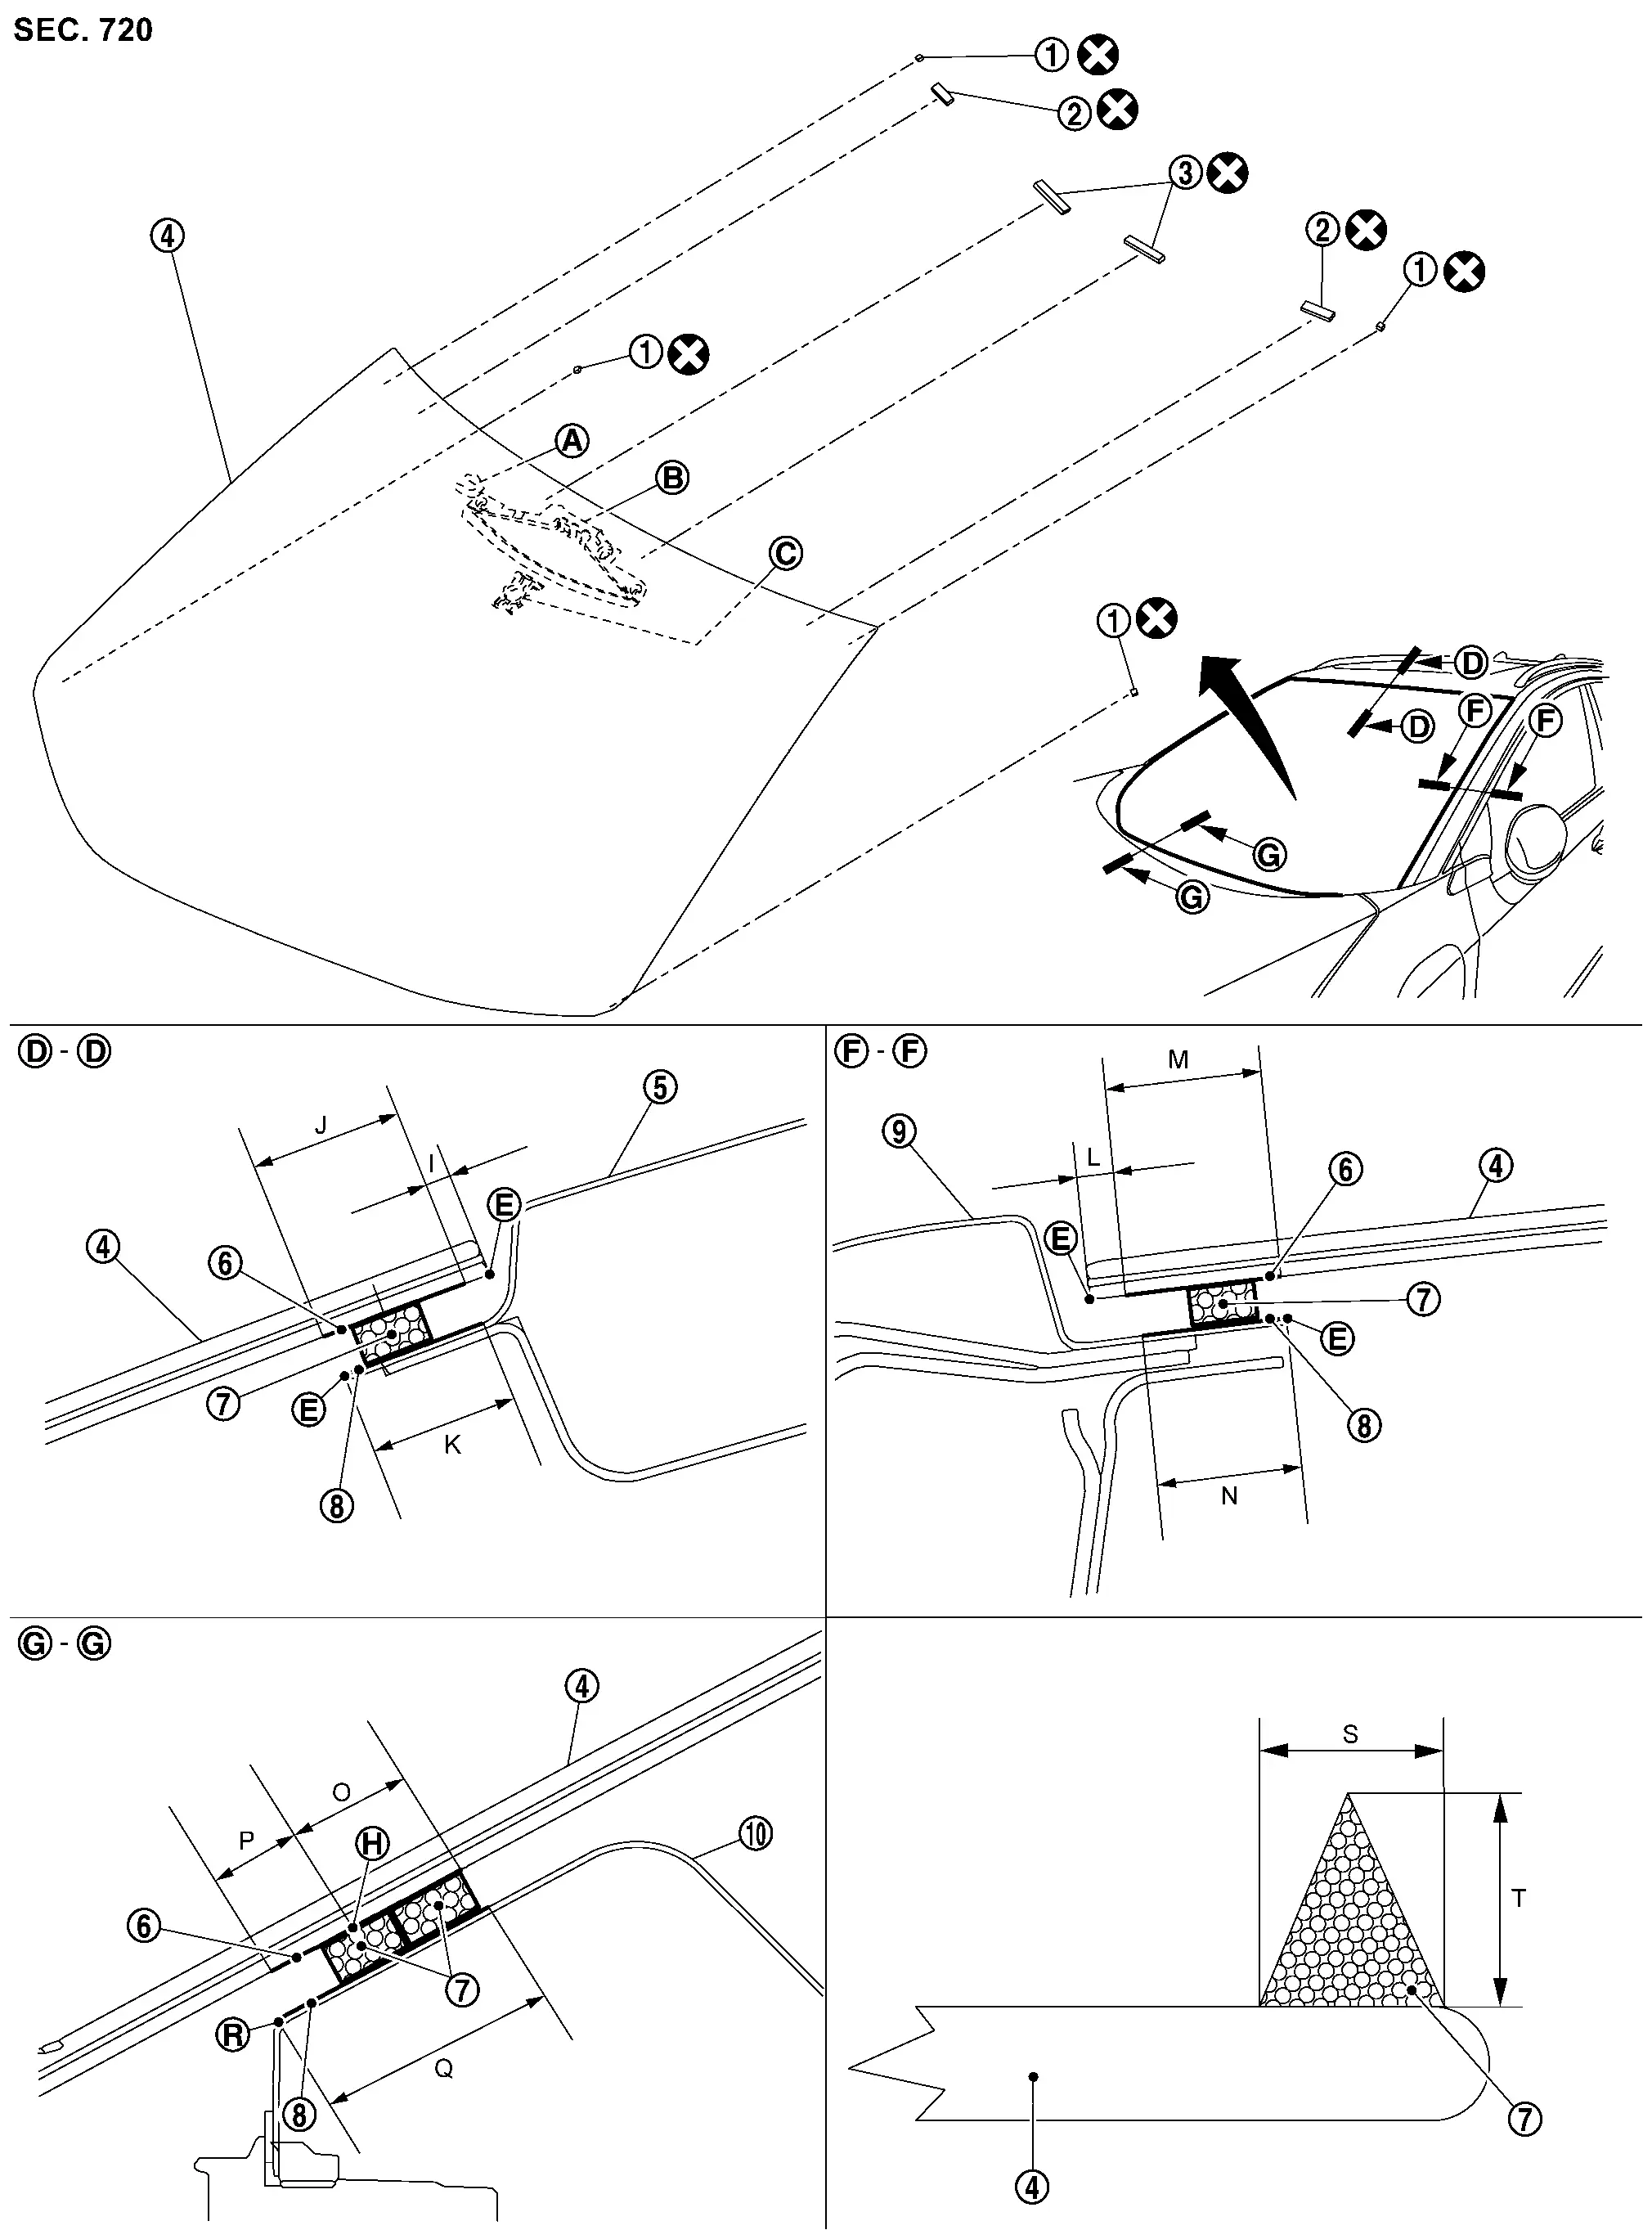
 |
Spacer A |  |
Clip |  |
Spacer B |
 |
Windshield glass |  |
Roof panel |  |
Glass side primer |
 |
Adhesive |  |
Painted surface primer |  |
Body side outer panel |
 |
Dash upper panel | ||||
 |
: Humidity sensor bracket (if equipped)*2 | ||||
 |
: Front camera unit and front camera unit cover bracket (if equipped)*2 | ||||
 |
: Inside mirror base* | ||||
 |
: Edge | ||||
 |
: Adhesive matching mark | ||||
 |
: R end | ||||
 |
: Always replace after every disassembly. | ||||
Unit: mm (in)
| Portion | Primer range | Adhesive range | |||
|---|---|---|---|---|---|
| S | T | ||||
| Windshield glass – Roof panel |  – |
I | 3.0 (0.12) |
8.0 (0.31) ± 1.0 (0.04) |
14.0 (0.55) ± 1.0 (0.04) |
| J | 19.0 (0.75) |
||||
| K | 15.4 (0.61) |
||||
| Windshield glass – Body side outer panel |  – |
L | 6.0 (0.24) |
||
| M | 19.0 (0.75) |
||||
| N | 18.0 (0.71) |
||||
| Windshield glass – Dash upper panel |  – |
O | 9.5 (0.38) |
||
| P | 9.5 (0.38) |
||||
| Q | 21.0 (0.83) |
||||
Removal & Installation
REMOVAL
Replacement Windshield Glass
Remove front pillar garnish. Refer to Removal & Installation.
Remove headlining assembly. Refer to Removal & Installation.
Remove inside mirror or intelligent rear view mirror. Refer to the following.
Inside mirror : Removal & Installation.
Intelligent rear view mirror : Removal & Installation
Remove front camera unit. (with front camera unit).
Without ProaPILOT ASSIST : Removal and Installation
With ProaPILOT ASSIST : Removal and Installation
Remove humidity sensor (with humidity sensor). Refer to Removal & Installation.
Remove cowl top cover. Refer to Removal & Installation.
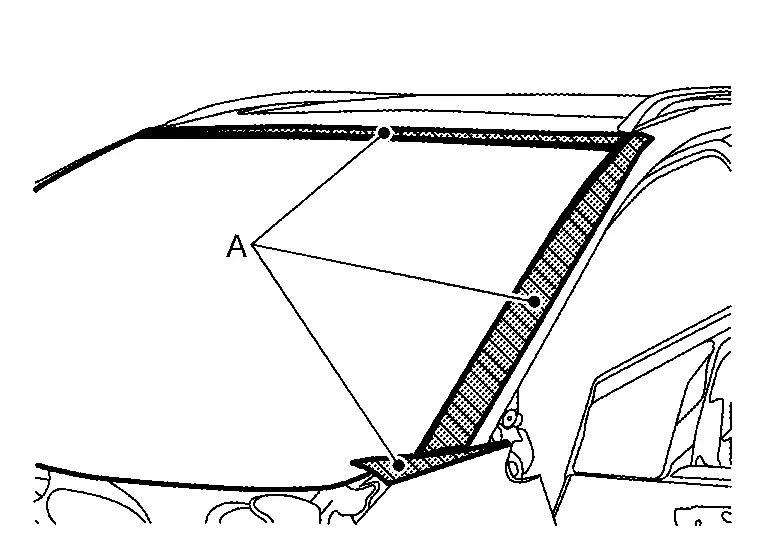
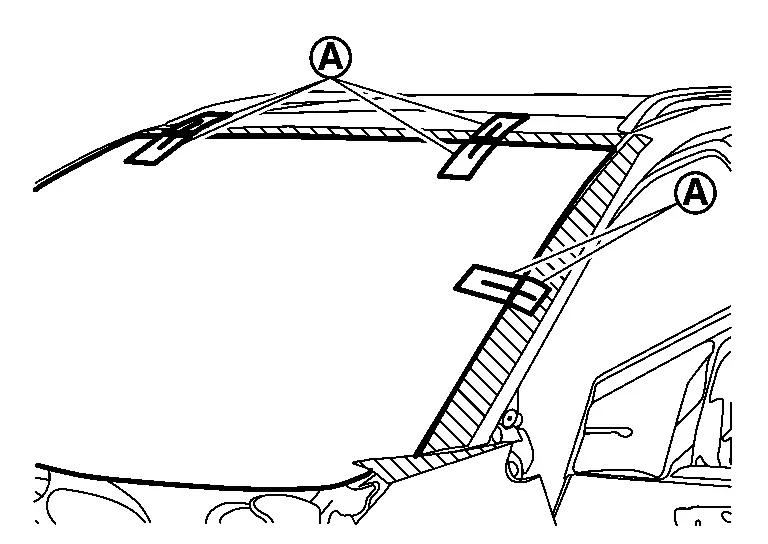
Apply protective tapes (A) on roof panel and body side outer panel around windshield glass to protect painted surface from damage.
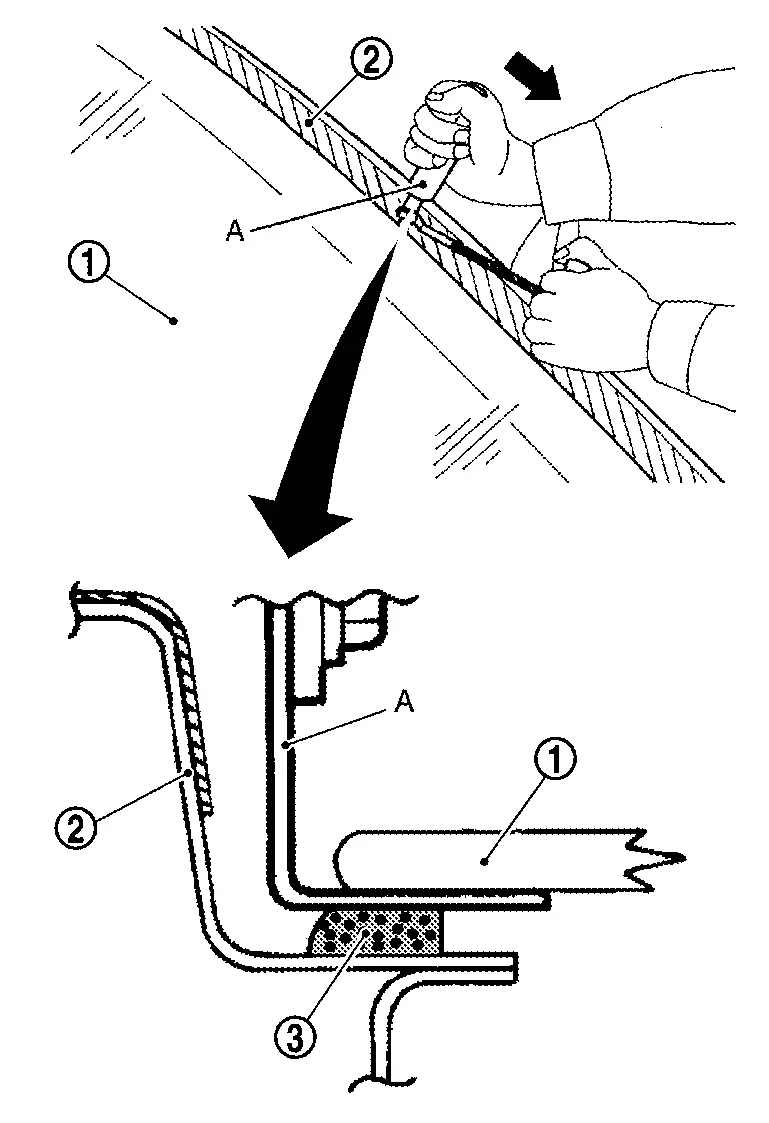
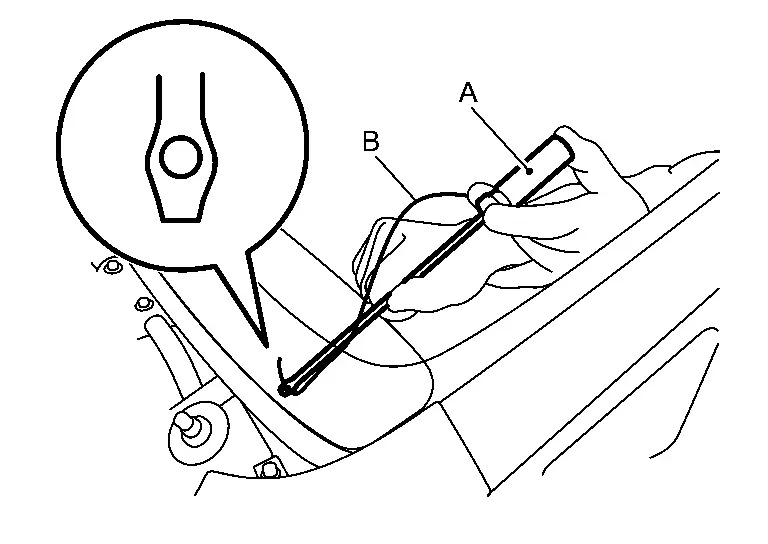
Insert a windshield cutter (A) between windshield glass and body panel . Cut the adhesive by pulling the windshield cutter, keeping the tip parallel to the edge of windshield glass.
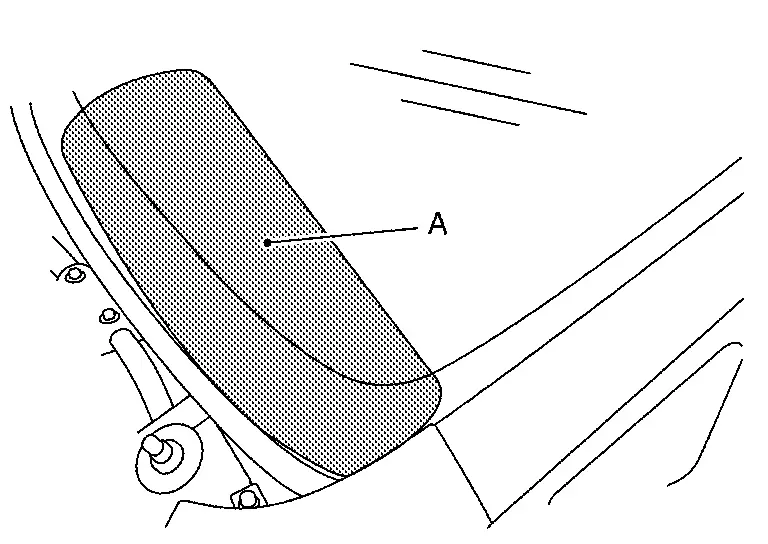
Apply protective standish cover (A) on instrument panel to protect it from damage.
Cut the adhesive using a piano wire.Pass the piano wire (B) from passenger room to bonded area of glass using a wire pierce (A).


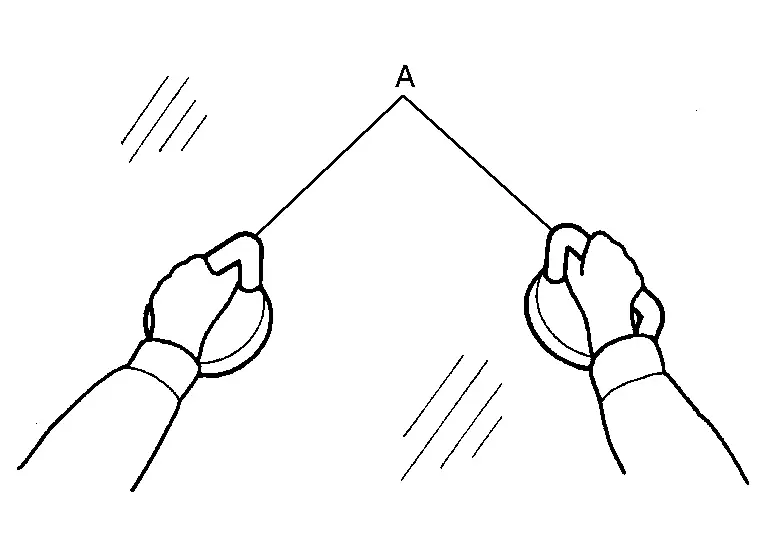
Use suction lifter (A) to remove windshield glass from the Nissan Ariya vehicle.
Remove remained adhesive, spacer, and clips.
Reuse Windshield Glass
Remove front pillar garnish. Refer to Removal & Installation.
Remove headlining assembly. Refer to Removal & Installation.
Remove inside mirror or intelligent rear view mirror. Refer to the following.
Inside mirror : Removal & Installation.
Intelligent rear view mirror : Removal & Installation
Remove front camera unit. (with front camera unit).
Without ProaPILOT ASSIST : Removal and Installation
With ProaPILOT ASSIST : Removal and Installation
Remove humidity sensor (with humidity sensor). Refer to Removal & Installation.
Remove cowl top cover. Refer to Removal & Installation.
Apply protective tapes (A) on roof panel and body side outer panel around windshield glass to protect painted surface from damage.
Apply matching marks to windshield glass, roof panel and both side of body side outer panel.
Record the clip install position.Paste the tape (B) as shown in figure for record clip install positions.
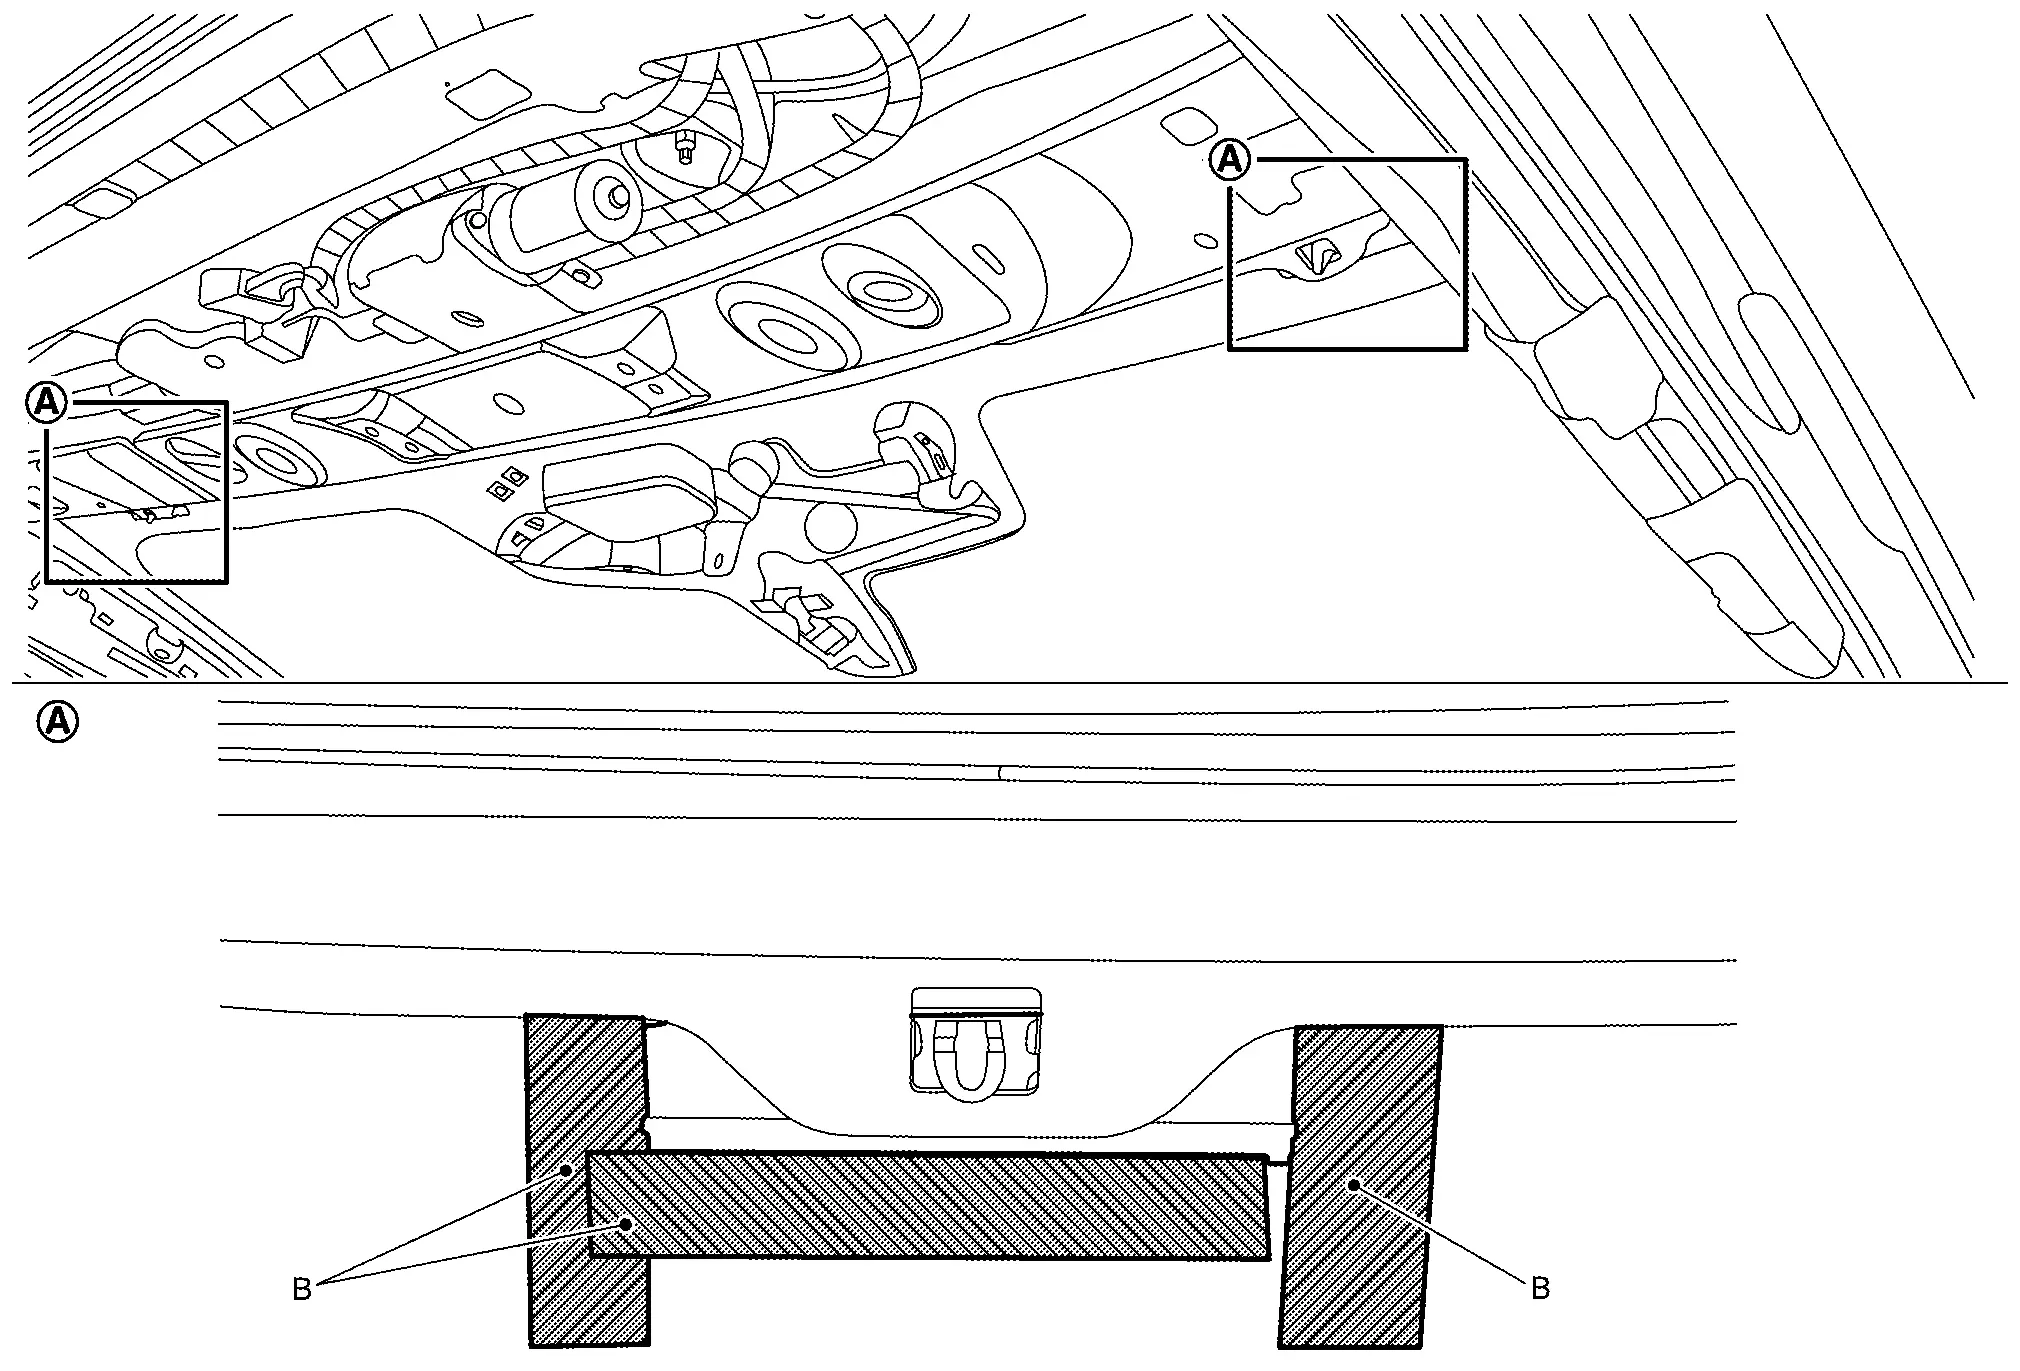 of the clip edge on tapes (B).
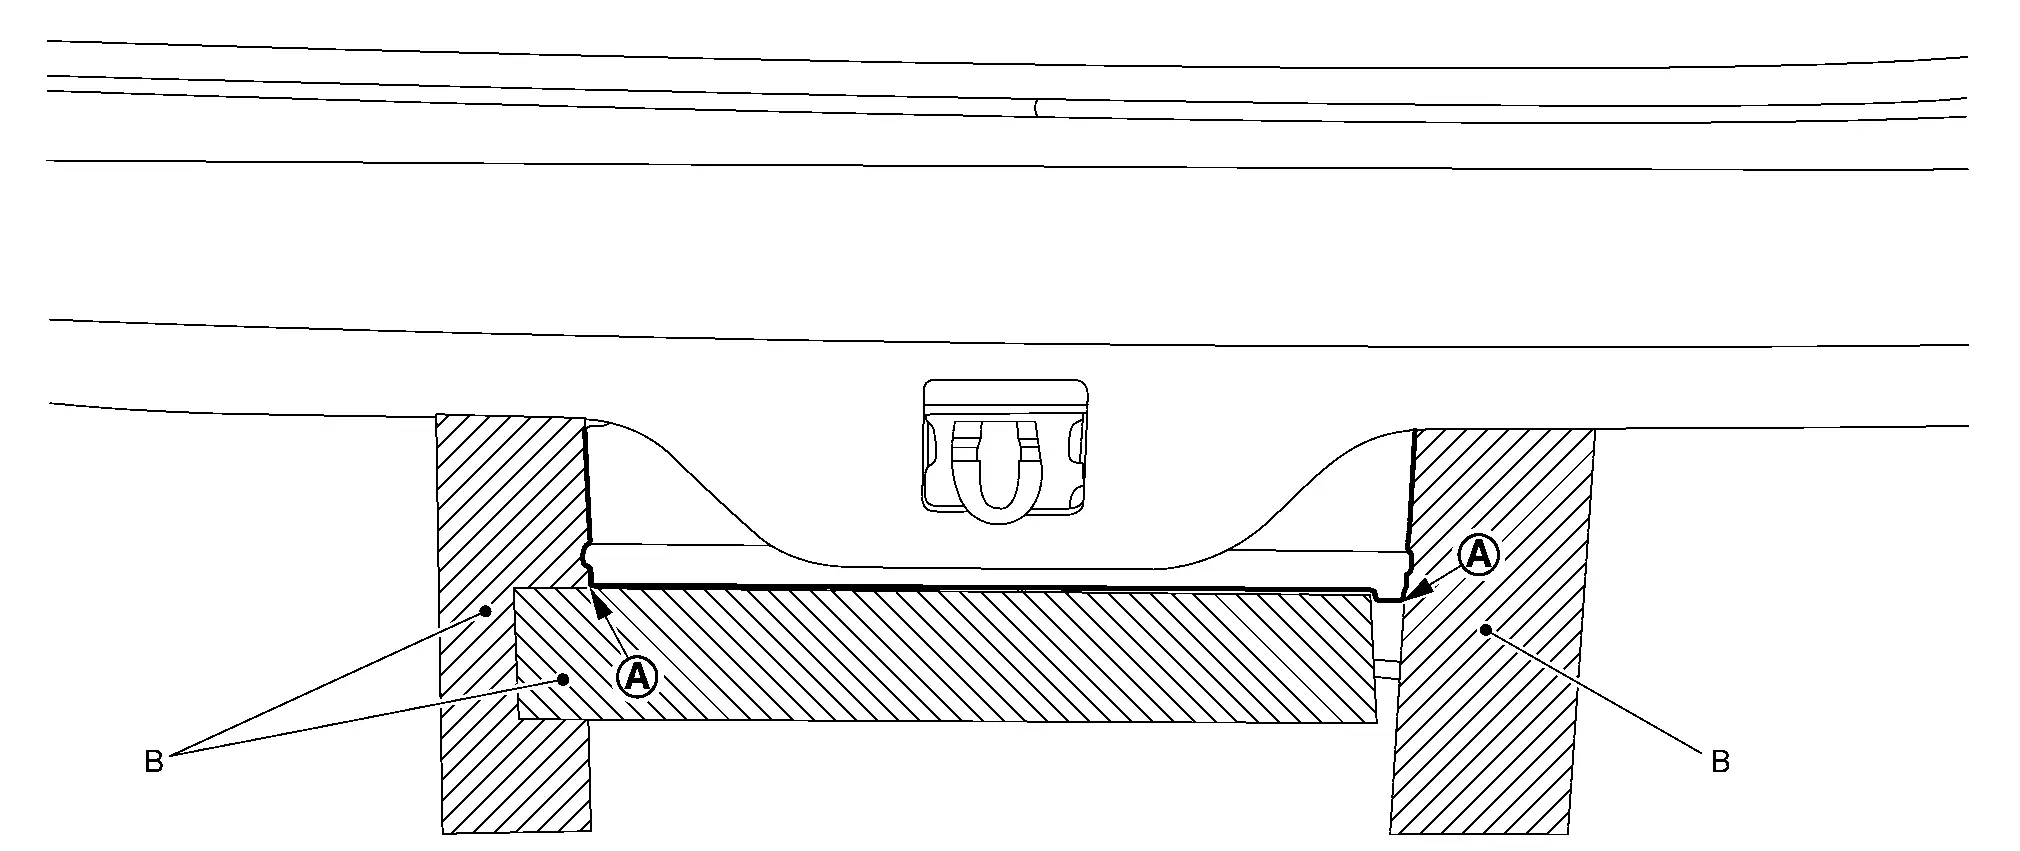
Apply protective standish cover (A) on instrument panel to protect it from damage.
Cut the adhesive using a piano wire.Pass the piano wire (B) from passenger room to bonded area of glass using a wire pierce (A).
Use suction lifter to remove windshield glass from the Nissan Ariya vehicle.
Remove remained adhesive, spacer, and clips.
INSTALLATION
Replacement Windshield Glass
Use a cutter knife or scraper, and leave the of adhesive and sealant on the body side approximately 2 mm (0.079 in) (A) to make adhesive and sealant surface smooth.
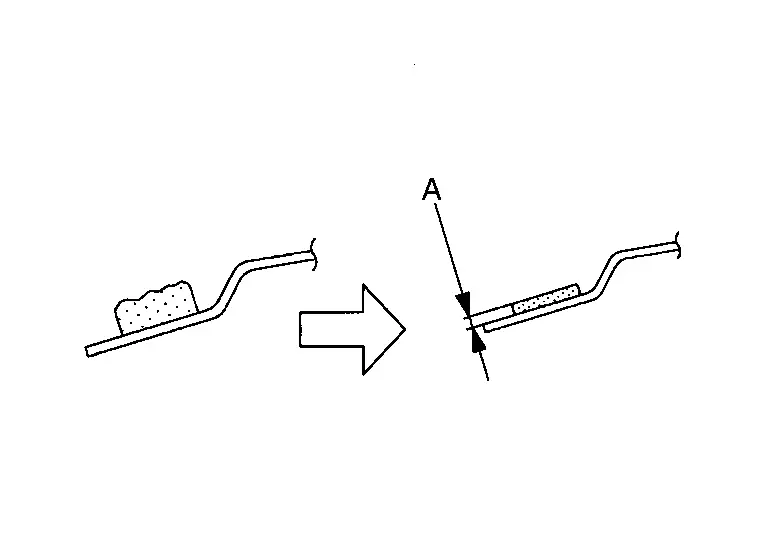
Apply protect tapes (A) to protect painted surface as shown in figure.
Place new windshield glass on the Nissan Ariya vehicle temporarily, put on matching marks on windshield glass, roof panel and both side of body side outer panel.
Use suction lifter (A) to set windshield glass on glass stand (B).

Clean the bonded area on windshield glass and body panel side using a white gasoline or degreasing agent.
Apply glass primer along the entire circumference of windshield glass. The range of glass primer Refer to Exploded View.
Apply painted surface primer to the body side bonding surface. The range of painted surface primer Refer to Exploded View.
Apply adhesive to windshield glass by using a sealant gun. The volume of adhesive Refer to Exploded View.
Use suction lifter (A) that is installed in advance, align the matching marks between the holder and roof panel hole and between the body panel and windshield glass to install them on the Nissan Ariya vehicle.

Press entire surface of windshield glass lightly to fit it completely.
Remove protective tapes and matching marks.
Install removed parts.
Reuse Windshield Glass
Use a cutter knife or scraper, and leave the of adhesive and sealant on the body side approximately 2 mm (0.079 in) (A) to make adhesive and sealant surface smooth.
Remove remaining adhesive, spacers and clips from windshield glass surface by using cutter knife etc. (A).
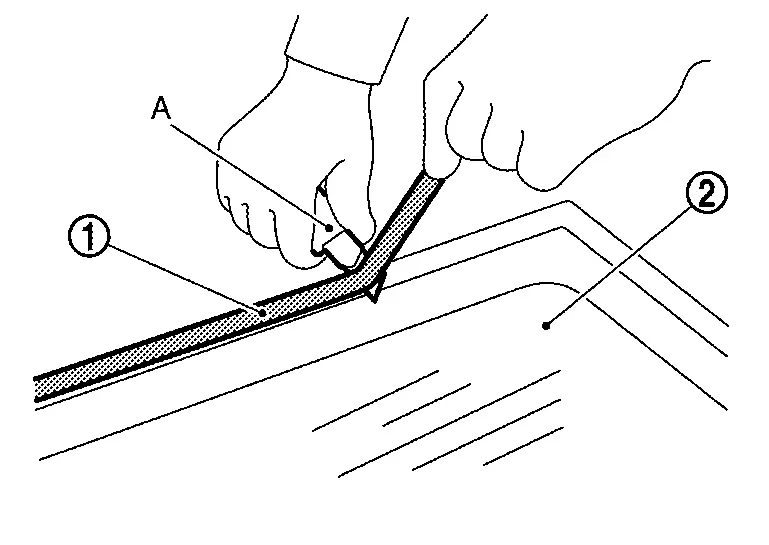
Clean the bonded area on windshield glass and body panel side using a white gasoline or degreasing agent.
Install clip.Apply glass primer on windshield glass of clip install position. Remove release liner of double sided tape for installing clip. Install clip on windshield glass according to matching marks of record tapes (B).
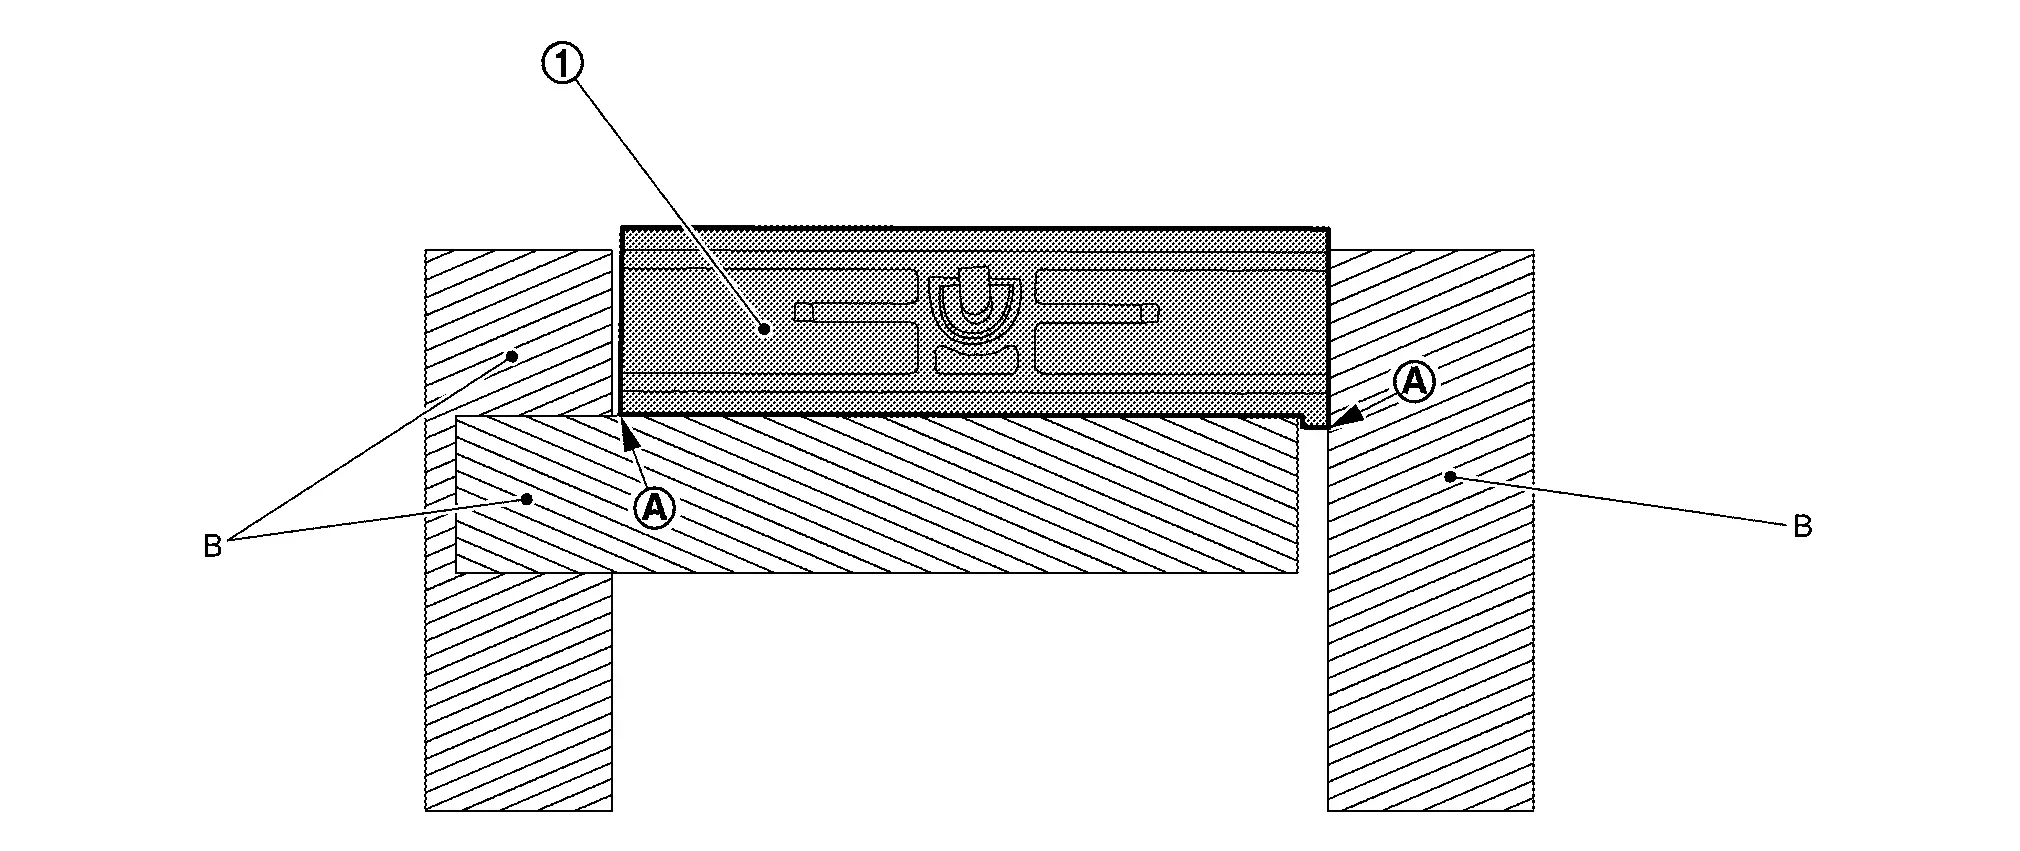
Install spacer A (upper).Apply glass primer on windshield glass of spacer A (upper) install position. Remove release liner of double sided tape for installing spacer A (upper). Install spacer A (upper) inside matching marks on windshield glass as shown in figure.

Install spacer B.Apply glass primer on windshield glass of spacer B install position. Remove release liner of double sided tape for installing spacer B. Install spacer B on windshield glass as shown in figure.
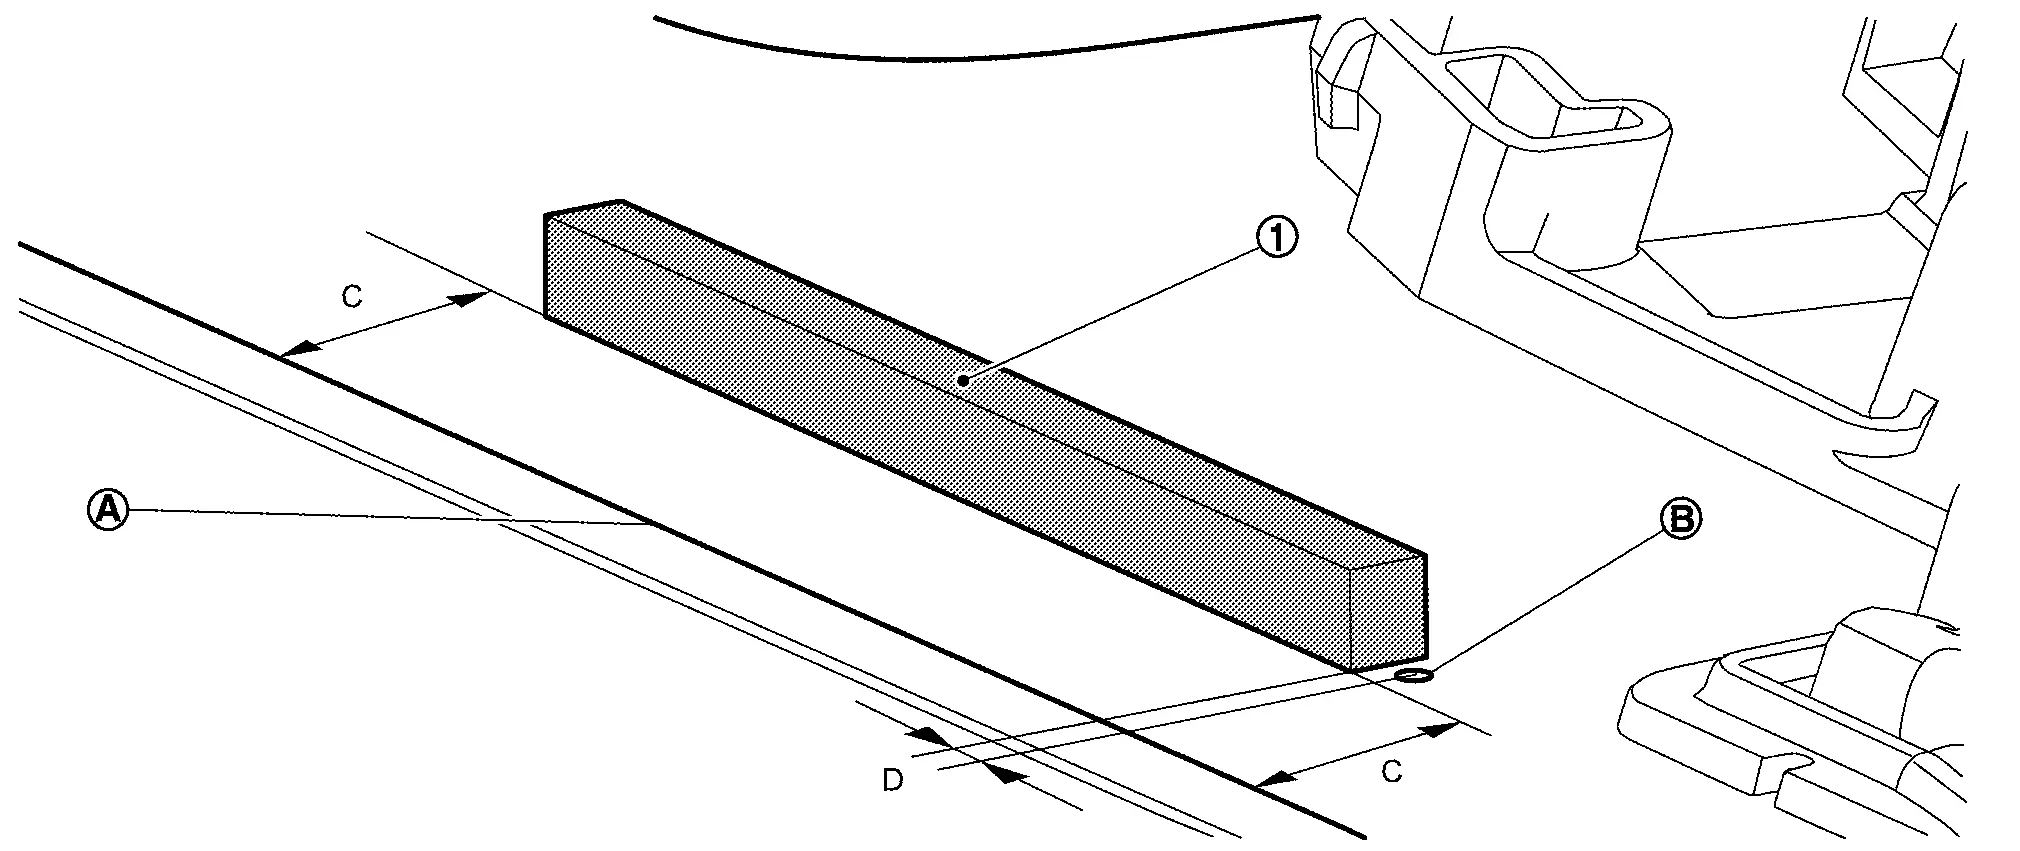
|
: Black print edge | |
: Adhesive matching mark |
| C | : 19.7 mm ± 1.5 mm (0.78 in ± 0.06 in) | D | : 1.5 mm ± 1.5 mm (0.06 in ± 0.06 in) |
Install spacer A (lower).Apply glass primer on windshield glass of spacer A (lower) install position. Remove release liner of double sided tape for installing spacer A (lower). Install spacer A (lower) as shown in figure.
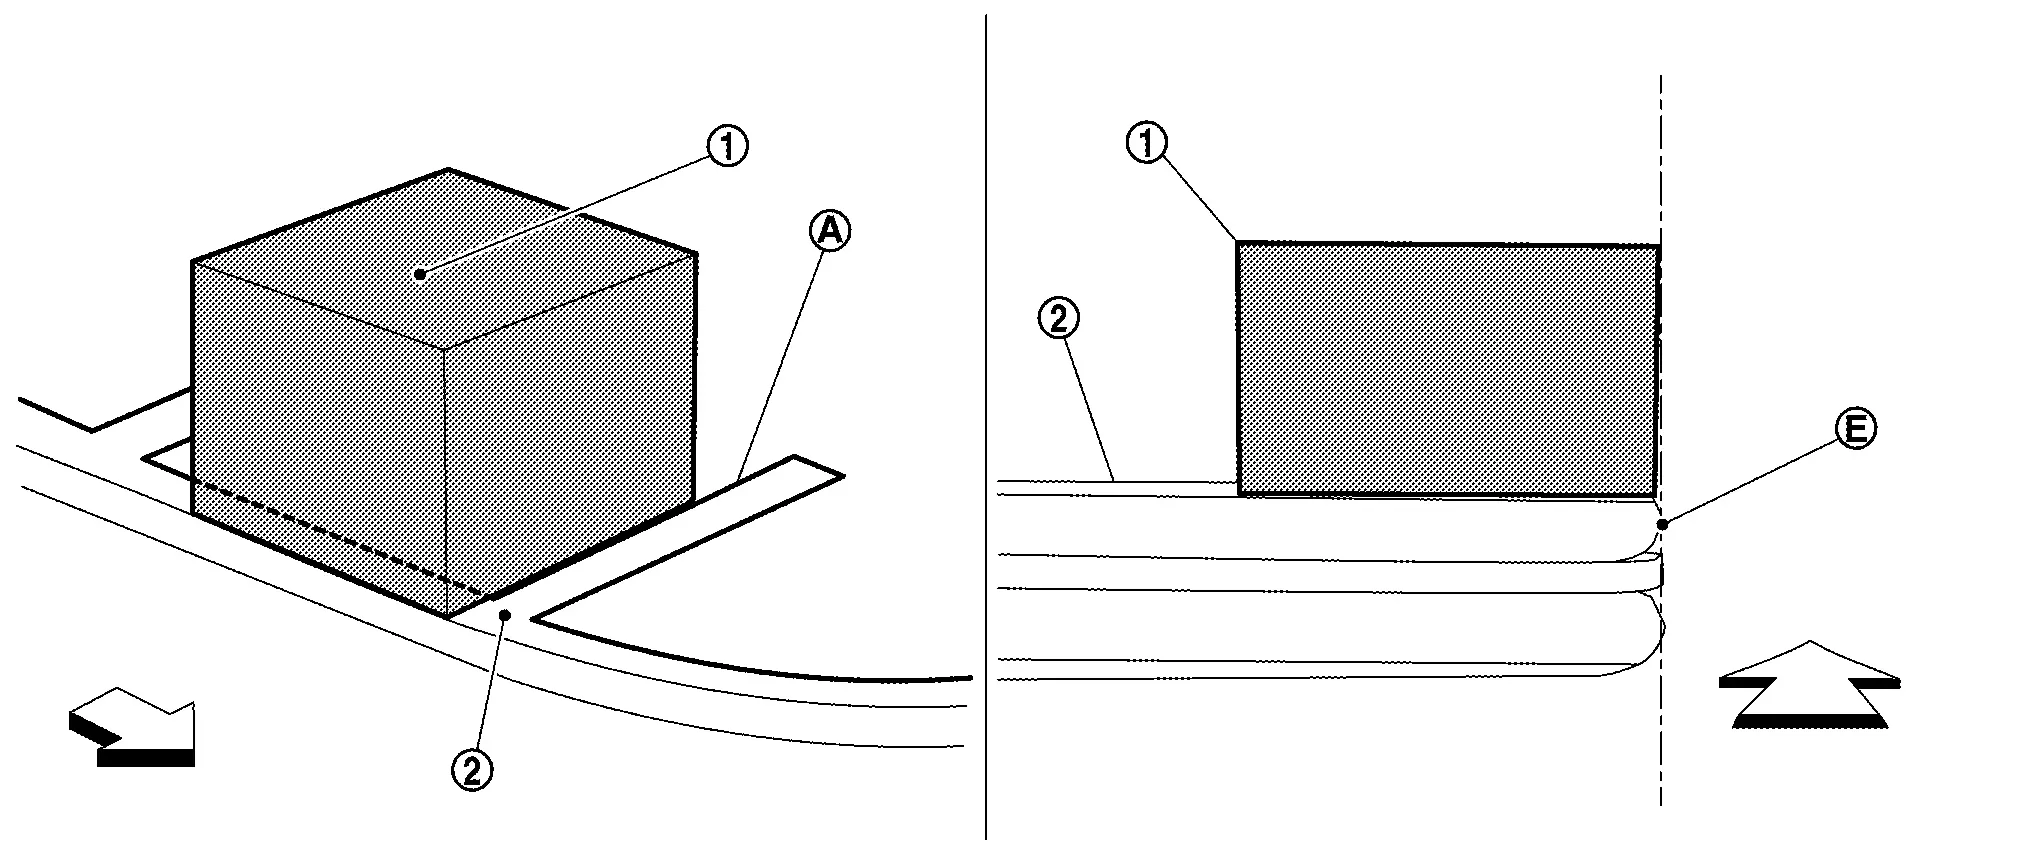
|
Windsheild glass | ||
|
: Matching mark | |
: Edge |
 |
: Upper side of windsheild glass |
Apply glass primer along the entire circumference of windshield glass. The range of glass primer Refer to Exploded View..
Apply painted surface primer to the body side bonding surface. The range of painted surface primer Refer to Exploded View..
Apply adhesive to windshield glass by using a sealant gun. The volume of adhesive Refer to Exploded View.
Use suction lifter (A) that is installed in advance, align the matching marks between the holder and roof panel hole and between the body panel and windshield glass to install them on the Nissan Ariya vehicle.
Press entire surface of windshield glass lightly to fit it completely.
Remove protective tapes and matching marks.
Install removed parts.
Inspection
WATER LEAKAGE INSPECTION
Back Door Window Glass Nissan Ariya 2023
Exploded View
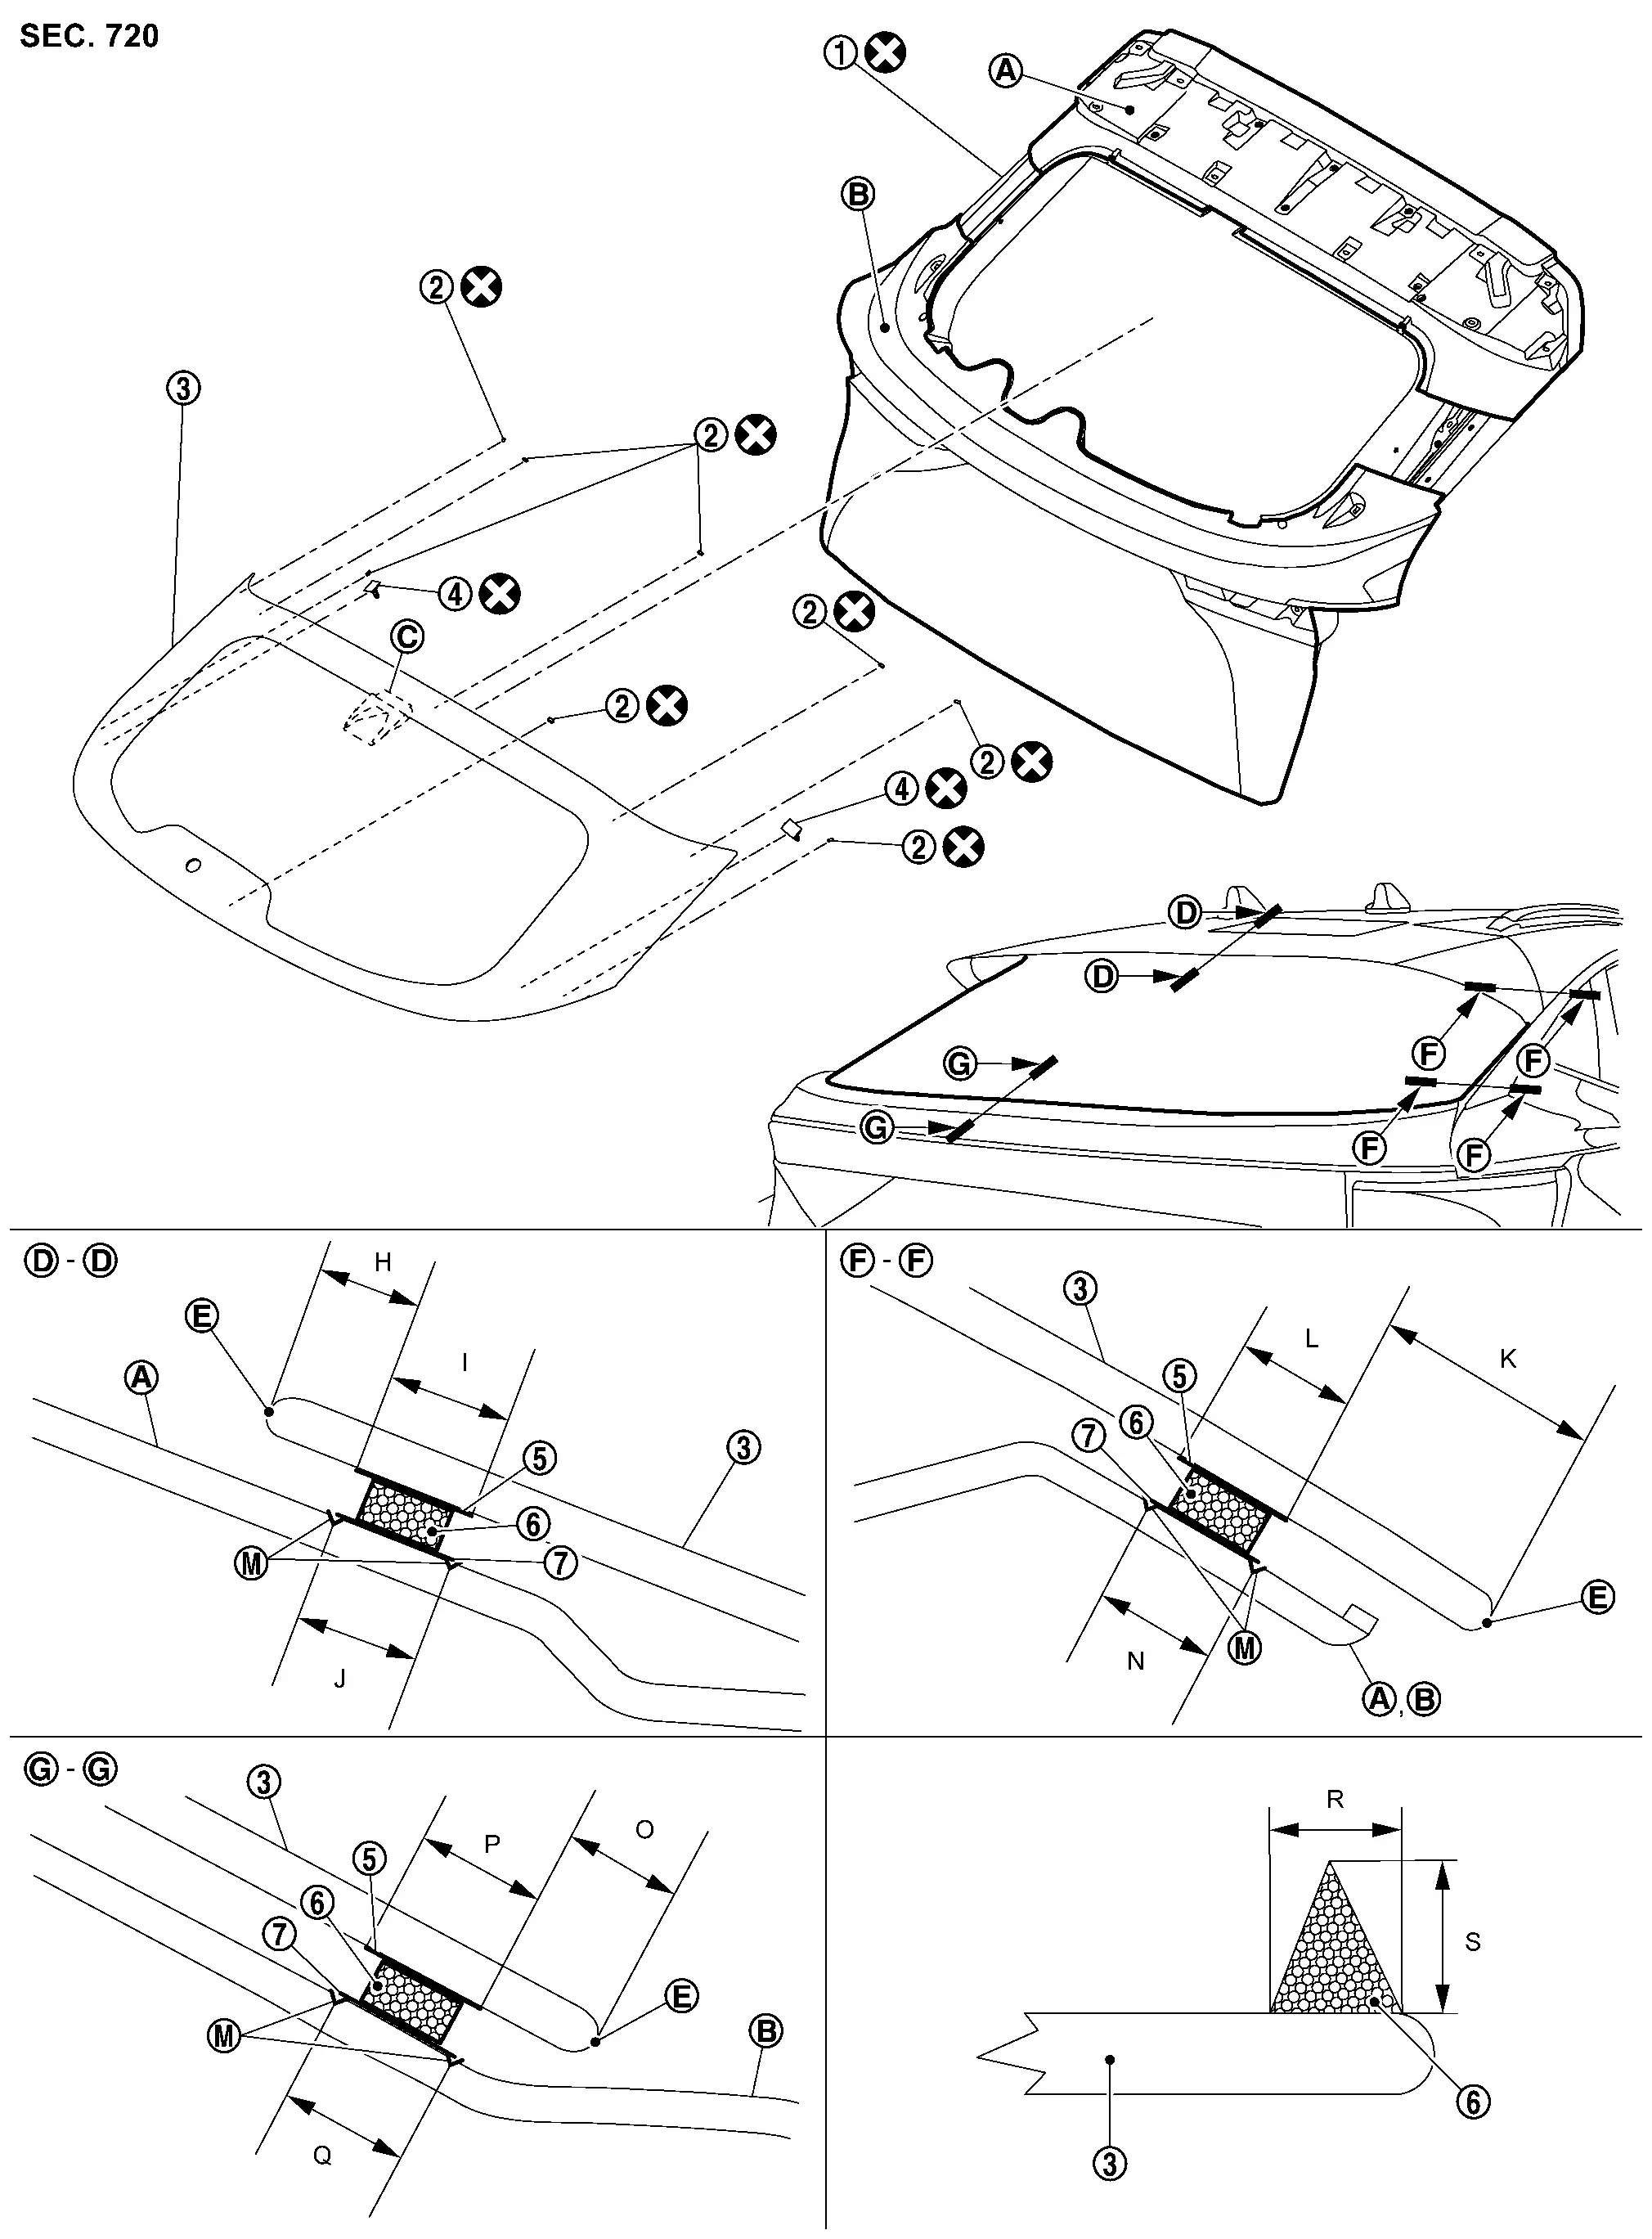
|
Back door panel | |
Spacer | |
Back door window glass |
|
Clip | |
Glass primer | |
Adhesive |
|
Painted surface primer | ||||
|
Back door outer panel upper | ||||
|
Back door outer panel lower | ||||
|
Intelligent room mirror camera bracket* | ||||
|
Edge | ||||
|
Adhesive matching mark | ||||
|
: Always replace after every disassembly. | ||||
* : Never disassemble because it is assembly parts with back door window glass. When need replace it, replace back door window glass assembly.
Unit: mm (in)
| Portion | Primer range | Adhesive range | |||
|---|---|---|---|---|---|
| R | S | ||||
| Back door window glass – Back door outer panel | – |
H | 5.7 (0.22) |
8.0 (0.31) |
12.0 (0.47) |
| I | 15.0 (0.59) |
||||
| J | 15.0 (0.59) |
||||
| – |
K | 15.8 (0.62) |
|||
| L | 15.0 (0.59) |
||||
| N | 15.0 (0.59) |
||||
| – |
O | 6.2 (0.24) |
|||
| P | 15.0 (0.59) |
||||
| Q | 15.0 (0.59) |
||||
Removal & Installation
REMOVAL
Replacement Back Door Window Glass
Reuse Back Door Window Glass
Remove back door inner finisher. Refer to Removal & Installation.
Remove rear wiper motor. Refer to Removal & Installation.
Disconnect window defogger connectors LH side and RH side.
Remove intelligent rear view mirror camera (with intelligent rear view mirror camera). Refer to Removal & Installation.
Remove rear spoiler. Refer to Removal & Installation.
Apply protective tapes (A) on back door outer panel around back door window glass to protect painted surface from damage.
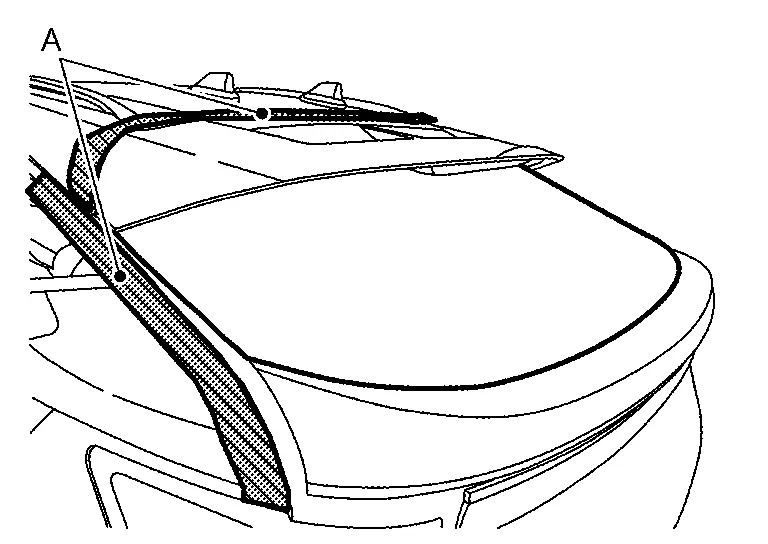
Cut the adhesive using a piano wire.Pass the piano wire passenger room to bonded area of back door window glass using a wire pierce.
Tie both ends of the piano wire (B) to wire grip (A), etc..To cut adhesive, back door window glass clips and spacers by using piano wire alongside of back door window glass.
Use suction lifter (A) to remove back door window glass from the Nissan Ariya vehicle.
Remove back door window glass clips and spacers from back door outer panel.
Remove all parts in back door panel.
INSTALLATION
Replacement Back Door Window Glass
Clean the bonded area on back door window glass and back door outer panel using a degreasing agent.
Apply glass primer along the entire circumference of back door window glass. The range of glass primer, Refer to Exploded View.
Apply painted surface primer to the back door outer panel bonding surface. The range of painted surface primer, Refer to Exploded View.
Remove protect films of adhesive (that had been applied). 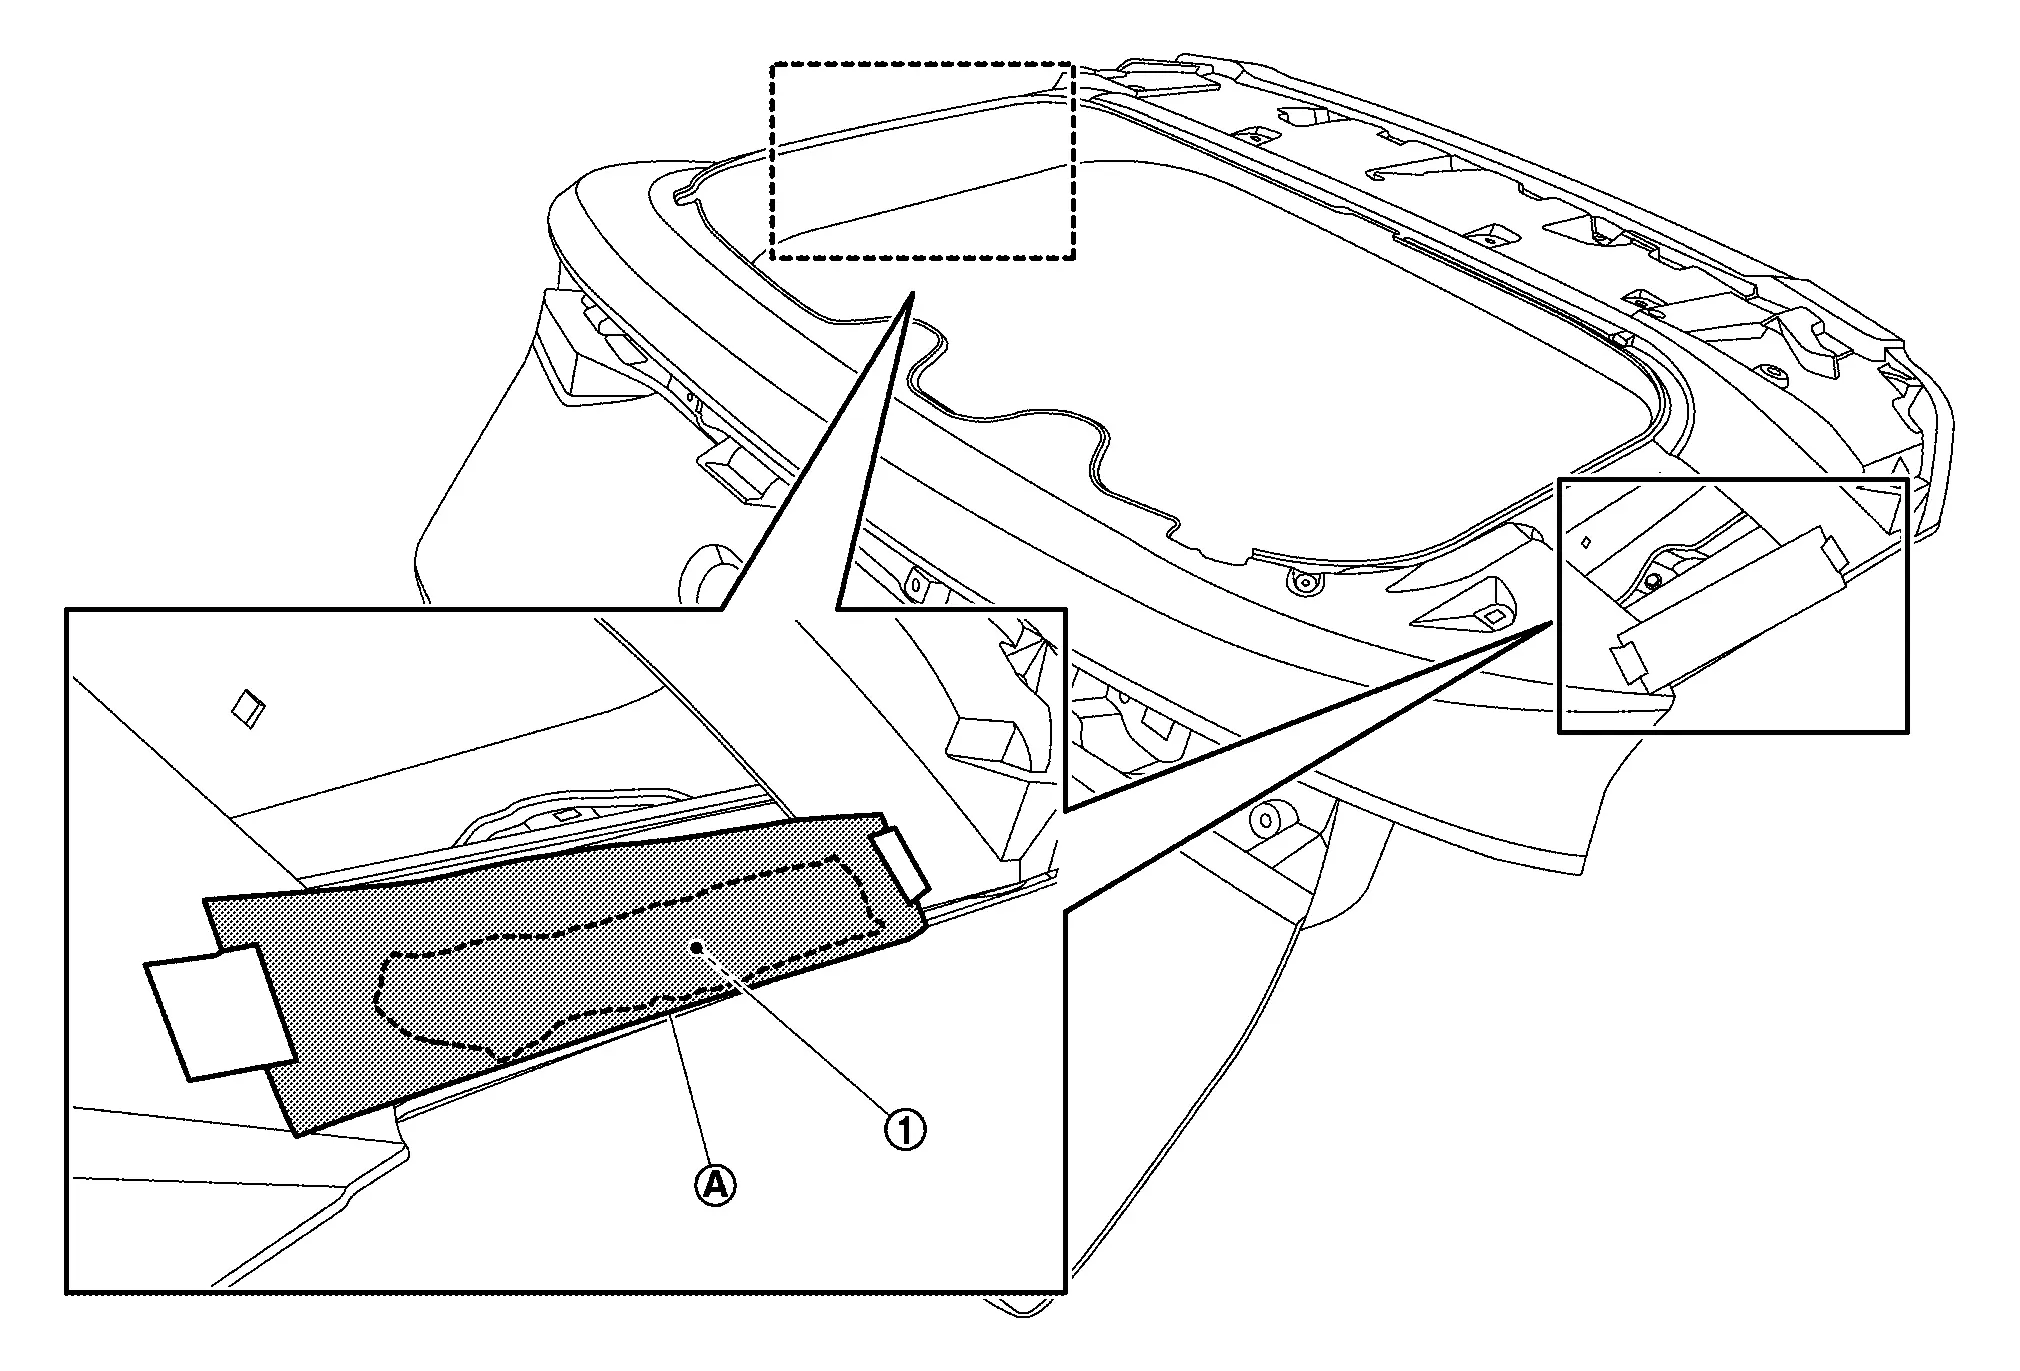

|
Adhesive (applied) | |
Panted surface primer (applied) |
|
The range of painted surface primer | |
Primer matching marks |
Apply adhesive to back door window glass. The range and volume of adhesive, Refer to Exploded View.

|
Clip | |
Adhesive |
| B | : 100 mm (3.94 in) | ||
Install back door window glass to new back door panel.
Press entire surface of back door window glass lightly to fit it completely.
Remove protective tape.
Install the removed parts.
Reuse Back Door Window Glass
Remove remaining adhesive using a cutter knife or scraper smooth out back door window glass surface.
Clean the bonded area on back door window glass and back door outer panel using a white gasoline or degreasing agent.
Install spacer.Clean back door window glass to install position of spacer by using white gasoline or degreasing agent. Remove release liner of double sided tape for installing spacer. Install spacer on back door window glass.
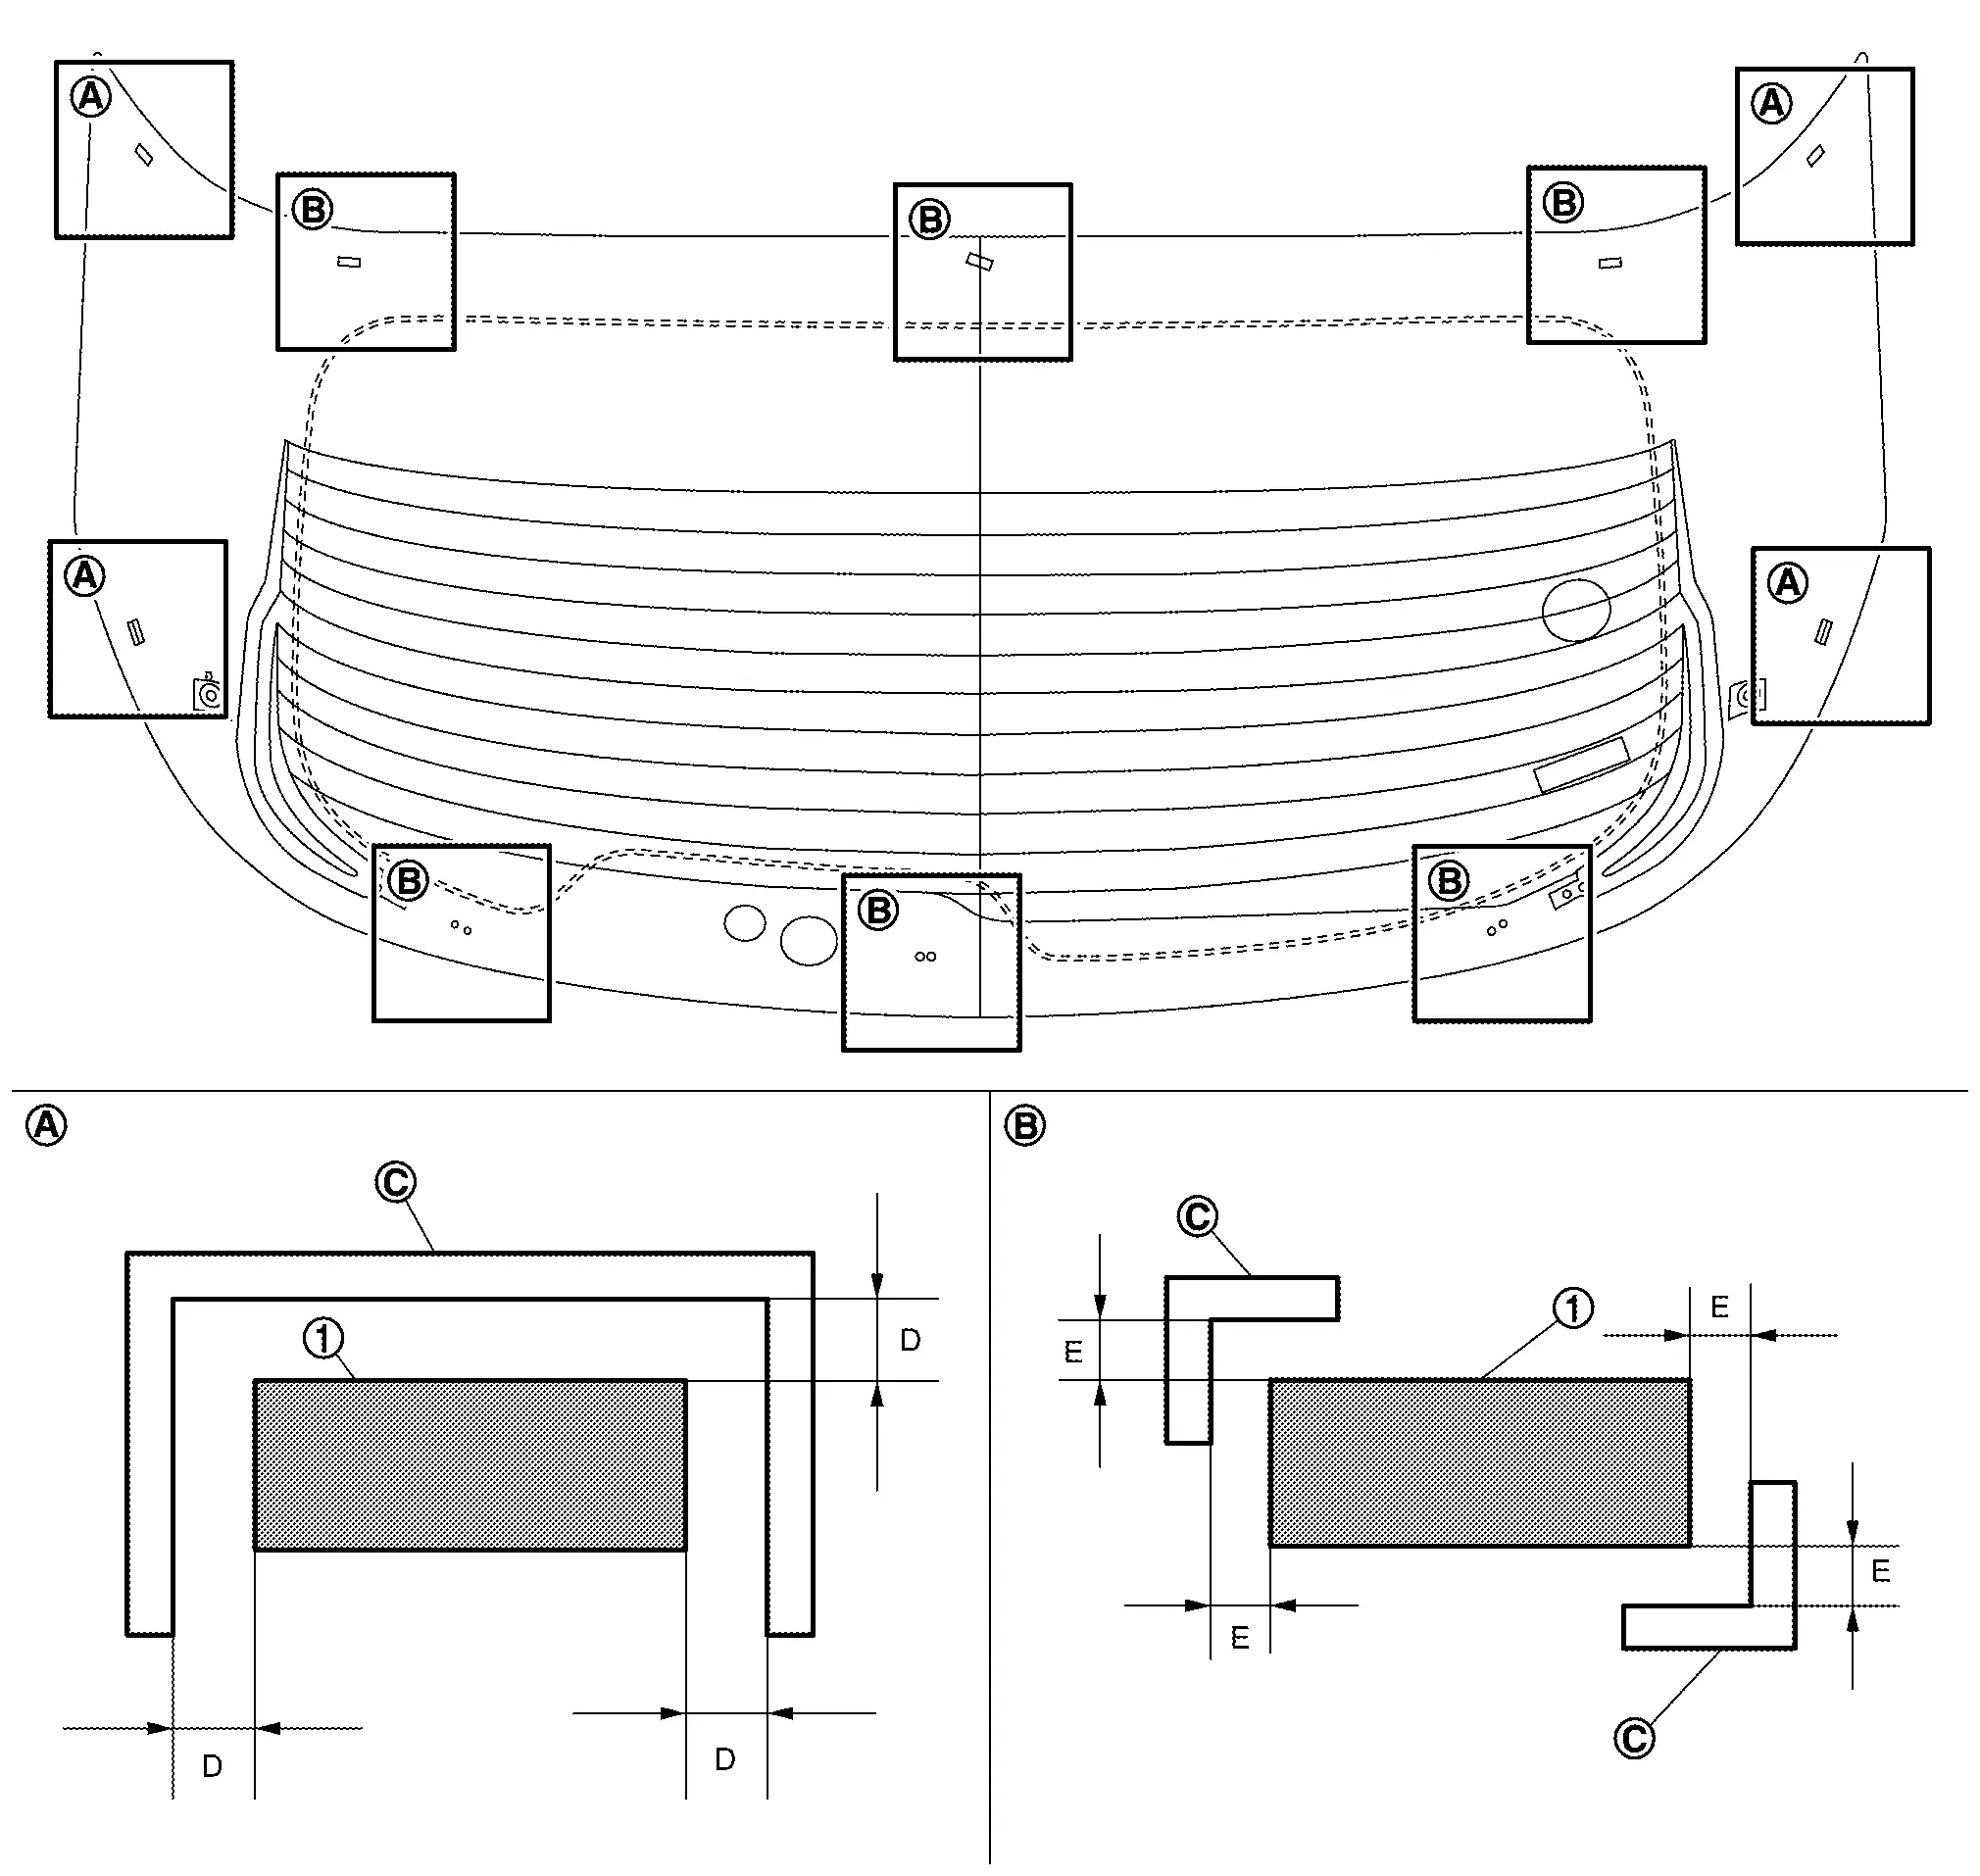
|
: Matching mark | ||||
| D | : 2.0 ± 2.0 mm (0.08 ± 0.08 in) | ||||
| E | : 1.5 ± 1.5 mm (0.06 ± 0.06 in) | ||||
Install clip.Clean back door window glass to install position of clip by using white gasoline or degreasing agent. Remove release liner of double sided tape for installing clip. Install clip on back door window glass.
Apply glass primer along the entire circumference of back door window glass. The range of glass primer, Refer to Exploded View.
Apply painted surface primer to the back door outer panel bonding surface. The range of painted surface primer, Refer to Exploded View.
Remove protect films of adhesive (that had been applied). |
Adhesive (had been applied) | |
Panted surface primer (had been applied) |
|
The range of painted surface primer | |
Primer matching marks |
Apply adhesive to back door window glass. The range of adhesive, Refer to Exploded View.
|
Clip | |
Adhesive |
| B | : 100 mm (3.94 in) | ||
Install back door window glass to new back door panel.
Press entire surface of back door window glass lightly to fit it completely.
Remove protective tape.
Install the removed parts.
Inspection
WATER LEAKAGE INSPECTION
Front Door Glass Nissan Ariya
Exploded View

|
Front door panel | |
Front door glass run | |
Front door glass run lower sash |
|
Front door glass | |
Front door regulator assembly | |
Front door sealing screen |
|
Front door lower sash | |
Front door power window motor | |
Front door regulator |
|
: Nissan Ariya Vehicle front | ||||
 |
: N·m (kg-m, in-lb) | ||||
 |
: Body grease | ||||
 ,  ,  ,  ,  ,  ,  ,: Indicates that the part is connected at points with same symbol in actual Nissan Ariya vehicle. |
|||||
Removal & Installation
ADDITIONAL SERVICE
Perform the additional service referencing with the below table for system work normally.
○: Applicable
| Parts | Work type | Additional servicve | Reference | |
|---|---|---|---|---|
| Replacement | Removal | |||
| Front door glass | ○ | ○ | System initialization | Work Procedure |
REMOVAL
Remove front door finisher. Refer to Removal & Installation.
Remove front door sash inner cover and front door inside seal. Refer to Removal & Installation.
Cut butyl-tape part of to make a work space. Cut the butyl-tape, Refer to Removal & Installation.
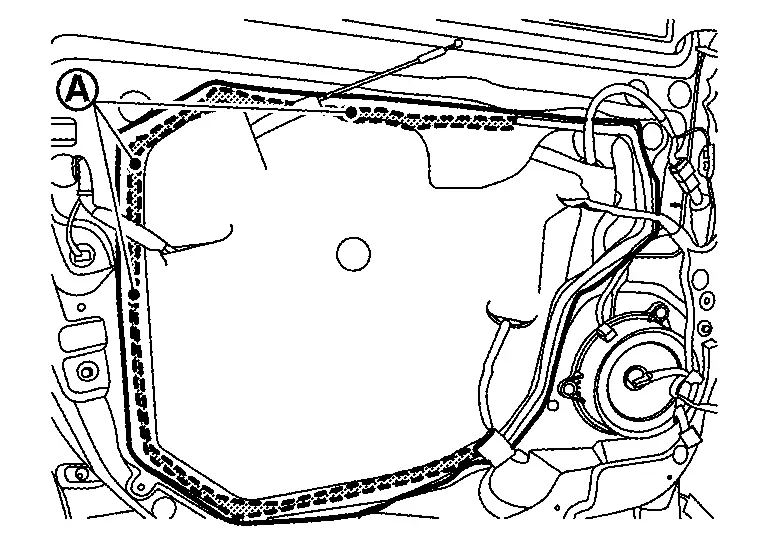
Reconnect power window main switch connector.
Operate power window main switch to raise or lower front door glass until front door glass mounting bolts can bee seen, and then remove front door glass mounting bolts.

Hold securely front door glass, and then remove it according to numerical order 1→3 indicated by arrows as shown in figure.
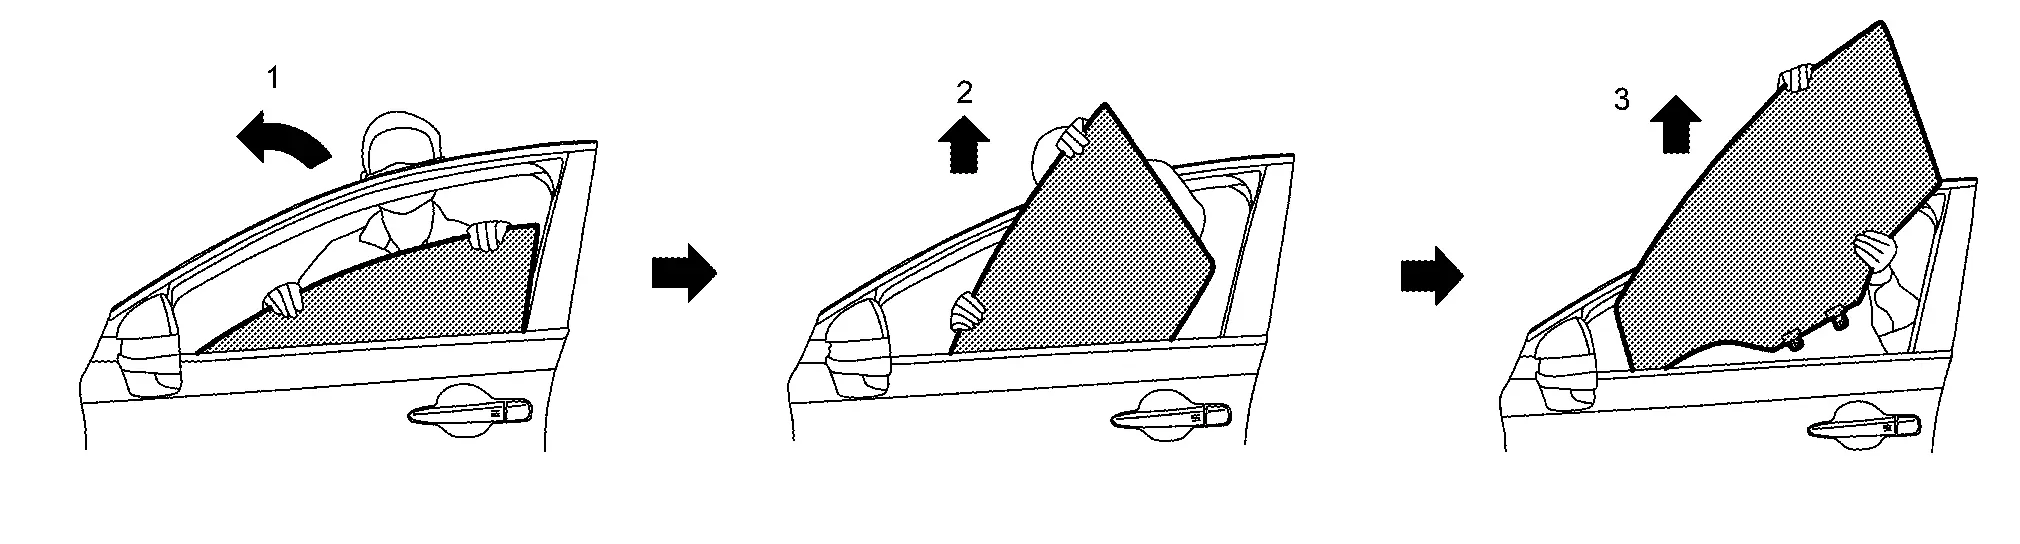
INSTALLATION
Note the following items, and then install in the reverse order of removal.
Inspection
SYSTEM INITIALIZATION
Work procedure. Refer to Work Procedure.
FITTING INSPECTION
Check that front door glass is fit securely into the sash groove.
Lower front door glass slightly [approximately 10 to 20 mm (0.394 to 0.787 in)], and check that the clearance to the sash is parallel. Loosen the regulator mounting bolts, guide rail mounting bolts, and glass and guide rail mounting bolts to correct the glass position if the clearance between the glass and sash is not parallel.
Front Door Sealing Screen Nissan Ariya 2026
Removal & Installation
REMOVAL
Remove front door finisher. Refer to Removal & Installation.
Disconnect front door lock assembly harness connector , and remove harness fixing clip .

Disconnect door harness connectors , and remove fixing clips .
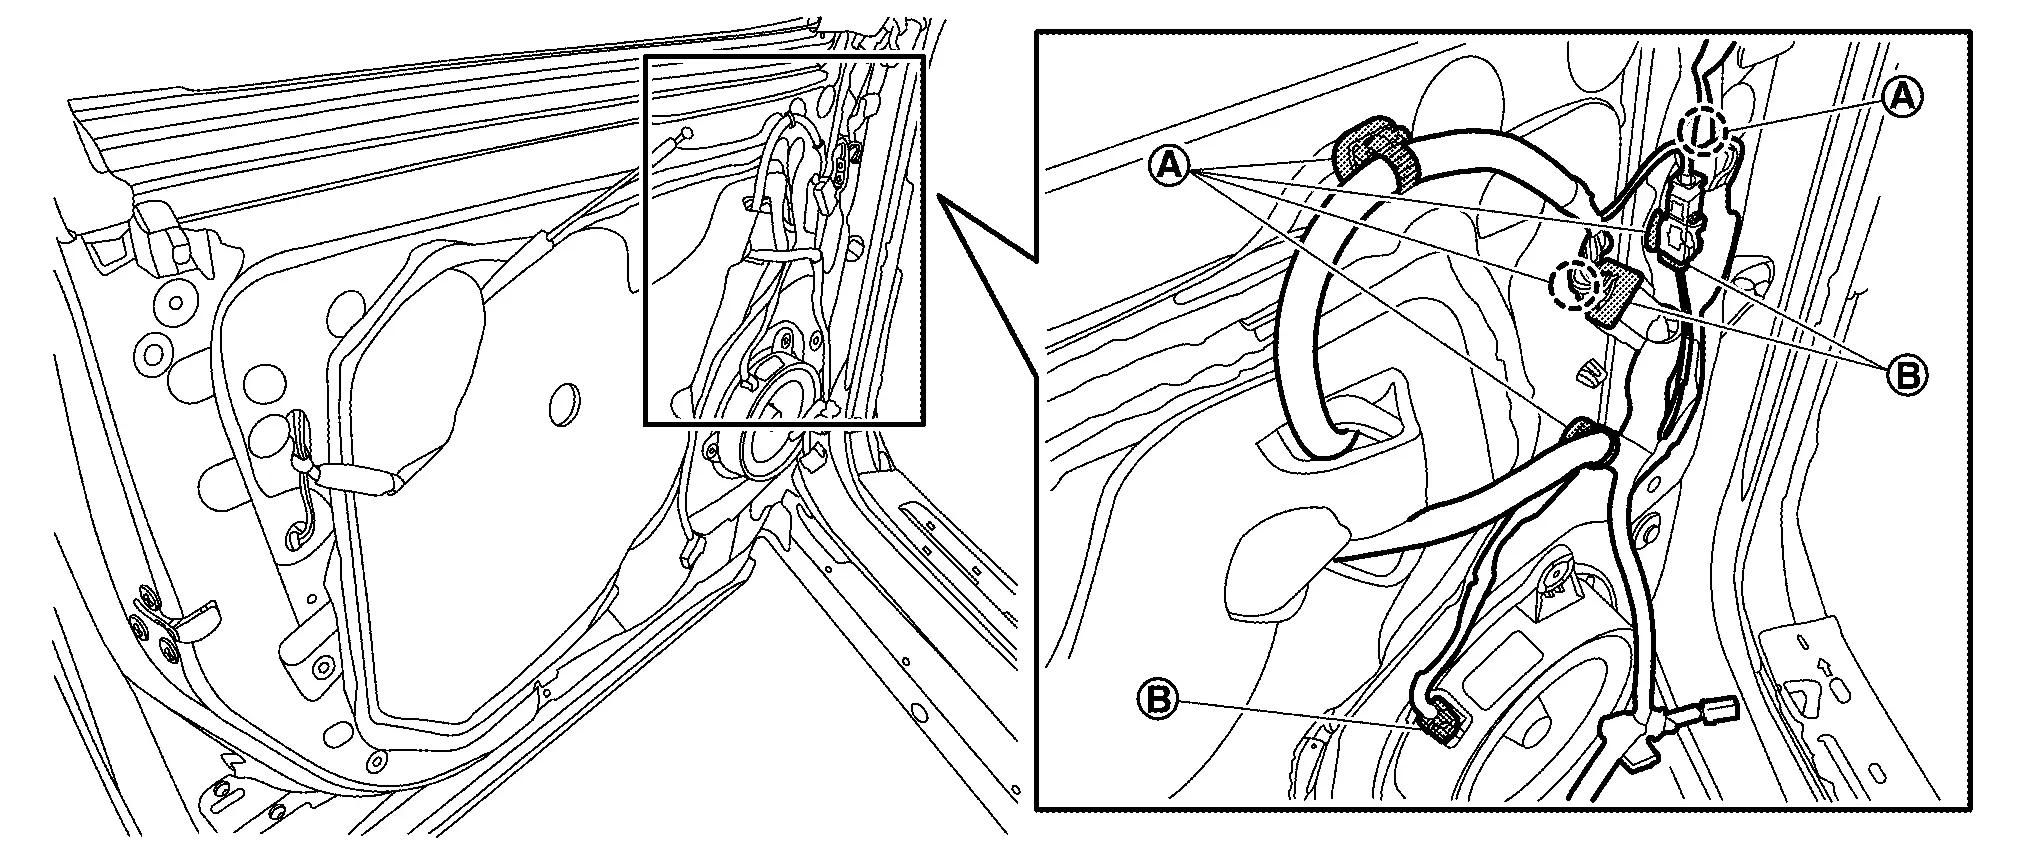
 |
: Clip | ||||
Disconnect door mirror harness connector. Refer to Removal & Installation.
Cut the butyl-tape by using cutter knife (A).
Pull out cable and harness, and then remove front door sealing screen.
INSTALLATION
Note the following items, and then install in the reverse order of removal.
Front Door Lower Sash Nissan Ariya SUV
Removal & Installation
REMOVAL
Fully close front door glass.
Remove front door finisher, Refer to Removal & Installation.
Remove front side of front door sealing screen. Cut the butyl-tape, Refer to Removal & Installation.
Remove front door glass run from front door lower sash.
Remove front door lower sash mounting bolt .

Disengage fixing portion according arrow direction, and then remove front door lower sash from front door panel.
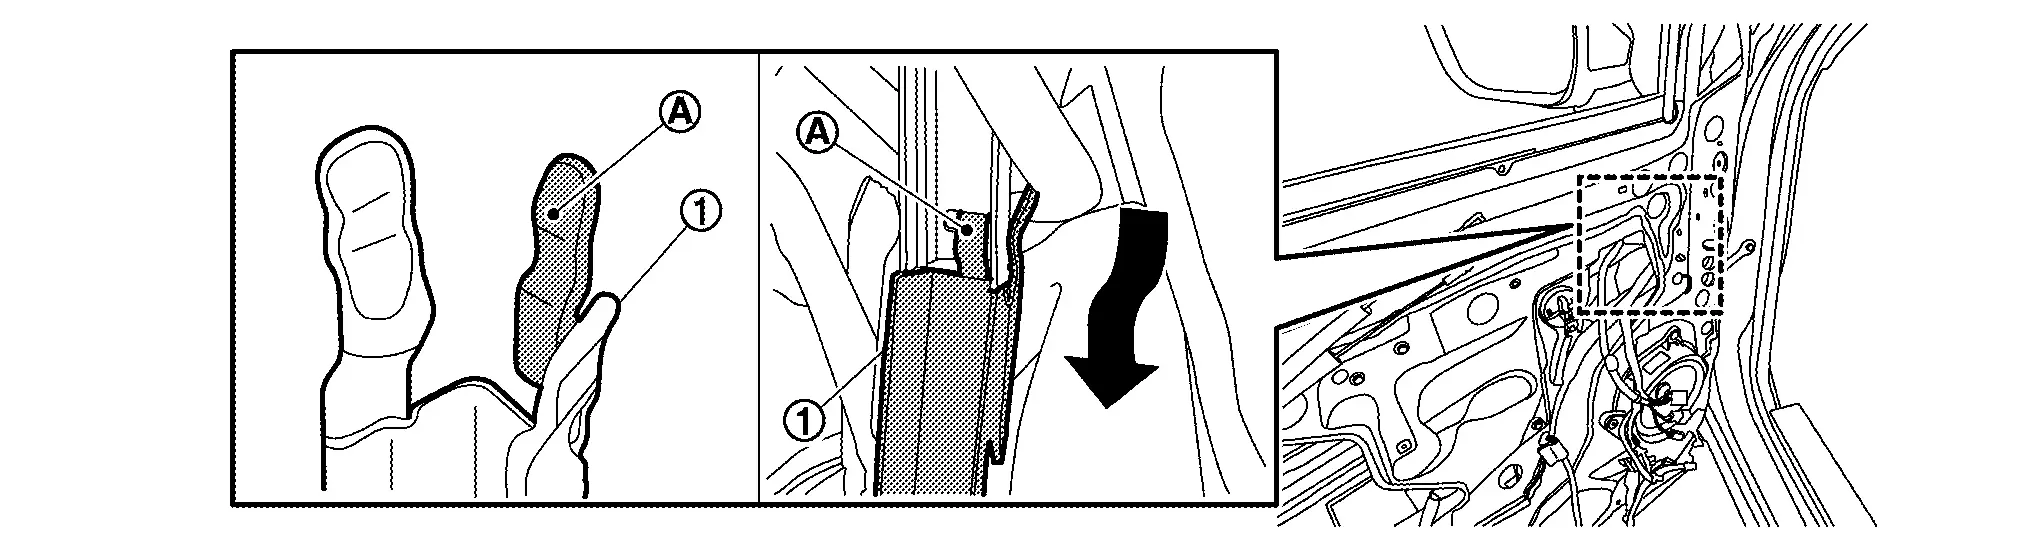
INSTALLATION
Note the following items, and then install in the reverse order of removal.
Front Door Glass Run Lower Sash Nissan Ariya 2026
Removal & Installation
REMOVAL
Fully close front door glass.
Remove front door finisher. Refer to Removal & Installation.
Make the work space by cutting butyl-tape part of front door sealing screen. Cut the butyl-tape, Refer to Removal & Installation.
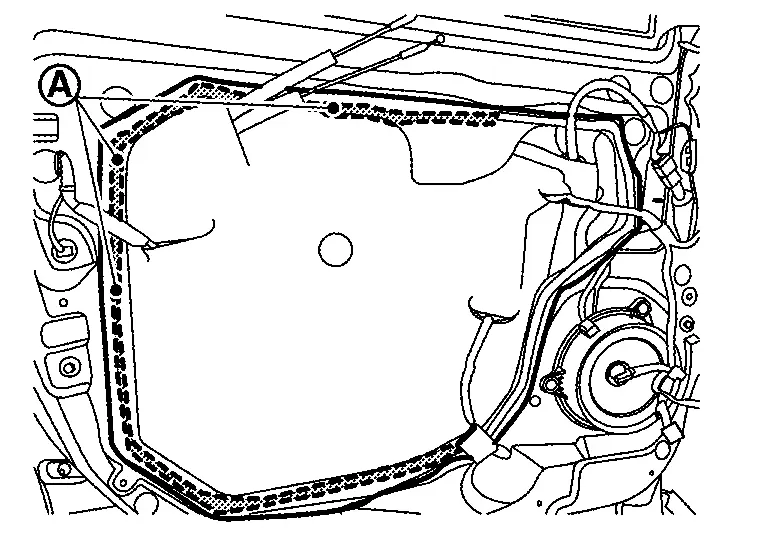
Remove front door glass run from front door glass run lower sash.
Remove front door glass run lower sash mounting bolt .
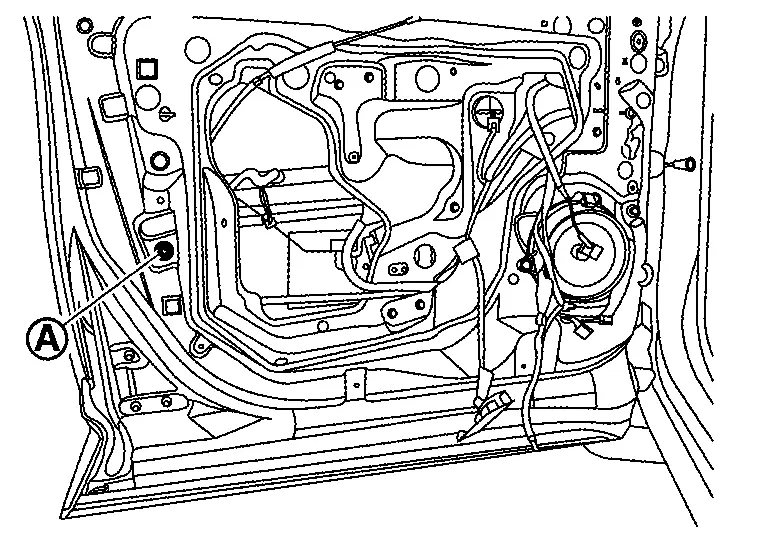
Disengage front door glass run lower sash fixing portion by arrow direction as shown in figure.

Remove front door glass run lower sash from open part of front door panel.
INSTALLATION
Note the following items, and then install in the reverse order of removal.
Front Door Glass Run Nissan Ariya
Removal & Installation
ADDITIONAL SERVICE
Perform the additional service referencing with the below table for system work normally.
○: Applicable
| Parts | Work type | Additional servicve | Reference | |
|---|---|---|---|---|
| Replacement | Removal | |||
| Front door glass run | ○ | ○ | System initialization | Work Procedure |
REMOVAL
Fully open front door glass.
Remove front door sash cover. Refer to Removal & Installation.
Remove front door outside molding. Refer to Removal & Installation.
Remove front door finisher. Refer to Removal & Installation.
Remove front door sash inner cover and inside seal. Refer to Removal & Installation.
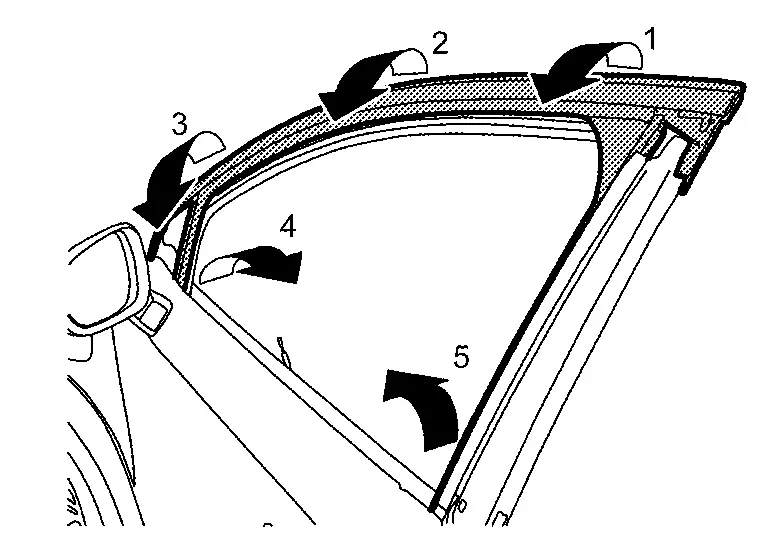
Remove front door glass run according to numerical order 1→5 indicated by arrows as shown in figure.
INSTALLATION
Note the following items, and then install in the reverse order of removal.
Front Door Regulator Nissan Ariya 2023
Exploded View
For exploded view of front door glass regulator, Refer to Exploded View.
Removal & Installation
ADDITIONAL SERVICE
Perform the additional service referencing with the below table for system work normally.
○: Applicable
| Parts | Work type | Additional servicve | Reference | |
|---|---|---|---|---|
| Replacement | Removal | |||
| Front door regulator | ○ | ○ | System initialization | Refer to Work Procedure. |
REMOVAL
Remove front door glass. Refer to Removal & Installation.
Disconnect power window motor harness connector .
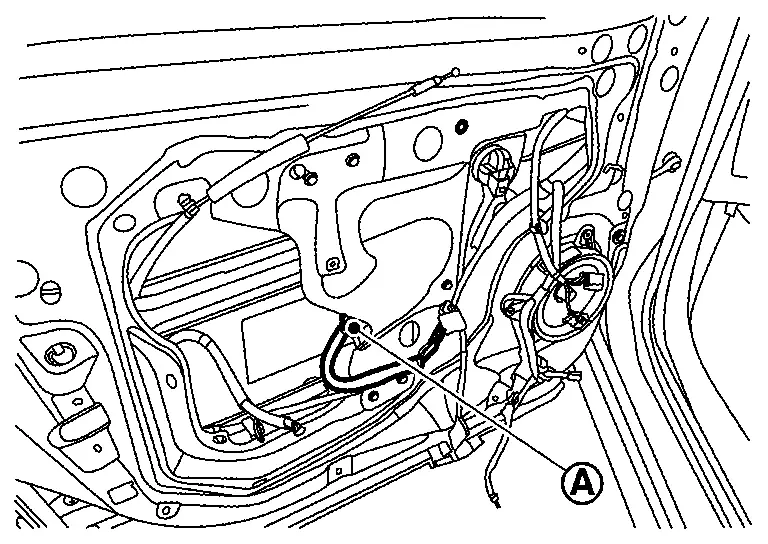
Loosen front door regulator assembly mounting bolt , and then remove front door regulator assembly mounting bolts .
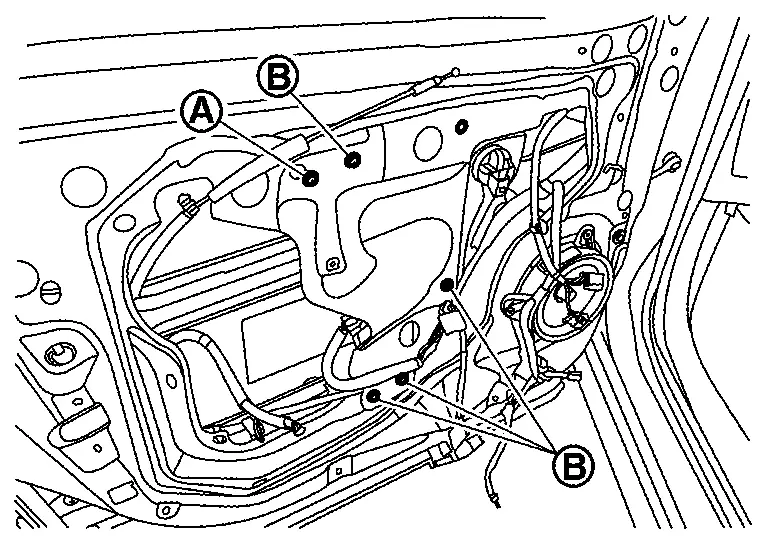
Remove front door regulator assembly from open part of front door panel.
INSTALLATION
Note the following items, and then install in the reverse order of removal.
Disassembly & Assembly
ADDITIONAL SERVICE
Perform the additional service referencing with the below table for system work normally.
○: Applicable
| Parts | Work type | Additional servicve | Reference | |
|---|---|---|---|---|
| Replacement | Removal | |||
| Power window motor | ○ | ○ | System initialization | Refer to Work Procedure. |
DISASSEMBLY
Remove front door regulator assembly. Refer to Removal & Installation.
Remove front door power window motor mounting bolts, and then remove front door power window motor.
ASSEMBLY
Note the following item, and then assemble in the reverse order of disassembly.
Inspection and Adjustment
SYSTEM INITIALIZATION
Work procedure. Work Procedure
FITTING INSPECTION
Check that the glass is fit securely into the sash groove.
Lower the glass slightly [approximately 10 to 20 mm (0.394 to 0.787 in)], and check that the clearance to the sash is parallel. Loosen the regulator mounting bolts, guide rail mounting bolts, and glass and guide rail mounting bolts to correct the glass position if the clearance between the glass and sash is not parallel.
Rear Door Glass Nissan Ariya 2026
Exploded View
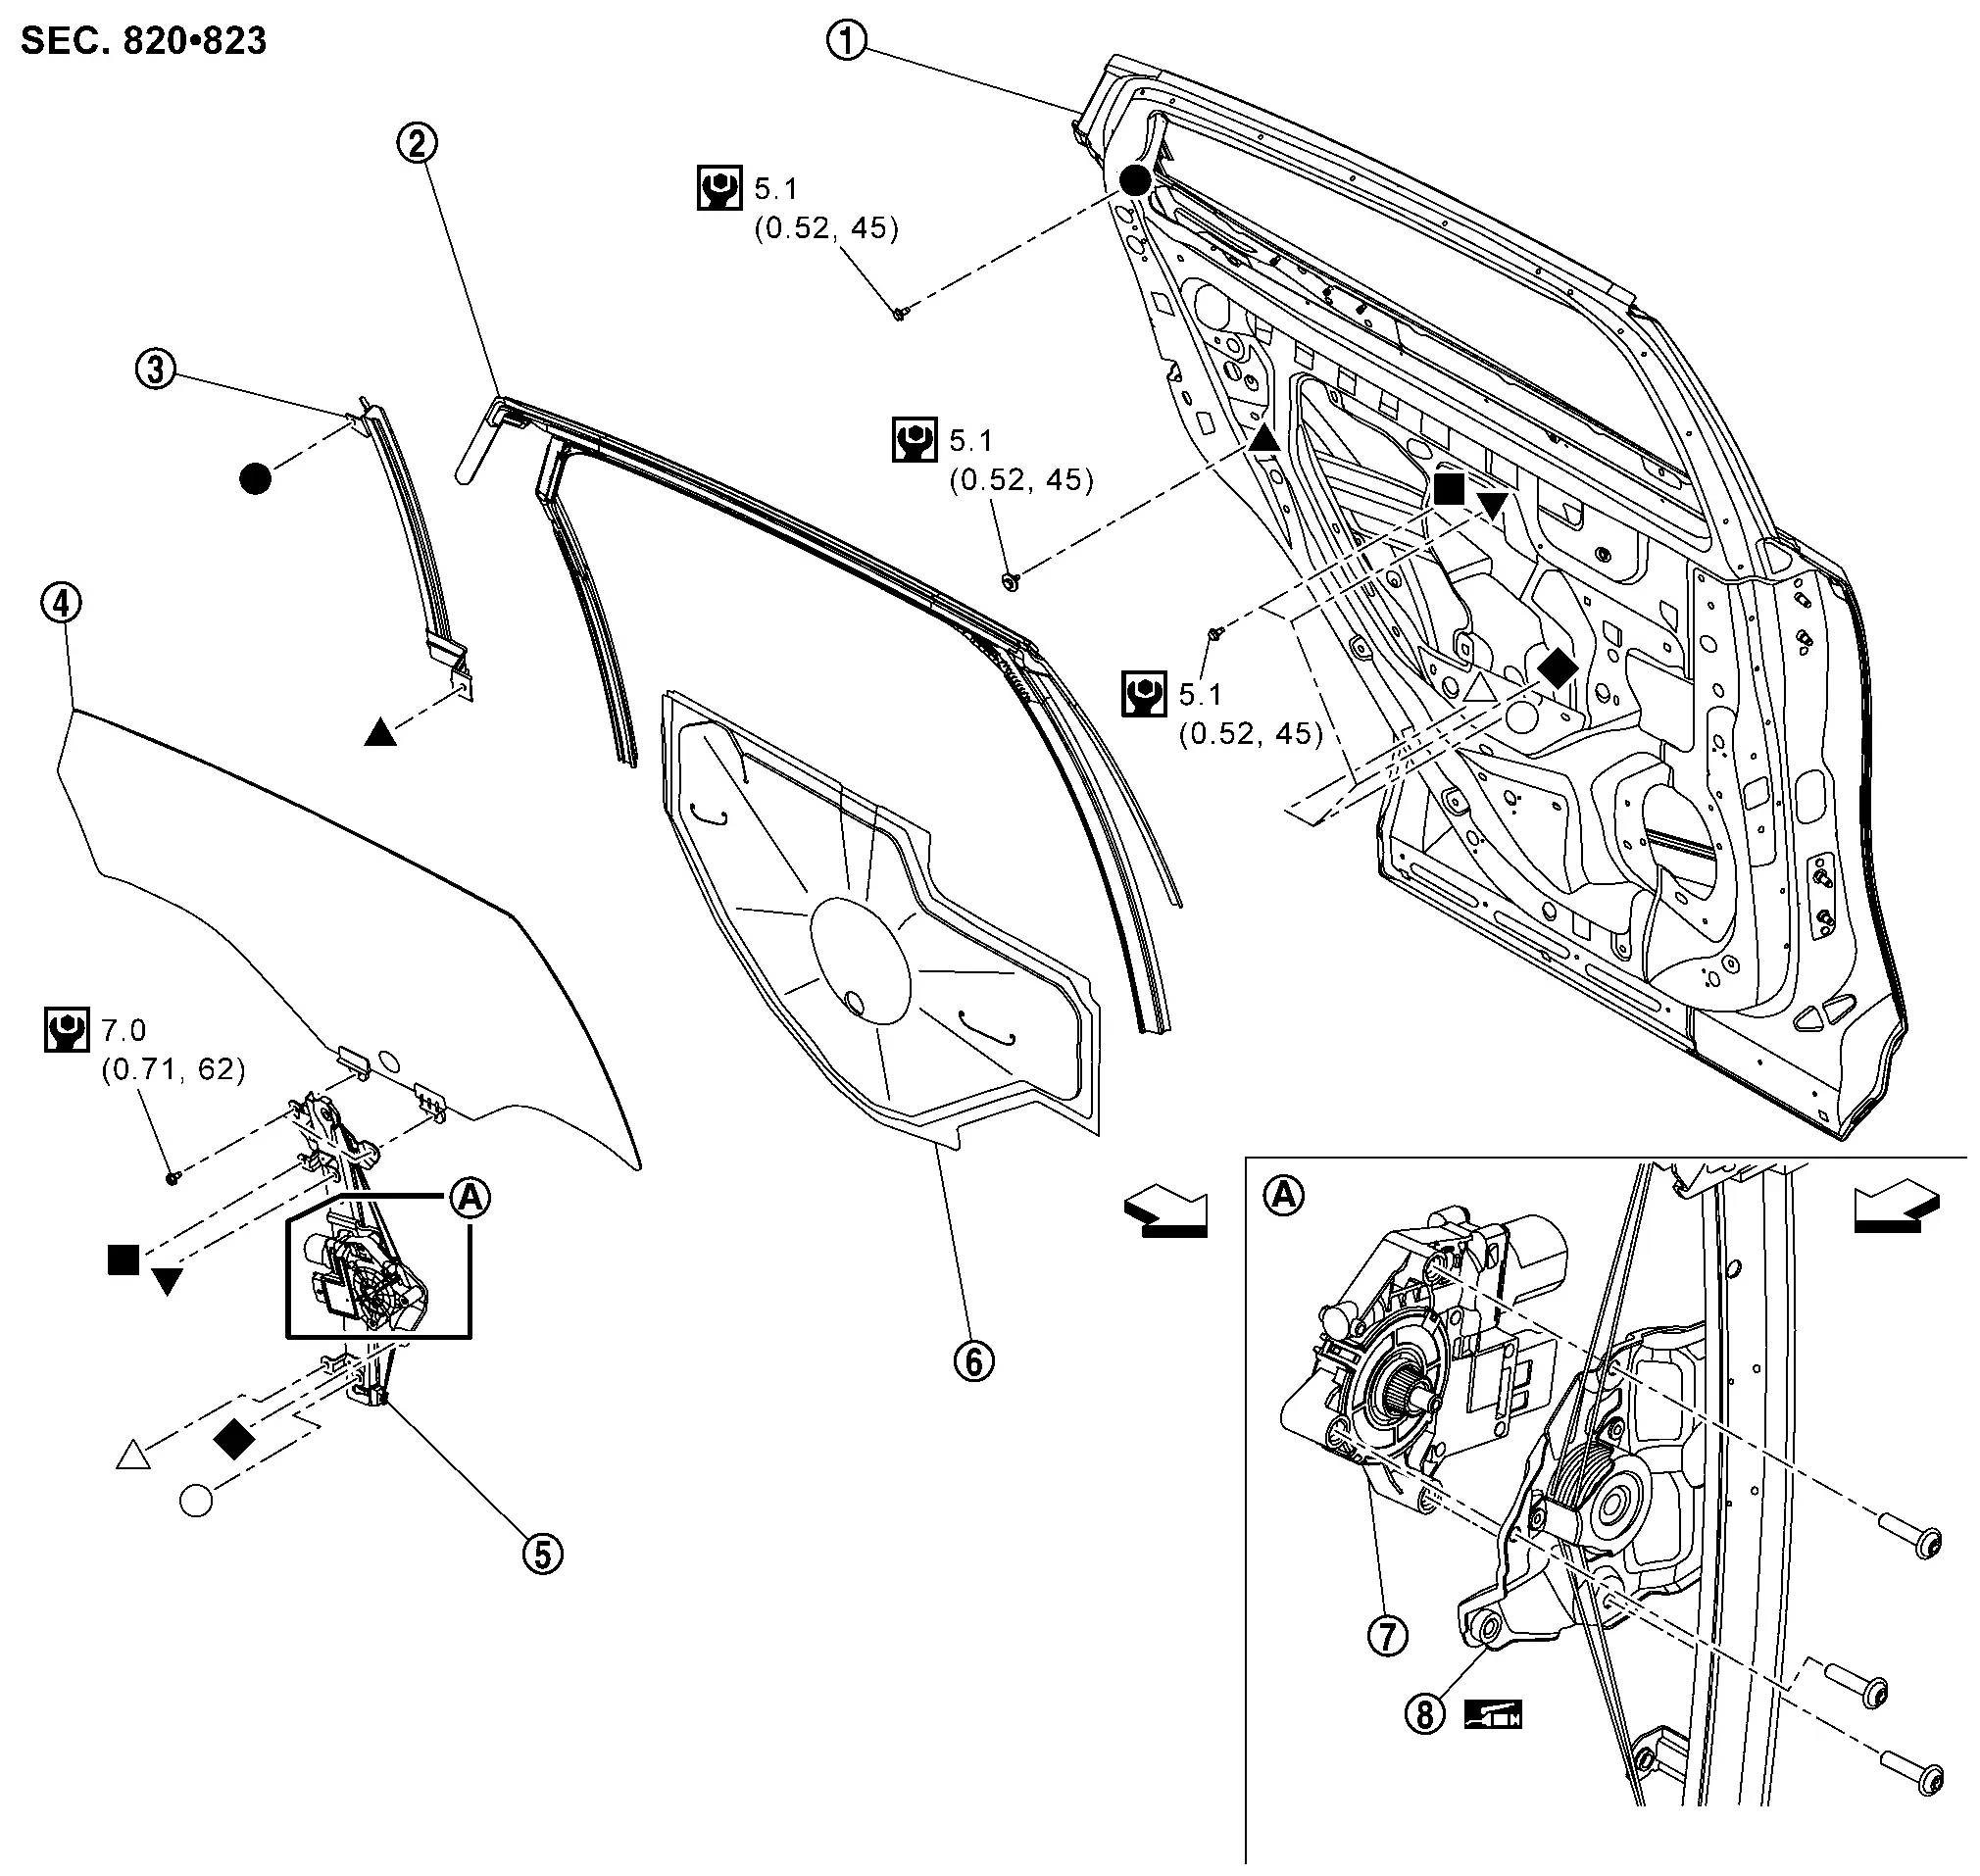
|
Rear door panel | |
Rear door glass run | |
Rear door glass run lower sash |
|
Rear door glass | |
Rear door regulator assembly | |
Rear door sealing screen |
|
Rear door power window motor | |
Rear door regulator | ||
|
: Nissan Ariya Vehicle front | ||||
|
: N·m (kg-m, in-lb) | ||||
|
: Body grease | ||||
| , , , , , , : Indicates that the part is connected at points with same symbol in actual Nissan Ariya vehicle. |
|||||
Removal & Installation
ADDITIONAL SERVICE
Perform the additional service referencing with the below table for system work normally.
○: Applicable
| Parts | Work type | Additional servicve | Reference | |
|---|---|---|---|---|
| Replacement | Removal | |||
| Rear door glass | ○ | ○ | System initialization | Work Procedure |
REMOVAL
Fully close rear door glass.
Remove rear door sash cover. Refer to Removal & Installation.
Remove rear door outside molding. Refer to Removal & Installation.
Remove rear door finisher. Refer to Removal & Installation.
Remove rear door sash inner cover. Refer to Removal & Installation.
Make the work space by cut the butyl-tape part of as shown in figure. Cut the butyl-tape, Refer to Removal & Installation.

Remove rear door glass run lower sash. Refer to Removal & Installation.
Reconnect power window switch connector.
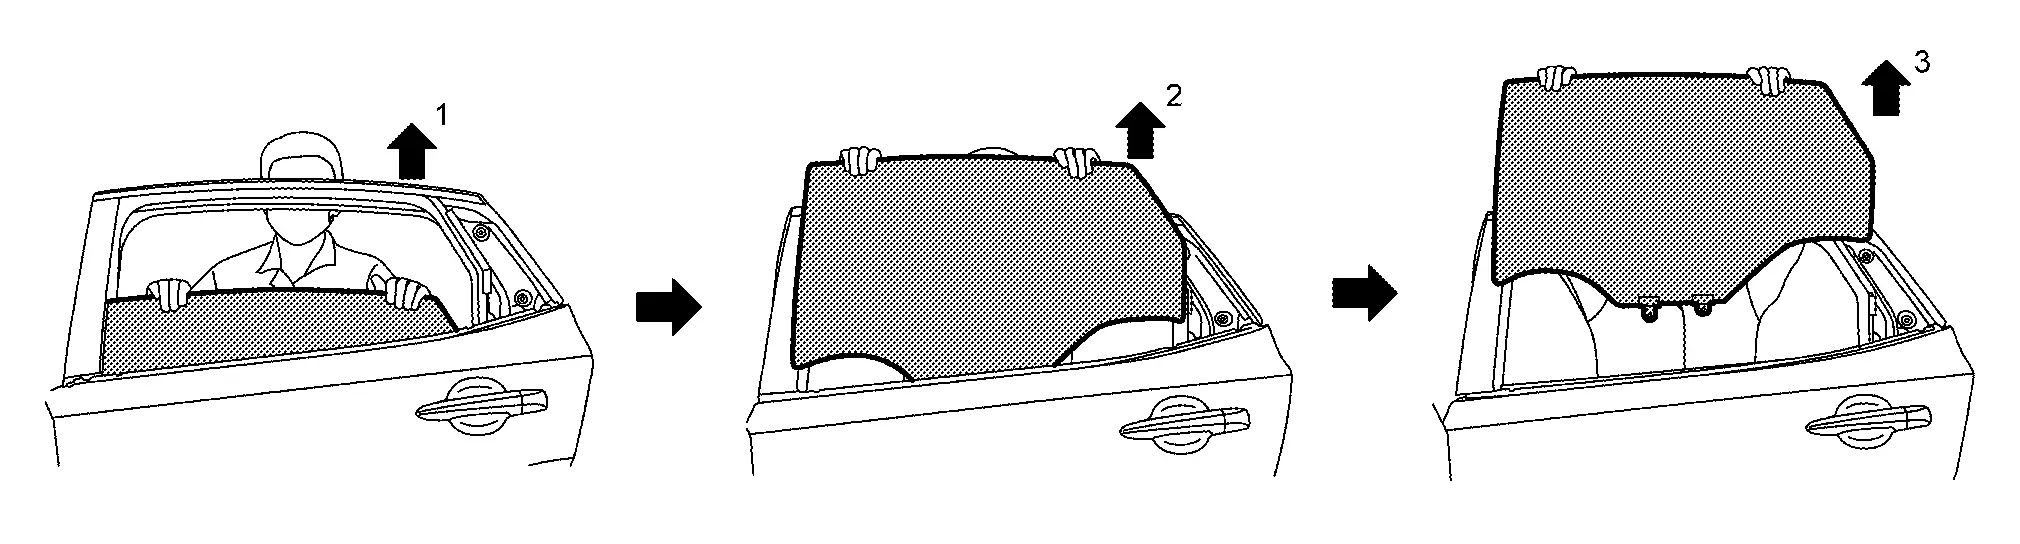
Operate power window switch to raise or lower rear door glass until rear door glass mounting bolts can be seen, and then remove rear door glass mounting bolts.
Hold securely rear door glass, and then remove it according to numerical order 1→3 indicated by arrows as shown in figure.
INSTALLATION
Note the following item, and then install in the reverse order of removal.
Inspection
SYSTEM INITIALIZATION
Refer to Work Procedure.
FITTING INSPECTION
Check that the glass is fit securely into the sash groove.
Lower the glass slightly [approximately 10 to 20 mm (0.394 to 0.787 in)], and check that the clearance to the sash is parallel. Loosen the regulator mounting bolts, guide rail mounting bolts, and glass and guide rail mounting bolts to correct the glass position if the clearance between the glass and sash is not parallel.
Rear Door Sealing Screen Nissan Ariya first Gen
Removal & Installation
REMOVAL
Remove rear door finisher. Refer to Removal & Installation.
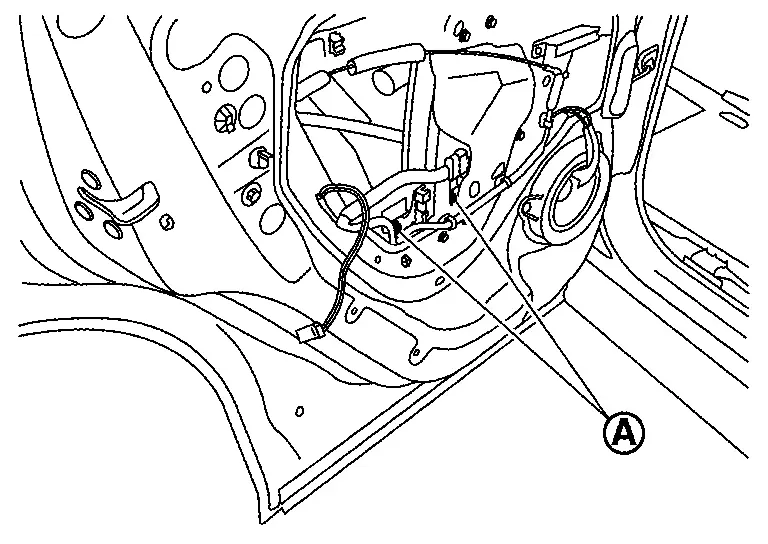
Disconnect rear door lock assembly and rear door speaker harness connector , and then disengage harness fixing clip .
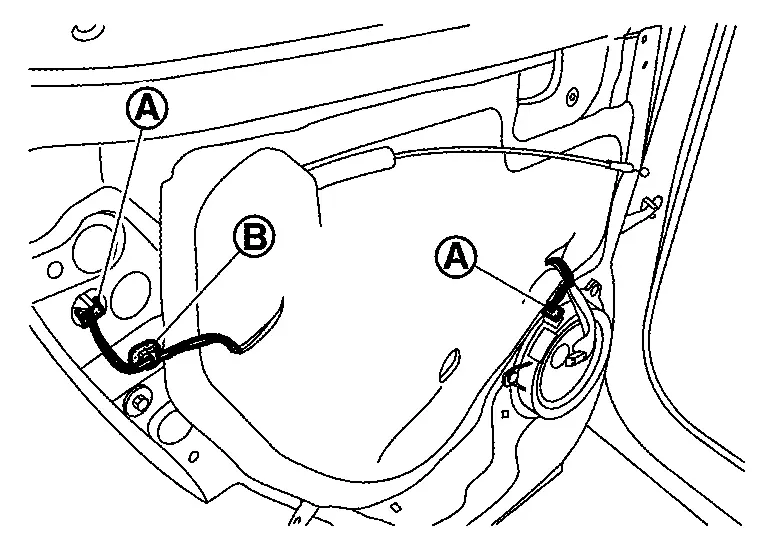
Cut butyl-tape inside of rear door sealing screen by using cutter knife.
Pull out cable and harness, and then remove rear door sealing screen.
INSTALLATION
Note the following items, and then install in the reverse order of removal.
Rear Door Glass Run Lower Sash Nissan Ariya SUV
Removal & Installation
REMOVAL
Fully close rear door glass.
Remove rear door sash cover. Refer to Removal & Installation.
Remove rear door outside molding. Refer to Removal & Installation.
Remove rear door finisher. Refer to Removal & Installation.
Remove rear door sash inner cover. Refer to Removal & Installation.
Make the work space by cut the butyl-tape part of as shown in figure. Cut the butyl-tape, Refer to Removal & Installation.
Remove rear door glass run lower sash mounting bolts .

Disengage fixing hook of rear door glass run lower sash from hole of rear door panel .

Disengage rear door glass run portions, and then remove rear door glass run lower sash.
INSTALLATION
Note the following item, and then install in the reverse order of removal.
Rear Door Glass Run Nissan Ariya 1st generation
Removal & Installation
ADDITIONAL SERVICE
Perform the additional service referencing with the below table for system work normally.
○: Applicable
| Parts | Work type | Additional servicve | Reference | |
|---|---|---|---|---|
| Replacement | Removal | |||
| Rear door glass run | ○ | ○ | System initialization | Work Procedure |
REMOVAL
Fully open rear door glass.
Remove rear door sash cover. Refer to Removal & Installation.
Remove rear door outside molding. Refer to Removal & Installation.
Disengage rear door glass run from rear door panel according to numerical order 1→5 indicated by arrows as shown in figure, and then remove rear door glass run.
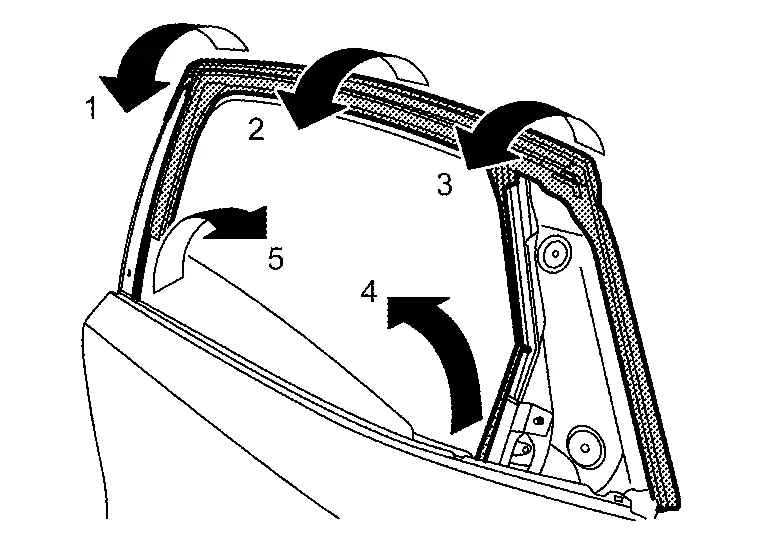
INSTALLATION
Note the following item, and then install in the reverse order of removal.
Rear Door Regulator Nissan Ariya: FE0
Exploded View
For exploded view of rear door regulator, Refer to Exploded View.
Removal & Installation
ADDITIONAL SERVICE
Perform the additional service referencing with the below table for system work normally.
○: Applicable
| Parts | Work type | Additional servicve | Reference | |
|---|---|---|---|---|
| Replacement | Removal | |||
| Rear door regulator | ○ | ○ | System initialization | Work Procedure |
REMOVAL
Remove rear door sealing screen. Refer to Removal & Installation.
Remove rear door glass. Refer to Removal & Installation.
Disconnect rear power window motor harness connector by using remover tool (A) according to numerical order 1→2 indicated by arrows as shown in figure.

Loosen rear door regulator assembly mounting bolt , and then remove rear door regulator assembly mounting bolts .
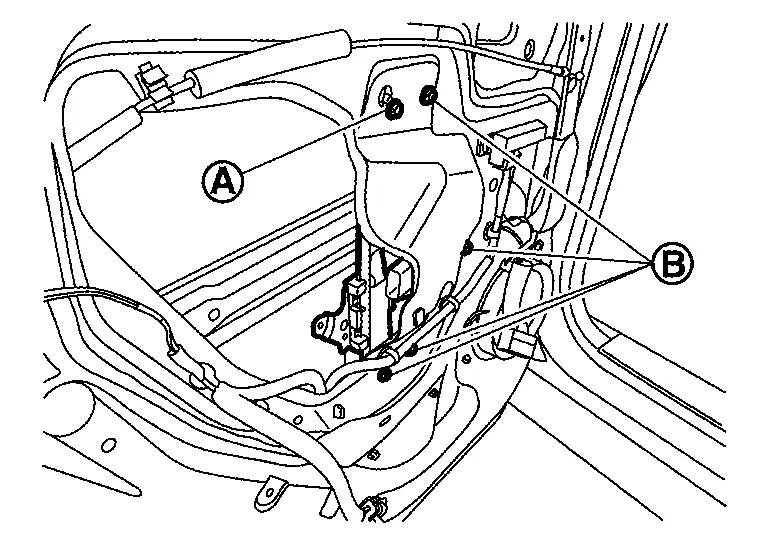
Remove rear door regulator assembly from open part of rear door panel.
INSTALLATION
Note the following items, and then install in the reverse order of removal.
Disassembly & Assembly
ADDITIONAL SERVICE
Perform the additional service referencing with the below table for system work normally.
○: Applicable
| Parts | Work type | Additional servicve | Reference | |
|---|---|---|---|---|
| Replacement | Removal | |||
| Rear door regulator | ○ | ○ | System initialization | Work Procedure |
DISASSEMBLY
Remove rear door regulator assembly. Refer to Removal & Installation.
Remove rear door power window motor mounting bolts, and then remove rear door power window motor.
ASSEMBLY
Note the following item, and then assemble in the reverse order of disassembly.
Inspection
SYSTEM INITIALIZATION
Refer to Work Procedure.
FITTING INSPECTION
Check that the glass is fit securely into the sash groove.
Lower the glass slightly [approximately 10 to 20 mm (0.394 to 0.787 in)], and check that the clearance to the sash is parallel. Loosen the regulator mounting bolts, guide rail mounting bolts, and glass and guide rail mounting bolts to correct the glass position if the clearance between the glass and sash is not parallel.