Removal and Installation
- Front Wheel Hub and Knuckle
- Front Drive Shaft Boot
- Front Drive Shaft
Front Wheel Hub and Knuckle Nissan Ariya 2026
FRONT WHEEL HUB AND KNUCKLE : Exploded View
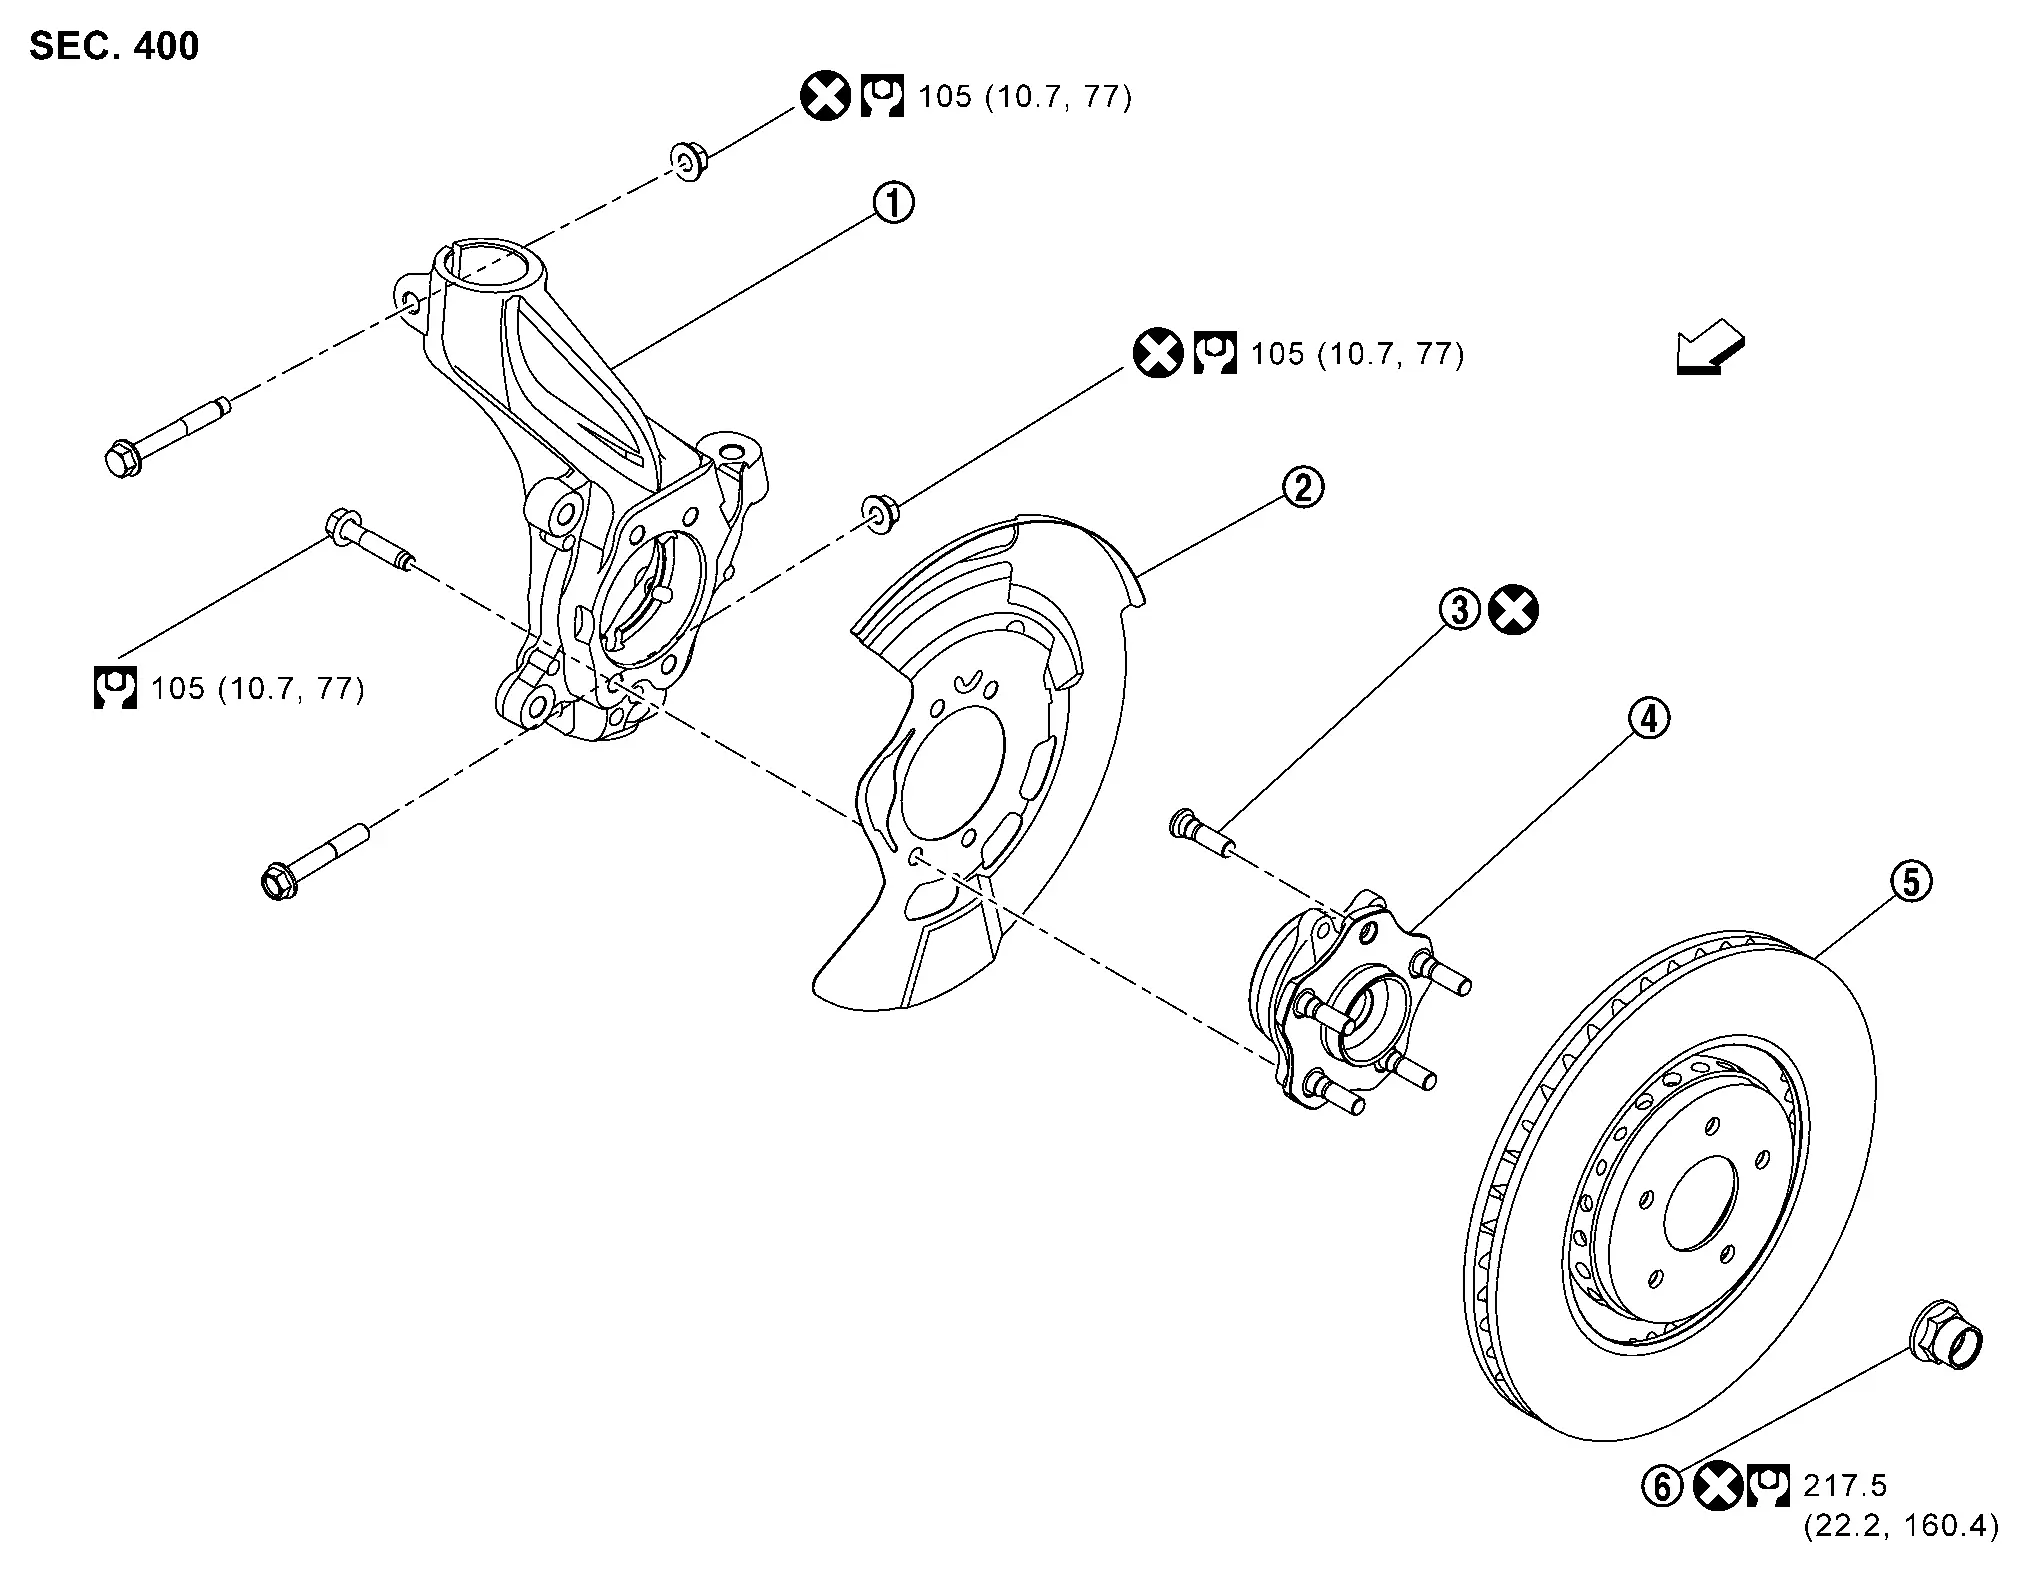
 |
Steering knuckle |  |
Splash guard |  |
Hub bolt |
 |
Wheel hub and bearing assembly |  |
Disc rotor |  |
Wheel hub lock nut |
 |
: N·m (kg-m, ft-lb) | ||||
 |
: Nissan Ariya Vehicle front | ||||
 |
: Always replace after every disassembly. | ||||
FRONT WHEEL HUB AND KNUCKLE : Removal & Installation
Removal and Installation
Remove tires. Refer to Removal & Installation.
Remove front wheel sensor. Refer to Removal & Installation.
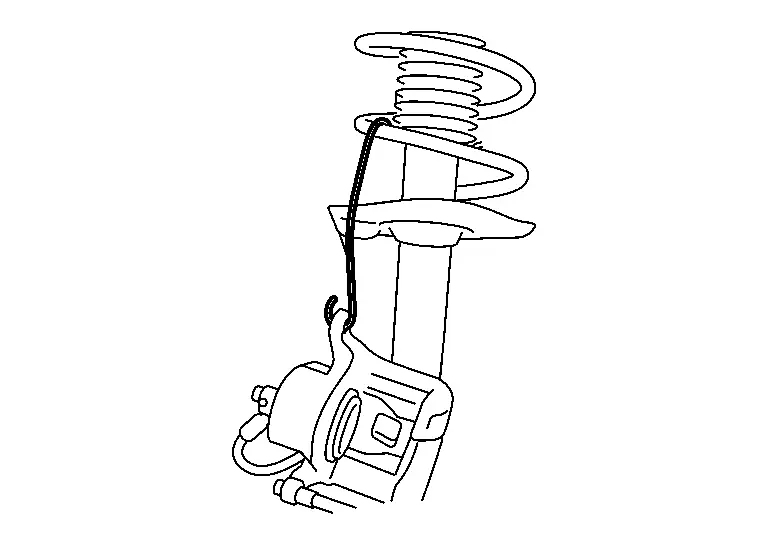
Remove lock plate from strut. Refer to Exploded View.
Remove torque member and brake caliper and hang them in a place where it will not interfere with work.
Remove disc rotor.
Using lock nut chisel (SST: KV40108800) (A), release staked area of wheel hub lock nut.

Loosen wheel hub lock nut, using a hub lock nut wrench (SST: KV40104000) (A).

Remove steering outer socket. Refer to Exploded View.
Remove transverse link. Refer to Removal & Installation.
Patch wheel hub lock nut with a piece of wood. Hammer slightly the wood to disengage wheel hub from drive shaft.
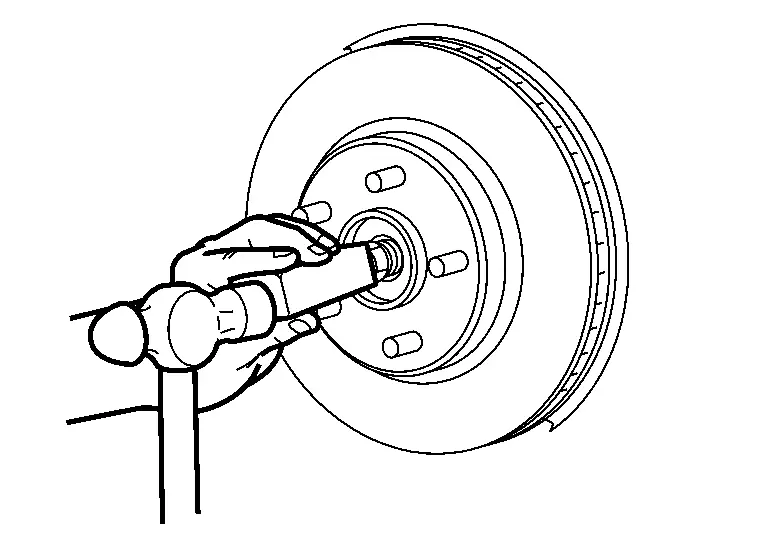
Never place drive shaft joint at an extreme angle.
Also be careful not to overextend slide joint of drive shaft.
Remove wheel hub lock nut.
Remove wheel hub assembly.
Remove splash guard.
Separate the connection of strut and steering knuckle as the following procedure.
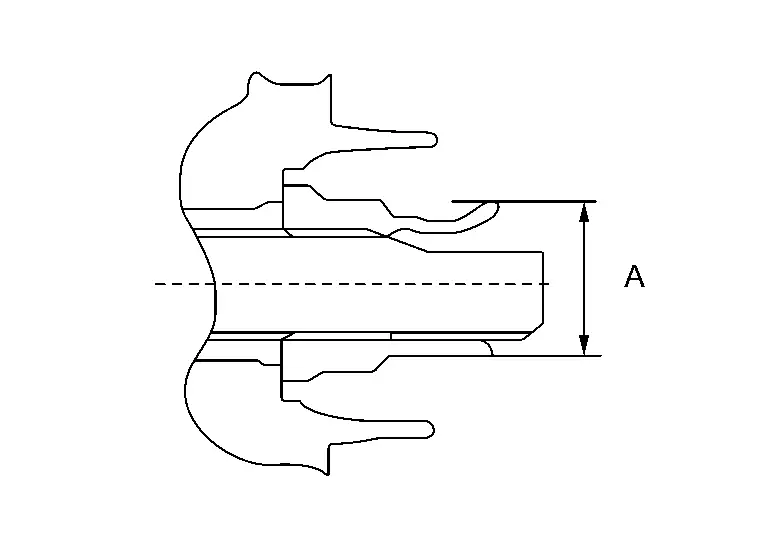
Remove connecting bolts and nuts between strut steering knuckle. Measure the gap (A) of the steering knuckle and determine sharpness (B) of flat chisel, and then put mark on flat chisel as depth limit (B) to enlarge gap.

Sharpness (B) = gap (A) + 2.5 mm (0.098 in)
Enlarge the gap of the steering knuckle with the chisel (A) (commercial service tool) not to surpass sharpness as shown in the figure.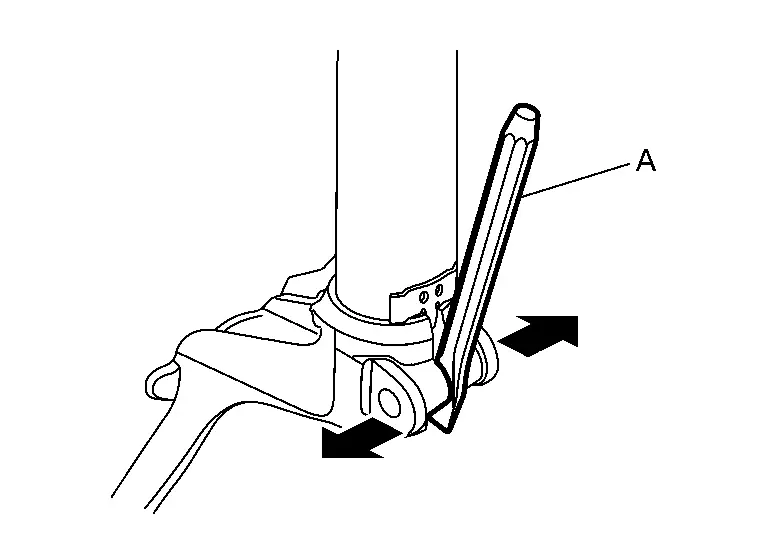
Never place drive shaft joint at an extreme angle.
Also be careful not to overextend slide joint of drive shaft.
Remove steering knuckle.
Remove hub bolt from wheel hub assembly with ball joint remover (commercial service tool) (A).
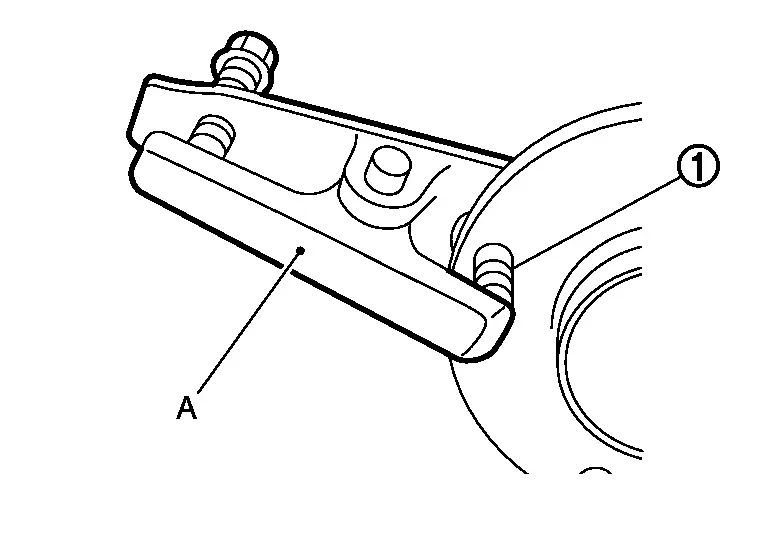
Perform inspection after removal. Refer to Inspection.
INSTALLATION
Note the following, and install in the reverse order of the removal.
Wheel hub
When suspension component parts and steering component parts are removed, perform final tightening under unladen condition with tires on level ground after installation of the component parts.
Place washer
 to hub bolt and install hub bolt with tightening force of nut
 .
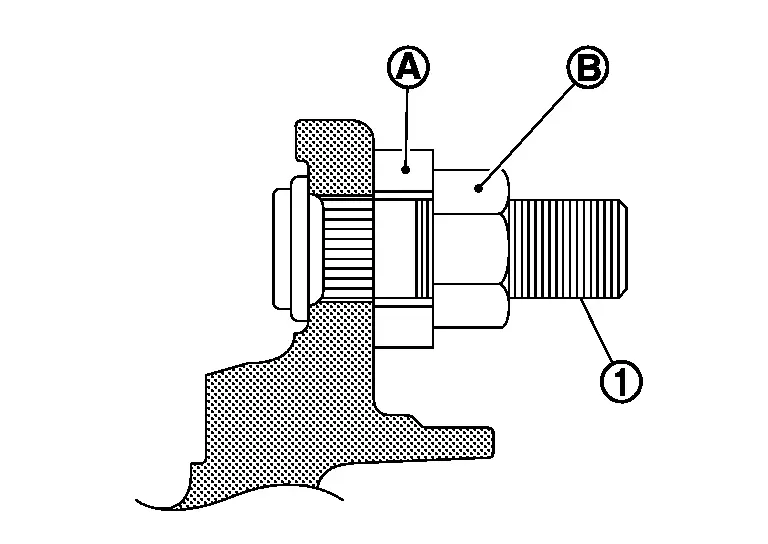
When replacing wheel hub assembly , clean the matching surface of drive shaft and then install drive shaft to wheel hub assembly.
Tighten wheel hub nut to the specified tightening torque. Refer to Exploded View
When reuse wheel hub assembly and disc rotor, install both to align with align marks put during removal.
Perform inspection after installation. Refer to Inspection.
Drive shaft
Clean the matching surface of wheel hub lock nut and wheel hub.
Clean the matching surface of drive shaft and wheel hub. And then apply the following amount of paste [service parts (440037S000)] to surface of joint sub-assembly
.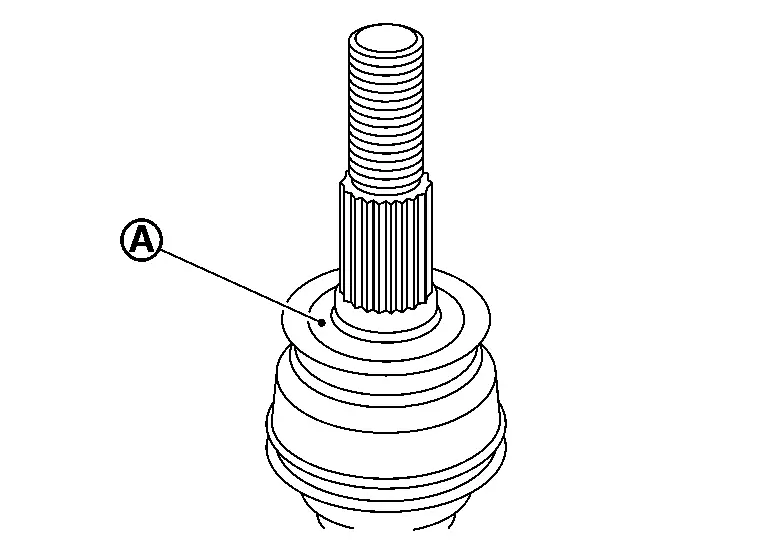
Amount of paste : 1.0 – 3.0 g (0.04 – 0.10 oz) When installing drive shaft to wheel hub, never align drive shaft staked area
and one of hub bolts.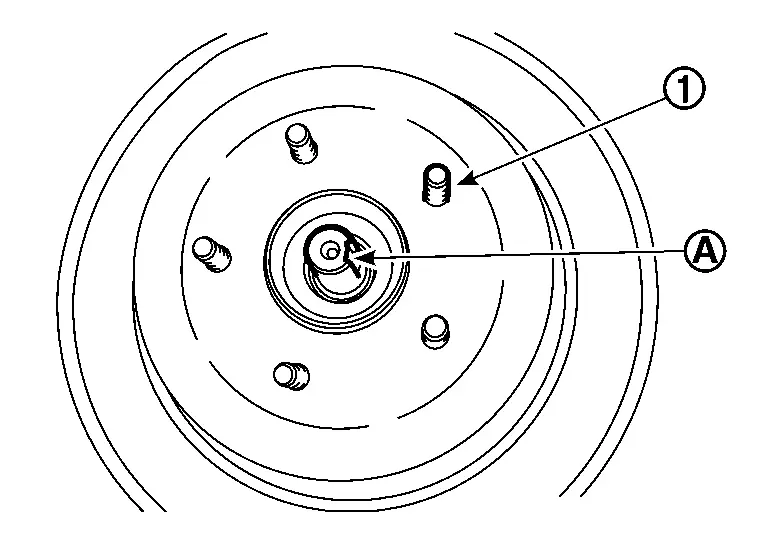
Use the following torque range for tightening the wheel hub lock nut.
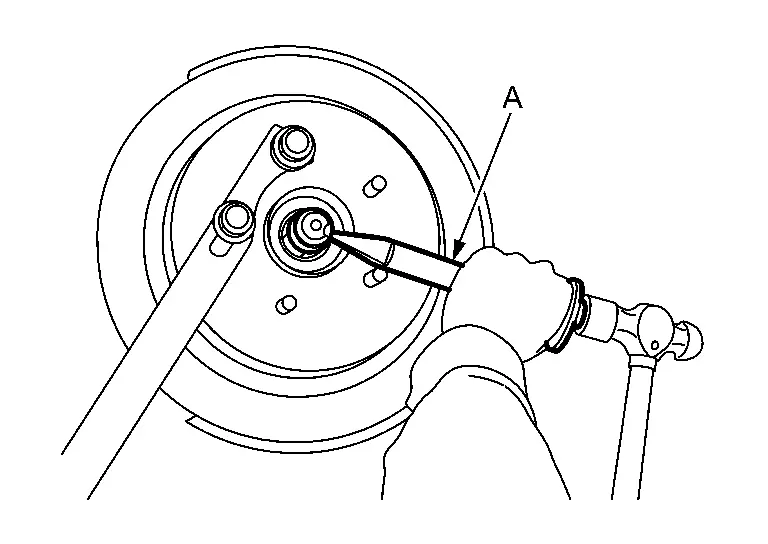
Specified tightening torque :205–230 N·m Using lock nut crimp punch (SST: KV40108700) (A), stake wheel hub lock nut to drive shaft.
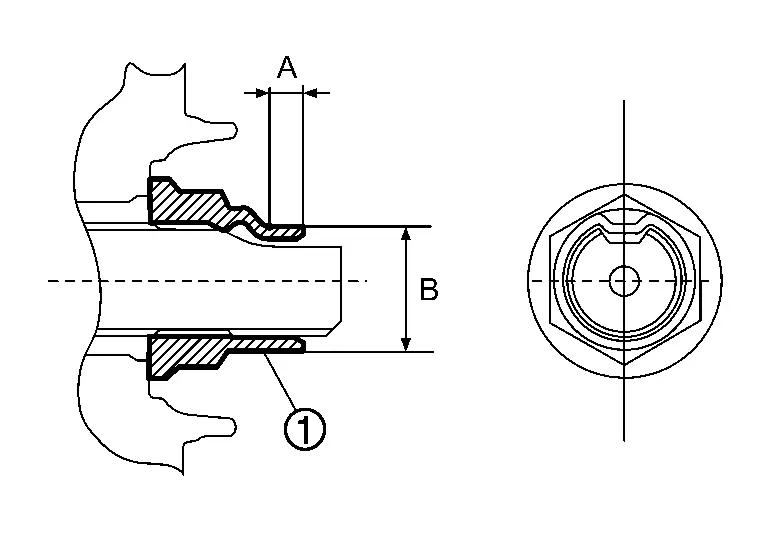
A : 6.2 mm (0.244 in) B : 26.4 – 27.8 mm (1.039 – 1.094 in)
Disc rotor
Align the marks
put during removal when reusing the disc rotor.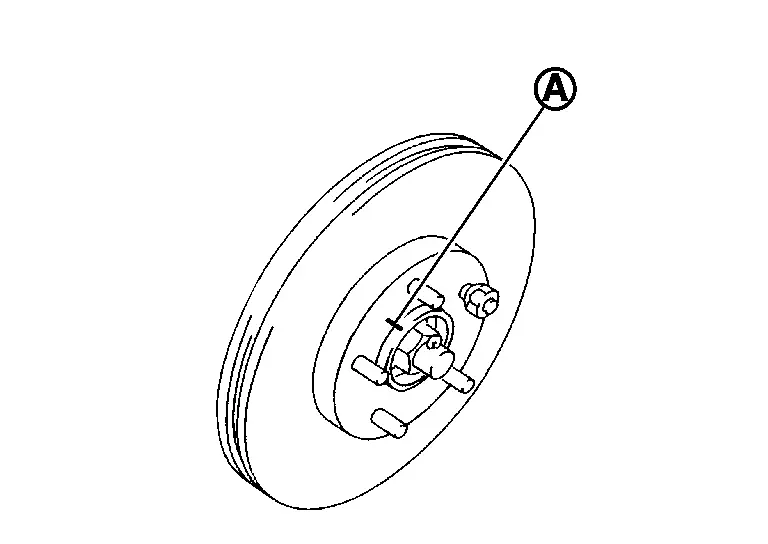
Never drop disc rotor.
Strut Assembly and Steering Knuckle Connection
Align the gap
of steering knuckle to the projection part of strut.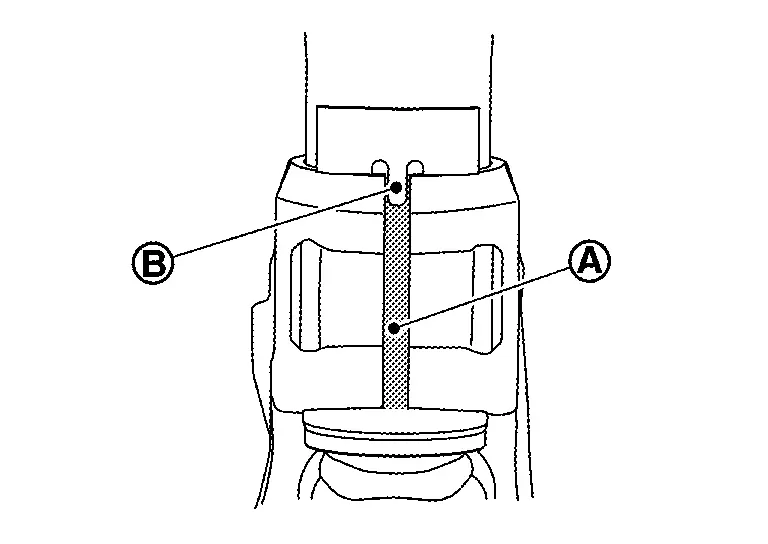
Tighten the mounting bolt and nut with pushing up the steering knuckle
until it contacts lower end of stopper bracket end face, using a suitable jack.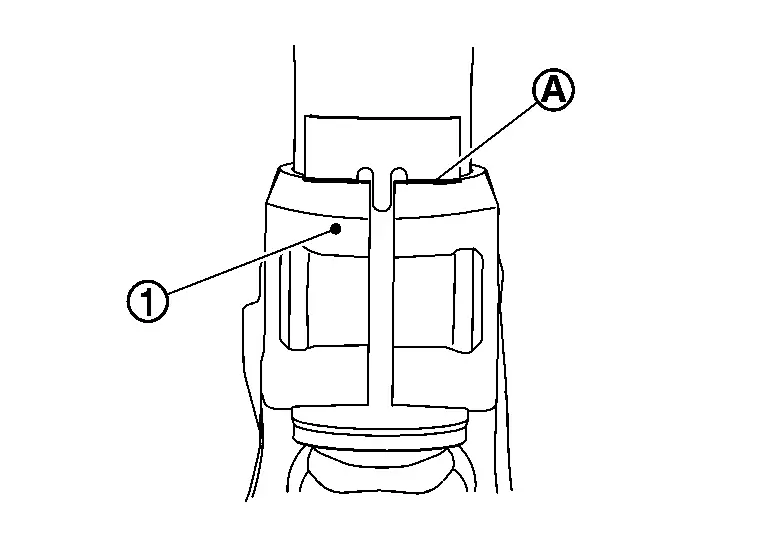
FRONT WHEEL HUB AND KNUCKLE : Inspection
Inspection after removal
Check the following item and if there is abnormality, replace malfunction parts.
Check components for deformation, cracks, and other damage.
Check transverse link and ball joint of outer socket.
Transverse link: Refer to Inspection.
Outer socket: Refer to Inspection.
Inspection after disassembly
Wheel hub
Check wheel hub for deformation, cracks, and other damage. If there is abnormality, replace malfunction parts.
Splash guard
Check splash guard for deformation, cracks, and other damage. If there is abnormality, replace malfunction parts.
Steering knuckle
Check steering knuckle for deformation, cracks, and other damage. If there is abnormality, replace malfunction parts.
Inspection after installation
When replacing disc rotor, check disc rotor for runout. Refer to Periodic Maintenance Operation.
Check front wheel sensor harness for proper connection and installation. Refer to Exploded View.
Check wheel alignment. Refer to Inspection.
Adjust neutral position of steering angle sensor. Refer to Work Procedure.
Front Drive Shaft Boot Nissan Ariya
FRONT DRIVE SHAFT BOOT : Exploded View
Left side
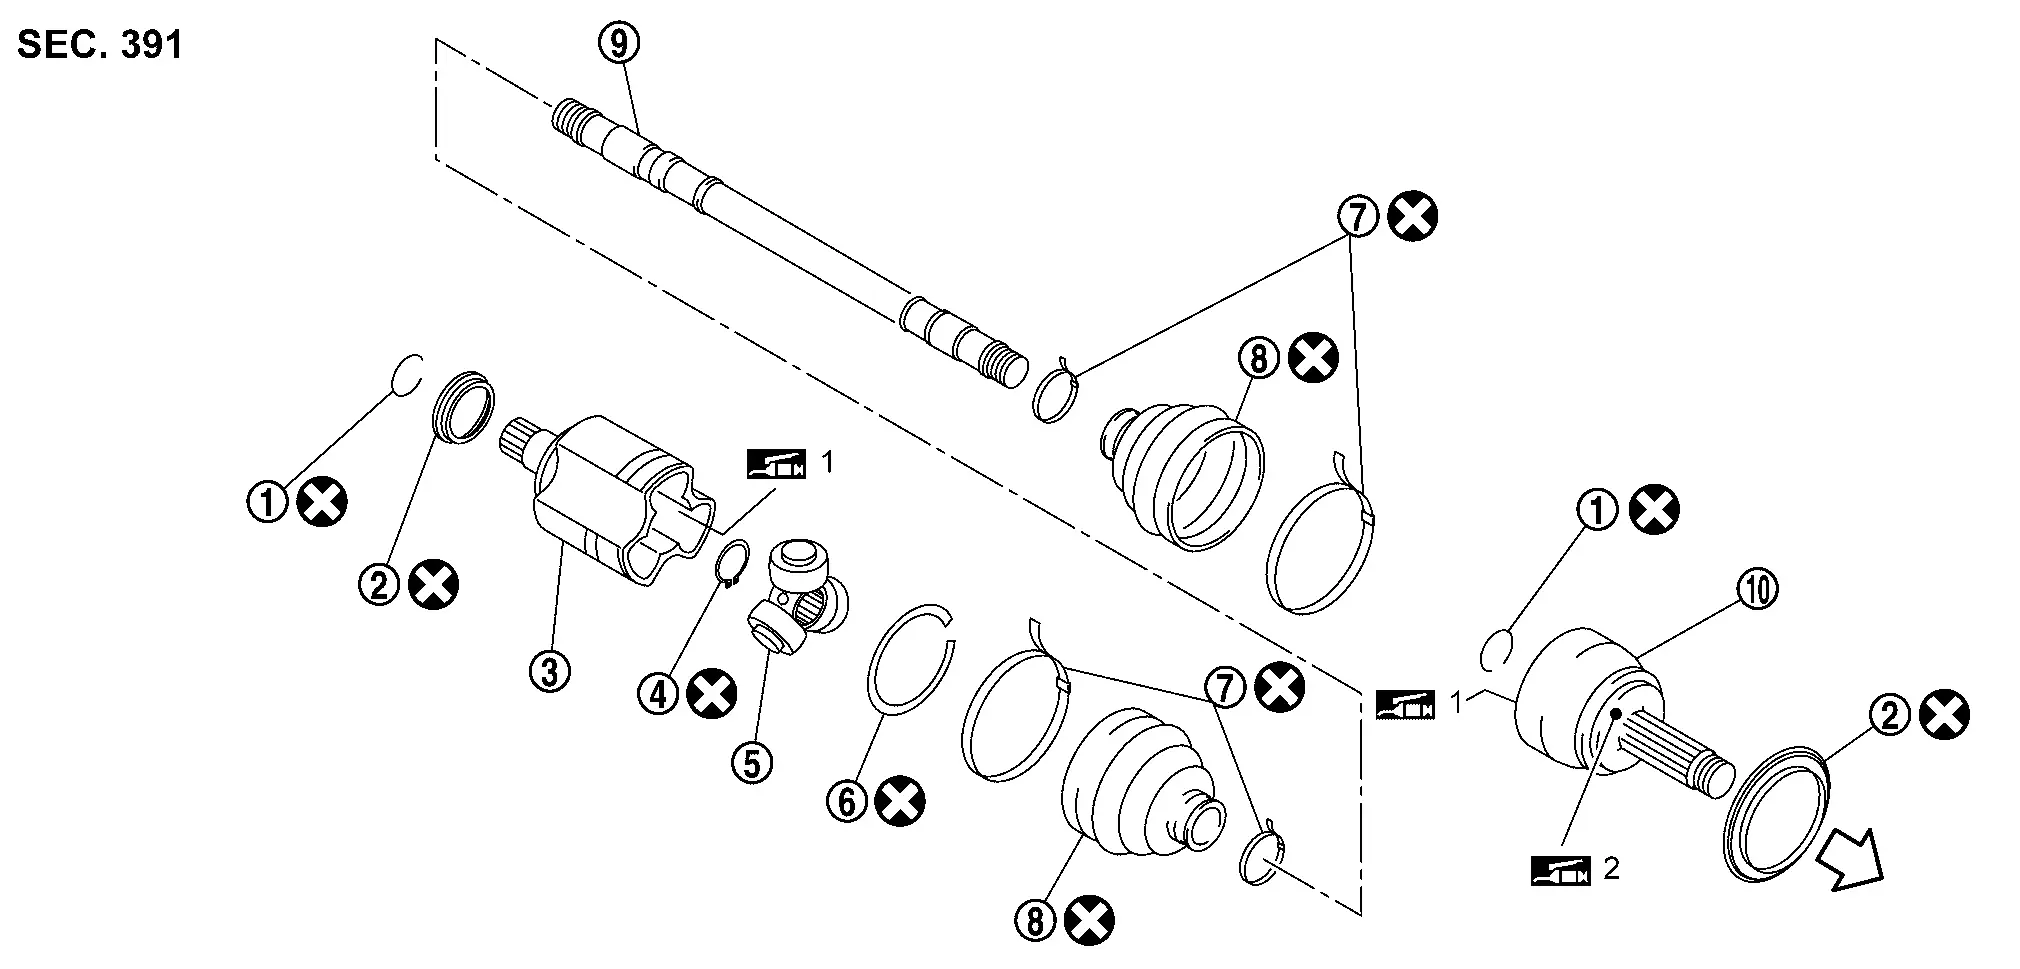
|
Circular clip | |
Dust shield | |
Housing |
|
Snap ring | |
Spider assembly | |
Stopper ring |
 |
Boot band |  |
Boot |  |
Shaft |
 |
Joint sub-assembly | ||||
|
: Wheel side | ||||
 1 |
: Nissan genuine designated grease (Refer to parts catalog) | ||||
| 2 |
: Apply paste [service parts (440037S000)] | ||||
|
: Always replace after every disassembly. | ||||
RIGHT side
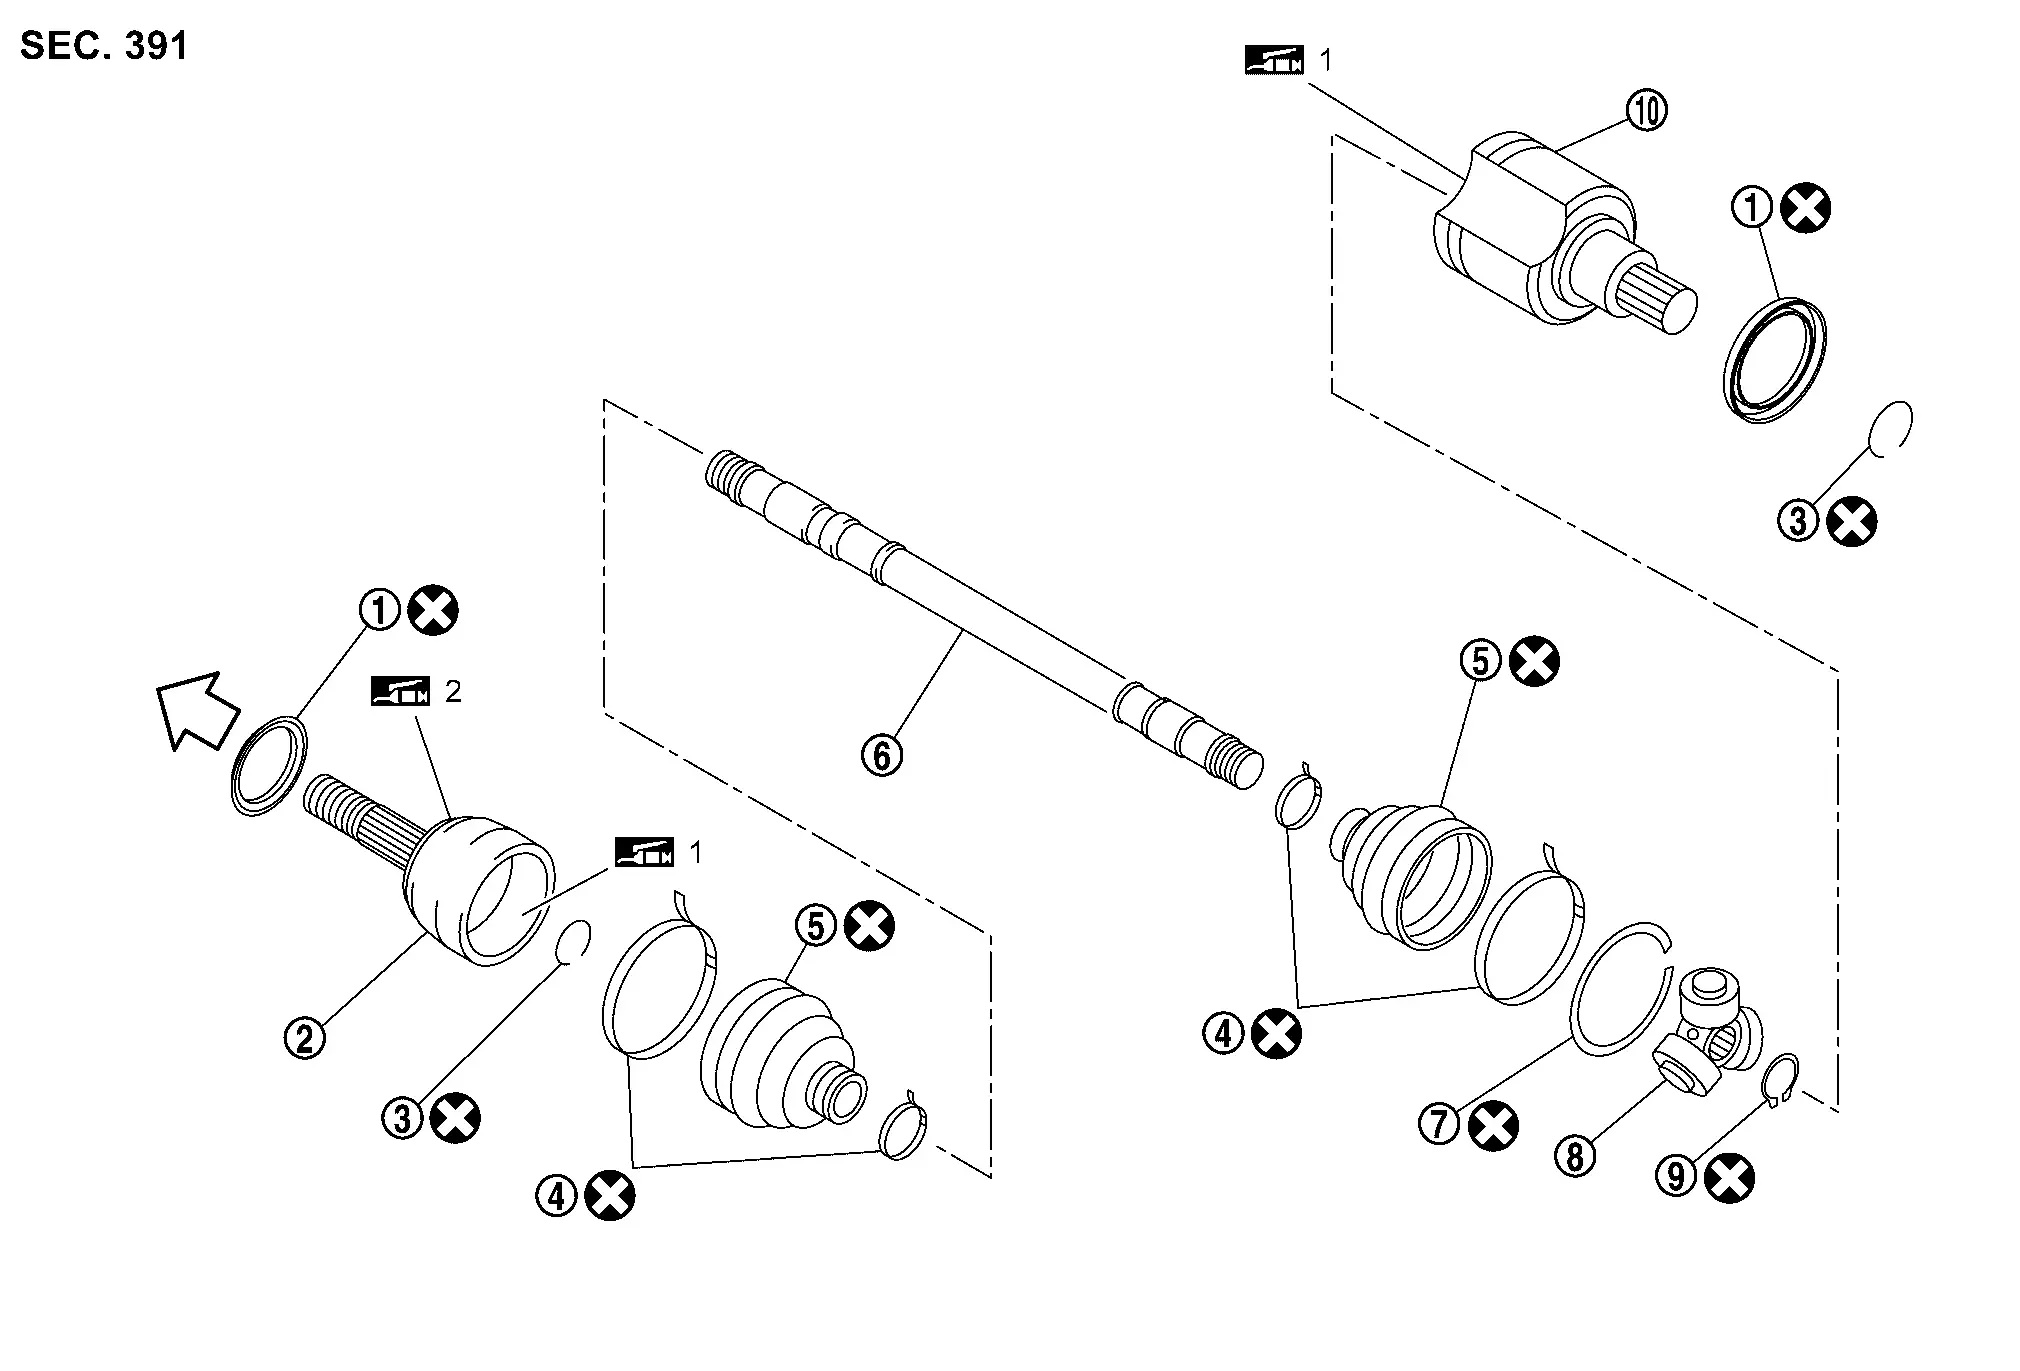
|
Dust shield | |
Joint sub-assembly | |
Circular clip |
|
Boot band | |
Boot | |
Shaft |
|
Stopper ring | |
Spider assembly | |
Snap ring |
|
Housing | ||||
|
: Wheel side | ||||
| 1 |
: Nissan genuine designated grease (Refer to parts catalog) | ||||
| 2 |
: Apply paste [service parts (440037S000)] | ||||
|
: Always replace after every disassembly. | ||||
FRONT DRIVE SHAFT BOOT (WHEEL SIDE) : Removal & Installation
REMOVAL
Remove tires. Refer to Removal & Installation.
Release staked of wheel hub lock nut. Refer to Removal & Installation.
Loosen wheel hub lock nut. Refer to Removal & Installation.
Remove transverse link. Refer to Removal & Installation.
Patch temporarily installed wheel hub lock nut with a piece of wood. Hammer the wood to disengage wheel hub from drive shaft.
Remove wheel hub lock nut. Refer to Removal & Installation.
Separate steering outer socket from steering knuckle. Refer to Exploded View.
Remove drive shaft from wheel hub and bearing assembly.
Remove boot bands, and then separate boot from joint sub-assembly.
Screw drive shaft puller (A) (commercial service tool) into joint sub-assembly screw part to a length of 30 mm (1.18 in) or more. Support drive shaft with one hand and pull out joint sub-assembly from shaft.
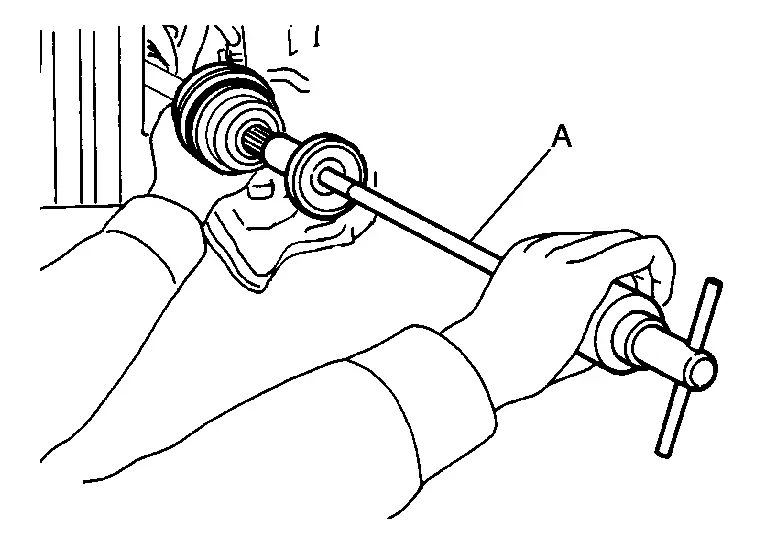
Remove circular clip from shaft.

Remove boot from shaft.
INSTALLATION
While rotating steel ball in the joint sub-assembly, clean the old grease adhering to the joint sub- assembly using a paper cloth.
Fill serration slot joint sub-assembly with NISSAN genuine grease or equivalent until the serration slot and ball groove become full to the brim.
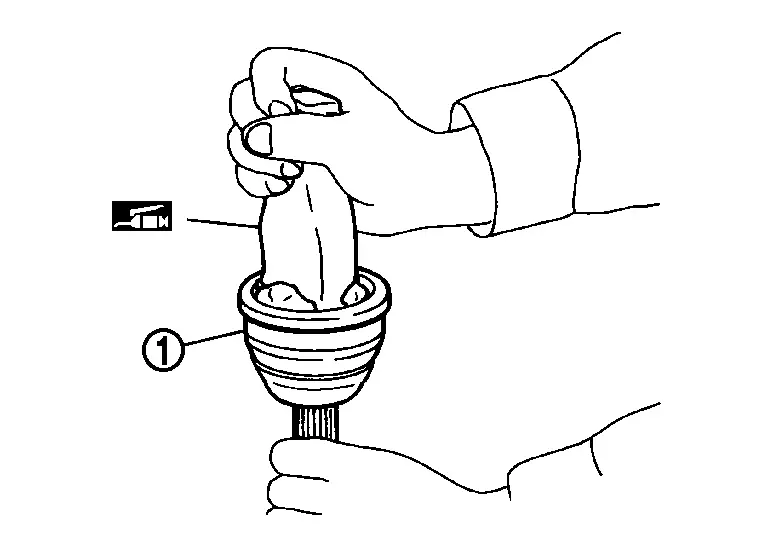
Install boot and boot bands to shaft.
Remove the tape wrapped around the serration on shaft.
Position the circular clip on groove at the shaft edge.
Align both center axles of the shaft edge and joint sub-assembly. Then assemble shaft with joint sub-assembly holding circular clip with tip of screw driver.
Push joint sub-assembly into shaft using plastic hammer.
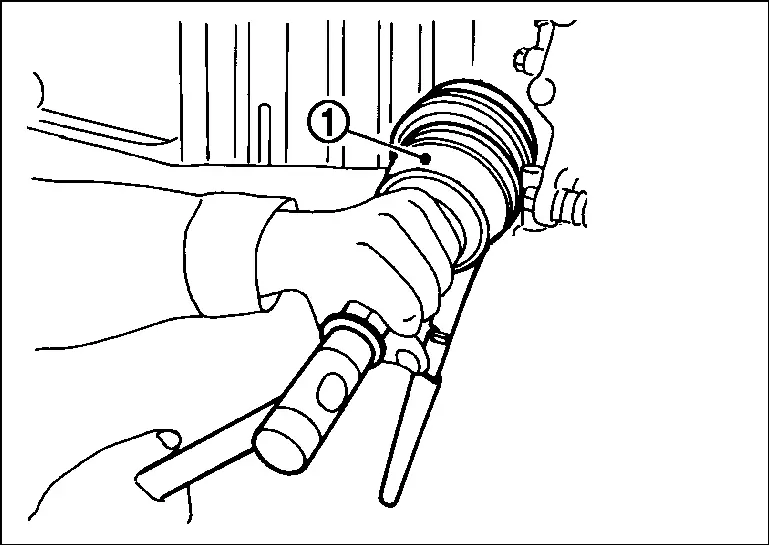
Pull the joint sub-assembly in the axial direction away from transaxle assembly. Confirm that the joint sub assembly cannot be pulled out from shaft of housing assembly.
Fill into the joint sub-assembly inside with the remaining amount of grease from large diameter side of boot.
| Specified value | |
| Total grease amount | : Refer to Service Data. |
Install the boot securely into grooves (indicated by “*”marks) shown in the figure.
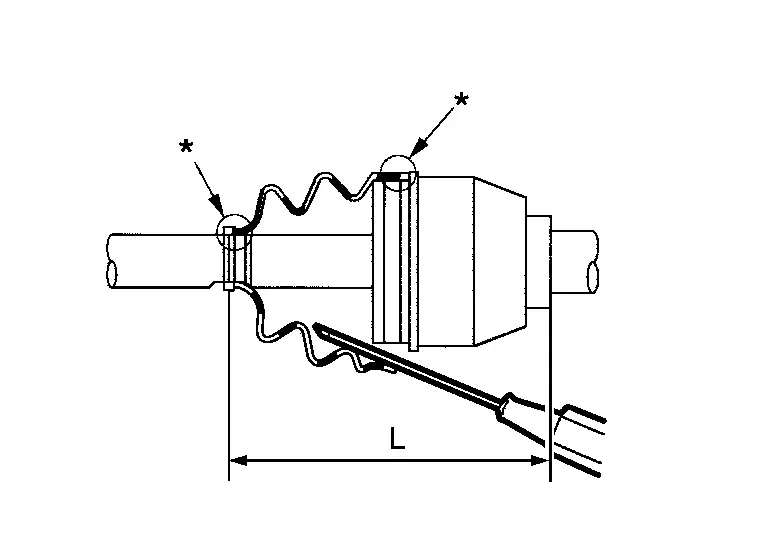
| Specified value | |
| Boot mounting length (L) | : Refer to Service Data. |
To prevent boot from deformation adjust boot installation length (L) to the specified value by inserting suitable tool into the inside of the boot from the large diameter side of boot and discharging inside air.
| Specified value | |
| Length of boot (L) | : Refer to Service Data. |
Secure the large and small ends of the boot with boot bands using the boot band crimp tool (A) (SST: KV40107300).
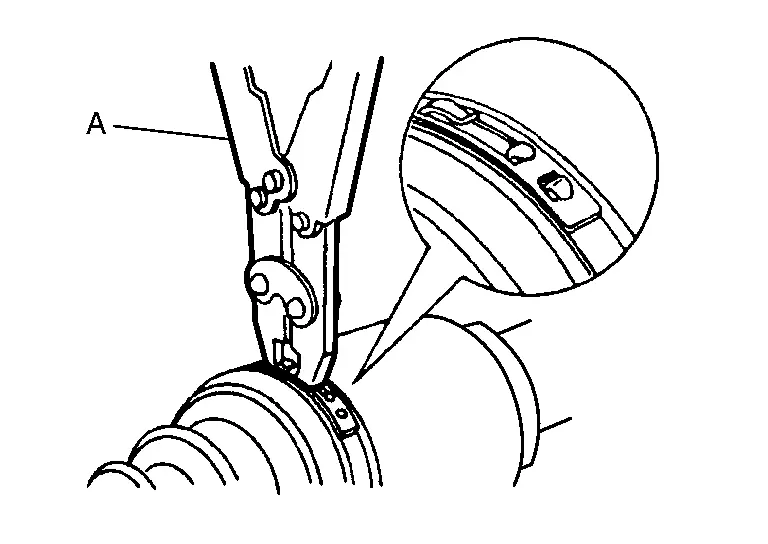
Check that misalignment does not occur when boot is rotated after fixing joint sub-assembly and shaft fixed.
Clean the matching surface of wheel hub lock nut and wheel hub assembly.
Clean the matching surface of drive shaft and wheel hub assembly. And then apply specified amount of paste [service parts (440037S000)] to surface of joint sub-assembly of drive shaft.
| Specified value | |
| Amount paste | : 1.0 – 3.0 g (0.04 – 0.10 oz) |
Insert drive shaft to wheel hub, and then temporarily tighten hub lock nut.
Install transverse link. Refer to Removal & Installation.
Install steering outer socket to steering knuckle. Refer to Removal & Installation.
Tighten wheel hub lock nut to the specified torque.
| Specified tightening torque | : 205 – 230 N·m |
Use the locknut crimping punch (A) (special tool: KV40108700) to crimp wheel hub locknut onto the drive shaft.
Install tires to Nissan Ariya vehicle. Refer to Removal & Installation.
Perform inspection after installation. Refer to Inspection.
FRONT DRIVE SHAFT BOOT (REDUCTION GEAR SIDE) : Removal & Installation
Remove boot after drive shaft is removed from the vehicle.
For drive shaft removal and installation, Refer to Removal and Installation.
For drive shaft disassembly and assembly, refer to Disassembly and Assembly.
FRONT DRIVE SHAFT BOOT : Inspection
INSPECTION AFTER INSTALLATION
Check the following items, and replace the part if necessary.
Check boots for deformation, cracks, grease leakage and other damage.
Move joint up/down, left/right, and in the axial directions. Check for motion that is not smooth and for significant looseness.
Check wheel sensor harness for proper connection. Refer to Exploded View.
Check the wheel alignment. Refer to Inspection.
Adjust neutral position of steering angle sensor. Refer to Work Procedure.
Front Drive Shaft Nissan Ariya first Gen
FRONT DRIVE SHAFT : Exploded View
LEFT SIDE
|
Circular clip | |
Dust shield | |
Housing |
|
Snap ring | |
Spider assembly | |
Stopper ring |
|
Boot band | |
Boot | |
Shaft |
|
Joint sub-assembly | ||||
|
: Wheel side | ||||
| 1 |
: Nissan genuine designated grease (Refer to parts catalog) | ||||
| 2 |
: Apply paste [service parts (440037S000)] | ||||
|
: Always replace after every disassembly. | ||||
RIGHT side
|
Dust shield | |
Joint sub-assembly | |
Circular clip |
|
Boot band | |
Boot | |
Shaft |
|
Stopper ring | |
Spider assembly | |
Snap ring |
|
Housing | ||||
|
: Wheel side | ||||
| 1 |
: Nissan genuine designated grease (Refer to parts catalog) | ||||
| 2 |
: Apply paste [service parts (440037S000)] | ||||
|
: Always replace after every disassembly. | ||||
FRONT DRIVE SHAFT: Removal & Installation
REMOVAL
Remove tires. Refer to Removal & Installation.
Drain oil from the reducer. Refer to Draining.
Remove wheel sensor from steering knuckle. Refer to Removal & Installation.
Remove lock plate from strut. Refer to Exploded View.
Remove torque member mounting bolts, and hang torque member and brake caliper in a place that does not interfere with the work.
Remove disc rotor.
Using lock nut chisel (SST: KV40108800) (A), release staked area of wheel hub lock nut.

Loosen wheel hub lock nut, using a hub lock nut wrench (SST: KV40104000) (A).
Move steering knuckle and then separate connection of drive shaft and wheel hub assembly.
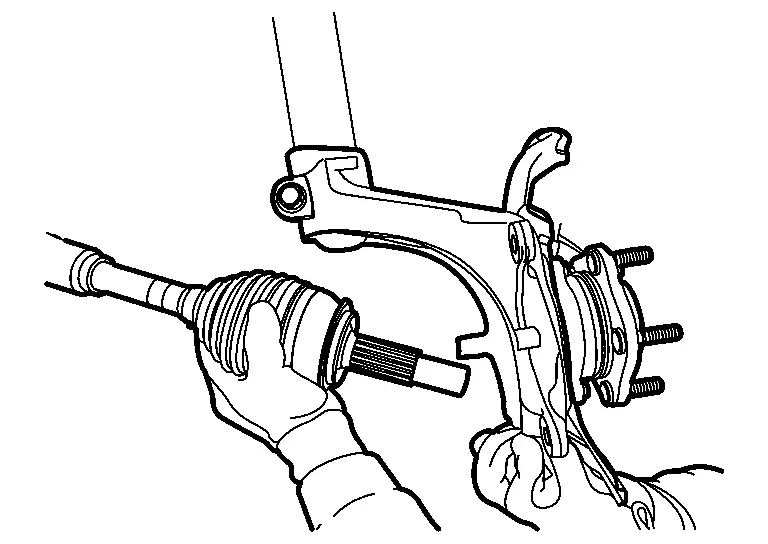
Use the drive shaft attachment (SST: KV40107500) (A) and a sliding hammer (commercial service tool) (B) while inserting tip of the drive shaft attachment between shaft and reduction gear assembly, and then remove drive shaft from reduction gear assembly.
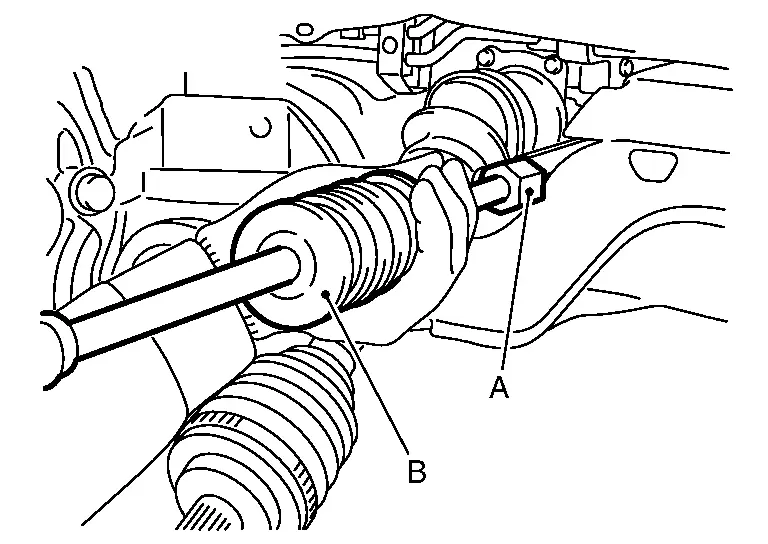
Perform inspection after removal. Refer to Inspection.
INSTALLATION
Note the following, and install in the reverse order of the removal.
Replace side oil seal of reducer. Refer to Removal & Installation.
When inserting drive shaft, attach a protector (special tool: KV38107900) (A) to oil seal to prevent damage to the side oil seal of the reducer. Then, insert drive shaft and slide the slide joint of drive shaft like a hammering to securely install it.
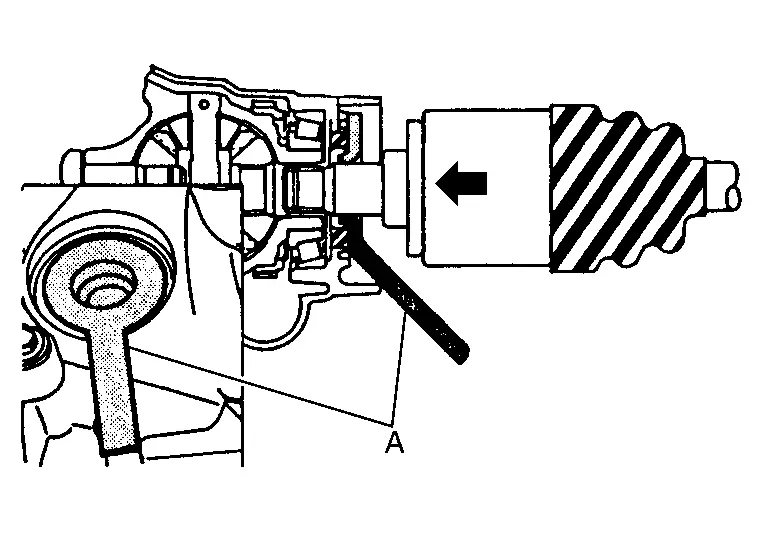
Insert drive shaft to wheel hub, and then temporarily tighten hub lock nut.
Install transverse link. Refer to Removal & Installation.
Install steering outer socket to steering knuckle. Refer to Exploded View.
Install disc rotor.
Install torque member and brake caliper to steering knuckle. Refer to Exploded View.
Install lock plate to strut. Refer to Exploded View.
Install wheel sensor to steering knuckle. Refer to Exploded View.
Tighten wheel hub lock nut to the specified torque.
Specified tightening torque : 205 – 230 N·m Use the locknut crimping punch (A) (special tool: KV40108700) to crimp wheel hub locknut onto the drive shaft.
A : 6.2 mm (0.244 in) B : 26.4 – 27.8 mm (1.039 – 1.094 in) When reuse disc rotor, install disc to align with align mark put during removal.
When suspension component parts and steering component parts are removed, perform final tightening in the grounded state without load after installation of the component parts.
Refill oil in reducer. Refer to Refilling.
Perform inspection after installation. Refer to Inspection.
FRONT DRIVE SHAFT: Disassembly & Assembly
Wheel Side
Disassembly
Fix shaft with a vise.
Remove boot bands, and then remove boot from joint sub-assembly.
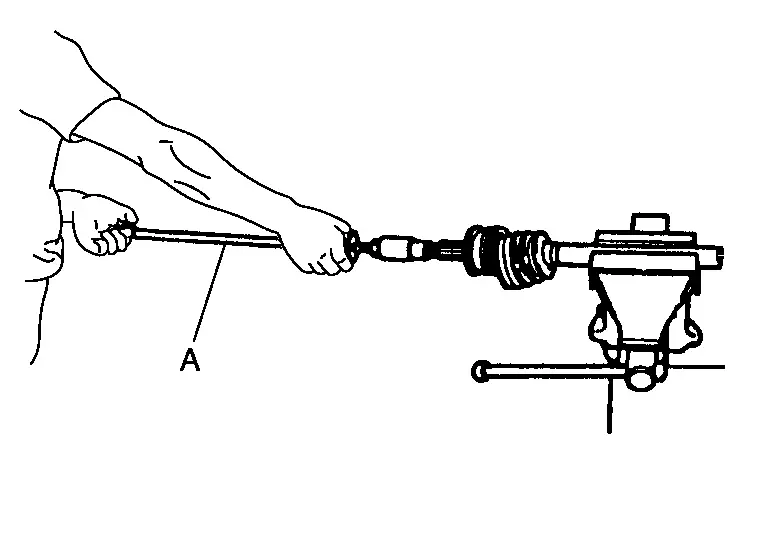
Screw drive shaft puller (A) (commercial service tool) into screw part of joint sub-assembly to a length of 30 mm (1.18 in) or more. Pull out joint sub-assembly from shaft during hammering.
Remove circular clip from shaft.
Remove boot from shaft.
Perform inspection after removal. Refer to Inspection.
Assembly
While rotating steel ball in the joint sub-assembly, clean the old grease adhering to the joint sub- assembly using a paper cloth.
Fill serration slot joint sub-assembly with NISSAN genuine grease or equivalent until the serration slot and ball groove become full to the brim.
Install boot and boot bands to shaft.
Remove the tape wrapped around the serration on shaft.
Position the circular clip on groove at the shaft edge.
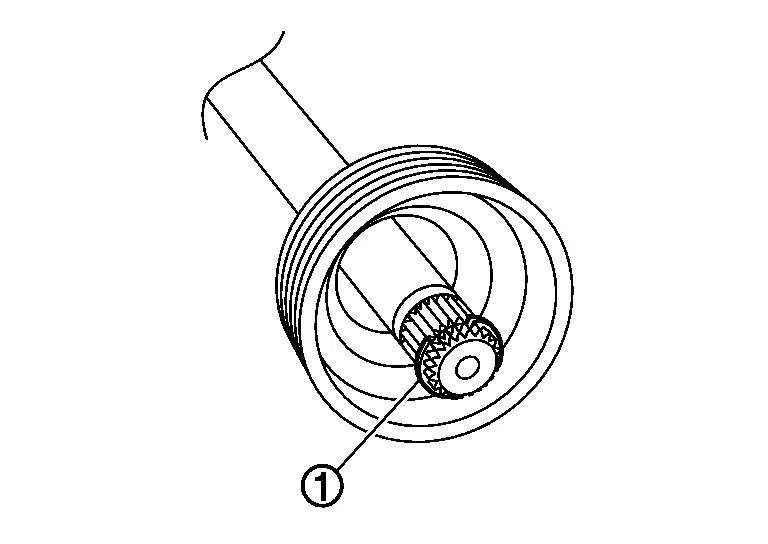
Align both center axles of the shaft edge and joint sub-assembly. Then assemble shaft with joint sub-assembly holding circular clip with tip of screw driver.
Push joint sub-assembly into shaft using plastic hammer.

Pull the joint sub-assembly in the axial direction away from transaxle assembly. Confirm that the joint sub assembly cannot be pulled out from shaft.
Fill into the joint sub-assembly inside with the remaining amount of grease from large diameter side of boot.
| Total grease amount | : Refer to Service Data. |
Install the boot securely into grooves (indicated by “*”marks) shown in the figure.

To prevent boot from deformation adjust boot installation length (L) to the specified value by inserting suitable tool into the inside of the boot from the large diameter side of boot and discharging inside air.
| Specified Value | |
| Length of boot (L) | : Refer to Service Data. |
Secure the large and small ends of the boot with boot bands using the boot band crimp tool (A) (SST: KV40107300).
| Specified value | |
| M | : 1.0 - 4.0 mm (0.04 - 0.16 in) |
Check that misalignment does not occur when boot is rotated after fixing joint sub-assembly and shaft fixed.
Reducer Side
Disassembly
Fix shaft with a vise.
Remove boot bands, and then remove boot from housing.
Remove stopper ring from housing.
Put align mark on housing and shaft and then remove housing from shaft.
Put align mark on spider assembly and shaft and then remove housing from shaft.

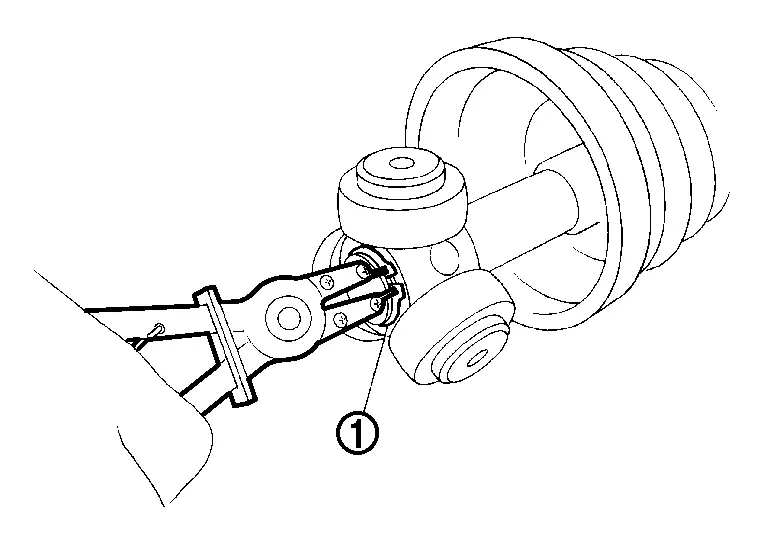
Remove snap ring  and the remove spider assembly from shaft.
Remove boot from shaft.
Remove dust shield from housing assembly.
Preform inspection after disassembly. Refer to Inspection.
Assembly
Clean old grease adhered on housing with paper cloth.
Install dust shield to housing.
Install circle clip to housing.
Install boot bands and boot to shaft.
Never reuse boot bands and boot.
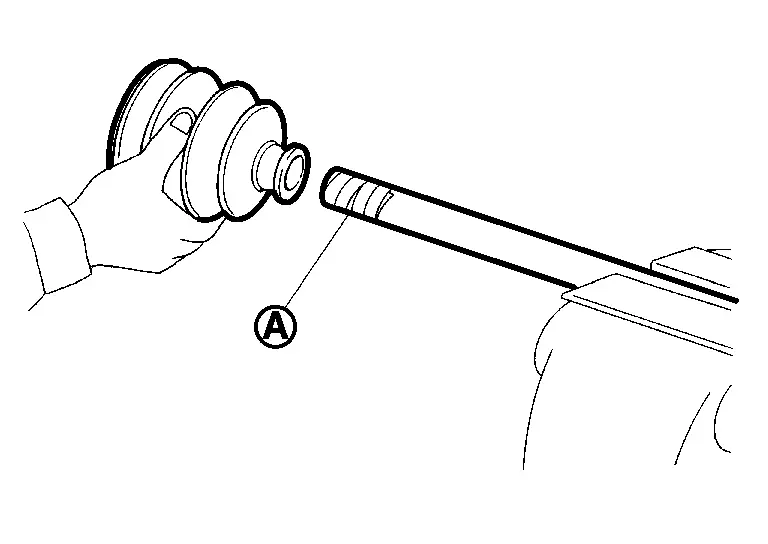
Remove tape around serration of shaft.
Align both marks on shaft and serration that are put during removal of spider assembly and then assemble them so that the chamfered part of serration part is on shaft side.
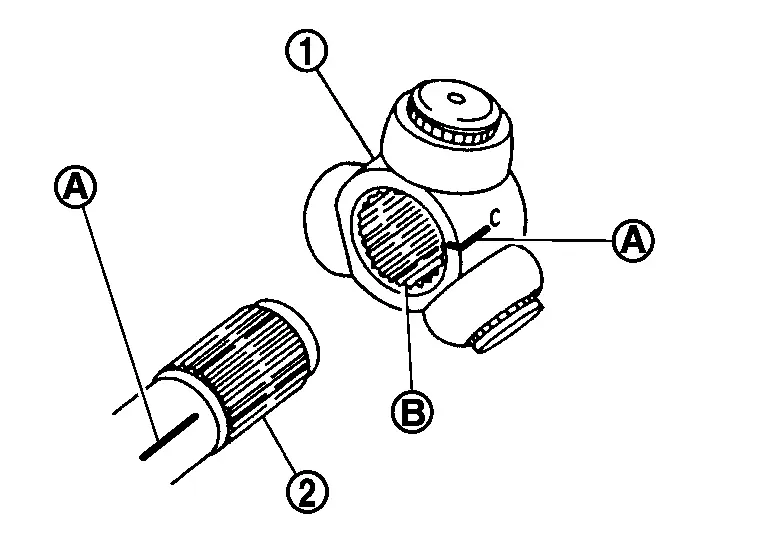
Secure spider assembly onto shaft with snap ring.
Apply the appropriate amount of grease to spider assembly and sliding surface.
Fill spider assembly and housing inside with the following amount of NISSAN genuine grease (Refer to - "Parts Catalogue)
| Specified Value | |
| Specified amount of grease | : Refer to Service Data. |
Align both marks put during removal of housing and then install to shaft.
Install stopper ring.
Install boot securely into grooves (indicated by “*”marks) shown in the figure.
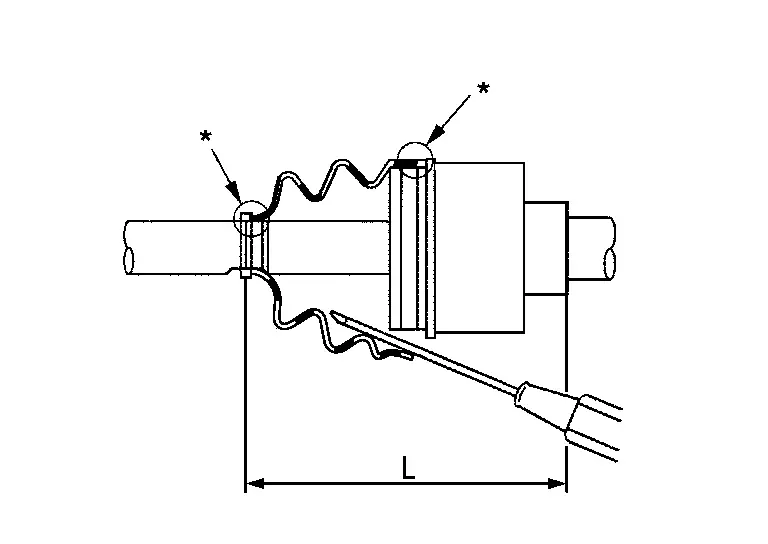
To prevent from deformation of the boot, adjust the boot installation length to the value shown below (L) by inserting the suitable tool into the inside of boot from the large diameter side of boot and discharging inside air.
| Specified Value | |
| Boot installation length (L) | : Refer to Service Data. |
Secure the small end of the boot with boot bands using the boot band crimping tool (SST: KV40107300) (A) as shown in the figure.
| Specified value | |
| M | : 1.0 - 4.0 mm (0.04 - 0.16 in) |
Secure the large end of the boot with boot band the boot band crimping tool (SST: KV40107310) (A).
Set boot band to the drive shaft boot groove and temporarily fix pawl
of boot band to of boot band.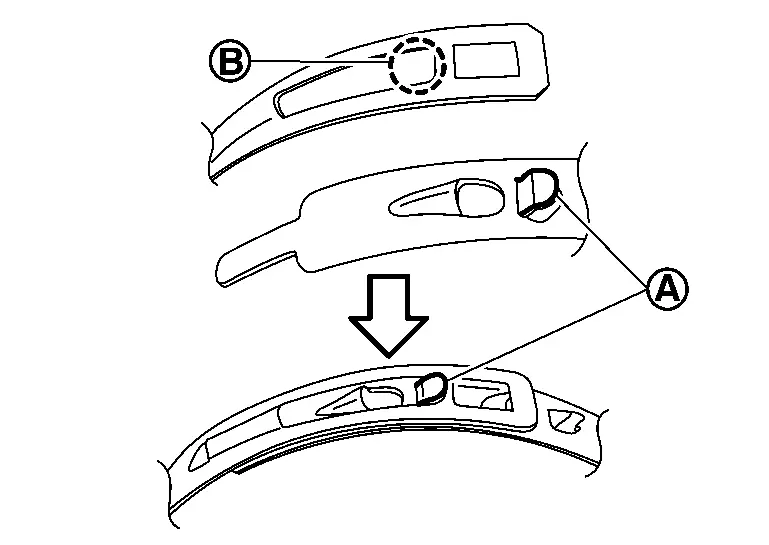
Pull protrusion of boot band tighten with boot band crimping tool (SST: KV40107310) (A) in the direction shown by arrows (
 ).

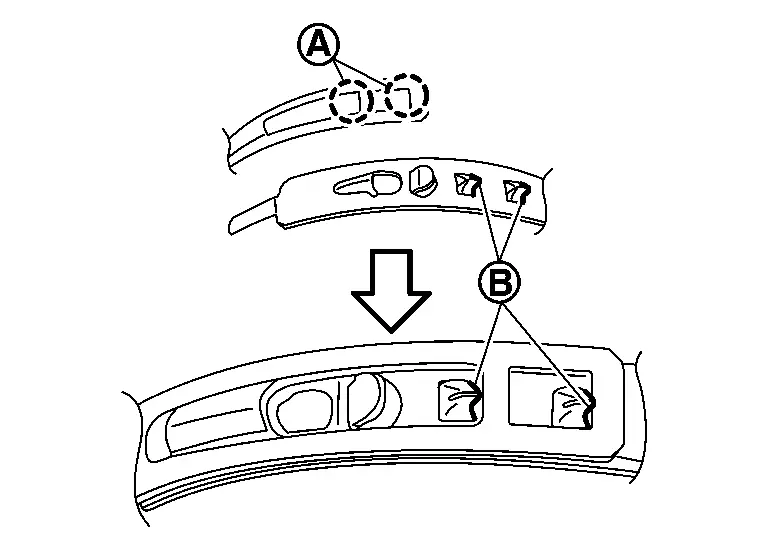
Securely install boot band
to boot band pawl .
Check that misalignment between housing and shaft does not occur when boot is rotated after fixing.
FRONT DRIVE SHAFT : Inspection
INSPECTION AFTER REMOVAL
Check the following item and if there is abnormality, replace malfunction parts.
Move joint up/down, left/right, and in the axial directions. Check motion of joint for smoothness and significant looseness.
Check boot for crack, damage and grease leakage
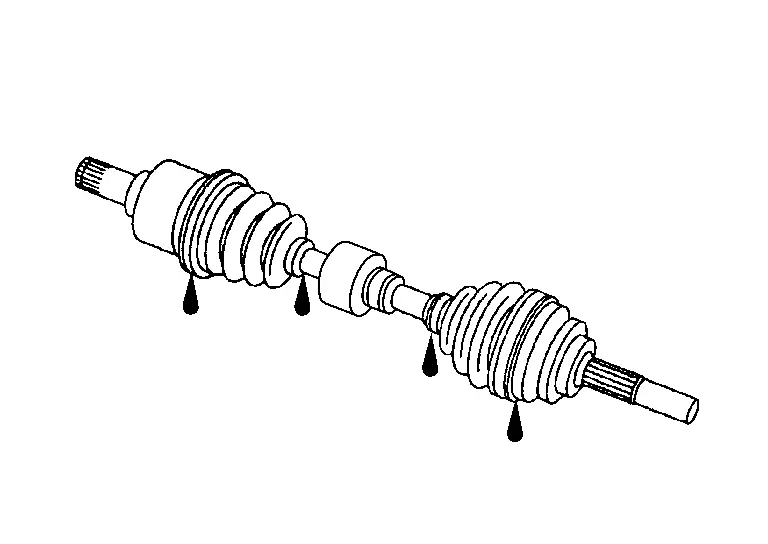
INSPECTION AFTER DISASSEMBLY
Check the following item and if there is abnormality, replace malfunction parts.
Shaft
Check shaft for runout, cracks, or other damage.
Joint Sub-Assembly (Wheel Side)
Check the following:
Joint sub-assembly for rough rotation and excessive axial looseness
Joint sub-assembly inside for entry of foreign material
Joint sub-assembly inside for compression scars, cracks, and fractures.
Housing and Spider assembly
Check roller contact surface of housing and roller contact surface spider assembly for scratch or wear.
INSPECTION AFTER INSTALLATION
Check wheel sensor harness for proper connection. Refer to Exploded View.
Check wheel alignment. Refer to Inspection.
Adjust neutral position of steering angle sensor. Refer to Work Procedure.