Dcm(telematics Transceiver)
- Removal
- Installation
Removal
REMOVAL
The necessary procedures (adjustment, calibration, initialization or registration) that must be performed after parts are removed and installed, or replaced during DCM (telematics transceiver) removal/installation are shown below.
Necessary Procedures After Parts Removed/Installed/ReplacedReplaced Part or Performed Procedure | Necessary Procedures | Effect/Inoperative Function When Necessary Procedures are not Performed | Link |
|---|---|---|---|
DCM (telematics transceiver) |
DCM activation |
Safety Connect System |
 |
Code registration |
Telematics System |
 |
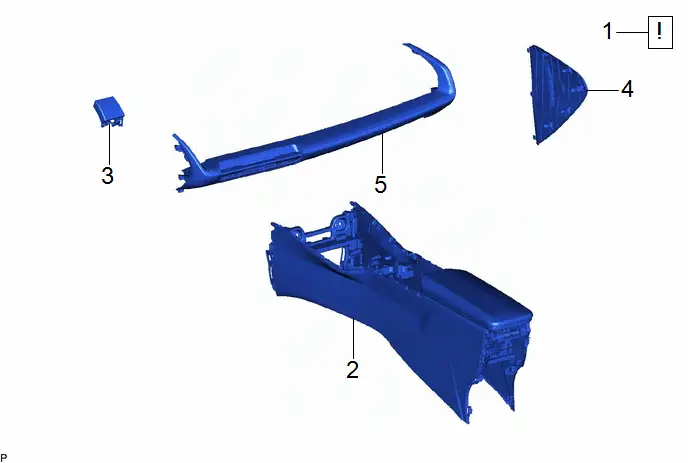
Procedure | Part Name Code |  |  |  |
|
|---|---|---|---|---|---|
1 |
PRECAUTION |
- |
 |
- |
- |
2 |
REAR CONSOLE BOX ASSEMBLY |
58910C |
- |
- |
- |
3 |
LOWER CENTER INSTRUMENT CLUSTER FINISH PANEL SUB-ASSEMBLY |
55406B |
- |
- |
- |
4 |
INSTRUMENT SIDE PANEL LH |
55318C |
- |
- |
- |
5 |
NO. 2 INSTRUMENT PANEL GARNISH SUB-ASSEMBLY WITH AIR CONDITIONING CONTROL ASSEMBLY |
- |
- |
- |
- |
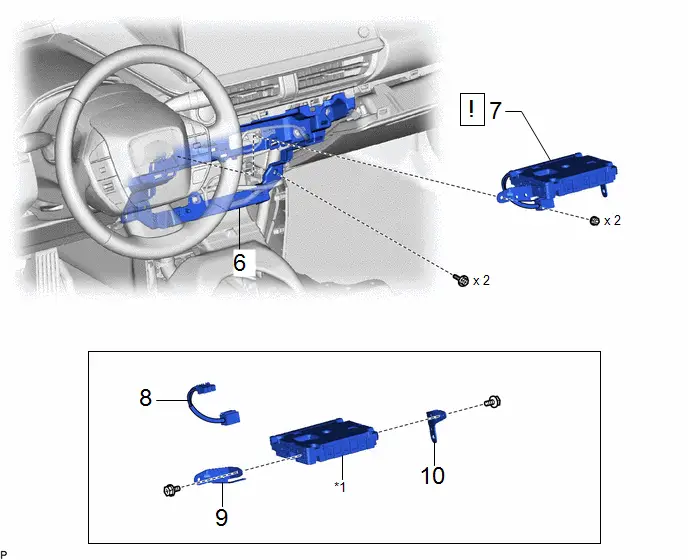
Procedure | Part Name Code |  |  |  |
|
|---|---|---|---|---|---|
6 |
INSTRUMENT PANEL SAFETY PAD SUB-ASSEMBLY |
- |
- |
- |
- |
7 |
DCM (TELEMATICS TRANSCEIVER) WITH BRACKET |
- |
 |
- |
- |
8 |
ANTENNA CORD SUB-ASSEMBLY |
86101S |
- |
- |
- |
9 |
NO. 1 TELEPHONE BRACKET |
86719A |
- |
- |
- |
10 |
NO. 2 TELEPHONE BRACKET |
86719B |
- |
- |
- |
*1 |
DCM (TELEMATICS TRANSCEIVER) |
- |
- |
PROCEDURE
1. PRECAUTION
 |
Click here |

2. REMOVE REAR CONSOLE BOX ASSEMBLY
Click here 

3. REMOVE LOWER CENTER INSTRUMENT CLUSTER FINISH PANEL SUB-ASSEMBLY
Click here 

4. REMOVE INSTRUMENT SIDE PANEL LH
Click here 

5. REMOVE NO. 2 INSTRUMENT PANEL GARNISH SUB-ASSEMBLY WITH AIR CONDITIONING CONTROL ASSEMBLY
Click here 

6. SEPARATE INSTRUMENT PANEL SAFETY PAD SUB-ASSEMBLY

7. REMOVE DCM (TELEMATICS TRANSCEIVER) WITH BRACKET
HINT:
The illustration shown is an example only. The illustration may differ from the actual parts according to the model.
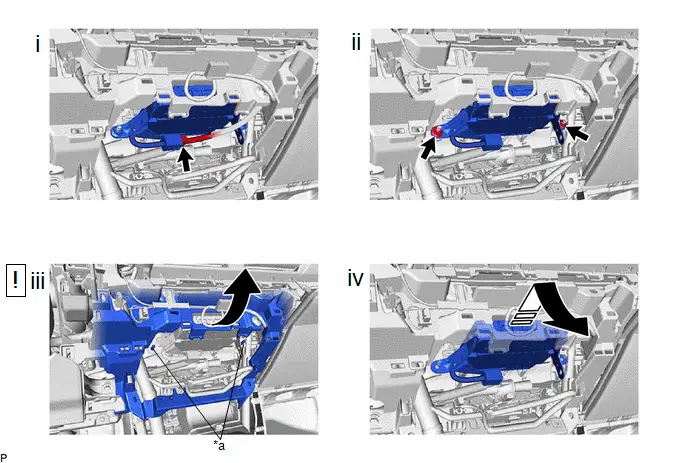
*a |
Stud Bolt |
- |
- |
 |
Remove in this Direction |
- |
- |
(1) Disconnect the connector.
(2) Remove the 2 nuts.
(3) As shown in the illustration, pull the instrument panel safety pad sub-assembly a small amount to secure enough space to remove the DCM (telematics transceiver) with bracket from the 2 stud bolts.
(4) Remove the DCM (telematics transceiver) with bracket as shown in the illustration.
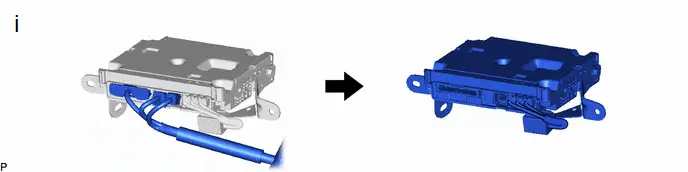
(1) Disconnect each connector.
8. REMOVE ANTENNA CORD SUB-ASSEMBLY

9. REMOVE NO. 1 TELEPHONE BRACKET

10. REMOVE NO. 2 TELEPHONE BRACKET

Installation
INSTALLATION
COMPONENTS (INSTALLATION)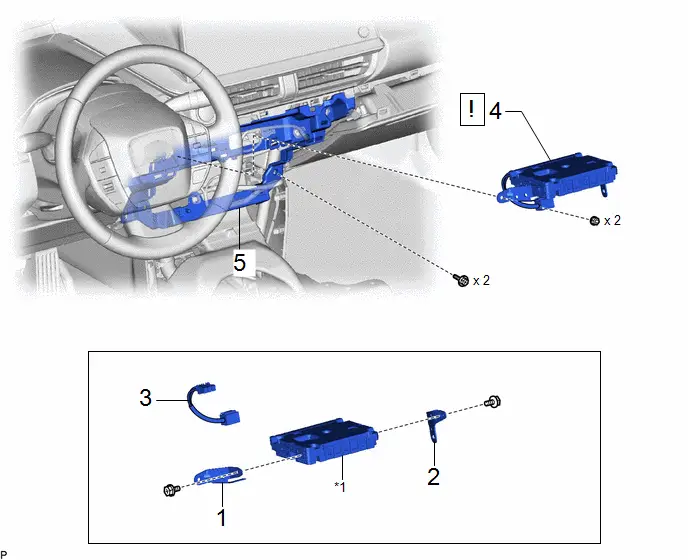
Procedure | Part Name Code |  |  |  |
|
|---|---|---|---|---|---|
1 |
NO. 1 TELEPHONE BRACKET |
86719A |
- |
- |
- |
2 |
NO. 2 TELEPHONE BRACKET |
86719B |
- |
- |
- |
3 |
ANTENNA CORD SUB-ASSEMBLY |
86101S |
- |
- |
- |
4 |
DCM (TELEMATICS TRANSCEIVER) WITH BRACKET |
- |
 |
- |
- |
5 |
INSTRUMENT PANEL SAFETY PAD SUB-ASSEMBLY |
- |
- |
- |
- |
*1 |
DCM (TELEMATICS TRANSCEIVER) |
- |
- |
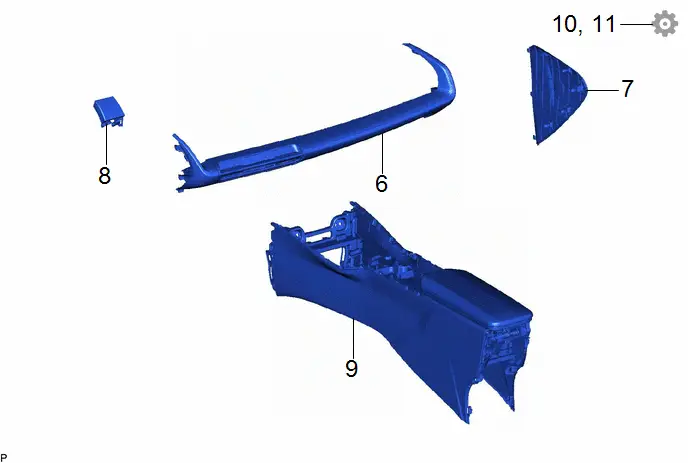
Procedure | Part Name Code |  |  |  |
|
|---|---|---|---|---|---|
6 |
NO. 2 INSTRUMENT PANEL GARNISH SUB-ASSEMBLY WITH AIR CONDITIONING CONTROL ASSEMBLY |
- |
- |
- |
- |
7 |
INSTRUMENT SIDE PANEL LH |
55318C |
- |
- |
- |
8 |
LOWER CENTER INSTRUMENT CLUSTER FINISH PANEL SUB-ASSEMBLY |
55406B |
- |
- |
- |
9 |
REAR CONSOLE BOX ASSEMBLY |
58910C |
- |
- |
- |
10 |
PERFORM DCM ACTIVATION |
- |
- |
- |
 |
11 |
PERFORM REGISTRATION |
- |
- |
- |
 |
PROCEDURE
1. INSTALL NO. 1 TELEPHONE BRACKET
2. INSTALL NO. 2 TELEPHONE BRACKET
3. INSTALL ANTENNA CORD SUB-ASSEMBLY
4. INSTALL DCM (TELEMATICS TRANSCEIVER) WITH BRACKET
HINT:
The illustration shown is an example only. The illustration may differ from the actual parts according to the model.
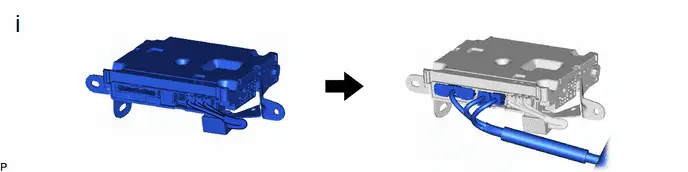
(1) Connect each connector.
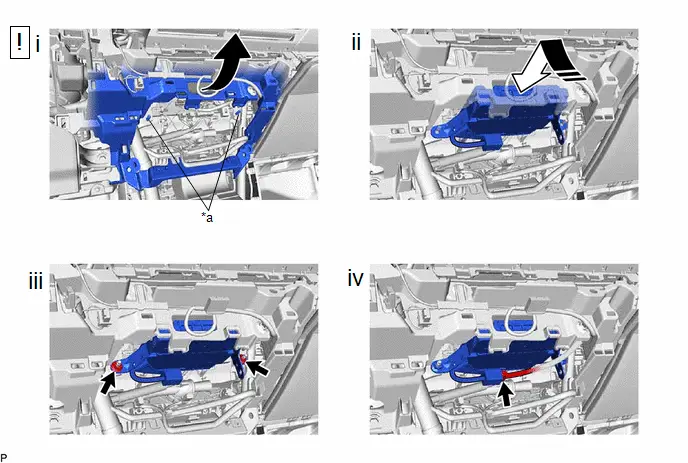
*a |
Stud Bolt |
- |
- |
 |
Install in this Direction |
- |
- |
(1) As shown in the illustration, pull the instrument panel safety pad sub-assembly a small amount to secure enough space to insert the DCM (telematics transceiver) with bracket over the 2 stud bolts.
(2) Temporarily install the DCM (telematics transceiver) with bracket as shown in the illustration.
(3) Install the DCM (telematics transceiver) with bracket with the 2 nuts.
(4) Connect the connector.
5. CONNECT INSTRUMENT PANEL SAFETY PAD SUB-ASSEMBLY
6. INSTALL NO. 2 INSTRUMENT PANEL GARNISH SUB-ASSEMBLY WITH AIR CONDITIONING CONTROL ASSEMBLY
7. INSTALL INSTRUMENT SIDE PANEL LH
8. INSTALL LOWER CENTER INSTRUMENT CLUSTER FINISH PANEL SUB-ASSEMBLY
9. INSTALL REAR CONSOLE BOX ASSEMBLY
Click here 
10. PERFORM DCM ACTIVATION
HINT:
After replacing the DCM (telematics transceiver), make sure to perform DCM activation.
Click here 
11. PERFORM REGISTRATION
for Remote Connect Compatible Type:
HINT:
After replacing the DCM (telematics transceiver), make sure to perform code registration (Smart key System (for Start Function)).
Click here 