Battery Ecu (for Hev Model)

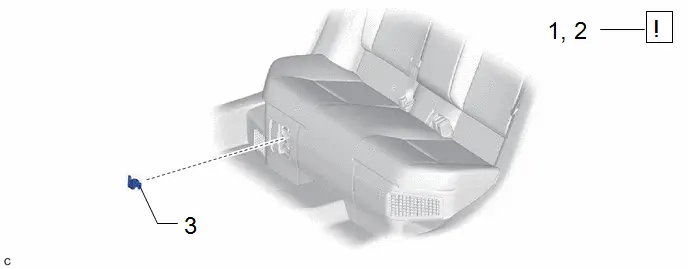
In this manual: Battery Ecu (for Hev Model)
How To Troubleshoot Ecu Controlled Systems — 1How To Use This Manual — 1Identification Information — 1Repair Instruction — 1Terms — 12zr-fxe Air Cleaner Filter Element — 12zr-fxe Auxiliary Battery — 12zr-fxe Coolant (for Engine Coolant) — 12zr-fxe Oil And Oil Filter — 12zr-fxe Spark Plug — 1Air Conditioning Filter — 1Battery Cooling Filter — 1Brake Fluid — 1Coolant (for Inverter) — 1Front Brake Flexible Hose — 1Front Disc Brake Pad — 1Front Lower Ball Joint — 1Front Wheel Alignment — 1Front Wiper Rubber — 1General Maintenance — 1M20a-fxs Air Cleaner Filter Element — 1M20a-fxs Auxiliary Battery — 1M20a-fxs Coolant (for Engine Coolant) — 1M20a-fxs Oil And Oil Filter — 1M20a-fxs Spark Plug — 1Pa10/pb10/pb12 Hybrid Transaxle Fluid — 1Q810 Hybrid Transaxle Fluid — 1Rear Brake Flexible Hose — 1Rear Disc Brake Pad — 1Rear Wheel Alignment — 1Steering Column — 1Tire And Wheel — 1Transmitter Battery — 1When Disconnecting Or Reconnecting Battery Terminal — 1When Replacing Or Removing/installing Parts — 1Automatic High Beam Main Switch — 1Automatic High Beam System — 1Driver Monitor Camera — 1Driver Monitor Camera System — 1Driver Monitor Ecu — 1Front Camera — 1Front Camera System — 1Front Radar Sensor System — 1Front Side Radar Sensor — 1Front Side Radar Sensor System — 1Millimeter Wave Radar Sensor — 1Utility — 1Advanced Park — 1Advanced Park Main Switch — 1Amplifier Antenna — 1Audio And Visual System — 1Front Door Speaker — 1Instrument Panel Speaker — 1Microphone — 1Noise Filter — 1Pillar Speaker — 1Radio Antenna Cord (for Back Door) — 1Radio Antenna Cord (for Instrument Panel) — 1Radio Antenna Cord (for Roof) — 1Radio Receiver — 1Rear Door Speaker — 1Roof Antenna — 1Stereo Component Amplifier — 1Stereo Jack Adapter Assembly — 1Window Glass Antenna Wire — 1Back-up Battery — 1Dcm(telematics Transceiver) — 1Manual(sos)switch — 1Safety Connect System — 1Telephone And Gps Antenna (for Front Side) — 1Telephone And Gps Antenna (for Roof Side) — 1Telephone And Gps Antenna Cords — 1Garage Door Opener System (for Digital Inner Mirror) — 1Garage Door Opener System (for Ec Inner Mirror) — 1Blind Spot Monitor Sensor — 1Blind Spot Monitor System — 1Clearance Warning Ecu — 1Intuitive Parking Assist System — 1Panoramic View Monitor Switch — 1Panoramic View Monitor System — 1Parking Assist Ecu — 1Parking Assist Light — 1Parking Assist Monitor System — 1Parking Support Brake System — 1Rear View Monitor System — 1Television Camera (for Front) — 1Television Camera (for Rear) — 1Television Camera (for Side) — 1Ultrasonic Sensor (for Front) — 1Ultrasonic Sensor (for Rear) — 1Brake Actuator — 1Brake Pedal Stroke Sensor — 1Electronically Controlled Brake System — 1Front Speed Sensor — 1Rear Speed Sensor (for Awd) — 1Steering Angle Sensor — 1Brake Booster — 1Brake Fluid — 1Brake Line — 1Brake Pedal — 1Brake System — 1Electric Parking Brake Actuator — 1Electric Parking Brake Switch — 1Electric Parking Brake System — 1Forced Release — 1Front Axle Hub — 1Front Axle Hub Bolt — 1Rear Axle Carrier (for 2wd) — 1Rear Axle Carrier (for Awd) — 1Rear Axle Hub (for 2wd) — 1Rear Axle Hub (for Awd) — 1Rear Axle Hub Bolt — 1Steering Knuckle — 1Drive Shaft System — 1Front Drive Shaft Assembly — 1Rear Drive Shaft Assembly — 1Combination Switch — 1Electronic Shift Lever System — 1Hybrid Transaxle Fluid — 1Hybrid Transaxle Oil Seal — 1Hybrid Transaxle System — 1Input Shaft Oil Seal — 1Motor Cable — 1Pa10 Hybrid Vehicle Transaxle — 1Pa10 Manual Parking Lock Release — 1Pa10 Oil Cooler — 1Pb10/pb12 Hybrid Vehicle Transaxle — 1Pb10/pb12 Manual Parking Lock Release — 1Pb10/pb12 Oil Cooler — 1Shift Control Actuator — 1Shift Lever — 1Shift Lever Knob — 1Differential Side Gear Shaft — 1Hybrid Transaxle Fluid — 1Hybrid Transaxle Side Gear Oil Seal — 1Motor Cable — 1Rear Traction Motor — 1Coolant (for Engine) — 1Cooling Fan Motor — 1Cooling Fan System — 1Radiator — 1Relay — 1Thermostat — 1Water Pump — 1Canister — 1Egr Cooler — 1Egr Valve — 1Emission Control System — 1Fuel Tank Cap — 1Pcv Valve — 1Purge Valve — 1Vacuum Sensor — 1Air Fuel Ratio Sensor — 1Camshaft Oil Control Valve — 1Camshaft Position Sensor — 1Crankshaft Position Sensor — 1Ecm — 1Engine Coolant Temperature Sensor — 1Heated Oxygen Sensor — 1Ignition Coil And Spark Plug — 1Ignition System — 1Knock Sensor — 1Mass Air Flow Meter — 1Relay — 1Sfi System — 1Throttle Body — 1Camshaft — 1Cylinder Block — 1Cylinder Head — 1Cylinder Head Gasket — 1Engine — 1Engine Assembly — 1Engine Unit — 1Front Crankshaft Oil Seal — 1Rear Crankshaft Oil Seal — 1Fuel Filter — 1Fuel Injector — 1Fuel Pressure Regulator — 1Fuel Pump — 1Fuel Sender Gauge Assembly — 1Fuel System — 1Fuel Tank — 1Air Cleaner Filter Element — 1Exhaust Manifold — 1Exhaust Pipe — 1Intake Manifold — 1Intake System — 1Lubrication System — 1Oil And Oil Filter — 1Oil Pan And Oil Level Sensor — 1Oil Pressure Switch — 1Oil Pump — 1Accelerator Pedal Sensor — 1Battery Blower (for Hev Model) — 1Battery Ecu (for Hev Model) — 1Battery Ecu (for Phev Model) — 1Battery Voltage Sensor (for Phev Model) — 1Charge Cable (for Phev Model) — 1Charge Indicator (for Phev Model) — 1Charge Inlet (for Phev Model) — 1Combination Switch — 1Coolant (for Inverter) — 1Cooler (for Phev Model) — 1Electric Vehicle Charger Assembly (for Phev Model) — 1Frame Wire (for Hev Model) — 1Frame Wire (for Phev Model) — 1Heater Relay (for Phev Model) — 1Hv Battery (for Hev Model) — 1Hv Battery (for Phev Model) — 1Hv Battery Heater (for Phev Model) — 1Hv Battery Stack (for Phev Model) — 1Hv Relay Assembly (for Hev Model) — 1Hv Relay Assembly (for Phev Model) — 1Hybrid Battery System (for 2zr-fxe) — 1Hybrid Battery System (for M20a-fxs) — 1Hybrid Battery System (for Phev Model) — 1Hybrid Vehicle Control Ecu — 1Inverter With Converter (for Hev Model) — 1Motor Generator Control System (for 2zr-fxe) — 1Plug-in Charge Control System (for Phev Model) — 1Refrigerant Line (for Phev Model) — 1Relay — 1Service Plug Grip (for Hev Model) — 1Sub Radiator — 1Water Pump With Motor — 1Auxiliary Battery — 1Battery Current Sensor — 1Charging System — 1Solar Charging System — 1Solar Control Unit — 1Solar Roof — 1Can Communication System (for Hev Model) — 1Lin Communication System — 1Network Gateway Ecu — 1Integration Control Supply — 1Main Body Ecu — 1Power Integration System — 1Sub Battery System — 1Power Steering Ecu — 1Power Steering System — 1Heated Steering Wheel Controller — 1Heated Steering Wheel System — 1Steering Column Assembly — 1Steering Heater Switch — 1Steering Pad Switch — 1Steering System — 1Steering Wheel — 1Front Lower Ball Joint — 1Front Lower Suspension Arm (for 2zr-fxe Lh Side) — 1Front Lower Suspension Arm (for 2zr-fxe Rh Side) — 1Front Lower Suspension Arm (for M20a-fxs) — 1Front Shock Absorber — 1Front Stabilizer Bar — 1Front Suspension Member — 1Rear Coil Spring — 1Rear Lower Arm (for Awd Lh Side) — 1Rear Lower Arm (for Awd Rh Side) — 1Rear Lower Arm (for Hev Model 2wd) — 1Rear Lower Arm (for Phev Model) — 1Rear Shock Absorber — 1Rear Stabilizer Bar — 1Rear Suspension Member (for 2wd) — 1Rear Suspension Member (for Awd) — 1Rear Trailing Arm — 1Rear Upper Arm — 1Tire And Wheel System — 1Tire Repair Seal — 1Tire Pressure Warning Receiver — 1Tire Pressure Warning System — 1Tire Pressure Warning Valve — 1Acoustic Vehicle Alerting System — 1Vehicle Approaching Speaker — 1Vehicle Approaching Speaker Ecu — 1Back Door — 1Back Door Closer Ecu — 1Back Door Opener Switch — 1Back Door Support — 1Back Door Weatherstrip — 1Charge Lid Courtesy Switch — 1Charge Lid Opener Motor Assembly — 1Charge Lid Opener System — 1Charge Lid Opener Unit — 1Front Door — 1Front Door Opening Trim Weatherstrip — 1Fuel Lid Opener Motor Assembly — 1Fuel Lid Opener Switch — 1Fuel Lid Opener System — 1Hood — 1Hood Lock Control Cable Assembly — 1Power Back Door Closer Switch — 1Power Back Door Control Switch — 1Power Back Door Drive Unit — 1Power Back Door System — 1Power Back Door Touch Sensor — 1Power Back Door Warning Buzzer — 1Rear Door — 1Rear Door Opening Trim Weatherstrip — 1Reserve Lock Switch — 1Front Bumper — 1Front Door Belt Moulding — 1Front Door Window Frame Moulding — 1Front Fender — 1Front Pillar Upper Cover — 1Grille Shutter — 1Grille Shutter System — 1Name Plate — 1Quarter Garnish — 1Rear Bumper — 1Rear Door Belt Moulding — 1Rear Door Window Frame Moulding — 1Rear Wheel House Plate — 1Rocker Panel Moulding — 1Roof Drip Side Finish Moulding — 1Roof Garnish — 1Wheel Opening Moulding (for Front Side) — 1Wheel Opening Moulding (for Rear Side) — 1Windshield Outside Moulding — 1Horn — 1Horn System — 1Relay — 1Automatic Light Control Sensor — 1Back-up Light Assembly — 1Charge Lid Light — 1Front Marker Light — 1Hazard Warning Switch — 1Headlight Assembly — 1Headlight Dimmer Switch — 1Headlight Leveling Switch — 1High Mounted Stop Light Assembly — 1Illumination Light Assembly — 1License Plate Light Assembly — 1Lighting System — 1Rear Combination Light Assembly — 1Rear Light Assembly — 1Rear Side Marker Light Assembly — 1Relay — 1Side Turn Signal Light Assembly — 1Stop Light Switch — 1Switch Housing — 1Outer Mirror Switch — 1Outer Rear View Mirror — 1Outer Rear View Mirror Cover — 1Outer Rear View Mirror Glass — 1Power Mirror Control System — 1Back Door Glass — 1Front Passenger Side Power Window Switch — 1Power Window Control System — 1Power Window Master Switch — 1Power Window Regulator Motor (for Front Door) — 1Power Window Regulator Motor (for Rear Door) — 1Rear Power Window Switch — 1Relay — 1Roof Window Fix Glass — 1Window Defogger System — 1Windshield Deicer Switch — 1Windshield Deicer System — 1Windshield Glass — 1Front Wiper Motor — 1Rain Sensor — 1Relay — 1Washer Motor — 1Washer Nozzle (for Front Side) — 1Washer Nozzle (for Rear Television Camera) — 1Wiper And Washer System — 1Wiper Ecu — 1Wiper Switch — 1Back Door Lock — 1Door Control Receiver — 1Door Control Switch — 1Door Control Transmitter — 1Door Lock Release Motor (for Rear Side) — 1Door Outside Handle (for Rear Side) — 1Front Door Lock — 1Power Door Lock Control System — 1Rear Door Lock — 1Transmitter Battery — 1Wireless Door Lock Control System — 1Accumulator — 1Air Conditioning Amplifier — 1Air Conditioning Panel — 1Air Conditioning Pressure Sensor — 1Air Conditioning Unit — 1Ambient Temperature Sensor — 1Blower Unit — 1Condenser (for Hev Model) — 1Condenser (for Phev Model) — 1Discharge Temperature Sensor — 1Electric Expansion Valve (cooling) — 1Electric Expansion Valve (heating) — 1Evaporator Pipe Temperature Sensor — 1Evaporator Pressure Regulator — 1Front Blower Motor — 1Front Evaporator Front Solenoid Valve — 1Air Conditioning System (for Hev Model) — 1Front Evaporator Temperature Sensor — 1Heat Exchanger Temperature Sensor — 1Heat Pump Ecu — 1High Pressure Magnetic Valve — 1Humidity Sensor — 1Internal Condenser Temperature Sensor — 1Low Pressure Magnetic Valve — 1Refrigerant (for Hfc-134a(r134a)) — 1Refrigerant Line (for Hev Model) — 1Refrigerant Line (for Phev Model) — 1Relay — 1Room Temperature Sensor — 1Solar Sensor — 1Floor Carpet — 1Front Console Box — 1Instrument Panel Safety Pad — 1Roof Headlining — 1Roof Sunshade — 1Ambient Light (for Driver Side) — 1Ambient Light (for Front Passenger Side) — 1Back Door Courtesy Switch — 1Footwell Light — 1Glove Box Light — 1Lighting System — 1Luggage Compartment Room Light — 1Personal Light — 1Room Light — 1Vanity Light — 1Vanity Light Switch — 1Combination Meter — 1Meter / Gauge System — 1Trip Switch — 1Digital Inner Mirror — 1Digital Rear-view Mirror System — 1Inner Mirror Monitor Camera — 1Inner Rear View Mirror (w/o Ec Mirror) — 1Accessory Power Outlet System — 1Power Outlet Socket (for Console Box Front Side) — 1Power Outlet Socket (for Console Box Rear Side) — 1Power Outlet Socket (for Console Box) — 1Power Outlet Socket (for Luggage Compartment) — 1Power Outlet Switch — 1Wireless Charger Assembly — 1Wireless Charging System — 1Climate Control Seat System — 1Front Power Seat Control System (w/ Memory) — 1Front Power Seat Motor Assembly — 1Front Seat Assembly (for Power Seat) — 1Front Seat Cushion Heater (for Power Seat) — 1Front Seatback Heater (for Power Seat) — 1Lumbar Support Adjuster Assembly — 1Power Seat Control Ecu — 1Power Seat Switch — 1Power Seat Track Rail Assembly — 1Rear Seat Assembly — 1Rear Seat Cushion Heater — 1Rear Seat Reminder System — 1Rear Seatback Heater — 1Seat Heater Control — 1Seat Heater Switch (for Front Seat) — 1Seat Heater Switch (for Rear Side) — 1Seat Heater System — 1Seat Memory Switch — 1Child Restraint Seat Anchor Bracket — 1Front Seat Inner Belt Assembly — 1Front Seat Outer Belt Assembly — 1Occupant Detection Sensor (for Front Passenger Side) — 1Rear Center Seat Outer Belt Assembly — 1Rear Seat Inner Belt Assembly (for Rh Side) — 1Rear Seat Outer Belt Assembly — 1Seat Belt Warning System (w/ Occupant Classification System) — 1Tongue Plate Stopper — 1Airbag System — 1Center Airbag Sensor Assembly — 1Curtain Shield Airbag Assembly — 1Front Airbag Sensor — 1Front Passenger Airbag Assembly — 1Front Seat Side Airbag Assembly — 1Inspection After Collision — 1Knee Airbag Assembly — 1Occupant Classification System — 1Rear Seat Side Airbag Assembly — 1Side Airbag Sensor (for Center Pillar) — 1Side Airbag Sensor (for Front Door) — 1Spiral Cable — 1Steering Pad — 1Certification Ecu — 1Digital Key Ecu — 1Digital Key Receiver (for Front Floor) — 1Digital Key Receiver (for Outside Luggage Compartment) — 1Digital Key Receiver (for Rear Door) — 1Digital Key System — 1Electrical Key Oscillator (for Front Floor) — 1Electrical Key Oscillator (for Outside Luggage Compartment) — 1Electrical Key Oscillator (for Rear Floor) — 1Engine Hood Courtesy Switch — 1Id Code Box — 1Smart Key System (for Start Function) — 1
~11min read
010203040507.56N·mlb·ft
Tightening torque found on this page
  • Removal
  • Installation

Removal

REMOVAL

The necessary procedures (adjustment, calibration, initialization, or registration) that must be performed after parts are removed and installed, or replaced during battery ECU assembly removal/installation are shown below.

Necessary Procedures After Parts Removed/Installed/Replaced

Replaced Part or Performed Procedure

Necessary Procedures

Effect/Inoperative Function when Necessary Procedure not Performed

Link

Replacement of battery ECU assembly

Current sensor offset learning

DTCs are stored

CAUTION:

  • Orange wire harnesses and connectors indicate high-voltage circuits. To prevent electric shock, always follow the procedure described in the repair manual.
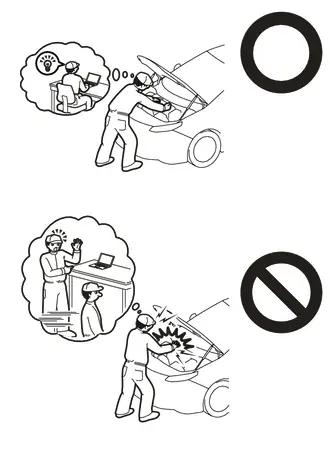
    Click here

  • To prevent electric shock, wear insulated gloves when working on wire harnesses and components of the high voltage system.
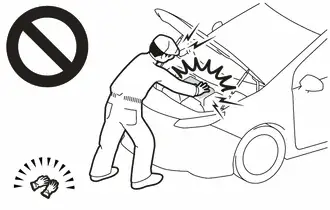
NOTICE:

  • The type of battery ECU assembly to be used varies depending on the Toyota Prius vehicle model.
  • If the wrong type of battery ECU assembly is installed, the ignition switch cannot be turned on (READY).
  • After installing the battery ECU assembly, perform the following to check that the ignition switch can be turned on (READY).
    • Turn the ignition switch to ON (READY).
    • Turn the ignition switch off and wait for 30 seconds or more.
    • Turn the ignition switch on (READY) again.
  • This procedure includes the removal of small-head bolts. Refer to Small-Head Bolts of Basic Repair Hint to identify the small-head bolts.

    Click here

  • After turning the power switch off, waiting time may be required before disconnecting the cable from the negative (-) auxiliary battery terminal.

    Click here

HINT:

When the cable is disconnected/reconnected to the auxiliary battery terminal, systems temporarily stop operating. However, each system has a function that completes learning the first time the system is used.

  • Items for which learning is completed by driving the Toyota Prius vehicle

    Effect/Inoperative Function When Necessary Procedures are not Performed

    Necessary Procedures

    Link

    Front Camera System

    Drive the Toyota Prius vehicle straight ahead at 35 km/h or more for 5 seconds or more.

  • Items for which learning is completed by operating the vehicle normally

    Effect/Inoperative Function When Necessary Procedures are not Performed

    Necessary Procedures

    Link

    *1: w/o Power Back Door System

    *2: w/ Power Back Door System

    Power Door Lock Control System*1

    • Back door opener

    Perform door unlock operation with door control switch or electrical key transmitter sub-assembly switch.

    Power Back Door System*2

    Reset back door close position

    Air Conditioning System

    After the ignition switch is turned to ON, the servo motor standard position is recognized.

    -

COMPONENTS (REMOVAL)

Procedure

Part Name Code

1

PRECAUTION

-

-

-

2

WHEN REPLACING BATTERY ECU ASSEMBLY

-

-

-

3

SERVICE PLUG GRIP

G3834

-

-

-

Procedure

Part Name Code

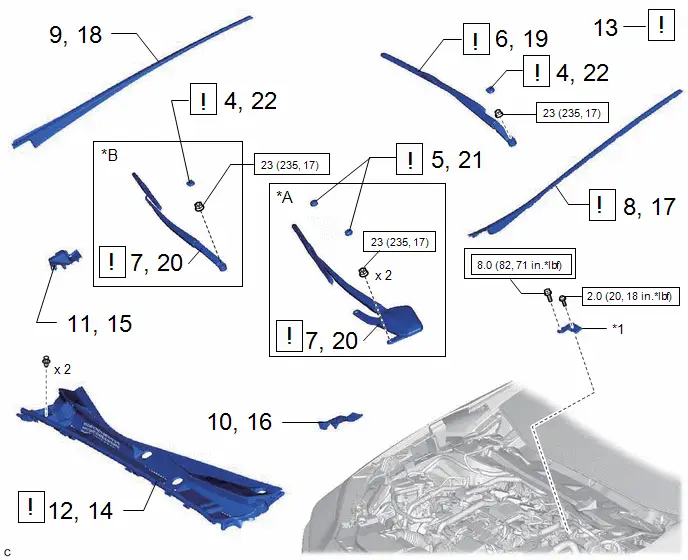
4

FRONT WIPER ARM HEAD CAP

85292B

-

-

5

SHIELD CAP

85247

-

-

6

FRONT WIPER ARM AND BLADE ASSEMBLY LH

-

-

-

-

7

FRONT WIPER ARM AND BLADE ASSEMBLY RH

-

-

-

-

8

WINDSHIELD LOWER OUTSIDE MOULDING LH

75536D

-

-

9

WINDSHIELD LOWER OUTSIDE MOULDING RH

75535F

-

-

-

10

COWL WATER EXTRACT SHIELD LH

55754F

-

-

-

11

COWL WATER EXTRACT SHIELD RH

55753D

-

-

-

12

COWL TOP VENTILATOR LOUVER SUB-ASSEMBLY

55708

-

-

-

13

CHECK TERMINAL VOLTAGE

-

-

-

14

COWL TOP VENTILATOR LOUVER SUB-ASSEMBLY

55708

-

-

15

COWL WATER EXTRACT SHIELD RH

55753D

-

-

-

16

COWL WATER EXTRACT SHIELD LH

55754F

-

-

-

17

WINDSHIELD LOWER OUTSIDE MOULDING LH

75536D

-

-

-

18

WINDSHIELD LOWER OUTSIDE MOULDING RH

75535F

-

-

-

19

FRONT WIPER ARM AND BLADE ASSEMBLY LH

-

-

-

20

FRONT WIPER ARM AND BLADE ASSEMBLY RH

-

-

-

21

SHIELD CAP

85247

-

-

-

22

FRONT WIPER ARM HEAD CAP

85292B

-

-

-

*A

for M20A-FXS

*B

for 2ZR-FXE

*1

Connector Cover Assembly

-

-

Tightening torque for "Major areas involving basic Toyota Prius vehicle performance such as moving/turning/stopping" : N*m (kgf*cm, ft.*lbf)

N*m (kgf*cm, ft.*lbf): Specified torque

Procedure

Part Name Code

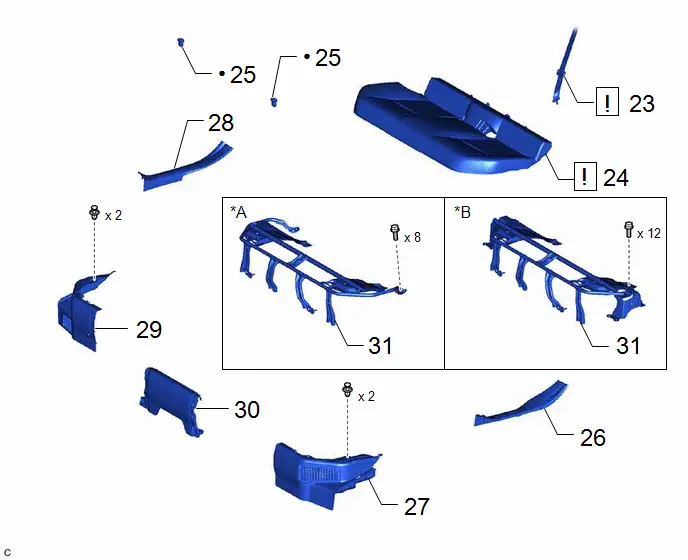
23

REAR CENTER SEAT OUTER BELT ASSEMBLY

73350C

-

-

24

REAR SEAT CUSHION ASSEMBLY

-

-

-

25

REAR SEAT CUSHION LOCK HOOK

72693

-

-

-

26

REAR DOOR SCUFF PLATE INSIDE LH

67918F

-

-

-

27

REAR UNDER SIDE COVER LH

76974E

-

-

-

28

REAR DOOR SCUFF PLATE INSIDE RH

67917F

-

-

-

29

REAR UNDER SIDE COVER RH

76973E

-

-

-

30

REAR UNDER COVER

76917F

-

-

-

31

REAR SEAT CUSHION LEG SUB-ASSEMBLY

71033

-

-

-

*A

for Type A

*B

for Type B

●

Non-reusable part

-

-

Procedure

Part Name Code

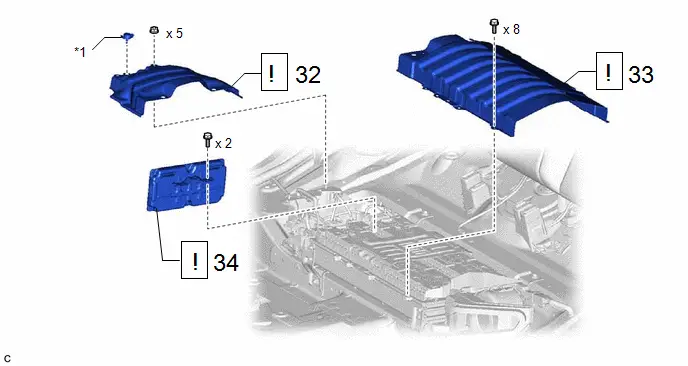
32

NO. 1 HV BATTERY COVER PANEL RH

G92N4A

-

-

33

UPPER HV BATTERY COVER SUB-ASSEMBLY

-

-

-

34

BATTERY ECU ASSEMBLY

89890A

-

-

*1

Battery Cover Lock Striker

-

-

PROCEDURE

1. PRECAUTION

Click here

2. WHEN REPLACING BATTERY ECU ASSEMBLY

HV battery learning values are stored in the battery ECU assembly and ECM and are used to detect malfunctions and illuminate the hybrid battery indicator light in the combination meter assembly. When either of these ECUs is replaced, the new ECU receives the HV battery learning values from the other ECU and stores them.

NOTICE:

  • Do not replace the battery ECU assembly and ECM at the same time as the HV battery learning values will be lost. However, if it is necessary to replace both ECUs at the same time, replace them by following the procedure below.
  • Do not replace the battery ECU assembly or ECM with a used one from another Toyota Prius vehicle.

(a) Procedure when replacing both battery ECU assembly and ECM:

(1) Disconnect the cable from the negative (-) auxiliary battery terminal.

(2) Replace either ECU.

(3) Connect the cable to the negative (-) auxiliary battery terminal.

(4) Turn the ignition switch on (READY) and wait for 5 minutes or more.

(5) Turn the ignition switch off and disconnect the cable from the negative (-) auxiliary battery terminal.

(6) Replace the other ECU.

(7) Connect the cable to the negative (-) auxiliary battery terminal.

(8) Check that the ignition switch can be turned on (READY).

HINT:

If the battery ECU assembly and ECM are replaced at the same time without following the above procedure, replace either of the ECUs with its original one and then replace it again by following the above procedure. If the correct procedure is not followed, perform the procedure again from the beginning.

3. REMOVE SERVICE PLUG GRIP

Click here

4. REMOVE FRONT WIPER ARM HEAD CAP

Click here

5. REMOVE SHIELD CAP (for M20A-FXS)

Click here

6. REMOVE FRONT WIPER ARM AND BLADE ASSEMBLY LH

Click here

7. REMOVE FRONT WIPER ARM AND BLADE ASSEMBLY RH

Click here

8. REMOVE WINDSHIELD LOWER OUTSIDE MOULDING LH

Click here

9. REMOVE WINDSHIELD LOWER OUTSIDE MOULDING RH

(a) Use the same procedure as for the LH side.

10. REMOVE COWL WATER EXTRACT SHIELD LH

Click here

11. REMOVE COWL WATER EXTRACT SHIELD RH

(a) Use the same procedure as for the LH side.

12. REMOVE COWL TOP VENTILATOR LOUVER SUB-ASSEMBLY

Click here

13. CHECK TERMINAL VOLTAGE

Click here

14. INSTALL COWL TOP VENTILATOR LOUVER SUB-ASSEMBLY

Click here

15. INSTALL COWL WATER EXTRACT SHIELD RH

16. INSTALL COWL WATER EXTRACT SHIELD LH

17. INSTALL WINDSHIELD LOWER OUTSIDE MOULDING LH

Click here

18. INSTALL WINDSHIELD LOWER OUTSIDE MOULDING RH

(a) Use the same procedure as for the LH side.

19. INSTALL FRONT WIPER ARM AND BLADE ASSEMBLY LH

Click here

20. INSTALL FRONT WIPER ARM AND BLADE ASSEMBLY RH

Click here

21. INSTALL SHIELD CAP (for M20A-FXS)

22. INSTALL FRONT WIPER ARM HEAD CAP

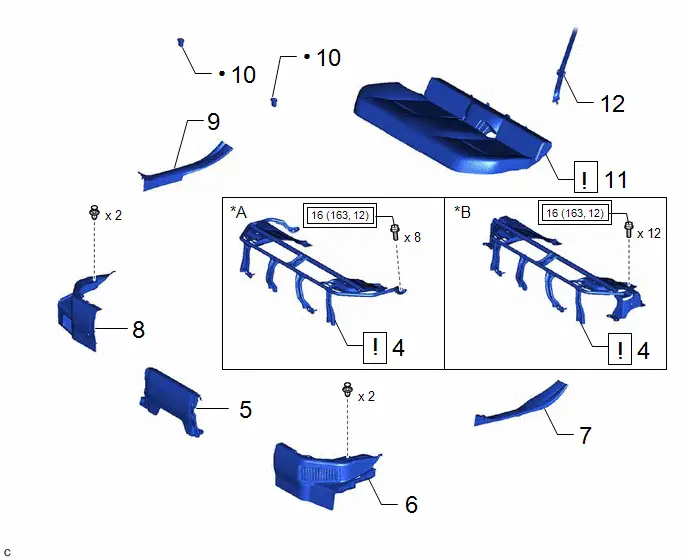
23. DISCONNECT REAR CENTER SEAT OUTER BELT ASSEMBLY

Click here

24. REMOVE REAR SEAT CUSHION ASSEMBLY

Click here

25. REMOVE REAR SEAT CUSHION LOCK HOOK

Click here

26. REMOVE REAR DOOR SCUFF PLATE INSIDE LH

Click here

27. REMOVE REAR UNDER SIDE COVER LH

Click here

28. REMOVE REAR DOOR SCUFF PLATE INSIDE RH

(a) Use the same procedure as for the LH side.

29. REMOVE REAR UNDER SIDE COVER RH

(a) Use the same procedure as for the LH side.

30. REMOVE REAR UNDER COVER

Click here

31. REMOVE REAR SEAT CUSHION LEG SUB-ASSEMBLY

Click here

32. REMOVE NO. 1 HV BATTERY COVER PANEL RH

Click here

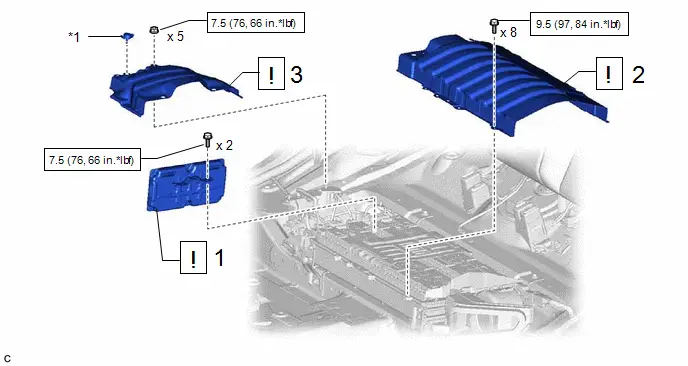
33. REMOVE UPPER HV BATTERY COVER SUB-ASSEMBLY

CAUTION:

Be sure to wear insulated gloves and protective goggles.

34. REMOVE BATTERY ECU ASSEMBLY

CAUTION:

Be sure to wear insulated gloves and protective goggles.

NOTICE:

  • Insulate each disconnected high-voltage connector with insulating tape. Wrap the connector from the wire harness side to the end of the connector.
  • If the battery ECU assembly has been struck or dropped, replace it.

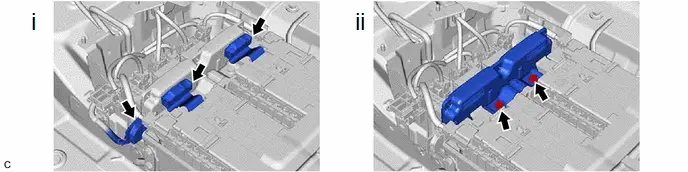
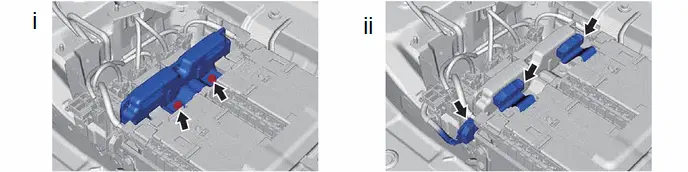
(1) Disconnect the 3 battery ECU assembly connectors.

(2) Using an 8 mm socket wrench, remove the 2 bolts and battery ECU assembly from the HV battery.

Installation

INSTALLATION

NOTICE:

This procedure includes the installation of small-head bolts. Refer to Small-Head Bolts of Basic Repair Hint to identify the small-head bolts.

Click here

COMPONENTS (INSTALLATION)

Procedure

Part Name Code

1

BATTERY ECU ASSEMBLY

89890A

-

-

2

UPPER HV BATTERY COVER SUB-ASSEMBLY

-

-

-

3

NO. 1 HV BATTERY COVER PANEL RH

G92N4A

-

-

*1

Battery Cover Lock Striker

-

-

N*m (kgf*cm, ft.*lbf): Specified torque

-

-

Procedure

Part Name Code

4

REAR SEAT CUSHION LEG SUB-ASSEMBLY

71033

-

-

5

REAR UNDER COVER

76971F

-

-

-

6

REAR UNDER SIDE COVER LH

76974E

-

-

-

7

REAR DOOR SCUFF PLATE INSIDE LH

67918F

-

-

-

8

REAR UNDER SIDE COVER RH

76973E

-

-

-

9

REAR DOOR SCUFF PLATE INSIDE RH

67917F

-

-

-

10

REAR SEAT CUSHION LOCK HOOK

72693

-

-

-

11

REAR SEAT CUSHION ASSEMBLY

-

-

-

12

REAR CENTER SEAT OUTER BELT ASSEMBLY

73350C

-

-

-

*A

for Type A

*B

for Type B

Tightening torque for "Major areas involving basic Toyota Prius vehicle performance such as moving/turning/stopping" : N*m (kgf*cm, ft.*lbf)

●

Non-reusable part

Procedure

Part Name Code

13

SERVICE PLUG GRIP

G3834

-

-

-

14

PERFORM INITIALIZATION

-

-

-

15

INITIALIZATION AFTER RECONNECTING BATTERY TERMINAL

-

-

-

PROCEDURE

1. INSTALL BATTERY ECU ASSEMBLY

CAUTION:

Be sure to wear insulated gloves and protective goggles.

NOTICE:

  • If the battery ECU assembly has been struck or dropped, replace it.
  • Make sure that the connectors are connected securely.

(1) Using an 8 mm socket wrench, install the battery ECU assembly to the HV battery with the 2 bolts.

Torque:

7,5 N·m {76 kgf·cm, 66 in·lbf}

(2) Connect the 3 battery ECU assembly connectors.

2. INSTALL UPPER HV BATTERY COVER SUB-ASSEMBLY

CAUTION:

Be sure to wear insulated gloves and protective goggles.

Torque:

9,5 N·m {97 kgf·cm, 84 in·lbf}

3. INSTALL NO. 1 HV BATTERY COVER PANEL RH

Click here

4. INSTALL REAR SEAT CUSHION LEG SUB-ASSEMBLY

Click here

5. INSTALL REAR UNDER COVER

6. INSTALL REAR UNDER SIDE COVER LH

7. INSTALL REAR DOOR SCUFF PLATE INSIDE LH

8. INSTALL REAR UNDER SIDE COVER RH

9. INSTALL REAR DOOR SCUFF PLATE INSIDE RH

10. INSTALL REAR SEAT CUSHION LOCK HOOK

11. INSTALL REAR SEAT CUSHION ASSEMBLY

Click here

12. CONNECT REAR CENTER SEAT OUTER BELT ASSEMBLY

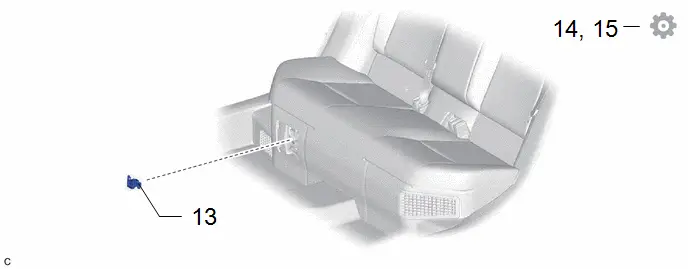
13. INSTALL SERVICE PLUG GRIP

Click here

14. PERFORM INITIALIZATION

Click here

15. INITIALIZATION AFTER RECONNECTING BATTERY TERMINAL

HINT:

When disconnecting and reconnecting the battery, there is an automatic learning function that completes learning when the respective system is used.

Click here