Seat Belt Warning System (w/ Occupant Classification System)
- Precaution
- Parts Location
- System Diagram
- System Description
- How To Proceed With Troubleshooting
- Operation Check
- Customize Parameters
- Problem Symptoms Table
- Terminals Of Ecu
- Diagnosis System
- Data List / Active Test
- Driver Side Seat Belt Warning Light does not Operate
- Front Passenger Side Seat Belt Warning Light does not Operate
- Rear Seat Belt Warning Light Malfunction
Precaution
PRECAUTION
PRECAUTION FOR DISCONNECTING CABLE FROM NEGATIVE (-) AUXILIARY BATTERY TERMINAL
NOTICE:
After the ignition switch is turned off, there may be a waiting time before disconnecting the negative (-) auxiliary battery terminal.
Click here 
HINT:
When disconnecting and reconnecting the auxiliary battery, there is an automatic learning function that completes learning when the respective system is used.
Click here 

Parts Location
PARTS LOCATION
ILLUSTRATION
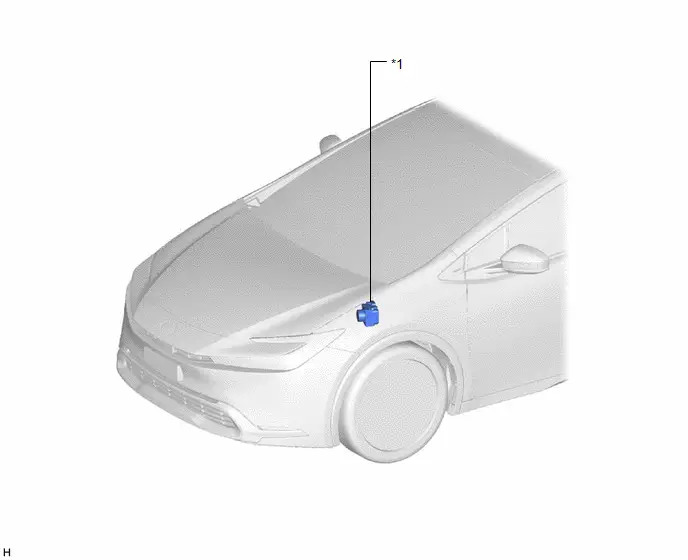
*1 |
NO. 2 SKID CONTROL ECU (BRAKE ACTUATOR ASSEMBLY) |
- |
- |
ILLUSTRATION
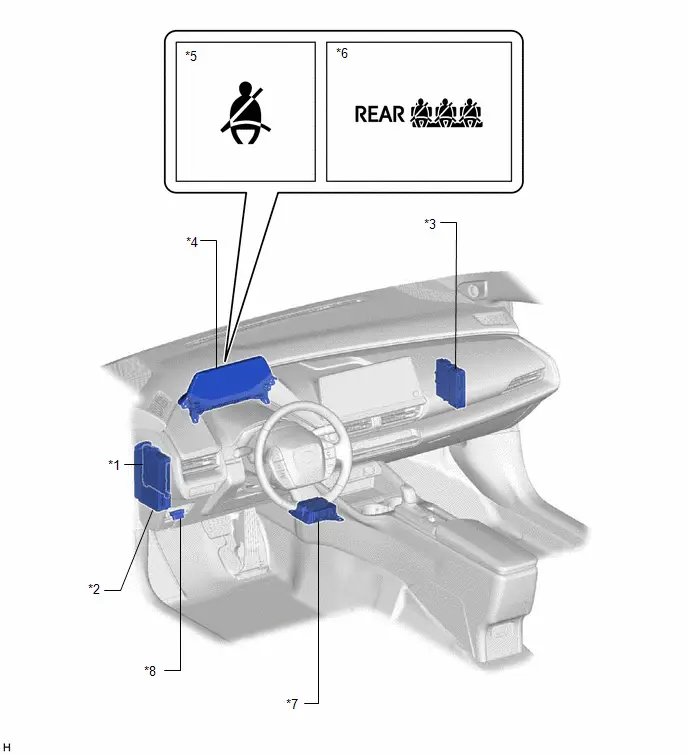
*1 |
MAIN BODY ECU (MULTIPLEX NETWORK BODY ECU) |
*2 |
POWER DISTRIBUTION BOX ASSEMBLY |
*3 |
HYBRID Toyota Prius Vehicle CONTROL ECU |
*4 |
COMBINATION METER ASSEMBLY - SEAT BELT WARNING BUZZER |
*5 |
FRONT SEAT BELT WARNING LIGHT |
*6 |
REAR SEAT BELT WARNING LIGHT |
*7 |
AIRBAG ECU ASSEMBLY |
*8 |
DLC3 |
ILLUSTRATION
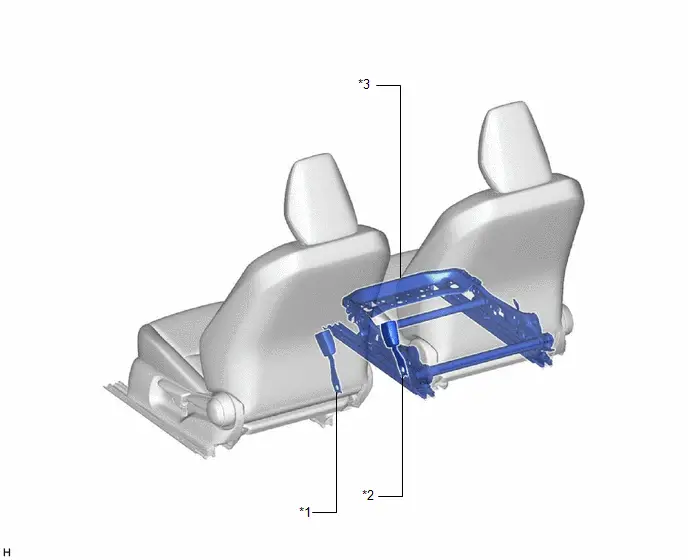
*1 |
FRONT SEAT INNER BELT ASSEMBLY LH |
*2 |
FRONT SEAT INNER BELT ASSEMBLY RH |
*3 |
FRONT SEAT ADJUSTER ASSEMBLY RH - FRONT OCCUPANT CLASSIFICATION SENSOR LH - REAR OCCUPANT CLASSIFICATION SENSOR LH |
- |
- |
ILLUSTRATION
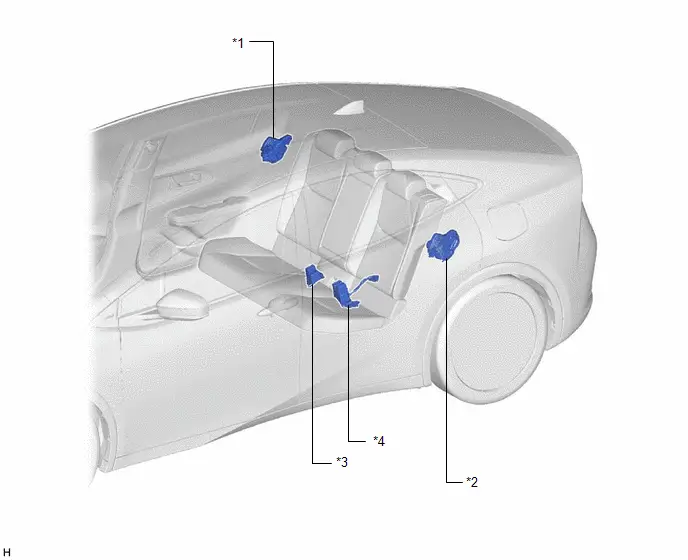
*1 |
REAR DOOR LOCK WITH MOTOR ASSEMBLY RH - DOOR COURTESY SWITCH |
*2 |
REAR DOOR LOCK WITH MOTOR ASSEMBLY LH - DOOR COURTESY SWITCH |
*3 |
REAR SEAT INNER BELT ASSEMBLY RH |
*4 |
REAR SEAT INNER WITH CENTER BELT ASSEMBLY LH |
System Diagram
SYSTEM DIAGRAM
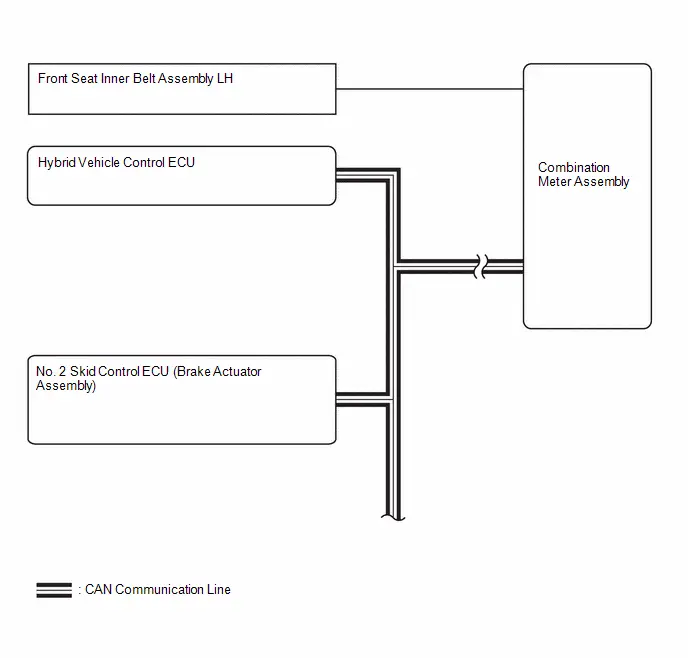
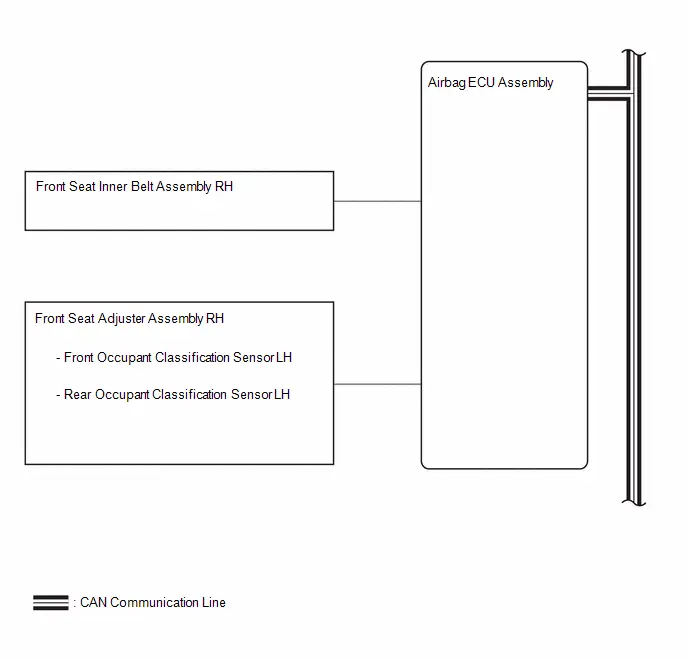
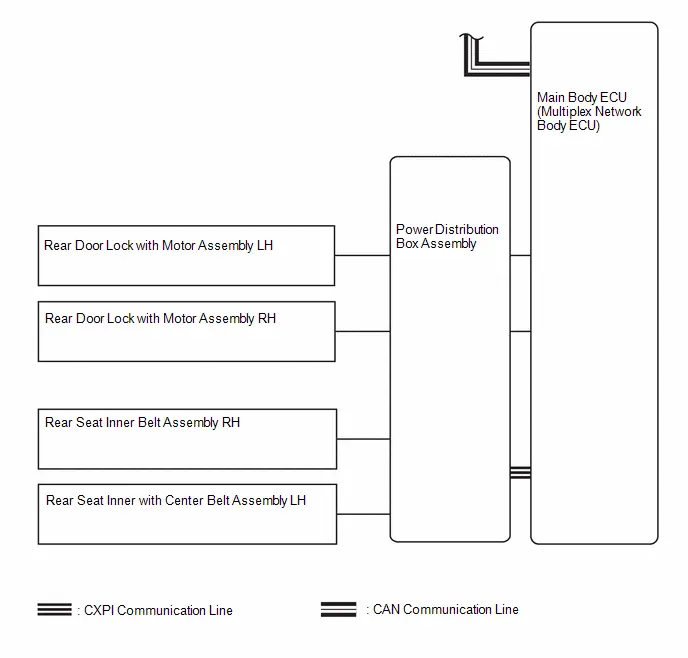 Communication Table
Sender | Receiver | Signal | Communication Method |
|---|---|---|---|
Airbag ECU assembly |
Combination meter assembly |
|
CAN |
Main body ECU (Multiplex network body ECU) |
Combination meter assembly |
|
|
No. 2 skid control ECU (brake actuator assembly) |
Combination meter assembly |
|
|
Hybrid vehicle control ECU |
Combination meter assembly |
Shift position |
|
Power distribution box assembly |
Main body ECU (multiplex network body ECU) |
Rear seat inner belt buckle switch (LH/RH/Center) |
CXPI |
System Description
SYSTEM DESCRIPTION
SEAT BELT WARNING SYSTEM DESCRIPTION
(a) Seat belt warning light operation for driver seat belt:
The seat belt warning light on the combination meter assembly illuminates, blinks or turns off in accordance with the driver seat belt state, vehicle speed, shift lever position and parking brake state.
(b) Seat belt warning light operation for front passenger seat belt:
The seat belt warning light on the combination meter assembly illuminates, blinks or turns off in accordance with whether the front passenger seat is occupied, the front passenger seat belt state, Toyota Prius vehicle speed, shift lever position and parking brake state.
(c) Seat belt warning light operation for rear seat belt:
The rear seat belt warning light on the combination meter assembly illuminates, blinks or turns off in accordance with the rear door state, rear seat belt state, vehicle speed, shift lever position and parking brake state.
(d) Seat belt warning buzzer operation for front seat belt:
After turning the ignition switch to ON, if the driver seat belt is not fastened within 1.8 seconds, the seat belt warning buzzer in the combination meter assembly will sound at an interval of 1.2 seconds for 6 seconds.
When the Toyota Prius vehicle is driven at approximately 20 km/h or more with the front passenger seat occupied and the driver or front passenger seat belt not fastened, the seat belt warning buzzer in the combination meter assembly sounds once.
When 18 seconds have passed after the buzzer sounded, the seat belt warning buzzer in the combination meter assembly will sound at an interval of 1.2 seconds for 6 seconds.
After that, the seat belt warning buzzer in the combination meter assembly will sound at an interval of 0.4 seconds for 100 seconds.
(e) Seat belt warning buzzer operation for rear seat belt:
When the Toyota Prius vehicle is driven at approximately 20 km/h or more with a rear seat belt not fastened, the seat belt warning buzzer in the combination meter assembly sounds once.
When 18 seconds have passed after the buzzer sounded, the seat belt warning buzzer in the combination meter assembly will sound at an interval of 1.2 seconds for 6 seconds.
After that, the seat belt warning buzzer in the combination meter assembly will sound at an interval of 0.4 seconds for 66 seconds.
FUNCTION OF MAIN COMPONENTS
Component | Function |
|---|---|
Front seat inner belt assembly LH |
Informs the combination meter assembly of the driver seat belt condition (fastened or unfastened). |
Front seat inner belt assembly RH |
Informs the airbag ECU assembly of front passenger seat belt condition (fastened or unfastened). |
|
Informs the airbag ECU assembly of the front passenger seat condition (occupied or unoccupied). |
Combination meter assembly |
|
|
Sends the rear seat belt buckle switch signal to the power distribution box assembly. |
|
Sends the rear door courtesy switch signal to the power distribution box assembly. |
Main body ECU (multiplex network body ECU) |
Sends the rear seat belt buckle switch signal and rear door courtesy light switch signal to the combination meter assembly via CAN communication. |
Power distribution box assembly |
Sends the rear seat belt buckle switch signal to the main body ECU (multiplex network body ECU) via CXPI communication. |
No. 2 skid control ECU (brake actuator assembly) |
|
Hybrid vehicle control ECU |
Sends the shift position signal to the combination meter assembly via CAN communication. |
Airbag ECU assembly |
Sends the front passenger seat belt buckle switch signal and occupant detection signal to the combination meter assembly via CAN communication. |
How To Proceed With Troubleshooting
HINT:
- Use the following procedure to troubleshoot the seat belt warning system.
- *: Use the GTS.
PROCEDURE
Toyota Prius Vehicle BROUGHT TO WORKSHOP
|

CUSTOMER PROBLEM ANALYSIS
(a) Interview the customer to confirm the problem.
Click here 
|

PRE-CHECK
(a) Measure the auxiliary battery voltage with the ignition switch off.
Standard Voltage:
11 to 14 V
If the voltage is below 11 V, recharge or replace the auxiliary battery before proceeding to the next step.
(b) Check the fuses and relays.
(c) Check the connector connections and terminals to make sure that there are no abnormalities such as loose connections, deformation, etc.
|

CHECK COMMUNICATION FUNCTION OF CAN COMMUNICATION SYSTEM*
(a) Using the GTS, check for CAN communication system DTCs.
for HEV Model: Click here 
for PHEV Model: Click here 
Result | Proceed to |
|---|---|
CAN DTCs are not output |
A |
CAN DTCs are output |
B |
| B |  |
GO TO CAN COMMUNICATION SYSTEM for HEV Model: Click here for PHEV Model: Click here |


|

CHECK COMMUNICATION FUNCTION OF CXPI COMMUNICATION SYSTEM*
(a) Using the GTS, check for CXPI communication system DTCs.
Click here 
Result | Proceed to |
|---|---|
CXPI DTCs are not output |
A |
CXPI DTCs are output |
B |
| B |  |
GO TO CXPI COMMUNICATION SYSTEM |
|

CHECK COMBINATION METER ASSEMBLY
(a) Check the operation of the speedometer, shift indicator and brake warning light on the combination meter assembly.
OK:
The speedometer, shift indicator and brake warning light on the combination meter assembly operate normally.
| NG |  |
GO TO METER / GAUGE SYSTEM |
|

PROBLEM SYMPTOMS TABLE
(a) Refer to Problem Symptoms Table.
Click here 
Result | Proceed to |
|---|---|
Fault is not listed in Problem Symptoms Table |
A |
Fault is listed in Problem Symptoms Table |
B |
| B |  |
GO TO STEP 9 |
|

OVERALL ANALYSIS AND TROUBLESHOOTING*
(a) Data List / Active Test
Click here 
(b) Terminals of ECU
Click here 
(c) Inspection
|

REPAIR OR REPLACE
|

CONFIRMATION TEST
| NEXT |  |
END |
Operation Check
OPERATION CHECK
HINT:
The seat belt warning light (in the combination meter assembly) is for both the driver seat and the passenger seat.
INSPECT DRIVER SEAT BELT WARNING LIGHT
(a) Turn the ignition switch off.
(b) Turn the ignition switch to ON.
(c) When the driver seat belt is not fastened, check that the seat belt warning light on the combination meter assembly blinks for 6 seconds.
Check that the seat belt warning light on the combination meter assembly changes from blinking to turns off.
(d) Lift the Toyota Prius vehicle.
Click here 
(e) Turn the ignition switch to ON (READY).
(f) Check the status of the seat belt warning light (in the combination meter assembly) under the conditions below.
(1) Check that the seat belt warning light (in the combination meter assembly) blinks when the driver seat belt is unfastened, the shift position is not in P and the parking brake is released.
(2) Check that the seat belt warning light (in the combination meter assembly) blinks when the Toyota Prius vehicle is driven at approximately 20 km/h or higher with the driver seat belt unfastened.
Check that after 106 seconds, the seat belt warning light (in the combination meter assembly) changes from blinking to on.
(3) Check that the seat belt warning light (in the combination meter assembly) changes to on when the seat belt warning light (in the combination meter assembly) is blinking, the Toyota Prius vehicle speed is 1,8 km/h or less and the shift position is changed to P.
(4) Check that the seat belt warning light (in the combination meter assembly) changes to on when the seat belt warning light (in the combination meter assembly) is blinking, the vehicle speed is 1,8 km/h or less and the parking brake is not released.
(5) Check that the seat belt warning light (in the combination meter assembly) turns off when the driver seat belt is fastened with the seat belt warning light (in the combination meter assembly) on or blinking.
INSPECT FRONT PASSENGER SEAT BELT WARNING LIGHT
HINT:
The seat belt warning light on the combination meter assembly is used for both the driver seat and front passenger seat.
(a) Turn the ignition switch to ON.
(b) Check that the seat belt warning light (in the combination meter assembly) turns on with a passenger seated in the passenger seat, the passenger seat belt unfastened and under the following conditions.
(1) Change the shift position to P.
(2) The parking brake is not released.
(c) Fasten the driver seat belt.
(d) Lift the Toyota Prius vehicle.
Click here 
(e) Turn the ignition switch to ON (READY).
(f) Place a weight of 20 kg (44.1 lb) on the front passenger seat.
NOTICE:
When placing the load on the passenger seat, do not let it touch the seatback.
(g) Check the status of the seat belt warning light (in the combination meter assembly) under the conditions below.
(1) Check that the seat belt warning light (in the combination meter assembly) blinks when the passenger seat belt is unfastened, the shift position is not in P and the parking brake is released.
(2) Check that the seat belt warning light (in the combination meter assembly) blinks when the Toyota Prius vehicle is driven at approximately 20 km/h or higher with the passenger seat belt unfastened.
Check that after 106 seconds, the seat belt warning light (in the combination meter assembly) changes from blinking to on.
(3) Check that the seat belt warning light (in the combination meter assembly) changes to on when the seat belt warning light (in the combination meter assembly) is blinking, the Toyota Prius vehicle speed is 1,8 km/h or less and the shift position is changed to P.
(4) Check that the seat belt warning light (in the combination meter assembly) changes to on when the seat belt warning light (in the combination meter assembly) is blinking, the vehicle speed is 1,8 km/h or less and the parking brake is not released.
(5) Check that the seat belt warning light (in the combination meter assembly) turns off when the passenger seat belt is fastened with the seat belt warning light (in the combination meter assembly) on or blinking.
INSPECT REAR SEAT BELT WARNING LIGHT
(a) Turn the ignition switch off.
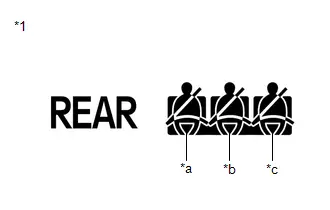
*1 |
Combination Meter Assembly (Rear Seat Belt Warning Light ) |
*a |
LH |
*b |
Center |
*c |
RH |
(b) Unfasten the rear seat belt.
(c) Turn the ignition switch to ON.
(d) Check that the rear seat belt warning light (in the combination meter assembly) turns on.
(e) Check that the rear seat belt warning light turns on for approximately 66 seconds and then turns off.
(f) Fasten the rear seat belt.
(g) With the rear seat belt warning light off, check that the rear seat belt warning light in the combination meter assembly turns on again when the rear seat belt is unfastened.
INSPECT DRIVER SEAT BELT WARNING BUZZER
HINT:
Using the GTS, check that the customization setting for the seat belt warning buzzer (in the combination meter assembly) is on.
Click here 
(a) Turn the ignition switch off.
(b) Turn the ignition switch to ON.
(c) After turning the ignition switch to ON, wait for approximately 1.8 seconds with the driver seat belt not fastened check that the seat belt warning buzzer in the combination meter assembly sounds at an interval of 1.2 seconds for 6 seconds.
(d) Lift the Toyota Prius vehicle.
Click here 
(e) Turn the ignition switch to ON (READY).
(f) Check that the seat belt warning buzzer (in the combination meter assembly) sounds once when the vehicle is driven at approximately 20 km/h or higher with the seat belt unfastened.
(g) After 18 seconds have passed after the buzzer sounds once, check that the seat belt warning buzzer (in the combination meter assembly) sounds intermittently at 1.2-second intervals for 6 seconds.
(h) After the buzzer has sounded intermittently at 1.2-second intervals for 6 seconds, check that the interval changes and the buzzer sounds intermittently at 0.4-second intervals for 100 seconds.
(i) When 106 seconds have passed after the buzzer started sounding intermittently, check that the seat belt warning buzzer (in the combination meter assembly) stops.
(j) After the seat belt warning buzzer (in the combination meter assembly) stops, check that the buzzer sounds once and then once again sounds intermittently when the seat belt is fastened and then unfastened again, and then the Toyota Prius vehicle is driven at approximately 20 km/h or higher.
(k) Check that the seat belt warning buzzer (in the combination meter assembly) stops when the shift position is changed to R while the seat belt warning buzzer (in the combination meter assembly) is sounding.
Check that the buzzer once again sounds intermittently when the shift position is changed to D again and the Toyota Prius vehicle is driven at approximately 5 km/h or higher with the seat belt unfastened.
INSPECT FRONT PASSENGER SEAT BELT WARNING BUZZER
HINT:
Using the GTS, check that the customization setting for the seat belt warning buzzer (in the combination meter assembly) is on.
Click here 
(a) Lift the Toyota Prius vehicle.
Click here 
(b) Fasten the driver seat belt.
(c) Turn the ignition switch to ON (READY).
(d) Place a weight of 20 kg (44.1 lb) on the front passenger seat.
NOTICE:
When placing the load on the passenger seat, do not let it touch the seatback.
(e) Check that the seat belt warning buzzer (in the combination meter assembly) sounds once when the Toyota Prius vehicle is driven at approximately 20 km/h or higher with the seat belt unfastened.
(f) After 18 seconds have passed after the buzzer sounds once, check that the seat belt warning buzzer (in the combination meter assembly) sounds intermittently at 1.2-second intervals for 6 seconds.
(g) After the buzzer has sounded intermittently at 1.2-second intervals for 6 seconds, check that the interval changes and the buzzer sounds intermittently at 0.4-second intervals for 100 seconds.
(h) When 106 seconds have passed after the buzzer started sounding intermittently, check that the seat belt warning buzzer (in the combination meter assembly) stops.
(i) After the seat belt warning buzzer (in the combination meter assembly) stops, check that the buzzer sounds once and then once again sounds intermittently when the seat belt is fastened and then unfastened again, and then the Toyota Prius vehicle is driven at approximately 20 km/h or higher.
(j) Check that the seat belt warning buzzer (in the combination meter assembly) stops when the shift position is changed to R while the seat belt warning buzzer (in the combination meter assembly) is sounding.
Check that the buzzer once again sounds intermittently when the shift position is changed to D again and the Toyota Prius vehicle is driven at approximately 5 km/h or higher with the seat belt unfastened.
INSPECT REAR SEAT BELT WARNING BUZZER
HINT:
The seat belt warning buzzer can be customized. Make sure that this function is ON.
Click here 
(a) Lift the Toyota Prius vehicle.
Click here 
(b) Fasten the driver seat belt.
(c) Turn the ignition switch to ON (READY).
(d) Ensure that the rear seat belt is fastened, and then unfasten it.
(e) Check that the seat belt warning buzzer (in the combination meter assembly) sounds once when the rear seat belt is fastened and then unfastened, and then the Toyota Prius vehicle is driven at approximately 20 km/h or higher.
(f) After 18 seconds have passed after the buzzer sounds once, check that the seat belt warning buzzer (in the combination meter assembly) sounds intermittently at 1.2-second intervals for 6 seconds.
(g) After the buzzer has sounded intermittently at 1.2-second intervals for 6 seconds, check that the interval changes and the buzzer sounds intermittently at 0.4-second intervals for 66 seconds.
(h) When 72 seconds have passed after the buzzer started sounding intermittently, check that the seat belt warning buzzer (in the combination meter assembly) stops.
(i) After the seat belt warning buzzer (in the combination meter assembly) stops, check that the buzzer sounds once and then once again sounds intermittently when the Toyota Prius vehicle is driven at approximately 20 km/h or higher with the rear seat belt unfastened.
(j) Check that the seat belt warning buzzer (in the combination meter assembly) stops when the shift position is changed to R while the seat belt warning buzzer (in the combination meter assembly) is sounding.
Check that the buzzer once again sounds intermittently when the shift position is changed to D again and the Toyota Prius vehicle is driven at approximately 5 km/h or higher with the rear seat belt unfastened.
Customize Parameters
CUSTOMIZE PARAMETERS
CUSTOMIZE SEAT BELT WARNING SYSTEM
NOTICE:
- When the customer requests a change in a function, first make sure that the function can be customized.
- Be sure to make a note of the current settings before customizing.
- When troubleshooting a function, first make sure that the function is set to the default setting.
- These buzzers should be on for safe driving. Perform this procedure only if it is necessary to set the buzzer to off (disabled).
HINT:
The following items can be customized.
(a) Customizing with the GTS
(1) Connect the GTS to the DLC3.
(2) Turn the ignition switch to ON.
(3) Turn the GTS on.
(4) Enter the following menus: Customize Setting / Warning.
(5) Select the setting by referring to the table below.
WarningTester Display | Description | Default | Setting | ECU |
|---|---|---|---|---|
Driver Seatbelt Warning Buzzer Function |
Enables sounding of the driver seat belt warning buzzer |
ON |
$00:OFF,$01:ON |
Combination meter assembly |
Passenger Seatbelt Warning Buzzer Function |
Enables sounding of the front passenger seat belt warning buzzer |
ON |
$00:OFF,$01:ON |
Combination meter assembly |
Rear Right Seatbelt Warning Buzzer Function |
Enables sounding of the rear RH seat belt warning buzzer |
ON |
$00:OFF,$01:ON |
Combination meter assembly |
Rear Left Seatbelt Warning Buzzer Function |
Enables sounding of the rear LH seat belt warning buzzer |
ON |
$00:OFF,$01:ON |
Combination meter assembly |
Rear Center Seatbelt Warning Buzzer Function |
Enables sounding of the rear center seat belt warning buzzer |
ON |
$00:OFF,$01:ON |
Combination meter assembly |
HINT:
These settings are only valid when the Toyota Prius vehicle is driven at approximately 20 km/h or more.
Problem Symptoms Table
PROBLEM SYMPTOMS TABLE
HINT:
Use the table below to help determine the cause of problem symptoms. If multiple suspected areas are listed, the potential causes of the symptoms are listed in order of probability in the "Suspected Area" column of the table. Check each symptom by checking the suspected areas in the order they are listed. Replace parts as necessary.
Seat Belt Warning SystemSymptom | Suspected Area | Link |
|---|---|---|
Driver side seat belt warning light does not operate |
Refer to the "Driver side seat belt warning light does not operate'' |
 |
Front passenger side seat belt warning light does not operate |
Refer to the "Front passenger side seat belt warning light does not operate'' |
 |
Rear seat belt warning light malfunction |
Refer to the "Rear Seat Belt Warning Light Malfunction" |
 |
Driver and front passenger seat belt warning light does not operate |
Combination meter assembly |
 |
Seat belt warning buzzer does not operate |
Check customized settings using the GTS |
 |
Combination meter assembly |
 |
Terminals Of Ecu
TERMINALS OF ECU
CHECK POWER DISTRIBUTION BOX ASSEMBLY AND MAIN BODY ECU (MULTIPLEX NETWORK BODY ECU)
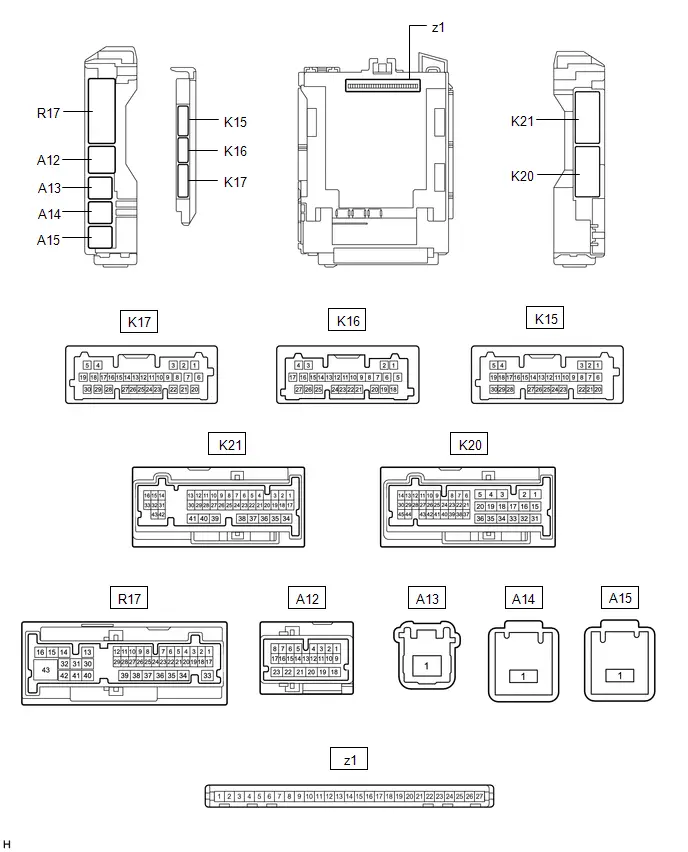
(a) Remove the main body ECU (multiplex network body ECU) from the power distribution box assembly.
Click here 

(b) Measure the voltage and resistance according to the value(s) in the table below.
Terminal No. (Symbol) | Terminal Description | Condition | Specified Condition |
|---|---|---|---|
z1-13 (GND1) - Body ground |
Ground |
Always |
Below 1 Ω |
z1-14 (GND2) - Body ground |
Ground |
Always |
Below 1 Ω |
z1-26 (BECU) - Body ground |
Auxiliary battery power supply |
Ignition switch off |
11 to 14 V |
z1-27 (IGR) - Body ground |
IG power supply |
Ignition switch ON |
11 to 14 V |
Ignition switch off |
Below 1 V |
(c) Reconnect the power distribution box assembly connectors.
(d) Measure the voltage according to the value(s) in the table below.
Terminal No. (Symbol) | Terminal Description | Condition | Specified Condition |
|---|---|---|---|
R17-1 (RCTY) - Body ground |
Rear door courtesy light switch (for RH) input |
Rear door RH open → closed |
Below 1 V → 11 to 14 V or pulse output (maximum 14 V) |
R17-26 (LCTY) - Body ground |
Rear door courtesy light switch (for LH) input |
Rear door LH open → closed |
Below 1 V → 11 to 14 V or pulse output (maximum 14 V) |
R17-4 - Body ground |
Rear center seat belt buckle switch signal |
Rear center seat belt fastened |
11 to 14 V |
Rear center seat belt unfastened |
Below 1 V |
||
R17-8 - Body ground |
Rear RH seat belt buckle switch signal |
Rear RH seat belt fastened |
11 to 14 V |
Rear RH seat belt unfastened |
Below 1 V |
||
R17-19 - Body ground |
Rear LH seat belt buckle switch signal |
Rear LH seat belt fastened |
11 to 14 V |
Rear LH seat belt unfastened |
Below 1 V |
CHECK AIRBAG ECU ASSEMBLY
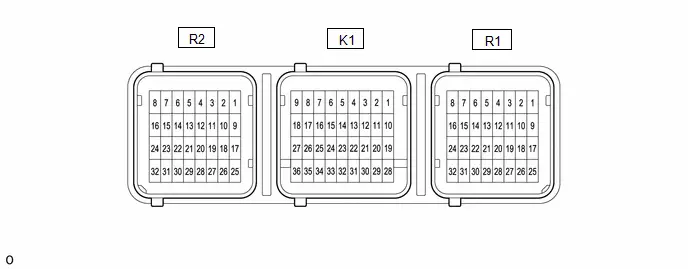
Terminal No. | Terminal Symbol | Destination |
|---|---|---|
R1-18 |
GNDR |
Front seat inner belt assembly RH |
R1-27 |
RBE |
|
R1-24 |
SVC |
Occupant classification sensor (Front seat adjuster assembly RH) |
R1-31 |
SGD |
|
R1-32 |
SIG |
CHECK COMBINATION METER ASSEMBLY
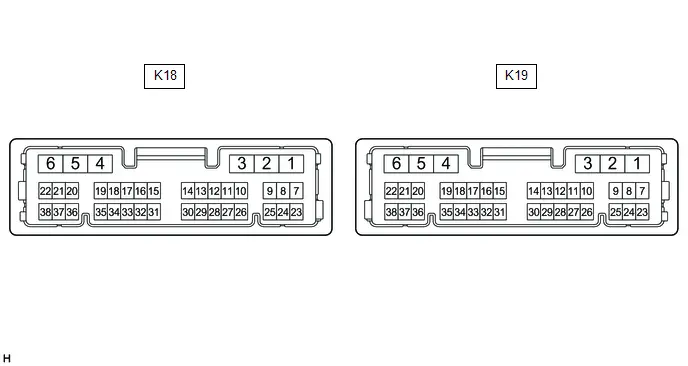
(a) Disconnect the K18 combination meter assembly connector.
(b) Measure the resistance and voltage according to the value(s) in the table below.
HINT:
Measure the values on the wire harness side with the connector disconnected.
Terminal No. (Symbol) | Terminal Description | Condition | Specified Condition |
|---|---|---|---|
K18-1 (EP) - Body ground |
Ground |
Always |
Below 1 Ω |
K18-2 (ES) - Body ground |
Ground |
Always |
Below 1 Ω |
K18-5 (B) - Body ground |
Auxiliary battery power supply |
Always |
11 to 14 V |
K18-6 (IG ) - Body ground |
Ignition power supply |
Ignition switch off |
Below 1 V |
Ignition switch ON |
11 to 14 V |
||
K18-29 (BKL) - Body ground |
Driver side seat belt buckle switch signal |
Driver side seat belt fastened |
1 MΩ or higher |
Driver side seat belt unfastened |
Below 1 Ω |
Diagnosis System
DIAGNOSIS SYSTEM
CHECK DLC3
(a) Check the DLC3.
Click here 
INSPECT AUXILIARY BATTERY VOLTAGE
(a) Measure the auxiliary battery voltage with the ignition switch off.
Standard Voltage:
11 to 14 V
If the voltage is below 11 V, recharge or replace the auxiliary battery.
Data List / Active Test
DATA LIST / ACTIVE TEST
DATA LIST
NOTICE:
In the following table, the values listed under "Normal Condition" are reference values. Do not depend solely on these reference values when deciding whether a part is faulty or not.
HINT:
Using the GTS to read the Data List allows the values or states of switches, sensors, actuators and other items to be read without removing any parts. This non-intrusive inspection can be very useful because intermittent conditions or signals may be discovered before parts or wiring is disturbed. Reading the Data List information early in troubleshooting is one way to save diagnostic time.
(a) Read the Data List according to the display on the GTS.
Body Electrical > Combination Meter > Data ListTester Display | Measurement Item | Range | Normal Condition | Diagnostic Note |
|---|---|---|---|---|
Driver Buckle Switch |
Driver seat belt buckle switch |
Fastened or Not Fastened |
Fastened: Driver seat belt buckle switch fastened Not Fastened: Driver seat belt buckle switch unfastened |
- |
Driver Seatbelt Warning Buzzer Function |
Driver seat belt warning buzzer |
OFF or ON |
Customize setting displayed |
- |
Passenger Seatbelt Warning Buzzer Function |
Front passenger seat belt warning buzzer |
OFF or ON |
Customize setting displayed |
- |
Rear Right Seatbelt Warning Buzzer Function |
Rear RH seat belt warning buzzer |
OFF or ON |
Customize setting displayed |
- |
Rear Left Seatbelt Warning Buzzer Function |
Rear LH seat belt warning buzzer |
OFF or ON |
Customize setting displayed |
- |
Rear Center Seatbelt Warning Buzzer Function |
Rear center seat belt warning buzzer |
OFF or ON |
Customize setting displayed |
- |
Tester Display | Measurement Item | Range | Normal Condition | Diagnostic Note |
|---|---|---|---|---|
Passenger Seat Buckle Switch Status |
Front passenger seat belt buckle switch |
Set, Unset or Unknown |
Set: Front passenger seat belt buckle switch fastened Unset: Front passenger seat belt buckle switch unfastened Unknown: Data is not determined |
Although the item is displayed on the GTS, it is not applicable to this Toyota Prius vehicle. |
Passenger Seat Occupant Sensor Status |
Front passenger occupant detection sensor |
OFF, ON or Unknown |
OFF: Front passenger seat not occupied ON: Front passenger seat occupied Unknown: Data is not determined |
Although the item is displayed on the GTS, it is not applicable to this Toyota Prius vehicle. |
Rear Seat RH Buckle Switch Status |
Rear RH seat belt buckle switch |
Set, Unset or Unknown |
Set: Rear RH seat belt buckle switch fastened Unset: Rear RH seat belt buckle switch unfastened Unknown: Data is not determined |
- |
Rear Seat Center Buckle Switch Status |
Rear center seat belt buckle switch |
Set, Unset or Unknown |
Set: Rear center seat belt buckle switch fastened Unset: Rear center seat belt buckle switch unfastened Unknown: Data is not determined |
- |
Rear Seat LH Buckle Switch Status |
Rear LH seat belt buckle switch |
Set, Unset or Unknown |
Set: Rear LH seat belt buckle switch fastened Unset: Rear LH seat belt buckle switch unfastened Unknown: Data is not determined |
- |
Tester Display | Measurement Item | Range | Normal Condition | Diagnostic Note |
|---|---|---|---|---|
RR Door Courtesy Switch Status |
Rear door courtesy light switch RH |
Close or Open |
Close: Rear door RH closed Open: Rear door RH open |
- |
RL Door Courtesy Switch Status |
Rear door courtesy light switch LH |
Close or Open |
Close: Rear door LH closed Open: Rear door LH open |
- |
Tester Display | Measurement Item | Range | Normal Condition | Diagnostic Note |
|---|---|---|---|---|
Driver Seat Buckle Switch Status |
Driver seat belt buckle switch |
Unknown, Unbuckle, Buckle, Malfunction |
Unknown: Data is not determined Unbuckle: Driver seat belt buckle switch unfastened Buckle: Driver seat belt buckle switch fastened Malfunction: Driver seat belt buckle switch is malfunctioning |
Although the item is displayed on the GTS, it is not applicable to this Toyota Prius vehicle. |
Passenger Seat Buckle Switch Status |
Passenger seat belt buckle switch |
Unknown, Unbuckle, Buckle, Malfunction |
Unknown: Data is not determined Unbuckle: Front passenger seat belt buckle switch unfastened Buckle: Front passenger seat belt buckle switch fastened Malfunction: Front passenger seat belt buckle switch is malfunctioning |
- |
ACTIVE TEST
HINT:
Using the GTS to perform Active Tests allows relays, VSVs, actuators and other items to be operated without removing any parts. This non-intrusive functional inspection can be very useful because intermittent operation may be discovered before parts or wiring is disturbed. Performing Active Tests early in troubleshooting is one way to save diagnostic time. Data List information can be displayed while performing Active Tests.
(a) Perform the Active Test according to the display on the GTS.
Body Electrical > Combination Meter > Active TestTester Display | Measurement Item | Control Range | Diagnostic Note |
|---|---|---|---|
Driver Side Seat Belt Warning |
Driver seat belt warning light |
OFF or ON |
- |
Rear Seat Belt Warning |
Rear seat belt warning light |
OFF or ON |
- |
Driver Side Seat Belt Warning Light does not Operate
DESCRIPTION
The combination meter assembly blinks or turns off the seat belt warning light on the combination meter assembly in accordance with the state of the front seat inner belt assembly of the driver seat.
WIRING DIAGRAM

NOTICE:
- The seat belt warning system uses the CAN communication system and CXPI communication system. First, confirm that there is no malfunction in the CAN communication system and CXPI communication system. Refer to the How to Proceed with Troubleshooting procedure.
Click here


- When replacing the combination meter assembly, always replace it with a new one. If a combination meter assembly which was installed to another Toyota Prius vehicle is used, the information stored in it will not match the information from the vehicle and a DTC may be stored.
- When replacing the combination meter assembly, update the ECU security key.
Click here

HINT:
- The seat belt warning light on the combination meter assembly is used for both the driver seat and front passenger seat. Check that the operation of the seat belt warning light is normal first.
Click here

- If the seat belt warning light does not operate for both the driver seat and front passenger seat, replace the combination meter assembly.
Click here

PROCEDURE
PERFORM ACTIVE TEST USING GTS
(a) Perform the Active Test according to the display on the GTS.
Body Electrical > Combination Meter > Active TestTester Display | Measurement Item | Control Range | Diagnostic Note |
|---|---|---|---|
Driver Side Seat Belt Warning |
Front seat belt warning light |
ON or OFF |
- |
OK:
The GTS display changes correctly in response to the warning light condition.
| OK |  |
REPLACE COMBINATION METER ASSEMBLY |
|

READ VALUE USING GTS
(a) Read the Data List according to the display on the GTS.
Body Electrical > Combination Meter > Data ListTester Display | Measurement Item | Range | Normal Condition | Diagnostic Note |
|---|---|---|---|---|
Driver Buckle Switch |
Driver side seat belt buckle switch |
Fastened or Not Fastened |
Fastened: Driver seat belt buckle switch fastened Not Fastened: Driver seat belt buckle switch unfastened |
- |
Driver Buckle Switch
OK:
The GTS display changes correctly in response to the driver seat belt condition.
| OK |  |
REPLACE COMBINATION METER ASSEMBLY |
|

INSPECT FRONT SEAT INNER BELT ASSEMBLY LH
Click here 
| NG |  |
REPLACE FRONT SEAT INNER BELT ASSEMBLY LH |


|

CHECK HARNESS AND CONNECTOR (FRONT SEAT INNER BELT ASSEMBLY LH - COMBINATION METER ASSEMBLY AND BODY GROUND)
(a) Disconnect the K18 combination meter assembly connector.
(b) Measure the resistance according to the value(s) in the table below.
Standard Resistance:
 Click Location & Routing(R64,K18) Click Connector(R64) Click Connector(K18)
Tester Connection | Condition | Specified Condition |
|---|---|---|
R64-3 ( ) - K18-29 (BKL) |
Always |
Below 1 Ω |
R64-3 ( ) or K18-29 (BKL) - Body ground |
Always |
10 kΩ or higher |
R64-2 (E) - Body ground |
Always |
Below 1 Ω |
| OK |  |
REPLACE COMBINATION METER ASSEMBLY |
| NG |  |
REPAIR OR REPLACE HARNESS OR CONNECTOR |
Front Passenger Side Seat Belt Warning Light does not Operate
DESCRIPTION
When the ignition switch is turned to ON, the airbag ECU assembly receives signals to indicate the state of the front seat inner belt assembly LH and also whether the front passenger seat is occupied. The airbag ECU assembly sends those signals to the combination meter assembly via CAN communication. The seat belt warning light on the combination meter assembly illuminates, blinks or turns off in accordance with these signals.
WIRING DIAGRAM
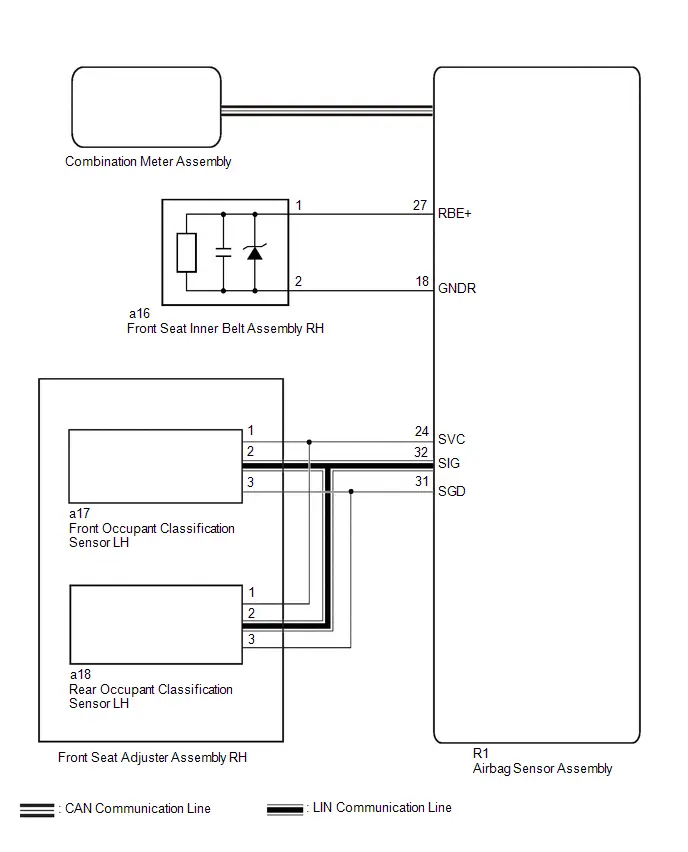
NOTICE:
The seat belt warning system uses the CAN communication system. First, confirm that there are no malfunctions in the CAN communication system. Refer to How to Proceed with Troubleshooting.
Click here 

HINT:
- The seat belt warning light on the combination meter assembly is used for both the driver seat and front passenger seat. Check that the operation of the seat belt warning light is normal first.
Click here

- If the seat belt warning light does not operate for both the driver seat and front passenger seat, replace the combination meter assembly.
Click here

- When replacing the combination meter assembly, update the ECU security key.
Click here

PROCEDURE
CHECK DTC OUTPUT (AIRBAG SYSTEM AND OCCUPANT CLASSIFICATION SYSTEM)
(a) Clear the DTCs.
Body Electrical > SRS Airbag > Clear DTCs(b) Check for DTCs.
Body Electrical > SRS Airbag > Trouble CodesResult | Proceed to |
|---|---|
DTCs are not output |
A |
DTCs are output |
B |
| A |  |
REPLACE COMBINATION METER ASSEMBLY |
| B |  |
GO TO OCCUPANT CLASSIFICATION SYSTEM |
Rear Seat Belt Warning Light Malfunction
DESCRIPTION
The power distribution box assembly sends a signal indicating a rear seat belt status when the ignition switch is ON to the main body ECU (multiplex network body ECU) via CXPI communication.
The main body ECU (multiplex network body ECU) sends a signal indicating the rear door courtesy light switch status when the ignition switch is ON or off and a signal indicating a rear seat belt status when the ignition switch is ON to the combination meter assembly via CAN communication.
Depending on the rear door courtesy light switch signal, shift position and Toyota Prius vehicle speed, the combination meter assembly illuminates or turns off the rear seat belt warning light.
WIRING DIAGRAM
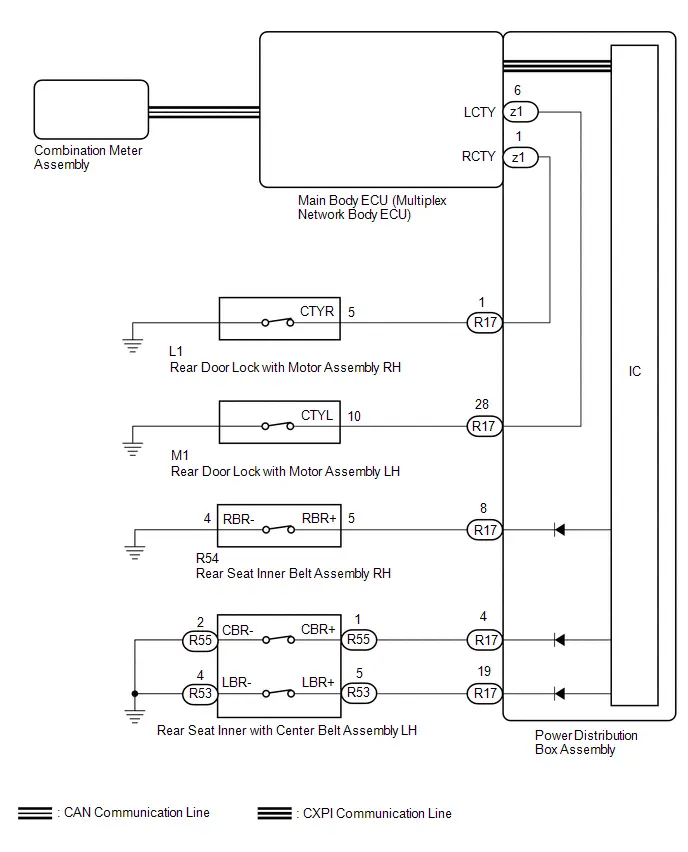
NOTICE:
- The seat belt warning system uses the CAN communication system and CXPI communication system. First, confirm that there is no malfunction in the CAN communication system and CXPI communication system. Refer to the How to Proceed with Troubleshooting procedure.
Click here


- Before replacing the main body ECU (multiplex network body ECU), refer to Service Bulletin.
- When replacing the combination meter assembly, always replace it with a new one. If a combination meter assembly which was installed to another Toyota Prius vehicle is used, the information stored in it will not match the information from the vehicle and a DTC may be stored.
- When replacing the combination meter assembly, update the ECU security key.
Click here

PROCEDURE
READ VALUE USING GTS
(a) Read the Data List according to the display on the GTS.
Body Electrical > Main Body > Data ListTester Display | Measurement Item | Range | Normal Condition | Diagnostic Note |
|---|---|---|---|---|
RR Door Courtesy Switch Status |
Rear door courtesy light switch (RH) signal |
Close or Open |
Close: Rear door RH closed Open: Rear door RH open |
- |
RL Door Courtesy Switch Status |
Rear door courtesy light switch (LH) signal |
Close or Open |
Close: Rear door LH closed Open: Rear door LH open |
- |
Tester Display |
|---|
RR Door Courtesy Switch Status |
RL Door Courtesy Switch Status |
OK:
The GTS display changes correctly in response to the rear door courtesy light switch condition.
| NG |  |
GO TO LIGHTING SYSTEM (Proceed to Rear Door Courtesy Switch Circuit) |
|

READ VALUE USING GTS
(a) Read the Data List according to the display on the GTS.
Body Electrical > Power Distribution Box > Data ListTester Display | Measurement Item | Range | Normal Condition | Diagnostic Note |
|---|---|---|---|---|
Rear Seat RH Buckle Switch Status |
Rear RH seat belt buckle switch |
Set, Unset or Unknown |
Set: Rear RH seat belt buckle switch fastened Unset: Rear RH seat belt buckle switch unfastened Unknown: Data is not determined |
- |
Rear Seat Center Buckle Switch Status |
Rear center seat belt buckle switch |
Set, Unset or Unknown |
Set: Rear center seat belt buckle switch fastened Unset: Rear center seat belt buckle switch unfastened Unknown: Data is not determined |
- |
Rear Seat LH Buckle Switch Status |
Rear LH seat belt buckle switch |
Set, Unset or Unknown |
Set: Rear LH seat belt buckle switch fastened Unset: Rear LH seat belt buckle switch unfastened Unknown: Data is not determined |
- |
Tester Display |
|---|
Rear Seat RH Buckle Switch Status |
Rear Seat Center Buckle Switch Status |
Rear Seat LH Buckle Switch Status |
OK:
The GTS display changes correctly in response to the rear seat belt buckle switch condition.
Result | Proceed to |
|---|---|
OK |
A |
NG (Unknown displayed) |
B |
NG (Rear RH seat belt malfunction) |
C |
NG (Rear center seat belt malfunction) |
D |
NG (Rear LH seat belt malfunction) |
E |
| A |  |
REPLACE COMBINATION METER ASSEMBLY |
| B |  |
REPLACE POWER DISTRIBUTION BOX ASSEMBLY |


| D |  |
GO TO STEP 5 |
| E |  |
GO TO STEP 7 |
|

INSPECT REAR SEAT INNER BELT ASSEMBLY RH
Click here 
| NG |  |
REPLACE REAR SEAT INNER BELT ASSEMBLY RH |


|

CHECK HARNESS AND CONNECTOR (REAR SEAT INNER BELT ASSEMBLY RH - POWER DISTRIBUTION BOX ASSEMBLY AND BODY GROUND)
(a) Disconnect the R17 power distribution box assembly connector.
(b) Measure the resistance according to the value(s) in the table below.
Standard Resistance:
 Click Location & Routing(R54,R17) Click Connector(R54) Click Connector(R17)
Tester Connection | Condition | Specified Condition |
|---|---|---|
R54-5 (RBR ) - R17-8 |
Always |
Below 1 Ω |
R54-5 (RBR ) or R17-8 - Body ground |
Always |
10 kΩ or higher |
R54-4 (RBR-) - Body ground |
Always |
Below 1 Ω |
| OK |  |
REPLACE POWER DISTRIBUTION BOX ASSEMBLY |


| NG |  |
REPAIR OR REPLACE HARNESS OR CONNECTOR |
INSPECT REAR SEAT INNER WITH CENTER BELT ASSEMBLY LH
Click here 
| NG |  |
REPLACE REAR SEAT INNER WITH CENTER BELT ASSEMBLY LH |


|

CHECK HARNESS AND CONNECTOR (REAR SEAT INNER WITH CENTER BELT ASSEMBLY LH - POWER DISTRIBUTION BOX ASSEMBLY AND BODY GROUND)
(a) Disconnect the R17 power distribution box assembly connector.
(b) Measure the resistance according to the value(s) in the table below.
Standard Resistance:
 Click Location & Routing(R55,R17) Click Connector(R55) Click Connector(R17)
Tester Connection | Condition | Specified Condition |
|---|---|---|
R55-1 (CBR ) - R17-4 |
Always |
Below 1 Ω |
R55-2 (CBR-) - Body ground |
Always |
Below 1 Ω |
R55-1 (CBR ) or R17-4 - Body ground |
Always |
10 kΩ or higher |
| OK |  |
REPLACE POWER DISTRIBUTION BOX ASSEMBLY |


| NG |  |
REPAIR OR REPLACE HARNESS OR CONNECTOR |
INSPECT REAR SEAT INNER WITH CENTER BELT ASSEMBLY LH
Click here 
| NG |  |
REPLACE REAR SEAT INNER WITH CENTER BELT ASSEMBLY LH |


|

CHECK HARNESS AND CONNECTOR (REAR SEAT INNER WITH CENTER BELT ASSEMBLY LH - POWER DISTRIBUTION BOX ASSEMBLY AND BODY GROUND)
(a) Disconnect the R17 power distribution box assembly connector.
(b) Measure the resistance according to the value(s) in the table below.
Standard Resistance:
 Click Location & Routing(R53,R17) Click Connector(R53) Click Connector(R17)
Tester Connection | Condition | Specified Condition |
|---|---|---|
R53-5 (LBR ) - R17-19 |
Always |
Below 1 Ω |
R53-4 (LBR-) - Body ground |
Always |
Below 1 Ω |
R53-5 (LBR ) or R17-19 - Body ground |
Always |
10 kΩ or higher |
| OK |  |
REPLACE POWER DISTRIBUTION BOX ASSEMBLY |


| NG |  |
REPAIR OR REPLACE HARNESS OR CONNECTOR |